Prevue Pet Products 3251BLK User manual
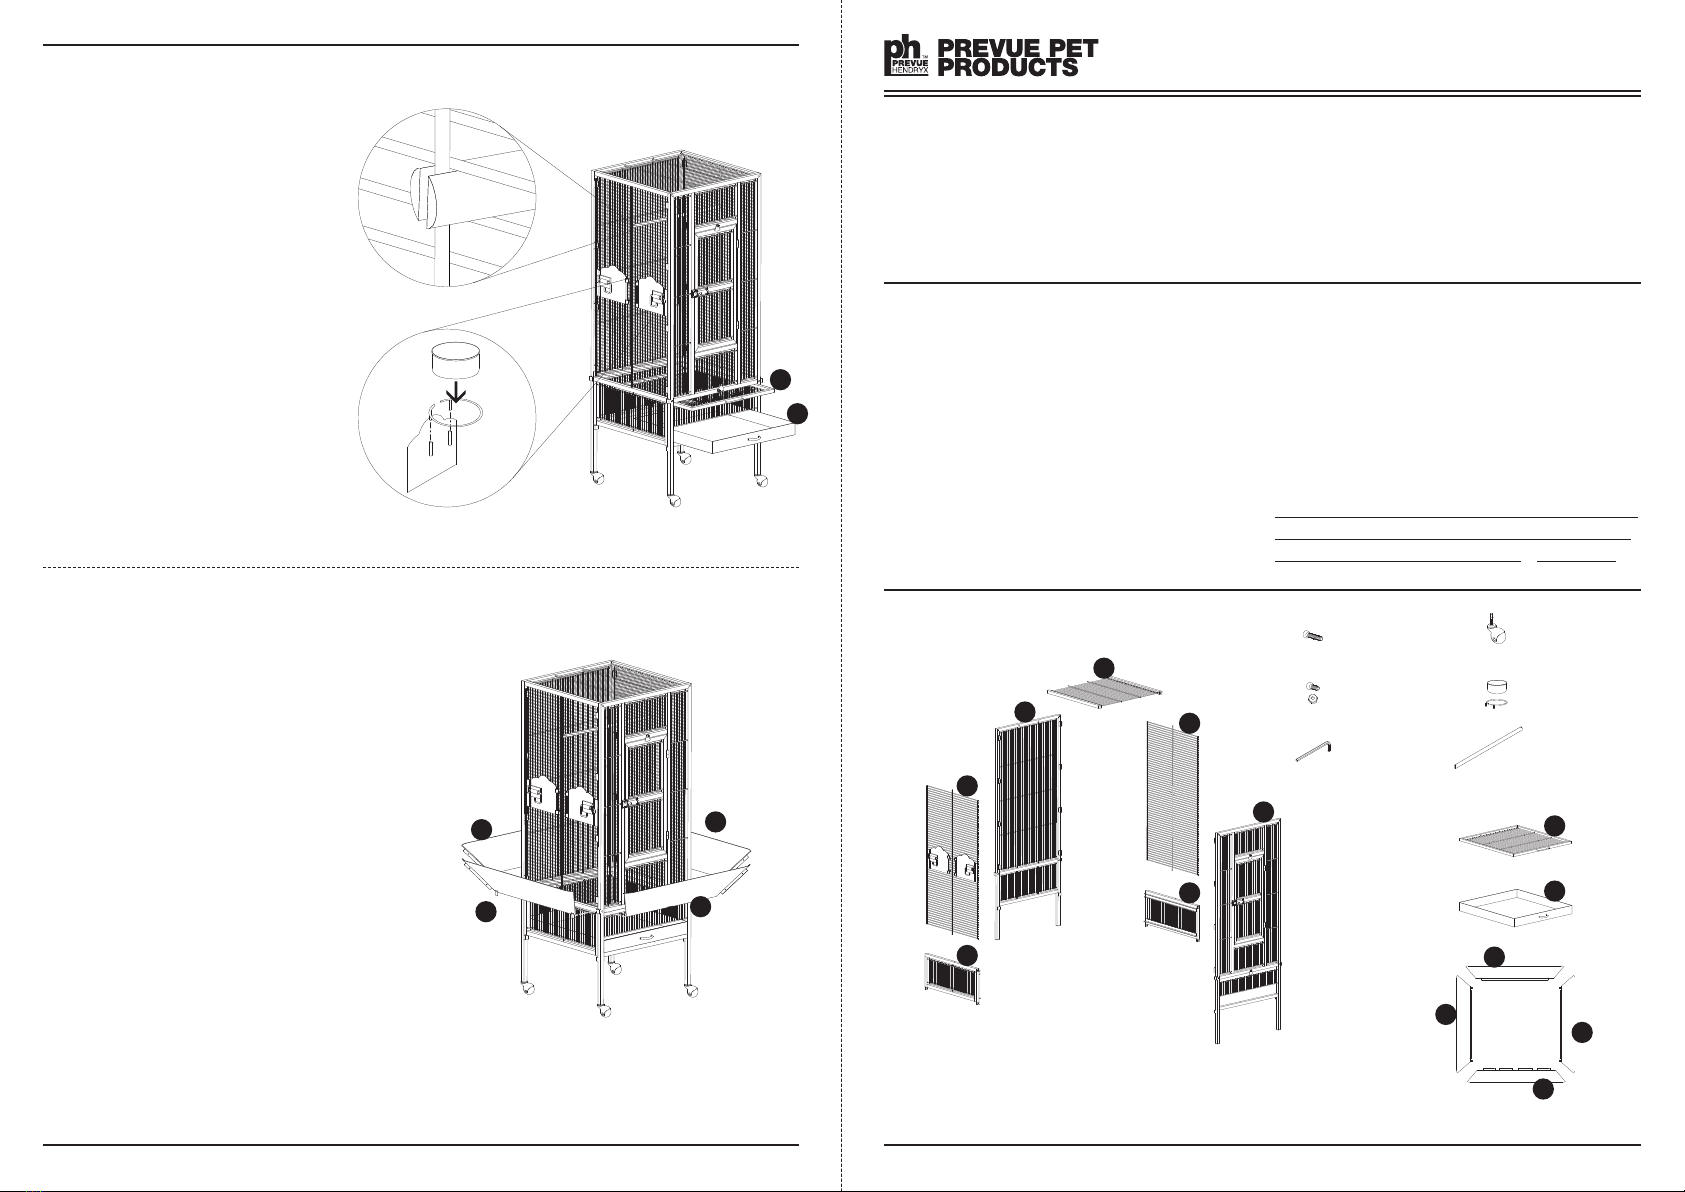
5Install Perch — Perch extends from left
side panel to right side panel, aligned on
center vertical wire (see detail [e]).
Install Cu s/Holders — Insert cup
holders into cup doors on (L2) panel, and
insert cups into holders (see detail [f]).
Add Grille & Tray — Rotate the windbell
lock out of the way and slide removable
grille (G) into the top channel tracks and
tray (T) into bottom channel tracks.
KEY:
L = Left panels
B = Back panel
C = Center (Top) panel
R = Right panels
F = Front panel
cageassemblyinstructions
Parkway Cage
Models: #3251BLK
#3252BLK
#3251
exter or: 18"L × 18"W × 48½"H
w/seed guards: 26¼"L × 26¼"W
nter or: 17"L × 17"W × 32¾"H
w re: [gauge] 8 & 8 [spac ng] ½"
#3252
exter or: 24"L × 22"W × 52¾"H
w/seed guards: 32½"L × 30½"W
nter or: 23½"L × 21¼"W × 37"H
w re: [gauge] 8 & 8 [spac ng] ½"
getting starte !
READ THESE NOTES FIRST:
Assembly steps & parts lists are exactly the same for both the
#3251 & #3252. The only differences are in dimensions.
• Enlist A Friend: These cages are easy to assemble, but for best
results, you may want to enlist a friend to help.
• Count Hardware & Review All Parts: If any screws are
missing, or if parts are damaged during shipping, please contact
Prevue Customer Service immediately.
•Tools: You will only need an allen wrench (provided). If you use
your own tools, please note: Prevue DOES NOT recommend ower
tools. Screws can be over-tightened and parts may be damaged or
stripped. Prevue is not responsible for this type of damage.
Review these instructions thoroughly before attempting to assemble
the cage. If you require assistance, please contact Prevue Customer
Service at 800.243.3624 or customerservice@prevuepet.com
parts
6The side seed guard (SG1) panels have tabs
extending down from the bottom corners which
correspond to sleeves along (F) & (B) panel
rail sides.
The front seed guard (SG2) has notches along
the bottom edge, corresponding to heavy vertical
rails on the front panel.
Slide the tabs on the left side (SG1) seed guard
into sleeves along the (F) & (B) panel rail sides.
Repeat for the right side (SG1) seed guard.
Hold the front (SG2) seed guard in place, align
holes at corner contact edge and secure front to
side seed guards with screw & nut pairs. Repeat
for back (SG3) seed guard.
✩Your cage is now fully assembled!
LEFT SIDE
FRONT
BACK
RIGHT SIDE
GRILLE
TRAY
SEED GUARDS
L2
L1
R2
R1
G
T
F
C
B
{8} hex head screws
{ 8 } short hex head
screw & nut pairs for
seed guard
{ 1 } allen wrench
{ 4 } rolling casters
{ 2 } cup hangers & cups
{ 1 } wood dowel perch
SG3
SG2
SG1
SG1
Made in China for Prevue Pet Products, Inc., Chicago IL USA www. revue et.com 800 243-3624 customerservice@revue et.com
G
T
SG1
SG1
SG2
SG3
3251/3252—03/12

1The lower side (L1) & (R1) panels feature:
→channels for the grille & tray — make sure
channels face interior of cage;
→tabs at the bottom which correspond to
sleeves on the legs of the front & back panels
(see detail).
Slide the tabs on the left side lower (L1)
panel down into the sleeves on the legs of the
front (F) and back (B) panels.
Install one long hex screw through the front
and back panels into the top corners of (L1)
and tighten with the allen wrench to secure
panel in place.
Repeat installation steps for right side lower
(R1) panel.
2ith the lower side panels installed, carefully
lay the cage on its side as illustrated.
Install rolling casters in each leg post.
After casters have been installed, carefully
upright the cage and continue assembly.
steps 3The upper side (L2) & (R2) panels:
→slide down into channels along the inside rails
of the front and back panels (see detail [a]);
→have a center vertical wire extending beyond
the top and bottom horizontal wires.
Slide left side u er (L2) panel (with cup doors)
down into place, making sure panel is centered
within all channels. Align lower extended vertical
wire with hole on top edge of (L1) rail (see detail
[b]). hen panel is installed correctly, cup door
locks are on the outside of the cage.
Repeat installation steps for right side u er
(R2) panel.
4The center to (C) panel:
→has two vertical wires extending beyond the
top and bottom horizontal wires.
→has one small hole centered on the underside
of each side rail;
Align the two extended vertical wires
on the center to (C) panel with the two
corresponding holes on the inside rails
of the (F) & (B) panels (see detail [c]).
Align the underside holes on the center to
(C) panel side rails with the extended vertical
wires on (L2) & (R2) panels (see detail [d]).
hen all extended wires and corresponding holes
are aligned, secure center to (C) panel with a long
hex screw in each corner.
L1
B
L1
R1
L2 R2
C
F
(a)
(b)
(c)
(d)
This manual suits for next models
3
Other Prevue Pet Products Farm Equipment manuals


Popular Farm Equipment manuals by other brands

Schaffert
Schaffert Rebounder Mounting instructions

Stocks AG
Stocks AG Fan Jet Pro Plus 65 Original Operating Manual and parts list

Cumberland
Cumberland Integra Feed-Link Installation and operation manual

BROWN
BROWN BDHP-1250 Owner's/operator's manual

Molon
Molon BCS operating instructions

Vaderstad
Vaderstad Rapid Series instructions


