Primos Truth Cam46 63020 User manual

Before Operation
Quick Start
Initial Camera Setup
Camera Menu Options
(Detailed Description)
Other Features/
Functions
Recommended
Accessories
Operating Tips
Customer Service &
Warranty
© 2010 Primos®Hunting Calls™
Additional information on this product and
answers to frequently asked questions
can be found at www.primos.com
!
PLEASE READ CAREFULLY BEFORE USE

www.primos.com/TruthCam
Instructions Video Clips
IMPORTANT RETURN POLICY
RETURN THIS PRODUCT TO PRIMOS®HUNTING CALLS™
DO NOT SEND BACK TO THE STORE
Please contact the Primos®Customer Service Team with any comments, questions,
TIP: Visiting www.primos.com/TruthCam and watching
our Instructional Video Clips is the “EASIEST WAY” to
learn “How To Use” your TRUTH®Camera!
(Note: Also available is frequently asked questions and answers,
as well as any updates.)
IMPORTANT
For your protection, please carefully read these warnings, precautions and safety/operating
instructions completely before operating the camera. Follow these instructions closely and
keep this manual for future reference.
WARNING
To reduce the risk of fire, electrical shock or product damage/failure,
- Do not expose unit with the door open to rain, moisture, dripping or splashing. Do not open
or close the camera door with wet hand. Completely wipe off water on camera and camera
door before opening.
- Do not lay product on moist ground or submerge in water (this unit is designed for vertical,
upright outdoor use)
- DONOTOPENCASEHOUSING.UNINSULATED,‘DANGEROUSVOLTAGE’WITHINPRODUCTS
ENCLOSURE. DO NOT REMOVE FRONT OR BACK HOUSING COVER. THERE ARE NO USER
-SERVICEABLEPARTSINSIDE,REFER SERVICINGTOPRIMOS®CUSTOMERSERVICE.
- Only use batteries as specified in this user manual and install according to correct
polarization. Failure to follow may result in leaking or exploding batteries, damage to camera,
fire or personal injury. Do not handle damaged or leaking batteries.
- Do not expose to extreme heat. Do not leave product and/or batteries exposed in direct
sunlight inside a vehicle, or other contained environment for a long period of time.
- Only use accessories as recommended in this manual
CARE & CAUTION
- Transport and handle with care. Do not strongly shake, bump, hit, drop or otherwise
cause impact to the camera – can result in camera malfunction, damage to lens, sensor,
LCD screen, or other key components. Additionally, damage to the case could result in
imperfections to water-resistant properties.
- Take extra care when handling or using camera in places with sand and dust. Sand, dust and
foreign substances exposed to camera lens, PIR sensor, LED array and/or the internal door
panel components may result in poor picture quality or malfunction of camera. If exposed to
any of these elements, please carefully wipe off completely before continued use.
MODIFICATION WARNING
You are cautioned that any changes or modifications not expressly approved in this manual
could void your warranty of this equipment.
OPERATING TEMPERATURE
- Recommended storage temperature range 200F to 1000F
- Recommended operating temperature range -100F to 1300F
Simple to Use
Simple to Understand
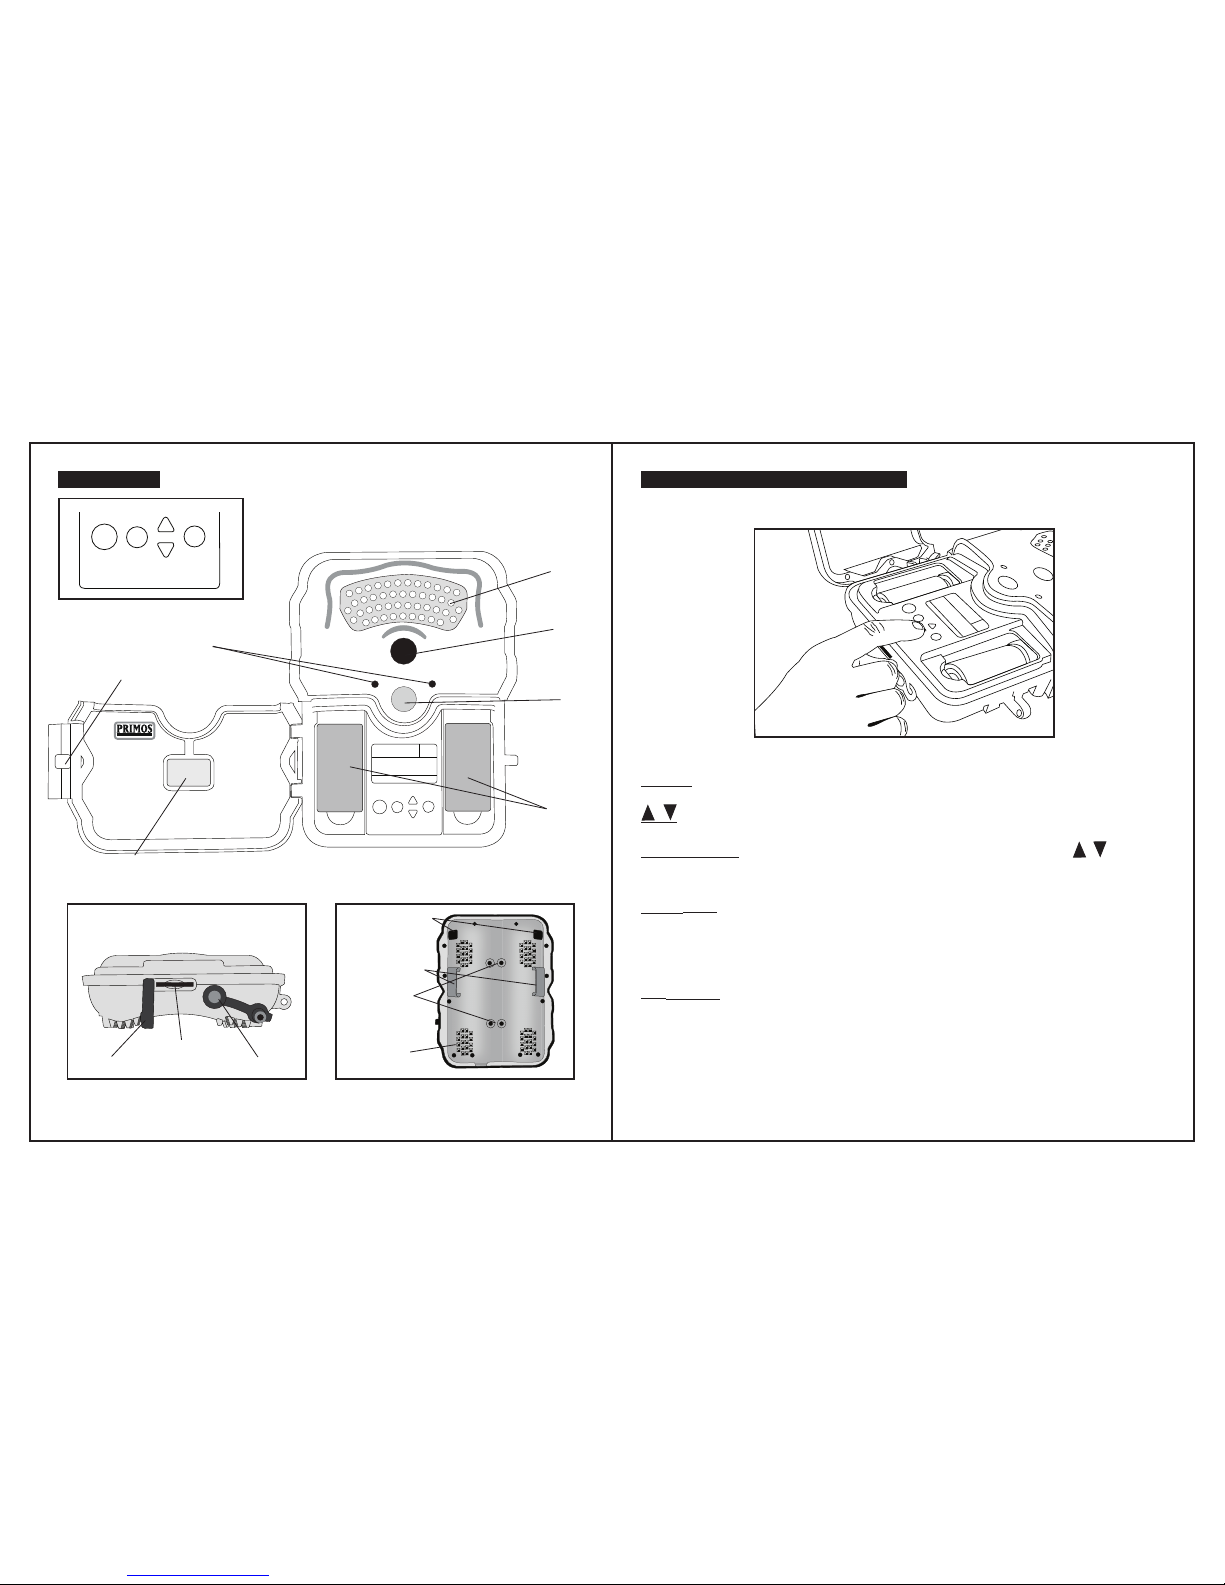
Table of Contents
Before Operation
Needed to Operate 1
Select SD Card Size 1
Help Selecting Photo or Video Settings 2
Identify Parts 3
Understand Button Functions 4
Quick Start - Initial Camera Setup
Easy 6 Step Setup 5
Camera Settings Backup Battery 6
Camera Status Lights 7
Camera Menu Options
Initial “PRIMOS” Menu Screen 8
Camera or Video 8
Number of LED’s 9
Delay 9
Burst 10
Camera Sensitivity 10
Time/Date 11
Format 11
Viewing/Retrieving Image 12
Clearing SD Card 13
Power Saving Sleep State 13
Powering Unit Off 13
Image Stamp 13
Other Features/Functions
Recommended Accessories
Primos®TRUTH®CAM Accessories 14
Other Accessories 14
Operating Tips
Customer Service & Warranty
Introduction
Our goal at Primos®is to provide products for hunters that are reliable and
“Simple to Use”. Our TRUTH®cameras have been built with that in mind.
TRUTH®cameras are “Simple to Use” and are reliable. They have the features
that we as hunters expect: Infrared LED’s that don’t spook game, fast trigger
speed, good photo images, extended night range and a SD memory capacity
of up to 8GB. In effect it has all the features you want in a trail camera that
is “Simple to Use”.
Important Notes 15
Contact Info 19
Warranty Protection 19

1GB
2GB
4GB
8GB
Photo
5MP
700
1410
2830
5670
Photo
3.1MP
820
1650
3300
6610
Photo
2MP
1420
2850
5710
11420
Video
15S High Res
40
90
180
360
Video
15S Low Res
280
570
1140
2280
Video
30S High Res
20
40
90
180
30S Low Res
140
280
570
1140
Video
60S Low Res
70
140
280
570
Video
*Photo/Video SD Card Storage Capacity
*Approximation - photo/video sizes vary based on individual image details
Included:
1. TRUTH® Camera (1)
2. 72” Mounting Strap (1)
3. Instruction Manual
4. Warranty Registration Card
TRUTH®CAM 46
INSTRUCTION MANUAL
1. Four (4) “D” size Alkaline or Rechargeable Batteries
2. One or more SD Memory Cards
(Camera will support up to 8GB SD or SDHC Cards)
Note: If no SD Card is installed ‘NO SD’ will display on initial menu screen
3. SD Memory Card Reader or other device to view image/video files
on SD Card. (Many computers have a SD Memory Card slot built-in)
1
BEFORE OPERATION
Select SD Card Size
This chart allows you to see the
approximate capacity of 1GB, 2GB,
4GB & 8GB SD Memory Cards. Check
to see what megapixel photos or
resolution videos that will be best for
your SD Card.
** Recommended for general
use and optimal battery life.
(See Operating Tips for more info.)
**
**
Needed to Operate:
Help Selecting Photo or Video Settings:
Best image quality - finer details when
zooming in for a closer look. Use for
chance of capturing photo of a lifetime
if you think the 'big trophy' is in the
area. Great for printing large-scale,
photo quality images.
Better image quality and a balance of
benefits between lower and higher MP.
For good image quality and recording a
large number of images. Faster to save,
transfer and e-mail. Recommended for
standard everyday use.
Usage Guidelines
Resolution
(Image/File Size)
Default # of
Images
Storage/
Recovery
Speed
Battery
Life
5MP
3.1MP
2MP
X
Larger
Smaller
Less
More
Slower
Faster
Shorter
Longer
Resolution
(Video/File Size) Usage Guidelines # of
Videos
Storage/
Recovery
Speed
Battery
Life
30s High Res
15s High Res
60s Low Res
30s Low Res
15s Low Res
Smaller
320 x 240
Larger
640 x 480
Larger size videos, but really large file
size and will fill up the SD Memory
card much faster than low resolution.
Better for expanding/maximizing on
your computer screen so you can see
the important action!
Smaller size videos, but can store 7
times more than high resolution for the
same length! Good for seeing what is
going on in your area, but not great for
expanding/maximizing on your
computer screen.
Less
More
Slower
Faster
Shorter
Longer
Photo
Video
2

43
Identify Parts
ON/OFF PROGRAM
SET
RUN/ WAKE
Infrared LED Lights
Camera Lens
PIR Motion Sensor
“D” Battery
Compartments
Door Latch with
Optional Pad Locking Hole
External LCD
Viewing Window
Status Indication Lights
ON/ OFF PROGRAM
SET
RUN/ WAKE
CLOSE UP VIEW OF CAMERA BUTTONS
Bottom View Back View
SD Card Slot
Rubber SD Card Cover External Battery Port
(Optional 6V DC)
Through Housing
Security Cable Hole
Tree Gripping Teeth
Mounting Strap Slots
Brass Inserts
(For optional
Attachment Accessories)
On/Off - Hold down for 2 seconds to turn camera ON or OFF.
- Use to navigate (scroll up or down) to see all MENU options.
Program/Set - Press to change any active menu setting; Use buttons
to adjust setting & press Program/Set again to save.
RUN/WAKE - When menu is on, press to quickly exit menu and turn camera
into active RUN mode; 30 second countdown will begin. (Note: If the LCD menu is
left inactive [no buttons are pushed]for 30 seconds, the camera will go into Power Saving Mode,
the LCD display will turn off and the camera is ready to start taking pictures/video.)
RUN/WAKE -When camera is in sleep mode, press to wake up LCD menu
screen. (Note: screen will not wake up while green indication light is illuminated or blinking)
UNDERSTAND BUTTON FUNCTIONS

65
1. Install Batteries - Uses four (4) “D”
size Alkaline or Rechargeable batteries.
(Note: Camera identifies fully charged rechargeable
batteries,such as NiMH, as lessthan 99% onbattery
indication level. Rechargeable batteries run on
different voltage and cause this variation. Most fully
charged rechargeable batteries will show 50-60%.)
2. Install up to 8GB SD Memory Card (not included) into the card slot
on the bottom of the camera. If SD Card is not installed, camera will display
“NO SD” on Initial Primos Menu Screen. (Note: SD Card Slot is protected by rubber
seal [plug]. Open door of the camera and gently rotate seal from slot. After SD Memory Card is
installed, replace rubber seal in original position to prevent moisture and elements from entering
camera and possibly causing malfunction.)
3. Secure Camera to Tree or Pole using included Mounting Strap
(must thread strap through Mounting Strap Slots on back of camera).
4. Turn On Camera and Review Default Settings on by holding down
ON/OFF button for 2 seconds. The LCD screen will turn on and show the
Camera Menu. Push UP or DOWN arrows to navigate through all Menu
options. For convenience and simplicity, your camera has the following
DEFAULT SETTINGS:
Camera Menu
Default
Other Sengs
Camera or Video
3MP
Camera - 5MP, 2.0MP
Video - High Res - 15s, 30s
Video - Low Res - 15s, 30s, 60s
Number LED's
46LED
25LED
Delay
1 Minute
5s, 10s, 30s, 30M, 60M
Burst
1 Picture
3 Picture, 5 Picture
Sensing Level
Normal
High, Low
Time
N/A
User needs to set
Date
N/A
User needs to set
MP - Megapixel s - Seconds M - Minutes
SD Card
QUICK START INITIAL CAMERA SETUP
Easy 6 Step Setup
DEFAULT SETTINGS:
5. Setup-Time and Date - Navigate through menu options to find Time and
Date screens. While on respective screen, press Program/Set button and
then buttons to adjust selected field.
6. Your camera is ready to use! Press RUN/WAKE button to quickly exit
menu and turn camera into active RUN mode. After 30 seconds the TRUTH®
Camera will be armed and ready to take pictures whenever the Motion Sensor
detects motion or movement. (NOTE: TEST camera before placing in field/woods. Run
camera in live “On/Run” mode and make sure Photos/Videos are being saved on SD Card. Can
view number of Photos/Videos being saved from external window.)
Camera Settings Backup Battery
*** This TRUTH®Camera is equipped with an internal rechargeable backup
battery that is dedicated to saving the date, time and menu settings when the
main D-cell batteries are removed. This internal backup battery can preserve
your settings for up to 6 months when fully charged. (NOTE: With first use or after
a long period of time without camera use, internal battery may initially take up to 30 hours to fully
charge - charges only when “D” batteries are installed when camera is turned ON.)

87
RED LIGHT
Lights up when the camera detects motion. After you close camera door
and are standing in front of the camera, visibility of this light is indication that
your camera is ON and working.
(TIP: Walk in front of the camera and look for the red light to illuminate when you are detected.
You can do this to verify your camera is pointing in the correct direction. Remember there is a
30 second delay from the time the camera is turned on till it is ready to take pictures.)
GREEN LIGHT
Lights up when the camera takes photo or is recording a video. The green light
stays on while the photo/video is being stored on the SD Memory Card.
(NOTE: Do not remove SD Memory Card when the green light is blinking – this could cause you
to lose all data on memory card!)
(NOTE: The LCD menu will not wake up from ON/RUN mode [Power Saving State] while the
Green Status Light is on. Wait until after Green Light turns off to WAKE up LCD screen by pushing
the WAKE button.)
Your TRUTH®Camera is equipped with 2 LED status indication lights on
the front of the camera (located right above door opening on each side
of PIR Motion Sensor).
ON/OFF PROGRAM
SET
RUN/WAKE
Green Light Red Light
Camera Status Lights
Camera or Video (CAM_VID) - Select camera MP (Megapixel) setting or
video length in S (Seconds). For help selecting camera or video settings see
(pg. 2)
CAMERA MENU OPTIONS
Initial PRIMOS®Menu Screen - displays
camera status, number of pictures ‘0074’,
time, battery life and date.
Example: Camera Menu is on and 74 picture/videos
are on SD Memory Card
Example: 5.0 Megapixel photos will be taken Example: 30 second High Res videos will be recorded
If SD Memory Card is NOT installed,
screen will display “NO SD” instead of
4-digit ‘0000’ picture count.
PLEASE INSERT SD CARD
If SD Memory Card is FULL, screen
will display “SD FULL” instead of 4-
digit ‘0000’ picture count.
PLEASE REPLACE SD CARD

109
Burst - Number of pictures taken each
triggering event (only relevant if in camera mode).
Camera Sensitivity (Sensing) - Motion
Detector Sensitivity. Use ‘Normal’ as default.
Number of LED’s (NUM_LED) - Choose
to use all LED’s for longer night vision or
less LED’s to save battery power when
the longer distance is not needed.
DELAY - The pre-set amount of time you
desire between photo/video recordings.
Example: 46 LED’s will be used at night
Example: Camera will wait 1 minute between
photo/video recordings with motion
Example: Camera will take 3 rapid photos in a row
More LED’s Less LED’s
Advantage
• Longer Night Illumination
• Brighter and Clearer Pictures
Drawback
• More Power Consumption
(shorter battery life)
• Greater Chance of Deer
Recognizing “Red LED Glow”
Advantage
• Less Power Cosumption (longer battery life)
• Less Chance of Deer
Recognizing “Red LED Glow”
Drawback
• Shorter Night Illumination
• Pictures not as Bright
Primos®recommends using versatility of selectable LED Number to your advantage
depending on the situation. If you know where the game is going to be and can setup
the camera closer, it probably it probably makes sense to enjoy the advantages of
Less LED’S. However, when you are uncertain or need the extended night range, you
can use all of the high-output LED’s!
TIP: It may not always be best to use ‘high sensitivity’ to see how far away you can capture
images of game. If the game is closer when the camera is triggered, you will end up with better
pictures/videos. You can learn what is best for your situation; here is a summary of the settings:
High Sensitivity
• Use when trying to detect game at further distances (in fields or open areas with long-range visibility)
• May use in warmer months or high heat climates so it is easier for sensor to detect difference
between body heat and outdoor temperature.
• May use when trying to capture photos of smaller game.
Normal Sensitivity
• Optimized to work best in most conditions and for normal use
Low Sensitivity
• May use if you have the camera setup in a location that is getting a lot of ‘empty’ photos
(false triggers)
• May use if you are getting a lot of hard-to-see long range photos of game (more likely in colder
temperatures or with larger game) and would like game to get closer before camera captures images.
You can adjust the sensitivity of the Passive Infrared
(PIR) Motion Sensor on your camera. The PIR
sensor detects motion AND the difference between
body heat and the outdoor temperature. Therefore,
adjusting the sensor affects the DISTANCE and
HEAT SENSITIVITY of the detection.

Time/Date – Time/Date setting in camera will be displayed on pictures
and video.
Format - Formats SD Memory Card
installed in camera – this DELETES
ALL PHOTOS OR VIDEO or any other
data on memory card!!!
To proceed with formatting:
1. Change field from NO to YES and hit
Program/Set (STEP 1)
2. The camera will ask you ‘Sure?’
3. Press Program/Set to format card. Press buttons to if you’re NOT
SURE and want to CANCEL. (STEP 2)
4. Camera should display ‘DONE’ when formatting complete and take you
back to initial PRIMOS®screen and display ‘0000’ pictures on card.
Step 1 Step 2
1211
Viewing / Retrieving Images
Explore these various methods for viewing TRUTH®Camera photos/videos:
1. Remove SD Memory Card from slot in bottom of camera.
2. Replace with separate, fresh SD Card if you want camera to continue working.
How to View Images/Videos
1. View images/videos with SD Card
directly in computer.
2. External USB memory card reader
3. Game Camera Viewer.
4. Other portable handheld devices
If available you can view images/videos by inserting SD Card
directly in SD memory card reader slot in computer.
If your computer doesn’t have an SD Card reader built in,
you can view images/videos by attaching USB memory
card reader to your computer.
You can view images/videos using a portable device
designed specifically for game cameras.
SD
SD
SD
GAME CAMERA VIEWER
SD
(NOTE: When using a computer you can view and delete images
directly from SD card or you can copy and store files to your
computer. Once files are safely stored on computer, you can
delete from SD Card to clear the space for next camera use.)
If convenient you may try viewing images/videos using
other portable handheld devices such as: digital cameras,
GPS, etc...
(NOTE: Many digital devices with viewing screens will display
pictures taken by the TRUTH®Camera. You can try these
alternative viewing devices at your own risk -- not all devices
with SD Memory card slots will read the TRUTH®Cam video
and/or photos.)

Clearing SD Memory Card
Formatting the SD Card erases all images and data.
To clear photos using TRUTH®Cam, see ‘FORMAT’ under
‘CAMERA MENU OPTIONS’. (Page 11)
Power Saving State
When the TRUTH®Camera is powered on, the LCD menu screen will
automatically turn on. If menu is left inactive (no settings changed or button
pushed) for 30 seconds, the camera will automatically switch to “RUN/ON”
mode and LCD screen will enter a power saving state.
(NOTE: The camera is active and ready to take photos/video when LCD is in a power saving
sleep state.)
The LCD screen can be awakened by pressing the RUN/WAKE button.
(NOTE: The LCD menu will not wake up from Power Saving State while the Green Status Light
is on. Wait until after Green Light turns off to WAKE up LCD screen.)
RECOMMENDED ACCESSORIES
1. Padlock for door latch to prevent tampering camera settings or memory
2. Locking Security Cable to run through case and around tree. Master Lock®
Python™ Adjustable Locking Cable is convenient and highly recommended.
3. 6V DC External Battery for those needing extended battery life for remote
or extremely active locations (plug into bottom of camera)
Primos®TRUTH®Cam Accessories
1. TRUTH®Cam Pivoting Mount
2. Camera Glove Protective Case
Other Accessories
2.
• Stretch Fit Neoprene
• Works with all
TRUTH®CAM Models
• Accessory Pouch and
SD Card Pocket
• Pivoting Camera Mount
• Fits on all TRUTH® CAM Models
• Allows You to Mount Camera
on ANY TREE and at virtually
ANY ANGLE
Camera Glove Protective Case
Powering Unit OFF
***LCD MENU MUST BE ON TO TURN OFF CAMERA
1. Wake up LCD screen from power saving mode by hitting RUN/WAKE
button (screen will not come on when Green Status Light is illuminated)
2. After the LCD menu screen is on, press and hold the ON/OFF button for
2 seconds. Screen should say PWR OFF before turning off.
Image Stamp
Step 1 (Wake Up LCD Screen) Step 2 (Powering Unit Off)
1.
1413

1615
OPERATING TIPS
IMPORTANT NOTES
Learning to use your TRUTH®Cam – Visiting www.primos.com/TruthCam and
watching our Instructional Video Clips is the ‘easiest way’ to learn ‘how to use’ your
TRUTH®Camera!
Troubleshooting or Questions – Before calling customer service, visit www.primos.
com/TruthCam to find troubleshooting tips, frequently asked questions and answers, as
well as any updates
Camera ‘Menu’ Mode or Camera ‘On/Run’ Mode - Your TRUTH®Cam only has two
modes when powered on.
Menu Mode -If the LCD screen is on displaying the menu or text, the camera is in ‘Menu’
mode and will not take pictures/videos during this time. If the LCD menu is left inactive
(no buttons are pushed) for 30 seconds, the camera will automatically go into a power
saving state.
ON/RUN Mode - The LCD display will turn off and the camera has switched to ‘On/Run’
mode and is ready to start taking pictures/video. You can also press the Run/Wake button
to quickly exit menu and turn camera into active ‘On/Run’ mode (30 second countdown
will begin). When the camera is in the ‘On/Run’ mode, you must exit the power saving
state by hitting the Run/Wake button to enter back into the camera ‘menu’ mode.
Waking Up LCD Menu – The LCD menu will not wake up from ‘On/Run’ mode (power
saving state) while the Green Status Light is on or blinking. Wait until after Green Light
turns off to WAKE up LCD screen.
Trouble Turning Camera Off – The OFF button will only work when the camera is in
‘Menu’ Mode. In other words, make sure the LCD screen is displaying the menu and
then hold the OFF button for 2 seconds. LCD screen will display ‘PWROFF’ as it is
turning off.
Battery Level on Display - Camera identifies fully charged rechargeable batteries, such
as NiMH, as less than 99% on battery indication level. Rechargeable batteries run on
different voltage and cause this variation. Most fully charged rechargeable batteries will
show 50-60%.
Battery Life – Long battery life is one of the most important requirements for convenient
and enjoyable game camera use. There are several variables that will determine the battery
life including type of batteries, temperature outside, image/video settings and frequency
of camera activity. Colder temperatures, more advanced image/video settings and high
photo frequency (low camera delay) will result in shorter battery life. Different brands of
batteries may also perform much better than others, so please experiment to find what
works best for you. Primos®has included a Image/Video Selection Guide in this manual to
help pick the best camera settings for higher performance or better battery life.
Internal Rechargeable Backup Battery - With first use or after a long time period of
camera storage, internal battery may initially take up to 30 hours to fully charge (charges
only when “D” batteries are installed when camera is turned ON). Once charged, this
backup battery is dedicated to saving the date, time and menu settings when the main
D-cell batteries are removed.
Camera Mounting Direction – The red status light illuminates when camera detects
motion. To verify your camera is pointing in the correct direction, you can walk in front of
the camera after it is setup and look for the red light to illuminate when you are detected
– the camera will take pictures/videos when motion is detected according to your settings.
The TRUTH®Cam Pivoting Mount makes mounting easier and allows photo capture from
the angle of your choice (versus relying on the tree).
Camera Mounting Height – Three feet from the ground is usually a good height to mount
the camera, but it depends on the type of game and ground terrain. The TRUTH®Cam
Pivoting Mount makes mounting easier and allows photo capture from the angle of your
choice (versus relying on the tree).
Blurry Image Quality – Primos®takes pride in the quality of images captured by the
TRUTH®Cam. However, this is an outdoor product that will be constantly exposed to
different/changing conditions that can affect the quality level. Blurry images typically result
from objects causing interference between the camera and the intended focal point (game
too close, brush, trees, etc). Blurry images may also be the result of direct sunlight, fog,
condensation (dew), water droplets, snow/ice, dirt, dust or other debris on the camera
lens. Carefully cleaning the camera lens window, making sure there are no scratches and/
or placing the camera in a different location may solve this type of problem.

1817
Blurry Image Quality – Motion – Primos®takes pride in the quality of images captured
by the TRUTH®Cam. With available technology, there was no way to eliminate the potential
of photos with blur caused by game moving (motion) too quickly. We have optimized the
TRUTH®Cam to limit the number of motion blurred images and provide as many clear,
quality photos as possible.
Dark or Light Image Quality – Primos®takes pride in the quality of images captured
by the TRUTH®Cam. As daylight transitions back-and-forth between light and dark, the
camera changes settings to optimize the picture. Some ‘lighter’ or ‘darker’ photos may be
captured during the camera transition process – this should be a limited amount of photos
with the optimization of our software. Also, please try to avoid setting up the camera in
situations where the sunlight will shine directly into camera lens. With any photo capturing,
taking pictures directly into sunlight produces less than desirable results.
Empty Photos/False Triggers – If there are a large number of photos taken with no
game present in the frame, first make sure your camera is mounted at the correct height
and in the right direction. If there are limited, random photos with no game present, the
following scenarios are most likely 1) an animal ran through the picture extremely fast or
2) a smaller animal/bird is around the camera/sensor but is not in the camera field of view
or 3) the sunlight or heat in combination with moving elements (trees, brush, shadows)
is causing a false trigger. The first two scenarios are hard to prevent, but the sunlight/
heat should not cause many false triggers as the camera has been optimized to sense
and distinguish for correct triggering. To prevent potential false triggers, try not to setup
the camera directly in the sunlight. You may also change the Camera Sensitivity Setting
according to your situation.
Camera Doesn’t Save Photos/Video – The SD Memory Card may be locked. Please
look closely at the card and make sure the card is in the ‘unlocked’ position. If photos/
videos are still not saved by camera activity, the SD Memory Card may be corrupt or
damaged. You can try to reformat the card on a computer and try it again, or simply try
replacing it with a different/new SD Memory Card.
Storing Camera – Do not store in extreme heat, cold, moist or humid conditions. Remove
batteries when storing for periods for longer than one week without use.
Operating Temperature - Recommended storage temperature range is 200F to 1000F
and recommended operating temperature range -100F to 1300F
Inside Camera Operation – The camera is designed for outdoor use. It is ok to test the
camera indoors for operation, but please note the indoor lighting and reflection may not
be optimal for correct photo exposure and video recording.
Selecting Image Size/Video Quality - More and bigger is not always better. See Help
Selecting Photo or Video Settings under ‘Before Your Operation’ guide.
Keep Clear of Debris - Keep the small water drainage hole on the camera door (running
from top lip to external window) clear of debris. This drainage hole allows any water that
happens to get on top of the door lid escape. If this hole is plugged and not allowed to
drain, the water can possibly enter the inside of the door (even when closed) and cause
permanent damage to the camera.

FCC STATEMENT
This equipment has been tested and found to comply with the limits for a
Class B digital device, pursuant to part 15 of the FCC Rules. These limits are
designed to provide reasonable protection against harmful interference in
a residential installation. This equipment generates, uses and can radiate
radio frequency energy and, if not installed and used in accordance with
the instructions, may cause harmful interference to radio communications.
However, there is no guarantee that interference will not occur in a particular
installation. If this equipment does cause harmful interference to radio or
television reception, which can be determined by turning the equipment off
and on, the user is encouraged to try to correct the interference by one or
more of the following measures:
Reorient or relocate the receiving antenna.
Increase the separation between the equipment and receiver.
Connect the equipment into an outlet on a circuit different from that to
which the receiver is connected.
Consult the dealer or an experienced radio/TV technician for help
20
DISCLAIMERS
19
Primos®makes no representations or warranties, either expressed or implied, by
or concerning any content of these written materials or software, or for damages
resulting from the use of the information contained therein. Primos®reserves the right
to alter the features and contents of this publication, hardware or software without
obligation or advance notice.
Warranty does not extend to any accessories used with the camera.
Primos®is not responsible if you use the TRUTH®Cam for illegal purposes.
Primos®shall not be obligated to perform preventative maintenance, installation,
deinstallation, or maintenance.
The illustrations in this manual are for instructional purposes only and may not
represent actual product exactly.
TRUTH®CAM 46
Model No. 63020
CUSTOMER SERVICE & WARRANTY
WARRANTY
You MUST register your Truth® Cam to receive warranty protection!
Up to 1 YEAR LIMITED WARRANTY
Primos®Hunting Calls™(“Primos”) warrants the TRUTH®Cam to be free from defects in workmanship
and materials, under normal use and conditions, for the time periods and terms as set forth below.
According to this Limited Warranty Primos®will, at its discretion, (a) repair the production using new
or refurbished parts or (b) replace the product with a new or refurbished product (product that has
been returned to its original specifications). In the event of a defect, these are the exclusive remedies
available to the original consumer purchaser only and is not assignable or transferable.
Terms: You must register your TRUTH®Cam to receive warranty protection. You may
register via postcard or on-line, but not both. If you register on-line you will receive
a longer warranty period. You MUST keep a receipt for “Proof of Purchase” for any
warranty claims on your TRUTH®Cam. More details below.
If registered via the enclosed postcard, you will receive a – Limited 180 Day Warranty*
For a period of 180 days from original date of purchase Primos®will repair or replace the product, at
its discretion, if service is required for any reason of any defect or malfunction.
*The included Warranty Registration Card must be filled out completely and returned to Primos®
within fourteen (14) days after the purchase date of the product.
If registered on-line, you will receive a – Limited 1 YEAR WARRANTY**
For a period of 1 year from original date of purchase Primos®will repair or replace the product, at its
discretion, if service is required for any reason of any defect or malfunction.
**Go online to www.primos.com/registration and complete the Online Product Registration within
fourteen (14) days of the purchase date of the product.
Limitations: This warranty is valid only if the product is used for the purpose for which it was designed.
It does not cover: 1) products which have been damaged by negligence/misuse (including, but not
limited to, improper storage, battery leakage and water damage caused by submersion), accident or
which have been modified or repaired by unauthorized persons; 2) cracked or broken housing of units
damaged by excess heat or impact/force; 3) damage caused by wild animals 4) the cost of shipping
this product to the factory for service and its return to you. This warranty is valid only in the United
States of America. Any applicable implied warranties are also limited to 180 days, and Primos®will
NOT be liable for consequential damages.
Instructions:
In the event warranty service is needed, please contact Primos®Customer Service to obtain a Return
Merchandise Authorization (RMA) number. Once you have secured a RMA number, you will be required to:
1. Write RMA number in large print on outside of package.
2. Remove SD memory card and batteries from product and pack in well-padded or highly protective
box. Primos®will NOT be responsible for damage incurred in returning product for repair.
3. Include Proof of Purchase and $20 for handling and return packing/shipping. Do NOT send cash.
Enclose your credit card number and expiration date, check or money order payable to Primos®Hunting
Calls™for the sum of $20.
4. Send product prepaid to: Primos®Hunting Calls™, Customer Service Department, 604 First Street,
Flora, MS 39071.

604 First Street, Flora, MS 39071 • Office 601-879-9323
• Orders 1-800-523-2395 • Fax 601-879-9324 • primos.com
Printed in China
Table of contents