Princess 321010 User manual

321010 Princess Digital Steam Press 40 |
4
English
9

2
100
200
300
400
8
726 4
5
9
12 1011
1
3
3
16 13 14 15
17
17a 17b 17c 17d 17e
A2
A1
3
5
4
6
7
B
18
11 8
18
8
C

4
EN
Congratulations!
You have purchased a Princess product. Our aim
is to provide quality products with a tasteful
design and at an affordable price. We hope that
you will enjoy this product for many years.
Description (fig. A)
Your 321010 Princess steam press has been
designed for steaming and pressing
garments and fabrics to remove creases. The
appliance is suitable for indoor use only. The
appliance is suitable for domestic use only.
Fig. A1
1. On/off switch
2. Control panel
3. Steam shot button
4. Handgrip
5. Ironing board
6. Pressing plate
7. Locking knob (pressing plate)
8. Water reservoir
9. Mains cable storage compartment
10. Pressing cushion
11. Measuring cup
12. Spray bottle
Fig. A2
13. On/off indicator (POWER)
14. Heating indicator (HEATING)
15. Steam shot indicator (SPRAY)
16. Standby indicator (WAIT)
17. Function keys/indicators
17a.NYLON key/indicator
17b.SILK key/indicator
17c. WOOL key/indicator
17d.COTTON key/indicator
17e.LINEN key/indicator
Initial use
Clean the appliance. Refer to the section•
”Cleaning and maintenance”.
Use
Filling the water reservoir (fig. B & C)
Before you proceed, we need you to pay
attention to the following notes:
- Before filling the water reservoir, switch off
the appliance, remove the mains plug from
the wall socket and wait until the appliance
has cooled down.
Before you proceed, we would like you to
focus your attention on the following notes:
- Do not use the appliance without water
in the water reservoir.
- Do not exceed the maximum mark when
you fill the water reservoir.
- It is recommended to fill the water reservoir
with a mixture of 50% tap water and 50%
distilled water in order to prevent the
formation of excessive limescale.
- Only use cold water to fill the water reservoir.
- Do not use carbonated water or other
liquids to fill the water reservoir.
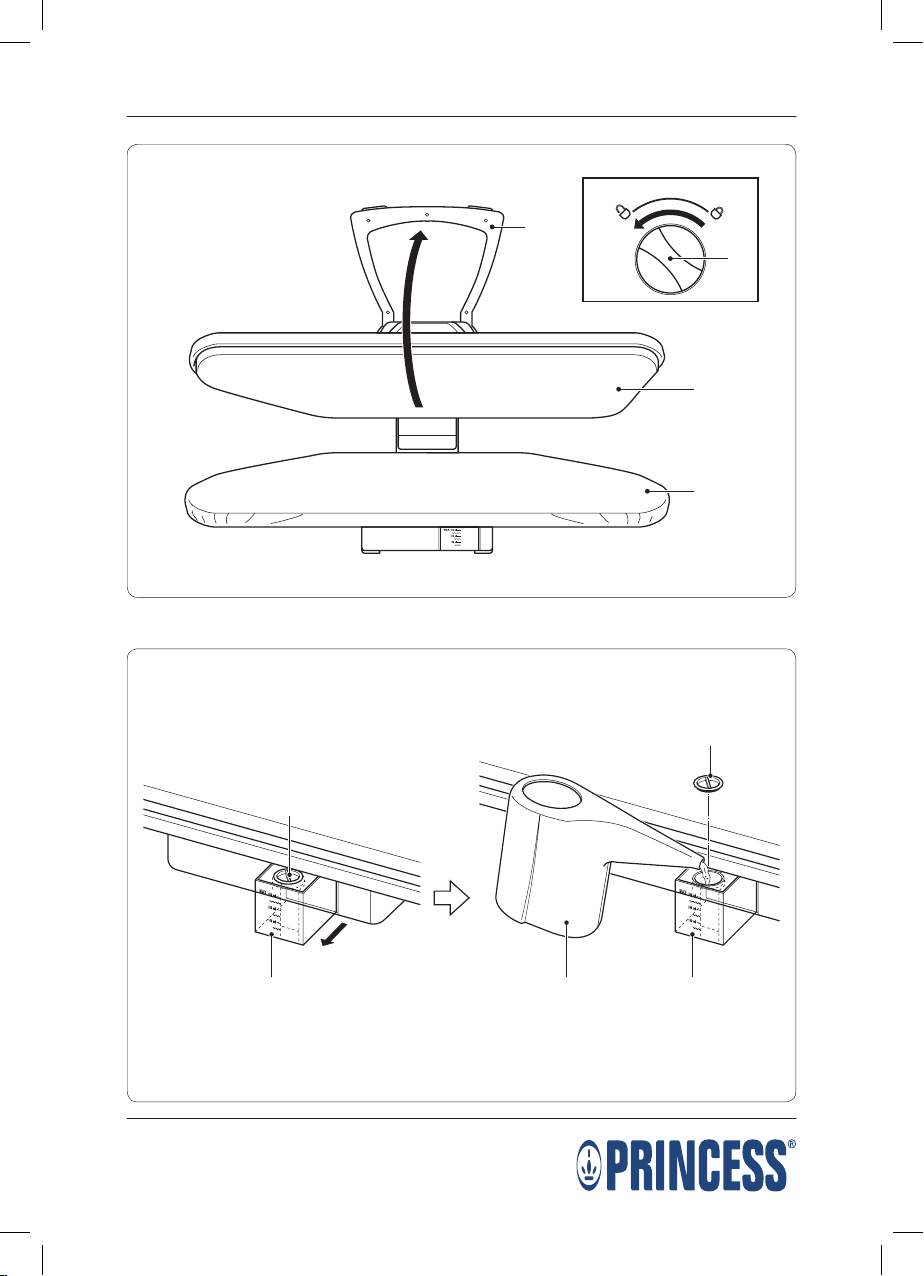
Place the appliance on a stable and flat•
surface.
Turn the locking knob (7) into the direction•
of the unlock symbol to unlock the pressing
plate (6).
Raise the pressing plate (6).•
Pull the water reservoir (8) out of the•
appliance.
Note: Do not attempt to completely remove
the water reservoir from the appliance.
Remove the cap (18).•
Fill the water reservoir (8) with the required•
amount of water. Use the measuring cup (11).
Mount the cap (18).•
Push the water reservoir (8) into the•
appliance.
Hints for use (fig. A - C)
Before you proceed, we would like you to
focus your attention on the following notes:
- If the appliance is left switched on with the
pressing plate in the lowered position for
10 seconds, a beep will sound to indicate
that the heating function is deactivated.
Raise the pressing plate to reactivate the
heating function.
- If the appliance is left switched on but
unused with the pressing plate in the
raised position for 15 minutes, a beep will
sound to indicate that the heating function
is deactivated.

5
EN
The standby indicator (16) comes on. Touch
the correct function key to reactivate the
heating function. The standby indicator (16)
goes off.
Place the appliance on a stable and flat•
surface.
Turn the locking knob (7) into the direction•
of the unlock symbol to unlock the pressing
plate (6).
Raise the pressing plate (6).•
Make sure that the water reservoir (8) is filled•
with water and placed into the appliance.
Insert the mains plug into the wall socket.•
To switch on the appliance, set the on/off•
switch (1) to the ’I’ position. The on/off
indicator (13) comes on. The standby
indicator (16) comes on.
Touch the correct function key (17)•
according to the type of fabric. Refer to the
table below. The corresponding function
indicator (17) comes on. The heating indicator
(14) comes on. The standby indicator (16)
goes off. The appliance starts heating.
Nr. Function key Type of fabric
17a NYLON key Nylon
17b SILK key Silk
17c WOOL key Wool
17d COTTON key Cotton
17e LINEN key Linen
Note: It is recommended to start with the most
delicate fabrics. Nylon and silk require lower
temperatures than wool, cotton and linen.
If the heating indicator (14) goes off, the•
pressing plate (6) has reached the required
temperature. The appliance is ready for use.
Lay the fabric flat on the ironing board (5).•
Before you proceed, we need you to pay
attention to the following notes:
- Do not use the steam shot function with
the pressing plate pointing towards you.
- Do not use the steam shot function when
the appliance is fully closed.
Note: The steam shot function cannot be used
if you select NYLON or SILK. If you first select
WOOL, COTTON or LINEN - the steam shot
indicator (15) will come on - and subsequently
select NYLON or SILK, the steam shot function
can be used only once. If the steam shot has
been completed, the steam shot indicator (15)
will go off.
If the steam shot indicator (15) comes on, you•
can press the steam shot button (3) to supply
a shot of steam that penetrates the fabric and
removes the most stubborn creases.
Lower the pressing plate (6). Hold the•
pressing plate (6) on the fabric and the
ironing board (5) for 8-10 seconds. Raise
the pressing plate (6).
Repeat the last steps until the creases are•
removed.
If necessary, add more water into the water•
reservoir (8).
If the process is completed, raise the pressing•
plate (6) and remove the fabric from the
ironing board (5).
To switch off the appliance, set the on/off•
switch (1) to the ’0’ position. The on/off
indicator (13) goes off.
Remove the mains plug from the wall socket.•
Allow the appliance to cool down completely.•
Shirts and blouses
Place the shoulder yoke onto the ironing•
board. Press the shoulder yoke.
Place the sleeves onto the ironing board•
with the fold parallel to the long seam.
Press the sleeves.
Place the cuffs onto the end of the ironing•
board. Press the cuffs.
Place the bottom of the garment behind•
the ironing board. First press the front and
subsequently the back of the garment.
Slowly pull the garment towards you, over
the ironing board, and carefully press the
garment section after section.
Pants
Place the waistband onto the ironing board.•
Place the pressing cushion under the
waistband. Press the waistband, constantly
moving the pressing cushion along with the
waistband.

6
EN
To press inseam, place the pressing cushion•
under the area to be pressed.
Place the pleated area onto the ironing•
board. Carefully fold and press the pleats.
Other hints
Use the spray bottle in order to lightly spray•
fabrics and remove the most stubborn creases.
Place a damp cloth over the fabric to remove•
the most stubborn creases.
Place embroidery, buttons and zips face-•
down onto the ironing board.
In order to press delicate fabrics, place the•
pressing cushion between the fabric and
the pressing plate.
In order to press large pieces of fabric, place•
the fabric behind the ironing board. Slowly
pull the fabric towards you, over the ironing
board, and carefully press the fabric section
after section.
Cleaning and maintenance (fig. A - C)
Before you proceed, we need you to pay
attention to the following notes:
- Before cleaning or maintenance, remove
the mains plug from the wall socket and
wait until the appliance has cooled down.
- Do not immerse the appliance in water or
any other liquids.
Before you proceed, we would like you to
focus your attention on the following notes:
- Do not use aggressive or abrasive cleaning
agents to clean the appliance.
- Do not use sharp objects to clean the
appliance.
Regularly check the appliance for possible•
damage.
Regularly check the water reservoir for•
possible leakage.
Clean the appliance after each use:•
- Place the appliance on a stable and flat
surface.
- Turn the locking knob (7) into the direction
of the unlock symbol to unlock the pressing
plate (6).
- Raise the pressing plate (6).
- Make sure that the water reservoir (8)
is filled with water and placed into the
appliance.
- Place the pressing cushion (10) in the
middle of the ironing board (5).
- Place a clean towel over the pressing
cushion (10) and the ironing board (5).
- Touch the LINEN key (17e). The LINEN
indicator (17e) comes on.
- If the steam shot indicator (15) comes
on, lower the pressing plate (6) onto the
pressing cushion (10).
- Press the steam shot button (3) 6 times.
- Allow the appliance to cool down
completely.
- Clean the pressing plate (6) with a soft,
damp cloth. Thoroughly dry the pressing
plate (6) with a clean, dry cloth.
Regularly clean the ironing board cover:•
- Remove the ironing board cover from
the ironing board (5).
- Wash the ironing board cover by hand
(max. 30 °C) using a mild detergent.
- Allow the ironing board cover to dry
naturally.
- Put the ironing board cover over the
ironing board (5).
Storage (fig. A - C)
Make sure that the water reservoir (8) is•
empty and placed into the appliance.
Lower the pressing plate (6).•
Turn the locking knob (7) into the direction•
of the lock symbol to lock the pressing
plate (6).
Put the mains cable in the storage•
compartment (9).
Put the appliance and the accessories in•
the original packaging.
Store the appliance with the accessories in•
a dry and frost-free place, out of the reach
of children.
Safety instructions
General safety
Read the manual carefully before use. Keep•
the manual for future reference.
Only use the appliance and the accessories•
for their intended purposes. Do not use the
appliance and the accessories for other
purposes than described in the manual.

7
EN
Do not use the appliance if any part or any•
accessory is damaged or defective. If a part
or an accessory is damaged or defective,
it must be replaced by the manufacturer or
an authorised repair agent.
Children should be supervised to ensure•
that they do not play with the appliance.
The appliance is not intended for use by•
persons (including children) with reduced
physical, sensory or mental capabilities, or
lack of experience and knowledge, unless
they have been given supervision or
instruction concerning use of the appliance
by a person responsible for their safety.
Do not use the appliance near bathtubs,•
showers, basins or other vessels containing
water.
Do not immerse the appliance in water or•
other liquids. If the appliance is immersed in
water or other liquids, do not remove the
appliance with your hands. Immediately
remove the mains plug from the wall socket.
If the appliance is immersed in water or other
liquids, do not use the appliance again.
This appliance is intended to be used in•
domestic and similar applications such as
staff kitchen areas in shops, offices and other
working environments; farm houses; by
clients in hotels, motels and other residential
type environments; bed-and-breakfast type
environments.
Electrical safety
Before use, always check that the mains•
voltage is the same as the voltage on the
rating plate of the appliance.
The appliance is not intended to be operated•
by means of an external timer or separate
remote-control system.
Connect the appliance to an earthed wall•
socket. If necessary, use an earthed
extension cable of a suitable diameter
(at least 3 x 1 mm2).
For additional protection, install a residual•
current device (RCD) with a rated residual
operating current that does not exceed 30 mA.
Make sure that water cannot enter the•
contact plugs of the mains cable and the
extension cable.
Always fully unwind the mains cable and•
the extension cable.
Make sure that the mains cable does not•
hang over the edge of a worktop and cannot
be caught accidentally or tripped over.
Keep the mains cable away from heat, oil•
and sharp edges.
Do not use the appliance if the mains cable•
or the mains plug is damaged or defective.
If the mains cable or the mains plug is
damaged or defective, it must be replaced
by the manufacturer or an authorised
repair agent.
Do not pull the mains cable to disconnect•
the mains plug from the mains.
Disconnect the mains plug from the mains•
when the appliance is not in use, before
assembly or disassembly and before
cleaning and maintenance.
Safety instructions for steam presses
Do not use the appliance outdoors.•
Be careful with hot steam to avoid burns.•
The accessible surfaces of the appliance can•
become very hot during use. Do not touch
the accessible surfaces. Only touch the
handgrip when the accessible surfaces are
hot.
Make sure that your hands are dry before•
touching the appliance.
Always wear shoes when using the•
appliance.
Do not steam and press garments while•
you or another person are wearing them.
Always hold the handgrip to move the•
appliance. Do not hold the ironing board
or the pressing plate to move the appliance.
Switch off the appliance and let the•
appliance cool down before leaving it
unattended and before replacing, cleaning
or inspecting any parts of the appliance.
U.K. Wiring instructions
The wires in the mains lead are coloured in
accordance with the following code:
BLUE NEUTRAL
BROWN LIVE
GREEN/YELLOW EARTH

8
EN
As the colours of the wire in the mains lead of
this appliance may not correspond with the
colour markings identifying the terminals on
your plug, proceed as follows:
The wire which is coloured BLUE must be
connected to the terminal which is marked
with the letter N or coloured black.
The wire which is coloured BROWN must be
connected to the terminal which is marked
with the letter L or coloured red.
The wire which is coloured GREEN/YELLOW
must be connected to the terminal which is
marked with the letter E or and is coloured
GREEN or GREEN/YELLOW.
If a 13Amp (BS1363) plug is used, a 13Amp
(BS1362) fuse must be fitted, or if any other
type of plug is used, a 13Amp fuse must be
fitted, either in the plug or adaptor, or on the
distribution board.
Warning! This appliance must be earthed.
Disclaimer
Subject to change; specifications can be
changed without further notice.

9
AR
ﺲﺒﻜﻟا رﺎﺨﺒﻟا ةاﻮﻜﻣ ﻢﯿﻤﺼﺗ ﻢﺗ ﺪﻘﻟ
ﺲﺑﻼﻤﻟا ﻲﻛو ﺮﯿﺨﺒﺘﻟ 321010
ماﺪﺨﺘﺳﻼﻟ ﺐﺳﺎﻨﻣ زﺎﮭﺠﻟا .ﺎﯾﺎﻨﺜﻟا ﺔﻟازﻹ ﺔﺸﻤﻗﻷاو
ﻲﻟﺰﻨﻤﻟا ماﺪﺨﺘﺳﻼﻟ ﺐﺳﺎﻨﻣ زﺎﮭﺠﻟا .ﻂﻘﻓ ﻲﻟﺰﻨﻤﻟا
.ﻂﻘﻓ
5
6
7
8
9
7
6
6
8
8
8

10
AR
7
6
6
8
6
5
66
85
6
8
6
5

11
AR
7
6
6
8
5
5
6
6
6
6
5
5
8
6
7
6
9

12
AR
×

13

14

© Princess 2018
Table of contents
Languages:
Other Princess Iron manuals


