Princess 321200 User manual

321200 Princess
Star Steam Station
Nederlands 4
English 10
Français 16
Deutsch 22
Español 29
Italiano 35
Svenska 41
Dansk 46
Norsk 51
Suomi 56
Português 61

2
8 12 9
7 1
3
14
6
2
5
15
16
4
10
11
17
13
A
3
A
B
C
7
7
7
17
18
13
C
B
A
B
C
D
D

4
NL
4
Gefeliciteerd!
U heeft een apparaat van Princess aangeschaft.
Ons doel is om kwaliteitsproducten met een
smaakvol ontwerp en tegen een betaalbare
prijs te bieden. We hopen dat u gedurende
vele jaren plezier zult hebben van dit apparaat.
Instructies voor gebruik
De instructies voor gebruik zijn verzameld in
de bijbehorende sectie. Zorg ervoor dat u
vertrouwd bent met de veiligheidsinstructies
wanneer u de instructies voor gebruik
raadpleegt.
Veiligheidsinstructies
Waarschuwing!
- Bij het gebruik van netvoedingapparatuur
moeten de basisveiligheidsinstructies altijd
in acht worden genomen om het risico van
brand, elektrische schok en persoonlijk
letsel te verkleinen.
- Gebruik het apparaat niet in de buurt van
badkuipen, douches, wastafels of andere
voorzieningen die water bevatten.
Lees voor gebruik de volledige
gebruiksaanwijzing zorgvuldig door.
Het beoogde gebruik is beschreven in
deze gebruiksaanwijzing. Het gebruik van
accessoires of het uitvoeren van
werkzaamheden met dit apparaat die niet
in deze gebruiksaanwijzing zijn beschreven,
kunnen leiden tot persoonlijk letsel.
Bewaar deze gebruiksaanwijzing voor
toekomstig gebruik.
Houd altijd toezicht op kinderen om te
voorkomen dat ze met het apparaat spelen.
Het gebruik van dit apparaat door kinderen
of personen met een lichamelijke,
zintuiglijke, geestelijke of motorische
handicap of zonder de benodigde kennis
en ervaring kan gevaar veroorzaken.
Personen die verantwoordelijk zijn voor
hun veiligheid moeten uitdrukkelijke
instructies geven of toezicht houden op het
gebruik van het apparaat.
Gebruik
Schakel het apparaat uit voordat u de
netstekker in het stopcontact steekt of van
de netvoeding verwijdert.
Wees altijd voorzichtig wanneer u het
apparaat gebruikt.
Gebruik het apparaat niet buitenshuis.
Bescherm het apparaat altijd tegen water
of hoge vochtigheid.
Gebruik het apparaat niet als u handen nat
zijn. Gebruik het apparaat niet als u
blootvoets bent.
Raak de bewegende delen niet aan. Houd
lang haar en losse kleding uit de buurt van
de bewegende delen.
Geleid het netsnoer zorgvuldig om ervoor
te zorgen dat het niet over de rand van
een werkblad hangt. Zorg ervoor dat het
netsnoer niet per ongeluk verstrengeld
raakt of de oorzaak van een struikeling kan
vormen.
Trek nooit aan het netsnoer om de
netstekker van de netvoeding te verwijderen.
Houd het netsnoer uit de buurt van
warmtebronnen, olie en scherpe randen.
Schakel het apparaat uit en wacht tot de
motor stopt met draaien voordat u de
netstekker van de netvoeding verwijdert.
Verwijder geen onderdeel of accessoire
wanneer de netstekker op de netvoeding
is aangesloten. Verwijder altijd eerst de
netstekker van de netvoeding.
Indien het netsnoer tijdens gebruik
beschadigd raakt, verwijder dan onmiddellijk
de netstekker van de netvoeding. Raak het
netsnoer niet aan voordat u de netstekker
van de netvoeding verwijdert.
Verwijder de netstekker van de netvoeding
wanneer het apparaat niet in gebruik is,
voor montage- of demontage-
werkzaamheden en voor reinigings- en
onderhoudswerkzaamheden.
Veiligheid van anderen
Laat kinderen en personen die niet
vertrouwd zijn met deze instructies het
apparaat niet gebruiken.

5
NL
Installeer voor extra bescherming een
reststroomvoorziening (RCD) met een
nominale bedrijfsstroom die kleiner is dan
of gelijk is aan 30 mA.
Het apparaat mag niet worden bediend
door middel van een externe timer of een
apart afstandsbedieningssysteem.
Zorg ervoor dat er geen water in de pluggen
van het netsnoer en het verlengsnoer kan
komen.
Draai het netsnoer en het verlengsnoer
altijd volledig uit.
Gebruik uitsluitend de juiste stekker om het
apparaat te bedienen.
Dompel het apparaat niet onder in water of
andere vloeistoffen. Verwijder het apparaat
niet met uw handen indien het apparaat is
ondergedompeld in water of andere
vloeistoffen. Verwijder onmiddellijk de
netstekker uit het stopcontact. Gebruik het
apparaat niet opnieuw indien het apparaat
is ondergedompeld in water of andere
vloeistoffen.
Controleer altijd of er op kledinglabels
strijkinstructies worden vermeld. Neem altijd
de strijkinstructies in acht.
Strijk niet over ritssluitingen, knopen, nagels
in spijkerbroeken, etc. om beschadinging
van de zoolplaat te voorkomen.
Pas op voor hete delen. Raak de zoolplaat
en de strijkijzerhouder niet aan. De zoolplaat
en de strijkijzerhouder worden zeer heet
tijdens gebruik.
Wees voorzichtig met hete stoom om
brandwonden te vermijden. Richt de
zoolplaat niet op uzelf op andere personen
tijdens gebruik.
De toegankelijke oppervlakken van het
apparaat kunnen zeer heet worden tijdens
gebruik. Raak de toegankelijke oppervlakken
niet aan. Raak uitsluitend de handgrepen
aan wanneer de toegankelijke oppervlakken
heet zijn.
Zorg ervoor dat uw handen droog zijn
voordat u het apparaat aanraakt.
Zorg ervoor dat het apparaat niet kan vallen
wanneer de strijkijzer op de strijkijzerhouder
is geplaatst.
Laat kinderen of dieren niet in de buurt van
de werkruimte komen. Laat kinderen of
dieren het apparaat of het netsnoer niet
aanraken. Nauw toezicht is noozakelijk
wanneer het apparaat wordt gebruikt in de
buurt van kinderen.
Na gebruik
Verwijder de netstekker van de netvoeding
en laat het apparaat afkoelen voordat u het
zonder toezicht achterlaat en voordat u
onderdelen van het apparaat verwisselt,
reinigt of inspecteert.
Berg het apparaat op een droge plaats op
wanneer het niet in gebruik is. Zorg ervoor
dat kinderen geen toegang hebben tot
opgeborgen apparaten.
Inspectie en reparaties
Controleer het apparaat voor gebruik op
beschadigde of defecte onderdelen.
Inspecteer het apparaat op kapotte
onderdelen, beschadigingen aan
schakelaars en andere zaken die de
werking nadelig kunnen beïnvloeden.
Gebruik het apparaat niet als een
onderdeel beschadigd of defect is.
Laat beschadigde of defecte onderdelen
door een erkend servicecentrum repareren
of vervangen.
Probeer nooit om onderdelen te verwijderen
of te vervangen die niet in deze in deze
gebruiksaanwijzing zijn beschreven.
Controleer voor gebruik het netsnoer op
slijtage of beschadiging.
Gebruik het apparaat niet als het netsnoer
of de netstekker beschadigd of defect is.
Indien het netsnoer of de netstekker
beschadigd of defect is, moet het door de
fabrikant of een erkend servicecentrum
worden vervangen.
Veiligheidsinstructies voor
stoomstrijkijzers
Controleer voor gebruik altijd of de
netspanning overeenkomt met de spanning
op het typeplaatje van het apparaat.
Sluit het apparaat aan op een geaard
stopcontact. Gebruik indien nodig een
geaarde verlengkabel met een geschikte
diameter (minimaal 3 x 1 mm2).

6
NL
Gebruik
Vullen van het waterreservoir
(fig. B)
Waarschuwing!
- Schakel voor het vullen van het
waterreservoir altijd het apparaat uit en
verwijder de netstekker uit het stopcontact.
- Open de vulopening van het waterreservoir
niet tijdens gebruik.
Voorzichtig!
- Vul het waterreservoir altijd met water, zelfs
indien de stoomfunctie niet wordt gebruikt.
- Vul het waterreservoir niet verder dan de
maximummarkering.
- Ter voorkoming van hardnekkige kalkaanslag
wordt aanbevolen om het waterreservoir
met een mengsel van 50% kraanwater en
50% gedistilleerd water te vullen, met name
in regio’s met hard water.
- Vul het waterreservoir uitsluitend met koud
water.
- Vul het waterreservoir niet met koolzuur-
houdend water of andere vloeistoffen.
Plaats het apparaat op een stabiel en vlak
oppervlak.
waterreservoir (13).
Vul het waterreservoir (13) met water
(max. 1,5 liter).
waterreservoir (13).
In- en uitschakelen (fig. A)
Strijkijzer
Zet de aan/uit-schakelaar (2) in positie ’I’
om het strijkijzer (1) in te schakelen.
De aan/uit-indicator (3) gaat branden.
Het strijkijzer begint met opwarmen.
Zet de aan/uit-schakelaar (2) in positie ’O’
om het strijkijzer (1) uit te schakelen.
De aan/uit-indicator (3) gaat uit.
Stoomgenerator
Zet de aan/uit-schakelaar (5) in positie ’I’
om de stoomgenerator (4) in te schakelen.
De aan/uit-indicator (6) gaat branden. De
stoomgenerator begint met het opwarmen
van het water.
Laat het apparaat niet onbeheerd achter
wanneer het strijkijzer op de stoomgenerator
is geplaatst en de netstekker op de
netvoeding is aangesloten.
Beschrijving (fig. A)
Uw 321200 Princess stoomstrijkijzer is
ontworpen voor droogstrijken en stoomstrijken.
Het apparaat is uitsluitend geschikt voor
huishoudelijk gebruik.
1. Strijkijzer
2. Aan/uit-schakelaar (strijkijzer)
3. Aan/uit-indicator (strijkijzer)
4. Stoomgenerator
5. Aan/uit-schakelaar (stoomgenerator)
6. Aan/uit-indicator (stoomgenerator)
9. Stoomknop
10. ”Stoom klaar”-indicator
11. ”Waterreservoir leeg”-indicator
12. Handgreep
13. Waterreservoir
14. Stoomslang
15. Zoolplaat
16. Strijkijzerhouder
Eerste gebruik
Reinig het apparaat.
Zie ”Reiniging en onderhoud”.
Draai de temperatuurregelknop naar de
positie ’max’ en strijk over een zachte,
vochtige doek om vervuilende stoffen van
de zoolplaat te verwijderen.
Let op: Indien u het appaaraat voor de eerste
keer inschakelt, kan even een lichte
rookontwikkeling en een specifieke geur
ontstaan. Dit is normaal.

NL
”Waterreservoir leeg”-indicator
(fig. A)
Indien het waterniveau in het waterreservoir
(13) te laag is, gaat de ”waterreservoir leeg”-
indicator (11) branden om aan te geven dat
het waterreservoir moet worden bijgevuld.
Let op: De stoomgenerator is beveiligd met
een veiligheidsventiel. Het deksel kan
uitsluitend van het waterreservoir worden
verwijderd wanneer de druk lager dan 1 bar is.
Schakel de stoomgenerator (4) uit met
behulp van de aan/uit-schakelaar (5).
Schakel het strijkijzer (1) uit met behulp
van de aan/uit-schakelaar (2).
Verwijder de netstekker uit het stopcontact.
Laat het apparaat volledig afkoelen.
Druk indien nodig op de stoomknop (9)
om de druk in het waterreservoir sneller te
verlagen.
Indien de druk voldoende is afgenomen,
waterreservoir (13).
Vul het waterreservoir (13) met de
aangegeven hoeveelheid water.
Zie ”Vullen van het waterreservoir”.
waterreservoir (12).
Aanwijzingen voor gebruik
Droogstrijken
Vul het waterreservoir (13) met water.
Plaats het strijkijzer (1) met de zoolplaat
(15) op de strijkijzerhouder (16).
Plaats de netstekker in het stopcontact.
Schakel het strijkijzer (1) in met behulp van
de aan/uit-schakelaar (2). De aan/uit-
indicator (3) gaat branden. Het strijkijzer
begint met opwarmen.
Stel de temperatuur in met behulp van de
heeft de zoolplaat (15) de gewenste
temperatuur bereikt. Het strijkijzer is klaar
voor gebruik.
Indien u het proces onderbreekt, plaats
dan het strijkijzer (1) met de zoolplaat (15)
op de strijkijzerhouder (16).
Zet de aan/uit-schakelaar (5) in positie ’O’
om de stoomgenerator (4) uit te schakelen.
De aan/uit-indicator (6) gaat uit.
Instellen van de temperatuur
(fig. A, C & D)
De temperatuur moet afhankelijk van het
textielsoort worden ingesteld.
Waarschuwing! Draai de temperatuurregel-
knop altijd naar de positie ’min’ voordat u de
netstekker in het stopcontact plaatst of de
netstekker uit het stopcontact verwijdert.
om de temperatuur te verhogen. De
gaat uit wanneer de zoolplaat (15) de
gewenste temperatuur heeft bereikt.
om de temperatuur te verlagen. De
gaat uit wanneer de zoolplaat (15) de
gewenste temperatuur heeft bereikt.
Label Textielsoort Temperatuur
(fig. D) (fig. C)
A Het textiel mag niet worden gestreken.
B Synthetisch (acryl, modacryl,
polypropyleen, polyurethaan) A
C Synthetisch
(acetaat, triacetaat) B
C Synthetisch (metaal, nylon,
polyester, viscose) B
C Zijde B
C Wol C (droogstrijken /
stoomstrijken)
C Katoen C (droogstrijken /
stoomstrijken)
D Linnen C (droogstrijken /
stoomstrijken)

NL
Reiniging en onderhoud
Waarschuwing!
- Verwijder voor reiniging en onderhoud de
netstekker uit het stopcontact en wacht
totdat het apparaat is afgekoeld.
- Dompel het apparaat voor reiniging niet
onder in water of andere vloeistoffen.
Voorzichtig!
- Gebruik geen bijtende of schurende
reinigingsmiddelen om het apparaat te
reinigen.
- Gebruik geen scherpe voorwerpen om het
apparaat te reinigen.
Controleer het apparaat regelmatig op
mogelijke schade.
Controleer het waterreservoir regelmatig
op mogelijke lekkage.
Reinig het apparaat na ieder gebruik:
- Leeg het waterreservoir.
- Verwijder kalkaanslag en andere
vervuilende stoffen van de zoolplaat met
een vochtige doek en een niet-schurend
reinigingsmiddel.
- Reinig de behuizing van het strijkijzer
met een zachte, vochtige doek.
- Reinig de behuizing van de stoomgenerator
met een zachte, vochtige doek.
Ontkalken van het apparaat
(fig. A & B)
Het apparaat moet regelmatig worden ontkalkt.
Indien het apparaat moet worden ontkalkt,
gebruik dan een ontkalkingsmiddel dat
geschikt is voor stoomstrijkijzers. Speciale
ontkalkingsmiddelen voor stoomstrijkijzers zijn
verkrijgbaar bij ons servicestation.
Let op: Princess is niet aansprakelijk voor
schade veroorzaakt door ontkalkingsmiddelen.
Schade veroorzaakt door het niet tijdig ontkalken
van het apparaat valt niet onder de garantie.
Voorzichtig!
- Wees voorzichtig bij het ontkalken van het
apparaat om beschadiging van meubels of
kleding te voorkomen.
- Gebruik geen azijn of azijnconcentraat om
het apparaat te ontkalken.
- Gebruik geen citroenzuur om het apparaat
te ontkalken.
Plaats na gebruik het strijkijzer (1) met de
zoolplaat (15) op de strijkijzerhouder (16).
Schakel de stoomgenerator (4) uit met
behulp van de aan/uit-schakelaar (5).
Schakel het strijkijzer (1) uit met behulp
van de aan/uit-schakelaar (2).
Verwijder de netstekker uit het stopcontact.
Laat het apparaat volledig afkoelen.
Stoomstrijken
Vul het waterreservoir (13) met water.
Plaats het strijkijzer (1) met de zoolplaat
(15) op de strijkijzerhouder (16).
Plaats de netstekker in het stopcontact.
Schakel het strijkijzer (1) in met behulp van
de aan/uit-schakelaar (2). De aan/uit-
indicator (3) gaat branden. Het strijkijzer
begint met opwarmen.
Schakel de stoomgenerator (4) in met
behulp van de aan/uit-schakelaar (5).
De aan/uit-indicator (6) gaat branden. De
stoomgenerator begint met het opwarmen
van het water.
Indien het water de gewenste temperatuur
heeft bereikt, gaat de ”stoom klaar”-indicator
(10) branden.
Stel de temperatuur in met behulp van de
heeft de zoolplaat (15) de gewenste
temperatuur bereikt. Het strijkijzer is klaar
voor gebruik.
Druk voor een stoomstoot tijdens gebruik
op de stoomknop (9).
Indien u het proces onderbreekt, plaats
dan het strijkijzer (1) met de zoolplaat (15)
op de strijkijzerhouder (16).
Plaats na gebruik het strijkijzer (1) met de
zoolplaat (15) op de strijkijzerhouder (16).
Schakel de stoomgenerator (4) uit met
behulp van de aan/uit-schakelaar (5).
Schakel het strijkijzer (1) uit met behulp
van de aan/uit-schakelaar (2).
Verwijder de netstekker uit het stopcontact.
Laat het apparaat volledig afkoelen.

9
NL
Opbergen
Berg het apparaat op in de originele
verpakking wanneer het niet in gebruik is.
Berg het apparaat op in rechtopstaande
positie om beschadiging van de zoolplaat
de voorkomen.
Berg het apparaat op op een droge en
vorstvrije plaats, buiten bereik van kinderen.
Disclaimer
Wijzigingen voorbehouden; specificaties
kunnen zonder opgave van redenen worden
gewijzigd.
waterreservoir (13).
Spoel het waterreservoir (13) met schoon
water.
Vul het waterreservoir (13) met een
ontkalkingsmiddel dat geschikt is voor
met water zoals aangegeven op de
verpakking van het ontkalkingsmiddel.
waterreservoir (13).
Plaats de netstekker in het stopcontact.
Schakel het strijkijzer (1) in met behulp van
de aan/uit-schakelaar (2).
Schakel de stoomgenerator (4) in met
behulp van de aan/uit-schakelaar (5).
Indien het water de gewenste temperatuur
heeft bereikt, gaat de ”stoom klaar”-
indicator (10) branden.
Houd de stoomknop (9) gedurende
ongeveer 2 minuten ingedrukt om het
ontkalkingsmiddel door het apparaat te
laten stromen.
Schakel de stoomgenerator (4) uit met
behulp van de aan/uit-schakelaar (5).
Schakel het strijkijzer (1) uit met behulp
van de aan/uit-schakelaar (2).
Verwijder de netstekker uit het stopcontact.
Laat het apparaat gedurende een nacht
staan om het ontkalkingsmiddel het
apparaat te laten ontkalken.
Spoel het waterreservoir (13) grondig met
schoon water.
waterreservoir (13).
Vul het waterreservoir (13) met schoon water.
waterreservoir (13).
Plaats de netstekker in het stopcontact.
Schakel het strijkijzer (1) in met behulp van
de aan/uit-schakelaar (2).
Schakel de stoomgenerator (4) in met
behulp van de aan/uit-schakelaar (5).
Indien het water de gewenste temperatuur
heeft bereikt, gaat de ”stoom klaar”-indicator
(10) branden.
Druk op de stoomkmop (9) om het schone
water door het apparaat te laten stromen.
Herhaal deze stap totdat het apparaat
volledig is gevuld met schoon water.

10
EN
Do not operate the appliance if your hands
are wet. Do not operate the appliance if
you are barefoot.
Do not touch moving parts. Keep long hair
and loose clothing away from the moving
parts.
Carefully guide the mains cable to make
sure that it does not hang over the edge of
a worktop and cannot be caught accidentally
or tripped over.
Never pull the mains cable to disconnect
the mains plug from the mains. Keep the
mains cable away from heat, oil and sharp
edges.
Switch off the appliance and wait for the
motor to stop running before disconnecting
the mains plug from the mains.
Do not remove any part or accessory when
the mains plug is connected to the mains.
Always first disconnect the mains plug from
the mains.
If the mains cable becomes damaged
during use, immediately disconnect the
mains plug from the mains. Do not touch
the mains cable before disconnecting the
mains plug from the mains.
Disconnect the mains plug from the mains
when the appliance is not in use, before
assembly or disassembly and before
cleaning and maintenance.
Safety of others
Do not allow children or any person
unfamiliar with these instructions to use the
appliance.
Do not allow children or animals to come
near the work area. Do not allow children
or animals to touch the appliance or mains
cable. Close supervision is necessary
when the appliance is used near children.
After use
Disconnect the mains plug from the mains
and let the appliance cool down before
leaving it unattended and before replacing,
cleaning or inspecting any parts of the
appliance.
Store the appliance in a dry place when not
access to stored appliances.
Congratulations!
You have purchased a Princess appliance.
Our aim is to provide quality products with
a tasteful design and at an affordable price.
We hope that you will enjoy this appliance for
many years.
Instructions for use
The instructions for use have been collected in
the corresponding section. Be familiar with the
safety instructions when you consult the
instructions for use.
Safety instructions
Warning!
- When using mains-powered appliances,
basic safety instructions must always be
followed to reduce the risk of fire, electric
shock and personal injury.
- Do not use the appliance near bathtubs,
showers, basins or other vessels containing
water.
Read the entire manual carefully before use.
The intended use is described in this
manual. The use of any accessory or the
performance of any operation with this
appliance other than recommended can
cause a risk of personal injury.
Keep this manual for future reference.
Children should be supervised to ensure
that they do not play with the appliance.
The use of this appliance by children or
persons with a physical, sensory, mental or
motorial disability, or lack of experience
and knowledge can give cause to hazards.
Persons responsible for their safety should
give explicit instructions or supervise the
use of the appliance.
Use
Switch off the appliance before connecting
to or disconnecting from the mains.
Always be careful when using the appliance.
Do not use the appliance outdoors.
Always protect the appliance from water or
excessive humidity.

11
EN
If the appliance is immersed in water or
other liquids, do not use the appliance again.
Always check clothing labels for ironing
instructions. Always observe the ironing
instructions.
Do not iron over zips, buttons, rivets in jeans,
etc. to prevent damage to the soleplate.
Beware of hot parts. Do not touch the
soleplate and the iron holder. The soleplate
and the iron holder become very hot during
use.
Be careful with hot steam to avoid burns.
Do not point the soleplate at yourself or
other persons during use.
The accessible surfaces of the appliance
can become very hot during use. Do not
touch the accessible surfaces. Only touch
the handgrips when the accessible surfaces
are hot.
touching the appliance.
when the iron is placed on the iron holder.
Do not leave the appliance unattended
when the iron is placed on the steam
generator and the mains plug is connected
to the mains.
U.K. Wiring instructions
The wires in the mains lead are coloured in
accordance with the following code:
BLUE NEUTRAL
BROWN LIVE
GREEN/YELLOW EARTH
As the colours of the wire in the mains lead of
this appliance may not correspond with the
colour markings identifying the terminals on
your plug, proceed as follows:
The wire which is coloured BLUE must be
connected to the terminal which is marked
with the letter N or coloured black.
The wire which is coloured BROWN must be
connected to the terminal which is marked
with the letter L or coloured red.
The wire which is coloured GREEN/YELLOW
must be connected to the terminal which is
marked with the letter E or (earth symbol) and
is coloured GREEN or GREEN/YELLOW.
Inspection and repairs
Before use, check the appliance for
damaged or defective parts. Inspect the
appliance for breakage of parts, damage
to switches and other conditions that can
affect the operation.
Do not use the appliance if any part is
damaged or defective.
Have any damaged or defective part
repaired or replaced by an authorised
repair agent.
Never attempt to remove or replace any
parts other than those specified in this
manual.
Before use, check the mains cable for wear
or damage.
Do not use the appliance if the mains cable
or mains plug is damaged or defective. If
the mains cable or mains plug is damaged
or defective, it must be replaced by the
manufacturer or an authorised repair agent.
Safety instructions for steam irons
Before use, always check that the mains
voltage is the same as the voltage on the
rating plate of the appliance.
Connect the appliance to an earthed wall
socket. If necessary, use an earthed
extension cable of a suitable diameter
(at least 3 x 1 mm2).
For additional protection, install a residual
current device (RCD) with a rated residual
operating current that does not exceed
30 mA.
The appliance is not intended to be
operated by means of an external timer or
separate remote-control system.
contact plugs of the mains cable and the
extension cable.
Always fully unwind the mains cable and
the extension cable.
Only use the appropriate connector to
operate the appliance.
Do not immerse the appliance in water or
other liquids. If the appliance is immersed
in water or other liquids, do not remove the
appliance with your hands. Immediately
remove the mains plug from the wall socket.

12
EN
Use
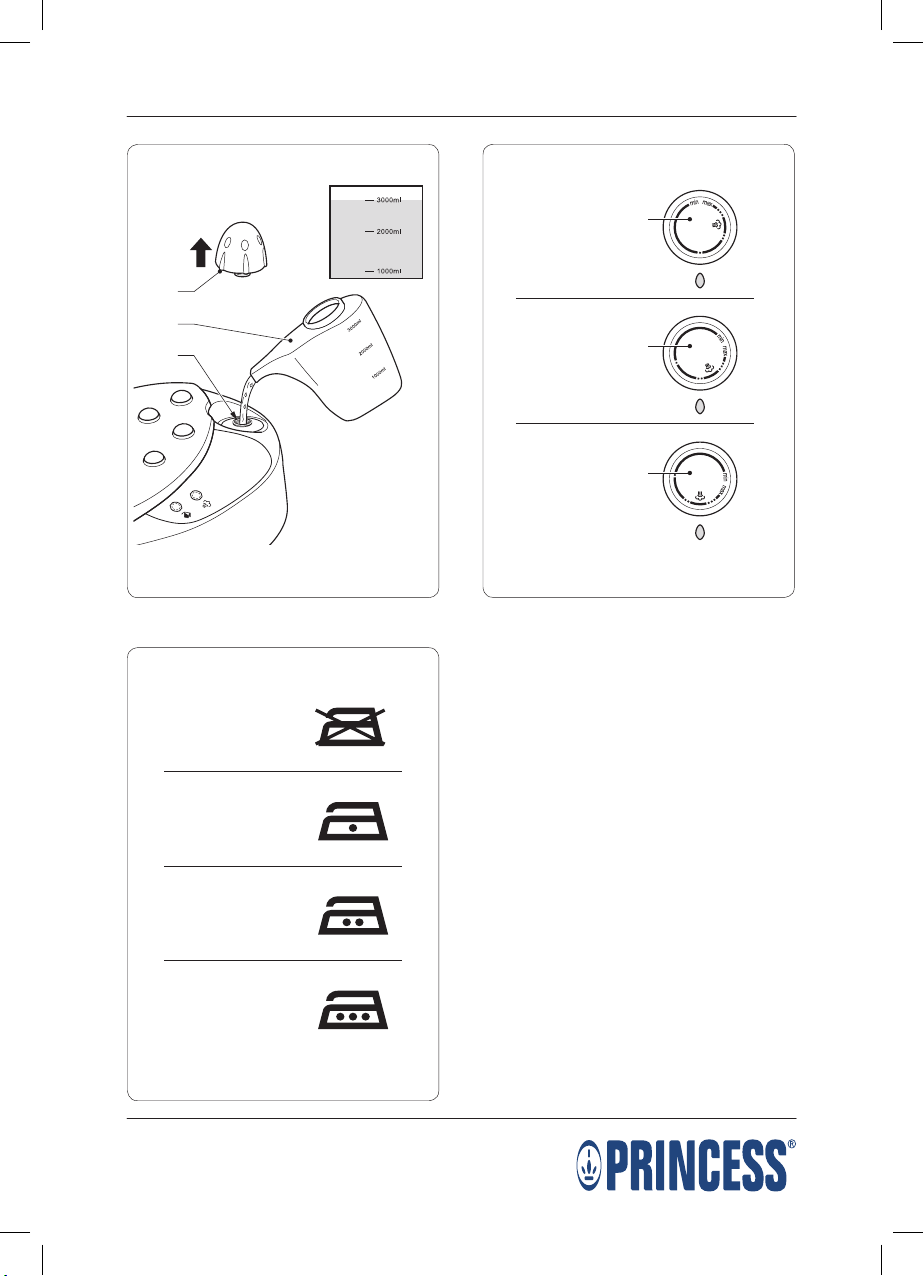
Filling the water reservoir (fig. B)
Warning!
- Before filling the water reservoir, always
switch off the appliance and remove the
mains plug from the wall socket.
- Do not open the filling aperture of the water
reservoir during use.
Caution!
- Always fill the water reservoir with water,
even if the steam function is not used.
- Do not exceed the maximum mark when
you fill the water reservoir.
- It is recommended to fill the water reservoir
with a mixture of 50% tap water and 50%
distilled water, especially in areas with hard
water, in order to prevent the formation of
excessive limescale.
- Only use cold water to fill the water reservoir.
- Do not use carbonated water or other liquids
to fill the water reservoir.
Place the appliance on a stable and flat
surface.
reservoir (13).
Fill the water reservoir (13) with water
(max. 1.5 litres).
(13).
Switching on and off (fig. A)
Iron
To switch on the iron (1), set the on/off switch
(2) to the ’I’ position. The on/off indicator (3)
comes on. The iron starts heating.
To switch off the iron (1), set the on/off
switch (2) to the ’O’ position. The on/off
indicator (3) goes off.
Steam generator
To switch on the steam generator (4),
set the on/off switch (5) to the ’I’ position.
The on/off indicator (6) comes on. The
steam generator starts to heat the water.
To switch off the steam generator (4),
set the on/off switch (5) to the ’O’ position.
The on/off indicator (6) goes off.
If a 13Amp (BS1363) plug is used, a 3Amp
(BS1362) fuse must be fitted, or if any other
type of plug is used, a 13Amp fuse must be
fitted, either in the plug or adaptor, or on the
distribution board.
Warning! This appliance must be earthed.
Description (fig. A)
Your 321200 Princess steam iron has been
designed for dry ironing and steam ironing.
The appliance is suitable for domestic use only.
1. Iron
2. On/off switch (iron)
3. On/off indicator (iron)
4. Steam generator
5. On/off switch (steam generator)
6. On/off indicator (steam generator)
9. Steam button
10. ”Steam ready” indicator
11. ”Water reservoir empty” indicator
12. Handgrip
13. Water reservoir
14. Steam hose
15. Soleplate
16. Iron holder
Initial use
Clean the appliance.
Refer to ”Cleaning and maintenance”.
To remove contaminants from the
soleplate, turn the temperature control dial
to the ’max’ position and iron over a soft,
damp cloth.
Note: If you switch on the appliance for the
first time, the appliance may emit a little smoke
and a characteristic smell for a short period.
This is normal operation.

13
EN
Note: The steam generator is protected with a
safety valve. The cover can only be removed
from the water reservoir when the pressure is
below 1 bar.
Switch off the steam generator (4) using
the on/off switch (5).
Switch off the iron (1) using the on/off
switch (2).
Remove the mains plug from the wall socket.
Allow the appliance to cool down completely.
If necessary, press the steam button (9) to
decrease the pressure in the water reservoir
more rapidly.
If the pressure has lowered sufficiently,
reservoir (13).
Fill the water reservoir (13) with the
indicated amount of water.
Refer to ”Filling the water reservoir”.
(12).
Hints for use
Dry ironing
Fill the water reservoir (13) with water.
Place the iron (1) with the soleplate (15)
onto the iron holder (16).
Insert the mains plug into the wall socket.
Switch on the iron (1) using the on/off
switch (2). The on/off indicator (3) comes on.
The iron starts heating.
Set the temperature using the temperature
the soleplate (15) has reached the required
temperature. The iron is ready for use.
If you interrupt the process, place the iron
(1) with the soleplate (15) onto the iron
holder (16).
After use, place the iron (1) with the
soleplate (15) onto the iron holder (16).
Switch off the steam generator (4) using
the on/off switch (5).
Switch off the iron (1) using the on/off
switch (2).
Remove the mains plug from the wall socket.
Allow the appliance to cool down completely.
Setting the temperature
(fig. A, C & D)
The temperature must be set according to the
type of fabric.
Warning! Always turn the temperature control
dial to the ’min’ position before inserting the
mains plug into the wall socket or removing
the mains plug from the wall socket.
clockwise to increase the temperature.
during the process. The temperature
(15) has reached the required temperature.
counterclockwise to decrease the
remains on during the process.
when the soleplate (15) has reached the
required temperature.
Label Type of fabric Temperature
(fig. D) (fig. C)
A The fabric must not be ironed.
B Synthetic (acryl, modacrylic,
polypropylene, polyurethane) A
C Synthetic (acetate, triacetate) B
C Synthetic (metal, nylon,
polyester, viscose) B
C Silk B
C Wool C (dry ironing /
steam ironing)
C Cotton C (dry ironing /
steam ironing)
D Linen C (dry ironing /
steam ironing)
”Water reservoir empty” indicator
(fig. A)
If the water level in the water reservoir (13) is
too low, the ”water reservoir empty” indicator
(11) will come on to indicate that the water
reservoir must be refilled.

14
EN
Regularly check the appliance for possible
damage.
Regularly check the water reservoir for
possible leakage.
Clean the appliance after each use:
- Empty the water reservoir.
- Remove limescale and other contaminants
from the soleplate with a damp cloth and
a non-abrasive cleaning agent.
- Clean the housing of the iron with a soft,
damp cloth.
- Clean the housing of the steam generator
with a soft, damp cloth.
Descaling the appliance (fig. A & B)
The appliance must be descaled regularly.
If the appliance must be descaled, use a
descaling agent that is suitable for steam irons.
Special descaling agents for steam irons are
available from our service station.
Note: Princess will not be responsible for any
damage caused by descaling agents.
Damage caused by not regularly descaling the
appliance is not covered by the guarantee.
Caution!
- Be careful when descaling the appliance to
prevent damage to furniture or clothing.
- Do not use vinegar or vinegar concentrate
to descale the appliance.
- Do not use citric acid to descale the
appliance.
reservoir (13).
Rinse the water reservoir (13) with clean
water.
Fill the water reservoir (13) with a descaling
the descaling agent with water as instructed
on the package of the descaling agent.
(13).
Insert the mains plug into the wall socket.
Switch on the iron (1) using the on/off switch
(2).
Switch on the steam generator (4) using
the on/off switch (5).
Steam ironing
Fill the water reservoir (13) with water.
Place the iron (1) with the soleplate (15)
onto the iron holder (16).
Insert the mains plug into the wall socket.
Switch on the iron (1) using the on/off
switch (2). The on/off indicator (3) comes
on. The iron starts heating.
Switch on the steam generator (4) using
the on/off switch (5). The on/off indicator
(6) comes on. The steam generator starts
to heat the water.
If the water has reached the required
temperature, the ”steam ready” indicator
(10) will come on.
Set the temperature using the temperature
the soleplate (15) has reached the required
temperature. The iron is ready for use.
To supply a shot of steam during use, press
the steam button (9).
If you interrupt the process, place the iron
(1) with the soleplate (15) onto the iron
holder (16).
After use, place the iron (1) with the
soleplate (15) onto the iron holder (16).
Switch off the steam generator (4) using
the on/off switch (5).
Switch off the iron (1) using the on/off switch
(2).
Remove the mains plug from the wall socket.
Allow the appliance to cool down completely.
Cleaning and maintenance
Warning!
- Before cleaning or maintenance, remove
the mains plug from the wall socket and
wait until the appliance has cooled down.
- Do not immerse the appliance in water or
any other liquids for cleaning.
Caution!
- Do not use aggressive or abrasive cleaning
agents to clean the appliance.
- Do not use sharp objects to clean the
appliance.

15
EN
If the water has reached the required
temperature, the ”steam ready” indicator
(10) will come on.
Keep the steam button (9) pressed for
approximately 2 minutes to allow the
descaling agent to flow through the
appliance.
Switch off the steam generator (4) using
the on/off switch (5).
Switch off the iron (1) using the on/off switch
(2).
Remove the mains plug from the wall socket.
Leave the appliance for one night to allow
the descaling agent to descale the appliance.
Thoroughly rinse the water reservoir (13)
with clean water.
reservoir (13).
Fill the water reservoir (13) with clean water.
(13).
Insert the mains plug into the wall socket.
Switch on the iron (1) using the on/off switch
(2).
Switch on the steam generator (4) using
the on/off switch (5).
If the water has reached the required
temperature, the ”steam ready” indicator
(10) will come on.
Press the steam button (9) to allow the
clean water to flow through the appliance.
Repeat this step until the appliance is
completely filled with clean water.
Storage
Store the appliance in the original packaging
when not in use.
Store the appliance in the upright position
to prevent damage to the soleplate.
Store the appliance in a dry and frost-free
place, out of the reach of children.
Disclaimer
Subject to change; specifications can be
changed without further notice.

16
FR
Faites attention en utilisant l’appareil.
N’utilisez pas l’appareil à l’extérieur.
Protégez toujours l’appareil de l’eau et
d’une humidité excessive.
N’utilisez pas l’appareil avec les mains
mouillées. N’employez pas l’appareil si
vous êtes pieds nus.
Ne touchez pas les parties mobiles.
N’approchez pas les cheveux longs et les
vêtements amples des pièces mobiles.
Guidez avec soin le cordon d’alimentation
pour vous assurer qu’il ne pend pas sur le
bord d’un plan de travail et qu’il ne peut
pas être happé ou faire trébucher
quelqu’un accidentellement.
Ne tirez jamais sur le cordon d’alimentation
pour débrancher la fiche secteur du secteur.
de la chaleur, de l’huile et des bords
tranchants.
Arrêtez l’appareil et attendez que le moteur
s’arrête avant de débrancher la fiche secteur
du secteur.
Ne retirez aucune pièce ou accessoire
lorsque la fiche secteur est branchée sur le
secteur. Débranchez toujours d’abord la
fiche secteur du secteur
Si le cordon d’alimentation est endommagé
pendant l’utilisation, débranchez
immédiatement la fiche secteur du secteur.
Ne touchez pas le cordon d’alimentation
avant d’avoir débranché la fiche secteur du
secteur.
Débranchez la fiche secteur du secteur
lorsque l’appareil n’est pas utilisé, avant le
montage ou le démontage de même
qu’avant le nettoyage ou l’entretien.
Sécurité des tiers
Ne laissez jamais aucun enfant ou aucune
personne non familiarisée avec ces
instructions utiliser cet appareil.
Ne laissez aucun enfant ou animal
s’approcher de la zone de travail. Ne
laissez aucun enfant ou animal toucher
l’appareil ou le cordon d’alimentation.
Redoublez de vigilance lorsque l’appareil
est utilisé à proximité d’enfants.
Félicitations!
Vous avez acheté un appareil Princess.
Nous souhaitons vous proposer des produits
de qualité associant un design raffiné et des
prix accessibles. Nous espérons que vous
profiterez longtemps de cet appareil.
Instructions d’utilisation
Les instructions d’utilisation ont été réunies
dans la section correspondante. Familiarisez-
vous avec les instructions de sécurité lorsque
vous consultez les instructions d’utilisation
Instructions de sécurité
Avertissement !
- Si vous utilisez un appareil électrique,
respectez les instructions de sécurité
élémentaires afin de réduire les risques
d’incendie, d’électrocution et de blessures.
- N’utilisez pas l’appareil à proximité d’une
baignoire, d’une douche, d’un lavabo ou
d’autres récipients contenant de l’eau.
Lisez avec soin le manuel complet avant
utilisation.
Le présent manuel décrit l’utilisation prévue
de l’appareil. L’emploi de tout accessoire
ou la réalisation de toute opération avec
cet appareil autres que ceux recommandés
est une source potentielle de blessures.
Conservez ce manuel pour référence
future.
Les enfants doivent toujours être surveillés
pour s’assurer qu’ils ne jouent pas avec
l’appareil.
L’emploi de cet appareil par des enfants
ou des personnes présentant un handicap
physique, sensoriel, mental ou moteur
voire ne disposant pas des connaissances
et de l’expérience nécessaires est
potentiellement dangereux. Les personnes
responsables de leur sécurité doivent leur
fournir des instructions explicites voire les
surveiller pour utiliser l’appareil.
Utilisation
Arrêtez l’appareil avant de le brancher ou
de le débrancher du secteur.

FR
L’appareil n’est pas conçu pour être utilisé
avec une minuterie externe ou un système
de télécommande séparé.
Assurez-vous que l’eau ne peut pas
s’infiltrer dans les contacts de prise du
cordon d’alimentation et de la rallonge.
Déroulez toujours complètement le cordon
d’alimentation et la rallonge.
Utilisez uniquement le connecteur
approprié pour faire fonctionner l’appareil.
Ne plongez pas l’appareil dans l’eau ou
autres liquides. Si l’appareil est plongé
dans l’eau ou d’autres liquides, ne retirez
pas l’appareil avec vos mains. Débranchez
immédiatement la fiche secteur de la prise
murale. Si l’appareil est plongé dans l’eau
ou autre liquide, ne l’utilisez pas à nouveau.
Consultez toujours les étiquettes des
vêtements pour connaître les instructions
de repassage. Respectez toujours les
instructions de repassage.
Ne repassez pas les fermetures éclair,
boutons, rivets des jeans, etc. pour éviter
d’endommager la semelle.
Attention aux pièces chaudes. Ne touchez
pas la semelle et le support du fer.
La semelle et le support du fer peuvent
devenir très chauds pendant l’usage.
Attention à la vapeur afin d’éviter les
brûlures. Ne pointez pas la semelle dans
votre direction ou vers autrui durant
l’utilisation.
Les surfaces accessibles de l’appareil
peuvent devenir très chaudes pendant
l’utilisation. Ne touchez pas les surfaces
accessibles. Touchez seulement les
poignées si les surfaces accessibles sont
chaudes.
Assurez-vous d’avoir les mains sèches
avant de toucher l’appareil.
Assurez-vous que l’appareil ne peut pas
tomber lorsque le fer est placé sur son
support.
Ne laissez pas l’appareil sans surveillance
si le fer se trouve sur le générateur de
vapeur et si la fiche est branchée sur le
secteur.
Après utilisation
Débranchez la fiche secteur du secteur et
laissez l’appareil refroidir avant de le laisser
sans surveillance et avant de remplacer,
de nettoyer ou d’inspecter l’une quelconque
de ses pièces.
Rangez l’appareil dans un endroit sec
lorsqu’il n’est pas utilisé. Assurez-vous que
les enfants ne puissent pas accéder aux
appareils rangés.
Inspection et réparations
Avant d’utiliser l’appareil, vérifiez qu’il n’est
pas endommagé et qu’aucune pièce n’est
défectueuse. Vérifiez si l’appareil présente
des pièces cassées, des boutons
endommagés ou d’autres dégâts
susceptibles d’affecter son fonctionnement.
N’utilisez pas l’appareil si une pièce est
endommagée ou défectueuse.
Faites réparer ou remplacer toute pièce
endommagée ou défectueuse par un
réparateur agréé.
N’essayez jamais d’enlever ou de changer
des pièces autres que celles spécifiées
dans ce manuel.
Avant utilisation, vérifiez si le cordon
d’alimentation est usé ou endommagé.
N’utilisez pas l’appareil si le cordon
d’alimentation ou la fiche secteur est
endommagé ou défectueux. Si le cordon
d’alimentation ou la fiche secteur est
endommagé ou défectueux, il doit être
remplacé par le fabricant ou par un
réparateur agréé.
Instructions pour les fers à vapeur
Avant toute utilisation, vérifiez que la tension
du secteur correspond à celle indiquée sur
la plaque signalétique de l’appareil.
Connectez l’appareil à une prise murale
mise à la terre. Si nécessaire, vous pouvez
utiliser une rallonge d’un diamètre adapté
(au moins 3 x 1 mm2).
Pour maximiser la protection, installez un
dispositif de courant résiduel (RCD)
présentant une intensité de service résiduelle
nominale inférieure ou égale à 30 mA.

FR
Attention !
- Remplissez toujours le réservoir d’eau même
si la fonction de vapeur n’est pas utilisée.
- Ne dépassez pas le repère maximum
lorsque vous remplissez le réservoir d’eau.
- Nous vous recommandons de remplir le
réservoir d’eau avec un mélange de 50 %
d’eau du robinet et de 50 % d’eau distillée,
spécialement dans les zones dont l’eau est
dure, afin d’éviter la formation excessive de
tartre
- Utilisez uniquement de l’eau froide pour
remplir le réservoir d’eau.
- N’utilisez pas de l’eau gazeuse ou autres
liquides pour remplir le réservoir.
Placez l’appareil sur une surface plane et
stable.
(13).
Remplissez le réservoir d‘eau (13) avec de
l’eau (max. 1,5 litres).
Mise en marche et arrêt (fig. A)
Fer
Pour mettre le fer en marche, positionnez
l’interrupteur marche/arrêt (1) sur ’I’.
Le témoin marche/arrêt (3) s’allume.
Le fer commence à chauffer.
Pour arrêter le fer, positionnez l’interrupteur
marche/arrêt (1) sur ’O’. Le témoin
marche/arrêt (3) s’éteint.
Générateur de vapeur
Pour mettre le générateur de vapeur (4)
en marche, positionnez l’interrupteur
marche/arrêt (5) sur ’I’. Le témoin
marche/arrêt (6) s’allume. Le générateur
de vapeur commence à chauffer l’eau.
Pour arrêter le générateur de vapeur (4),
positionnez l’interrupteur marche/arrêt (5)
sur ’O’. Le témoin marche/arrêt (6) s’éteint.
Description (fig. A)
Votre fer à vapeur Princess 321200 a été conçu
pour le repassage à sec et à la vapeur.
L’appareil est réservé à un usage domestique.
1. Fer
2. Interrupteur marche/arrêt (fer)
3. Témoin marche/arrêt (fer)
4. Générateur de vapeur
5. Interrupteur marche/arrêt
(générateur de vapeur)
6. Témoin marche/arrêt
(générateur de vapeur)
9. Bouton de vapeur
10. Témoin ”vapeur prête”
11. Témoin ”réservoir d’eau vide”
12. Poignée
13. Réservoir d’eau
14. Flexible de vapeur
15. Semelle
16. Support de fer
Utilisation initiale
Nettoyez l’appareil.
Voir ”Nettoyage et entretien”.
Pour éliminer toutes les traces de la semelle,
positionnez la molette de température sur
’max’ et repassez un chiffon doux et mouillé.
Remarque : pour sa première mise en marche,
l’appareil peut émettre une légère fumée et
une odeur caractéristique pendant une période
brève. C’est normal.
Utilisation
Remplissage du réservoir d’eau
(fig. B)
Avertissement !
- Avant de remplir le réservoir d’eau, arrêtez
toujours l’appareil et débranchez la fiche
secteur de la prise murale.
- N’ouvrez pas l’ouverture de remplissage
du réservoir d’eau pendant l’utilisation.

19
FR
Remarque : le générateur de vapeur est
protégé par une soupape de sécurité. Le cache
peut être retiré du réservoir d’eau uniquement
si la pression est inférieure à 1 bar.
Arrêtez le générateur de vapeur (4) avec
l’interrupteur marche/arrêt (5).
Arrêtez le fer (1) avec l’interrupteur
marche/arrêt (2).
Débranchez la fiche secteur de la prise
murale.
Laissez l’appareil refroidir complètement.
Si nécessaire, appuyez sur le bouton de
vapeur (9) afin de réduire plus rapidement
la pression dans le réservoir d’eau.
Si la pression a suffisamment baissé,
(13).
Remplissez le réservoir d’eau (13) avec
la quantité d’eau indiquée. Consultez
”Remplissage du réservoir d’eau”.
Conseils d’utilisation
Repassage à sec
Remplissez le réservoir (13) avec de l’eau.
Placez le fer (1) avec la semelle (15) sur le
support du fer (6).
Insérez la fiche secteur dans la prise murale.
marche/arrêt (2). Le témoin marche/arrêt
(3) s’allume. Le fer commence à chauffer.
Réglez la température avec la molette de
la semelle (15) a atteint la température
requise. Le fer est prêt à être utilisé.
Si vous interrompez le processus, placez
le fer (1) avec la semelle (15) sur le support
du fer (6).
Après utilisation, placez le fer (1) avec la
semelle (15) sur le support du fer (6).
Arrêtez le générateur de vapeur (4) avec
l’interrupteur marche/arrêt (5).
Arrêtez le fer (1) avec l’interrupteur
marche/arrêt (2).
Débranchez la fiche secteur de la prise
murale.
Laissez l’appareil refroidir complètement.
Réglage de la température
(fig. A, C & D)
La température doit être réglée en fonction du
type de tissu.
Avertissement ! Positionnez toujours la
molette de température sur ’min’ avant
d’insérer la fiche secteur dans la prise murale
ou de la retirer.
le sens horaire pour augmenter la
reste allumé durant le processus. Le témoin
semelle (15) atteint la température requise.
le sens antihoraire pour réduire la
reste allumé durant le processus. Le témoin
semelle (15) atteint la température requise.
Étiquette Type de tissu Température
(fig. D) (fig. C)
A Le tissu ne doit pas être repassé.
B Synthétiques (acrylique,
modacrylique, polypropylène,
polyuréthane) A
C Synthétiques
(acétate, triacétate) B
C Synthétiques (métal, nylon,
polyester, viscose) B
C Soie B
C Laine C(repassage à
sec / à vapeur)
C Coton C (repassage à
sec / à vapeur)
D Lin C (repassage à
sec / à vapeur)
Témoin ”réservoir d’eau vide”
(fig. A)
Si le niveau d’eau dans le réservoir d’eau (13)
est trop faible, le témoin ”réservoir d’eau vide”
(11) s’allume afin d’indiquer que le réservoir
d’eau doit être rempli.

20
FR
Contrôlez régulièrement les éventuels
dommages sur l’appareil.
Contrôlez régulièrement si le réservoir
d’eau présente des fuites.
Nettoyez l’appareil après chaque utilisation :
- Videz le réservoir d’eau.
- Éliminez le tartre et les autres produits
contaminants de la semelle avec un
chiffon humide et un produit nettoyant
non abrasif.
- Nettoyez le boîtier du fer à l’aide d’un
chiffon doux et humide.
- Nettoyez le boîtier du générateur de
vapeur à l’aide d’un chiffon doux et
humide.
Détartrage de l’appareil (fig. A & B)
L’appareil doit être détartré régulièrement.
Si l’appareil doit être détartré, utilisez un agent
détartrant adapté aux fers à vapeur. Les agents
détartrants spéciaux pour les fers à vapeur sont
disponibles auprès de notre station d’entretien.
Remarque : Princess décline toute
responsabilité pour tout dommage occasionné
par les agents détartrants. Les dommages
causés par l’absence de détartrage régulier de
l’appareil ne sont pas couverts par la garantie.
Attention !
- Attention lors du détartrage de l’appareil
à ne pas endommager le mobilier ou les
vêtements.
- N’utilisez ni vinaigre, ni concentré de
vinaigre pour détartrer l’appareil.
- N’utilisez pas d’acide citrique pour détartrer
l’appareil.
(13).
Rincez le réservoir d’eau (13) avec de
l’eau propre.
Remplissez le réservoir d’eau (13) avec un
agent détartrant adapté aux fers à vapeur.
selon les instructions de l’emballage de
l’agent détartrant.
Insérez la fiche secteur dans la prise murale.
l’interrupteur marche/arrêt (2).
Repassage à la vapeur
Remplissez le réservoir (13) avec de l’eau.
Placez le fer (1) avec la semelle (15) sur le
support du fer (6).
Insérez la fiche secteur dans la prise murale.
marche/arrêt (2). Le témoin marche/arrêt
(3) s’allume. Le fer commence à chauffer.
marche avec l’interrupteur marche/arrêt (5).
Le témoin marche/arrêt (6) s’allume. Le
générateur de vapeur commence à chauffer
l’eau.
Si l’eau a atteint la température requise,
le témoin ”vapeur prête” (10) s’allume.
Réglez la température avec la molette de
la semelle (15) a atteint la température
requise. Le fer est prêt à être utilisé.
Pour donner un coup de vapeur durant
l’utilisation, appuyez sur le bouton de vapeur
(9).
Si vous interrompez le processus, placez
le fer (1) avec la semelle (15) sur le support
du fer (6).
Après utilisation, placez le fer (1) avec la
semelle (15) sur le support du fer (6).
Arrêtez le générateur de vapeur (4) avec
l’interrupteur marche/arrêt (5).
Arrêtez le fer (1) avec l’interrupteur
marche/arrêt (2).
Débranchez la fiche secteur de la prise
murale.
Laissez l’appareil refroidir complètement.
Nettoyage et entretien
Avertissement !
- Avant le nettoyage ou l’entretien, retirez la
fiche secteur de la prise murale et attendez
que l’appareil refroidisse.
- Ne plongez pas l’appareil dans l’eau ou
autres liquides pour le nettoyer.
Attention !
- N’utilisez pas de produits de nettoyage
agressifs ou abrasifs pour nettoyer l’appareil.
- Ne nettoyez pas l’appareil avec des objets
coupants.
Table of contents
Languages:
Other Princess Iron manuals


