Princess 2388 User manual
New Classics 4-slice Toaster
Article 2388
• Gebruiksaanwijzing • User's instructions • Mode d'emploi
• Bedienungsanleitung • Instrucciones de uso • Istruzioni per l'uso
• Bruksanvisning • Brugsanvisning • Bruksanvisning
• Käyttöohje • Instruções de uso •
ϡΪΨΘδϤϟϞϴϟΩ
Δ
ϗΎτΑϥΎϤπϟ
˯ήθϟΦϳέΎΗήΟΎΘϟϞϳΩϮϤϟϱήΘθϤ
ϟ

1
2
5
3 4
ΓΪΤΘϤϟΔϜϠϤϤϟϥΎϤπϟρϭήηΔϣΪΨΘδϤϟΩϮϤϟϭϊϴϨμΘϟϲϓΐϴϋϱϷΓΪΣϭΔϨγ˱ΔϠϣΎϛϥΎϤπϟΔϗΎτΑ˯ϞϣϝΎΣϲϓϻ·˱ΎΤϟΎλϥΎϤπϟϥϮϜϳϻϭˬίΎϬΠϟϡΪΨΘγ˯ϮγϦϋΔΠΗΎϨϟΏϮϴόϟϥΎϤπϟϲτϐϳϻϭϞϜθΑϪϜϓϭίΎϬΠϟρϮϘγϦϋΞΗΎϨϟϞτόϟϭˬϪΑκΧήϤϟήϴϏΔϴϋΎΒΘΘγϻέήοϷϥΎϤπϟϲτϐϳϻϭ

1
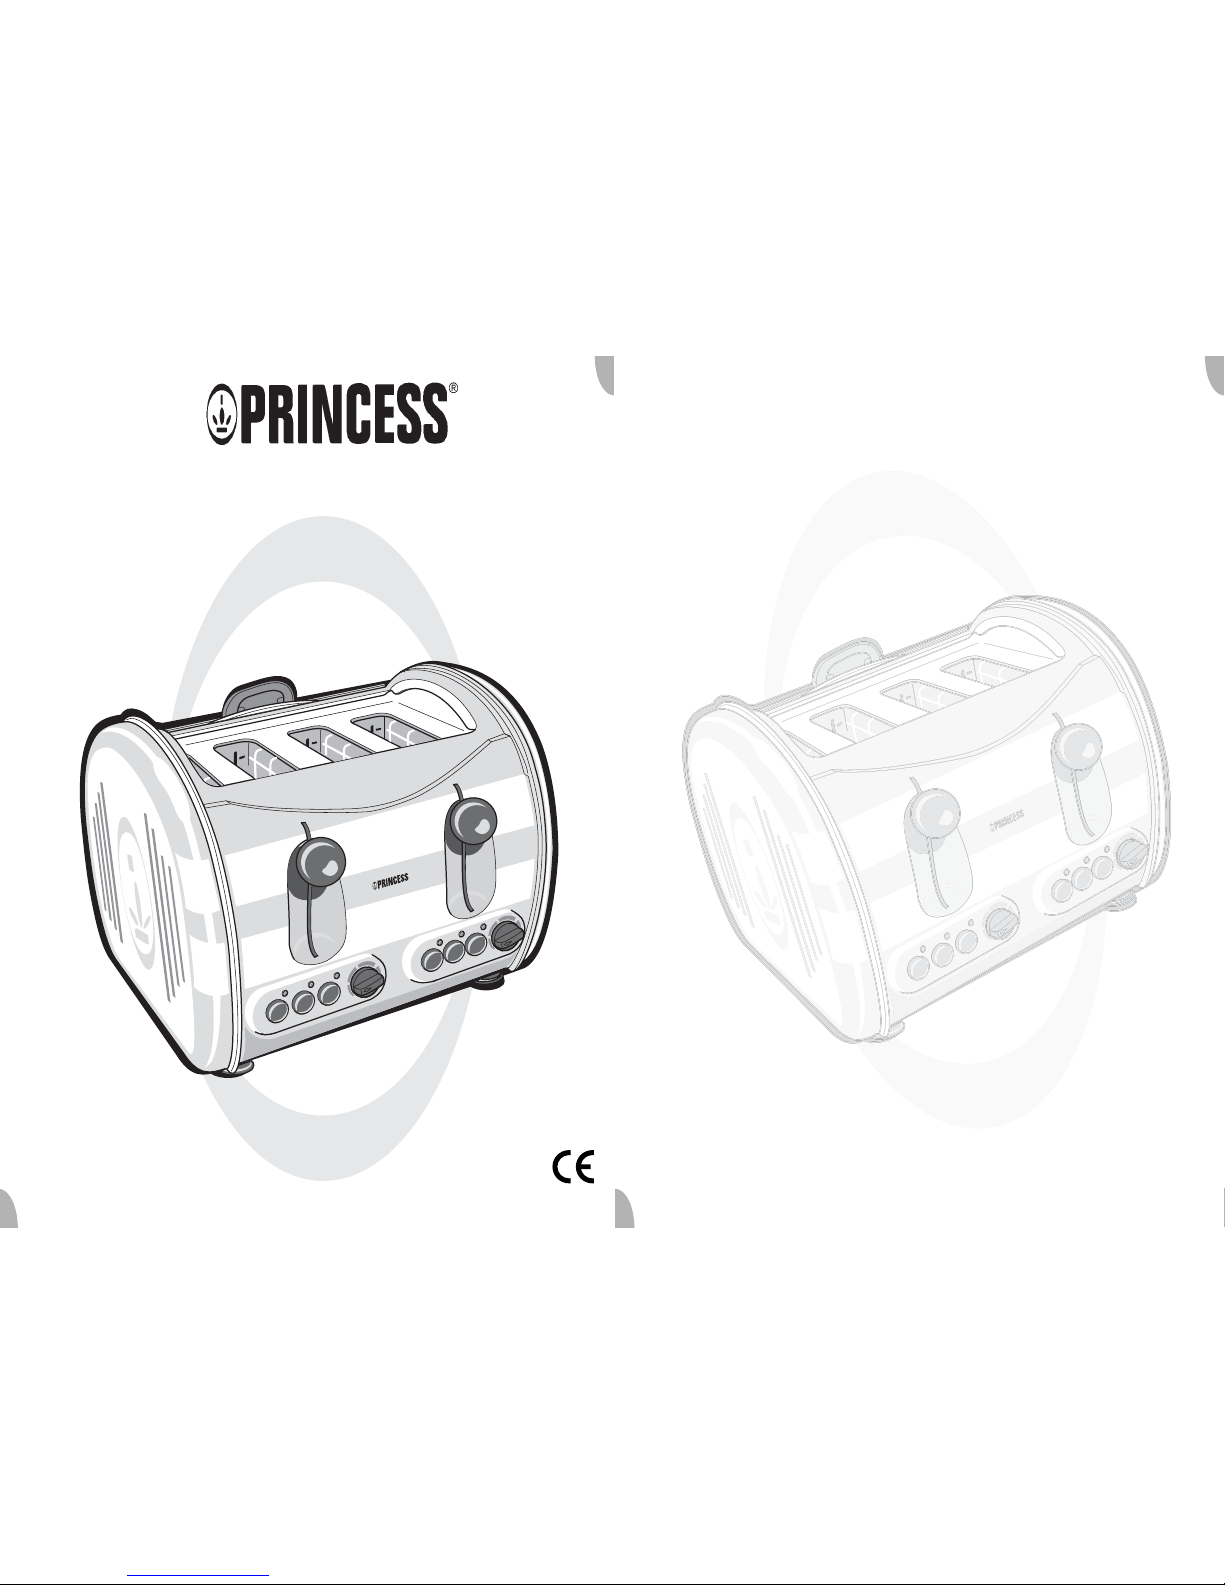
New Classics 4-slice Toaster Article 2388
Algemeen
Deze fraaie Princess New Classics 4-slice
Toaster is onderdeel van onze New
Classics-productlijn, die is uitgevoerd in
robuust verchroomd staal. Compleet
geleverd met tostihouders en een
opzetrekje voor broodjes en stokbrood.
Deze uitgekiende Toaster met een
vermogen van 1350 - 1500 W kan snel en
gemakkelijk voor vier personen tegelijk
boterhammen of tosti's roosteren. Een
uitkomst voor het hele gezin! Ook kunt u er
broodjes of stokbrood mee roosteren met
behulp van het meegeleverde opzetrekje.
Het apparaat is verder uitgerust met een
stofdeksel, een stop- een opwarm- en een
ontdooiknop, een bruiningsregelaar, een
broodlift en een centreringsmechanisme.
Het centreringsmechanisme zorgt ervoor
dat het brood altijd op de juiste plaats in de
gleuf van het apparaat zit. U sluit het
apparaat aan op het elektriciteitsnet (220 -
240 V).
Werking en bediening
Zie figuur 1.
Het apparaat bevat de volgende
onderdelen:
1 Stofwerend deksel
2 Broodlift
3 Snoer met stekker
4 Bruiningsregelaar (links en rechts)
5 Ontdooiknop (links en rechts)
6 Opwarmknop (links en rechts)
7 Stopknop (links en rechts)
8 Opzetrekje voor broodjes en stokbrood
9 Tostihouders (2)
Aan de achterzijde van het apparaat
bevindt zich de kruimellade voor het
verwijderen van achtergebleven brood-
kruimels.
Voor het eerste gebruik
1 Verwijder voor het eerste gebruik de
gehele verpakking.
2 Nu kunt u beginnen met het roosteren
van:
• brood;
•tosti's;
• broodjes/stokbrood (met het opzet-
rekje).
Brood roosteren
Brood roostert u door het in de gleuven
van het apparaat te stoppen en het
apparaat in werking te stellen.
• Druk het brood niet met geweld in de
gleuven. Hierdoor kan het vastraken.
Is het brood te groot, snijd het dan
eerst op maat. Snijd het brood niet te
klein, omdat u het dan niet meer goed
uit de gleuf kunt halen.
• U kunt het apparaat altijd tussentijds
stoppen door op de stopknop te
drukken. Het apparaat stopt hierdoor
met roosteren en de broodlift springt
omhoog.
1 Steek de stekker in een geaard stop-
contact.
2 Open het stofwerend deksel.
3 Plaats het brood in de gleuven van het
apparaat.
4 Stel de gewenste bruiningsgraad in met
de bruiningsregelaar.
5 Druk de broodlift met de hendel naar
beneden om het roosteren te starten.
Het apparaat zorgt ervoor dat het brood
goed gecentreerd in de gleuven staat.
6 Het apparaat stopt automatisch met
roosteren en de broodlift gaat automa-
tisch omhoog. Haal het geroosterde
brood uit het apparaat.
7 Trek bij einde gebruik de stekker uit het
stopcontact en laat het apparaat af-
koelen. Sluit het deksel.

2New Classics 4-slice Toaster Article 2388
Bruiningsgraad instellen
Zie figuur 2.
De bruiningsgraad stelt u in met de
bruiningsregelaar. Draait u deze met de
klok mee dan wordt het brood donkerder
geroosterd:
• de linkerstand betekent net knapperig
• in het midden goudgeel
• de rechterstand betekent donkerbruin
geroosterd.
8 Probeer verschillende standen uit om
het door u gewenste resultaat te
bereiken. Start hierbij altijd op de laag-
ste stand. Houd er rekening mee dat de
toestand van het brood invloed heeft op
het resultaat: droog en oud brood gaan
sneller, vers en diepvriesbrood hebben
wat meer tijd nodig.
Brood opwarmen/ontdooien
Zie figuur 3.
Geroosterde boterhammen die afgekoeld
zijn kunt u opnieuw verwarmen. Ook kunt u
nog bevroren boterhammen ontdooien.
Volg hierbij de instructies onder ‘Brood
roosteren’ en druk na stap 5 op de
onwarmknop of de ontdooiknop.
Tosti's roosteren
Tosti's worden gewoonlijk gemaakt van
brood en kaas. U kunt naar eigen keuze
ingrediënten toevoegen als ham, bacon,
ui, salami, ananas, tomaat, gerookte zalm,
etc.
Zie figuur 4.
1 Steek de stekker in een geaard stop-
contact.
2 Open het stofwerend deksel.
3 Stop de tosti van uw keuze in de tosti-
houder en klem de handvatten tegen
elkaar aan.
4 Plaats de gevulde tostihouder in een
van de gleuven van het apparaat.
5 Rooster de tosti op de normale wijze.
Volg hierbij de instructies vanaf punt 4
onder 'Brood roosteren'.
Broodjes/stokbrood roosteren
met het opzetrekje
Broodjes en stokbrood die te breed zijn
voor de gleuven van het apparaat, kunt u
roosteren met behulp van het opzetrekje.
Hierbij plaatst u het opzetrekje bovenop
het apparaat.
Zie figuur 5.
1 Steek de stekker in een geaard stop-
contact.
2 Open het stofwerend deksel.
3 Plaats het opzetrekje bovenop het
apparaat.
4 Leg de broodjes/het stokbrood op het
rekje.
5 Rooster het brood op de normale wijze
(onder 'Brood roosteren', vanaf punt 4),
waarbij u eventueel de broodjes/het
stokbrood tussentijds kunt omdraaien
voor een gelijkmatige bruining.

3
New Classics 4-slice Toaster Article 2388
Onderhoud
en reinigen
Reinig het apparaat en de bijbehorende
onderdelen na ieder gebruik. Zo voorkomt
u dat voedselresten aan het apparaat
vastkoeken.
• Zorg ervoor dat er geen vocht aan de
binnenkant van het apparaat komt.
• Dompel het apparaat nooit onder in
water of een andere vloeistof. Mocht
dit wel gebeuren, gebruik het apparaat
dan niet meer en gooi het weg.
• Gebruik geen schurende of
agressieve middelen.
Kruimellade verwijderen
Zie figuur 5.
1 Haal, als dat nog niet gebeurd is, altijd
eerst de stekker uit het stopcontact.
2 Laat het apparaat afkoelen.
3 Trek de kruimellade aan de achterzijde
uit het apparaat en verwijder de achter-
gebleven broodkruimels.
4 Was de losse onderdelen (kruimellade,
tostihouders en opzetrekje) met water
en zeep. Droog na met een droge doek.
5 Reinig de buitenzijde van het apparaat
met het speciaal daarvoor bijgeleverde
microvezeldoekje. Gebruik dit doekje
alleen droog.
6 Plaats de kruimellade terug in het appa-
raat.
7 Zet het apparaat met gesloten deksel
op een veilige plaats weg.
Veiligheid
Algemeen
• Lees de gebruiksaanwijzing goed
door en bewaar deze zorgvuldig.
• Gebruik dit apparaat alleen zoals
beschreven in deze gebruiks-
aanwijzing.
• Gebruik dit apparaat alleen voor
huishoudelijke doeleinden.
• Houd het apparaat buiten het bereik
van kinderen of personen die er niet
goed mee om kunnen gaan.
• Laat reparaties uitvoeren door een
gekwalificeerde monteur. Probeer
nooit zelf het apparaat te repareren.
Warmte en elektriciteit
• Controleer voordat u het apparaat
gebruikt of de netspanning
overeenkomt met de aangegeven
netspanning op het typeplaatje van
het apparaat.
• Gebruik een geaard stopcontact.
• Haal altijd de stekker uit het
stopcontact wanneer u het apparaat
niet gebruikt.
• Als u de stekker uit het stopcontact
neemt, trek dan aan de stekker, niet
aan het snoer.
• Controleer regelmatig of het snoer van
het apparaat nog intact is. Gebruik het
apparaat niet als het snoer beschadi-
gingen vertoont. Laat een beschadigd
snoer vervangen door een
gekwalificeerde monteur.
• Zorg ervoor dat het apparaat en het
snoer niet in aanraking komen met
hittebronnen, zoals een hete
kookplaat of open vuur.

4New Classics 4-slice Toaster Article 2388
• Zorg ervoor dat het apparaat, het
snoer en de stekker niet in aanraking
komen met water.
• Wees voorzichtig met het vastpakken
van onderdelen en het apparaat zelf.
Laat het apparaat eerst afkoelen. Het
apparaat en de onderdelen worden
namelijk heet tijdens het gebruik. Ook
de behuizing van het apparaat wordt
heet, omdat de behuizing de warmte
goed geleidt.
• Het apparaat moet zijn warmte kwijt
kunnen om brandgevaar te
voorkomen. Zorg er dus voor dat het
apparaat voldoende vrij is en niet in
contact kan komen met brandbaar
materiaal. Het apparaat mag niet
worden bedekt.
Tijdens gebruik
• Gebruik het apparaat nooit buiten.
• Plaats het apparaat op een stabiele en
vlakke ondergrond, op een plaats
waar het niet kan vallen.
• Laat het snoer niet over de rand van
een aanrecht, werkblad of tafel
hangen.
• Zorg ervoor dat uw handen droog zijn
als u het apparaat, het snoer of de
stekker aanraakt.
• Gebruik het apparaat nooit in vochtige
ruimten.
• Schakel het apparaat uit en verwijder
de stekker uit het stopcontact als u
tijdens het gebruik storingen
ondervindt, het apparaat gaat
reinigen, een accessoire aanbrengt of
verwijdert, of klaar bent met het
gebruik.
• Gebruik het apparaat nooit met een
afgesloten deksel.
• Zorg dat kleine kinderen niet bij het
apparaat kunnen. Het apparaat en de
onderdelen kunnen tijdens het
gebruik heet worden.
• Verwijder klemgeraakt brood nooit
met een mes of ander scherp
voorwerp. Indien het brood klem raakt
in het rooster, trek dan eerst de
stekker uit het stopcontact voordat u
het brood verwijdert.
• Pak het apparaat niet op wanneer het
in het water is gevallen. Neem direct
de stekker uit het stopcontact.
Gebruik het apparaat niet meer.
• Maak het apparaat na gebruik grondig
schoon (zie hoofdstuk ‘Onderhoud en
reinigen’).
Milieu
Werp verpakkingsmateriaal zoals plastic
en dozen in de daarvoor bestemde
containers.
Aan het eind van de levensduur dient het
apparaat op een verantwoorde wijze
afgevoerd te worden. Neem hiervoor
contact op met uw gemeente of
afvalverwerkingsinstantie. U kunt het
apparaat ook inleveren bij de winkelier.

5
New Classics 4-slice Toaster Article 2388
General
This attractive Princess New Classics 4-
slice Toaster is one of the products in our
New Classics range, all of which are
finished in sturdy chrome-plated steel. The
toaster is supplied complete with tosti
holders and a rack accessory to toast rolls
and French bread.
This sophisticated 1350 -1500 W toaster
rapidly toasts slices of bread or tostis for 4
people at the same time, and is very
simple to use – making it a boon for the
entire family! The rack accessory also
enables you to toast rolls or French bread.
In addition, the appliance is equipped with
a dustproof cover, stop, reheating and
thawing buttons, a browning control, a
bread lift, and a centring mechanism. The
centring mechanism ensures that slices of
bread are always correctly positioned in
the slots. Connect the appliance to a 220 -
240 V mains power supply.
Operation and
controls
See Figure 1.
The appliance is equipped with the
following features:
1 Dustproof cover
2 Bread lift
3 Power cord and plug
4 Browning control (left and right)
5 Thawing button (left and right)
6 Reheating button (left and right)
7 Stop button (left and right)
8 Rack accessory for rolls and French
bread
9 Tosti holders (2)
A removable crumb tray at the rear of the
appliance collects any loose breadcrumbs
for easy cleaning.
Before use for the first time
1 Remove all packaging materials before
using the appliance for the first time.
2 You can now toast any of the following:
• slices of bread;
•tostis;
• rolls/French bread (using the rack
accessory).
Toasting bread
Toast slices of bread by dropping them into
the slots and switching on the appliance.
• Do not force the slices into the slots;
they could become stuck. Slices of
bread that are too high for the
appliance should be cut to size before
toasting. However, slices that are too
small will be difficult to remove from
the slots.
• You can break off the toasting cycle
by pressing the stop button. The
appliance will stop toasting, and the
bread lift will rise.
1 Put the plug into an earthed wall socket.
2 Open the dustproof cover.
3 Drop the slices in the toaster’s slots.
4 Adjust the browning control to the
required degree of browning.
5 Press the lever downwards to lower the
bread lift and start the toasting. The
appliance ensures that the slices are
correctly centred in the slots.
6 The appliance will automatically stop
toasting, and the bread lift will
automatically rise. Remove the toast
from the appliance.
7 When you have finished using the
toaster remove the plug from the wall
socket and allow the appliance to cool.
Close the cover.

6New Classics 4-slice Toaster Article 2388
Adjusting the degree of browning
See Figure 2.
The degree of browning can be varied with
the browning control. Turning the control
clockwise will yield browner toast:
• with the control in the left position the
toast will be just crisp
• with the control in the mid position the
toast will be yellowish-gold
• with the control in the right position the
toast will be dark-brown.
8 Try different settings to obtain the
required result. Always begin with the
control in the lowest setting. Bear in
mind that the result will depend on the
nature of the bread: dry or older bread
will toast more rapidly, fresh or deep-
frozen bread will require a little more
time.
Reheating toast/thawing bread
See Figure 3.
You can use the appliance to reheat cold
toast. You can also use it to thaw slices of
bread. Follow the instructions under
‘Toasting bread’ and after step 5 press the
reheating or thawing button.
Toasting tostis
Tostis are usually prepared from bread and
cheese. If you so wish, you can also add
ingredients such as ham, bacon, onion,
salami, pineapple, tomato, smoked
salmon, etc.
See Figure 4.
1 Put the plug into an earthed wall socket.
2 Open the dustproof cover.
3 Put the tosti in the tosti holder and
clamp the grips together.
4 Fit the tosti holder containing the tosti in
one of the toaster’s slots.
5 Toast the tosti in the normal manner, in
accordance with the 'Toasting bread'
instructions from step 4 onwards.
Toasting rolls/French bread
with the rack accessory
Rolls and French bread that are too wide
for the toaster’s slots can be toasted using
the rack accessory. Fit the rack accessory
to the top of the toaster.
See Figure 5.
1 Put the plug into an earthed wall socket.
2 Open the dustproof cover.
3 Fit the rack accessory to the top of the
toaster.
4 Lay the rolls/French bread on the rack.
5 Toast the bread in the normal manner
(in accordance with the 'Toasting bread'
instructions, from step 4 onwards); if so
required, turning the rolls/French bread
over whilst the toaster is operating will
result in more uniform browning.
Maintenance
and cleaning
Always clean the appliance and the
accessories after each use. This will
prevent food residues from baking onto the
appliance.
• Make sure no moisture gets into the
appliance.
• Do not immerse the appliance in
water, or in other liquids. If this
happens do not use the appliance any
more; for safety reasons, dispose of
the appliance.
• Never use corrosive or scouring
cleaning agents.

7
New Classics 4-slice Toaster Article 2388
Removing the crumb tray
See Figure 5.
1 Always remove the plug from the wall
socket before removing the crumb tray.
2 Allow the appliance to cool.
3 Pull the crumb tray out of the rear of the
appliance, and remove any
breadcrumbs.
4 Wash the loose parts (crumb tray, tosti
holders and rack accessory) with water
containing washing-up liquid. Dry with a
dry cloth.
5 Clean the exterior of the toaster with the
special microfibre cloth supplied with
the appliance. Do not moisten the cloth.
6 Return the crumb tray to the appliance.
7 Close the cover, and store the
appliance in a safe place.
Safety
General
• Please read these instructions
carefully and retain them for
reference.
• Use this appliance only in accordance
with the instructions.
• This appliance is intended solely for
domestic use.
• Keep the appliance out of the reach of
children, and of persons who may not
be able to operate it safely.
• Have the appliance repaired only by a
qualified electrician. Never try to
repair the appliance yourself.
Electricity and heat
• Verify that the mains voltage is the
same as that indicated on the type
plate on the appliance before use.
• Plug the appliance into an earthed
wall socket.
• Always remove the plug from the
socket when the appliance is not in
use.
• Always remove the plug from the wall
socket by pulling on the plug, not the
power cord.
• Check the appliance’s power cord
regularly to make sure it is not
damaged. Do not use the appliance if
the power cord is damaged. Have a
damaged power cord replaced by a
qualified electrician.
• Make sure that the appliance and the
power cord do not come in contact
with sources of heat, such as a hot
hob or naked flame.
• Make sure that the appliance, the
power cord and plug do not come in
contact with water.
• Take care when touching the toaster
and the accessories. Allow the
appliance to cool down first. The
toaster and the accessories will
become hot whilst the appliance is in
use. The toaster’s housing will also
become hot, since the housing is an
excellent conductor of heat.
• The appliance needs space to allow
heat to escape, thereby preventing the
risk of fire. Make sure that the
appliance has sufficient space around
it, and does not come in contact with
flammable material. The appliance
must not be covered.
During use
• Never use the appliance outdoors.
• Place the appliance on a flat, stable
surface where it cannot fall.
• Never allow the power cord to hang
over the edge of the draining board,
worktop or table.
• Make sure that your hands are dry
before touching the appliance, power
cord or plug.

8New Classics 4-slice Toaster Article 2388
• Never use the appliance in a humid
room.
• Switch off the appliance and remove
the plug from the wall socket in the
event of a malfunction during use, and
before cleaning the appliance, fitting
or removing an accessory, or storing
the appliance after use.
• Never use the appliance with the
cover closed.
• Make sure that the appliance is
outside the reach of children. The
toaster and the accessories can
become hot whilst the appliance is in
use.
• Never remove jammed toast with a
knife or other sharp object. Always
remove the plug from the wall socket
before removing jammed toast.
• Do not pick up the appliance if it falls
into water. Remove the plug from the
wall socket immediately. Do not use
the appliance any more.
• Clean the appliance thoroughly after
use (see the ‘Cleaning and
maintenance’ Section).
U.K. WIRING INSTRUCTIONS
The wires in the mains lead are
coloured in accordance with the
following code:
• BLUE NEUTRAL
•BROWN LIVE
• GREEN/YELLOW EARTH
As the colours of the wire in the mains
lead of this appliance may not
correspond with the colour markings
identifying the terminals on your plug,
proceed as follows:
• The wire which is coloured BLUE
must be connected to the terminal
which is marked with the letter N or
coloured black.
• The wire which is coloured BROWN
must be connected to the terminal
which is marked with the letter L or
coloured red.
• The wire which is coloured GREEN/
YELLOW must be connected to the
terminal which is marked with the
letter E or (earth symbol) and is
coloured GREEN or GREEN/YELLOW
WARNING: THIS APPLIANCE MUST BE
EARTHED
The Environment
Dispose of packaging material, such as
plastic and boxes, in the appropriate waste
containers.
When it reaches the end of its useful life
the appliance must be disposed of in a
responsible manner. Contact your
municipal council or refuse-disposal
agency for disposal instructions. You can
also hand in the appliance to the retailer.

9
New Classics 4-slice Toaster Article 2388
Généralités
Le magnifique grille-pain Princess New
Classics 4-slice Toaster fait partie de notre
ligne de produits New Classics en robuste
acier chromé. Il est livré avec accessoires:
la grille à croque-monsieur et le support à
viennoiseries.
Votre grille-pain de pointe dispose d'une
puissance de 1350- 1500 W et est capable
de griller vite et facilement quatre tranches
de pain ou quatre croque-monsieur à la
fois. Pour toute la famille, c'est l'idéal ! Il
vous permet également, grâce au support
à viennoiseries, de préparer des petits
pains ou une baguette.
L'appareil est en outre équipé d'un
couvercle cache-poussière, de boutons
'stop', 'réchauffage' et 'décongélation', d'un
sélecteur du niveau de brunissage, d'un
dispositif de remontée du toast, et d'un
mécanisme de centrage automatique. Le
mécanisme de centrage automatique
positionne toujours automatiquement votre
tranche de pain exactement au milieu de la
fente de l'appareil. L'appareil se connecte
simplement sur le secteur (courant 220-
240 V).
Fonctionnement et
utilisation
Voir la figure 1.
Les composants de l'appareil sont :
1 Couvercle cache-poussière
2 Dispositif de remontée du toast
3 Cordon et fiche
4 Sélecteur du niveau de brunissage
(gauche et droite)
5 Bouton 'décongélation' (gauche et
droite)
6 Bouton 'réchauffage' (gauche et droite)
7 Bouton 'stop' (gauche et droite)
8 Support à viennoiseries
9 Grilles à croque-monsieur (2)
À l'arrière de l'appareil, vous trouvez le
tiroir à miettes permettant de ramasser les
miettes de pain tombées dans l'appareil.
Avant la première utilisation
1 Enlevez entièrement l'emballage avant
la première utilisation.
2 Ensuite, vous pouvez commencer à
griller :
• pain;
• croque-monsieur;
• petits pain, baguette (sur le support à
viennoiseries).
Griller du pain
Pour faire des toasts, vous glissez des
tranches de pain dans les fentes du grille-
pain et vous le mettez en marche.
• N'enfoncez pas les tranches de pain
de force. Elles pourraient se coincer.
Si la tranche ne passe pas, coupez-la
sur mesure. Ne coupez pas de
tranches trop petites, qui sont
difficiles à retirer de la fente.
• Vous avez toujours le choix d'arrêter
l'appareil en cours de fonctionnement,
il vous suffit d'enfoncer le bouton
'stop'. L'appareil s'arrête alors et le
dispositif de remontée du toast se
relève.
1 Branchez la fiche sur une prise
raccordée à la terre.
2 Ouvrez le couvercle cache-poussière.
3 Placez les tranches de pain dans les
fentes de l'appareil.
4 Réglez le sélecteur du niveau de
brunissage au niveau voulu.
5 Enfoncez le dispositif de remontée du
toast pour mettre le grille-pain en
marche. L'appareil centre

10 New Classics 4-slice Toaster Article 2388
automatiquement les tranches de pain
dans les fentes.
6 L'appareil s'arrête automatiquement et
le dispositif de remontée du toast se
relève. Sortez les toasts de l'appareil.
7 Lorsque vous avez terminé d'utiliser
l'appareil, débranchez la fiche et
laissez-le refroidir. Refermez le
couvercle.
Sélection du niveau de brunissage
Voir la figure 2.
Le sélecteur du niveau de brunissage vous
permet de sélectionner à quel degré vous
grillez votre pain. Tournez-le vers la droite
et votre pain sera grillé plus fort.
• la position de gauche donne un pain
juste croustillant
• la position du milieu donne un pain doré
• la position de droite donne un pain grillé
bien brun.
8 Faites l'essai des différentes positions
pour déterminer laquelle vous
conviendra. Commencez toujours par
la position minimale. Tenez compte des
différences d'un pain à l'autre, qui
influencent le résultat; un pain rassis
sera grillé plus rapidement, le pain frais
ou surgelé demande un peu plus de
temps.
Réchauffer/décongeler du pain
Voir la figure 3.
Si vos toasts se sont refroidis, vous
pouvez les réchauffer. Vous pouvez
également décongeler des tranches de
pain. Pour ce faire, suivez les instructions
du paragraphe 'Griller du pain' et après
l'étape 5, enfoncez soit le bouton de
réchauffage, soit le bouton de
décongélation.
Préparation de croque-
monsieur
Le croque-monsieur ordinaire se compose
de pain et de fromage. Vous pouvez
l'enrichir à volonté de jambon, bacon, oeuf,
salami, ananas, tomate, saumon fumé etc.
Voir la figure 4.
1 Branchez la fiche sur une prise
raccordée à la terre.
2 Ouvrez le couvercle cache-poussière.
3 Placez le croque-monsieur de votre
composition dans la grille et refermez la
grille, en bloquant les poignées l'une
contre l'autre.
4 Enfoncez la grille à croque-monsieur
dans l'une des fentes de l'appareil.
5 Faites griller le croque-monsieur
comme un toast ordinaire. Suivez les
instructions à partir du point 4 du
paragraphe 'Griller du pain'.
Le support à viennoiseries,
pour petits pains et baguettes
La baguette, les petits pains et autres
viennoiseries sont trop grands pour les
fentes de l'appareil; pour les griller ou les
réchauffer, utilisez le support à
viennoiseries. Le support à viennoiseries
se place sur le dessus de l'appareil.
Voir la figure 5.
1 Branchez la fiche sur une prise
raccordée à la terre.
2 Ouvrez le couvercle cache-poussière.
3 Placez le support à viennoiseries sur le
dessus de l'appareil.
4 Posez les petits pains ou autres sur le
support.
5 Faites fonctionner l'appareil comme
pour un toast ordinaire (suivez les
instructions à partir du point 4 du
paragraphe 'Griller du pain'); pour un
résultat égal, retourner au bout d'un
moment le pain placé sur le support.

11
New Classics 4-slice Toaster Article 2388
Entretien
et nettoyage
Nettoyez l'appareil et les accessoires
chaque fois que vous les avez utilisés.
Vous évitez ainsi que d'éventuels restes se
collent à l'intérieur de l'appareil.
• Ne laissez pas d'humidité pénétrer à
l'intérieur de l'appareil.
• N'immergez jamais l'appareil dans
l'eau ou dans un autre liquide. Le cas
échéant, cessez d'utiliser l'appareil et
mettez-le au rebut.
• N'utilisez pas de détergents agressifs
ou décapants.
Sortir le tiroir à miettes
Voir la figure 5.
1 Débranchez la fiche, si ce n'est pas
déjà fait.
2 Laissez l'appareil refroidir.
3 Sortez le tiroir à miettes à l'arrière de
l'appareil, et videz les miettes de pain
qui restent.
4 Nettoyez les composants amovibles
(tiroir à miettes, grille à croque-
monsieur, support à viennoiseries) à
l'eau chaude additionnée d'un peu de
détergent pour la vaisselle. Séchez
bien avec un chiffon sec.
5 Nettoyez l'extérieur de l'appareil avec le
chiffon microfibres spécial livré avec
l'appareil. Utilisez ce chiffon
uniquement à sec.
6 Remettez le tiroir à miettes en place
dans l'appareil.
7 Rangez l'appareil, couvercle fermé,
dans un endroit sûr.
Sécurité
Généralités
• Lisez soigneusement le mode
d'emploi et conservez-le
précieusement.
• Utilisez cet appareil uniquement
suivant les instructions décrites dans
le mode d'emploi.
• L'appareil est destiné uniquement à
l'utilisation domestique.
• Tenez l'appareil hors de la portée des
enfants ou des personnes incapables
de l'utiliser correctement.
• Faites effectuer les réparations par un
technicien qualifié. Ne tentez jamais
de réparer vous-même l'appareil.
Électricité et chaleur
• Avant d'utiliser cet appareil, assurez-
vous que la tension du réseau
correspond à la tension du réseau
indiquée sur la plaquette type de
l'appareil.
• Utilisez une prise raccordée à la terre.
• Débranchez toujours l'appareil
lorsque vous ne l'utilisez pas.
• Lorsque vous débranchez la fiche,
saisissez la fiche elle-même; ne tirez
pas sur le cordon.
• Vérifiez régulièrement que le cordon
de l'appareil est intact. N'utilisez pas
l'appareil si vous constatez que le
cordon est endommagé. Faites
remplacer le cordon endommagé par
un technicien qualifié.
• Assurez-vous que ni l'appareil, ni le
cordon n'entre en contact avec une
source de chaleur telle qu'une plaque
électrique chaude ou une flamme.

12 New Classics 4-slice Toaster Article 2388
• Assurez-vous que ni l'appareil, ni le
cordon, ni la fiche n'entre en contact
avec de l'eau.
• Faites attention lorsque vous touchez
les composants et l'appareil
proprement dit. Laissez d'abord
l'appareil refroidir. L'appareil et ses
composants peuvent devenir brûlants
pendant l'utilisation. L'extérieur de
l'appareil se réchauffe également, car
le matériau conduit bien la chaleur.
• L'appareil doit pouvoir évacuer cette
chaleur pour ne pas risquer de
prendre feu. Laissez donc
suffisamment d'espace autour de
l'appareil et évitez tout contact avec
des matériaux inflammables.
L'appareil ne doit jamais être
recouvert.
Pendant l'utilisation
• N´utilisez jamais l'appareil à
l'extérieur.
• Installez l'appareil sur une surface
plane et stable, à un endroit où il ne
risque pas de tomber.
• Ne laissez pas le cordon pendre par-
dessus le bord du plan de travail ou
de la table.
• Assurez-vous que vos mains sont
sèches avant de toucher l'appareil, le
cordon ou la fiche.
• N'utilisez jamais l'appareil dans une
pièce humide.
• Éteignez l'appareil et débranchez la
fiche en cas de problème durant
l'utilisation, pour le nettoyage, le
montage ou le démontage d'un
accessoire, et dès que vous avez fini
de l'utiliser.
• Ne faites jamais fonctionner l'appareil
pendant que le couvercle est fermé.
• Gardez l'appareil hors de portée des
enfants. L'appareil et ses composants
peuvent devenir brûlants pendant
l'utilisation.
• Si une tranche de pain s'est coincée,
n'utilisez jamais un couteau ou autre
objet coupant pour la décoincer. Si
une tranche de pain se coince dans le
grille-pain, débranchez la fiche de
l'appareil avant de décoincer la
tranche de pain.
• Si l'appareil est tombé à l'eau, ne le
rattrapez pas. Débranchez
immédiatement la fiche. Cessez
d'utiliser l'appareil.
• Nettoyez soigneusement l'appareil
après l'utilisation (voir 'Nettoyage et
entretien').
Environnement
Jetez le matériel d'emballage, tel que le
plastique et les boîtes, dans les
conteneurs prévus à cet effet.
Lorsque l'appareil est usé, il doit être mis
au rebut selon les règlements en vigueur.
Pour plus d'informations, contactez les
autorités communales ou l'autorité
responsable du retraitement des déchets.
Vous pouvez également rapporter
l'appareil au point de vente.

13
New Classics 4-slice Toaster Article 2388
Allgemein
Dieser formschöne Princess New Classics
4-slice Toaster ist Teil unserer New
Classics-Produktreihe, die aus stabilem,
verchromten Stahl hergestellt wird. Der
Toaster wird komplett mit
Sandwichhalterungen und einem
Aufsatzgestell für Brötchen und Baguette
geliefert.
Dieser ausgeklügelte Toaster mit einer
Leistung von 1350 – 1500 W kann schnell
und einfach für vier Personen gleichzeitig
Brotscheiben oder Sandwiches toasten.
Eine Lösung für die ganze Familie! Mithilfe
des mitgelieferten Aufsatzgestells können
Sie damit auch Brötchen oder Baguette
toasten.
Das Gerät ist weiterhin mit einem
Staubdeckel, einer Stopp-, Aufwärm- und
Auftautaste, einem Bräunungsregler,
einem Brotheber sowie einem
Zentrierungsmechanismus ausgestattet.
Der Zentrierungsmechanismus sorgt dafür,
dass sich das Brot immer an der richtigen
Stelle im Schlitz des Geräts befindet. Das
Gerät wird an das Elektrizitätsnetz (220 –
240 V) angeschlossen.
Funktion und
Bedienung
Siehe Abbildung 1.
Das Gerät besteht aus den folgenden
Teilen:
1 staubabweisender Deckel
2 Brotheber
3 Kabel mit Stecker
4 Bräunungsregler (links und rechts)
5 Auftautaste (links und rechts)
6 Aufwärmtaste (links und rechts)
7 Stopptaste (links und rechts)
8 Aufsatzgestell für Brötchen und
Baguette
9 Sandwichhalterungen (2)
An der Geräterückseite befindet sich die
Krümelschublade, mit der die
zurückgebliebenen Brotkrümel entfernt
werden können.
Vor der ersten Verwendung
1 Entfernen Sie vor der ersten
Verwendung die komplette Verpackung.
2 Jetzt können Sie mit dem Toasten von:
•Brot;
• Sandwiches;
• Brötchen/Baguette (mit dem
Aufsatzgestell) beginnen.
Brot toasten
Zum Toasten von Brot stecken Sie dieses
in die Schlitze des Geräts und schalten
das Gerät ein.
• Drücken Sie das Brot nicht mit Gewalt
in die Schlitze. Dadurch kann es
steckenbleiben. Wenn das Brot zu
groß ist, dann schneiden Sie es erst
zurecht. Schneiden Sie das Brot nicht
zu klein, da Sie es sonst nicht mehr
gut aus dem Schlitz herausnehmen
können.

14 New Classics 4-slice Toaster Article 2388
• Sie können das Gerät zwischendurch
immer ausschalten, indem Sie auf die
Stopptaste drücken. Das Gerät
beendet den Toastvorgang und der
Brotheber springt nach oben.
1 Stecken Sie den Stecker in eine
geerdete Steckdose.
2 Öffnen Sie den staubabweisenden
Deckel.
3 Stecken Sie das Brot in die Schlitze des
Geräts.
4 Stellen Sie den gewünschten
Bräunungsgrad mit dem
Bräunungsregler ein.
5 Drücken Sie den Brotheber mit dem
Griff nach unten, um den Toastvorgang
zu starten. Das Gerät sorgt dafür, dass
das Brot richtig zentriert in den
Schlitzen steckt.
6 Das Gerät beendet den Toastvorgang
automatisch und der Brotheber springt
automatisch nach oben. Nehmen Sie
das getoastete Brot aus dem Gerät.
7 Ziehen Sie nach der Benutzung den
Stecker aus der Steckdose und lassen
Sie das Gerät abkühlen. Schließen Sie
den Deckel.
Bräunungsgrad einstellen
Siehe Abbildung 2.
Den Bräunungsgrad stellen Sie mit dem
Bräunungsregler ein. Drehen Sie diesen
im Uhrzeigersinn, dann wird das Brot
dunkler getoastet:
• die linke Einstellung bedeutet schön
knusprig
• in der Mitte goldgelb
• die rechte Einstellung bedeutet
dunkelbraun getoastet.
8 Probieren Sie verschiedene
Einstellungen aus, um das von Ihnen
gewünschte Ergebnis zu erreichen.
Fangen Sie dabei immer mit der
niedrigsten Einstellung an.
Berücksichtigen Sie, dass das Ergebnis
durch den Zustand des Brots
beeinflusst wird: trockenes und altes
Brot ist schneller zu toasten, frisches
und tiefgefrorenes Brot benötigen
etwas mehr Zeit.
Brot aufwärmen/auftauen
Siehe Abbildung 3.
Getoastete Brotscheiben, die abgekühlt
sind, können Sie erneut erwärmen. Sie
können auch noch gefrorene Brotscheiben
auftauen. Befolgen Sie hierzu die
Anweisungen, wie sie unter „Brot toasten"
stehen und drücken Sie nach Schritt 5 die
Aufwärm- oder Auftautaste.
Sandwiches toasten
Sandwiches werden normalerweise aus
Brot und Käse hergestellt. Sie können
nach eigener Wahl Zutaten wie Schinken,
Speck, Zwiebel, Salami, Ananas, Tomate,
geräucherten Lachs usw. hinzufügen.
Siehe Abbildung 4.
1 Stecken Sie den Stecker in eine
geerdete Steckdose.
2 Öffnen Sie den staubabweisenden
Deckel.
3 Stecken Sie die Sandwiches Ihrer Wahl
in die Sandwichhalterung und drücken
Sie die Griffe gegeneinander.
4 Stecken Sie die gefüllten
Sandwichhalterungen in einen der
Schlitze des Geräts.
5 Toasten Sie die Sandwiches wie
gewohnt. Befolgen Sie hierzu die
Anweisungen ab Punkt 4 unter „Brot
toasten“.

15
New Classics 4-slice Toaster Article 2388
Brötchen/Baguette mit dem
Aufsatzgestell toasten
Brötchen und Baguette, die zu breit für die
Schlitze des Geräts sind, können Sie
mithilfe des Aufsatzgestells toasten. Hierzu
bringen Sie das Aufsatzgestell oben auf
dem Gerät an.
Siehe Abbildung 5.
1 Stecken Sie den Stecker in eine
geerdete Steckdose.
2 Öffnen Sie den staubabweisenden
Deckel.
3 Bringen Sie das Aufsatzgestell oben
auf dem Gerät an.
4 Legen Sie die Brötchen/das Baguette
auf das Gestell.
5 Toasten Sie das Brot wie gewohnt
(unter „Brot toasten“, ab Punkt 4),
wobei Sie die Brötchen/das Baguette
zwischendurch eventuell umdrehen
können, um eine gleichmäßige
Bräunung zu erhalten.
Pflege
und Reinigung
Reinigen Sie das Gerät und die
dazugehörigen Teile nach jeder
Verwendung. So verhindern Sie, dass
Essensreste am Gerät anhaften.
• Achten Sie darauf, dass keine
Feuchtigkeit in die Innenseite des
Geräts gelangt.
• Tauchen Sie das Gerät nie ins Wasser
oder in andere Flüssigkeiten. Sollte
dies trotzdem passieren, dann
verwenden Sie das Gerät nicht mehr
und entsorgen Sie es.
• Verwenden Sie keine aggressiven
Reinigungs- oder Scheuermittel.
Krümelschublade entfernen
Siehe Abbildung 5.
1 Ziehen Sie, falls dies noch nicht
geschehen ist, immer erst den Stecker
aus der Steckdose.
2 Lassen Sie das Gerät abkühlen.
3 Ziehen Sie die Krümelschublade an der
Rückseite aus dem Gerät heraus und
entfernen Sie die zurückgebliebenen
Brotkrümel.
4 Reinigen Sie die einzelnen Teile
(Krümelschublade,
Sandwichhalterungen und
Aufsatzgestell) mit Wasser und Seife.
Trocken Sie diese mit einem trockenen
Tuch nach.
5 Reinigen Sie die Außenseite des Gerät
mit dem speziell dafür mitgelieferten
Microfasertuch. Verwenden Sie diees
Tuch nur trocken.
6 Schieben Sie die Krümelschublade
zurück ins Gerät.

16 New Classics 4-slice Toaster Article 2388
7 Verstauen Sie das Gerät mit
geschlossenem Deckel an einem
sicheren Platz.
Sicherheit
Allgemein
• Lesen Sie die Bedienungsanleitung
gut durch und bewahren Sie diese
sorgfältig auf.
• Verwenden Sie dieses Gerät nur so
wie in dieser Bedienungsanleitung
beschrieben.
• Verwenden Sie dieses Gerät nur für
den Hausgebrauch.
• Halten Sie das Gerät außerhalb der
Reichweite von Kindern oder
Personen, die damit nicht gut
umgehen können.
• Lassen Sie Reparaturen von einem
qualifizierten Mechaniker ausführen.
Versuchen Sie nie, das Gerät selbst zu
reparieren.
Wärme und Elektrizität
• Bevor Sie das Gerät verwenden,
prüfen Sie, ob die Netzspannung mit
der auf dem Typenschild des Geräts
angegebenen Stromstärke
übereinstimmt.
• Verwenden Sie eine geerdete
Steckdose.
• Ziehen Sie immer den Stecker aus der
Steckdose, wenn Sie das Gerät nicht
benutzen.
• Ziehen Sie beim Entfernen des
Steckers aus der Steckdose am
Stecker und nicht am Kabel.
• Überprüfen Sie regelmäßig, ob das
Gerätekabel noch intakt ist. Benutzen
Sie das Gerät nicht, wenn das Kabel
beschädigt ist. Lassen Sie ein
beschädigtes Kabel von einem
qualifizierten Wartungsdienst
ersetzen.
• Sorgen Sie dafür, dass das Gerät und
das Kabel nicht mit Hitzequellen wie
heißen Kochplatten oder offenem
Feuer in Berührung kommen.
• Sorgen Sie dafür, dass das Gerät, das
Kabel und der Stecker nicht mit
Wasser in Berührung kommen.
• Seien Sie vorsichtig, wenn Sie die
Teile und das Gerät selbst anfassen.
Lassen Sie das Gerät erst abkühlen.
Das Gerät und die Teile werden
nämlich während der Benutzung heiß.
Auch das Gerätegehäuse wird heiß, da
das Gehäuse die Wärme gut leitet.
• Um Brandgefahr zu verhindern, muss
das Gerät seine Wärme abgeben
können. Sorgen Sie also dafür, dass
das Gerät ausreichend frei steht und
nicht in Kontakt mit brennbarem
Material kommen kann. Das Gerät darf
nicht abgedeckt werden.
Bei der Benutzung
• Benutzen Sie das Gerät nie im Freien.
• Stellen Sie das Gerät auf einen
stabilen und ebenen Untergrund und
an eine Stelle, wo es nicht
herunterfallen kann.
• Lassen Sie das Kabel nicht über den
Rand einer Anrichte, der Arbeitsplatte
oder eines Tisches hängen.
• Sorgen Sie dafür, dass Ihre Hände
trocken sind, wenn Sie das Gerät, das
Kabel oder den Stecker berühren.
• Benutzen Sie das Gerät nie in
feuchten Räumen.
• Schalten Sie das Gerät aus und ziehen
Sie den Stecker aus der Steckdose,
wenn bei der Benutzung Störungen
auftreten, Sie das Gerät reinigen,
Zubehör anbringen oder abnehmen
oder Sie das Gerät nicht mehr
benutzen.

17
New Classics 4-slice Toaster Article 2388
• Benutzen Sie das Gerät nie mit
geschlossenem Deckel.
• Sorgen Sie dafür, dass kleine Kinder
nicht an das Gerät kommen. Das Gerät
und die Teile können während der
Benutzung heiß werden.
• Entfernen Sie eingeklemmtes Brot nie
mit einem Messer oder einem anderen
scharfen Gegenstand. Wenn das Brot
im Toaster eingeklemmt ist, ziehen Sie
dann zuerst den Stecker aus der
Steckdose bevor Sie das Brot
entfernen.
• Nehmen Sie das Gerät nicht auf, wenn
es ins Wasser gefallen ist. Ziehen Sie
sofort den Stecker aus der Steckdose.
Benutzen Sie das Gerät nicht mehr.
• Reinigen Sie das Gerät nach der
Benutzung gründlich (siehe Kapitel
„Reinigung und Wartung“).
Umwelt
Werfen Sie Verpackungsmaterial wie
Kunststoff und Kartons in die dafür
vorgesehenen Container.
Wenn das Gerät das Ende seiner
Lebensdauer erreicht hat, muss es auf
verantwortungsvolle Weise entsorgt
werden. Nehmen Sie hierzu Kontakt mit
Ihrer Stadt oder der
Müllverarbeitungsgesellschaft auf. Sie
können das Gerät auch beim Händler
abgeben.

18 New Classics 4-slice Toaster Article 2388
Table of contents
Languages:
Other Princess Toaster manuals

Princess
Princess 01.142389.02.001 User manual

Princess
Princess NICE PRICE 142007 User manual

Princess
Princess Steel Style 2 User manual

Princess
Princess Compact4All User manual

Princess
Princess 142330 User manual

Princess
Princess CLASSIC TOASTER ROMA User manual

Princess
Princess 142372 User manual

Princess
Princess 143001 User manual

Princess
Princess Simply White User manual

Princess
Princess NICE PRICE 142008 User manual


