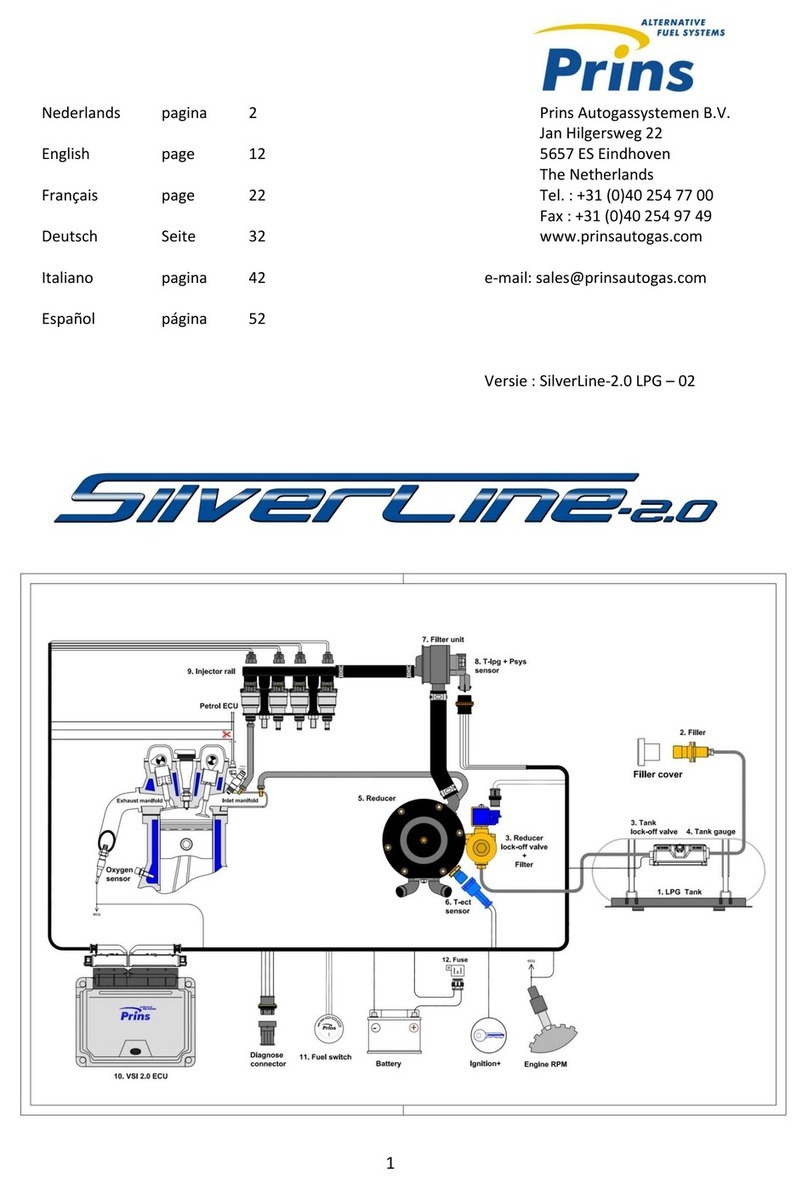
Prins VSI LPG User manual

DATE :
2013-09-04
Copyright © Prins Autogassystemen B.V. 2013 VERSION NR :
C

Table of contents
Required equipment / tools / materials for installing a complete system _______________________ 3
Vehicle check ________________________________________________________________________ 3
General instructions __________________________________________________________________ 4
Introduction _________________________________________________________________________ 5
Approval numbers VSI LPG / CNG components ___________________________________________ 6
The Prins LPG reducer ________________________________________________________________ 7
The Keihin CNG regulator______________________________________________________________ 8
The injector rail ______________________________________________________________________ 9
The Prins filter unit __________________________________________________________________ 10
The Keihin filter unit _________________________________________________________________ 10
The VSI computer____________________________________________________________________ 11
VSI-I _______________________________________________________________________________ 11
VSI-2.0 computer ____________________________________________________________________ 12
Instructions rotating the Prins VSI injector rail ___________________________________________ 13
The wiring loom._____________________________________________________________________ 14
VSI-I _______________________________________________________________________________ 14
VSI-2.0_____________________________________________________________________________ 14
Hose connections ___________________________________________________________________ 15
Diagram 1 VSI inlet manifold coupling_________________________________________________ 16
Diagram 2 VSI inlet manifold coupling with nylon hose __________________________________ 17
Diagram 3 Parallel water connection __________________________________________________ 18
Diagram 4 Serial water connection____________________________________________________ 19
Diagram 5 Serial water connection CNG regulator_______________________________________ 20
The VSI-I fuel switch _________________________________________________________________ 21
The VSI-2.0 fuel switch _______________________________________________________________ 22
Electrical connections on the LPG reservoir _____________________________________________ 23
Electrical connections VSI-I wiring harness ______________________________________________ 24
Electrical connections VSI-I wiring harness ______________________________________________ 25
Electrical connections VSI-2.0 wiring harness____________________________________________ 26
Electrical connections VSI-2.0 wiring harness____________________________________________ 27
Insulate all not used wires. ____________________________________________________________ 27
Electrical connections VSI-2.0 wiring harness____________________________________________ 28
Electrical connections VSI-2.0 wiring harness____________________________________________ 29
Electrical connections RPM module 091/0236 ____________________________________________ 30
Electrical connections Petrol Pressure Simulator 091/0252 _________________________________ 31
Electrical connections Dual Sensor Interface (DSI)________________________________________ 32
Electrical connections CNG Prins Timing Optimizer (PTO) _________________________________ 33
Diagram CNG PTO wiring Prins Turbo / MAP sensor ______________________________________ 33
Prins Turbo / MAP sensor_____________________________________________________________ 34
Diagram 5 LPG Base layout VSI 4 cylinder connector____________________________________ 35

Copyright © Prins Autogassystemen B.V. 2013 Page 2
Diagram 6 LPG Base layout VSI 4 cylinder solder _______________________________________ 36
Diagram 7 LPG Base layout VSI 5 cylinder _____________________________________________ 37
Diagram 8 LPG Base layout VSI 6 cylinder connector____________________________________ 38
Diagram 9 LPG Base layout VSI 6 cylinder solder _______________________________________ 39
Diagram 10 LPG Base layout VSI 8 cylinder connector___________________________________ 40
Diagram 11 LPG Base layout VSI 8 cylinder solder ______________________________________ 41
Diagram 12 CNG Base layout ________________________________________________________ 42
Diagram 13 VSI-2.0 LPG Base layout __________________________________________________ 43
Diagram 14 VSI-2.0 MAP LPG Base layout_____________________________________________ 44
Diagram 13 Injection module 4-cylinder ( 180/70024 connector )___________________________ 46
Diagram 14 Injection module 4-cylinder ( 180/ 70024 solder )______________________________ 47
Diagram 15 Injection module 6-cylinder ( 180/70026 connector )___________________________ 48
Diagram 16 Injection module 6-cylinder ( 180/70026 solder ) ______________________________ 49
Diagram 17 Injection module 8-cylinder ( 180/ 70024 connector)___________________________ 50
Diagram 18 Injection module 8-cylinder ( 180/70024 solder)_______________________________ 51
Diagram 19 Repair module 180/30024 (4-8 cylinder) _____________________________________ 52
Diagram 20 connector injection module 091/71004 ______________________________________ 53
Diagram 21 injection module 091/71006 _______________________________________________ 54
Diagram 22 Replacing the injection module 180/70024 → 091/0145_________________________ 55
Diagram 23 Replacing the injection module 180/70024 → 091/71004 (4 cylinder) _____________ 56
Diagram 24 Replacing the injection module 180/70026 → 091/71006 (6 cylinder) _____________ 57
Diagram 25 Replacing the injection module 180/70024 → 091/71004 (8 cylinder) _____________ 58
Diagram 26 LPG wiring 180/70014 ____________________________________________________ 59
Diagram 27 LPG wiring 180/70004 ____________________________________________________ 60
Diagram 28 LPG wiring 180/70016 ____________________________________________________ 61
Diagram 29 LPG wiring 180/70006 ____________________________________________________ 62
Diagram 30 LPG wiring 180/70018 ____________________________________________________ 63
Diagram 31 LPG wiring 180/70008 ____________________________________________________ 64
Diagram 32 LPG wiring 080/72040 ____________________________________________________ 65
Diagram 33 LPG wiring 080/72045 ____________________________________________________ 66
Diagram 34 LPG wiring 080/72050 ____________________________________________________ 67
Diagram 35 LPG wiring 080/72055 ____________________________________________________ 68
Diagram 36 LPG wiring 080/72060 ____________________________________________________ 69
Diagram 37 LPG wiring 080/72065 ____________________________________________________ 70
Diagram 38 CNG wiring 095/72045 ____________________________________________________ 71
Diagram 39 VSI-2.0 wiring 191/040002 _________________________________________________ 72
Trouble code chart LPG ______________________________________________________________ 73
Maintenance instructions _____________________________________________________________ 74
Checklist after installation ____________________________________________________________ 76

Copyright © Prins Autogassystemen B.V. 2013 Page 3
Required equipment / tools / materials for installing a complete system
-Complete workshop toolbox ( wrenches, screwdrivers, cutters, pliers, ratchet, sockets )
-Car lift
-Portable computer : operating on Windows 98,W2000 or XP.
Internal memory : 16 Mb or more
Memory HD space : 5MB
Screen : 256 colours, advise colours 16 bits or more
Com port : 1 free COM port 1 or COM port 2 with a 9 or 25 pins connector
or USB
-Vehicle fuel system scan tool or OBD scan tool Prins ( part nr. 099/99928 )
-Exhaust gas analyser
-Multimeter
-Oscilloscope
-Prins VSI diagnostic software
-Prins VSI serial interface
-Prins VSI break out box ( part nr. 080/70090 )
-Torque wrench ( 10Nm )
-Portable light
-Assortment drill bits 4 to 12 mm
-Assortment cutters ( ø 20, 30, 50, 70 mm )
-Punching tool ø 70 mm
-Round file
-Portable drill or pneumatic drill
-Threading device ( male M6x1, M8x1, M10x1 )
-Pipe-flaring tool ( for 6 and 8 mm copper pipe )
-Air gun
-Vacuum cleaner
-Hot air gun
-Allan spanner for inlet couplings 3,5mm ( part nr. 099//9970 )
-Reducer adjustment tool ( part nr. 099/9960 )
-Molex extraction tool for VSI switch connector ( part nr. 090/9929 )
-Soldering iron, soldering tin
-Wire-stripping pliers
-Adhesive tape
-Adhesive sealant
-Thread locking compound
-Anti-corrosion agent / black body coating
-Gas leak detection device or foam leak spray
-Shrink sleeves
-Engine coolant
Vehicle check
-Check the vehicle drivability on petrol
-Check the fuel system for error codes ( scan tool )
-Check if the catalytic converter is in good condition ( exhaust gas analyzer )
-Check the condition of the ignition system ( spark plugs, cables, coil )

Copyright © Prins Autogassystemen B.V. 2013 Page 4
General instructions
The installation of the system shall be done in accordance with the installation manual provided by Prins
Autogassystemen.
Always disconnect the battery when installing the LPG/CNG system.
Do not place the main fuse into the fuse holder before having completed the installation of the VSI system.
The VSI computer has to be activated by means of the diagnosis software.
In the unlikely event the VSI computer fails, it will automatically switch over to petrol.
Never disconnect the VSI computer connector, unless you have removed the main fuse.
When installing the VSI wiring harness, ensure that it does not run near any of the ignition components.
Solder and insulate all electrical connections.
The wires in the loom are provided with numbers and text. The text on the wire explains the function of the wire.
The wire loom is not model specific, therefore is it may be necessary to adjust the length of the wires.
Ensure maximum care is taken when connecting wiring.
Make professional joints using solder and shrink sleeve. Do not stretch the wiring harness.
No component of the LPG/CNG-system shall be located within 100 mm of the exhaust or similar heat source,
unless such components are adequately shielded against heat.
Remove any internal burrs, after having shortened the LPG/CNG hose. (This guarantees the maximum flow
through the hose without pollution.)
If holes have to be drilled (wear safety glasses) in order to facilitate mounting the device frame, the reservoir
frame, the LPG/CNG cut-off valve, etc., the drilled holes must always be treated with an anti-corrosive, after the
burrs have been removed ( especially when mounting a exterior filler ).
After having completed the installation, check the whole system for gas leakage; use a gas leak detection device.
Fitting and maintenance is only allowed by Prins Autogassystemen selected LPG/CNG engineers.
Prins Autogassystemen is not responsible for any damages to people or objects as a result of changes to Prins
products.
Check our website regularly for updates, info-bulletins and product information. ( www.prinsautogassytemen.com )
For installing a dedicated VSI-system download DEDICATED MANUAL ( part 2/2 )
Please fill in the warranty card completely and return it within 8 days after installation.

Copyright © Prins Autogassystemen B.V. 2013 Page 5
Introduction
VSI stands for “vapour sequential injection”, it points directly to the most important properties of the system.
This second-generation gas injection system is based on a vapour LPG/CNG injection that is injected
sequentially in the engine. Sequential means that the gas injectors will inject the LPG/CNG in the sequence
equal to the injection sequence of the petrol injectors,
This sequence in most applications is equal to the firing order of the ignition sequence of the engine, for
example with a 4-cylinder engine this is normally 1-3-4-2. Sequential injection means that the amount of
injected fuel per cylinder the can be metered and timed individually.
This achieves a much higher level of performance emission and drivability. The VSI system was designed
and developed in-house by Prins Autogassystemen B.V.
VSI characterizes itself with a high level of integration into to the petrol management system. The two
systems integrate as “master-slave” system.
This means that the original petrol management ECM controls the amount of LPG/CNG injected via the gas
injectors into the engine. The VSI ECM only translates the relevant signals coming from the engine
management system necessary for MASTER /SLAVE strategy.
Following this strategy the petrol management system is the “MASTER” and the VSI ECM the “SLAVE”.
The advantage of this strategy: while driving on LPG/CNG the lambda control and OBD functions keep
within the OE parameters, functioning correctly and controlled by the petrol management system. So when
operating on LPG/CNG it is not necessary to generate simulated signals.
There is one exception made for the petrol injector signals, while driving on LPG/CNG the petrol injector’s
are switched off to discontinue the petrol supply. To maintain the injection control signals it is necessary to
simulate the petrol injectors to ensure the original ECM does not detect a fault code. Secondly when
operating on LPG/CNG it is necessary to maintain a petrol injector control signal to measure the required
fuel demand.
The second generation injection system VSI has the ability to inject sequentially making it quicker and more
accurate, large benefits can be gained in engine and emission performance.

Copyright © Prins Autogassystemen B.V. 2013 Page 6
Approval numbers VSI LPG / CNG components
Mark
Component
LPG
CNG
Prins
VSI Reducer
E4-67R-010054
Valtec
6 / 8mm lock-off valve
E4-67R-010041
Keihin
Regulator
E4-110R-000092
OMB
lock-off valve
E4-110R-000095
Wika
CNG Pressure indicator
E4-110R-000190
Prins
VSI Injector rail
E4-67R-010093
E4-110R-000021
Keihin
VSI Injector
E4-67R-010092
E4-110R-000020
Prins
Filter unit
E4-67R-010096
E4-110R-000028
Keihin
Filter unit
E4-67R-010177
E4-110R-000091
Prins
ECU
E4-67R-010098
E4-110R-000083
Electrical VSI components
EMC : E4-10R-020507
VSI-I LPG VSI-2.0 LPG / VSI-2.0 DI LPG
VSI-1 CNG VSI-2-0 CNG / VSI-2-0 DI CNG

Copyright © Prins Autogassystemen B.V. 2013 Page 7
The Prins LPG reducer
Mount the reducer to the body of the vehicle in the engine compartment, never on the engine!
Mount the reducer so that it is easy to adjust the pressure.
Install the supplied 8 mm threaded end in the back cover of the reducer.
Mount the reducer as shown in the drawing.
Mount the reducer on a bracket and bolt on with a M8x1 nut.
The LPG lock-off valve can be installed in different positions. Do not damage the O-rings when
rotating the lock-off valve. See picture for torque moment.
The reducer is connected to the heating system circuit by couplings between the coolant fluid
hoses: dependant on the converted vehicle the reducer is placed in series or in parallel with the
heating system.
Overpressure 5mm relief hose : connect to the intake manifold.
No component of the LPG-system shall be located within 100 mm of the exhaust or similar heat
source, unless such components are adequately shielded against heat.
The pressure can be adjusted with the adjusting screw (Allan screw) in the front cover.
Seal the adjusting screw, with the sticker, in the front cover of the reducer after adjusting the
pressure.
mounting positions
Standard reducer, 6 mm LPG pipe, used for engines with a HP up to 135 kW ( 180 HP ).
High Output reducer, 8 mm LPG pipe, used for engines with a HP over 135 kW ( 180 HP ).
Use a High Output MAP reducer on blown engines ( turbo / compressor )
NO threat locking compound allowed !!

Copyright © Prins Autogassystemen B.V. 2013 Page 8
The Keihin CNG regulator
Mount the Keihin regulator to the body of the vehicle in the engine compartment, never on the
engine!
Mount the regulator so that it is easy to replace the inlet filter.
Mount the regulator as shown in the drawing with the water connections downwards.
Mount the regulator on a bracket and bolt on with 3 M6x1 nuts.
The regulator is connected to the heating system circuit by couplings between the coolant fluid
hoses.
Optional MAP connection: connect to the intake manifold if needed.
No component of the CNG-system shall be located within 100 mm of the exhaust or similar heat
source, unless such components are adequately shielded against heat.
The pressure may not be adjusted and is fixed on 3.3 bar

Copyright © Prins Autogassystemen B.V. 2013 Page 9
The injector rail
VSI 4-cylinder injector rail [KN8/KN9]
The Prins injector rail is available in 2 - 3 - 4 - 5 rail versions.
Guideline VSI injector choice : divide total engine power in kW up into the amount of cylinders.
LPG:
CNG:
Color ID
(KN-8)
Injector size
Minimum power per
cylinder [LPG]
Maximum power per
cylinder [LPG]
kW
HP
kW
HP
Green
32cc /stroke
13,0
17,4
white
42cc/stroke
9,0
12,1
15,0
20,1
Blue
52cc/stroke
13,0
17,4
20,0
26,8
Orange
63cc/stroke
18,0
24,1
27,0
36,2
Yellow
73cc/stroke
25,0
33,5
35,0
46,9
82cc/stroke
28.0
37,6
39,0
52,3
Brown
100cc/stroke
31,0
41,6
45,0
60,3
Color ID
(KN-8)
(KN-8)
Injector size
Minimum power per
cylinder [CNG]
Maximum power per
cylinder [CNG]
kW
HP
kW
HP
Green
9,0
12,1
White
42cc/stroke
7,0
9,4
12,0
16,1
Blue
52cc/stroke
10,0
13,4
16,0
21,5
Orange
63cc/stroke
14,0
18,8
22,0
29,5
Yellow
73cc/stroke
20,0
26,8
28,0
37,5
82cc/stroke
23,0
30,8
33,0
44,2
Brown
100cc/stroke
25
33,5
36,0
48,3

Copyright © Prins Autogassystemen B.V. 2013 Page 10
The Prins filter unit
The filter unit filters the LPG/CNG and is also used to measure the gas temperature (T_gas) and gas
pressure (Psys) in the VSI system, by means of a combination sensor.
The filter unit has a single or a double outlet of 11mm.
Single outlet : on converted vehicle with 3-4 or 5 cylinder engines with one VSI injector rail.
Double outlet : on converted vehicle with 6 or 8 cylinder engines with two VSI injector rails.
Single outlet Double outlet
3-4-5 cylinder engine 6-8 cylinder engine
The Keihin filter unit

Copyright © Prins Autogassystemen B.V. 2013 Page 11
The VSI computer
The VSI computer can be mounted into the engine room as well as inside the car, depending on the
converted vehicle.
Never mount the computer near a heat source.
Never mount the computer upside down.
Never clean engine room with a high pressure cleaner.
VSI-I

Copyright © Prins Autogassystemen B.V. 2013 Page 12
VSI-2.0 computer
The Prins VSI-2.0 computer is the second generation master-slave management system. This new design
has distinctive features and will be used as a new platform for current and future Prins injection systems.

Copyright © Prins Autogassystemen B.V. 2013 Page 13
Instructions rotating the Prins VSI injector rail
This is an instruction how to convert a “right” rail into a “left” injector rail
Tools : Ring spanner size 13 mm
Torque spanner ( 0-3 Nm )
Disassembly / assembly:
1. Unscrew both M8 (4) nuts.
2. Remove the strip (2).
3. Remove the injectors (10) with a rotating movement out of the fuel rail (1).
4. Rotate the rail (1) 180 degrees.
5. Mount the injectors (10) with a rotating movement into the fuel rail (1).
6. Mount the strip (2) on the injectors (10).
7. Tighten the strip (2) with two M8 nuts (4). Tightening moment 2.5 Nm.

Copyright © Prins Autogassystemen B.V. 2013 Page 14
The wiring loom.
The cables in the loom are provided with numbers and text. The text on the cable explains the function of
the wire. The wire loom is not model specific, therefore is it may be necessary to adjust the length of the
wires.
The watertight ECM housing is made from aluminium; this material is chosen for its excellent heat
dissipation qualities, necessary for cool the injector drivers.
Always fix the computer in the coolest place in the engine compartment.
Ensure maximum care is taken when connecting wiring.
Make professional solder joints and insulate the joints.
Do not stretch the wiring harness.
VSI-I
The wiring harness is equipped with a 56 position interlocking connector which slots into the VSI computer.
Pull the purple interlocking clip and push the connector into the VSI computer, push the clip back into its
original position, the connector is now locked into the VSI computer.
VSI-2.0
The wiring harness connects to the computer via two Bosch a 81+40 pins connector which is locked to the
VSI-2.0 computer by means of connector clamping mechanism.
All cable numbers correspond with a position numbered on the connector.
Example wire number 4 is mounted on connector position 4.

Copyright © Prins Autogassystemen B.V. 2013 Page 15
Hose connections
Try to keep the inlet manifold hoses as short as possible.
Use a hose clamp on all the LPG/CNG hose connections.
Please observe that there is no damage or fouling to the hoses.

16
Diagram 1 VSI inlet manifold coupling
Lambda sensor
exhaust manifold
VSI inlet manifold coupling
inlet manifold
petrol injector
VSI injector
Hose clamp
LPG hose
Hose clamp
Coupling

Copyright © Prins Autogassystemen B.V. 2013 Page 17
Diagram 2 VSI inlet manifold coupling with nylon hose
petrol injector
Coupling
Barrel
Hose clamp
Nylon hose
LPG hose
Nut
VSI injector
Hose clamp
inlet manifold
VSI inlet manifold coupling with nylon hose
exhaust manifold
oxygen sensor

Copyright © Prins Autogassystemen B.V. 2013 Page 18
Diagram 3 Parallel water connection
injector rail
filter unit
+
lock-off valve
reducer
oxygen sensor
heater
valve
petrol injector
cylinder 1
VSI injector 1 2 3 4
exhaust
T-piece
interior heater with valve
LPG fuel line Tank
overpressure hose
Psys + Tlpg
sensor
engine coolant
in
out
inlet manifold
vsi coupling
throttle body

Copyright © Prins Autogassystemen B.V. 2013 Page 19
Diagram 4 Serial water connection
injector rail
filter unit
+
lock-off valve
reducer
overpressure hose
oxygen sensor
interior heater without valve
engine coolant
LPG fuel line Tank
petrol injector
cylinder 1
VSI injector 1 2 3 4
inlet manifold
exhaust
vsi coupling
in
out
throttle body
Psys + Tlpg
sensor
in
This manual suits for next models
1
Table of contents
Other Prins Automobile Accessories manuals


