Printa Systems 990 series User manual

1
990 PAD PRINTING SYSTEM QUICK GUIDE

2
990 Pad Printing System Quick Guide
Table of Contents
INITIAL SET UP :Product / Artwork /Pads.......................................Page 3
INITIAL SET UP: Ink Carriage Assembly...........................................Page 4
FIXTURE PUTTY AND MOLD MAKING.............................................Page 5
PLATE MAKING PROCESS.....................................................................Page 6
INK MIXING..............................................................................................Page 7
FINAL SET UP OF 990 SYSTEM............................................................Page 8
PRINTING...................................................................................................Page 9 &10
CLEANING.................................................................................................Page 11
INK INFORMATION.................................................................................Page 12
INK CURING INFORMATION.................................................................Page 13

3
990 Pad Printing System Quick Guide
Initial Set Up : Product to be printed / Artwork/ Pads
Step 2: Print out artwork on laser film. Do not use an Ink
Jet Printer! Check to see if artwork is dark enough: hold to
light, if you can see through it, then you will need a toner
enhancer such a Casey’s Ultra Black. Always double check
your artwork before proceeding as you cannot remake a
plate!
Step 3: Choose which pad will be appropriate for you job.
You want a pad that is generally a little larger than your
product. If pad is new, wipe down with rubbing alcohol to
remove silicone residue. Press into blank paper or card-
board to further remove silicone. Pad is now ready. Keep
pads in a dark environment out of direct sunlight, as it will
ruin the pads. Also keep pads stored upside down on the
wooden base and always clean pads with either packing
tape or rubbing alcohol: DO NOTuse thinners to clean
pads!
Step 1: Decide which product you are going to pad print. In
this example,we will pad print a sunglass holder.If you are
printing a plastic product, always check to see if it is solvent
sensitive: that is if the ink will adhere to your product after
drying. To test:gently wipe some medium thinner on a part
of the product you can test. If it melts or becomes dull, then
you can proceed with the process. If it does not, then a
pretreatment or different type of ink will need to be used.
Contact your Printa Systems representative for more infor-
mation. If your product is glass or metal, then simply wipe
with rubbing alcohol before printing to prep surface.

4
990 Pad Printing System Quick Guide
Ink Carriage Assembly
Step 1: Familiarize yourself with
the ink carriage assembly.Take a
moment or two to install and
uninstall the ink roller.
Step 2: Install doctor blade into the blade
keeper. Make note that grounded edge of
doctor blade is out and down. Press blade
against plate keeper screws and tighten.
Step 5: Practice a couple times
putting the ink carriage into inner
and outer posts. Do this until you get
comfortable. Make a note that the
post that has the angle adjustment
knob (black knob) has a spring inside
of it.
Step 3: Ink carriage assembly
should look like this.
Step 4: Hold ink carriage assembly as
follows.
Step 6: Once ink carriage is installed,
tighten down with nylon nut. Once firm,
turn back 1/16th of an inch.You do not
want the nut to be completely tightened
or the ink carriage will not work properly.
5
990 Pad Printing System Quick Guide
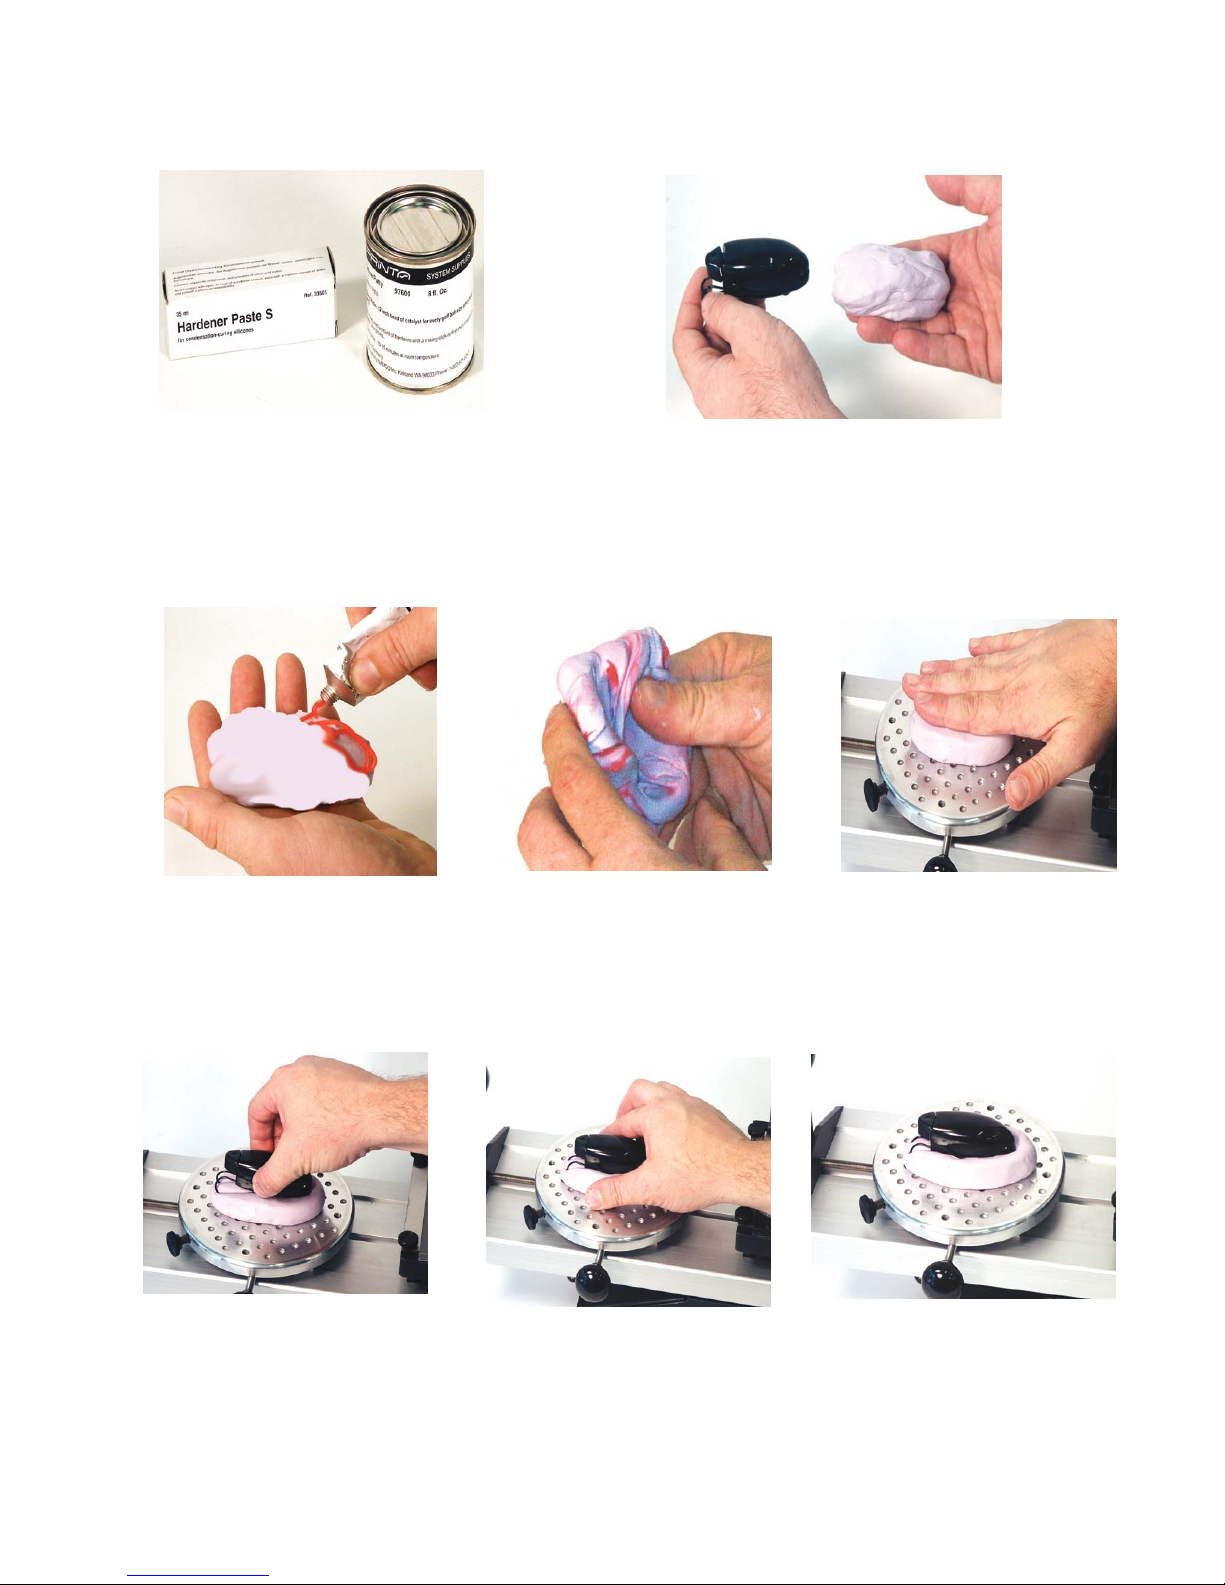
Fixture putty and mold making.
Step 1: Since many products are
unique in shape, included with the
990 System is fixture putty so you can
secure your product to print.The
putty requires a hardener to cure.
Step 2: Get appropriate amount of
putty to be used. Generally you
want to get an amount a little larger
than your product.
Step 3: Add about a 6” inch
bead of hardener to a palm
sized amount of putty.
Step 4: Mix thoroughly by
hand, make sure there are no
swirls as the putty must be an
even color. Mix quick as you
have about a minute.
Step 5: Press firmly
into turntable as to
make registration
marks in the bottom
of the putty for future
use.
Step 6: Place product into
fixture putty.Make sure the
putty goes up at least half of
the product to secure it.
Step 7: Gently mold
putty around edges of
product to secure
product.
Step 8: Let sit for at least ten
minutes for the putty to
harden. You now have a
fixture that can be reused for
the same product.

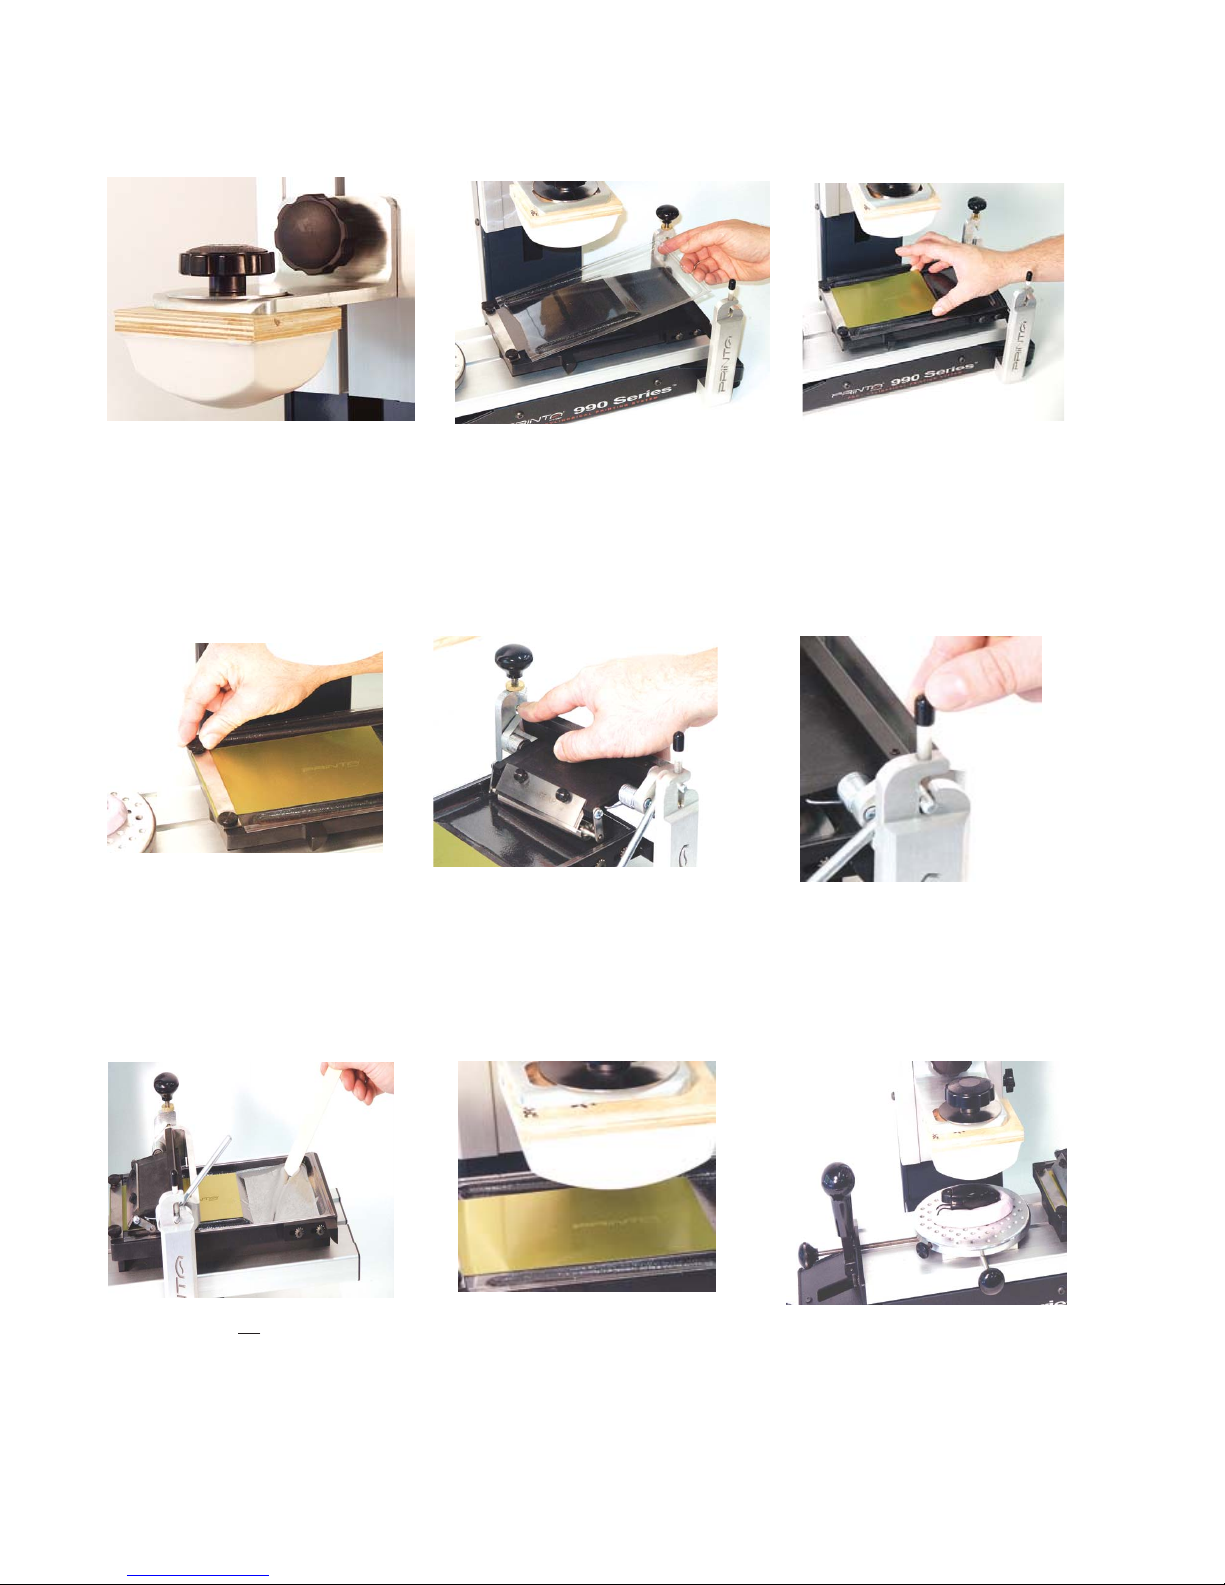
6
Step 1: Print out art-
work onto laser film.
Make sure artwork is
completely black. Cut
around artwork 1/2”
with sharp scissors.
Step 2: Remove
plate from package.
Plates are light
sensitive so remove
only one plate at a
time. Peel off protec-
tive covering.
Step 3: Remove
cassette from expo-
sure unit. Unlock
tabs and lift glass.
Place plate on foam,
and place artwork
on plate.
Step 4: Close
glass: lock down
tabs
Step 5: Place cassette into
exposure unit. Set timer for
60 seconds. Press start and
expose plate.
Step 6: After exposure,
remove cassette. Unlock tabs
and remove artwork from
plate. Store artwork for
future use.
Step 7: Place screen tint on top
of plate. The 200 DPI screen tint
will be used almost exclusively.
The 300 DPI will be used for
halftones and photographs.
Step 8: Place cassette back into exposure
unit. Expose for 90 seconds. Remove plate
from cassette. Store screen tint in enve-
lope as it is reusable.Take to sink and rinse
with HOT water. Image should appear
within 30 - 45 seconds.
Step 9: After rinsing, either used com-
pressed air or hair dryer to blow off excess
water. Cure plate with heat gun or place
in oven @ 110 degrees for 10 minutes.
Post expose in exposure unit for 10
minutes by placing plate on top of
cassette.
990 Pad Printing System Quick Guide
Plate making process

7
Ink Mixing
The inks that come standard with the 990 Pad
Printing System are a two-part epoxy based ink.
The inks need to be mixed with a hardener and a
thinner. There are two types of hardeners and
thinners that come with the kit: SE hardener and
medium thinner & VR hardener and VR thinner.
Remember: VR hardener is used for glass and
ceramics, while the SE is used for SOME plastics.
Remember to test your plastics before committing
to a print run to see if the ink with adhere to the
surface! There are other inks available for different
plastics, please call your Printa Systems representa-
tive for more information.
Step 1: You will need your
inks, hardener, thinner and
mixing supplies as well as
your gram scale. Because the
sunglass holder is plastic, SE
hardener and Medium
thinner will be used.
Step 2: Place cup and stick
on scale, press TARE button
so it calibrates the scale and
reads 0.
Step 3: Pour ink into cup.
You need to need to mix at
least 25 -30 grams. Do not
mix less as it will make the
ink unstable and dry out
quicker.
Step 4: Pour hardener
into cup. You add 20%
hardener to the weight
of the ink. Remember!
SE hardener for SOME
plastics,VR for glass and
ceramics.
Step 5: Mix hardener
and ink mixture.
Step 6: Add 20%
thinner to the mixture
of ink and hardener.
Step 7: Mix thor-
oughly!
990 Pad Printing System Quick Guide
8
990 Pad Printing System Quick Guide
Step 1: Install pad onto pad
mount. Leave pad loose in
mount so you can adjust pad
according to the artwork.
Step 2: Install ink tray. Slide
under plate keeper on far
left of ink tray.
Step 3: Place plate on top of
tray liner. Slide under plate
keeper bar: plate may extend
from end of bar but this will
not cause any problems.
Step 4:Tighten down plate
keepers bolts. Step 5: Install ink carriage
assembly. Step 6: Secure ink carriage
by locking down Nylon nut.
Remember not to over-
tighten!
Step 7: Pour all if ink into ink
tray.Note the cam lever bar
is in the 2 o’clock position.
Test ink by running mixing
stick through it.The ink
should close up in 3 seconds.
If it takes longer, then add
thinner to mixture.
Step 8: Lower pad to plate.
Check pad position in
reference to artwork. Move
pad until centered on art-
work, then tighten pad onto
pad mount.
Step 9: Slide bed slide to
right. Lower pad to product:
make sure that it is in the
general print area of the pad.

9
990 Pad Printing System Quick Guide
Printing
Step 1: Place packing tape
over product so you can
safely print without marking
on it.
Step 2: Slide bed-slide to
right, flooding plate.
Step 3: Plate should be
completely covered.
Step 4: Pull bed slide to left:
cleaning off plate with
doctor blade.
Step 5: Plate should be
cleaned off evenly like
above.
Step 6: If plate is not cleaned
evenly, then adjust angle of
ink carriage using angle
adjustment knob.
Step 7. After plate is cleaned
properly, wait several sec-
onds before coming down
onto plate.This will help the
thinner evaporate and ink
adhere to the pad.
Step 8: Lift pad and slide
bed-slide back to right. Hold
pad in air for several seconds
to let ink become tacky so it
will release fully from the
pad onto the product.
Step 9: Lower pad onto
product to release ink. Hold
for a second on the product.
The entire print cycle should
be around ten seconds.

10
990 Pad Printing System Quick Guide
Printing
Step 10: Look at print on
product to see if it is aligned
properly.
Step 11: If it is not, loosen
the turntable lock stud so
the table rotates freely.
Step 12:Use the X & Y Axis
adjusters to move the turn-
table assembly. When done,
secure turntable lock stud.
Step 13: Place packing tape
on product and repeat steps
1 - 12 until you are satisfied
with the print.
Step 14: Once you have aligned
print and are ready,remove tape
and begin print run. Remove
product after print while the plate
is flooded.
Step 15. The finished product!
Pad Printing Tips
* Print Cycle should be about 10 seconds on average.
* Always use 25 - 30 grams of ink, the correct thinner and hardener.
* If printing on plastic, always test by placing small dab of thinner on product: if it melts or becomes dull,
then continue with the printing process.If it wipes off, then you will need to either pretreat the product
before printing or use a special type of ink designed for plastics.
* SE hardener is for woods and plastics,VR is for glass and metals. DO NOT mix either thinner or hardener as
it will cause the ink to gel.

11
990 Pad Printing System Quick Guide
Cleaning
Step 1: Clean off pad using
packing tape.
Step 2: Gently remove ink
carriage.There will be a lot
of ink on the roller. Use a lint
free cloth to catch ink.
Step 3:Wipe down roller
with cloth.You may need a
few drops of medium thin-
ner to completely remove
ink.
Step 4: Remove doctor
blade.Wipe down with cloth.
Again, a few drops of thinner
may be needed.
Step 5: Loosen plate keeper
bolts.
Step 6: Using knife or small
screwdriver, remove plate
from ink tray.
Step 7: Place plate on clean
towel. Place a few drops on
plate and wipe down. You
do not need to use lots of
thinner! A little goes along
way!
Step 8: Flip plate over and
clean off back of plate.
Again, use medium thinner
sparingly.
Step 9. Remove ink tray and
throw in trash. Ink will
harden to ink tray and be
safe to dispose of in several
hours. Install clean parts and
you are ready to start again!

12
990 Pad Printing System Quick Guide
Ink Information
The inks that come standard with the 990 System are a two-part Epoxy ink called the KK Series. These inks
are excellent for standard pad printing applications,and printing on numerous substrates. However, there
are some different items (mostly plastics) that require either pretreatment or an additive to help the KK series
bond to it.Some products require a different series of ink for superior adhesion. The chart below is the major
inks that are sold through Printa Systems and should cover almost every application. There are other series
available for more specific applications. Please contact your Printa Systems Representative for more infor-
mation on these and other products.
SERIES APPLICATION
KK Comes standard with system. Use with glass, ceramics,
urethane, some polyfines (PE/PP), nylon, polyester, styrene,
painted surfaces and wood.
T-25 Use for printing on untreated polypropylene. Great for other
plastics also.Need T-25 thinner also.
VC & VC / SP Use on flexible items: koozies, vinyl some stress balls and foam
promotional goods. Also good for flexible magnets.
ADDITIVES APPLICATION
Primer Used to wipe down surface of polyfines (plastics). Use to treat surface
instead of flame treating.
May cause discoloration of product!
Adhesion Modifier Add to KK series ink to promote adhesion to polyfines (plastics). Also
can be used with other inks to provide extra adhesion.

13
990 Pad Printing System Quick Guide
Ink Curing Information
Most products that are pad printed require a heat curing afterwards to promote the bonding properties of
the inks. Some products such as solvent sensitive plastics, wood and paper may not require heat curing.
Most of your harder goods will require heat curing for the proper bonding. A good rule of thumb is the
harder the product, the more heat you will need. Because there are so many variables when dealing with
plastics, it is almost impossible to give an accurate temperature for curing. If a plastic is solvent sensitive: the
thinner melts into the plastic and bonds almost immediately,then a lower temperature can be used. If you
wipe some thinner on a product and it does not dull the surface and wipes off, then you will need a higher
temperature. Glass and ceramics always require a high temperature for superior adhesion.The chart below is
for the KK series inks. The inks can air dry depending on your substrate and application, but heat curing is
always recommended. ALWAYS TEST YOUR PRODUCT FOR RESISTANCE TO HEAT!
APPLICATION TIME & TEMPERATURE
Solvent sensitive plastics 1 - 2 minutes @ 120 - 160 degrees F
Hard plastics* 1-5 minutes @ 120 - 220 degrees F
Glass & Ceramics* 10 minutes @ 365 degrees F
* The harder the object to be printed, it is always advisable to wipe down the product with rubbing alcohol
to help promote a clean surface. DO NOT use thinners or windex to clean the product as this will leave a film
that can cause adhesion problems during the curing process.
Table of contents


