PRISM+ CLAYMORE ULTRA+ II Series User manual

ULTRA plus ,,-M/X
User Manual
CLAYMORE ULTRA+ II
-
M CLAYMORE ULTRA+ II
-
X
CLC2-1200(RD/BK) CLC2-2200(RD/BK)
Warranty
Item
Model No.
Seller
Date of Purchase
1. Thank you for purchasing CLAYMORE series of Prism Co., Ltd.
2. This product has passed strict quality control and testing process.
When you find some inappropriate working on the product, please contact
authorized service center listed on below.
Free Service
1) Failure of the product under normal operating conditions during the warranty
period will be repaired by Prism or authorized service center on free of charge.
Some shipping or handling charges may be involved.
2) Warranty period: 1 years
Charged Service
1) Damage caused when the warranty period is over
2) Damage caused due to the user’s mishandling, abuse, or improper operation
3)
Damage caused by arbitrary or personal repair or disassemble in unauthorized service center
4) Damage from input electricity or cable defect
5) Damage caused by natural disaster
Manufacturer
www.claymorelight.com / www.prismlight.co.kr
101-1501, Chunui-Technopark, Bucheon-ro 198 Road, 36,
Bucheon-si, Gyeonggi-do, Korea
Bigtent Outdoor Equipment Ltd. www.bigtentoutdoors.com
Prism Co., Ltd.
Official Import Distributor
info@bigtentoutdoors.com
6. Specifications
7. Package
5. Solution to malfunction
* If there is something wrong with the product, please check the following first
1. If it does not light up, check the charging status
2. If the external device can not be charged, check the On state of the function button
10~80hour
125×115.6×39.8mm
465g
15~150 hour
125×115.6×55.8mm
675g
Li-ion
3.6V 23,200mAh
CLC2-1200(RD/BK)
6 hour
(Quick charge adapter) 8 hour
(Quick charge adapter)
Warm : 3000K , Bright : 4200K , Cool : 6200K (±15%)
5V 2A / 9V 2A / 12V 1.5A
MADE IN KOREA
USB 5V 2A / 9V 2A / 12V 1.5A
40~1,200 Lm
CLAYMORE ULTRA+ II
-
M
Li-ion
3.6V 11,600mAh
CLC2-2200(RD/BK)
50~2,200 Lm
CLAYMORE ULTRA+ II
-
X
Product name
Model name
Charging time
LED color temperature
OUTPUT
Origin
INPUT
Run Time
Size
Weight
Brightness (lumen)
Battery type
Battery capacity
①Claymore Ultra+ II ②Lantern Hook ⑤Manual④Pouch
③ Micro 5pin
USB cable
* For long-term storage, fully recharge the lantern. (Repeat every six months)
* Please keep in mind that if stored below 10°C the battery life may be affected.
* Please keep in a dry place without moisture.
* After the battery is fully discharged, the battery remaining indicator may not flash.
If this happens, plug the USB cable back in or press the button to turn the battery indicator again.
Cautions for long-term storage
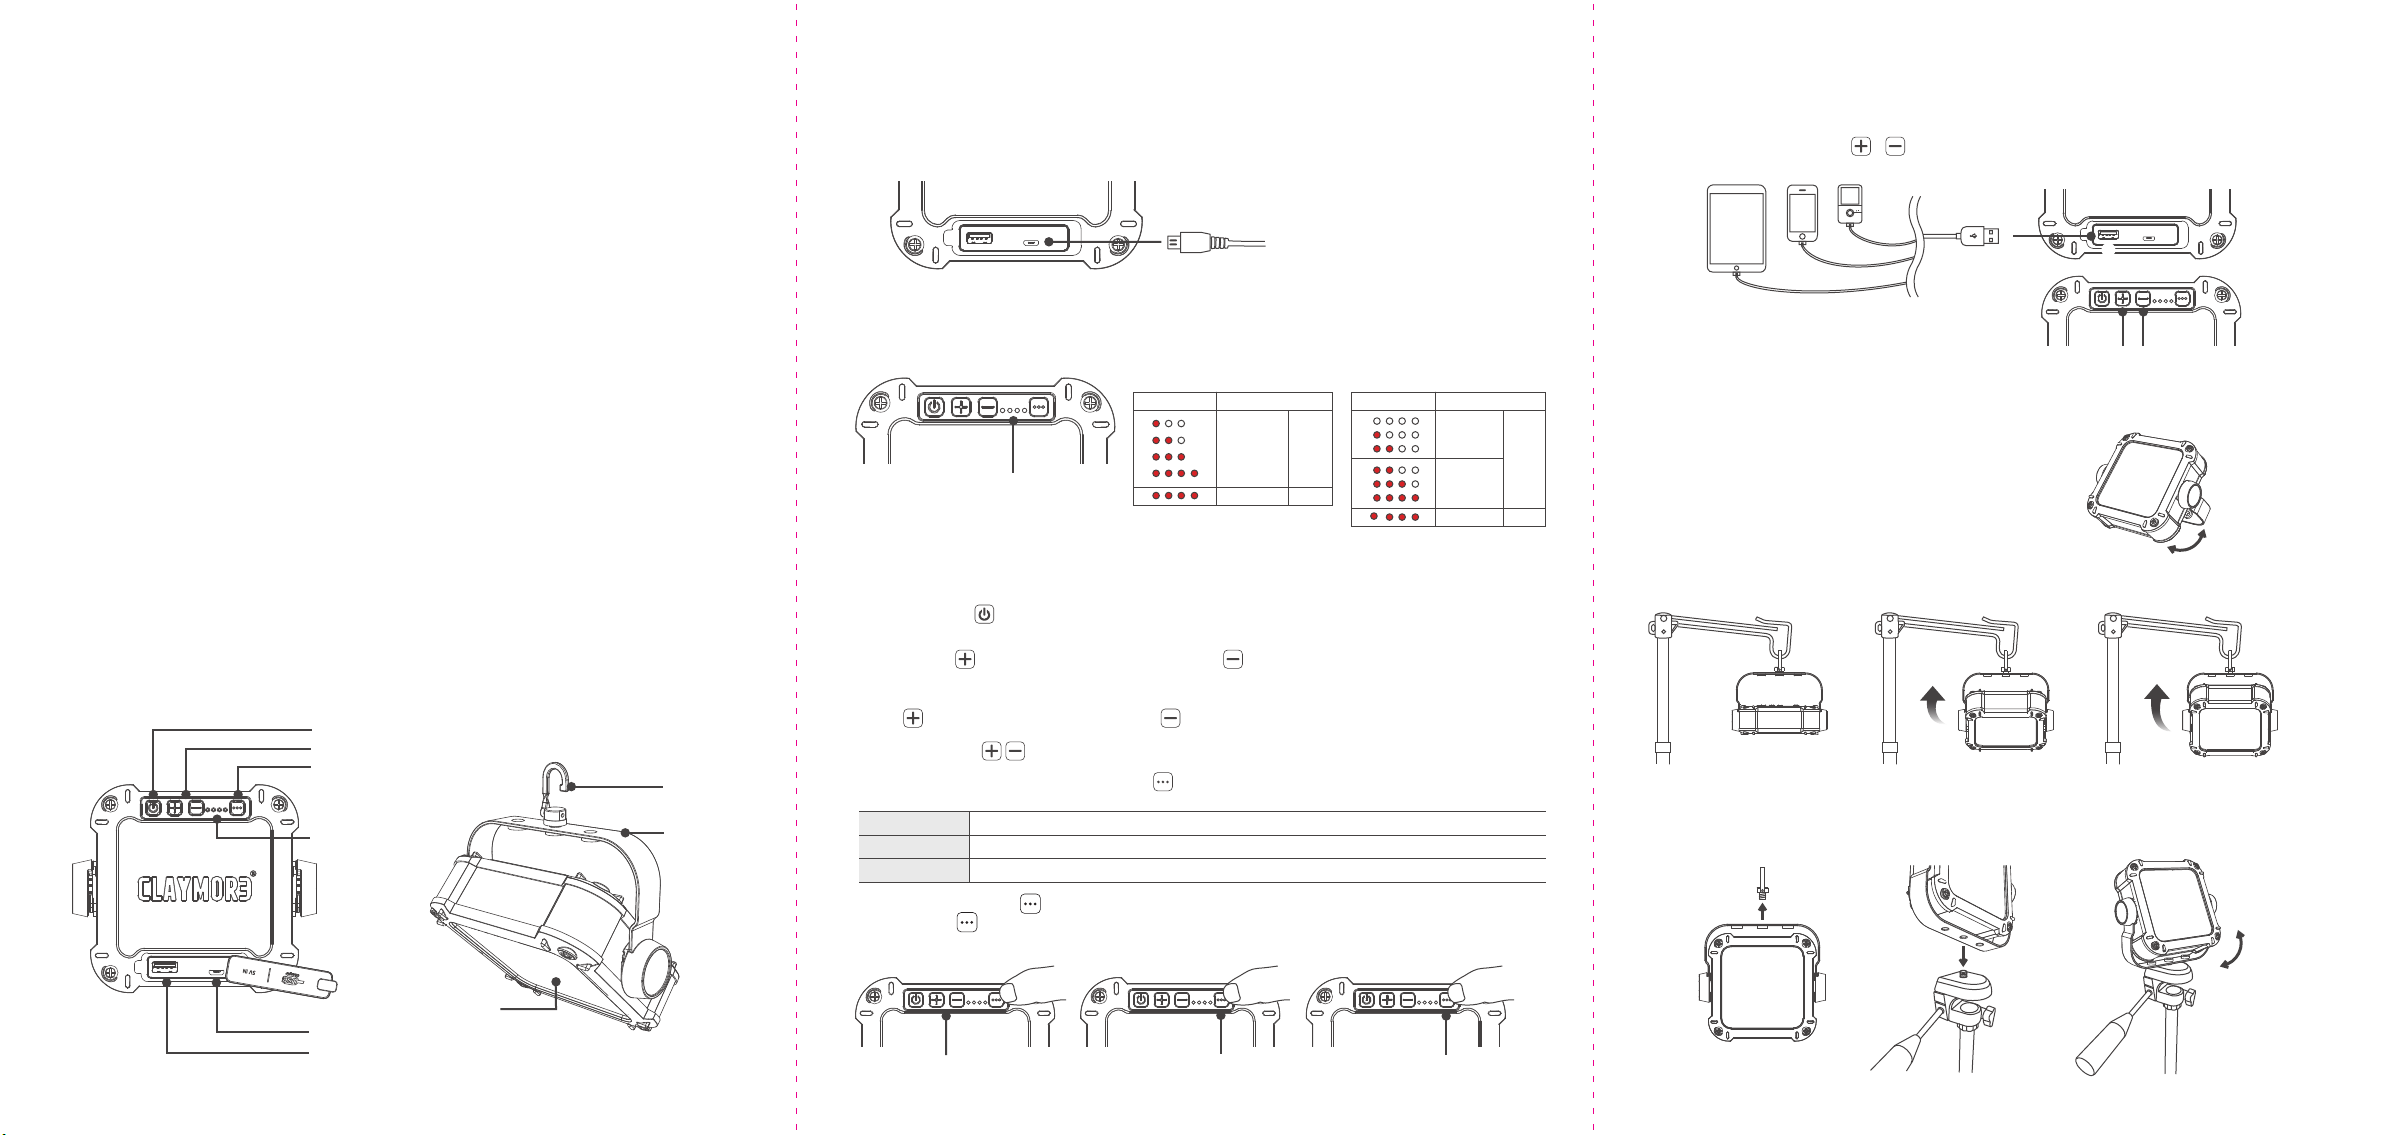
3. Operating manual
● Charging the lantern
1) As shown in the figure, open the cover of the product and connect the USB cable to the charging port.
Charging time may vary depending on battery capacity and external environment.
● Operate the lantern
1) On/Off & Dimming : Push on/off button shortly to turn and off the lante
2) Battery Check : Press button once , the battery level is displayed in 4 steps of LED quantity.
3) LED Color change: : When the power is ON, pressing function button once enables to adjust the color of light in three
steps in order of Warm > Bright > Cool
● Power bank function
4. How to install the product
● When mounting the lantern on camera tripod
1) Unscrew lantern hook from handle,then put the hole of the handle wire into the camera tripod and fix it.
2) Adjust the angle of the handle wire or the direction of the tripod to illuminate the desired spot.
● When hanging on a lantern hook or string
(Press once->LED Color change) (Press and hold for 2 seconds->SOS Flash)
⑧ Lantern Hook
⑨ Metal handle
⑥ USB In port
⑤ LED Light and Diffusion filter
① Power button
② Dimming button
④ Battery indicator
③ Function button
(LED Color temperature/SOS Flash)
LED Color Change SOS-Flash
(Press once->Battery indicator)
Battery Check
⑥
③
1) Turn metal handle to adjust the angle of light in for the desired direction
Claymore Ultra+ II model offers smart quick charge.
Connect various devices and lantern with USB cable from ③USB out port and it will automatically start charging.
(On status : Battery indicator turns on)
If power bank is not working, press or button once to activate it. (5V charge)
⑦ USB Out port
2) When the product is being charged, the battery level indicator flickers. If the light is not flicking and
all the lights are on, it indicates that the battery has been fully charged
④ Battery indicator
※Blinks once when Maximum and Minimum brightness is reached
※ Please charge with the supplied USB cable with 5V 2A / 9V 2A / 12V 1.5A smart quick charger.
Micro 5-pin USB charger that plugs into a
PC or laptop and is compatible with
charging cable for smartphones.
This portable lantern contains Li-ion battery.
Please follow user's manual before using it. If any abnormality is found in the product,
please discontinue use and contact the dealer or service center that you purchased.
1. Caution
① Do not use it near high temperature such as fire or heating equipment. It may cause explosion and ignition.
② This product is water resistant. However, if left in the rain for a long time, it may cause malfunction.
If you accidentally fall into the water, please quickly wipe it off
③ Do not store or use in vehicles exposed to direct sunlight. It may cause explosion and malfunction.
④ Do not touch the light source directly as it may become very hot during use. Use handle to carry out.
⑤ Do not use when it exceed the operating temperature range (-10 ° C to 40 ° C).
⑥ Do not use external power other than USB 5V. It may cause heat and ignition.
⑦ Please do not place in the reach of infants. It may cause swallowing of parts or injury.
⑧ Supervisor by guardian is necessary when used by children.
Misuse of lantern may cause injury or electric shock.
⑨ Do not insert any metal parts into the terminal block of the connector.
It may cause heat, explosion or electric shock.
⑩ Do not disassemble or modify the product.
⑪ Do not touch the connector with wet hands. There is a danger of electric shock.
⑫ After use, be sure to turn off the power.
⑬ Dropping or impacting the product can cause damage to the inside of the product,
resulting an unexpected failures in normal use. Be careful not to apply impact to the body.
2. Parts & Contents
● When making the lantern stand up on a flat and even surface
1) You can place the lantern vertically or horizontally
when configuring the lantern on a flat surface
2) Turn the ⑨metal handle to correct angle of lighting and
place on a flat surface to obtain desired lighting direction
Angle
Adjustment
(0˚>45˚>90˚)
4) SOS-flash: ③Press and hold button for 2 seconds from ON states to activate the SOS distress signal.
Press button once again to stop SOS flash
* Charging time may vary depending on battery capacity of
external devices and external environment of the product.
Press once -> Turn on Power bank function
Warm
Bright
Cool
LED light with low color temperature, warm light feels like ordinary gas lantern
LED light with a neutral color of daylight and light bulb and comfortable feeling
LED light with high color temperature, cool light feels like ordinary fluorescent light
- Stepless Dimming
push and hold button to increase brightness.Push and hold buottn to decrease brightness.
- 5 Step Dimming
Push button shortly to increase brightness. Push button shortly to decrease brightness.
※ When the battery capacity is less than 4%,
Battery check and power bank functions may not work.
Battery indicator Charging
0~25%
25~50%
50~75%
75~100%
Fully charged
Fully charged
Flickers
Stop
Flickers
Stop
※ When charging
Battery indicator Charging
0~50%
50~100%
※ When using
This manual suits for next models
8
Other PRISM+ Lighting Equipment manuals


Popular Lighting Equipment manuals by other brands

Gemini
Gemini MIX2GO quick start guide

Viabizzuno
Viabizzuno clv 1 Installing instructions

ABB
ABB GE ReliaGear Lighting Panelboard Instructions for mounting

DOTLUX
DOTLUX STYLEbutler 5248-040080 user manual

ML Accessories
ML Accessories AX CCT Installation & maintenance manual

PXF Lighting
PXF Lighting Bari II DL 195 installation manual

UWE
UWE JetStream BAMBO2 Installation and operating instructions

Philips
Philips 78201 U7 Series user manual

GAME OF BRICKS
GAME OF BRICKS Great Pyramid of Giza 21058 instruction manual

Apollo
Apollo Smart Move manual

American DJ
American DJ Festive Light Pak User instruction

Code 3
Code 3 ED3974 Series Installation and operation instruction


