PRIXTON SKY 4K User manual

DRONE MINI
SKY 4K

ES
CONOZCA SU DRON
Con una banda de frecuencia 2.4G para una larga distancia de control remoto, el dron permite vuelos
sin ninguna interferencia. Los usuarios pueden controlarlo para que vuele, flote y haga fotos y vídeos
con la APP y la conexión WIFI de un smartphone
Carcasa superior
1Brazo plegable
5
Carcasa inferior
2Batería
6
Hélice
3
Motor
7
Protección de la
hélice
4
Cámara
8
DRON x1
(Batería incluida) Hélices de reserva x2 Cable de carga
x1
Mando a distancia
x1
ACCESORIOS
2

Destornillador x1 Manual del usuario x1
SUPER ENDURANCE FOLDABLEDRONE
OPERATINGMANUAL
Pleaseread this manual carefully before operation
andkeep it properly for future reference.
ETÀ 14 +
Nota:
Use un cargador de 5V 1A como el de la
mayoría de teléfonos móviles (no incluido)
PREPARACIÓN PREVIA AL VUELO
1.ENTORNO DE VUELO
Vuelos en interior: mantener alejado de
personas, animales y obstáculos.
Vuelos en exterior: las mejores condiciones son
los días soleados sin viento.
Mantenga el dron a la vista durante el vuelo y
aléjelo de barreras, cables de alta tensión,
árboles y personas.
No vuele nunca en ambientes extremos como
el calor, frío, viento fuerte o lluvia intensa.
Alinee la protección y presiónela firmemente
con la posición de dos agujeros debajo
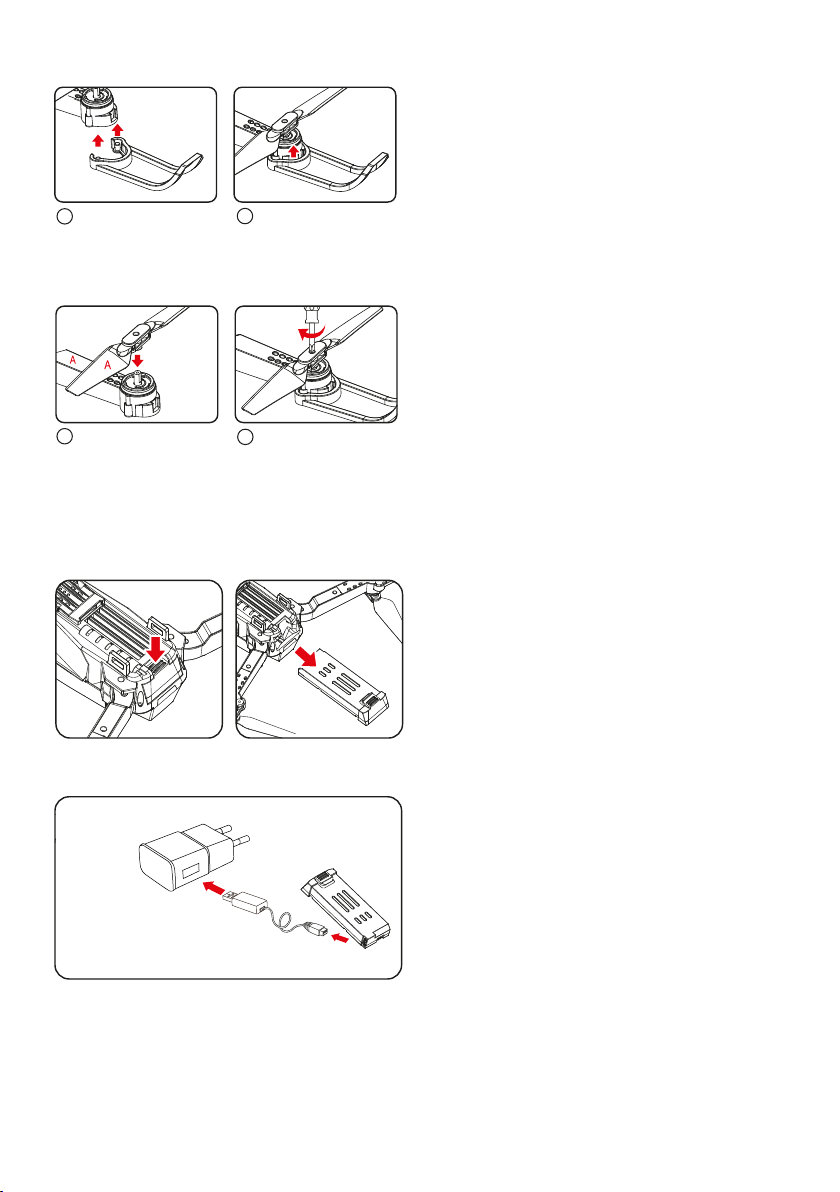
2.PLEGADO DE LOS BRAZOS
3.MONTAJE DE LAS PROTECCIONES
Abrir primero los brazos delanteros y posteriormente
los traseros
3

Afloje el tornillo de la hélice mediante el destornillador incluido y tire
de ella cuidadosamente. A la hora de instalar la hélice fíjese en la
forma del vástago y hágalo coincidir antes de presionarla hacia
abajo. A continuación apriete el tornillo.
4. SUSTITUCIÓN DE LAS HÉLICES
5. CARGAR LAS DE BATERÍAS DEL DRON
A.Retire la batería de la parte inferior del dron.
B.Conéctela al cable de carga y al cargador
NOTA:
Mientras la luz LED esté roja indicará que está
cargando. Cuando cambie a color verde se
habrá completado la carga. El tiempo de carga
es de unos 150 minutos (dependiendo del
cargador). El tiempo de uso es de unos 6
minutos.
INSTRUCCIONES DE LA BATERÍA
El uso de baterías de litio entraña cierto riesgo.
Puede provocar incendios, lesiones corporales o pérdidas materiales. Los usuarios deben ser
conscientes de los riesgos y asumir toda la responsabilidad por el uso inadecuado de las baterías.
•Si se produce una fuga de la batería, evite el contacto con los ojos o la piel. Si se produce, lávese los
ojos con agua limpia y acuda inmediatamente al médico.
•Por favor, desconecte el enchufe inmediatamente si percibe algún ruido extraño, olor o humo
Carga de la batería
•Por favor, utilice el cable de carga original para garantizar su uso seguro.
•No cargue la batería si está hinchada o deteriorada.
•No sobrecargue la batería. Desenchufe el cargador cuando esté completamente cargado.
•No cargue la batería cerca de objetos inflamables, como alfombras, suelos de madera o muebles de
madera, ni sobre la superficie de objetos electroconductores. Vigile siempre la batería durante la
carga.
•No cargue la batería si aún no se ha enfriado.
•La temperatura de carga debe estar entre 0 °C y 40 °C
Reciclaje de baterías
•No tire la batería a la basura. Por favor, deséchela de acuerdo sus requisitos especiales de reciclaje.
4
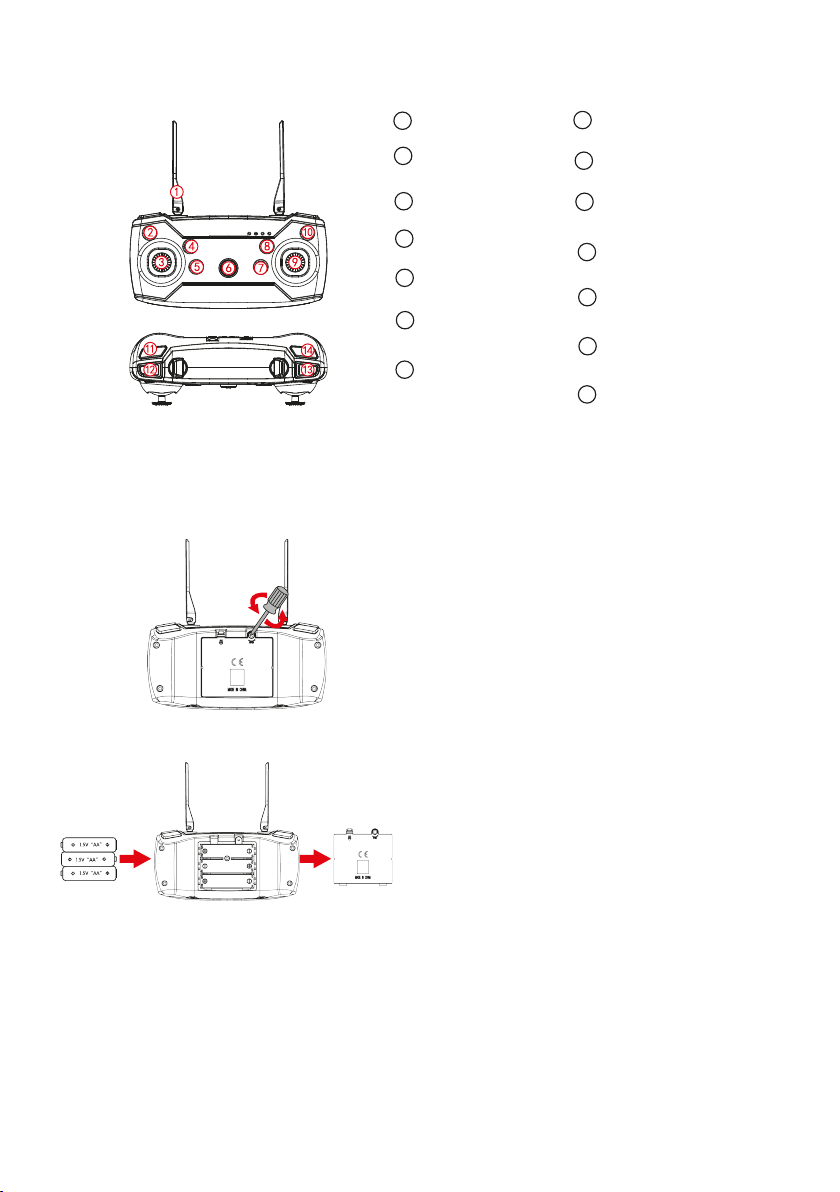
CONOZCA SU MANDO A DISTANCIA
Partes del mando a distancia Antena
1Ajuste vuelo
adelante
8
Ajuste de vuelo
hacia izquierda
2Joystick derecho
9
Joystick izquierdo
3Ajuste vuelo a
derecha
10
Ascenso
automático
4Modo
Headless
11
Aterrizaje
automático
5Aumentar/disminuir
velocidad
12
Interruptor de
encendido
6
Giro 360º
automático
13
Ajuste vuelo
atrás
7Calibrado
automático
14
INSTALACIÓN DE LAS PILAS DEL MANDO
Abra la tapa de las pilas del mando
Instalación de las pilas AA
Abra la tapa e inserte las 3 pilas AA correctamente. (no incluidas)
NOTA:
1.Asegúrese de que las pilas están cargadas y colocadas correctamente respetando los polos.
2.No mezcle pilas viejas y nuevas.
3.No mezcle pilas de distintos tipos.
5

CALIBRACION DEL MANDO CON EL DRON
1.Encienda el dron manteniendo pulsado el botón superior y sus luces se quedaran parpadeando.
2.Encienda el mando mediante su botón central y a continuación mueva hacia arriba el joystick
izquierdo y después hacia abajo hasta que oiga un pitido continuo y vea que las luces del dron ya no
parpadean y están fijas. En ese momento el dron se habrá sincronizado con el mando.
3.Pulse el boton 14 del mando para completar el proceso de calibrado. Las luces del dron
parpadearán rapidamente hasta quedarse fijas
INICIAR EL VUELO
NOTA: Para el primer vuelo y hasta que domine su control, coloque el dron en el suelo, en un lugar
abierto, libre de obstáculos
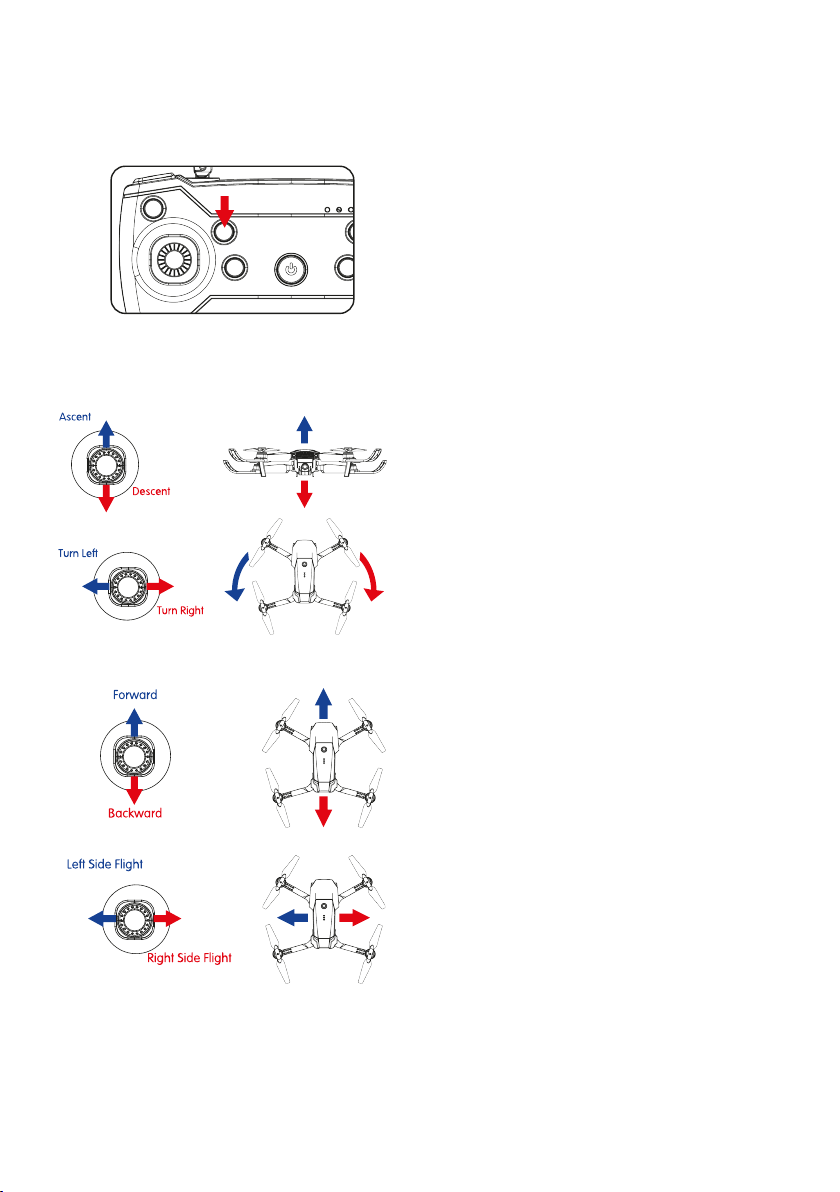
Ascenso automático
Pulse el botón 4 y las aspas del dron girarán y volará automáticamente hasta una altura de
1,5 metros.
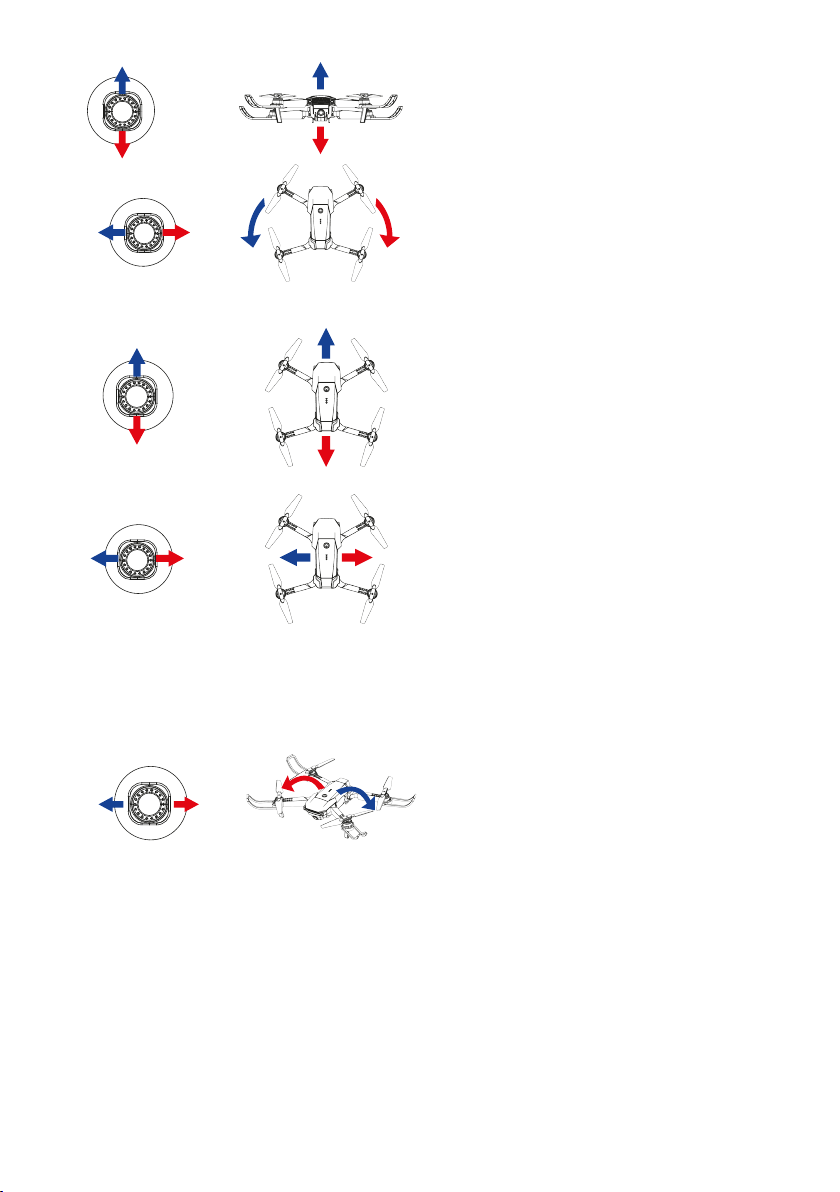
Funciones del Joystick izquierdo
Utilice el mando izquierdo para controlar la altitud de vuelo y girar a izquierda/derecha, y el mando
derecho para controlar las direcciones de vuelo hacia delante, hacia atrás, hacia la izquierda y hacia
la derecha.
6
Hacia arriba
Hacia abajo
Vuelo
Lado
Izquierdo Vuelo
Lado
Derecho
Giro 360º automático
Cuando el dron alcance más de 3 metros de altura, pulse el botón 13 y mueva el joystick derecho en
una dirección determinada. El dron girará en esa dirección.
Funciones del Joystick derecho
Funciones del Joystick derecho
Hacia delante
Hacia atrás
Vuelo
Lado
Izquierdo Vuelo
Lado
Derecho
Giro a la
izquierda Giro a la
derecha
Modo headless
Frecuentemente es difícil identificar qué parte del dron es el frente y cuál es la parte posterior cuando
está volando lo que puede generar cierta confusión con el control del mando.
Este modo elimina la necesidad de alinear la orientación del dron con el mando y permite una
experiencia de vuelo con la línea de visión mucho más fácil. Esta función rastrea la orientación del
dron con el mando y no con su orientación propia en el espacio. Es decir, no importa dónde esté
apuntando la parte frontal del dron, por ejemplo girar a la izquierda siempre hará que el dron gire a la
izquierda en tu punto de vista actual.
Pulse una vez el botón 11 para entrar a este modo y vuelva a pulsarlo para salir de él.
7

NOTA:
Cuando el dron se encuentre a menos de 30 cm del suelo, se verá afectado por el vórtice de las
aspas creado por él mismo y se volverá inestable. A esta distancia no será posible la calibración.
FUNCIÓN DE AJUSTE EN VUELO
Mientras vuela, el dron puede perder ligeramente el rumbo, lo que provoca que manteniéndolo
estático se desvíe solo hacia algún lado. Para ello haga clic en los botones 2, 10, 8 y 7 de ajuste del
mando según la dirección necesitada para calibrarlo hasta que el dron vuelva a la normalidad.
Ajuste hacia
delante/atrás
1
Ajuste de Vuelo
deLado Izquierdo/-
Derecho
2
8

PROBLEMAS
Fallo de
control
Ascensión
del dron
Aterrizaje
demasiado
rápido
Perdida de
la señal
No enciende al
pulsar el botón.
La velocidad de
rotación de las palas
principales es
demasiado lenta.
La palanca del
acelerador se tira
hacia abajo demasia-
do rápido.
El dron no responde
correctamente a las
órdenes del mando.
Asegúrese de que
opera el dron dentro
de la distancia
controlable de 40-50
metros.
Baje lentamente la palanca
del acelerador para realizar
un aterrizaje suave. O pulse
el botón de aterrizaje
automático
Empuje hacia arriba
el mando del acele-
rador.
Por favor, cargue
completamente la
batería.
No tiene la suficiente
potencia para
ascender.
Batería completa-
mente descargada.
Cárguela.
No vuele en días
ventosos. El rendi-
miento y el control
del dron se verán
afectados por los
fuertes vientos.
Vuelo inestable.
CAUSAS SOLUCIONES
PREGUNTAS FRECUENTES
9

MANUAL DE FUNCIONAMIENTO DE LA APLICACIÓN
Descargar e instalar la aplicación móvil
1.Busque "RC FPV" en "App store" o "Google Play" para descargar e instalar.
2.Escanee el siguiente código QR para descargar e instalar.
Ajustes de conexión:
1.Encienda el dron y empezará a emitir señal de WIFI mientras parpadean sus luces
2.Abra la opción de configuración del teléfono móvil, inicie WiFi, y busque la red "WIFI_4K…" en la
lista de búsqueda, haga clic en Conectar hasta que aparezca conectado. Es posible que el teléfono le
pregunte si desea mantener la conexión ya que esta red no dispone de internet, en este caso
indíquele que sí.
3.Abra la aplicación, haga clic en el icono "Configuración" situado en la esquina superior derecha
para seleccionar el modo de control y el idioma
4.Abra el software y haga clic en el icono "Inicio" para acceder a la interfaz.
RC FPV Descripción de la función
Mediateca Altura fija
Corregir
Volteo de imágenes
Panel de control
Más funciones
Modo música
Pantalla dividida
Zoom
Ajuste fino
Aterrizaje en un clic
Trayectoria de vuelo
Cinta de vídeo
Fotografía
Retorno
Control gestual
Giro
Modelo Vientiane
Acelerador y
rotación
Despegue con un
clic
Ajuste fino del
giro
Parada de
emergencia
Inducción de
gravedad
Ajuste fino
del vuelo
lateral
Control de
dirección
Interruptor
Velocidad
10
Política de garantía
En cumplimiento de lo establecido en el art. 16.7 del Real Decreto-ley 7/2021, de 27 de abril.
Ref. BOE-A-2021-6872, se pone a disposición de los interesados, accediendo a www.prix-
ton.com, cuanta información sea necesaria para ejercer los derechos de desistimiento
atendiendo a los supuestos que recoge dicha ley, dando por cumplidas las exigencias que
esta demanda de la parte vendedora en el contrato de venta.
Las características técnicas y eléctricas que aquí se brindan corresponden a unidades
típicas y podrían cambiarse sin previo aviso con el fin de proveer un mejor equipo.
Declaración ue de conformidad simplificada
Por la presente, La Trastienda Digital SL como propietaria de la marca comercial Prixton,
ubicada en Avenida Cervantes 49, módulo 25, Basauri 48970, Bizkaia, declara que el tipo de
equipo radioeléctrico que a continuación se expone:
Es conforme con la Directiva 2014/53/UE del Parlamento Europeo y del consejo de 16 de
abril de 2014.
El texto completo de la declaración UE de conformidad está disponible en la dirección de
Internet siguiente:
www.prixton.com LA TRASTIENDA DIGITAL
Nota: La potencia máxima de Radiofrecuencia es de 14 dB.
Nota: El objetivo de la protección contra el sobrecalentamiento del motor es tomar
medidas de protección en el diseño, la fabricación, la instalación y el uso del motor.
Cuando el motor funciona bajo ciertas condiciones de carga y sobrecalentamiento,
dejará de funcionar. Y volverá a la normalidad cuando la temperatura tienda a ser
normal.
MARCA MODELO DESCRIPCIÓN CATEGORÍA
PRIXTON SKY 4K DRONE MINI OCIO
11

KNOW YOUR DRONE
With a 2.4G frequency band for a long remote control distance, the drone allows multiple flights at the
same time without any interference. Users can control it to fly, hover, and take photos/ videos with the
APP and WIFI connection on a smartphone
Upper Casing
1Arm
5
Lower Casing
2Battery
6
Propeller
3Motor
7
Protective
Guard
4Camera
8
DRONE x1
(Battery Included)
Backup Propellers x2
Screwdriver x1 User Manual x1
USB Charger x1
Remote Control x1
ACCESSORIES
SUPER ENDURANCE FOLDABLEDRONE
OPERATINGMANUAL
Pleaseread this manual carefully before operation
andkeep it properly for future reference.
ETÀ 14 +
NOTES:
Please check the number of accessories carefully (as shown above). Please provide proof of
purchase and contact the store for replacement of any missing parts.
EN
12
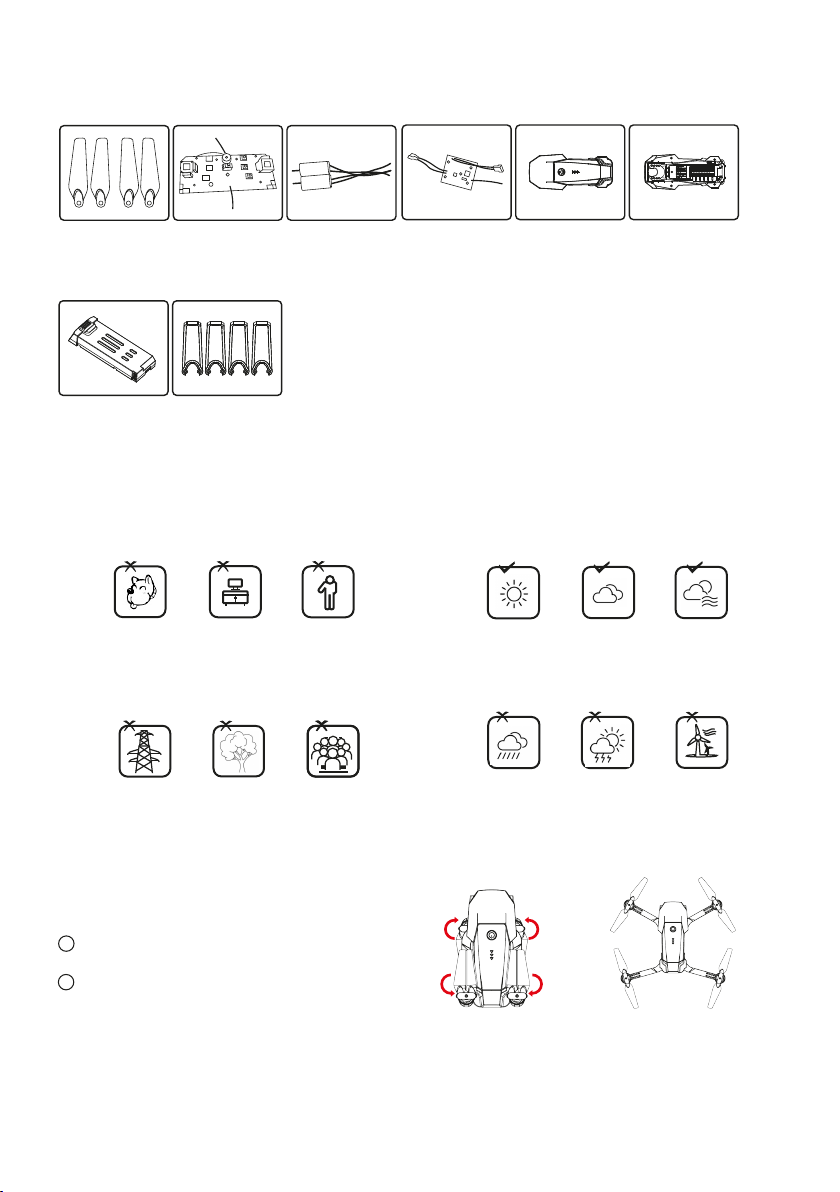
Propellers Launch board Motor Receiving
board
Battery Protective
Guard
Upper Casing
Lower Casing
OPTIONAL ACCESSORIES LIST
NOTES:
If any of the above accessories are damaged
during operation, you can contact the seller to
purchase.
PRE-FLIGHT PREPARATION
1. FLIGHT ENVIRONMENT
Indoor:Spacious spaces away from barriers,
crowds or pets are preferred.
Outdoor:Sunny, windless and breezy weathers
are preferred.
Please keep the drone in sight during the flight
and keep it away from barriers, high-tension
cables, trees, and people.
Do not fly in extreme environments such as
hotness, coldness, strong wind, or heavy rain.
2. 0PEN THE WINGS
Opening arm
OPENING STEPS
Open the front arm (close to the camera)
Open the back arm
Fold the back arm firstly and then the front
arm when folding.
1
2
13
Align the protective
guard with the two
holes below.
Correspond the
Propellers with the hex
nuts of the crankshaft
(The arm identification is
consistent with the Propellers
identification)
Tighten the screws
clockwise.
Press firmly on the
arrow position.
3. ASSEMBLNG PROTECTIVE GUARD
4. ASSEMBLING PROPELLERS
1
12
2
5.BATTERY CHARGING FOR DRONE
A. Remove the lithium battery from the bottom
of the drone.
NOTES:
LED lights turn red when charging and it will
turn green when full charging completes. The
charging time is about 150 minutes. The usage
time is about 6 minutes.
BATTERY INSTRUCTIONS
There is a certain risk when using lithium batteries.
14

It may cause fire, body injury, or property loss. Users must be aware of the risks and take full
responsibility for using batteries improperly.
• If battery leakage occurs, please avoid contacting your eyes or skin with electrolytes. Once it
happens, please wash your eyes with clean water and seek medical care immediately.
• Please remove the plug immediately if you sense any peculiar smell noise or smog.
Battery Charging
• Please use the charger from the original factory to ensure your safe usage.
• Do not charge the dilatant or outworn battery.
• Do not overcharge the battery. Please unplug the charger once fully charged.
• Do not charge the battery next to inflammable, such as carpet, timber floor, or wood furniture, or on
the surface of electro-conductive objects. Please always keep an eye on the battery when charging.
• Do not charge battery which not cool down yet.
• The charging temperature should be between 0°Cto 40C
Battery Recycling
• Do not dispose of the battery as daily rubbish. Please familiarize yourself with the local garbage
disposal method and dispose of it according to the special requirement.
KNOW YOUR REMOTE CONTROL
1.Parts of remote control Antenna
1Forward
fine-tuning
8
Left side fly
fine-tuning
2Right joystick
9
Left joystick
3Right side fly
fine-tuning
10
One-key
Ascend
4Headless
Mode
11
One-key
Landing
5High/low
speed
12
Power switch
6One-key
Flips&Rolls
13
Backward
fine-turning
7One-key
calibration
14
LITHIUM BATTERY INSTRUCTION
1. Open the remote control battery cover
15

2. Remote control battery installation
AA batteries
Open the battery cover and insert the 3 AA batteries correctly according to the electrode instructions.
(Batteries not included)
NOTES:
1. Make sure the battery are loaded correctly according to the polarity indications on the battery
compartment.
2. Please do not mix old and new batteries together.
3. Please do not mix different types of batteries together.
TRANSMITTER CALIBRATION
SIGNAL CONNECTION OF TRANSMITTER AND RECEIVER
1. Turn on the drone and place it on a level surface, the indicator light of the transmitter and the LED of
the drone flashing.
2. Push the throttle joystick to the highest point then push back to the lowest point, and when you hear
two beeps, the indicator light of the transmitter and the LED of the drone become normally on, and the
signal connection is completed.
Apply transmitter calibration when the drone fails to take off vertically. Press the "One button
calibration" button when the lights of the drone are on and then start flashing and keep it on again, the
calibration is complete, and the drone must be placed on a horizontal surface in a steady state when
the calibrations are conducted.
16
START YOUR FLIGHT
1. One-key Ascend
Press the "One-key Ascend" button, the drone blades rotate and automatically fly to a height of 1.5
meters.
2. Basic Flight
Use the left joystick to control the flight altitude and turn left/ right, and the right joystick to control the
forward, backward, left and right side flight directions.
Flips & Rolls
When the drone is reaching more than 3 meters high, click "360° flips and rolls" and move the right
joystick to a certain direction, the drone will rotate in that direction.
Right joystick
17

Right joystick
Headless Mode
The flight direction of the drone is subjected to the direction of remote control.
1. When the drone adjusts the frequency, the drone is default to common mode. Then the indicator
light of the drone is normally on. When you press the headless function key of the remote control, the
remote control beeps once and enters a headless state. When you press the headless function key
again, you listen to a long beep sound and the drone exits the headless mode.
2. ln the headless state, the operator doesn't need to identify the direction of the nose but control the
drone according to the operating level of the remote control.
Hover
When you release the left joystick (throttle) after the ascent/descent action, the drone will hover at a
certain height.
Left joystick
NOTES:
When the drone is within 30cm from the ground, it will be affected by the blade vortex made by itself
and become unstable. This is the “ground effect”. The lower this drone is. The greater the effect will
be.
FINE-TUNING FUNCTION
When deviating from course, click "Fine-tuning" for calibration until the drone is back to normal.
Forward/Backward
Fine-tuning
1
Left/Right Side
Fly Fine-tuning
2
18

PROBLEMS
Control
failure
Fail to
ascend
Landing too
soon
Out of
control
Not connect with the
quadcopter battery.
The rotation speed
of main blades is too
slow.
The throttle stick is
pulled down too fast.
Beyond the effective
controlling distance.
Ensure operation
within the controllable
distance:
remote
control of 100 meters
and WIFI control of
40-50 meters.
Pull down the throttle
stick slowly to perform
a smooth landing.
Push up the throttle
joystick.
Please full charge
the quadcopter.
The battery of the
quadcopter is not
fully charged.
Connect the quad-
copter battery in
right way.
Do not fly on windy
days. The perfor-
mance and the
control of the quad-
copter will be affec-
ted by the strong
winds.
Too strong wind force.
CAUSES SOLUTIONS
FAQ
19

Media library Fixed height
Correct
Image flipping
Control panel
More features
Music mode
Split screen
Zoom
Fine tuning
One click landing
Trajectory flight
Videotape
Photograph
Return
Gesture control
Roll
Vientiane model
Throttle and
rotation
One click take off
Spin fine tuning Emergency
stop
Gravity
induction
Side flight
fine tuning
Direction
control
Switch
Speed
APP OPERATION MANUAL
Download and install mobile App
1. Search "RC FPV" in "app store" or "Google Play" to download and install.
2. Scan the QR code below to download and install.
Connection settings:
1. Connect the power supply of the module, and the indicator light starts to flash, which indicates that
the mobile phone is waiting to be connected.
2. Open the mobile phone settings option, start WiFi, and search "WiFi_*** " in the search list , click
Connect until connected appears, which means the connection is successful.
3. Open the software and click the "Start" icon to enter the real-time image transmission interface.
RC FPV Function description
20
Table of contents
Languages:


