Juguetronica NANODRONE EVOLUTION Manual

MANUAL OF INSTRUCTION
Age: 14+
NANODRONE
EVOLUTION

BOX CONTENTS
CONTROL
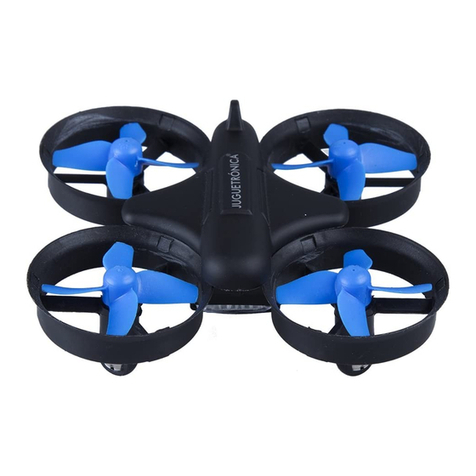
1 x Nanodrone Evolution
The front of the NanoDrone corresponds to the black propellers
Control Parts
Installing Batteries
Connecting Headset
Indicator
On/Off
Language selection but-
ton (Spanish / English)
Button to activate the ab-
solute control
Button to activate the
aerobatics mode
Power lever and turns (up
/ down, left / right)
Trimming button
Lever forward / bac-
kward and left / right
direction
Remove the battery
cover by removing the
screws with the inclu-
ded screwdriver.
Replace the cover and
tighten the screw.
Place 3 “AAA” batteries
according to the
correct polarity.
1 x Control
1 x USB
Cable 1 x Screwdriver 1 x Battery
2 x Propellers A
2 x Propellers B
1 x Manual of
Instruction
1 x Headset

BATTERY CHARGE
TAKE OFF
The Nanodrone Evolution has two flight modes:
1. Manual mode.
2. Multimode (combination of manual control and voice control).
Log in and synchronization
1. Inserts in the battery NanoDrone Evolution (compartment is located at the bottom of
the drone) and connects the drone battery. The drone lights up and the four LEDs blink
rapidly.
2. Connect the headset to the control (see “control parts” section to locate the connector).
When you connect the control, this will sound twice as the handset emits a warning sound
and you will hear the “voice recognition activated.” Then, the flash control of the LED and
the two LEDs flash slowly in the drone.
3. When you push the left lever control up completely, the control will emit a beep. Then you
push the lever back down completely (picture 1); the control will emit a beep and the LED
of the control stops flashing and remains with the fixed light. The drone lights also stop
flashing and become fixed. Now the drone and the control are synchronized.
Connect one end of the USB charge cable to USB port of a PC or a plug adapter and the other
end to the battery.The indicator lights in red while the battery
is charging. When the battery is fully charged, the light
goes off. A full charge will take between 70 and 100 minu-
tes and provides an autonomy of 5 minutes of flight.
After synchronization, move both levers inwards and diagonally (image2). This action turns on
the engines allowing the drone get ready to take off. Now raise the left lever to make the drone
take off and start flying. If you release the power lever, you will notice that the drone keeps the
stationary flight, this is possible thanks to the integrated height control system.
It can also take off using voice control, saying loud and clear the “TAKE OFF” command.
Turn Off
Lower the power lever to maximum (figure 3) and hold or pronounce the “RE-
TURN” voice command so the drone will automatically descend until it lands.
To turn off the motors, move both levers inwards and diagonally (figure 2).
Calibration
Synchronizes the control with the drone. Place the drone on a horizontal
surface and perform a turning clockwise, with the right lever (picture
4). The four LEDs of the drone flash for few seconds performing the
calibration. Then, the LED will stop flashing. Picture 4
Picture 3
Picture 2
Picture 1
FLIGHT CONTROL
IMPORTANT
During the synchronization process and / or calibration, place the drone on a horizontal surface
to achieve stable flight.
If the drone tends to move in stationary flight, do the calibration process.
Previous advices
It takes the time to learn to maintain good control of the drone. We recommend that, in the
beginning you fly slowly and without sudden movements. If the drone come down slightly, slowly
push the left lever to adjust the height of the flight. Do not move abruptly the power lever (left).
Trimming
Press the trimming button to activate the “adjustment mode”. The
LED os the control will flash. Now, perform the following steps de-
pending on what happens to the drone:
• The drone advances by itself in stationary flight. In “Setting
mode” activated, move the right lever down (the led back
of the drone turns off) until the drone stop moving.
• The drone goes back by otself in stationary flight. In the
“adjustment mode” activated, move the right lever up (the
LED of the front goes off).
• The drone moves right by itself at steady flight. In the “adjustment mode” activated, move
the right lever to the left (the LED on the left of the drone goes off) until the drone stops
to move right by itself.
• The drone moves left by itself in the stationary flight. In “Mode setting” activated move
the right lever to the right (the LED on the right of the drone goes off) until the drone stop
move left by itself.
Push the lever on the left (power) up or down
to for the drone goes up or down respectively.
Push the lever on the right (direction) to
forward and back and the drone move
forward and back respectively.
Push right lever (direction) left or right so the
drone moves to the desired direction.
Push the lever on the left (power) to the left
or right, the drone will turn to the left or right
respectively.
Turn right
Turn left
Go up
Go down
Left Right
Go forward
Go back

FLIGHT IN ACROBATIC MODE
The drone moves left by itself in the stationary flight. In “Mode setting” activated move the right
lever to the right (the LED on the right of the drone goes off) until the drone stop displaceable
left alone.
Note: If in the “Mode setting” on, three seconds pass without making any adjustment movement,
the “adjustment mode” turns off alone and the LED indicator On / Off will stop flashing and
will again be fixed.
Press the right lever; the control will emit a beep and enter
into “acrobatic mode”.
In this mode, the drone can perform loops.
Low Battery Alarm
If the four leds of the drone start flashing, it is said that the drone’s battery is running out. At this
time, the drone automatically disables the “acrobatic mode” and back to “normal mode” flight.
Looping to the left
Press the right lever and the control will
emit a beep. Now, push the lever to the
left and the drone will perform a looping
to the indicated side.
Looping to the right
Press the right lever and the control will
emit a beep. Now, pushes the right lever,
the drone will hold a loop to the indi-
cated side.
Looping forward
Press the right lever and the control
will emit a beep. Now, push the lever
forward, the drone will perform a loo-
ping to the indicated side.
Looping backward
Press the right lever and the control will
emit a beep. Now, push the lever back
and the drone will perform a looping to
the indicated side.
To prevent accidents, we recommend that the drone flies at
a height of reference at least 1.2m., Since, after performing
aerobatics may lose some height.

FLIGHT IN ABSOLUTE CONTROL MODE
Absolute control mode
When “Control Mode Absolute” is activated, the drone can return auto-
matically to where it took off (back home).
Activation and configuration of Absolute Con-
trol Mode
Place the drone on a horizontal surface or hold stationary flight kee-
ping the front of the drone (black propellers) pointing forward (pictu-
re 4). In this position, press the left lever. The control will emit a beep
while the LED lights of the front and the back flash. The “Absolute
Control Mode” is enabled.
Disable Control Absolute Mode
Press the left lever and the control will emit a beep while the LED
lights of the front and traseirase remain lit steadily. The “Control
Mode Absolute” is disabled.
Calibration
If the drone suffer an accident, you may begin to deviate
during the flight, so you’ll have to perform a calibration. To
do this, place the drone on a horizontal surface and perform
a clockwise rotation with the right lever (picture 5). The four
LEDs of the drone flash for a few seconds. When the LEDs stop
flashing, the calibration will be over.
Look at the following images
With the “Absolute Control Mode” on, no matter where it is directed the front of the drone (black
propellers): if moves right lever down, the drone will return back and push it forward, the drone
will move away from you.
Picture 4
Picture 5

FLYING IN VOICE CONTROL MODE
Start
After the initial pairing, select your language with the button “Language selection”: “S” for Engli-
sh and “F” for Spanish and then says in a loud, clear voice command “TAKEOFF” to start flying
drone. The flight should be adjusted by the left lever manually.
In the “Voice Control Mode” the drone can be controlled by voice commands.
For a correct run operation voice control, avoid noisy environments or hold conversations with
others. The voice commands only operate and the normal flight mode.
Available commands
TAKE OFF GO UP GO DOWN
FORWARD
BACKWARD

LEFT
RIGHT
BACK
AUTOMATIC PILOT

COME BACK
(In Absolute Control Mode)(Regular mode control)
CANCEL
FLIP FORWARD ROTATION
IMPORTANT
The voice command “COME BACK” behaves differently according to the flight mode that
is enabled. In normal mode the action is “LANDING” while the absolute control mode
the action “GO BACK”. In mode absolute control this is the only command that works.
When you are flying in “Absolute Control” mode, you can bring the drone again the
starting position before the voice command “COME BACK”. After this command the will
return flying at you (turning on its own axis).
When it is near to you, press the left stick (to disable Absolute Control) and the drone to
land in this place. After settling down, the propellers stop.

DO AEROBATICS
DANCE CIRCLES
Recommendation: In voice control mode enabled you should not speak normally as
the drone can interpret wrong commands and cause uncontrolled movements and
even cause accidents. If you have to talk, unplug the headset first . Then the acrobatic
flight mode is activated, always flies outdoors. Thus, you will avoid the drone strikes
against objects.
FLIP BACKWARD FLIP LEFT FLIP RIGHT

ASSEMBLY OF THE PROPELLER
POSSIBLE PROBLEMS AND SOLUTIONS
All propellers of the drones are equal. Follow
the installation order, so always make match
propeller and engine:
• The propeller A with motor A.
• THE Propeller B with motor B.
It is important that each hills propeller in place
to prevent the drone fly from incorrectly.
The propellers are fitted by pressu-
re; to removing them, just pull while
holding with one hand propeller and
with the other hand the engine. To
assemble the new propeller, follow
the same steps, with the positions
reversed.
BLACK PROPELLERS
A
B
B
A
PROBLEM SOLUTION
The control does not
work Synchronize the drone and the control
The gyroscope does
not work
Change the batteries if they are exhausted
Synchronize the drone and control
Place the drone on a horizontal surface and make the calibration
The drone does not do
acrobatics
Push the right lever to activate the acrobatics mode
Recharge the battery if it is low
The drone vibrates
during flight Check the drone and proves that all parts are correct
The drone can not fly
Confirms that the propellers are assembled well
Proves that the drone and the control are synchronized
Check the battery that is not low, if so, loading it
El drone se desvía
Comprueba que las hélices estén bien montadas
Realiza los ajustes de trimado hasta corregir la desviación

JUGUETRÓNICA, SL - NIF: B83788414
Gracias por adquirir este producto.
Warranty and Service National Technical
Shop: C/ Alberto Aguilera, 1 - 28015 Madrid - España
After sales service: C/ Acuerdo, 36 - 28015 Madrid - España
INFORMATION ABOUT BATTERIES USE
• Do not mix different types or new to used.
• Do not recharge non-rechargeable batteries.
• The charging process should always take place under the supervision of an adult.
• Use only recommended batteries and assures you that correctly places according to the
polarities “+” and “-”.
• Remove the batteries when you are not using the Nanodrone Evolution.
• Takes the control of used batteries.
• Turn off the Nanodrone Evolution when you are not using it.
• We do not recommend the use of rechargeable batteries.
• Not cause short circuit.
• Deposit the batteries in a battery collection point. Do not mix with organic waste, bury
or burn the batteries.
• Do not open a battery, it can explode and / or leak toxic liquids.
• Bad contact can cause loss of energy.
• If Nanodrone Evolution is affected by any electrical interference, move it to another zone
free of interference and reset, off and on, or removing and placing the batteries.
• Loads Nanodrone Evolution only with your charge cable and control.
O conteiner com rodas riscado indica que os produtos e as baterias
não devem ser depositados com lixo orgânico, já que contém subs-
tâncias nocivas para o meio ambiente. Por favor, utiliza os pontos de
coleta para depositá-los.
Table of contents
Other Juguetronica Drone manuals

Juguetronica
Juguetronica THE FOLLOWER User manual

Juguetronica
Juguetronica MICRODRONE AUTOFLIGHT User manual

Juguetronica
Juguetronica VR HD NANO DRONE User manual

Juguetronica
Juguetronica BRICK DRONE User manual

Juguetronica
Juguetronica SMARTVIEW Manual

Juguetronica
Juguetronica VR AUTOFLIGHT User manual

Juguetronica
Juguetronica JUG0315 User manual

Juguetronica
Juguetronica MICRO HEXADRONE VCAM HD User manual

Juguetronica
Juguetronica SMARTDRONE BT User manual

Juguetronica
Juguetronica JUG0246 User manual