E Star Hubble-11 User manual

EN HUBBLE DRONE
USER MANUAL
Thank you for purchasing eSTAR product
PLEASE READ THESE INSTRUCTIONS THOROUGHLY BEFORE USE
For detailed information please visit www.estar.eu
• The Product is made of highly durable plastic materials
• 4 Axis construction with 6 Axis Gyro Stabilizer enables precise ight positioning
• Ease of use by selecting the ight speed
• Headless mode and Return to Home functions
• 2.4Ghz Radio Remote Control
• 360 degree 3D overturning
The Manufacturer reserves the right to alter the parameters/functions without the prior written notice.
MAIN TECHNICAL DATA AND FEATURES:
Size 110x110x28mm
Recommended eld of use: Indoor, outdoor
Recommended user age 12+ years
Maximum ight control range 20-25m
Battery: 3.4V LiPo 150mAh
Flight time 6-7 min
Weight 60g
EN
WARNING TO AVOID DAMAGES:
• USE ONLY ORIGINAL SPARE PARTS
• DO NOT DISSASEMBLE THE PRODUCT
• INNER PARTS CAN BE REPAIRED ONLY BY SERVICE CENTER. PLEASE CONTACT QUALIFIED
• SERVICE PARTNERS IN YOUR COUNTRY.
BATTERY SAFETY NOTES
• Danger of re and explosion occurs if a battery is not
connected properly.
• Always charge LiPo batteries under supervision.
• Always use ONLY the original LiPo- battery
• Please stop charging if you notice a deformation or if
the battery is blowing up!
• Do not shortcut, never throw into re!
• Do not use if the battery deforms, discolors or softens
• Store the battery at temperatures between 10° and 30°
at dry and dark places.
• Avoid heating over 50°C at charge or discharge
• The recommended charging capacity - min. 80%,
• Never exhaust the battery
• Store away from children and pets
• Keep away from re, water, heating sources
and foreign materials that can cause a shortcut
• Always use the original charger which is placed
on a reproof surface
• Avoid mechanical exposure and do not open
• Do not touch the battery if gas or liquid leaks
out of the battery
• Improper handling may result into health
problems
• Dispose wasted batteries properly
BATTERY DISPOSAL SYMBOL
This symbol is marked on a product or packaging, it means that the product including the
batteries must not be disposed of with your general household waste. Only discard electrical/
electronic items in separate collection schemes, which cater for the recovery and recycling of
materials contained within. Your co-operation is vital to ensure the protection of the environment.
GENERAL SAFETY NOTES
This Aircraft is powerful, please use the throttle stick gently especially for the rst ight.
Fly only in the safe areas away from the other people and obstacles.
FLY the drone only in the Line of sight, always ensuring the controlled returning back possibility
DO NOT y during windy conditions, limited visibility
DO NOT y over crowds, high trees, buildings, electric Power Lines and the other danger areas
The manufacturer is not responsible to any accident, damages, injuries and other direct or indirect losses
originating from the error of the Pilot, collision, radio interference or the other improper use during
operation.

3
For the better rst experience satisfaction it is strongly recommended to obtain the assistance of experienced
pilot.
The operating temperature range of the product is from +150C to +300C.
Please switch o the power of the aircraft and the Remote Control Unit when not in use.
Keep the product in a cool and dry place, away from the liquids and heat sources.
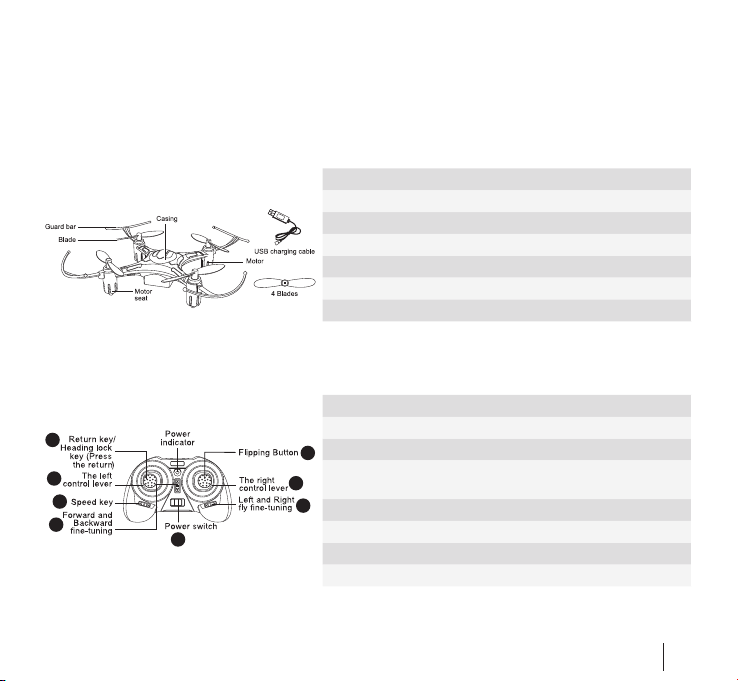
GENERAL PACKAGE CONTENTS (1a)
REMOTE CONTROL UNIT (RCU) COMPONENTS (1)
1. Drone base housing with propeller blades assembled.
2. 150mAh LiPolymer battery
3. USB charger
4. Remote Control Unit (batteries are not included)
5. Landing foot, 4 pcs
6. Propeller blades, 4 pcs.
7. Screwdriver
1. Speed button
2. Flip button
3. Up/down and turn left-right Joystick
4. Forward / backward, left / right Joystick
5. Headless mode button/ return home
6. Left-right side trim button
7. Forward / backward trim button
8. Power switch
1
2
34
5
6
7
8
EN
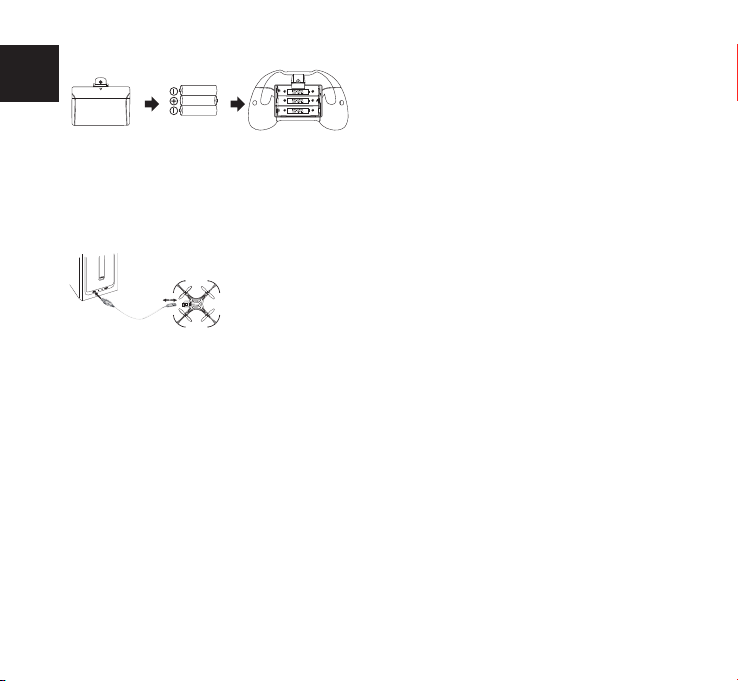
REMOTE CONTROL UNIT BATTERY INSTALLATION (2)
RECHARGING OF LITIUM POLYMER BATTERY (3)
PREPARATION FOR THE FLIGHT
BINDING OF RADIO TRANSMITTER AND RECEIVER (4)
Please use 3 AAA type batteries (not included)
Step 1:
Open the battery cover on the back of the RCU
Step 2:
Put inside 3 AAA type batteries, following the + and – polarity signs as marked
In the battery place and pictures
WARNING! Install the batteries with correct polarity
DO NOT mix old and new batteries
DO NOT mix dierent types of the batteries
Please read the safety notes for the battery rst!
Please connect the USB charger cable to the battery charging port.
Further the USB charger should be connected to the USB port of the computer or
AC USB charger. When the red LED is on - the battery is charging. When red LED
is blinking or turned OFF – the battery is fully charged. Please note the USB port or
USB charger should support the current not less than 0,5A. The charging time may take up to 60 mins.
Step 1 (5): Install the battery in the drone’s battery compartment, as shown on picture.
Connect the battery cable to the drone power cable with black/red connector.
Place the drone on the at surface. Turn on the power switch on the drone.
The lights of the drone will start ashing.
Step 2. (6): Lower the throttle stick to the lowest position, then turn on the remote controller.
Turn the throttle stick shortly up/down.
Wait until the RCU indicator and the drone lights stop ashing, then the drone is ready to y.
Step 3. (7): When ying is nished, turn o the drone power switch. It is also recommended to disconnect
The battery power cable when not in use for a longer period to have a longer battery life.
Step 4. Turn o the RCU power. (8): If the drone is not used for the longer period, it is recommended to remove
the batteries from RCU.
5
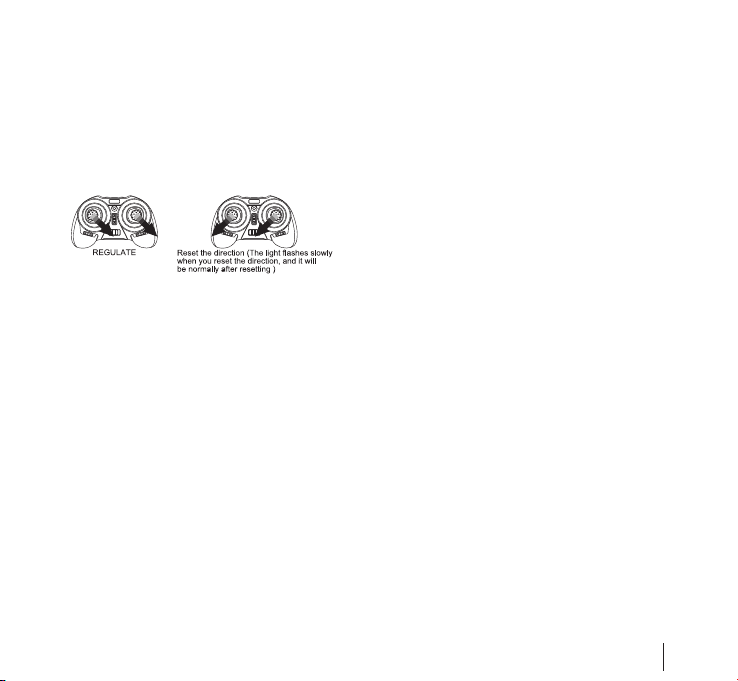
FLIGHT SETTING AND ADJUSTMENTS
AUTOMATIC CALIBRATION (on at horizontal surface): (11)
ADJUSTING OF THE TRIM (FINE TUNING) (10)
Practice simulation before actual ying
1. Please practice with the RCU joysticks and buttons until you will get used to the Remote Controller.
2. Put the aircraft in the open space, 2-3 meters in front of you, the red lights mark the front of the drone.
3. Exercise the joystick functions without turning on the RCU, then practice the hovering function and adjusting
the trim of the drone rst, see instructions further. Hovering means keeping the drone in the mid-air, xed
position.
It is recommended to set the drone into “calibration” mode
before ying, so all settings will be restored as factory settings
with automatic ne-tuning.
Calibration methods :
1. For Gyroscope calibration please move simultaneously left
and right joysticks to lower right position. Wait until the LEDs on the drone stops blinking.
2. For Direction reset please move simultaneously left and right joysticks to lower left position. Wait until the LEDs
on the drone stops blinking.
It is recommended to perform both calibrations before the ight.
When starting to hover at the low level above the ground the drone may move slightly in either direction – left
or right, forward – backwards, or turn left - right even if the joysticks are in central position. If this is noticed, it is
required to proceed ne tuning by the help of ne tuning buttons on the RCU FUNCTIONS. There are 2 buttons
with 2 positions for ne tuning each direction, please check the picture of RCU. Press these buttons up to several
times (each time you will hear the beep) for forward – backward, left –right and turning right – left ne tuning.
Please check the illustrations for the trim adjustments.
360 degree FLIPPING FUNCTION (9)
When you are used to basic operation, you can do some awesome tricks and stunts!
First, y the drone to the height not less than 2-3 meters, press FLIP button (press down RIGHT joystick) , then
push the right joystick in any desired direction to make 360 degree ip.

EN HEADLESS ( COMPASS) MODE FUNCTION (12)
AUTO RETURN FUNCTION (13)
TROUBLESHOOTING INSTRUCTIONS
Normal mode is used to control the drone positioned accordingly in front – back position.
Headless mode enables to control the drone according to joystick commands in any drone positioning. After Headless
mode button is pressed, you will hear the beeps.
Turning ON: Please move simultaneously left and right joysticks to lower left position, then press the left joystick.
The beep sound starts indicating the mode is turned on.
Turning OFF: Press the left joystick, the beep sound disappears, the drone is in normal mode.
NOTE: THIS FUNCTION IS NOT ACTIVE IN HEADLESS MODE !
When you are ying the drone, it is possible to return it back to Operator position by pressing Auto return button. The
drone will automatically y to the direction of RCU / Operator. Warning: the drone will NOT perform automatic landing!
Please switch the function o by pressing the button again to overtake the drone control at Close range.
Situation Cause Way to deal
Receiver status LED blinks continuously
for more than 4 seconds after vehicle is
powered, no response to control input
Unable to bind to transmitter Repeat power up initializing process
No response after battery connected
to drone
1.Power to transmitter and
receiver
2. low transmitter / receiver
voltage
3. poor contacts on the
terminals
1. Check if battery is connected properly,
turn on the drone again.
2. Use fully charged batteries
3. Re-seat the batteries in the battery
compartment after checking their
condition
Motor does not respond to the throttle
stick lever, LED ashes
Battery depleted Change / charge the battery
Main rotor spins, unable to take o Main rotor blade deformation
Drone battery depleted
Inspect the propellers and replace if
necessary
Change / charge the battery
Strong vibration of the drone Deformed blades / axis Replace the blades,
apply to the Service Center
Tail still o trim after ne adjustment,
inconsistent speed during ight or turn
Damaged rotors
Damaged drive motor
Replace rotors / motor
Flight is still not stable after trim
adjustment during hover
Gyroscope operation fault Repeat Automatic Calibration procedure

7
14. Propeller replacement according to the propeller shape
1. 2.
Please note, before replacing the
propeller make sure the replacement
propeller shape is the same.
EN

ES Helicóptero radiodirigido HUBBLE
MANUAL DE USUARIO
Gracias por comprar el producto de eSTAR
POR FAVOR, LEA LAS INSTRUCCIONES ANTES DE USO
Información detallada www.estar.eu
• El producto está hecho de materiales poliméricos de alta resistencia
• Construcción de 4 ejes con un estabilizador giroscópico de 6 ejes
• Fácil de usar, la elección de la velocidad de vuelo
• Modo “Principiante” (Headless mode) y modo de regreso a casa
• Control remoto de 2,4 GHz
• 3D giro a 360 grados
El fabricante se reserva el derecho de cambiar los parámetros/funciones sin previo aviso por escrito
ESPECIFICACIONES Y CARACTERÍSTICAS PRINCIPALES:
Tamaño 110x110x28mm
Aplicación recomendada: actividades al aire libre, Para locales
Edad de usuario recomendada desde 12 años
Distancia máxima de control de vuelo 20-25m
Acumulador: 3.4V LiPo 150mAh
Tiempo de vuelo 6-7 min
Peso 60g

ES
¡Atención! Con el n de evitar daños:
• UTILICE SÓLO PIEZAS DE REPUESTO ORIGINALES;
• NO DESMONTE EL PRODUCTO;
• LOS COMPONENTES INTERNOS DEL DISPOSITIVO PUEDEN SER REPARADOS POR EL SERVICIO TÉCNICO.
CONTACTE CON NUESTRO CENTRO DE SERVICIO EN SU PAÍS;
NOTAS SOBRE LA TÉCNICA DE SEGURIDAD DURANTE EL
USO DEL ACUMULADOR
• Si la batería no está conectada correctamente, puede
ocurrir un riesgo de incendio o explosión.
• Siempre cargue el acumulador Li-Po bajo su propia
supervisión.
• Siempre use sólo el acumulador original LiPo.
• ¡Deje de cargar si nota cualquiera deformación o si el
acumulador comienza a inarse!
• ¡No provoque un cortocircuito, no lo tire al fuego!
• No utilice el acumulador en caso de su deformación,
decoloración o ablandamiento.
• Mantenga el acumulador a una temperatura de 10 ° C a 30 °
C en un lugar seco y oscuro.
• Evite el calentamiento más de 50 ° C durante la carga o
descarga.
• La capacidad de carga recomendada - min. 80%.
• Nunca agote el acumulador.
• Mantenga el dispositivo alejado de los niños y
mascotas.
• Mantenga alejado de los fuentes de fuego, agua,
calor y de los materiales extraños que pueden
causar cortocircuito.
• Siempre utilice el cargador original, que está
colocado sobre la supercie refractaria.
• Evite el impacto mecánico en el dispositivo y no
lo abra.
• No toque el acumulador en caso de una fuga de
gas o líquido de él.
• Cualquier manejo inadecuado puede provocar
problemas de salud.
• Deseche adecuadamente las baterías usadas.
SIGNO DE RECICLAJE DE LAS BATERÍAS
Si este símbolo está disponible en el producto o su embalaje, indica que el producto, incluyendo
las baterías, no debe desecharse con la basura doméstica convencional. Desheche los
componentes eléctricos/electrónicos en lugares especiales que están destinados a utilización
y reciclado de los materiales contenidos en ellos. Su cooperación es vital para garantizar la
protección del medio ambiente.
INFORMACIÓN GENERAL DE SEGURIDAD
Este helicóptero radiodirigido es muy potente; por favor, utilice la palanca de mando con cuidado, especialmente
durante el primer vuelo. Es necesario lanzar el aparato sólo en zonas seguras, lejos de otras personas y obstáculos.
Lance el helicóptero radiodirigido sólo en los límites de visión directa, proporcionando siempre su control y
capacidad de regresar. NO lance el helicóptero radiodirigido en los fuertes vientos y la visibilidad limitada. NO
lance el helicóptero radiodirigido encima de la multitud, árboles altos, edicios, líneas eléctricas y otras áreas
peligrosas. El fabricante no asume responsabilidad de los accidentes, daños, lesiones y otras pérdidas directas
11
o indirectas que ocurren a causa de un error del piloto, colisiones interferencias de radio o cualquier otro uso
inadecuado durante la operación. Para obtener las mejores prácticas de control, se recomienda insistentemente el
uso de la ayuda de pilotos con experiencia durante el primer lanzamiento. Diapasón de temperatura de operación
del producto: de + 15 ° a + 30 ° C. Por favor, apague la alimentación del helicóptero radiodirigido y su control remoto
cuando no está en uso. Almacene el producto en un lugar fresco y seco, lejos de líquidos y fuentes de calor.
JUEGO DE SUMINISTRO (1a)
FUNCIONES DEL CONTROL REMOTO (1)
1. Cuerpo ensamblado del helicóptero radiodirigido con paletas.
2. Acumulador 150 mАh, LiPo
3. Cargador USB
4. Control remoto (las pilas no están incluidas)
5. Soporte para aterrizaje, 4 ps.
6. Paletas de hélice, 4 ps.
7. Destornillador y juego de hélices
1. Botón de velocidad
2. Botón de vuelta
3. Palanca de mando hacia arriba/abajo y a la izquierda/derecha
4. Palanca de mando hacia adelante/atrás y a la izquierda/
derecha
5. Botón del “Modo de principiante”
6. Botón de control del trimer a la izquierda-derecha
7. Botón de control del trimer hacia adelante-atrás
8. Interruptor de alimentación
1
2
34
5
6
7
8

ES
INSTALACIÓN DE LAS PILAS EN EL CONTROL REMOTO (2)
CARGA DEL ACUMULADOR DE POLÍMERO DE LITIO (3)
PREPARACIÓN PARA EL VUELO
MEDICIÓN DE REFERENCIA DEL TRANSMITOR DE RADIO Y RECEPTOR (6)
Por favor, use 3 pilas del tipo AАА (no se incluyen en el
juego)
Paso 1: Abra la tapa del compartimiento de pilas en la parte
posterior del control remoto
Paso 2: Instale adentro 3 pilas del tipo AАА, con la polaridad correcta.
ATENCIÓN!
• Instale las pilas con la polaridad correcta
• NO instale las pilas viejas y nuevas simultáneamente
• NO instale las pilas de diferentes tipos.
¡Por favor, lea las instrucciones de seguridad cuando utiliza el acumulador!
Por favor, conecte el cable del cargador USB al puerto de la carga de acumulador.
A continuación, el cargador USB debe estar conectado al puerto USB del ordenador
o al cargador USB de la red eléctrica. El indicador rojo signica que la batería se está
cargando. Si el indicador rojo está parpadeando o apagado – el acumulador está
completamente cargado. Por favor, tenga en cuenta que el puerto USB o el cargador USB deben mantener una
corriente de al menos 0,5A. La carga puede durar 60 minutos.
Paso 1 (5): Instale la batería en el compartimiento de batería del helicóptero radiodirigido, como se muestra en la
gura. Conecte el cable del acumulador con el cable de alimentación mediante el conector negro/rojo. Coloque
el helicóptero radiodirigido sobre una supercie plana. Enchufe el interruptor de alimentación del helicóptero
radiodirigido. Los indicadores del helicóptero radiodirigido empezarán a parpadear.
Paso 2. (6): Baje la palanca de mando a la posición inferior extrema, y luego enchufe el control remoto.
Realice la conmutación rápida de la palanca de mando hacia arriba/abajo.
Espere hasta que el indicador de control remoto y los indicadores del helicóptero radiodirigido dejen de
parpadear. Ahora el helicóptero radiodirigido está listo para el vuelo.
Paso 3. (7): Al nalizar el vuelo, apague el interruptor de alimentación del helicóptero radiodirigido. También se
recomienda desconectar el cable de alimentación del acumulador, cuando aquel no está en uso durante un
período prolongado con el n de tener una mayor duración de servicio del acumulador.
Paso 4. Apague la alimentación del control remoto. (8): Si el helicóptero radiodirigido no se utiliza durante un
período más largo, se recomienda sacar las pilas del control remoto.

13
AJUSTE Y REGULACIÓN DEVUELO
CALIBRACIÓN AUTOMÁTICA (en una supercie plana horizontal) (11)
AJUSTE DE TRIMER (AJUSTE FINO) (10)
Practique la simulación del vuelo antes de un lanzamiento real del helicóptero radiodirigido. Por favor, practique con la
palanca de mando y los botones del control remoto antes de que no esté acostumbrado al control remoto.
1. Saque el helicóptero radiodirigido a la zona abierta, colóquelo 2-3 metros por delante de sí, las luces rojas indican la
parte delantera del helicóptero radiodirigido.
2. Practique con las funciones de la palanca de mando sin activar el control remoto, y luego practique la función de
suspensión, y ajustando primero el trimer del helicóptero radiodirigido, siga las instrucciones siguientes.
3. Suspensión signica la posición ja del helicóptero radiodirigido en el aire.
Se recomienda ajustar el helicóptero radiodirigido al modo de
“calibración”, ya que todos los ajustes se restaurarán como los de la
fábrica, con el ajuste no automático.
Los métodos de calibración:
1. Por favor, dirige simultáneamente la palanca de mando izquierda y
derecha a la posición inferior derecha para calibrar el giroscopio. Espera
hasta que los indicadores en el drone se apaguen.
2. Por favor, dirige simultáneamente la palanca de mando izquierda y derecha a la posición inferior izquierda para
restablecer la dirección. Espera hasta que los indicadores en el drone se apaguen.
Se recomienda efectuar las dos calibraciones antes del vuelo.
Suspendiendo al nivel bajo por encima del suelo, el helicóptero radiodirigido puede cambiar ligeramente su posición en
cualquier dirección - a la izquierda o a la derecha, hacia delante - hacia atrás o girar a la izquierda - a la derecha, incluso si
las palancas de mando están en la posición central. Si lo ha jado, es necesario continuar el ajuste no con los botones
de ajuste no en control remoto. Allí hay 2 botones con 2 posiciones para ajuste no de cada dirección, mire Figura del
panel de control. Pulse estos botones varias veces (cada vez se oye un señal acústico) para mover hacia adelante - atrás, a la
izquierda - a la derecha y girar a la derecha - a la izquierda para un ajuste no. Por favor, mire las ilustraciones de ajuste de
timón de dirección, elevación y timón de balanceo.
FUNCIONES DE REVUELTA (9)
¡Al acostumbrarse a las operaciones básicas, Usted podrá realizar algunos trucos impresionantes! En primer lugar, lance el
helicóptero radiodirigido a una altura no menos de 4 m, pulse el botón FLIP en la parte trasera derecha del control remoto
y, a continuación, posicione la palanca de mando derecha en cualquier dirección requerido para hacer una vuelta a 360
grados.

ES
MODO DE PRINCIPIANTE (MODO DE BRÚJULA) (12)
FUNCIÓN DE REGRESO AUTOMÁTICO (13)
INSTRUCCIONES PARA SOLUCIONAR PROBLEMAS
El modo normal se usa para controlar el helicóptero radiodirigido, a base a su propia posición en el espacio.
El modo de principiante permite controlar el helicóptero radiodirigido, de acuerdo con los comandos de la palanca de mando
en cualquier posición del helicóptero radiodirigido en espacio. Después de pulsar el botón Headless Mode, Usted oirá una señal
acústica. Conexión: Por favor, dirige simultáneamente la palanca de mando izquierda y derecha a la posición inferior izquierda,
después pulsa la palanca izquierda. La señal acustica indica que el modo se ha activado.
Desconexión: Pulsa la palanca izquierda, la señal acustica se parará y el drone se vuelve al modo normal.
OBSERVACIÓN: ¡ESTA FUNCIÓN NO ES ACTIVA EN EL MODO DE PRINCIPIANTE!
Cuando Usted realiza el control del helicóptero radiodirigido, es posible volverlo a la posición del operador pulsando el botón de
regreso automático (Auto return Home). El helicóptero radiodirigido volará automáticamente en la dirección del control remoto/
operador. Advertencia: ¡el helicóptero radiodirigido no realizará un aterrizaje automático! Por favor, desactiva la función repulsando el
botón para controlar el helicóptero radiodirigido a una distancia cercana.
Situación Causa Acciones necesarias
Indicador de estado del receptor parpadea
continuamente durante más de 4 segundos
después del lanzamiento del helicóptero
radiodirigido, no hay respuesta al control
remoto
Medición de referencia no está
hecha.
Recargar el aparato.
No hay respuesta después de conectar el
acumulador al helicóptero radioelegido
1. Estado del transmisor/ receptor
2. La alta tensión del transmisor/
receptor
3. Contactos ojos en los bornes
Compruébese que el acumulador está
correctamente conectado, ponga el
helicóptero radiodirigido en marcha una
vez más.
Utilice las pilas completamente cargadas
Reinstale las pilas en el compartimiento de la
batería después de comprobar su estado
El motor no responde a los movimientos de
la palanca de mando, el LED parpadea
Acumulador está descargado Reemplace/ recargue el acumulador
El rotor principal gira, pero el helicóptero
radiodirigido no puede despegar
Deformación de la paleta del
hélice de apoyo
El acumulador del helicóptero
radiodirigido está descargado
Revise los hélices, y si sea necesario
Reemplace/ recargue el acumulador
Vibración fuerte del helicóptero radiodirigido Rotores están dañados
Transmisión de motor está
dañada
Reemplace rotores / motor
El vuelo no es estable todavía después de
operación de trimer durante suspensión
Defectuosidad de operación de
giróscopo
Repetir el procedimiento de la calibración
automática

15
14. Cambio de la hélice de acuerdo con la forma de hélice
1. 2.
Antes de cambiar la hélice, asegúrate
que la forma de la hélice reemplazada
es la misma.

ES
GR HUBBLE DRONE
ΕΓΧΕΙΡΙΔΙΟ ΧΡΗΣΗΣ
Σας ευχαριστούμε που αγοράσατε ένα προϊόν eSTAR
ΠΑΡΑΚΑΛΟΥΜΕ ΔΙΑΒΑΣΤΕ ΠΡΟΣΕΚΤΙΚΑ ΑΥΤΕΣ ΤΙΣ ΟΔΗΓΙΕΣ ΠΡΙΝ ΤΗ ΧΡΗΣΗ
Περισσότερες πληροφορίες σχετικά με www.estar.eu
• Το προϊόν είναι κατασκευασμένο από πλαστικά υλικά υψηλής αντοχής
• Κατασκευή από 4 άξονες με Σταθεροποιητή Gyro 6 αξόνων διευκολύνει την πτήση με ακριβή καθορισμό θέσης
• Ευκολία στη χρήση με την επιλογή της ταχύτητας πτήσης
• Λειτουργία χωρίς κεφαλή και δυνατότης επιστροφής στην Αρχική
• Ραδιοτηλεχειρισμός 2.4Ghz
• 3D ανατροπή σε 360 μοίρες
Ο Κατασκευαστής διατηρεί το δικαίωμα να τροποποιεί τις παραμέτρους / λειτουργίες, χωρίς την προηγούμενη
έγγραφη ειδοποίηση.
ΒΑΣΙΚΑ ΤΕΧΝΙΚΑ ΣΤΟΙΧΕΙΑ ΚΑΙ ΔΥΝΑΤΟΤΗΤΕΣ:
Μέγεθος 110x110x28mm
Προτεινόμενος χώρος χρήσης: Εξωτερικοί χώροι, Εσωτερικοί χώροι
Προτεινόμενη ηλικία χρήστη 12+ ετών
Μέγιστο εύρος ελέγχου πτήσης 20-25 μ
Μπαταρία: 3.4V LiPo 150mAh
Χρόνος πτήσης 6-7 λεπτά
Βάρος 60 γρ.

GR
ΠΡΟΕΙΔΟΠΟΙΗΣΗ ΓΙΑΤΗΝ ΑΠΟΦΥΓΗ ΖΗΜΙΩΝ:
• ΧΡΗΣΙΜΟΠΟΙΕΙΤΕ ΜΟΝΟ ΓΝΗΣΙΑ ΑΝΤΑΛΛΑΚΤΙΚΑ,
• ΜΗΝ ΑΠΟΣΥΝΑΡΜΟΛΟΓΕΙΤΕ ΤΟ ΠΡΟΙΟΝ,
• ΤΑ ΕΣΩΤΕΡΙΚΑ ΜΕΡΗ ΜΠΟΡΟΥΝ ΝΑ ΕΠΙΣΚΕΥΑΣΤΟΥΝ ΜΟΝΟ ΑΠΟ ΤΑ ΚΕΝΤΡΑ ΣΕΡΒΙΣ. ΠΑΡΑΚΑΛΟΥΜΕ ΕΠΙΚΟΙΝΩΝΗΣΤΕ
ΜΕ ΤΟΥΣ ΕΞΟΥΣΙΟΔΟΤΗΜΕΝΟΥΣ ΑΝΤΙΠΡΟΣΩΠΟΥΣ ΣΤΗ ΧΩΡΑ ΣΑΣ.
ΠΑΡΑΤΗΡΗΣΕΙΣ ΑΣΦΑΛΕΙΑΣ ΤΗΣ ΜΠΑΤΑΡΙΑΣ
• Υπάρχει κίνδυνος πυρκαγιάς και έκρηξης αν μια μπαταρία δεν
έχει συνδεθεί σωστά.
• Πάντοτε να φορτίζετε τις μπαταρίες LiPo υπό επιτήρηση.
• Πάντα να χρησιμοποιείτε ΜΟΝΟ την αρχική μπαταρία LiPo
• Να διακόπτετε τη φόρτιση αν παρατηρήσετε μια παραμόρφωση
ή αν η μπαταρία ανατιναχθεί!
• Μην βραχυκυκλώνετε, μην ρίχνετε στη φωτιά!
• Μην το χρησιμοποιείτε εάν η μπαταρία παραμορφωθεί,
αποχρωματιστεί ή μαλακώσει
• Φυλάξτε την μπαταρία σε θερμοκρασίες μεταξύ 10 ° και 30 ° σε
ξηρά και σκοτεινά μέρη.
• Αποφύγετε τη θέρμανση πάνω από 50 ° C σε φόρτιση ή
αποφόρτιση
• Η συνιστώμενη χωρητικότητα φόρτισης - min. 80%,
• Ποτέ μην εξαντλείτε την μπαταρία
• Φυλάξτε μακριά από παιδιά και κατοικίδια ζώα
• Να φυλάσσεται μακριά από φωτιά, νερό, πηγές
θέρμανσης και ξένα υλικά που μπορεί να προκαλέσουν
βραχυκύκλωμα
• Να χρησιμοποιείτε πάντα τον αρχικό φορτιστή που
είναι τοποθετημένος σε πυρίμαχη επιφάνεια
• Αποφύγετε τη μηχανική καταπόνηση και μην ανοίγετε
• Μην αγγίζετε την μπαταρία σε περίπτωση διαρροής
αερίου ή υγρού από την μπαταρία
• Ο ακατάλληλος χειρισμός μπορεί να οδηγήσει σε
προβλήματα υγείας
• Απορρίψτε κατάλληλα τις μπαταρίες προς απόρριψη
ΣΥΜΒΟΛΟ ΑΠΟΡΡΙΨΗΣ ΜΠΑΤΑΡΙΑΣ
Το σύμβολο αυτό έχει επισημανθεί σε ένα προϊόν ή στη συσκευασία, αυτό σημαίνει ότι το προϊόν,
συμπεριλαμβανομένων των μπαταριών δεν πρέπει να απορρίπτονται μαζί με τα γενικά οικιακά
απορρίμματα. Απορρίπτετε τα ηλεκτρικά / ηλεκτρονικά είδη μόνο σε χωριστά συστήματα συλλογής,
τα οποία φροντίζουν για την ανάκτηση και την ανακύκλωση των υλικών που περιέχονται μέσα. Η
συνεργασία σας είναι ζωτικής σημασίας για τη διασφάλιση της προστασίας του περιβάλλοντος.
ΓΕΝΙΚΕΣ ΠΑΡΑΤΗΡΗΣΕΙΣ ΑΣΦΑΛΕΙΑΣ
Αυτό το αεροσκάφος είναι πολύ ισχυρό, παρακαλούμε να χρησιμοποιήσετε το μοχλό ρυθμιστή απαλά ειδικά κατά την
πρώτη πτήση. Η πτήση να γίνεται μόνο σε ασφαλείς περιοχές μακριά από άλλους ανθρώπους και εμπόδια.
Η ΠΤΗΣΗ του drone να γίνεται μόνο εντός του πεδίου ορατότητας, διασφαλίζοντας πάντα τη δυνατότητα της ελεγχόμενης
επιστροφής. ΝΑ ΜΗΝ πετάει κατά τη διάρκεια θυελλωδών συνθηκών με περιορισμένη ορατότητα. ΝΑ ΜΗΝ πετάει πάνω
από πλήθη, ψηλά δέντρα, κτήρια, γραμμές μεταφοράς ηλεκτρικού ρεύματος και άλλες επικίνδυνες ζώνες
Ο κατασκευαστής δεν υπέχει ευθύνη για τυχόν ατυχήματα, ζημιές, τραυματισμούς και άλλες άμεσες ή έμμεσες ζημίες
που προέρχονται από σφάλμα του Πιλότου, σύγκρουση, ραδιοφωνικές παρεμβολές ή άλλη ακατάλληλη χρήση κατά τη

19
διάρκεια της λειτουργίας. Για την καλύτερη ικανοποίηση της πρώτης εμπειρίας συνιστάται να λαμβάνετε τη βοήθεια ενός
έμπειρου πιλότου. Το εύρος θερμοκρασίας λειτουργίας του προϊόντος είναι από +150C έως + 300C.
Παρακαλούμε να απενεργοποιήσετε την παροχή ενέργειας του αεροσκάφους και της μονάδας τηλεχειρισμού όταν δεν είναι σε
χρήση.
Διατηρείτε το προϊόν σε δροσερό και ξηρό μέρος, μακριά από υγρά και πηγές θερμότητας.
ΓΕΝΙΚΑ ΠΕΡΙΕΧΟΜΕΝΑ ΣΥΣΚΕΥΑΣΙΑΣ (1a)
ΛΕΙΤΟΥΡΓΙΑ ΜΟΝΑΔΑΣΤΗΛΕΧΕΙΡΙΣΜΟΥ (RCU) (1)
1. Κιβώτιο βάσης του drone με τα πτερύγια έλικα
συναρμολογημένα.
2. Μπαταρία ιόντων λιθίου και πολυμερών λιθίου 150mAh
3. Φορτιστής USB
4. Μονάδα τηλεχειρισμού (οι μπαταρίες δεν περιλαμβάνονται)
5. Πόδι προσγείωσης, 4 τεμάχια
6. Πτερύγια έλικα, 4 τεμάχια
7. Κατσαβίδι και σετ με βίδες
1. Πλήκτρο ταχύτητας
2. Πλήκτρο αναπήδησης
3. Μοχλός κίνησης προς τα πάνω/κάτω και στροφή προς δεξιά-
αριστερά
4. Μοχλός κίνησης προς τα εμπρός/ πίσω, αριστερά/ δεξιά
5. Κουμπί λειτουργίας χωρίς κεφαλή
6. Κουμπί διόρθωσης πορείας αριστερά - δεξιά
7. Κουμπί διόρθωσης πορείας προς τα εμπρός/ προς τα πίσω
8. Διακόπτης παροχής ενέργειας
1
2
34
5
6
7
8

GR
ΤΟΠΟΘΕΤΗΣΗ ΜΠΑΤΑΡΙΑΣ ΜΟΝΑΔΑΣ ΤΗΛΕΧΕΙΡΙΣΜΟΥ (2)
ΕΠΑΝΑΦΟΡΤΙΣΗ ΜΠΑΤΑΡΙΑΣ ΙΟΝΤΩΝ ΛΙΘΙΟΥ ΚΑΙ ΠΟΛΥΜΕΡΩΝ ΛΙΘΙΟΥ (3)
ΠΡΟΕΤΟΙΜΑΣΙΑ ΓΙΑΤΗΝ ΠΤΗΣΗ
ΔΗΜΙΟΥΡΓΙΑ ΖΕΥΞΗΣ ΑΝΑΜΕΤΑΔΟΤΗ ΚΑΙ ΛΗΠΤΗ (4)
Παρακαλούμε χρησιμοποιείτε 3 μπαταρίες τύπου AAA (δεν
περιλαμβάνονται)
Βήμα 1: Ανοίξτε το κάλυμμα της μπαταρίας στο πίσω μέρος
του τηλεχειριστηρίου
Βήμα 2: Τοποθετήσετε μέσα 3 μπαταρίες τύπου AAA, ακολουθώντας τα σύμβολα πολικότητας + και - όπως
σημειώνεται στη θέση της μπαταρίας και τις εικόνες.
ΠΡΟΕΙΔΟΠΟΙΗΣΗ!
• Τοποθετήστε τις μπαταρίες με τη σωστή πολικότητα
• ΜΗΝ αναμιγνύετε παλιές και νέες μπαταρίες
• ΜΗΝ αναμιγνύετε διαφορετικούς τύπους μπαταριών
Παρακαλούμε διαβάστε πρώτα τις οδηγίες ασφαλείας για την μπαταρία! Συνδέστε
το καλώδιο του φορτιστή USB στη θύρα φόρτισης της μπαταρίας. Επιπλέον ο
φορτιστής USB πρέπει να συνδεθεί με τη θύρα USB του υπολογιστή ή σε φορτιστή
USB. εναλλασσόμενου ρεύματος. Όταν η κόκκινη λυχνία είναι αναμμένη τότε η
μπαταρία φορτίζεται. Αν η κόκκινη λυχνία αναβοσβήνει ή είναι σβηστή τότε η
μπαταρία είναι πλήρως φορτισμένη. Παρακαλούμε σημειώσετε ότι η θύρα USB ή ο φορτιστής USB θα πρέπει να
υποστηρίζει το ηλεκτρικό ρεύμα όχι λιγότερο από 0.5A. Ο χρόνος φόρτισης μπορεί να διαρκέσει 60 λεπτά.
Βήμα 1 (5): Εγκαταστήστε την μπαταρία στη θήκη της μπαταρίας του drone, όπως φαίνεται στην εικόνα.
Συνδέστε το καλώδιο της μπαταρίας στο καλώδιο παροχής ρεύματος του drone με μαύρο / κόκκινο συνδετήρα.
Τοποθετήστε το drone πάνω στην επίπεδη επιφάνεια. Ενεργοποιήστε το διακόπτη ισχύος του drone. Τα φώτα του
drone θα αρχίσουν να αναβοσβήνουν.
Βήμα 2 (6): Χαμηλώστε το μοχλό του γκαζιού στη χαμηλότερη θέση, στη συνέχεια, ενεργοποιήστε το
τηλεχειριστήριο. Γυρίστε το μοχλό του γκαζιού απαλά προς τα πάνω / κάτω.
Περιμένετε έως ότου ο δείκτης του τηλεχειριστηρίου και τα φώτα του drone σταματήσουν να αναβοσβήνουν,
τότε το drone είναι έτοιμο να πετάξει.
Βήμα 3. (7): Όταν ολοκληρωθεί η πτήση, απενεργοποιήστε το διακόπτη ρεύματος του drone. Συνιστάται, επίσης,
να αποσυνδέετε το καλώδιο τροφοδοσίας της μπαταρίας όταν δεν το χρησιμοποιείτε για μεγάλο χρονικό
διάστημα ώστε να κερδίσετε μεγαλύτερη διάρκεια ζωής της μπαταρίας
Βήμα 4. Απενεργοποίηση παροχής ρεύματος του τηλεχειριστηρίου. (8): Αν το drone δεν χρησιμοποιείται για
μεγάλο χρονικό διάστημα, συνιστάται να αφαιρείτε τις μπαταρίες από το τηλεχειριστήριο.
Table of contents
Languages:
Other E Star Drone manuals


