PRIZM Micro-Z MINI User manual

MICRO-Z MINI™ Operations Manual
Please read all instructions
carefully before use
CAUTION: Federal law (USA) restricts this device to
sale by or on the order of a physician
Rev. 8/2007 – P/N 0-61-MZMMAN-0-1
Manufactured for:
P. O. Box 40
Oakwood, GA 30566 USA
Tel: (770) 622-0933

1
TABLE OF CONTENTS
Section
1.0 MICRO-Z MINI™ SYSTEM
DESCRIPTION
2.0 PATIENT INFORMATION
2.1 Indication for Use
2.2 Contraindications
3.3 Warnings
3.4 Precautions
3.5 Adverse Effects
3.0 System Components, Device
Components and Markings
4.0 INSTRUCTIONS FOR USE
4.1 Unpacking the Device
4.2 Electrode Placement
4.3 Powering the Device
4.4 Connecting the Lead Wires
4.5 Turning the Device On
4.6 Protocol Selection
4.7 Treatment Intensity
4.8 Powering the Device Off
5.0 SETTING CLINICIAN VALUES
5.1 Protocols
5.2 Clinician Value Details
5.3 Rate
6.0 BATTERY CARE-LOW BATTERY
6.1 Battery Care
6.2 Low Battery
7.0 CARE AND CLEANING
8.0 TROUBLE SHOOTING
8.1 Device Will Not Turn On
8.2 No Stimulation
8.3 Program Failure
9.0 HELPFUL HINTS
10.0 LIMITED WARRANTY

2
1.0 MICRO-Z MINI™ SYSTEM DESCRIPTION
The Micro-Z Mini™is:
• A one channel transcutaneous electrical
nerve stimulator and electrical neuromuscular
stimulator that delivers a pulsed DC current
with a monophasic waveform to the surface area
of our garment electrodes to provide electrical
stimulation where there is an indication for use.
• Microprocessor controlled, allowing easy
alteration of the treatment parameters and
precise control of each setting.
• Designed for ease of patient use with clearly
marked patient intensity buttons.
• Designed for stand-alone use or, when
used with an external programmer, as
a programmable device for a full variety
of frequencies, time settings, and delivery
schedules.
• Designed for use with our patented garment
electrodes; wearable electrodes that cover a
large surface area providing total stimulation to
the treatment area.
2.0 PATIENT INFORMATION
2.1 INDICATIONS FOR USE
2.1.1 TENS
• Symptomatic relief and management of
chronic intractable pain
• Adjunctive treatment for post-surgical
and post-trauma acute pain
2.1.2 NMES
• Relaxation of muscle spasm
• Prevention or retardation of disuse
atrophy
• Increasing of local blood circulation
• Muscle reeducation
• Immediate post-surgical stimulation of
calf muscles to prevent venous
thrombosis
• Maintaining or increasing range of motion
Electrical stimulation devices should
only be used under medical supervision
for adjunctive therapy for the treatment
of medical diseases and conditions.

3
2.2 CONTRAINDICATIONS
2.2.1 TENS
• Do not stimulate over the carotid sinus
nerves, laryngeal or pharyngeal muscles
(anterior throat area); severe spasm may
occur causing contractions that may be
strong enough to close the airway or
cause difficulty in breathing.
• Do not use TENS device on undiagnosed
pain symptoms until the etiology has
been established.
• Do not place electrical current
transcerebrally (through the head).
• Do not use TENS on patients wearing a
demand type cardiac pacemaker.
2.2.2 NMES
• Electrical stimulation devices are
contraindicated for patients with cardiac
demand pacemakers.
• Electric stimulation devices should not be
used on cancer patients.
2.3 WARNINGS
2.3.1 TENS
• Safety has not been established for the
use of electrical stimulation devices
during pregnancy.
• TENS is not effective for pain of the central
origin. (This includes headache.)
• TENS devices should be used only under the
continued supervision of a physician or qualified
professional.
• TENS devices have no curative value.
• TENS is a symptomatic treatment and as such
suppresses the sensation of pain, which
would otherwise serve as a protective
mechanism.
• Keep electrical stimulators out of the reach of
children.
• Electronic monitoring equipment (such as ECG
monitors and ECG alarms) may not operate
properly when TENS stimulation is in use.
WARNINGS Continued
2.3.2 NMES
• Safety has not been established for the use
of electrical stimulation devices during
pregnancy.
• Long-term effects of chronic electrical stimulation
are unknown.
• Precautions should be taken in the case of
persons with suspected or diagnosed epilepsy.
• Precautions should be taken in the case of
persons with suspected heart problems.
• Due to possible arrhythmia, do not place an

4
electrical stimulator across a patient's heart or
transthoracically.
• Do not stimulate over the carotid sinus nerves;
especially for patients with known sensitivity to
the carotid sinus reflex.
• Severe spasm of the laryngeal or pharyngeal
muscles may occur when electrodes are placed
over the neck or mouth area. Contractions may
be strong enough to close the airway or cause
difficulty in breathing.
• Do not apply electrical stimulation
transcerebrally.
• Do not use electrical stimulation over
swollen, infected or inflamed areas, or
skin eruptions such as phlebitis,
thrombophlebitis, or varicose veins.
• Keep electrical stimulators out of the reach of
children.
2.4 PRECAUTIONS
2.4.1 TENS
• Isolated cases of skin irritation may occur at the
site of electrode placement following long-term
application
• Effectiveness is highly dependent upon patient
selection by a person qualified in the
management of pain.
PRECAUTIONS Continued
2.4.2 NMES
1. Precautions should be taken in the presence of:
Atendency to hemorrhage following acute trauma or
fracture
Recent surgical procedures when muscle
contraction may disrupt the healing process.
A menstruating uterus.
Sensory nerve damage (loss of normal skin
sensation).
2. Some patients experience skin irritation or
hypersensitivity due to the conductive medium or
electrical stimulation. This condition can usually be
reduced by alternative electrode placement or use of
additional or a different conductive medium.
3. Electrode placement and stimulation settings should
be based on the guidance of the prescribing physician.
4. Powered muscle stimulators should be used only with
the lead wires and electrodes recommended for use by
the manufacturer.
2.5 ADVERSE EFFECTS
Skin irritation and burns beneath the electrodes
have been reported from use of electrical
stimulators.

5
3.0 SYSTEM COMPONENTS
DEVICE COMPONENTS AND MARKINGS
1. Micro-Z Mini™ Device A. Intensity Control Increase
2. Two (2) lead wires B. Intensity Control Decrease
•
One (1) red C. On/Active Switch
•One (1) black D. Micro-Z Mini™
3. One (1)AAA Battery E. LCD Display
4. Velcro Arm / Leg Strap
5. Conduct Mist™ or TheraCream™
1
2
3
4
5

6
4.0 INSTRUCTIONS FOR USE
4.1 Unpacking the Device
Remove the Micro-Z Mini™ System
Components from the packaging. Verify that all
components listed in Section 3.0, System
Components, are present. The garment
electrodes and Conduct Mist™ spray may be
packaged separately.
4.2 Electrode Placement
WARNING!
Do not place an electrical stimulator across a
patient's heart or transthoracically.
Do not stimulate over the carotid sinus nerves.
Severe spasm of the laryngeal or pharyngeal
muscles may occur when electrodes are placed
over the neck or mouth area. Contractions may
be strong enough to close the airway or cause
difficulty in breathing.
Do not apply electrical stimulation
transcerebrally.
Do not use electrical stimulation over
swollen, infected or inflamed areas, or
skin eruptions such as phlebitis,
thrombophlebitis, or varicose veins. Place
electrodes according to prescribed treatment
with the above cautions in mind. Follow all
instructions for the electrode use.
4.3 Powering the Device
The Micro-Z Mini™ is powered by one (1) AAA
battery. Remove the battery compartment cover
from the back of the device. Install the battery
according to the illustration inside the battery
compartment making certain the positive terminal
of the battery aligns with the ‘+’. Replace the
battery compartment cover.
4.4 Connecting the Lead wires
The lead wires determine the polarity of the current
and are coded accordingly; black is negative and
red is positive. Connect the lead wire snaps to the
Micro-z Mini™ by inserting the snap stud end into
the inside position of the slot and sliding toward
the outside position to lock in place. The red lead
wire is placed on the right hand side and black on
the left. Connect the garment electrodes to the
lead wires by inserting the pin ends into the
garment electrode.
Garment Electrode
Please read the product insert accompanying the
garment electrode. Connect the Silver-Thera™ or
Electro-Mesh™ garment electrode to the lead
wires using the female snaps.

7
4.5 Turning the Device On
The Micro-Z Mini™ is powered on by pressing
and releasing the On [|] / Active button for about
2 seconds until the display lights up with P1. Only
the “P” will be flashing. The Unit should be
connected to the garment electrodes and the
garment should be worn at this point.
4.6 Protocol Selection
When the unit is powered on, select desired
protocol P1 or P2 based on your clinician’s
instructions (refer to Step 5 for more details).
Protocol selection is made by repeatedly pressing
the On [|] / Active button until the desired Protocol
is shown on the far left of the display, only the “P”
will be flashing.
4.7 Treatment Intensity
Two buttons on the device control intensity
Increase () and Decrease ()
The intensity is always at five when the device is
powered on or when the batteries have been
removed and replaced.
Press the Increase button to set the
protocol and intensity level. The “P” will stop
flashing and as you continue to press the button,
the intensity will increase and the LCD will
display the numeric value. The intensity will
increase in increments of 5, up to the maximum
intensity of 100. To decrease the intensity, press
the Decrease () button.
Note: The Increase and Decrease buttons
lock out after 20 seconds of nonuse so that
stimulation cannot be inadvertently changed
during treatment.
To reactivate the intensity controls, press
and release the On [|] / Active button. Intensity
controls will remain active for 20 seconds after the
last button was pressed.
4.8 Powering the Device Off
The Micro-Z Mini™ will automatically power off
when treatment is completed.
The Micro-Z Mini™ can be powered off manually
at any time. To manually power off, press the On
Active button for about 4 seconds and the device
will turn off. Or you may press and hold the
decrease button until the device reads 0, release
it and press it again and the device will turn off.
8
5.0 SETTING CLINICIAN VALUES
5.1 Protocols
The Micro-Z Mini™ is factory programmed for
two treatment protocols.
P1: Protocol One, 30 Minute Treatment,
is a two-segment 30-minute treatment: Segment
One runs 100 pps (Hz) for 15 minutes, Segment
2 runs 10 pps (Hz) for 15 minutes.
P2: Protocol Two, 8-Hour Treatment,
is an 8-hour routine that consists of 20 minutes
of therapy followed by 40 minutes of rest every
hour for 8 hours. The 20-minute treatment
consists of 10 minutes at 80 pps (Hz) and 10
minutes at 8 pps (Hz).
After treatment P1 or P2 is complete, the Micro
Z Mini™ will automatically turn itself off. Every
10 seconds during the protocol run the display
will show time remaining in hours and minutes or
minutes and seconds. During the Dwell time of
protocol 2 (P2) the intensity setting will flash.
5.2 Clinician Value Details
The Micro-Z Mini™ can be programmed for
many different treatment protocols with the Prizm
Medical Micro-Z Mini™ docking station to a PC.
Check with your clinician or dealer for these
options.
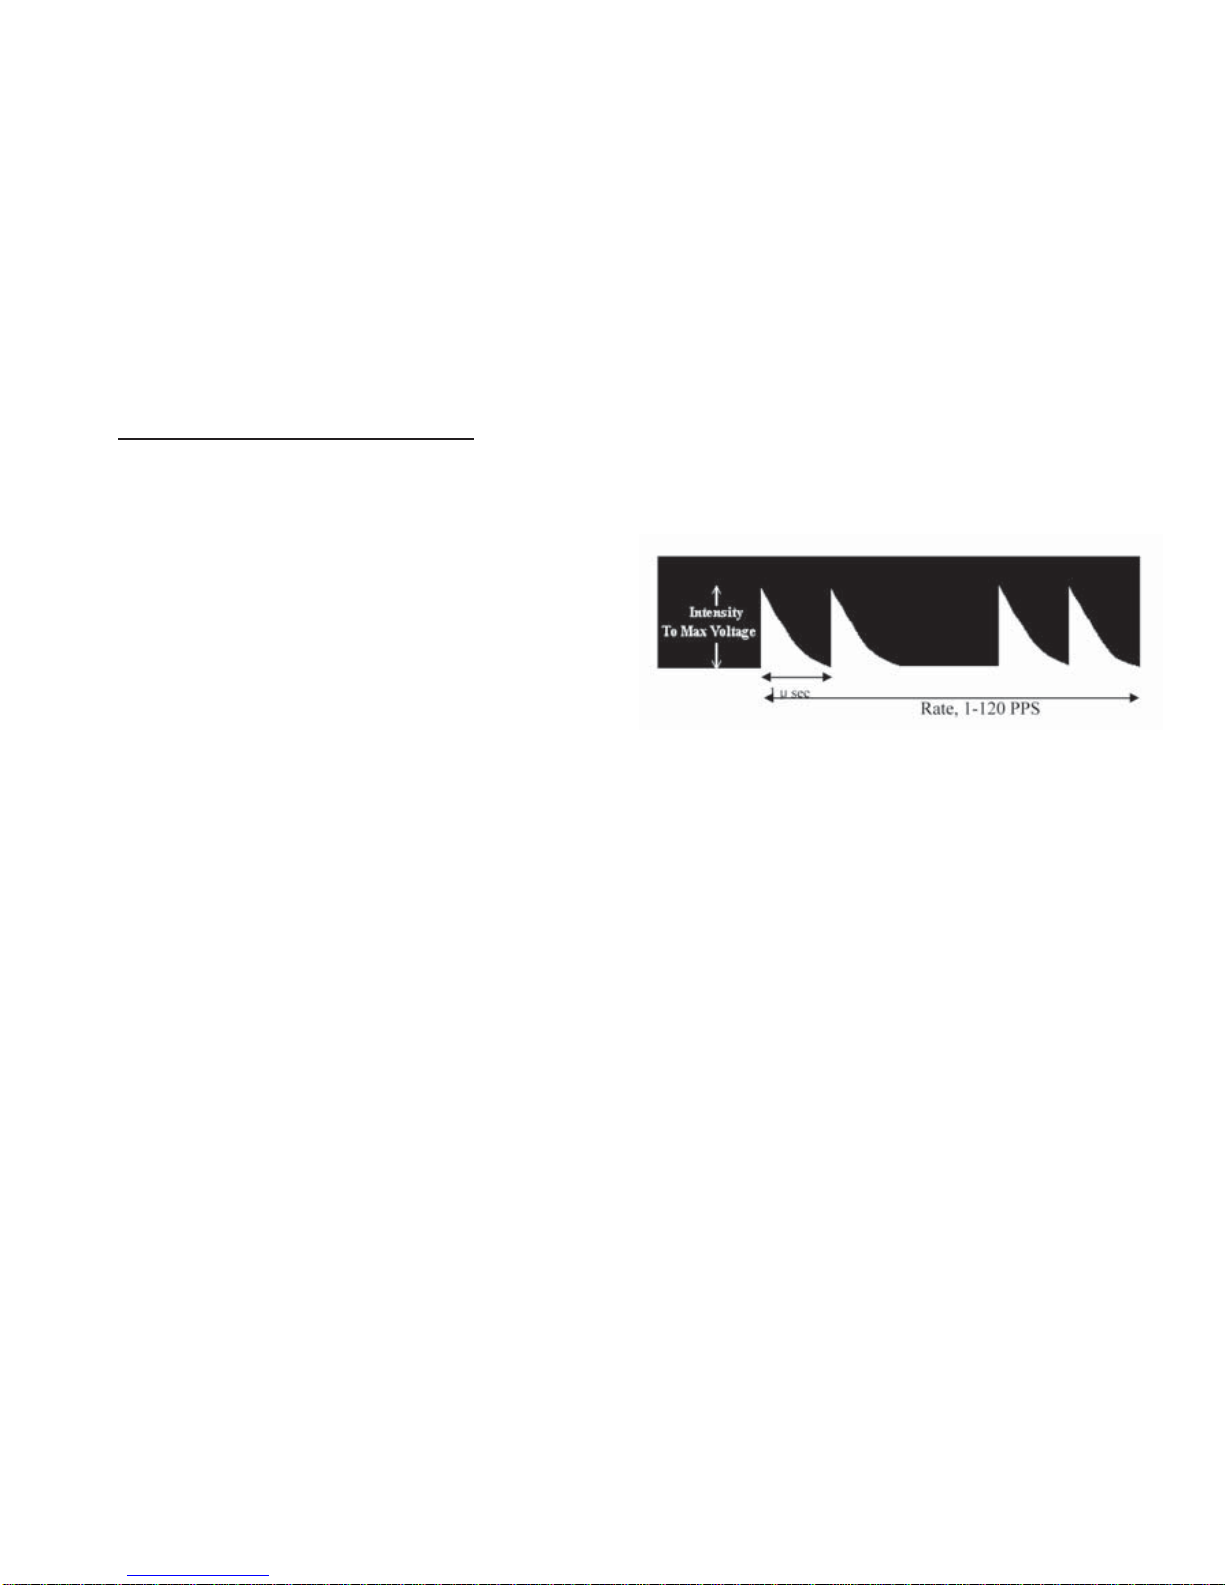
The Micro-Z Mini™ delivers a high
voltage twin peak monophasic wave
form. The maximum voltage as
indicated on the packaging would
coincide with the numeric intensity
value on the LCD display
Contact Prizm Medical, Inc.
for additional information including
ranges, accuracy and precision
of the displayed intensity readings.
5.3 Rate
Rate selects the number of times the waveform
repeats every second. Note that P1 is
programmed at 100 pps for 15 minutes and

9
10 pps for 15 minutes for a total treatment of 30
minutes. P2 is programmed at 80 pps for 10
minutes and 8 pps for ten minutes totaling 20
minutes of treatment for each hour of the 8-hour
routine.
6.0 Battery Care – Low Battery
1.1 Battery Care
The Micro-Z Mini™ uses one AAAbattery. To
replace the battery, open the battery compartment
at the back of the device and insert a new battery.
Be sure the ‘+’ symbol on the battery lines up with
the ‘+’ symbol in the compartment.
6.2 Low Battery
When the battery is low, a battery symbol will flash
on the far right of the display. Replace the battery
at the first indication of low battery life. The device
will turn off automatically if there is not enough
voltage to sustain therapy.
7.0 CARE AND CLEANING
• Do not store the Micro-Z Mini™ with the battery
installed. Battery acid causes irreparable
damage, which is not covered by the warranty.
• When not in use, make certain the device is
turned off.
• Turn the power off when cleaning the device.
Do not immerse the device in liquid. Avoid
spilling liquids on the Micro-Z Mini™.
• The surface of the Micro-Z Mini™ may be wiped
with a soft cloth or sponge dampened with a mild
soap solution. Avoid caustic cleansers.
8.0 TROUBLE-SHOOTING
8.1 Device will not turn on
• Check for proper battery installation
• Replace battery.
8.2 No Stimulation:
• Check lead wires for proper connection onto the
device.
• Check for proper patient electrode application
• Apply conductive spray or cream to the area to
be stimulated
• Check treatment time for expiration.
Dwell
Time
Total Time
Segment
1 Time
Segment
2 Time
10
8.3 PROGRAM FAIL
• Call your Micro-Z Mini™ dealer.
9.0 HELPFUL HINTS
• Electrotherapy, like medications, should be dosed
correctly. Too much stimulation does not equal better or
more rapid results. Stimulate based on clinical goals.
• Patients with loss of sensory perception or insensate
skin should not over-stimulate. Consult your physician,
therapist, nurse or trainer, etc.
• Always prepare the skin correctly by washing it and
removing all dirt, oils, and dead skin before applying
electrodes.
• If the stimulation becomes uncomfortable, causing a
stinging sensation, when using the Silver-Thera™ or
Electro-Mesh™ garments during treatment, re-apply
Conduct-Mist™ conductive spray or TheraCream™
over the treatment area.
10.0 LIMITED WARRANTY
The Micro-Z Mini™ is warranted against defects in
material and workmanship for one (1) year from the date
of purchase. The manufacturer, at its sole discretion, will
repair or replace at no charge, defective parts provided
the device has been properly packaged and returned
postage prepaid to the manufacturer. This warranty is
rendered void if damage to the device results from
mishandling, misuse, abuse, or if the device is
disassembled. Furthermore, no warranty will apply to
damage resulting from the customer’s use of parts,
fittings, or accessories not specified by the manufacturer,
or from service or modifications performed by
unauthorized personnel.
This warranty shall not apply to lead wires, electrodes, or
batteries.
The manufacturer shall not be liable for incidental or
consequential damages including loss of use, property
damage, or to the extent allowed by law, personal injury
that results from breach of warranty. This warranty is in
lieu of all other warranties, expressed or implied, including
warranties of merchantability and fitness for a particular
purpose.
CAUTION
Federal law restricts the device for sale by, or on the order
of anyone other than a licensed physician or any other
practitioner licensed by the law of the state in which he or
she practices, to use or order the use of this device.
0088
Table of contents
Popular Medical Equipment manuals by other brands


Lifelines
Lifelines Trackit M manual

laerdal
laerdal SIMETRI 212-55130 user manual

Porter
Porter 4065D Component Diagram and Installation Instructions

Bard
Bard MAX-CORE MC1410 Instructions for use

Otto Bock
Otto Bock Lumbo Sensa Male Instructions for use

COOK Medical
COOK Medical Advance 35 LP Instructions for use

Liko
Liko RepoSheet Original Instruction guide

SSCOR
SSCOR Quickdraw 2400 Series Operating Instructions & Maintenance Manual

ZOLL
ZOLL M Series Operator's guide

VBM Medizintechnik
VBM Medizintechnik 60-50-150-1 Instructions for use

Dentsply Sirona
Dentsply Sirona Orthophos E Installation requirements

kENDALL
kENDALL SCD 5325 Operating and service manual