Pro 6 R7 User manual
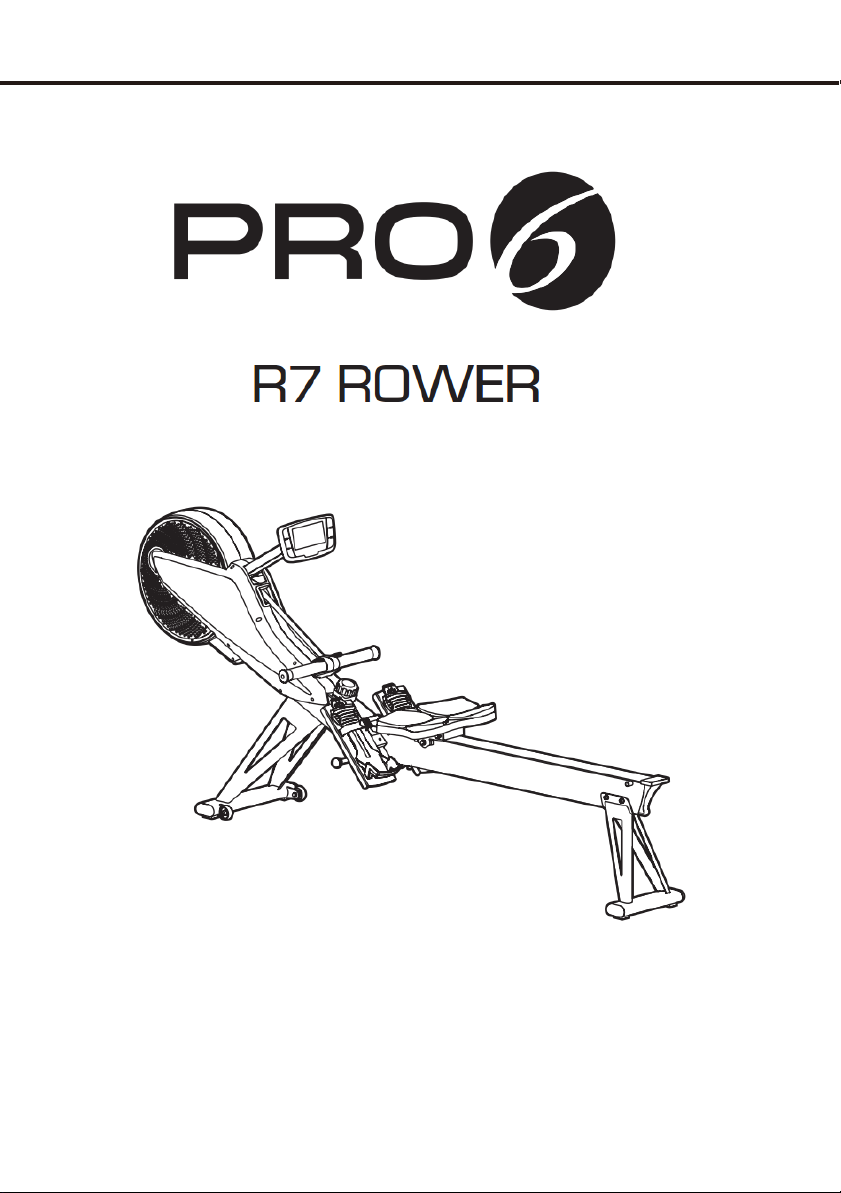
Owner's manual
Dear Customer,
Thank you for purchaseing the PRO6 R7 Rower.
This product was designed to meet your workout and fitness needs
and provide you with a healthier lifestyle. Before you begin using this
product, please read the Owner’s Manual completely and thoroughly.
Follow the instructions paying attention to all WARNINGS. Always
consult your medical physician before beginning use of new exercising
equipment.
If you have any questions about this product or are in need of
replacement parts, please contact Customer Service by calling (909)
212-5555 or emailing us at: info@goldendesignsinc.ccom
WARNING:
Do not dispose of electrical appliances as normal
municipal waste. You must follow the applicable
city and county guidelines for the disposal of
electrical appliances.
Contact your local government for information regarding the
collection/recycle systems available.
If electrical appliances are disposed of in landfills or dumps,
hazardous substances can leak into the groundwater and get into
the food chain, damaging your health and well-be.

INTRODUCTION / SAFETY GUIDELINE
A. Introduction
Thank you very much for choosing this product. To secure your safety,
please read the manual and all recommendations carefully before
using this product. By reading through the manual, we believe that you
can enjoy safe exercise and have a healthier lifestyle.
B. Safety guideline
a. Read the owner's manual and all accompanying instructions. Follow
it carefully before using your machine.
b. This machine is intended for indoor use only.
c. Inspect your exercise machine prior to exercising to ensure that all
nuts and bolts are fully tightened.
d. Make sure the machine is stable on the floor. Avoid uneven surfaces.
e. Most exercise equipment is not recommended for children. Children
should not use the machine. Keep unsupervised children away from
the equipment.
f. This exercise equipment has moving parts. Keep others, especially
children, at a safe distance while exercising.
g. Make sure all devices are fully adjusted before use to avoid injury.
h. Remove all jewelry, including rings, chains and pins before
exercising.
i. Always wear suitable clothing and footwear during exercise. Do not
wear loose fitting clothing that could become caught in the moving
parts of your exercise machine.
j. Warm up for 5 to 10 minutes before each workout and cool down for
5 to 10 minutes afterward. This allows your heart rate to gradually
increase and decrease and will help prevent muscle strain.
k. Never hold your breath while exercising. You should breathe at a
normal rate for the level of exercise being performed.
l. Rest adequately between workouts. Muscles tone and development
may occur during workout. Beginners should work out twice a week
and increase frequency gradually.
m. Do not "over train". Incorrect or excessive training may result in
injury.
n. Check that none of the adjustment devices are left protruding.

INTRODUCTION / SAFETY GUIDELINE
IMPORTANT: THE MAXIMUM RECOMMENDED WEIGHT CAPACITY
FOR YOUR EQUIPMENT IS 396 LB (180 KG).
Warning: Before beginning any exercise program, please consult your
physician. If at any time you feel faint, dizzy or are
experiencing pain, stop and consult your physician. The
manufacturer may use this as a defense to any claim for
injuries, damage or loss. The above warnings are in no way
intended to limit or modify the consumer's remedies for
breach of warranties pursuant to applicable Federal and
State laws of regulations. They are being supplied strictly
to ensure the safety of the individuals using this product.
To maintain the safety level of the equipment, please
examine it regularly for any damage or wear.
This exercise equipment is not for children under 14
years of age.
Safe distance: Front and back: 40 inches
Left and right sides: 40 inches
This equipment is not suitable for therapeutic
purposes.
Images and pictures are intended for visual
guides only. Equipment, accessories, and
parts are subject to change.

INTRODUCTION / SAFETY GUIDELINE
INFORMATION
Before you begin
Important: Read all instructions carefully. Assemble the unit in
accordance with the steps in the manual. Lay out all parts
on the floor and check if all the parts are included before
beginning assembly. In case of a discrepancy, please call
the customer service department for help.
Replace defective components immediately and keep the
equipment out of use until repaired.
Note: Some parts may be factory pre-assembled.
Screws are already attached to rower frame.
This machine is equipped with self-powered generator and either
compatible for using 6V/1A DC transformer.
Note: Do not plug the rower to a power supply/outlet before it is
fully assembled. Input power supply specification depends on
local electricity supply, and a proper transformer may be needed.
DC transformer spec.: Input: 100-120V (220-240V) ~ 60Hz (50Hz)
Output: 6V - 1.0A
The parts most susceptible to wear are:
Bearing / Belt
Tools required for assembly:
Open wrench 14mm Screw driver Allen wrench
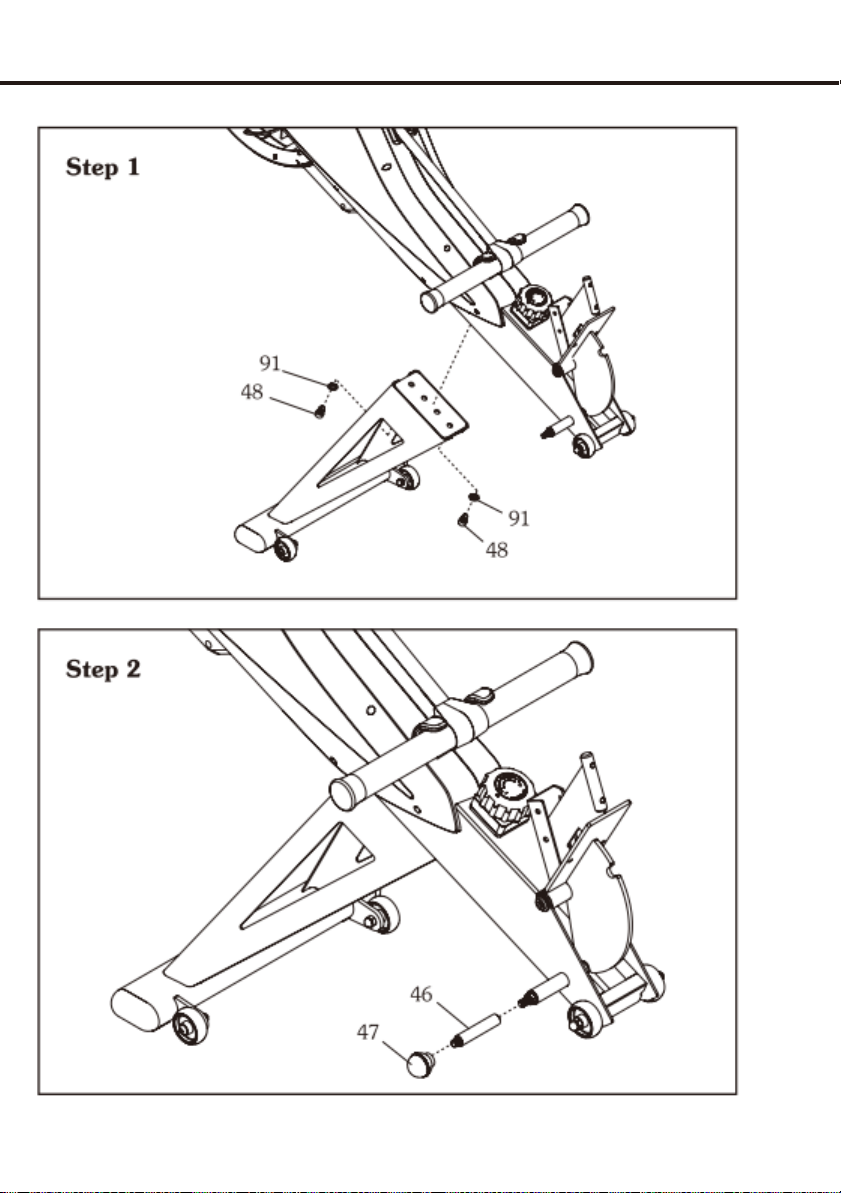
FOLDING INSTRUCTIONS

FOLDING INSTRUCTIONS

FOLDING INSTRUCTIONS
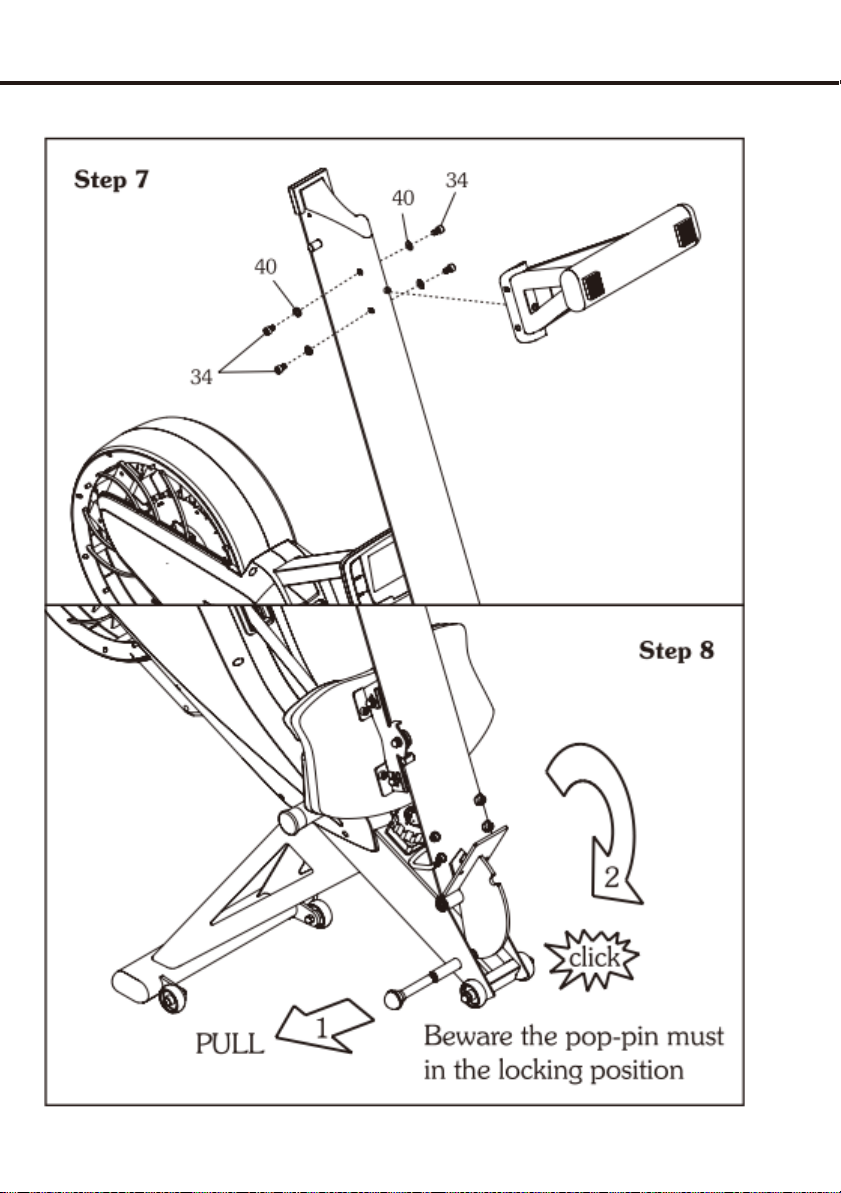
FOLDING INSTRUCTIONS
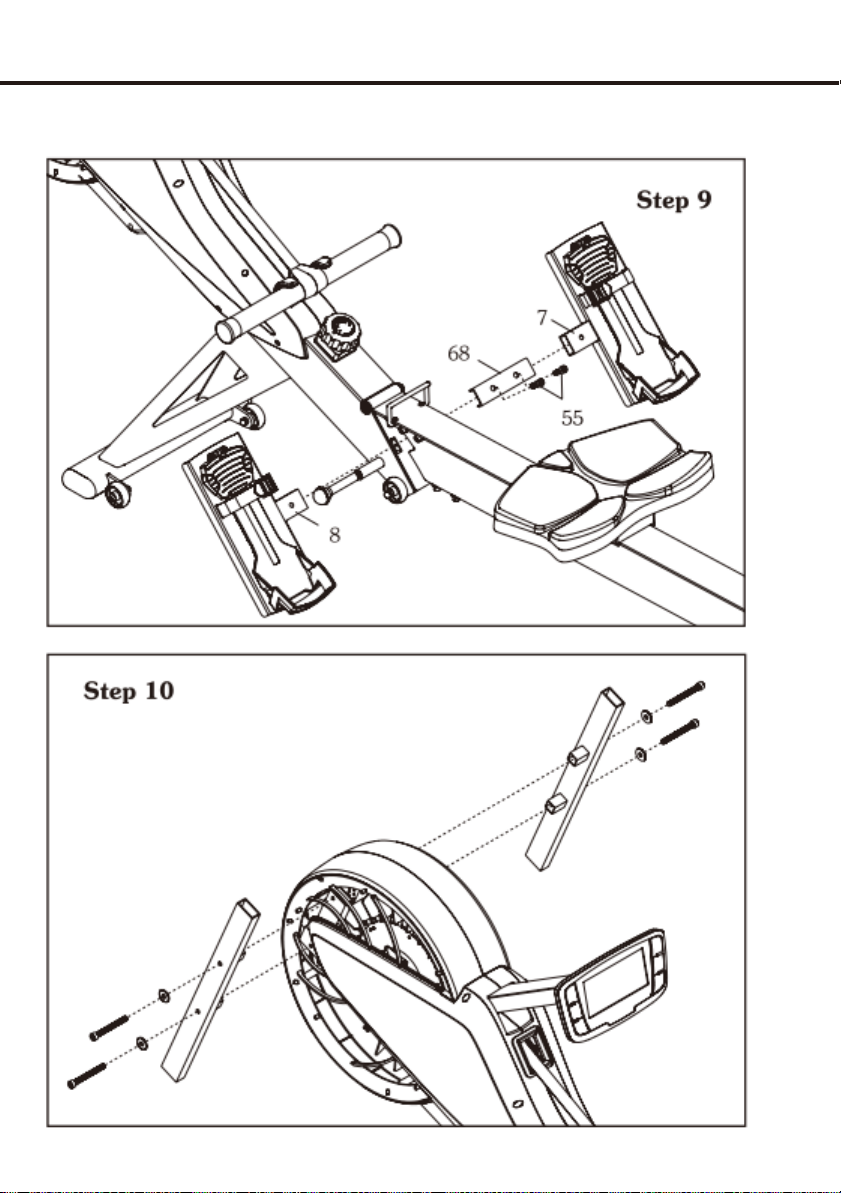
FOLDING INSTRUCTIONS

FOLDING INSTRUCTIONS
NOW YOUR MACHINE HAS BEEN WELL ASSEMBLED.
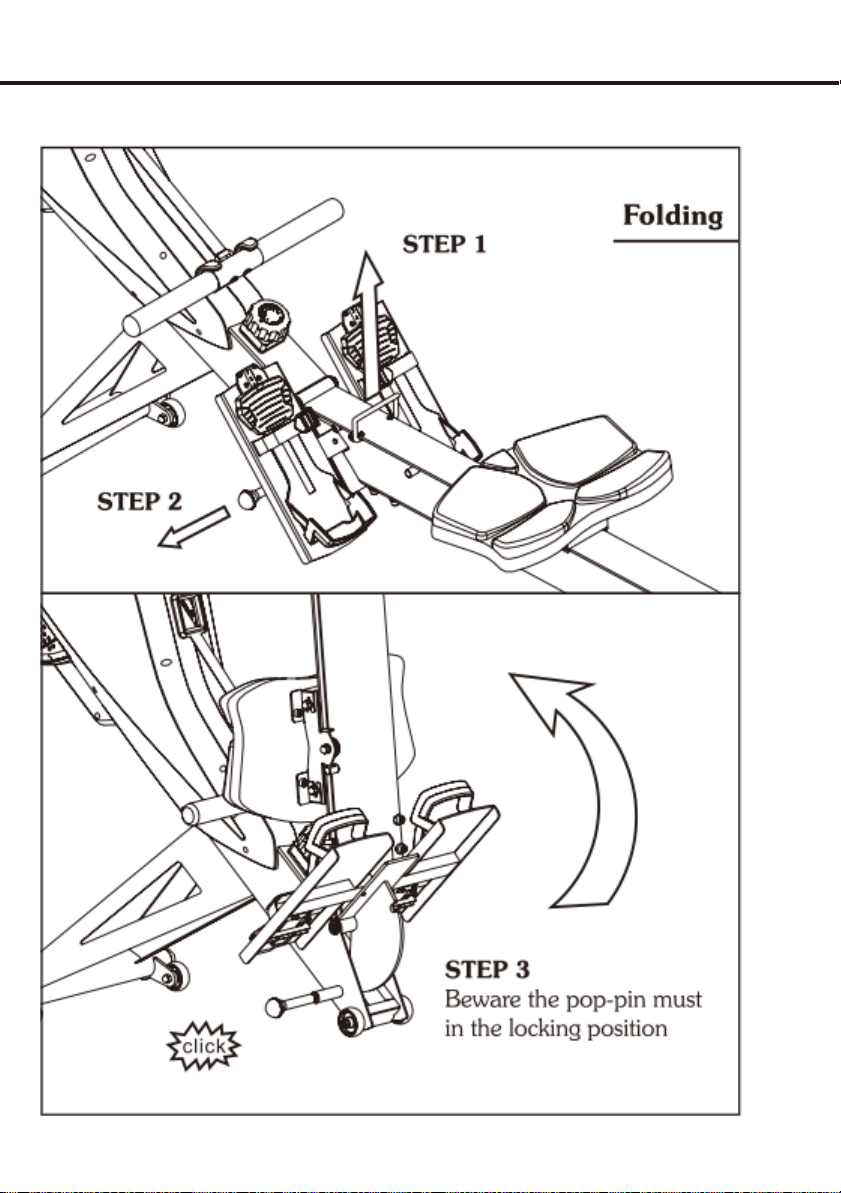
FOLDING INSTRUCTIONS
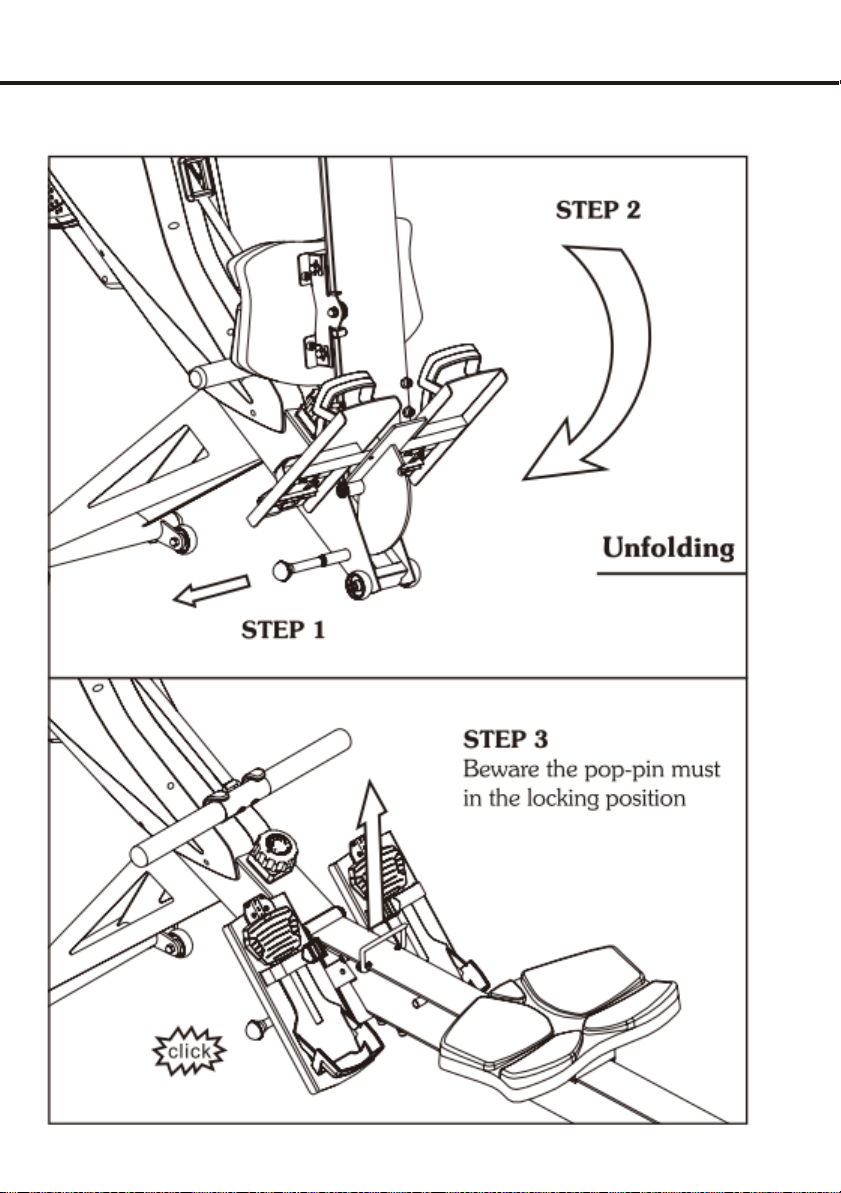
FOLDING INSTRUCTIONS
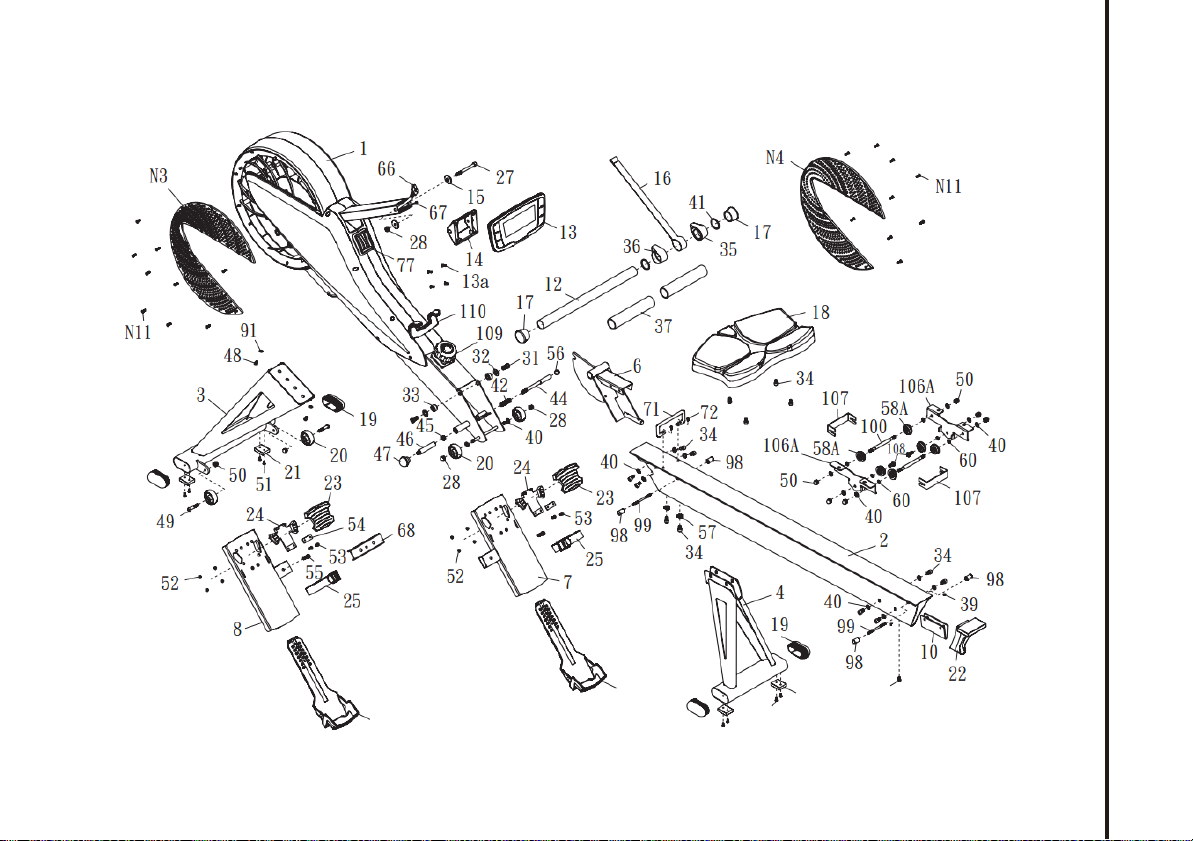
EXPLODED VIEW
55

PARTS LIST
NO.
DESCRIPTION
Q’TY
1
Main frame
1
2
Central beam
1
3
Front stabilizer
1
4
Rear stabilizer
1
6
Folding rotatably supporter
1
7
Pedal base - R
1
8
Pedal base - L
1
10
Rear stabilizer holding bracket
1
12
Handlebar
1
13
Console
1
13a
Round head screw M5 x 10
4
14
Console base
1
15
Console washer
2
16
Nylon webbing
1
17
End cap for handlebar
2
18
Saddle
1
19
End cap for stabilizer
4
20
Transportation wheel
4
21
Foot pad
4
22
End cap for central beam
1
23
Pedal A
2
24
Pedal adjustment bottom
2
25
Pedal strap
2
26
Pedal B
2
27
Socket head bolt M8 x 85mm
1
28
Nylon nut M8
1
31
Socket head bolt M10 x 16mm
2
PARTS LIST
NO.
DESCRIPTION
Q’TY
32
Washer Ø1/2" x Ø23 x 2T
2
33
Spacer
2
34
Socket head bolt M8 x 12mm
14
35
Cover - R
1
36
Cover - L
1
37
Foam grip
2
39
Round head self-tapping screw M3 x 6mm
2
40
Washer Ø8 x Ø16 x 2T
16
41
Plastic washer
2
42
Spring
1
44
Pop pin
1
45
Nut 3/8"-16
1
46
Pop pin knob connector
1
47
Knob for pop pin
1
48
Socket head bolt M10 x 16mm
2
49
Round head bolt M8 x 40mm
2
50
Domed nut
10
51
Round head screw 5/32 x 1/2"
8
52
Round head self-tapping screw M4 x 8mm
8
53
Pan head screw M5 x 15mm
4
54
Pedal adjustment bottom holder
2
55
Socket head bolt M8 x 25mm
2
56
End cap for decoration
1
57
Washer M8 x 2T x Ø19
2
58A
Roller assembly
6
PARTS LIST
NO.
DESCRIPTION
Q’TY
60
Powder metal sleeve (12 x 8 x 2mm)
6
65
Socket head screw M6 x 10mm
1
66
Wire upper
1
67
Pulse wire
1
68
Pedal base bracket
1
69
PRO6 logo L
1
70
PRO6 logo R
1
71
D handle
1
72
Round head screw M5 x 10mm
2
77
Strap protected pad
1
91
Washer Ø3/8”x Ø18 x 2.0t
2
98
Stopper
4
99
Stud bolt Ø5.25 x 85
2
100
Stud bolt Ø10 x 121
2
106A
Sliding support side plate
2
107
Sliding support baffle plate
2
108
Socket head bolt M8 x 20
2
109
T
ension
knob
1
110
Handlebar holder
1
N1
Shroud - L
1
N2
Shroud - R
1
N3
Fan cover - L
1
N4
Fan cover - R
1
N5
Shroud-bottom - L
1
N6
Shroud-bottom - R
1
N11
Screw 1/8 x 1
/
2"
18

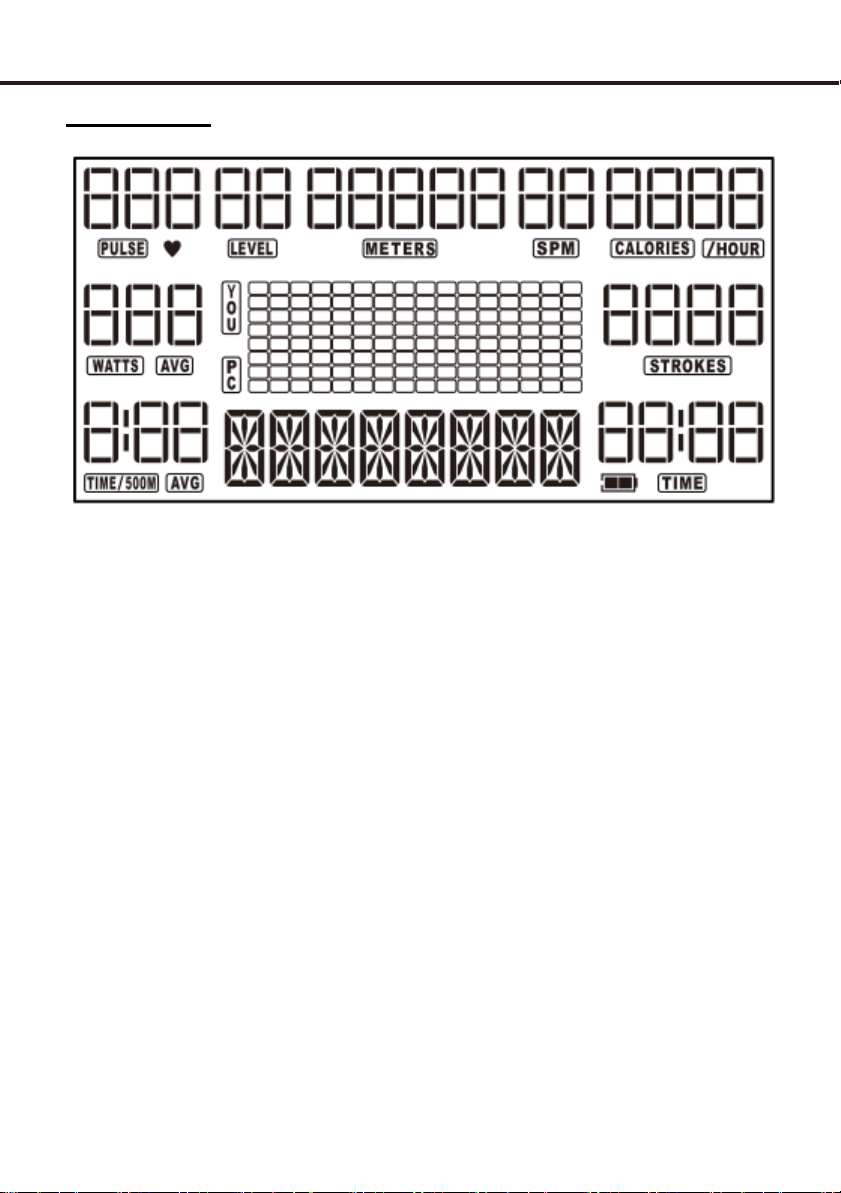
CONSOLE
Console user manual
* Function Buttons
* About Displays
* Operation Instructions
Power supply: Self-powered
Compatible charger:
Please start to charge by using charger (at rated Output DC 6V / 1A)
when battery symbol showing low power on console screen.
Power-saving Mode:
If there is no SPM signal input within 6 seconds, the console will enter the
PAUSE mode. After 60 seconds, the backlight will turn OFF. After 120
seconds has passed, all the displayed information on the console will
disappear. The whole console system will shut down.

CONSOLE
Function Buttons
There are total 6 buttons: including START/STOP, UP, DOWN,
ENTER, RECOVERY and RESET buttons.
1. START/ STOP: To start or stop workout.
2.
2. UP & DOWN:
a. During the initial mode, press this button to select your desired
program from MANUAL and RACE.
b. In the setting mode, press the UP/DOWN button to
increase/decrease the value. Press and hold the button to speed
up the increment/decrement of the value.
3. ENTER: To enter and confirm all settings.
4. RECOVERY:
a. Press this button to activate the heart rate recovery function. The
heartbeats must be detected by the console in advance, and then the
recovery function will start to work.
b. The RECOVERY function checks your heart rate recovery once
exercise is stopped. It is measured on a scale from F1.0 to F6.0. -
F1.0 being the best and F6.0 being the worst. This function may
reflect your heart rate recovery ability and improve it through daily
exercise. In order to get an accurate rate, users must test it
immediately after the workout. The heart rate recovery test will last for
1 minute and the result will show on the display. To leave the
RECOVERY mode, you can press RESET button at any time during
or after the test.
5. RESET:
1. The user can press the “RESET” button at any time during the
program setting process to return the console to the no setting state.
2. When the machine is in the stop or pause state, press the "RESET"
button to clear the display data, and return the console to the no
setting state.
3. When the machine is in the "RECOVERY" state, press the "RESET"
button, the program will automatically return to the no setting state.
CONSOLE
About display
A. TIME / TIME/500M window: Shows exercise time / the time you
need to row 500 meters in your current speed.
TIME/500MAVG (average time/500M): During exercise, the console
will record your velocity per 500 meters. Once exercise is stopped,
the console will display your average velocity per 500 meters.
B. SPM window: Shows total strokes rowed per minute.
C. DISTANCE window: Shows the distance rowed in meters.
D. METER window: Shows the exercise distance. Unit is in meters.
E. STROKES window: Shows total strokes rowed overall.
F. CALORIES window: Shows CALORIES / CALORIES per hour.
NOTE: This data is a rough guide, which shouldn’t be used for
medical reference.
G. WATT window: Shows workout efforts during exercise.
WATT AVG (average WATT):
During exercise, the console records WATT values. Once exercise
is stopped, the console will display average WATTs expended.
Table of contents
Popular Fitness Equipment manuals by other brands


G-FITNESS
G-FITNESS AIR ROWER user manual

CAPITAL SPORTS
CAPITAL SPORTS Dominate Edition 10028796 manual

Martin System
Martin System TT4FK user guide

CIRCLE FITNESS
CIRCLE FITNESS E7 owner's manual

G-FITNESS
G-FITNESS TZ-6017 user manual

Accelerated Care Plus
Accelerated Care Plus OMNISTIM FX2 CYCLE/WALK user manual


