Pro-Elec PEL00582 User manual

1
Model No. PEL00582
MAINTAINED
LED EMERGENCY CEILING MOUNT SPOTLIGHT

2
Please read these instructions carefully before starting installation and retain for
future reference. The centre page test record can be removed and kept with the
building re safety records.
IMPORTANT SAFETY INFORMATION
NOTE: Before drilling any holes, check that there are no hidden obstructions behind the
mounting surface such as pipes or cables.
1. Cut a 70mm diameter hole in the ceiling for the light tting.
2. Feed the mains supply wiring down through the hole just cut.
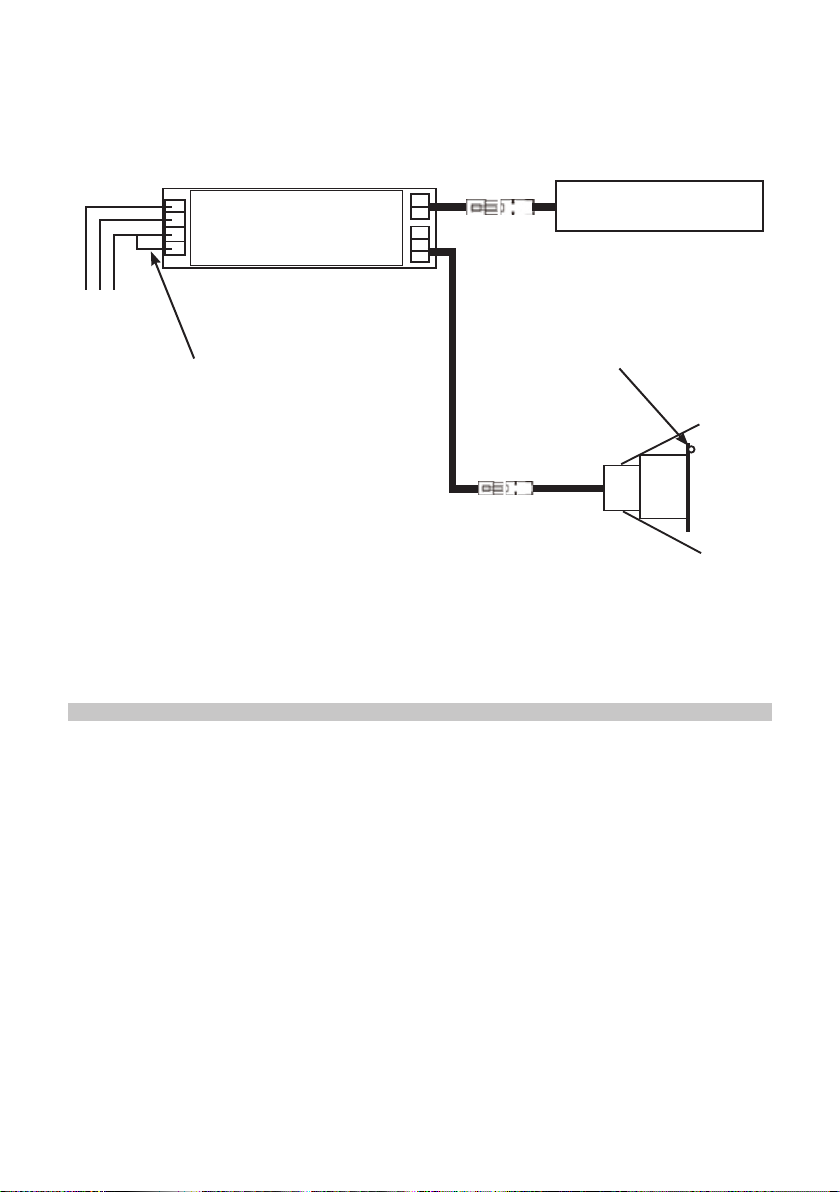
3. Unscrew and remove the cover over the mains input connectors on the emergency
pack.
4. Make connection to the mains supply using the terminal block on the emergency
pack. Ensure that the correct polarities are observed i.e.:
● Brown – Live terminal ‘L’
● Blue – Neutral terminal ‘N’.
● Green/Yellow – Earth terminal ‘E’
● Link wire ‘L’ to ‘L1’ can be removed to change between maintained and non-
maintained mode of operation.
5. Ret the cover over the terminals feeding the cable out through the exit hole.
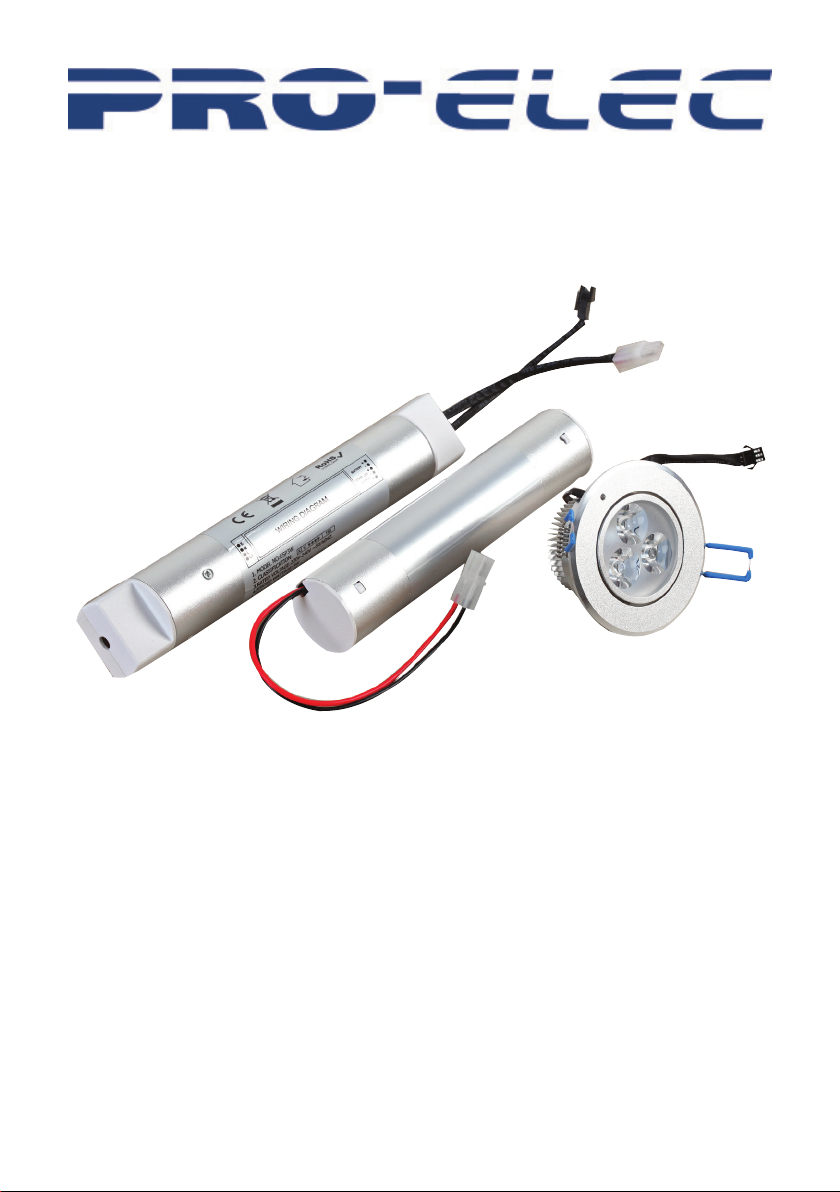
6. Write the current date on the battery pack in the space provided.
7. Connect the battery pack to the matching white in-line connector on the wires to the
emergency pack.
8. Connect the lamp to the small black in-line connector to the emergency pack.
9. Insert the emergency pack and battery through the hole into the ceiling space and
insert the lamp into the hole so it ts ush and is secure.
10. Turn on the power supply. The green LED should light to indicate that the battery is
charging.
11. In maintained mode, the lamp will illuminate.
12. Perform the electrical tests specied in the Wiring Regulations (BS7671).
INSTALLATION
RISK OF ELECTRICAL SHOCK. ALWAYS ISOLATE THE POWER AT THE MAINS
BEFORE INSTALLING OR MAINTAINING THIS EMERGENCY LIGHT.
• This product must be installed by a competent person in accordance with the
Building Regulations and the current edition of the IET Wiring Regulations
(BS7671).
• This product is suitable for mounting on normally ammable surfaces such as
wood, plasterboard or masonry.
• Emergency light ttings should have their own separate mains circuit, protected
with an appropriate MCB or fuse. They should not share their supply with other
lighting or electrical equipment.
• This product is suitable for connection to a 220-240V~ 50Hz.
• This product must be earthed.
• This product is for indoor use only and suitable for ceiling mounting.
• Ensure that after installation the equipment and accessories remain accessible for
regular maintenance and testing.

3
Test Record Sheet on reverse
PULL OUT

4
Installation, maintenance and operation check record
Location:
Installation date:
Installation test duration:
Installed by:
20__ 20__
20__ 20__ 20__
Month Test Sign Date Sign Date
Sign Date Sign Date Sign Date
1Short
2Short
3Short
4Short
5Short
6 1 h
7Short
8Short
9Short
10 Short
11 Short
12 3h

5
Installation, maintenance and operation check record
Location:
Installation date:
Installation test duration:
Installed by:
20__ 20__ 20__
20__ 20__
Month Test Sign Date Sign Date Sign
Date Sign Date Sign Date
1Short
2Short
3Short
4Short
5Short
6 1 h
7Short
8Short
9Short
10 Short
11 Short
12 3h

6
Test Record Sheet on reverse
PULL OUT

7
OPERATIONAL CHECKS
Note: This equipment must be checked regularly in compliance with local regulation and
codes of practice. For your own safety, testing should occur during the day.
• After installation, you should allow 24 hours for the battery pack to charge fully
before testing.
• Isolate the power supply and check that the lamp remains illuminated for at least
three hours. Restore the power supply.
• Each day: Check that the green charging LED is lit.
• Each month (short test): Isolate the power supply and check that the lamp remains
illuminated. Record the results on the test record sheet included with these
instructions.
• Every six months: Isolate the power supply and check that the lamp remains
illuminated after 1 hour. Record the results on the included test record.
• Once each year: Isolate the power supply and check that the lamp is still illuminated
after 3 hours. Record the results on the included test record.
Please keep these test records in a safe place. A re ofcer or other authorised
person may want to see your record of inspection and testing.
Battery
E
N
L
L1
State Led
Output
Mains
Supply
Input
Battery
LED Lamp
In-line connector
Emergency
Pack
Maintained mode link
Charge
Indicator
LED

8
INFORMATION ON WASTE DISPOSAL FOR CONSUMERS OF
ELECTRICAL & ELECTRONIC EQUIPMENT.
When this product has reached the end of its life it must be treated as Waste Electrical
& Electronic Equipment (WEEE). Any WEEE marked products must not be mixed with
general household waste, but kept separate for the treatment, recovery and recycling
of the materials used. Waste batteries can be returned to any waste battery recycling
point which are provided by most battery retailers. Contact your local authority for
details of battery and recycling schemes in your area.
Made in China. PR2 9PP
Man Rev 1.0
Cd
CLEANING AND MAINTENANCE
Changing the battery
• If after a routine operation check, the lamp does not remain lit for the 3 hour period,
a new battery pack may be required. Change the battery pack as follows:
1. Isolate from the mains supply.
2. Remove the tting from the ceiling cut-out.
3. Extract the battery and emergency unit from above the ceiling.
4. Unplug the in-line battery pack connector and remove the old battery pack.
5. Write the current date on the new battery pack and connect it.
6. Insert the emergency unit and battery into the ceiling space and ret the lamp into
the hole making sure that it is securely clipped in place.
7. Restore mains power and allow to charge for 24 hours.
8. Perform the full operation check and update the test record.
• Clean this product with a soft, dry cloth only. Do not use any solvents or abrasive
chemical cleaners.
• The LED lamps in this product are non-replaceable.
SPECIFICATIONS
Input voltage: 220-240V~, 50Hz
Rated power: 3.0W
Lamps: White LED 1W x 3pcs
Luminous ux: 280Lm(AC) / 275Lm(DC)
Continuous emergency illumination: > 3 hours (when battery is fully charged)
Battery pack: Ni-Cd 3.6V 3Ah
Recharge time: 24 hours – approx.
Ambient temperature: 0°C - 40°C
Over-discharge protection: Yes
Ingress protection rating: IP20

X-ON Electronics
Largest Supplier of Electrical and Electronic Components
Click to view similar products for pro elec manufacturer:
Other Similar products are found below :
PE01004 PE01003 LMP-G60BCW07-02B PSG91116 PEL00582 PEL00418 PEL00217 PEL00156 PEL00170 PEL00175 PEL00251
PEL00417 PEL00581 PEL00346 PEL00350 PEL00291 PEL00153 PEL00061 PEL00199 PEL00371 PE01005 PEL00414 JR60431
PEL00091 PEL00075 PEL00222 PEL00144 PEL00227 PEL00151 PEL00154 PEL00281 LMP-G60E27W07-02B PSG91112 2213U 2.4A
PEL00093 PEL00223 PEL00165 PEL00051 HS-5626 1518C WHT PEL00067 PEL00221 PEL00225 PEL00157 PEL00162 PEL00163
PEL00231 PE000031 PC2213U PEL00347
Table of contents
Other Pro-Elec Spotlight manuals
Popular Spotlight manuals by other brands

Somogyi Elektronic
Somogyi Elektronic home LNL 120 quick start guide

Varytec
Varytec LED Studio 150 2900K user manual

Martin
Martin MAC Encore Performance user manual

Black & Decker
Black & Decker BSL301 instruction manual

Wagan
Wagan Brite-Nite WR600 user manual

MONDOLUX
MONDOLUX Hartley HE installation manual