Pro's Kit PT-5203A User manual

PT-5203A/I/G Electric Engraver
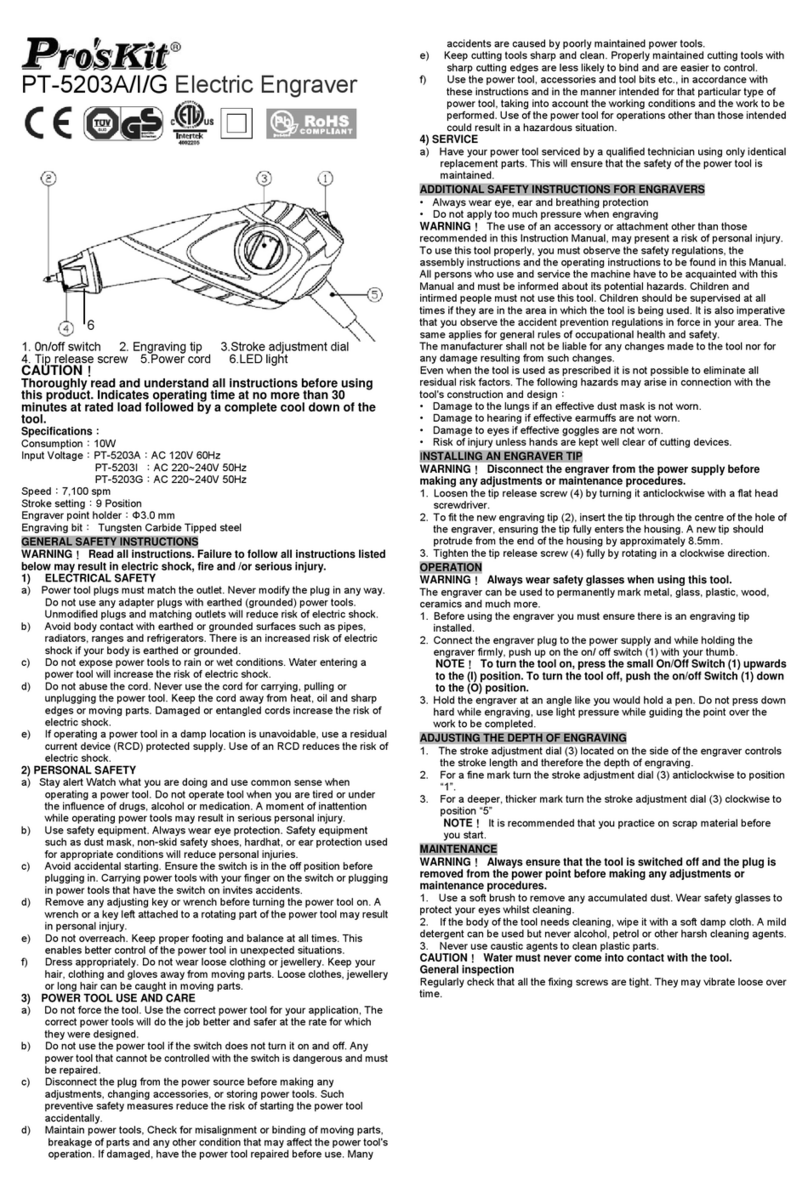
1. 0n/off switch 2. Engraving tip 3.Stroke adjustment
dial
4. Tip release screw 5.Power cord 6.LED
light
CAUTION!
Thoroughly read and understand all instructions before using
this product. Indicates operating time at no more than 30
minutes at rated load followed by a complete cool down of the
tool.
Specifications:
Consumption:10W
Input Voltage:PT-5203A:AC 120V 60Hz
PT-5203I :AC 220~240V 50Hz
PT-5203G:AC 220~240V 50Hz
Speed:7,100 spm
Stroke setting:9 Position
Engraver point holder:Φ3.0 mm
Engraving bit:Tungsten Carbide Tipped steel
GENERAL SAFETY INSTRUCTIONS
WARNING!Read all instructions. Failure to follow all instructions listed
below may result in electric shock, fire and /or serious injury.
1) ELECTRICAL SAFETY
a) Power tool plugs must match the outlet. Never modify the plug in any way.
Do not use any adapter plugs with earthed (grounded) power tools.
Unmodified plugs and matching outlets will reduce risk of electric shock.
b) Avoid body contact with earthed or grounded surfaces such as pipes,
radiators, ranges and refrigerators. There is an increased risk of electric
shock if your body is earthed or grounded.
c) Do not expose power tools to rain or wet conditions. Water entering a
power tool will increase the risk of electric shock.
d) Do not abuse the cord. Never use the cord for carrying, pulling or
unplugging the power tool. Keep the cord away from heat, oil and sharp
edges or moving parts. Damaged or entangled cords increase the risk of
electric shock.
e) If operating a power tool in a damp location is unavoidable, use a residual
current device (RCD) protected supply. Use of an RCD reduces the risk of
electric shock.
2) PERSONAL SAFETY
a) Stay alert Watch what you are doing and use common sense when
operating a power tool. Do not operate tool when you are tired or under
the influence of drugs, alcohol or medication. A moment of inattention
while operating power tools may result in serious personal injury.
b) Use safety equipment. Always wear eye protection. Safety equipment
such as dust mask, non-skid safety shoes, hardhat, or ear protection used
for appropriate conditions will reduce personal injuries.
c) Avoid accidental starting. Ensure the switch is in the off position before
plugging in. Carrying power tools with your finger on the switch or plugging
in power tools that have the switch on invites accidents.
d) Remove any adjusting key or wrench before turning the power tool on. A
wrench or a key left attached to a rotating part of the power tool may result
in personal injury.
e) Do not overreach. Keep proper footing and balance at all times. This
enables better control of the power tool in unexpected situations.
f) Dress appropriately. Do not wear loose clothing or jewellery. Keep your
hair, clothing and gloves away from moving parts. Loose clothes, jewellery
or long hair can be caught in moving parts.
3) POWER TOOL USE AND CARE
a) Do not force the tool. Use the correct power tool for your application, The
correct power tools will do the job better and safer at the rate for which
they were designed.
b) Do not use the power tool if the switch does not turn it on and off. Any
power tool that cannot be controlled with the switch is dangerous and must
be repaired.
c) Disconnect the plug from the power source before making any
adjustments, changing accessories, or storing power tools. Such
preventive safety measures reduce the risk of starting the power tool
accidentally.
d) Maintain power tools, Check for misalignment or binding of moving parts,
breakage of parts and any other condition that may affect the power tool's
operation. If damaged, have the power tool repaired before use. Many
accidents are caused by poorly maintained power tools.
e) Keep cutting tools sharp and clean. Properly maintained cutting tools with
sharp cutting edges are less likely to bind and are easier to control.
f) Use the power tool, accessories and tool bits etc., in accordance with
these instructions and in the manner intended for that particular type of
power tool, taking into account the working conditions and the work to be
performed. Use of the power tool for operations other than those intended
could result in a hazardous situation.
4) SERVICE
a) Have your power tool serviced by a qualified technician using only identical
replacement parts. This will ensure that the safety of the power tool is
maintained.
ADDITIONAL SAFETY INSTRUCTIONS FOR ENGRAVERS
• Always wear eye, ear and breathing protection
• Do not apply too much pressure when engraving
WARNING!The use of an accessory or attachment other than those
recommended in this Instruction Manual, may present a risk of personal injury.
To use this tool properly, you must observe the safety regulations, the
assembly instructions and the operating instructions to be found in this Manual.
All persons who use and service the machine have to be acquainted with this
Manual and must be informed about its potential hazards. Children and
intirmed people must not use this tool. Children should be supervised at all
times if they are in the area in which the tool is being used. It is also imperative
that you observe the accident prevention regulations in force in your area. The
same applies for general rules of occupational health and safety.
6
The manufacturer shall not be liable for any changes made to the tool nor for
any damage resulting from such changes.
Even when the tool is used as prescribed it is not possible to eliminate all
residual risk factors. The following hazards may arise in connection with the
tool's construction and design:
• Damage to the lungs if an effective dust mask is not worn.
• Damage to hearing if effective earmuffs are not worn.
• Damage to eyes if effective goggles are not worn.
• Risk of injury unless hands are kept well clear of cutting devices.
INSTALLING AN ENGRAVER TIP
WARNING!Disconnect the engraver from the power supply before
making any adjustments or maintenance procedures.
1. Loosen the tip release screw (4) by turning it anticlockwise with a flat head
screwdriver.
2. To fit the new engraving tip (2), insert the tip through the centre of the hole of
the engraver, ensuring the tip fully enters the housing. A new tip should
protrude from the end of the housing by approximately 8.5mm.
3. Tighten the tip release screw (4) fully by rotating in a clockwise direction.
OPERATION
WARNING!Always wear safety glasses when using this tool.
The engraver can be used to permanently mark metal, glass, plastic, wood,
ceramics and much more.
1. Before using the engraver you must ensure there is an engraving tip
installed.
2. Connect the engraver plug to the power supply and while holding the
engraver firmly, push up on the on/ off switch (1) with your thumb.
NOTE!To turn the tool on, press the small On/Off Switch (1) upwards
to the (I) position. To turn the tool off, push the on/off Switch (1) down
to the (O) position.
3. Hold the engraver at an angle like you would hold a pen. Do not press down
hard while engraving, use light pressure while guiding the point over the
work to be completed.
ADJUSTING THE DEPTH OF ENGRAVING
1. The stroke adjustment dial (3) located on the side of the engraver controls
the stroke length and therefore the depth of engraving.
2. For a fine mark turn the stroke adjustment dial (3) anticlockwise to position
“1”.
3. For a deeper, thicker mark turn the stroke adjustment dial (3) clockwise to
position “5”
NOTE!It is recommended that you practice on scrap material before
you start.
MAINTENANCE
WARNING!Always ensure that the tool is switched off and the plug is
removed from the power point before making any adjustments or
maintenance procedures.
1. Use a soft brush to remove any accumulated dust. Wear safety glasses to
protect your eyes whilst cleaning.
2. If the body of the tool needs cleaning, wipe it with a soft damp cloth. A mild
detergent can be used but never alcohol, petrol or other harsh cleaning agents.
3. Never use caustic agents to clean plastic parts.
CAUTION!Water must never come into contact with the tool.
General inspection
Regularly check that all the fixing screws are tight. They may vibrate loose over
time.
Test Equipment Depot -800.517.8431
99 Washington Street Melrose, MA 02176
TestEquipmentDepot.com

PT-5203A/I/G 電動雕刻刀
1. 0n/off 電源開關
2. 雕刻針
3. 衝擊速度調整旋鈕
4. 雕刻針固定螺絲
5. 電源線
6. LED 工作照明燈
注意!
使用本產品前,應詳閱和了解本說明書中的所有指示;為了確保產品的
使用壽命,一般應在操作 30 分鐘以下時,讓本產品先靜止一段時間,
待冷卻後.再使用!
規格:
消耗功率:10W
輸入電壓:PT-5203A:AC 120V 60Hz;PT-5203I:AC 220~240V 50Hz
PT-5203G:AC 220~240V 50Hz
衝擊速度:7,100 spm
衝擊速度設定:9段
雕刻針孔座:Φ3.0 mm
雕刻針:鎢碳化鋼
一般安全指示
危險!詳閱本說明書。未能遵循說明書中的紙是可能導致觸電、火災、
和/或重傷害。
1)電氣安全
a) 電動工具的插頭需與插座匹配,不可用任何方式修改插頭!具有接
地的電動工具,不可使用轉換插頭!不修改插頭和使用匹配的插
座,將減少觸電的風險!
b) 避免身體接觸接地的表面,例如..管線、天線、延伸空間和和電冰箱。
當你身體接觸接地的表面,將有增高觸電的風險。
c) 不可將電動工具暴露在下雨或潮濕的環境中。浸濕的電動工具,將
提高觸電的風險。
d) 不可濫用電源線。不可使用電動工具的電源線,做為攜帶、拖拉或
拉拔等用途。
e) 如果無法可避免在一個潮濕的地區中,操作一台電動工具,應使用
電流保護設備,去保護電源!使用電流保護設備,可以減少觸電
的風險。
2) 人身安全
a) 當操作一台電動工具時,應保持警戒、集中注意力.注意工作。當你
感覺疲倦時,或在使用藥物和飲酒後,不可操作電動工具。
b) 使用安全的設備,戴上眼鏡保護眼睛。安全設備.例如.防塵面罩、防
滑的安全鞋、頭盔,或耳朵保護罩,適當的使用可以減少人身的
傷害。
c) 避免意外的啟動。在插入插頭前,應先確認開關在關閉的狀態下!
攜帶工具時,手指應遠離開關或誤插電源,當不慎打開電源可能
造成意外。
d) 在開啟電動工具前,請移除所有調整工具和扳手。調整工具或扳手
等電動工具附屬的旋具,可能導致人身傷害。
e) 不要過度延伸;始終保持穩固和平衡;這可以在出乎預料的情況下,
更容易的控制電動工具。
f) 適合的服裝:不要穿著寬鬆的衣物或掛飾珠寶項鍊。不要讓你的頭
髮、服裝和手套靠近轉動的機具。寬鬆的衣服、珠寶.項鍊或長髮,
可能被捲入轉動的機具中。
3) 電動工具的使用和注意事項
a) 操作工具不要太過用力。正確的使用電動工具,正確的使用電動工
具,他們的設計將有助於節省成本,和將工作做得更好.更安全。
b) 如果開關忽開忽關時,請不要繼續使用這電動工具。任何不受控制
的電動工具是危險的,請速送到經銷商處維修。
c) 更換配件或儲存電動工具之前,請拔除插頭、切斷電源。這樣可以
預防意外啟動電動工具的風險,減少意外發生。
d) 維護電動工具,檢查和鎖緊鬆動、破損的零配件,這些問題可能影
響電動工具的操作。如果已損壞,請在操作電動工具前修復,很
多意外的發生,是因為電動工具不當的維護所引起。
e) 保持電動工具的鋒利和清潔。正確的保持電動工具的鋒利,比較不
會受限和容易受控制。
f) 使用電動工具和雕刻針等…配件。依照說明書指示和用這些特別的
配件類型,應用在各種工作條件下和待執行的工作上。不當的使
用非正規的配件,將導致危險的發生。
4) 售後服務
a) 本電動工具只有是經確認合格的工程師,並替換與原產品完全相同
的零件下,才可以進行維修。如此才能確保產品維修的安全。
雕刻師附加指示
•請穿戴保護眼睛、耳朵、呼吸的裝備。
•雕刻時,請勿用力過猛。
6
危險!除了在這說明書中所推薦或是本產品所附加的配件外,不當的配
件可能傷害人體。操作本電動工具時,請務必遵守本說明書中的相關規
定。所有的使用或維修本機器的人,必須熟讀本說明書,且一定要注意
要它潛在的危險。小孩子與不熟悉電動工具操作的人,禁止使用本電動
工具。如果小孩與旁觀者在電動工具操作的範圍中,應該要監視與注
意。當它在你工作時,在規定範圍中,必需要遵守意外事件預防事項,
同你ㄧ樣的遵守這些一般的健康.安全守則。
安裝雕刻針
危險!當要進行調整或維修前,請先將雕刻機的電源斷開。
1. 鬆開雕刻針的(4)緊固螺絲,以扳手逆時針旋轉鬆開。
2. 挑選大小合適(ψ3.0mm)新的雕刻針(2),插入雕刻針孔座中,並確
認雕刻針以完全插入座中。新的雕刻針應該凸出雕刻針座約
8.5mm。
3. 用扳手以順時針方向旋轉,旋緊固定螺絲(4)。
操作方法
危險!當使用本電動工具時,請都戴上保護眼鏡!
本電動雕刻機,適合用於金屬、玻璃、塑膠、木頭、陶磁…等,永久的
刻上圖文。
1. 在您使用本電動雕刻機前,請先確認雕刻針已完全裝置妥善。
2. 連結本電動雕刻機的插頭,插妥在電源插座上,緊握住本電動雕
刻機,再用手指打開 on/off 開關(1)
注意!要將電源打開,請向上壓下 on/of 開關;要將電源關閉,請向
下壓下 on/of 開關。
3. 像握持一支筆一樣的緊握住本電動雕刻機。操作時請不要過度用
力,只要輕力.穩定的帶動雕刻針到所有雕刻工作結束。
調整雕刻深度
1. 調整.旋轉 衝擊速度調整旋鈕(3),從 1到5共9段,去調整你
需要的雕刻深度。
2. 對於較軟的材質和刻紋需要淺一點時,請將 衝擊速度調整旋鈕
(3),逆時針調整到”1”的位置。
3. 對於較硬的材質和刻紋需要深一點時,請將 衝擊速度調整旋鈕
(3),順時針調整到”5”的位置。
注意!當你要雕刻前,請先用一小片區域進行練習。
保養與維護
危險!當要進行調整或維修前,請先將雕刻機的電源斷開。
1. 請戴上眼鏡保護眼睛,使用軟性刷子,先將本電動雕刻機上的灰
塵刷除。
2. 如果需要擦拭外殼,請用軟性布沾濕後,確實擰乾後,再擦拭。
可以使用中性的清潔劑,但嚴禁使用酒精、汽油…等揮發性溶劑
擦拭外殼。
3. 不可使用腐蝕性溶劑擦拭外殼。
注意!擦拭清潔時,不可以讓水滲入機身內!
一般檢查
長時間的使用可能鬆動螺絲,請經常地檢查所有的固定螺絲是鎖緊的。
寶工實業股份有限公司
PROKIT’S INDUSTRIES CO., LTD.
©2015 Prokit’s Industries Co., LTD. All rights reserved 2015002(C)
Test Equipment Depot -800.517.8431
99 Washington Street Melrose, MA 02176
TestEquipmentDepot.com
This manual suits for next models
2
Other Pro's Kit Engraver manuals
Popular Engraver manuals by other brands

GRAVOGRAPH
GRAVOGRAPH LS900 XP Operating and maintenance manual

Vision
Vision MAX Pro user manual
Roland
Roland EGX-30 user manual
Vision
Vision SP Series user manual

Miyachi
Miyachi LMV1000 user manual
Universal Laser Systems
Universal Laser Systems VersaLaser VL-200 Safety, installation, operation, and basic maintenance manual

Roland
Roland EGX-30A user manual

Redsail
Redsail X700 user manual

Omtech
Omtech POLAR 350 owner's manual

Vision Engraving & Routing Systems
Vision Engraving & Routing Systems Express user manual
idp
idp SMART-70X user manual

Universal Laser Systems
Universal Laser Systems PLS3.60 Safety, installation, operation, and basic maintenance manual
