Proactive Medical Protekt Aire 9900 User manual
UML-P1509006-E-2022/04
Protekt® Aire 9900
True Low Air Loss Mattress System with Alternating Pressure & Pulsation
Instructions For Use
Proactive Medical Products
270 Washington Street
Mount Vernon, NY 10553
Phone# 1-855-BE-PROACTIVE (855-237-7622)
Fax# 845-205-6005
www.proactivemedical.com

1
IMPORTANT SAFEGUARDS
READ ALL INSTRUCTIONS BEFORE OPERATING THIS DEVICE
The system has been designed to comply with regulatory safety standards including:
ANSI/AAMI ES60601-1
ANSI/AAMI 60601-1-2
NOTE, CAUTION AND WARNING STATEMENTS:
NOTE—Indicate some tips.
CAUTION—Indicate correct operating or maintenance procedures in order to prevent
damage to or destruction of the equipment or other property.
WARNING—Call attention to a potential danger that requires correct procedures or
practices in order to prevent personal injury.
WARNING: To reduce the risk of electrocution:
1. Patients are not allowed to operate the product. Always unplug this product
immediately while it’s not in use.
2. Do not disassemble the pump to avoid electrocution.
3. Do not place or store product where it can fall or be pulled into a tub or sink.
4. Do not place in or drop into water or other liquid. Do not use while bathing.
5. Do not reach for a product that has fallen into water. Unplug immediately.
WARNING: To reduce the risk of burns, electrocution, fire or injury to person:
1. The system must be operated with the mattress connected to the pump. Please do
not power-off or unplug the pump while in use.
2. Always use the same voltage as stated on the label. Do not use other power cords on
the pump. Keep the plastic packing away from children and pets to prevent
suffocation hazards.
3. Equipment is not suitable to use in the presence of a flammable anesthetic mixture
with air, with oxygen, or nitrous oxide.
4. Keep away from sharp objects.
5. Close supervision is necessary when this product is used by, on, or near children or
people with disabilities.
6. Use this product only for its intended use as described in this manual. Do not use
attachments not recommended by the manufacturer.
7. Never operate this product if the pump has a damaged power cord or plug, if the
pump is not working properly, if the pump has been dropped or damaged, or the

2
pump has been dropped into water. Return the product to a service center or to the
distributor for examination and repair.
8. Keep the power cord away from heated surfaces.
9. Never block the air openings of this product or place the product on a soft surface,
such as a bed or couch, where the openings may be blocked. Keep the air opening
free of lint, hair, and other similar particles.
10. Never drop or insert any object into any air opening or hose tube.
11. Avoid dropping or putting any heavy object on the pump.
12. Place the power cord and hose tube at patient’s foot area to avoid strangling of
patient’s neck.
13. The pump will have minor heat generated in operation, please do not directly contact
the surface continuously for more than 1 minute.
14. When the main supply is lost or has temporarily failed, the pump will stop, and the
power failure alarm will alarm up to 20 minutes. This is normal and the product will
return to normal operation once the main supply is resumed.
15. Do not modify this equipment without authorization of the manufacturer.
16. The device incorporates electronic programmable systems. Do not attempt to access
the systems without authorization.
WARNING: If the patient has a small body size and the side rails are lifted,
ensure the openings through the side rails or the openings between the side rails
and the mattress do not pose a threat to the patient. Frequently check patient
against entrapment is required.
CAUTION: Any serious incident that has occurred in relation to the device should
be reported to the manufacturer and the competent authority of the Member
State in which the user and/or patient is established.

3
PRODUCT SYMBOL DESCRIPTION
I
POWER ON
O
POWER OFF
ATTENTION
CAUTION, READ THE
INSTRUCTIONS BEFORE USE
AWAY FROM THE FLAME
IP21
WATER AND DUST PROTECTION
CLASSIFICATION
“BF” SYMBOL, INDICATES THIS
PRODUCT IS ACCORDING TO
THE DEGREE OF PROTECTION
AGAINST ELECTRIC SHOCK FOR
TYPE BF EQUIPMENT. APPLIED
PART: MATTRESS
DISPOSAL OF ELECTRICAL &
ELECTRONIC EQUIPMENT (WEEE):
THIS PRODUCT SHOULD BE
HANDED OVER TO AN APPLICABLE
COLLECTION POINT FOR THE
RECYCLING OF ELECTRICAL AND
ELECTRONIC EQUIPMENT.
DOUBLE INSULATED
MODEL NUMBER
FUSE SPECIFICATION
CATALOGUE NUMBER
HUMIDITY LIMITATION
BATCH CODE
TEMPERATURE LIMIT
SERIAL NUMBER
USE NO HAND HOOKS
UNIQUE DEVICE IDENTIFIER
MANUFACTURER
SGS CERTIFICATION LOGO
WITH RESPECT TO ELECTRICAL
SHOCK, FIRE AND
MECHANICAL HAZARDS ONLY
IN ACCORDANCE WITH IEC
60601-1.

4
Contents
1. INTRODUCTION .......................................................................................................................5
2. INTENDED USE.........................................................................................................................5
3. PRODUCT DESCRIPTION ..........................................................................................................5
4. PRODUCT INSTALLATION GUIDE..............................................................................................6
5. PANEL DISPLAY AND OPERATION GUIDE .................................................................................9
6. CLEANING ..............................................................................................................................16
7. STORAGE................................................................................................................................17
8. MAINTENANCE ......................................................................................................................17
9. THE DISPOSAL OF AIR MATTRESS ..........................................................................................18
10. TROUBLESHOOTING………………………………………………………………………………………………………….19
11. TECHNICAL DATA....................................................................................................................20

5
1. INTRODUCTION
This Instruction for use provides the information required for the initial set up and for
the normal operation of the Proactive Medical Product’s Protekt® Aire 9900
Mattress System. Before operating the Proactive Medical Product’s Protekt® Aire
9900 Mattress System, be sure the operator has read and understood in detail the
content of this Instruction for Use.
2. INTENDED USE
The Proactive Medical Product’s Protekt® Aire 9900 Mattress System is intended for
prevention of pressure ulcers. The Proactive Medical Product’s Protekt® Aire 9900
Mattress System may be used in a variety of settings including, but not limited to
individual home care setting and long-term care patients suffering from pressure
ulcers, or pain management as prescribed by physician.
Contraindication—The mattress is not suitable for use on patients with unstable
fractures.
The connection of the Fowler’s Position Detector to the pump shall be performed by
the operator. It’s not designed for the patient to perform the connection.
NOTE: Equipment is not suitable for use in the presence of a flammable
anesthetic mixture with air or with oxygen or nitrous oxide.
3. PRODUCT DESCRIPTION
The Proactive Medical Product’s Protekt® Aire 9900 Mattress System is an
alternating pressure air mattress replacement system used for the prevention of
pressure ulcers by using the established principles of alternating therapy.
The control unit of the Proactive Medical Product’s Protekt® Aire 9900 Mattress
System is a pump featuring a digital pressure adjustment function, mode selections,
and audiovisual alarms. The 18 air cells mattress unit alternates with 3 static head
cells which remain static and provide a “pillow”support for optimum comfort. The
mattress has a heavy-duty polyester-PU base sheet with a vapor permeable PU
coated nylon quilted cover.
The system includes a rapid release twist CPR valve by the head section of the
mattress in the event of cardiac arrest.

6
4. PRODUCT INSTALLATION GUIDE
1. Unpack the box to inspect all items for any damage that may have occurred during
shipping. If there is any damage, please contact your dealer immediately for
assistance.
2. Place the mattress on top of the bed frame. The feet symbol on both sides of the
mattress indicates location of the foot end.
3. Secure the mattress onto the bed
frame by using the securing side
straps.
4. Ensure the CPR valve is at CLOSE
position before turning on the
power.
CPR
Air mattress
Patient Head
Air mattress model no.
and serial no. label
(Inside the base cover)
CPR Position Indicator
Securing Side Strap
Pump unit
Hose connector
Pump model no.
and serial no. label
(Behind the pump unit)

7
5. Position the pump by its elastic
hanger brackets over footboard of
the bed. The elastic hanger
brackets will self-adjust onto the
footboard tightly.
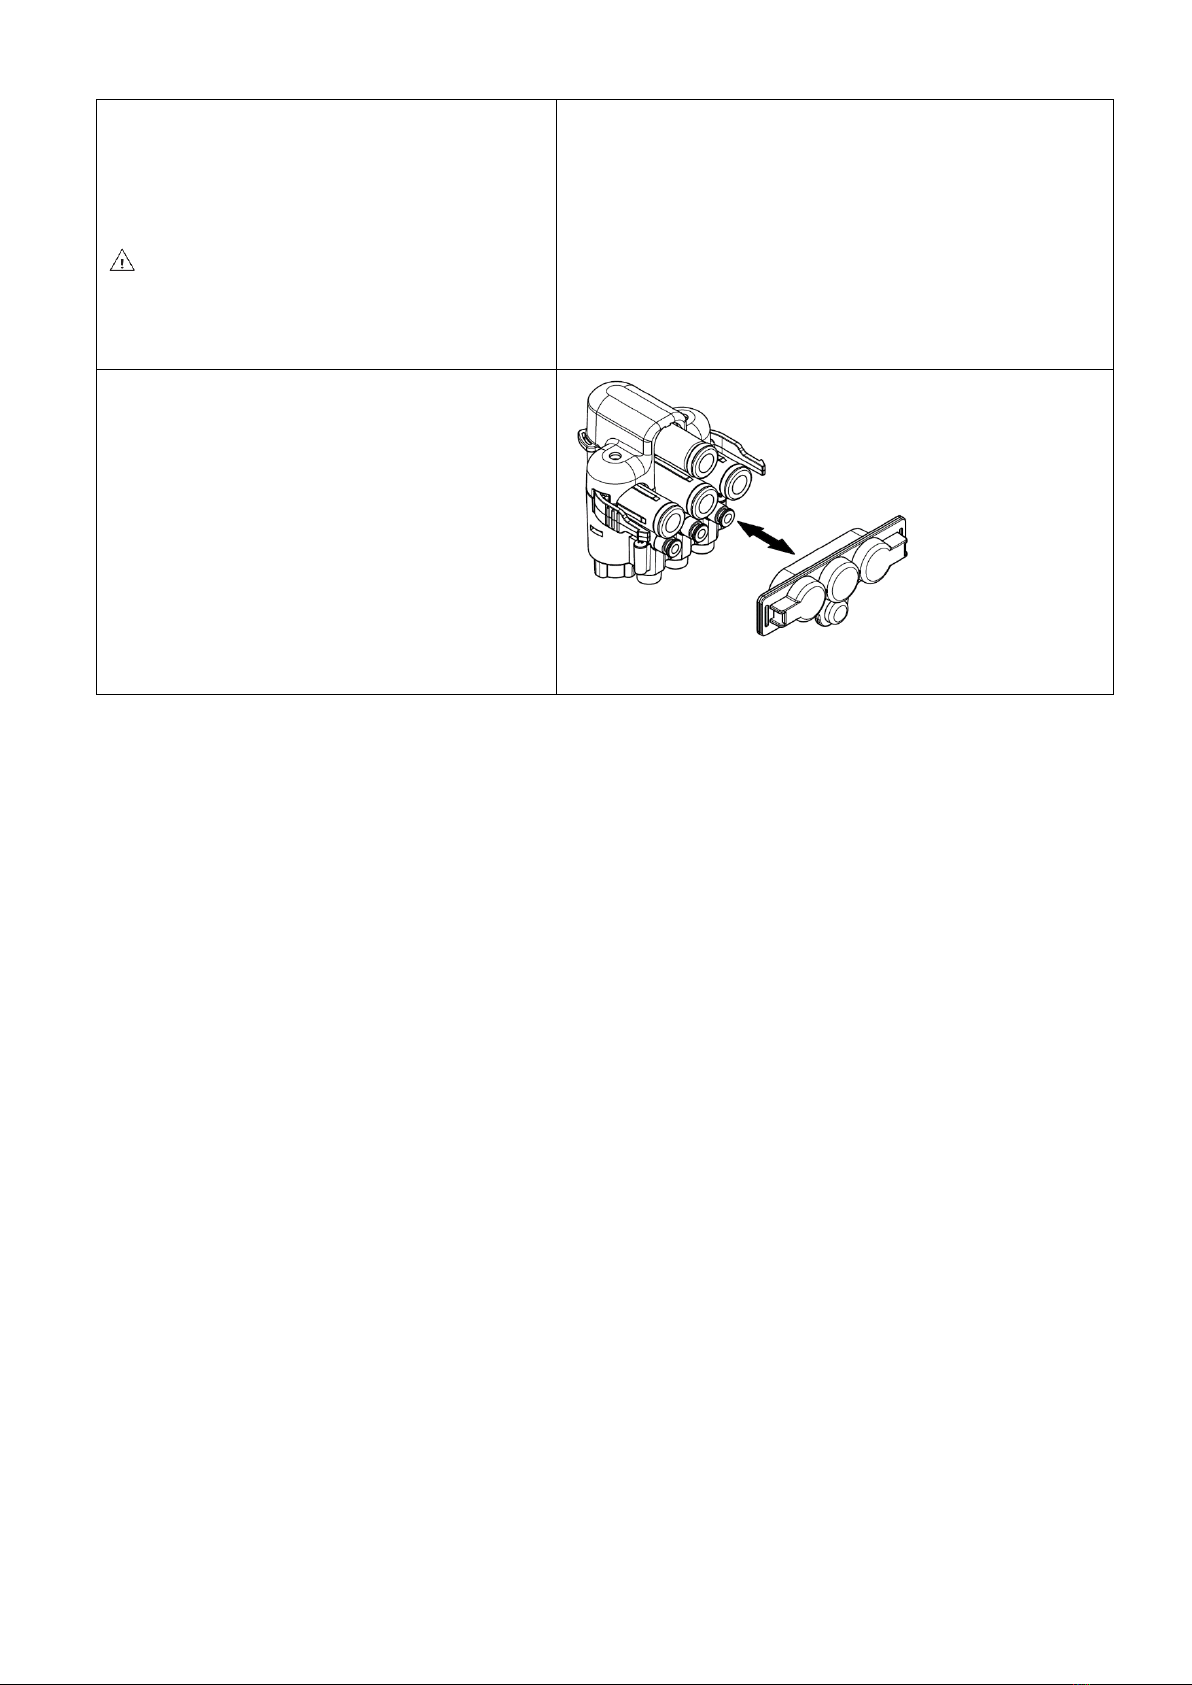
6. Remove the Transport Cap of the
hose connector and connect the
hose connector to the pump unit.
Firmly push the hose connector
into position and a “click”sound
will secure the connection.
7. Connect the Fowler’s Position
Detector cable to the pump unit
by pushing in to secure the
connection.
Follow the direction for connection.
8. Connect the power cord to the
pump. The power switch should
remain off.
9. Press the red power cord
protector downward to secure the
power cord.
10. Plug the power cord into the
electrical outlet.
NOTE: Check and ensure the
pump unit is suitable for the local
power voltage.
CAUTION: The pump can only be
5
6
7
1
0
9
8
Fowler’s Position Detector
8
applied to the mattress
recommended by the
manufacturer. Do not use the
pump for any other purpose.
WARNING: Do not place the pump
unit in area where power cord can
come off easily or inaccessible.
11. For patient’s transportation, press
“Auto-Firm” button and wait for 5
minutes for the mattress to be
inflated. Disconnect the hose from
the pump unit and put on the
hose connector Transport Cap to
keep the mattress inflated.
Bi-directional Transport Cap

9
5. PANEL DISPLAY AND OPERATION GUIDE
5.1 PANEL DISPLAY
①Alarm Mute and Alarm Indicator
⚫Low Pressure Alarm Indicator
⚫Power Failure Alarm Indicator
⚫Service (Malfunction) Alarm Indicator
②Alternate/Pulsate Cycle Time Selection or Warning Code Display
③Operating or Standby
④Auto-Firm
⑤Mode Selection (Alternate/Pulsate/Static)
⑥Panel Lock-Out
⑦Bariatric Mode
⑧Comfort Control
5.1.1 Alarm Mute
Press the alarm mute button to suspend temporary alarms. Should the situation
not be resolved, and faulty conditions continue, the alarm will resume notifying the
patient and caregiver.
5.1.2 Alternate/Pulsate Cycle Time Selection
Alternate cycle time can be selected to 5, 10, 15, 20, 25, or 30 minutes by pressing
the Cycle button.
Pulsate cycle time can be selected from 1-20 minutes by pressing the Cycle button.
3
4
2
5
6
7
8
1

10
5.1.3 Operate or Standby
Press this button to start operating or go into standby.
5.1.4 Auto-Firm
The pump will go into the inflation mode (LED lights flashing) every time the
operate mode is triggered. This ensures the mattress to be able to reach its
maximum operating pressure. Once the max pressure level is reached, the pump
will automatically switch into the previous selected mode and comfort level. User
can also use this function as full mattress inflation during patient sit-up or
ingress/egress for better support.
5.1.5 Mode Selection
⚫Alternate—The air cells of the mattress are proportionally deflated to reduce
the interface pressure. The alternating cycle will continue at the selected cycle
time until another mode is selected.
⚫Static—The mattress maintains a constant lower pressure.
⚫Pulsate—The mattress maintains in static mode and oscillates at selected
pressure at the selected cycle time. The pulsate cycle will continue until
another mode is selected.
5.1.6 Panel Lock-Out
Press the Lock-Out button to lock the panel. Should the panel remain untouched
for 30 seconds, the Lock-Out feature will lock the panel to prevent accident from
changing setting without notice. To unlock, press the Lock-Out button for 3
seconds.
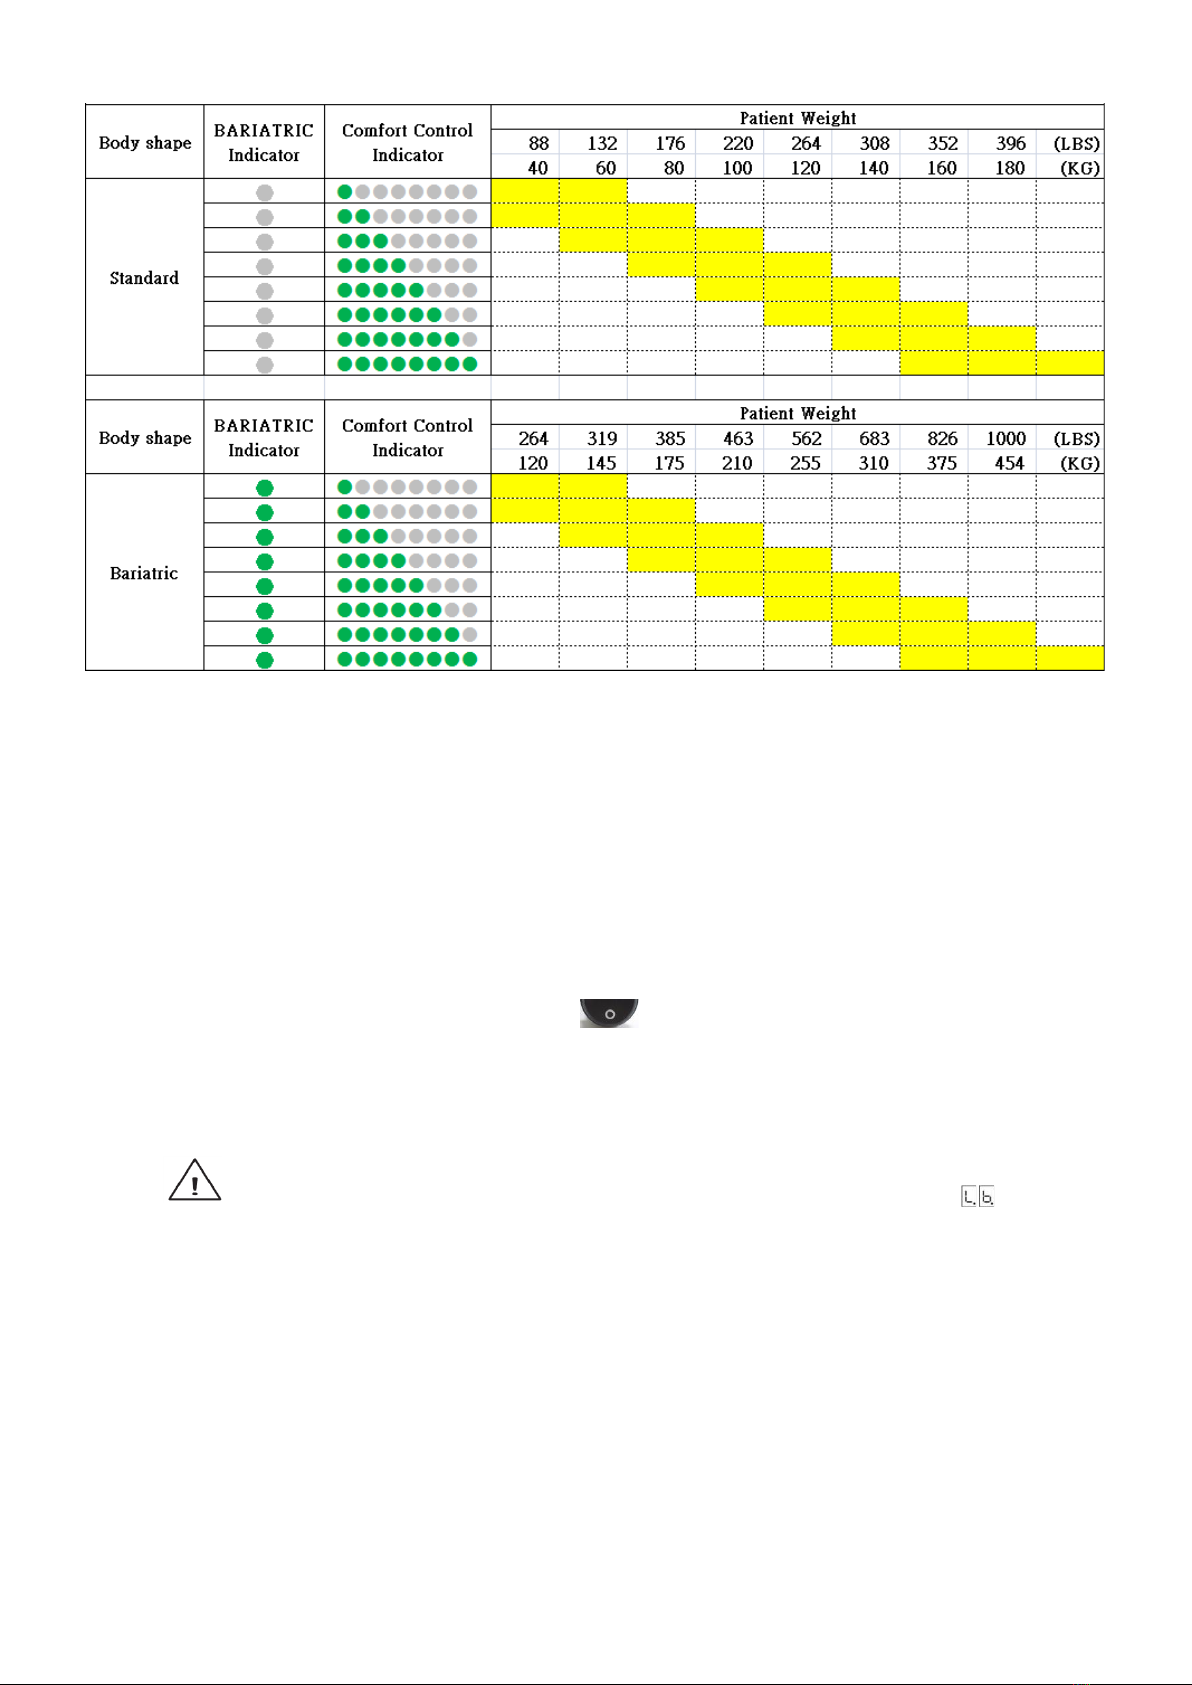
5.1.7 Bariatric Mode
Bariatric mode enhances the output of the pump for heavier patient support. Refer
to Table 1 Weight and Comfort Level Reference for weight and comfort level

11
recommendation.
5.1.8 Comfort Control
Comfort controls the air pressure output level. Press Firm button and the output
pressure will increase and higher pressure output will support heavier weight
patient, for decreasing air pressure, vice versa. Check to see if the suitable pressure
is selected by sliding one hand between a deflated air cell and the patient’s
buttocks areas and there should be minimum contact. Always leave at least 1 inch
space between a deflated air cell and patient’s buttocks areas to prevent
“bottoming-out”. Refer to Table 1 Weight and Comfort Level Reference for weight
and comfort level suggestion.
5.2 OPERATION GUIDE
5.2.1 General Operation:
NOTE: The power switch is located on the side of the pump.
⚫Press to turn on the unit, all LED indicators on the control panel will light
up accompanied with a beep for 2 seconds (check for indicator failure if any),
and the indicator of Standby on the control panel will light up. If the pump was
previously shut off in operate mode, then the pump will enter operate mode
directly.
To test the battery, press to turn off the power and the power failure
alarm should be triggered. Refer to 5.2.3 Audiovisual Alarm if the alarm is not
triggered.
⚫Press the Operate button and the system will begin to inflate, and the
"Auto-Firm" indicator will be flashing.
⚫The mattress should be fully inflated within 5 minutes, and automatically enter
the previous operating mode, otherwise the low pressure alarm with warning
code “ ” will be triggered.
NOTE: Do not proceed to other settings before inflation is completed.
⚫After initial inflation is completed. Press Auto-Firm button for moving the
patient onto the mattress. The mattress will turn into a steady condition in
approx. 5 minutes. Move the patient onto the mattress and press Auto-Firm
button again to cancel Auto-Firm mode and select the appropriate mode.

12
⚫According to the weight of the patient, adjust the pressure setting to the most
suitable level without “bottoming-out”. User can determine an appropriate
pressure by adjusting the Comfort Level. Please consult with your physician for
a proper setting.
WARNING: The pump unit should always be operating to prevent pressure
injury from occurring.
⚫In operate mode, press operate/standby button for the system to enter
standby mode. The system should be in standby mode before shut down.
Switch the power switch to off and the warning code“ ”will appear on
the display to shut off the system.
NOTE: For reminder purposes, power failure alarm will be triggered if the
power is switched off in operating mode (refer to 5.2.3 Audiovisual
Alarm). Press power switch to restart the system, or press Alarm
Mute to turn off the system (refer to 5.2.4 Alarm Mute)
Table 1 Weight and Comfort Level Reference
Protekt® Aire 9900 & 81090-36
13
Protekt® Aire 9900 & 81090-42, 81090-48, 81090-54, 81090-60
5.2.2 CPR
When CPR needs to be performed, quickly rotate the CPR valve to “OPEN” position,
at the same time, disconnect the hose connector from the pump to speed up the
air release.
5.2.3 Audiovisual Alarm
⚫Power Failure—When electrical shortage occurs or power cord is unplug
without turning off the pump or is pressed (intentionally or
unintentionally), the “Power Failure” indicator will light up along with buzzer
and will last 20 minutes.
NOTE: When the pump has not been used for more than 3 months or after
the Power Failure Alarm has been buzzing for a long time and is
showing after the pump has been restarted, the pump may need 6 hours
or more of charging time (in operate or standby mode) for the alarms to
function properly.
⚫Low Pressure—When an abnormal low pressure occurs in the body section, the
"Low Pressure" indicator will flash and beep. Should the situation not be
resolved, and faulty conditions continue, the alarm will resume.
⚫Service (Malfunction)—When faulty conditions occur, the "Service" indicator
will light up along with buzzer.

14
NOTE: Refer to Table 2 for Warning Code Reference if error code appears
on the display or refer to 10. TROUBLESHOOTING
5.2.4 Alarm Mute
⚫When alarms are triggered, both LED light and buzzer will turn on to warn the
patient and caregiver. By pressing the button, it will temporarily mute the
buzzer so the caregiver may check for possible causes. Should the situation not
resolve and faulty conditions continue, the alarm will resume. Refer to 10.
TROUBLESHOOTING for diagnosis.
⚫During “power failure”, pressing “alarm mute” will cease all buzzers and
indicators and turn off the system.
⚫During “low pressure alarm” if the pressure resumes back to normal, then the
low pressure alarm will stop.
⚫When more than one alarm is triggered, the alarm will be performed according
to priority level. Refer to Table 2 Warning Code Reference for priority level.

15
Table 2 Warning Code Reference
PRIORITY
HIGH
↓
LOW
WARNING
CODE
INDICATOR
LED
AUDIBLE OUTPUT
MODE
WARNING DESCRIPTION
REMARKS
0
N/A
N/A
ONCE
Key Tone from Functional
Buttons
Key Tone
1
Power Failure
ONCE
S
hut
d
own
Shutdown
2
ALL LED
ONCE
All Indicators On
Power-On
3
N/A
N/A
ONCE
No Display
State/Mode Switching
4
Auto-Firm
ONCE
I
nflation
E
nded
Mattress Inflation Completion
5
Auto-Firm
ONCE
A
uto-Firm
E
nded
Auto-Firm Completion
6
Static
ONCE
S
tatic
E
nded
Static Completion
7
N/A
Power Failure
REPEAT
(Cycle 4 sec.)
No Display
Power Failure Alarm
8
Low Pressure
REPEAT
(Cycle 4 sec.)
I
nflation
F
ailure
Power-On Inflation Failure Alarm
9
Low Pressure
REPEAT
(Cycle 4 sec.)
A
uto-Firm
F
ailure
Auto-Firm Failure Alarm
10
Low Pressure
REPEAT
(Cycle 4 sec.)
L
ow
P
ressure
Low Pressure Overtime Alarm
11
Service
REPEAT
(Cycle 4.5 sec.)
H
igh
P
ressure
High Pressure Overtime Alarm
12
Service
REPEAT
(Cycle 4.5 sec.)
H
igh
T
emperature
High Ambient Temperature Alarm
13
Service
REPEAT
(Cycle 4.5 sec.)
A
ir Valve
1
Failure
Air Valve 1 Positioning Failure Alarm
14
Service
REPEAT
(Cycle 15 sec.)
L
ow
B
attery
Low Battery Alarm
15
NONE
NONE
L
ift-Up
H
igh
Lift-Up Angle > 45° (± 15°)
16
NONE
NONE
L
ift-Up
L
ow
Lift-Up Angle > 20° (± 15°)
17
Service
REPEAT
S
ervice
I
ndicator
18
NONE
NONE
C
alibration
U
ncompleted
Calibration Uncompleted
19
NONE
NONE
C
alibration
C
ompleted
Calibration Completed
5.2.5 Fowler’s Position Detector
⚫Fowler’s Position Mode will be triggered, and output pressure will increase
when the upper half of the mattress is elevated and exceeds an angle of 20°(±
15°) or more, and the warning code will appear on the display. The pump
unit will resume to previous setting when it is lower than an angle of 20°(±
15°).
⚫Auto-Firm mode will be activated when the upper half of the mattress is
elevated and exceeds an angle of 45°(± 15°) or more, and the warning code
will appear on the display. The pump unit will resume to previous setting
when it’s lower than an angle of 45°(± 15°).

16
6. CLEANING
Wipe the pump unit with a damp cloth pre-soaked with a mild detergent and keep the
pump unit away from dust. If other detergent is used, choose one that will have no
chemical effects on the surface of the plastic case of the pump unit.
CAUTION: Do not immerse or soak the pump unit.
Clean the mattress cover by using single use wipes with a solution of neutral
detergent and hand hot water. Rinse thoroughly with clean water and damp dry the
mattress using single use wipes. When cleaning, always visually check the mattress for
cuts, tears, cracks, pin holes or snags. Do NOT use a mattress with a damaged cover –
If the inner core of the mattress is heavily soiled, you are advised to replace it.
Disinfecting the cover
If the cover is heavily soiled or has been exposed to bodily fluids such as blood, it will
require a more thorough cleaning procedure.
Use single use wipes with a 0.1 % chlorine solution (1,000 ppm) and cold water to
wipe the cover. Rinse thoroughly with clean water and damp dry the mattress using
single use wipes. Ensure the cover is completely dried before refitting to the mattress.
Frequent or prolonged exposure to higher concentration disinfectant solutions may
prematurely age the fabric cover of mattresses. Cover surfaces should be protected
during use and rinsed and dried thoroughly after disinfectant.
Laundering
⚫Before laundering, mattress cover should be completely removed.
⚫Remove the Fowler’s Position Detector located underneath the mattress bottom
before laundering.
⚫Mattress covers can be laundered as follows:
⚫Prewash 60 °C + 15 minutes
⚫Main wash 60 °C + 15 minutes
⚫This should be followed by a cold rinse and extraction.
⚫Fowler’s Position Detector is not washable. It can be wiped as described and
installed back after the mattress is completely dry.
Drying
Mattress covers should be hung from a line or bar and drip dried in a clean indoor
environment. Covers must be completely dried before refitting to the mattress.
Mattress covers can be tumble dried on a low heat setting for 90 minutes. Drying
temperature must not exceed 40 °C. Exceeding the temperature can cause significant

17
damage to the mattress cover.
CAUTION: Do not use phenolic-based product for cleaning.
CAUTION: After cleaning, dry the mattress without direct exposure of
sunlight.
7. STORAGE
⚫Rotate the CPR valve to OPEN position and disconnect the hose connector to
release the air.
⚫Lay the mattress flat and roll the mattress from the head end towards the foot
end.
⚫Tighten the packing strap around the rolled mattress to prevent unrolling.
⚫Ensure the hose connector is wrapped around the mattress to prevent kinking
the hose connector.
⚫The pump power cord can be coiled around the pump or disconnected for
storage.
8. MAINTENANCE
WARNING: Maintenance shall only be performed when the device is not in use.
General
⚫Check main power cord and plug if there are abrasions or excessive wear.
⚫Check mattress cover for signs of wear or damage. Ensure mattress cover and
tubes are secured together correctly.
⚫Check the air hoses for any kink or break. For replacement, please contact your
local dealer.
Fuse replacement
⚫Disconnect the plug from main power when a blown fuse is suspected.
⚫Remove the cover of the fuse holder by means of a small screwdriver.
Mattress
Hose Connector

18
⚫Insert a new fuse in the correct rating and replace the cover of the fuse holder.
The fuse rating should comply with the requested specification.
Air Filter Replacement
After checking 10. TROUBLESHOOTING, if the air filter needs to be replaced:
⚫Replace the air filter located at the back of the pump.
⚫The filter is reusable and can be washed gently with a mild detergent and water.
Dry the filter before use.
⚫Check and replace air filter regularly if environment is dirty.
9. THE DISPOSAL OF AIR MATTRESS
When the air mattress is broken or no longer useable, the mattress and the pump
may be discarded for recycle.

19
10. TROUBLESHOOTING
PROBLEM
SOLUTION
The mattress is not able to
connect with the pump
⚫Check if the mattress model (model no. located inside the cover by
the foot end) xxAAAxxx matches with the pump model xxBBB-xxx.
The AAA should be the same as BBB. If not, please contact with the
agent or distributor.
⚫Check if the Transport Cap is removed and make sure the
connector is not broken.
The pump is showing no
indications of working
⚫Check if the plug is connected to the main supply.
⚫Check if the power switch is switched to ON position (press ).
⚫Check if there is any blown fuse.
Power failure alarm failed
⚫If the pump is in operation but failed to trigger the power failure
alarm during power off - Charge the pump for 6 hours or more of
operating time. If the power failure still does not work, then please
contact the dealer or agent for further investigation.
The low pressure light is
constantly flashing and the
alarm is sounded
⚫Check if the CPR is at the CLOSE position
⚫Check if the connection between air tubes to pump unit is tightly
secured.
⚫Check if all coupling connections along mattress are secured.
⚫If the main supply is normal but there is no sound of the pump,
please remove the connector from the pump to check if there’s air
comes out. If not, please turn off the machine and contact the
dealer or agent for further investigation.
⚫If all of above steps have been checked. Press “Alarm Mute” for
system to be verified again.
The pump is on, but the
mattress is not alternating
⚫Ensure the mattress inflation is completed.
⚫Check the pump control panel - the indicator of “Alternate” should
be lighted on, if not, switch it to “Alternate.”
⚫Check if “Service” alarm indicator is on with buzzer, if yes, contact
the dealer or agent for further investigation.
Service (Malfunction)
Alarm is on
⚫Press “alarm mute” for system to be verified again. If the alarm is
still on, please contact dealer or agent.
The pump is operating
noisily
⚫Make sure the pump is resting against a solid surface.
⚫If the noise gets louder, contact the dealer or agent for further
investigation.
Patient is bottoming out
(without alarm triggered)
⚫Pressure setting might be inadequate for the patient, adjust
comfort level to FIRM (refer to Table 1 Weight and Comfort Level
Reference Table) and wait for a few minutes for better comfort.
⚫Follow the procedures “The low pressure light is constantly flashing
and the alarm is sounded” for inspection.
If the above information does not solve the problem, please contact your local dealer or agent for further support.
Table of contents
Other Proactive Medical Medical Equipment manuals


Popular Medical Equipment manuals by other brands


BIOSENCY
BIOSENCY BORA Band BB-100 user manual

Enraf Nonius
Enraf Nonius Eltrac 471 operating instructions

NIPPON SIGMAX
NIPPON SIGMAX ZAMST FINGER WRAP Single Instructions for use

Simulab
Simulab ArteriaLineTrainer Easy setup

Cogentix Medical
Cogentix Medical Urgent PC Treatment Steps

ConMed
ConMed Linvatec Hall PowerPro PRO6150 instruction manual