TECHNICAL FILES TECHNISCHE FICHE
T1.55
WARRANTY
GARANTIE
Water Evolution guarantees all its products in case of manufacturing defects,
as follows:
5 YEAR WARRANTY:
- Machining or casting faults and porosity defects.
- Cartridge and valve defaults, the wear of this component depends on water
quality.
- Chrome plating or PVD defects. Defects caused by improper use
are excluded, please refer to care instructions.
2 YEAR WARRANTY:
- Powder Coating finish. Defects caused by improper use
are excluded, please refer to care instructions.
Our responsibility is only subject to damages caused exclusively by
production’s flaws.
e warranty does not cover components parts subject to wear and tear such
as o-rings, gaskets, flexible hoses and joints for connections.
ATTENTION: Natural finishes such as brass or stainless steel depend entirely
on exposure to the environment of use and maintenance therefore any stain
that appears cannot be considered a product defect.
e warranty gives the right to have all the parts, which due to a
manufacturing fault, do not work correctly, substituted free of charge.
e following are excluded from the warranty:
- Items or parts which are damaged or do not work properly owing to
negligence in the use or wrong maintenance.
- Wrong installation.
- Intervention by unqualified people or for circumstances beyond one’s
control.
In order to use this warranty, please keep the invoice and attach it to this
document. Defective products must be sent to WE with shipping expenses
borne by the sender.
is warranty document and a copy of the purchase invoice must be attached
to the package where the products will be promptly replaced and send back
with shipping expenses borne by WE.
Water Evolution waarborgt alle producten in geval van fabricagefouten als
volgt:
5 JAAR GARANTIE:
- Productie- en gietfouten.
- Defecte cartouche, de slijtage van dit onderdeel hangt sterk af van de
waterkwaliteit.
- Fouten in het chroom of PVD oppervlak, beschadigingen door fout onderhoud
of reiniging zijn uitgesloten. Gelieve hiervoor de onderhoudsvoorschriften te
raadplegen.
2 JAAR GARANTIE:
- Poederlak afwerking, beschadigingen door fout onderhoud of reiniging zijn
uitgesloten. Gelieve hiervoor de onderhoudsvoorschriften te raadplegen.
Onze verantwoordelijkheid is beperkt tot beschadigingen als gevolg van
productiefouten. De garantie geldt niet voor onderdelen die blootgesteld
worden aan slijtage zoals dichtingen, flexibels en filters.
AANDACHT: Natuurlijke afwerkingen zoals messing of roestvrij staal zijn sterk
beïnvloedbaar door blootstelling aan de omgeving en het onderhoud. Indien
vlekken zouden ontstaan, worden deze niet als een defect beschouwd.
De garantie geeft recht op gratis vervanging van alle onderdelen die niet correct
functioneren als gevolg van een fabricagefout.
Volgende gevallen vallen niet onder garantie:
-Producten of onderdelen die niet correct functioneren als gevolg van fout
gebruik of onderhoud.
- Foutieve installatie.
- Interventie door niet-gekwalificeerde personen of omstandigheden als gevolg
van overmacht. Om de garantie te kunnen claimen, gelieve de factuur tesamen
met dit document te bewaren. De garantie geeft recht op gratis vervanging van
onderdelen die de goede werking van het product verhinderen als gevolg van
fabricagefouten en dit in alle gevallen waarbij de oorzaak niet te wijten is aan
oneigenlijk gebruik, fout onderhoud, niet-conforme installatie, montage door
niet-gekwalificeerde personen of force majeur. Defecte producten dienen
retour gestuurd te worden naar WE, waarbij de verzendingskosten door de
verzender gedragen worden. Tevens dient de factuur en dit document bij het
pakket gevoegd te worden, waarbij de producten onmiddellijk vervangen
worden en teruggestuurd waarbij WE de verzendingskosten zal dragen. Bij het
niet naleven van deze voorwaarden zal de garantie nietig verklaard worden.
CARTRIDGE REPLACEMENT
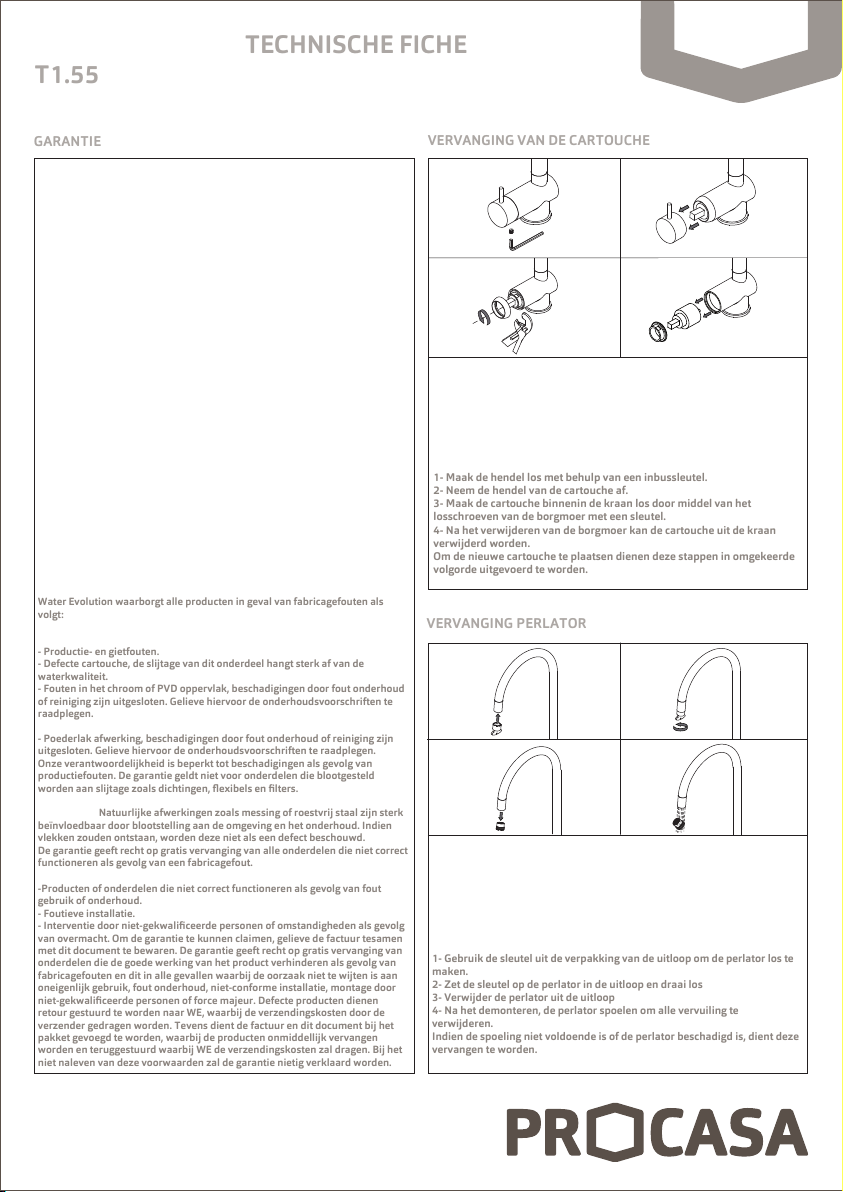
VERVANGING VAN DE CARTOUCHE
AERATOR REPLACEMENT
VERVANGING PERLATOR
1- Unscrew the handle with the help of the umbrak key.
2- Remove the handle from the top of the cartridge.
3 - Unscrew the copper cartridge placed inside the body of the mixer.
Loosen the locknut with the help of a wrench.
4 - After removing the locknut, you will be able to remove the cartridge
and proceed to its replacement.
To apply the new cartridge please consider the reverse procedure.
1- Maak de hendel los met behulp van een inbussleutel.
2- Neem de hendel van de cartouche af.
3- Maak de cartouche binnenin de kraan los door middel van het
losschroeven van de borgmoer met een sleutel.
4- Na het verwijderen van de borgmoer kan de cartouche uit de kraan
verwijderd worden.
Om de nieuwe cartouche te plaatsen dienen deze stappen in omgekeerde
volgorde uitgevoerd te worden.
1- Use the tool supplied in the spout box to unscrew the aerator.
2 -Fit the aerator key on the end of the spout and unscrew it.
3 - Remove the aerator from the spout
4 - After removing the aerator wash it with running water to eliminate
any remaining deposit.
If this procedure is not enough or if the aerator is damaged it should be
replaced, following the reverse procedure.
1- Gebruik de sleutel uit de verpakking van de uitloop om de perlator los te
maken.
2- Zet de sleutel op de perlator in de uitloop en draai los
3- Verwijder de perlator uit de uitloop
4- Na het demonteren, de perlator spoelen om alle vervuiling te
verwijderen.
Indien de spoeling niet voldoende is of de perlator beschadigd is, dient deze
vervangen te worden.
1 2
3 4
12
34