PROCASA T1.30T User manual

TECHNICAL FILES TECHNISCHE FICHE
T1.30T
THERMOSTATIC BATHTUB MIXER WITH 2 EXITS
BAD/DOUCHE THERMOSTAAT
TECHNICAL FILES TECHNISCHE FICHE
T1.30T
*AVAILABLE IN CHROMED BRASS; WHITE; BLACK
AND PVD FINISHES.
*BESCHIKBAAR IN CHROOM, MAT WIT, MAT ZWART
EN PVD-AFWERKING.
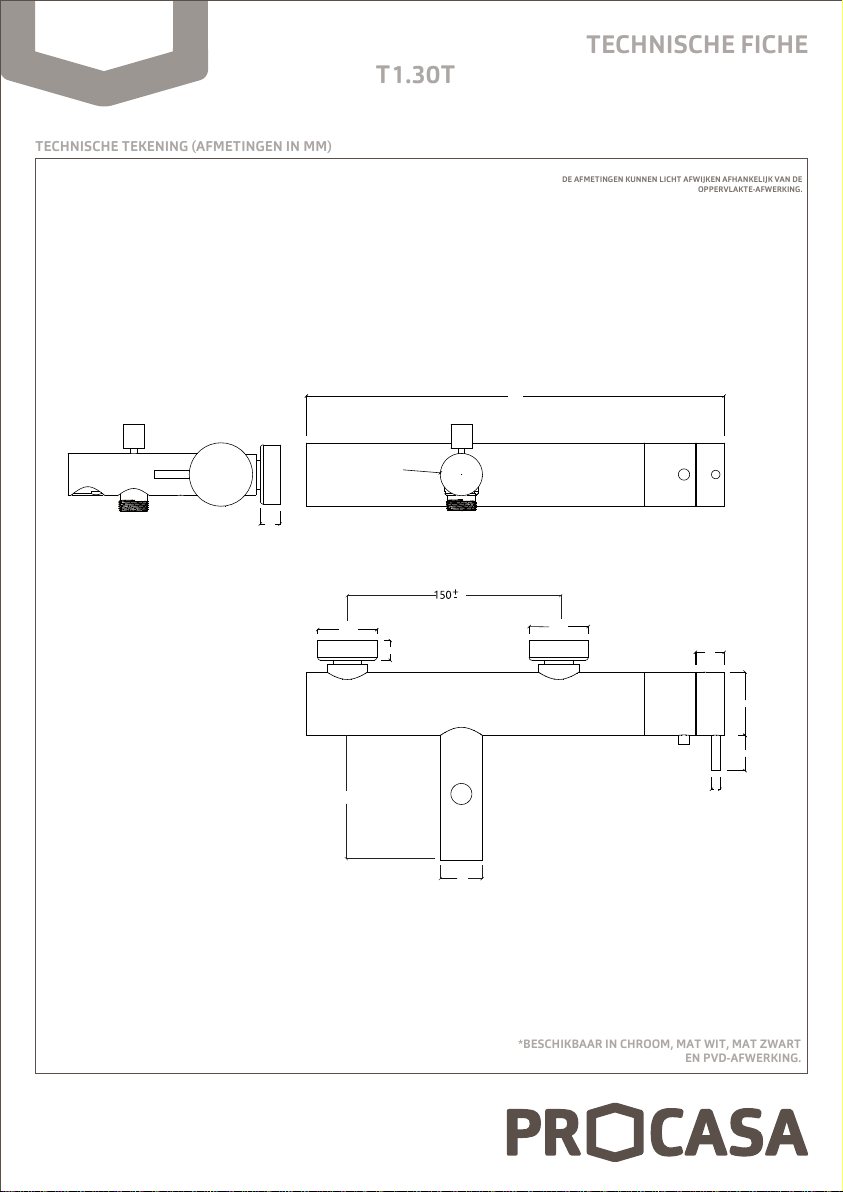
TECHNICAL DRAWING (MEASUREMENTS IN MM)
TECHNISCHE TEKENING (AFMETINGEN IN MM)
THE DIMENSIONS MIGHT VARY SLIGHTLY FROM ONE FINISH TO THE OTHER.
DE AFMETINGEN KUNNEN LICHT AFWIJKEN AFHANKELIJK VAN DE
OPPERVLAKTE-AFWERKING.
Ø45
25
20
Ø42
6
297
14
Ø42
Ø30
14
88
30
6

TECHNICAL FILES TECHNISCHE FICHE
T1.30T
Nº T1.30T
01COLLAR FOR SEAT
ZADELSTUK
P23870
02 SEAT
AANSLUITSTUK
04 PLATE
ROSET
05 ECCENTRIC
S-KOPPELING
06 HANDLE
HENDEL
07 THERMOSTATIC HANDLE
THERMOSTATISCHE GREEP
08 LOCKNUT
BORGMOER
09 CARTRIDGE THERMOSTATIC
CARTOUCHE
10 TAP BODY
KRAANLICHAAM
11 CANNON
ADAPTER
12 INVERTER HANDLE
OMSTELLICHAAM HENDEL
13 SPOUT
UITLOOP
14 AERATOR
PERLATOR
15 INVERTER
OMSTELLER
COMPONENT DRAWING
EXPLOSIETEKENING
COMPONENT LIST
ONDERDELENLIJST
We recommend periodical maintenance of the taps. is will contribute to
keep them in good condition for a long time.
Please avoid the formation of calcareous stains to prevent premature
damage of the tap surface. To clean de surface use only a neutral soap and
water. Always wiping with soft cloth. Never use cleaning solutions containing
abrasive substances, chloric acids, ammonia, varnish remoner, vinegar,
bleach, domestic acids, disinfectants, or any type of abrasive.
ATTENTION: Incorrect cleaning may permanently damage the surface of the
products and in such case Water Evolution may not be held liable for damage.
e supplying pipes must be carefully cleaned before installation.
We raden aan om periodiek de kranen te onderhouden. Dit zal bijdragen tot
een langere levensduur.
Vermijd de aanslag van kalkvlekken om voortijdige schade aan het oppervlak
van de kraan te voorkomen. Om het oppervlak te reinigen, gebruik enkel
neutrale zeep en water. Droog steeds met een zachte doek. Maak nooit
gebruik van schoonmaakmiddelen die schuurmiddelen, chloor, ammoniak,
vernis verwijderaar, azijn, bleekmiddel, ontsmettingsmiddelen of enig ander
type van agressieve bestanddelen bevat.
AANDACHT: Het niet naleven van de onderhoudsinstructies kan de afwerking
van de oppervlakte permanent beschadigen. In dit geval kan Water Evolution
niet aansprakelijk gehouden worden voor de geleden schade.
De aanvoerleidingen moeten grondig gereinigd worden voor installatie.
PRODUCT CARE
ONDERHOUDSINSTRUCTIES
CARTRIDGE REPLACEMENT
VERVANGING VAN DE CARTOUCHE
P27466
03 CHECK VALVE
TERUGSLAGKLEP
10
mm
COLD WATER INLET
ENTRADADE ÁGUAFRIA
HOT WATER INLET
ENTRADADE ÁGUAQUENTE
123
4
6
7
8
9
10
14
11
12
13
5
10mm
15
1- Unscrew the handle (2) with the aid of umbrako key (1).
2 -Remove thermostatic handle (3).
3 - Push the temperature safety washer (4).
4 - Loosen the locking nut (5).
5 - Replace the thermostatic cartridge (6).
6- Tighten the locking nut (5) tightly to ensure seal.
7- With the new cartridge properly placed align it vertically and facing you (see
image B).
8- Fit the locking washer (4) aligning the stopper with the mentioned above (see
image B).
9- Apply the temperature knob (3) in line with the markings (see image B).
10 -Tighten the handle (2) with the aid of umbrako key (1).
1- Maak de debietregelaar (2) los met behulp van een inbussleutel (1).
2 -Verwijder de thermostatische greep (3).
3 - Verwijder de temperatuurbeveiliging (4).
4 - Schroef de borgmoer (5) los.
5 - Vervang het thermostatisch element (6).
6- Schroef de borgmoer (5) goed vast om de dichting te verzekeren.
7- Nu de nieuwe cartouche geplaatst is, lijn het verticaal uit zoals getoond in
tekening B.
8- Schuif de temperatuurbeveiling (4) op de cartouche, uitgelijnd zoals op
tekening B
9- Plaats de thermostatische greep (3) in lijn met de markeringen zoals getoond
op tekening B.
10 -Plaats de debietregelaar (2) met behulp van een inbussleutel (1).
IMAGE A
IMAGE A
3
2
1
6
5
4
IMAGE B
IMAGE B
TECHNICAL FILES TECHNISCHE FICHE
T1.30T
WARRANTY
GARANTIE
ASSEMBLY INSTRUCTIONS
MONTAGE INSTRUCTIES
Water Evolution guarantees all its products in case of manufacturing defects,
as follows:
5 YEAR WARRANTY:
- Machining or casting faults and porosity defects.
- Cartridge and valve defaults, the wear of this component depends on water
quality.
- Chrome plating or PVD defects. Defects caused by improper use
are excluded, please refer to care instructions.
2 YEAR WARRANTY:
- Powder Coating finish. Defects caused by improper use
are excluded, please refer to care instructions.
Our responsibility is only subject to damages caused exclusively by
production’s flaws.
e warranty does not cover components parts subject to wear and tear such
as o-rings, gaskets, flexible hoses and joints for connections.
ATTENTION: Natural finishes such as brass or stainless steel depend entirely
on exposure to the environment of use and maintenance therefore any stain
that appears cannot be considered a product defect.
e warranty gives the right to have all the parts, which due to a
manufacturing fault, do not work correctly, substituted free of charge.
e following are excluded from the warranty:
- Items or parts which are damaged or do not work properly owing to
negligence in the use or wrong maintenance.
- Wrong installation.
- Intervention by unqualified people or for circumstances beyond one’s
control.
In order to use this warranty, please keep the invoice and attach it to this
document. Defective products must be sent to WE with shipping expenses
borne by the sender.
is warranty document and a copy of the purchase invoice must be attached
to the package where the products will be promptly replaced and send back
with shipping expenses borne by WE.
Water Evolution waarborgt alle producten in geval van fabricagefouten als
volgt:
5 JAAR GARANTIE:
- Productie- en gietfouten.
- Defecte cartouche, de slijtage van dit onderdeel hangt sterk af van de
waterkwaliteit.
- Fouten in het chroom of PVD oppervlak, beschadigingen door fout onderhoud
of reiniging zijn uitgesloten. Gelieve hiervoor de onderhoudsvoorschriften te
raadplegen.
2 JAAR GARANTIE:
- Poederlak afwerking, beschadigingen door fout onderhoud of reiniging zijn
uitgesloten. Gelieve hiervoor de onderhoudsvoorschriften te raadplegen.
Onze verantwoordelijkheid is beperkt tot beschadigingen als gevolg van
productiefouten. De garantie geldt niet voor onderdelen die blootgesteld
worden aan slijtage zoals dichtingen, flexibels en filters.
AANDACHT: Natuurlijke afwerkingen zoals messing of roestvrij staal zijn sterk
beïnvloedbaar door blootstelling aan de omgeving en het onderhoud. Indien
vlekken zouden ontstaan, worden deze niet als een defect beschouwd.
De garantie geeft recht op gratis vervanging van alle onderdelen die niet correct
functioneren als gevolg van een fabricagefout.
Volgende gevallen vallen niet onder garantie:
-Producten of onderdelen die niet correct functioneren als gevolg van fout
gebruik of onderhoud.
- Foutieve installatie.
- Interventie door niet-gekwalificeerde personen of omstandigheden als gevolg
van overmacht. Om de garantie te kunnen claimen, gelieve de factuur tesamen
met dit document te bewaren. De garantie geeft recht op gratis vervanging van
onderdelen die de goede werking van het product verhinderen als gevolg van
fabricagefouten en dit in alle gevallen waarbij de oorzaak niet te wijten is aan
oneigenlijk gebruik, fout onderhoud, niet-conforme installatie, montage door
niet-gekwalificeerde personen of force majeur. Defecte producten dienen
retour gestuurd te worden naar WE, waarbij de verzendingskosten door de
verzender gedragen worden. Tevens dient de factuur en dit document bij het
pakket gevoegd te worden, waarbij de producten onmiddellijk vervangen
worden en teruggestuurd waarbij WE de verzendingskosten zal dragen. Bij het
niet naleven van deze voorwaarden zal de garantie nietig verklaard worden.
1- e first step is to pull the inverter bottom up.
2 - en you must turn this bottom in order to fix it into this position.
After these two actions the water is either headed to the spout or the
hand shower.
1- Trek de omsteller naar boven.
2 - Draai de omsteller om de positie vast te zetten. In telkens één van de
twee standen wordt ofwel de handsproeier of de baduitloop aangezet.
USAGE INSTRUCTIONS FOR THE INVERTER
GEBRUIKSAANWIJZING VOOR DE OMSTELLER
12
12
6
COLD WATER INLET
KOUD WATER TOEVOER
HOT WATER INLET
WARM WATER TOEVOER
34
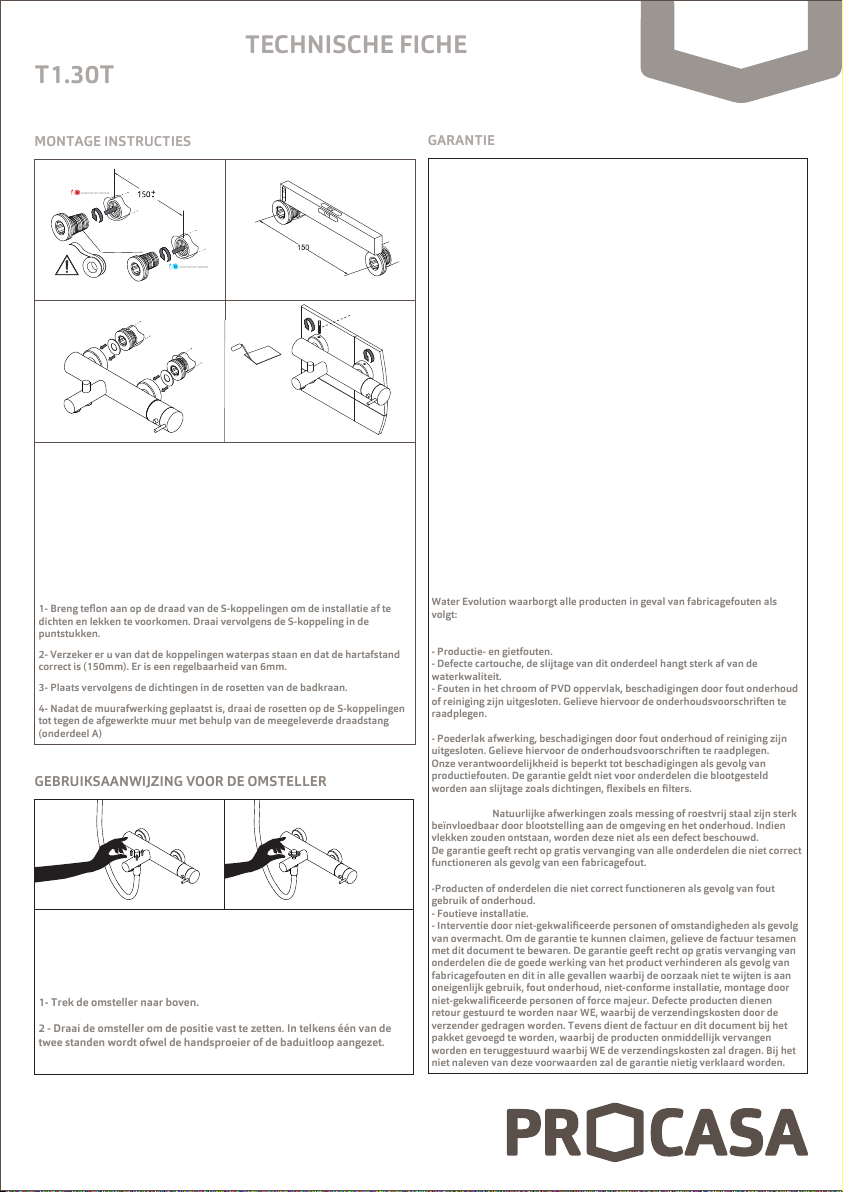
1- Apply teflon around the threads in order to seal the installation and prevent
leakage. Afterwards tighten the eccentrics in the water tubes.
2- Check with the help of a spirit level if the eccentrics are correctly placed and
the distance between the axes are correct (150mm). ere is a tolerance of
6mm.
3 - After the tightening of the eccentrics, place the sealing rings inside the
backplates of the mixer.
4 - Once the tiles have been placed, apply the backplates until the end of the
eccentrics and tighten them correctly with the help of the tightening pin (item
A).
1- Breng teflon aan op de draad van de S-koppelingen om de installatie af te
dichten en lekken te voorkomen. Draai vervolgens de S-koppeling in de
puntstukken.
2- Verzeker er u van dat de koppelingen waterpas staan en dat de hartafstand
correct is (150mm). Er is een regelbaarheid van 6mm.
3- Plaats vervolgens de dichtingen in de rosetten van de badkraan.
4- Nadat de muurafwerking geplaatst is, draai de rosetten op de S-koppelingen
tot tegen de afgewerkte muur met behulp van de meegeleverde draadstang
(onderdeel A)
A
Other PROCASA Plumbing Product manuals


Popular Plumbing Product manuals by other brands


Sanela
Sanela SLUN 81PT Instructions for use

OVE
OVE ATHENA MILLY installation manual

Toto
Toto GE TBG07201U Installation and owner's manual

Toto
Toto TBV01101U Installation and owner's manual

Acorn Safety
Acorn Safety S0706 Installation, operation and maintenance instructions

Iqua
Iqua maxx M10 Installation & user manual


