PROFECO 42250 User manual

Thermal camera -20°C - +550°C
42250
EN Instruction manual

2
Safety Instruction
Please ensure that you have read and understood the safety precautions described
in the following text before using the product, so that you can operate it correctly. The
safety precautions described in the following text will help you to operate the product
and its accessories correctly and safely to avoid damage and loss to yourself, other
people and the equipment.
Considerations
To avoid damage to the product, please follow the instructions below:
Don't assemble or disassemble the product without permission.
The product is a high precision piece of equipment. Do not attempt to disassemble,
assemble, or modify any part of the product.
Avoid damaging the probe of the product.
Note: Don't place the product directly next to a strong heat source (such as an
electric iron). This may damage the probe of the product.
Product hums.
When the product is working, there is a slight clicking sound every few seconds. This
is a normal phenomenon of the lens taking pictures.
Warning
The warning describes actions that may cause harm to users. Please observe the
following procedure to avoid electric shock or personal injury.
•If the product case is damaged, do not use it continuously.
Please contact your local distributor.
•If, during use, you notice smoke, sparks or a burnt smell sparks or a
burnt smell, stop using the product immediately.
If this happens, the first thing to do is to switch off the power supply to the
product. When the smoke and odour have completely disappeared, contact
your local distributor.
•Don't modify the adapter and the data cable.
Failure to do so may result in a short circuit or fire.
•Don't weld the battery without permission.
Such operation may damage the battery and result in leakage and explosion
of the battery.
•Avoid subjecting the battery to impacts (e.g., collisions, falls, etc.).
Such a condition may damage the battery casing or cause the battery to leak
or explode. leaking or exploding.
•Unplug the adapter from the wall outlet when charging. is not being
made.
The adapter may overheat if left connected to the power supply for a long
time. This may cause overheating, deformation, and fire.

3
•Make sure that the plug of the adapter is inserted into the socket
provided.
The adapter plug may be different depending on the region. Please make
confirmation that the specification of the adapter is consistent with the
specification of electrical appliances in your region. Failure to do so may result
in overheating of the equipment, electric shock, fire, chemical leakage inside
the battery, explosion, and other serious consequences.
•If the plug of the adapter or the cable is damaged, discontinue use
immediately.
Do not change the battery unless the charger plug is fully inserted into the
socket.
•Do not touch the power cord with wet hands.
Touching the electric wire with wet hands may cause electric shock. When
pulling out the electric wire, hold the head of the electric wire to the right to pull
out the wire. Don't pull the electric wire directly. Otherwise, the electric wire
may break, causing electric shock and fire.
•Do not immerse the product in rainwater.
If the case comes into contact with any liquid, wipe it dry immediately. If water
or other liquid enters the inside of the unit, turn off the power immediately.
Continuous use may damage the product.
•Clean the dust from the adapter plug and data cable.
If exposed to a dusty and dusty environment for a long time, the dirt around
the electrical equipment will accumulate moisture. This This may cause short
circuit and fire.
•Please use the company's original adapter to charge the product.
Use of non-original power supply accessories may result in overheating,
electric shock, fire, chemical leakage inside the battery, explosion and other
serious consequences.
•Do not use abrasives, isopropanol, or solvents to clean the unit's casing.
Doing so may damage the product casing.
•The product temperature may rise after a long period of charging.
You may feel burning heat when your hands touch the sensors.
•Problem caused by water condensation.
Do not move the unit from a high temperature environment to a low
temperature environment or from a low temperature environment to a high
temperature environment within a short period of time. This may cause water
condensation on the inside and outside of the instrument. In such a condition,
the instrument should be placed in a portable box or plastic bag. Before use,
allow it to return to ambient temperature and take it out for use. If there is
water condensation inside the product, turn off the power immediately. Failure
to do so may damage the product. Operation is until the water condensation
has disappeared.
•Avoid exposing the product to impacts (e.g. collisions, falls, etc.).
This may cause damage to the product. Please avoid such operation.
•Long term storage and regular recharging.
If the product is not to be used for a long period of time, it should be stored in
a cool, dry place. If the product is to be stored for a long period with the battery
installed, it should be charged regularly. Otherwise, the battery will be
exhausted, and its life will be shortened.

4
Infrared thermal imager basics
Infrared thermal detection technology has long been an important means of ensuring
industrial safety in developed countries. The application field includes electric power,
metallurgy, petrochemical, machinery, coal, transportation, fire control and national
defence, etc. It can not only carry out real-time detection under high voltage, high
current, and high-speed operation to carry out real-time detection for production and
equipment, but also need not turn off the power supply, stop the machine or stop
production to find the potential problems and prevent the occurrence of malfunction.
The modern "non-contact" detection technology is safe, reliable, and fast. It is a kind
of technical revolution compared to the traditional contact detection method.
Infrared thermal imaging technology is widely used in the following areas fields:
•Power equipment, transmission, transformer line inspection.
•Hidden fire source search in fire protection.
•Fire search and rescue and fire command.
•Analysing the location and heat loss of leaks in heat pipes and heating
equipment.
•Determination of the location of the operating train's heating fault.
•Night surveillance of the security department.
Product Overview
This product is an infrared camera that integrates surface temperature measurement
and real-time thermal imaging. The traditional inferred thermometer needs to
measure each component one by one, whereas the infrared imaging camera does
not, thus saving time. The potential problems can be clearly displayed on the colour
screen. In addition, the central point measurement cursor is used to locate quickly
and accurately to measure the temperature of the target object. The product is
equipped with a visible light camera to increase differentiation. The thermal and
visible images are stored in the unit and can be read out via USB or stored on a
computer for report generation or printing. With small volume, the product is easy to
operate and has strong function. it is the ideal choice for electric power, electronic
manufacturing, industrial inspection and other fields.
The following key features enhance the accuracy and usability of the product:
•The radiation coefficient can be adjusted to increase the measurement
accuracy of objects with half reflective surfaces.
•The Highest Temperature and Lowest Temperature cursors can guide users to
the highest and lowest temperature areas of the thermal images.
•The selectable colour palette.
Cleaning of product
Clean the case of this product with a damp cloth or diluted soapy water. Do not use
abrasive cleaners, isopropyl alcohol, or solvents to clean the lens and screen. and
screen. Use a professional optical lens cleaner.

5
Maintenance of the lens
Avoid damaging the infrared lens:
•Carefully clean the infrared lens. The lens has an anti-reflective coating.
•Don't use force when cleaning to avoid damaging the anti-reflective coating.
•To clean the lens, use a cleaning solution such as commercially available
alcohol-based lens cleaner, alcohol and a lint-free cloth or paper towel.
•Compressed air can be used to remove loose particles.
Clean the lens:
•The compressed air tank or dry nitrogen ion gun (if applicable) can be used to
blow loose particles from the lens surface.
•Dip the lint-free cloth in alcohol.
•Squeeze the excess alcohol into the cloth or lightly apply the lint-free cloth to a
dry cloth.
•Wipe the lens surface in a circular motion. Then discard the cloth.
•If it is necessary to repeat the above step, use a new cloth soaked in the
cleaning solution. with the cleaning solution.
Battery charging and description
Use the USB data cable to charge:
•The product has built-in rechargeable 18650 lithium batteries.
•When the battery level is low, " " will be displayed on the top right of the
screen. Please charge in time through the micro-USB interface (when the
product is off, you can charge).
•Unplug the USB cable after charging is complete.
To make the lithium-ion battery can play the perfect performance:
•Don't leave the battery on the charger for more than 24 hours.
•The thermal imager should be charged for at least two hours every three
months to maximise battery life.
•Do not attempt to charge the battery in extremely cold conditions.

6
Performance index
Mode
HT-03
Type of infrared detector
Vanadium oxide uncooled infrared focal
plane
Infrared resolution
120 x 90
Field angle
26⁰x19⁰
Cell size
12μm
NETD
≤50mK @25⁰C, @F/1.1
Thermal imaging frame rate
≤25Hz
Lens focal length
3.2mm
Emissivity setting
Adjustable from 0.01 to 1.00
IFOV
3.75mrad
Temperature measurement resolution
0.1⁰C
Infrared response band
8 to14μm
Focus mode
Free focus
Temperature measurement range
-20⁰C to +550⁰C (-4⁰F to 1022⁰F)
Measurement accuracy
±2⁰C (35.6⁰F) or ±2%
Temperature measurement mode
Centre point/hot and cold spot tracking
Colour palette
Rainbow, iron, cold colour, white hot,
black hot
Display size
2.8-inch (240×320)
Image display mode
Infrared/visible light/dual light fusion
Lighting system
LED fill light
Device storage
Built-in 4G eMMC (user available
storage space is about 3G)
Storage Image/Video Format
JPG/MP4
Image/video export method
USB connection to computer export
Menu language
English, Chinese, Italian, German
Battery Type
Removable rechargeable lithium battery
(18650)
Battery capacity
2000mAh
Working time
2 to 3 hours
Power interface
Micro USB
Power configuration
5 minutes / 20 minutes / no automatic
shutdown
Work temperature
-10⁰C to +45⁰C (14⁰F to 122⁰F)
Storage temperature
-20⁰C to +60⁰C (-4⁰F to 140⁰F)
Relative humidity
10% to 85%RH (non-condensing)
Product weight
375g
Product size
96mm x 72mm x 226mm

7
Product description
1. Structure guide

8
9
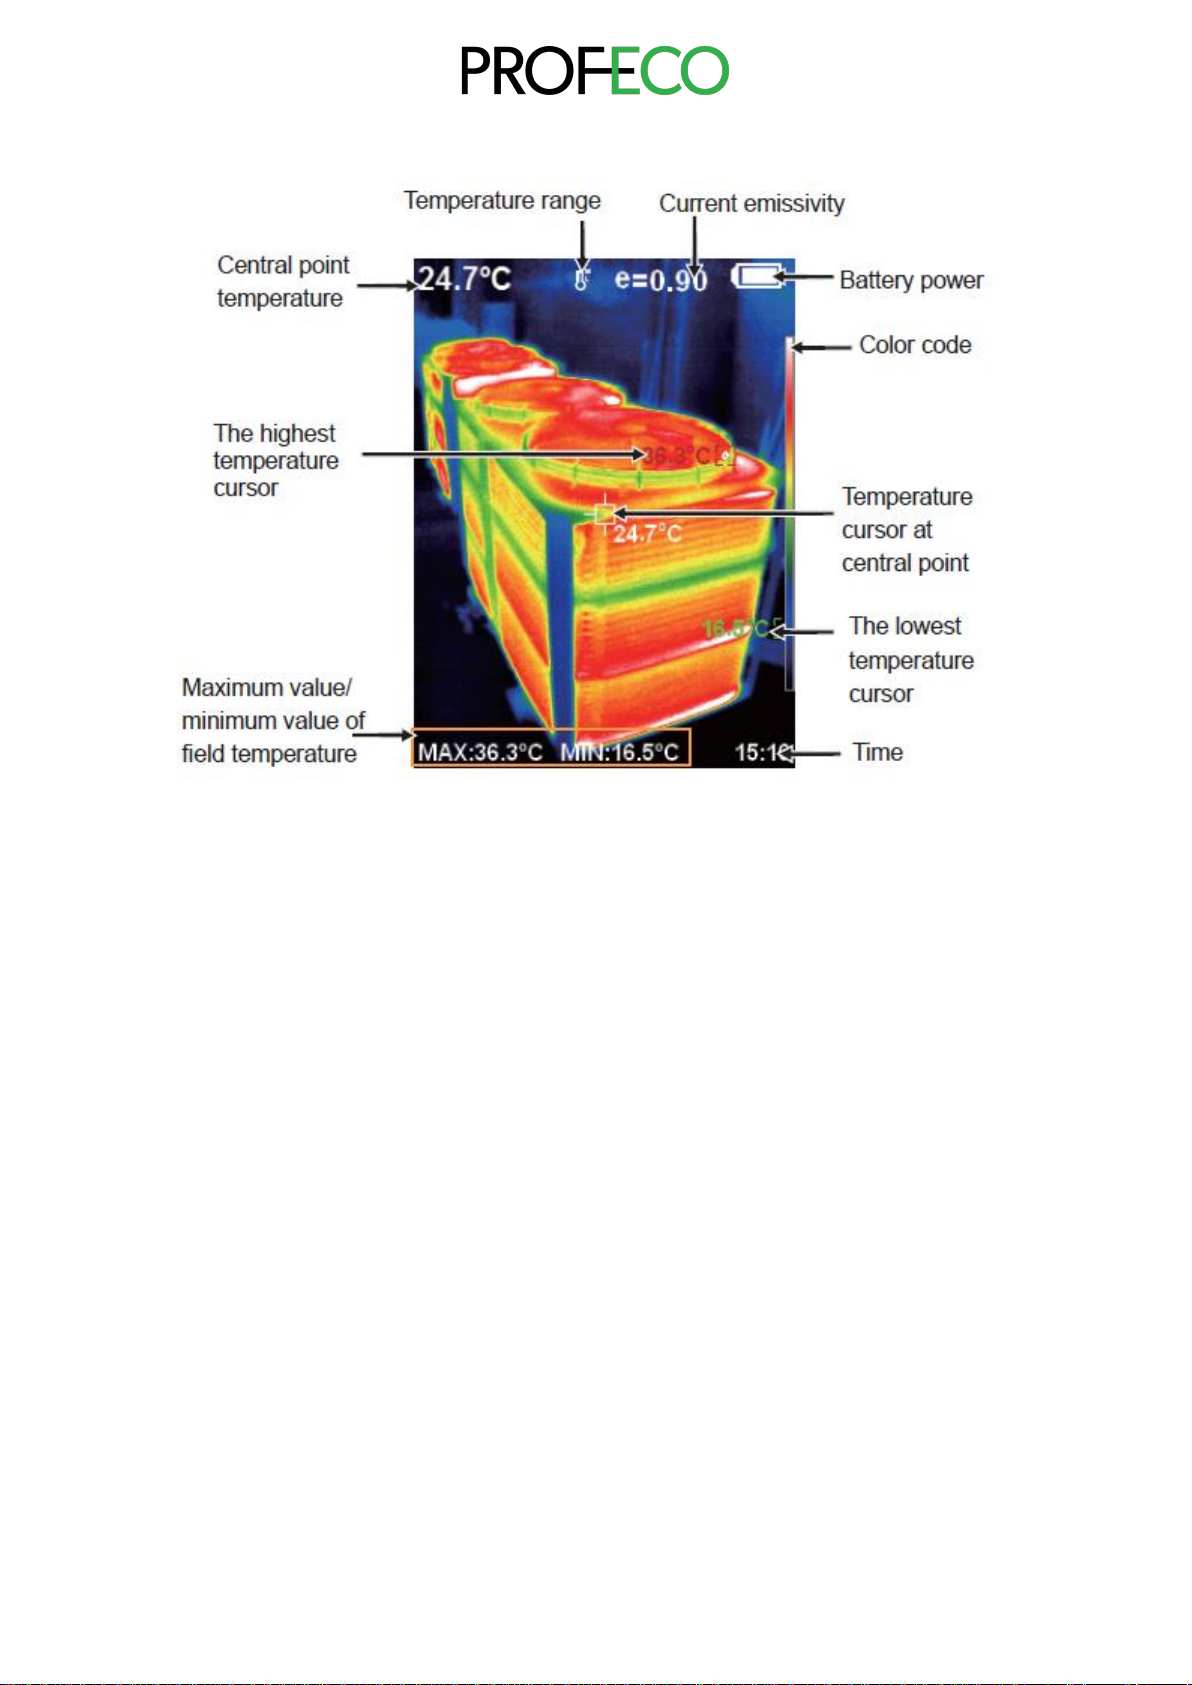
2. Display description
Temperature range: The temperature measurement range.
Colour code: used to indicate the colour corresponding to the relative temperature
from low to high in the design area.
The centre point temperature cursor: is used to indicate the central position in the
screen area. The cursor colour is white. The temperature value is displayed in the
upper left corner of the screen.
Highest temperature cursor: is used to indicate the position of the highest
temperature on the screen. It moves with the movement of the highest
temperature. The cursor is red. The temperature value is displayed at the bottom
left of the screen.
Lowest temperature cursor: is used to indicate the position of the lowest
temperature in the screen area. It moves with the movement of the lowest
temperature. The cursor is green. The temperature value is displayed at the
centre of the screen.

10
3. Key description
Initial operation
•Product boot/shutdown
Press and hold the "MENU/ " button for more than 3 seconds to turn the
thermal image on or off.
•LCD screen display
When the unit is switched on, the screen displays the thermal imaging
status.
Note: Time adjustment may be required when moving the camera between
environments with widely varying ambient temperatures.
•LED illumination on/off
Press and hold the image capture button for about 3 seconds to turn the
LED indicator on and off.
•Switching between infrared thermal image and visible image
Press the "⯇" or "⯈" key to toggle the degree of fusion between the
derived thermal images and the visible images (the degree of fusion is 0%,
25%, 50%, 75% and 100%).
•Image capture
Press the Capture button. If the image is captured successfully, the screen
will display "Save photo? If "Yes" is selected, press the “MENU/ ”button
to save the image. If "no" is selected, press the "SELECT/ENTER" button
to determine not to save the image. to save the image.
•Video recording
In the normal startup and operation interface, press and hold the Capture
button, the screen will display the prompt "Record Video?", if you want to
select "Yes" at this time, please press the "MENU/ " button or the Capture
button to start recording. If you want to select "No", press the
SELECT/ENTER button to cancel the recording. When recording is
complete, press and hold the capture button again to stop recording.
•Hide high/low temperature column function at the bottom of the
screen
After normal start-up, press the "⯅" button and the high/low temperature
column will appear at the bottom of the screen. It can also be hidden by
pressing "⯆".

11
•Image output
Images captured can be reviewed and output by connecting to a computer
via Micro-USB.
•Read images
Open the USB cover as shown in the figure ②. Use the USB cable to
connect the USB port, and then connect the computer to read the images
or save them to the computer.
The supported operating system by verification includes: winxp, win7, win
8, win10, Apple system. It is recommended to use the attached USB cable
or USB cable with higher quality.
Note: When connecting to a computer, disconnect the data cable after
selecting "eject device safely" to avoid file system damage and other
problems. If "unable to save" and other problems occur, you can locate the
HDD in the computer and repair it.
Introduction to the menu
Press the left of the "MENU/ " button and the menu bar appears. The submenus are
"Image Overlap", "Image", "Video", "Colour Palette", "Emissivity" and "Adjustment".
1. “Image Overlapping” Submenu
1.1 Description of image overlap
Image overlapping makes it easier for users to understand the infrared images
by using aligned visible and infrared images. By using image overlapping, the
visible image of each infrared image can be captured to accurately represent
the temperature distribution in the target area. and more effectively shared
with others.
1.2 Using image overlapping
Press the "MENU/ " button to display the main menu and select " " (Image
registration) on the main menu. Press the "SELECT/ENTER" button to enter
the Image registration mode and use the navigation buttons (up, down, left,
and right) to move the visible image. Press the "SELECT/ENTER" button to
exit the Image Blend mode (Note: If no operation is performed for more than 6
seconds, the Image Blend mode will be automatically exited).

12
2. Introduction to “image” Sub-menu
2.1 View image
Press the "MENU/ " button to display the main menu and select " "
(Image) on the main menu.
Then press "⯈" button to enter the image list as shown in the figure. Press "⯅"
or "⯆" button to select the image. Then press "SELECT/ENTER" button to
view the image. When viewing the images, press "⯇" button to view the
favourite image, press "⯈" button to view the next image. Press
"SELECT/ENTER" button to return. Press the " MENU/ " button to exit the
menu.
2.2 Delete Images
When viewing the images, the "Delete image?" prompt will appear on the
screen by pressing the "⯅" button. If "Yes" is currently selected, press the
"MENU/ " button to delete the image. If "no" is selected, press the
"SELECT/ENTER" button to determine not to delete the image. image.

13
3. Introduction to “Video” submenu
3.1 View Video
Press "MENU/ " button to enter the main menu, select " " in the main menu
(video) as shown below.
Then press "⯈" button to enter the image list as shown in the figure. Press "⯅"
or "⯆" button to select the image. Then press "SELECT/ENTER" button to
view the image. When viewing the images, press "⯇" button to view the
favourite image, press "⯈" button to view the next image. Press
"SELECT/ENTER" button to return. Press the " MENU/ " button to exit the
menu.
3.2 Delete Video
When viewing the video (if it is not playing), press the "⯅" button and the
prompt "Delete video?" will appear on the screen. If you want to select "Yes",
press the "MENU/ " button to confirm the deletion of the video. If you want to
select "No", press the "SELECT/ENTER" button to confirm that the video will
not be deleted.

14
4. Introduction to “Colour Palette” Sub-menu
4.1 Colour palette description
The palette can be used to change the pseudo-colour display of the infrared
image on the display. Some colour palettes are more suitable for specific
applications and can be set as required. The palette is divided into: rainbow,
iron, cold colour, white hot, black hot, five palettes. These palettes work best
with high thermal contrast and provide additional colour contrast between high
and low temperatures.
The appropriate choice of colour palette will better display the details of the
target. Rainbow, Iron and Cold colour palettes focus on displaying colour.
These palettes are very suitable for high heat contrast and are used to and are
used to improve the colour contrast between high and low temperatures.
between high and low temperatures. However, the White hot and Black hot
colour palettes provide even linear colour.
Below is the image of the same object with different colour palettes selected.
4.2 Using the colour palette
As shown in the figure, press "MENU/ " key to enter the main menu and
select "🎨" (colour palette) option and press "⯈" key to enter the colour palette
list. Press "⯅" and "⯆" keys in the navigation to select the colour palette. Then
press "SELECT/ENTER" button to select the colour palette. Press "⯇" to
return. Press "MENU/ " button to exit the menu. from the menu.
15
5. Introduction to “Emissivity” sub-menu
5.1 Emissivity description
The emissivity of the product can be adjusted from 0.01 to 1.00 with a default
value of 0.95. Many common objects and materials (such as wood, water, skin
and textiles) can reflect heat energy effectively. It is therefore easy to obtain a
relatively accurate reading. The emissivity is usually set at 0.95 for rough
objects that give off energy easily. For semi-matt objects, which emit less
energy, the emissivity is usually around 0.85, and the emissivity of semi-gloss
objects is 0.6. Glossy objects are divided into low emissivity materials. The
emissivity is usually set to 0.3 at the time of measurement. The correct setting
of the emissivity value is very important for you to make the most accurate
temperature measurement. The surface emissivity will have a huge impact on
the surface temperature measured by the product. Understanding surface
emissivity will enable you to obtain the correct temperature measurement
result.
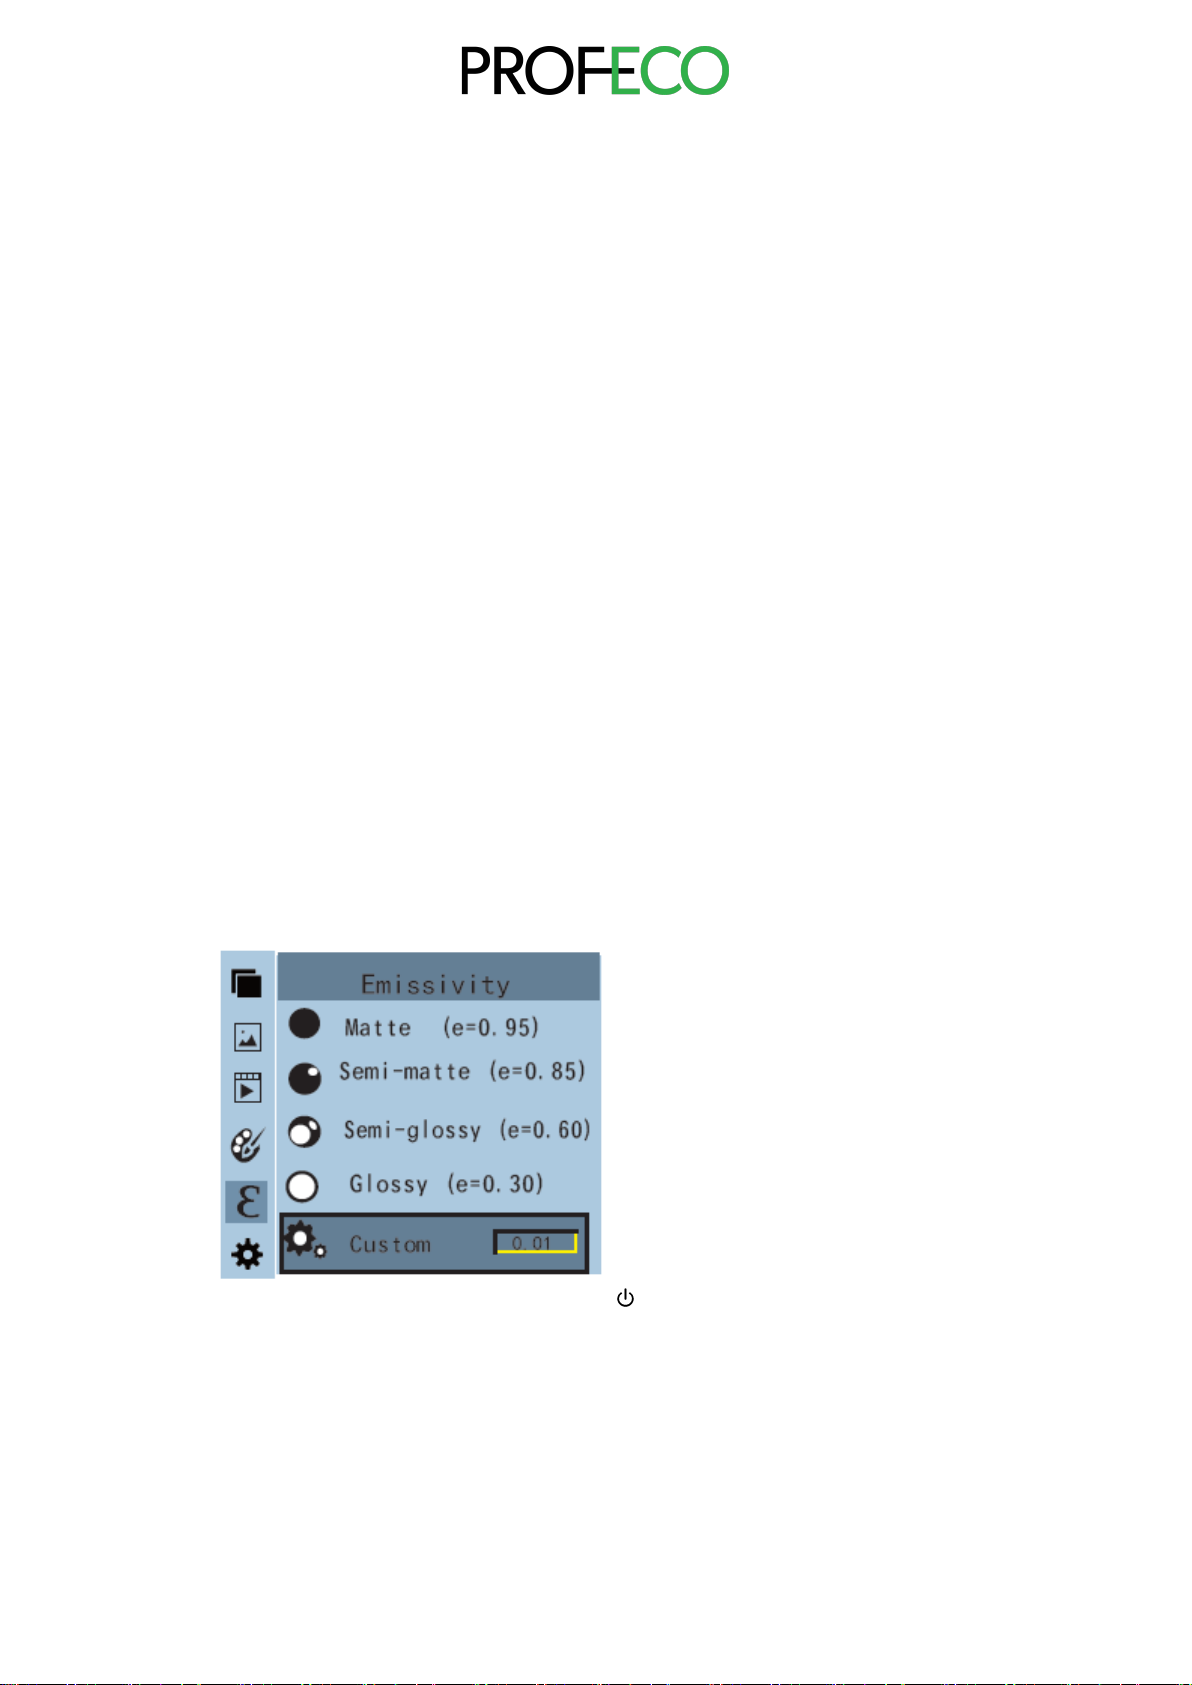
5.2 Emissivity Setting
The product is equipped with four types of object measurement modes:
•Coarse object (0.95)
•Semi-matt object (0.85)
•Semi glossy object (0.60)
•Glossy object (0.30)
According to the characteristics of the measured objects, the user can set the
emissivity value using the "Self-define" option (see the "Emissivity of common
materials" table). table "Emissivity of common materials").
The procedure is as follows:
As shown in the figure, press "MENU/ " key to enter the main menu and
select "𝜀"(emissivity) option and press "⯈" key to enter the emissivity list.
Press "⯅" and "⯆" on the navigation key to select the emissivity. Then press
"SELECT/ENTER" button to confirm the emissivity selection. Press the "⯇"
button again to return.
16
If you select "Custom" emissivity, press the "SELECT/ENTER" button to enter
the editing mode. Use the "⯇" / "⯈" keys to select the number to be changed,
then use the "⯅" "⯆" keys to change the value. When the change is complete,
press "SELECT/ENTER" to confirm, then press "⯇" to return. Press
"MENU/ " to exit the menu.
5.3 Emissivity of common materials
Materials
Thermal radiation
Materials
Thermal radiation
Asphalt
0,90~0,98
Black cloth
0,98
Concrete
0,94
Human skin
0,98
Cement
0,96
Bubbles
0,75~0,80
Sand
0,90
Charcoal dust
0,96
Soil
0,92~0,96
Paint
0,80~0,95
Water
0,92~0,96
Matt paint
0,97
Ice
0,96~0,98
Black rubber
0,94
Snow
0,83
Plastic
0,85~0,95
Glass
0,90
Wood
0,90
Ceramics
0,90~0,95
Paper
0,70~0,94
Marble
0,90~0,94
Chromium oxide
0,81
Plaster
0,94
Copper oxide
0,78
Mortar
0,80~0,90
Iron oxide
0,78~0,82
Brick
0,89~0,91
Textile
0,90
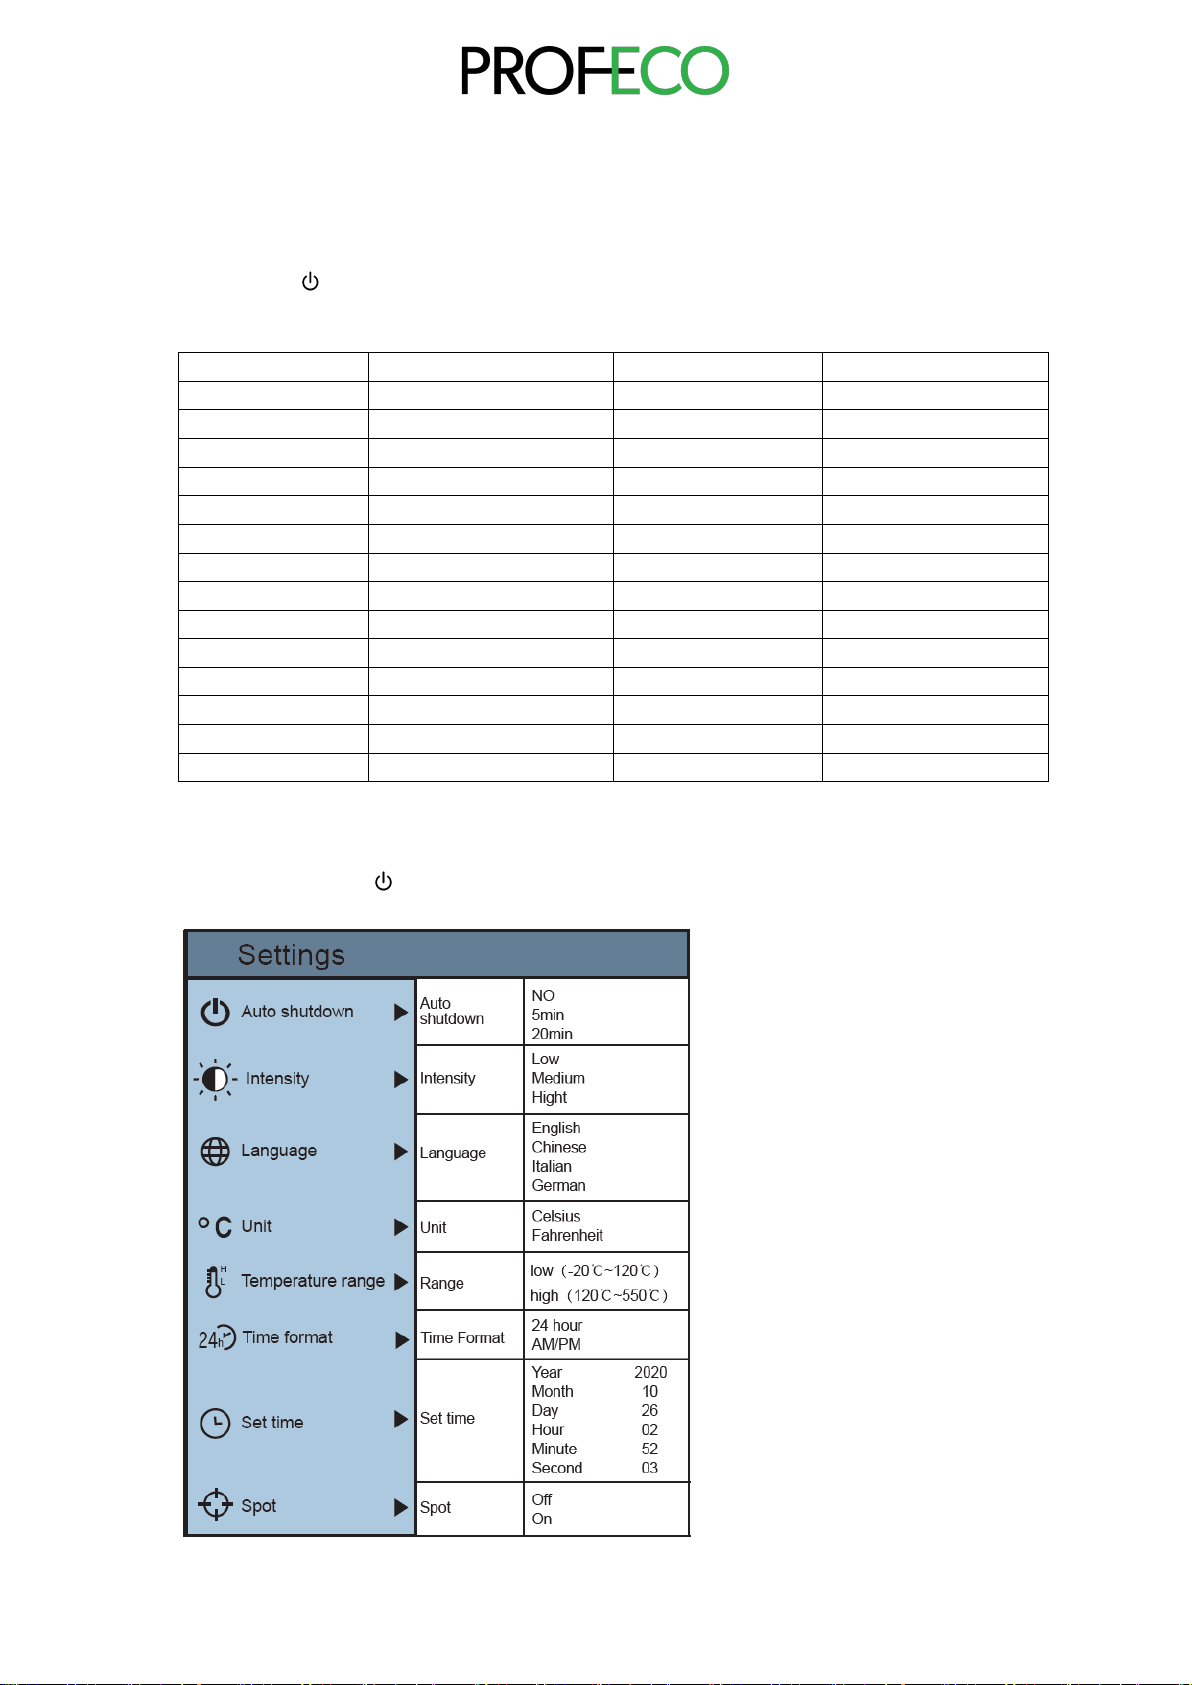
6. Introduction to “Setting” sub-menu
Press the "MENU/ " button to select ""(Setting) in the main menu. Press the "⯈"
button again to enter the "Setting" submenu.

17
6.1 Auto shutdown setting
After entering the "Settings" sub-menu, select "MENU/ " (Auto Power Off),
press navigation the "⯈" button in the button, enters the Auto Power Off
setting. Can be set so that the watch does not switch off automatically or 5
points, or the watch will turn off in 20 minutes.
6.2 Intensity settings
After selecting "🔅" (brightness), press "⯈" on the navigation button to enter
the brightness setting. The brightness can be set to medium or high.
6.3 Language settings
After selecting "🌐" (language), press "⯈" on the navigation button to enter the
language setting. Available in 4 languages: English, Chinese, Italian and
German.
6.4 Unit setting
After selecting "⁰C" (unit), press the "⯈" button on the navigation key to enter
the temperature unit setting. Can be set to either Celsius or Fahrenheit.
6.5 Temperature range setting
After selecting "🌡" (temperature range), press "⯈" on the navigation buttons
to enter the temperature range setting. It can be set to low temperature (-20°C
to 120°C) or high temperature (120°C to 550°C).
6.6 Time format setting
After selecting " "(time format), press "⯈" on the navigation button to enter
the time format setting. It can be set to 24 hours or 12 hours.
6.7 Time setting
As shown in the figure, after selecting "🕒" (set time), press "⯈" on the
navigation button to enter the setting time.

18
•Press "⯅"/"⯆" to select year/month/day/hour/minute.
•After selection, press "SELECT/ENTER" key to enter the edit mode.
•Press"⯇" and "⯈" keys to select the number to be changed. Press “⯅”/
“⯆”key to change the value. When the change is complete, press the
"SELECT/ENTER" button to enter.
•When the time setting is completed, press "" to return. Press
"MENU/ " to exit the menu.
6.8 Enable/Disable highest and lowest temperature cursor
As shown in the figure, after selecting "⌖" (cold hotspot), press the "⯈" button
on the navigation button to enter the cold hotspot setting.
•Press "⯅"/"⯆" keys to select "Enable" or "Disable".
•Then press "SELECT/ENTER" button to confirm the selection.
•When the setting is complete, press "⯇" key to return. Press
"MENU/ " key to exit the menu.
Other manuals for 42250
1
Table of contents
Other PROFECO Thermal Camera manuals


