manuals.online logo
Brands
  1. Home
  2. •
  3. Brands
  4. •
  5. Profile
  6. •
  7. Telephone
  8. •
  9. Profile PAC-110 User manual

Profile PAC-110 User manual

Profile Videophone EN - 1
PAC-110
We thank you for the purchase of this Profile product.
Note: It is important that you read this manual carefully
before using the product. Then keep this manual in a
safe place.
Technical data Monitor
Supply voltage adapter: 230VAC/15VDC 1A
Working current: +/- 420 / 620 mA
Operating temperature: -10°C to 50°C
Max relative humidity: 85%
Number of pixels: 480 x 3 (RGB) x 240 vertical
Screen size: 7 Inches (diagonal)
Video system: PAL/NTSC
Total dimensions: 200(L) x 190(B) x 20(H) mm
Technical data Camera
Working current: < 300mA
Temperature for use: -20°C / +50°C
Type: pinhole camera
Focus/picture angle: 50°
Total dimensions: 122 (L) x 73 (B) x 44 (H) mm
Technical requirements for connections
Use either the cable supplied measuring 10 metres
or own wiring measuring 0.6 - 0.8mm² with a max.
length of 25 metres.
You need a plug socket that is max. 1.5 m from the
monitor.
Required wiring without door lock: 4
Required wiring with door lock: 6
Parts
Hands-free monitor
Camera
Protective cover for external unit
Mounting bracket for monitor
Fixing screws
Connecting cable 10 m
Safety instructions
The monitor or camera may never be cleaned with
detergents. Only use soap and a damp cloth.
The power wiring may never be cut through nor
extended; this renders the guarantee invalid!
Note: respect the correct polarity.
Red = ‘+’, Black = ‘-‘
The monitor may not be placed close to magnetic
fields such as next to a TV or thick power cables.
Water may never be poured over the camera or
monitor. The camera is only splashproof.
Assembly instructions
1. If there is not yet any wiring:
The position of the monitor is determined as
follows: the height amounts to approximately 165
cm, and is max. 150 cm from a plug socket where
the adapter will be plugged in. The connecting
cable between monitor and outside camera must
therefore come from the wall behind the monitor.
Provide a tube so the cable can move freely. If
possible also provide a tube with a sufficiently
large diameter (20-25mm).
Determine the position of the camera outside at
the door. The ideal installation height is 155 to
165 cm. Shorter and taller persons then also
remain in picture.
Bring the camera cable to the monitor from outside
to inside; the cable is moulded.
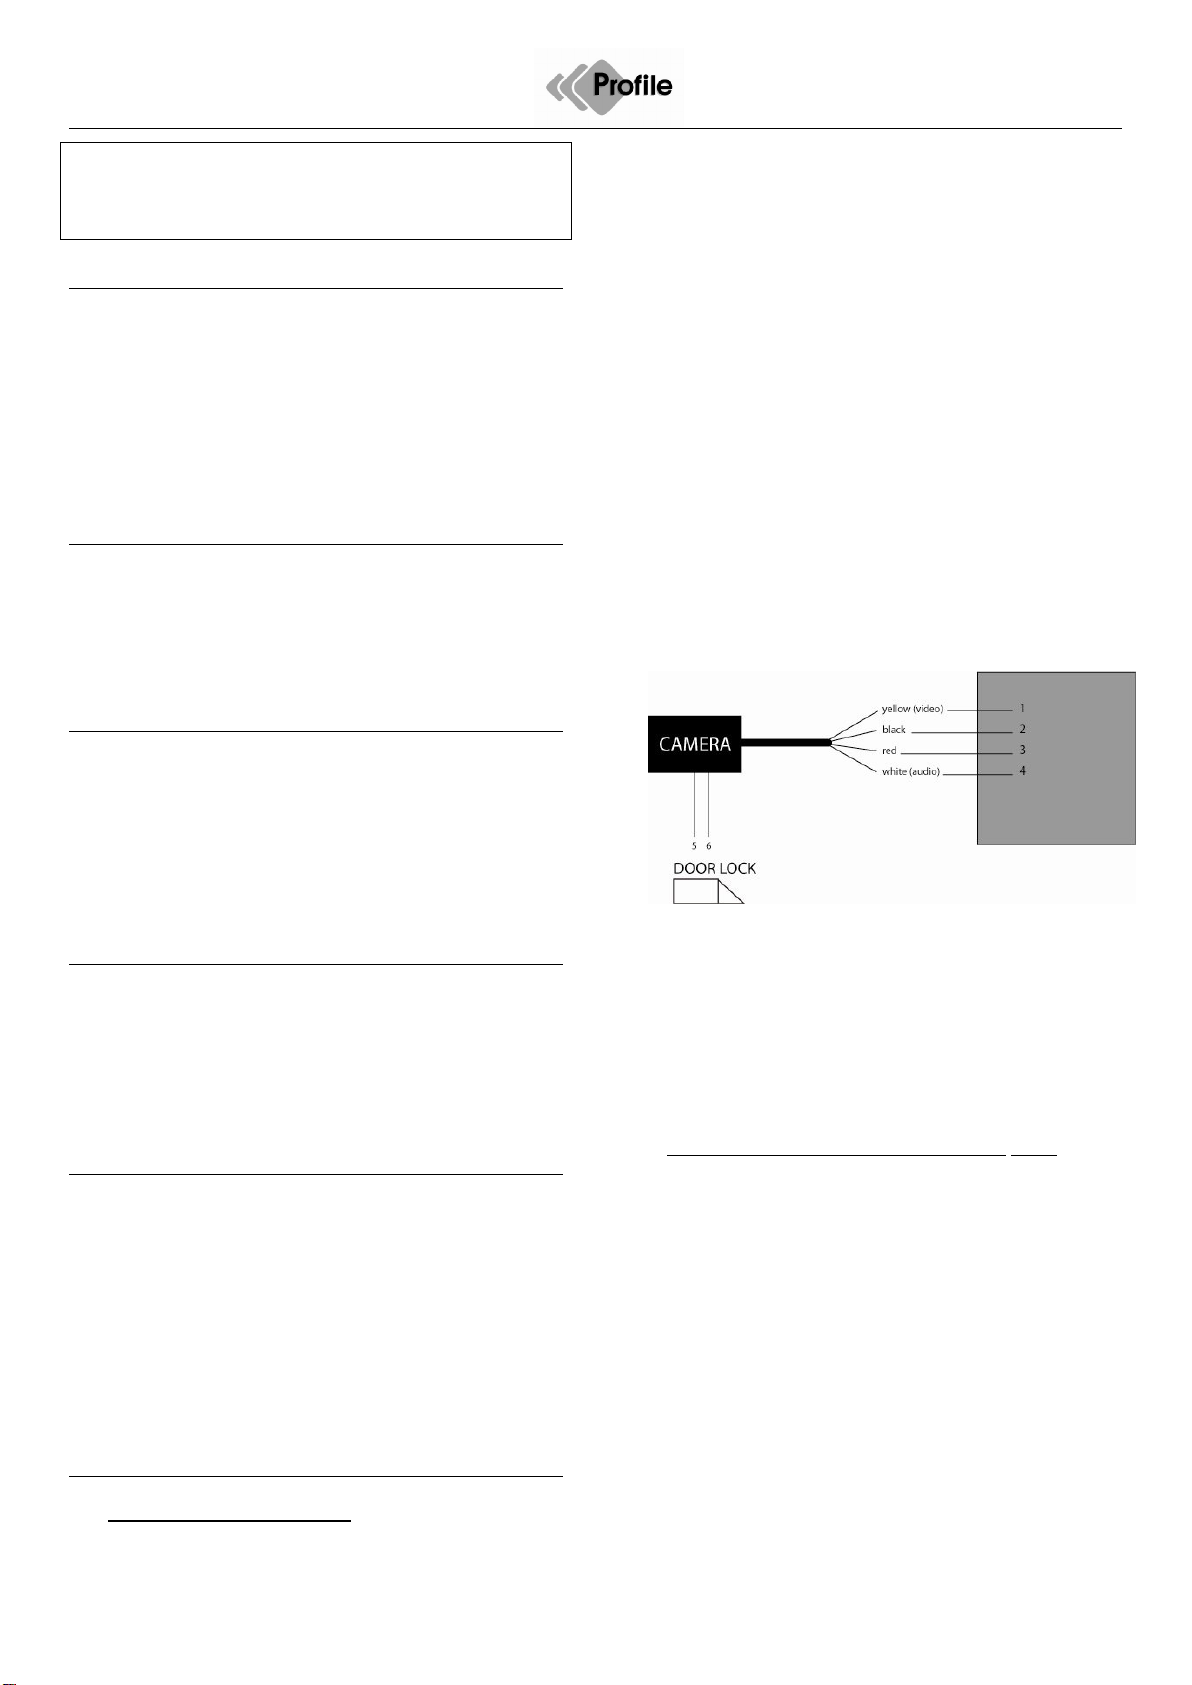
Connect the wiring according to the diagram
below. We again emphasise that the power supply
wiring may not be extended or cut through: this
causes the appliance to work poorly and
invalidates the guarantee.
Note: respect the correct polarity.
Red = ‘+’, Black = ‘-‘
Cut off the cables with 2 cores without door lock.
If a door lock is to be connected, its connection
must be from the camera as shown on the diagram
above. The lock may consume no more than 300
mA and must have a memory function (the lock
remains free until just before the door is pushed
open). The 2 wires are already provided in a
moulded cable (4m).
2. if there is already existing wiring (max. 25m):
The wire diameter must be between 0.6 and 0.8
mm².
Shorten the moulded cables to the desired length
and strip the wires approximately 1cm. If an
electrical door lock is used: also strip the 2-core
cable over a length of 1cm.
The door lock is connected from the camera with
the moulded cable with two wires. The lock may
consume no more than 300 mA and must have a
memory function (the lock remains in a free
position as long as the door is not pushed open).
Provide a recess behind the camera in the wall or
door frames, connect the wiring using the
connecting blocks and push this into the recess. If
you cannot do this the wires must be twisted
together and insulated with insulation tape.
Profile Videophone EN - 2
PAC-110
Use:
A. Having a normal conversation
1. Ringing on the external unit
2. The picture automatically appears on the
monitor inside.
3. Press the conversation key and speak to the
visitor.
4. The door lock can be operated with the key for
that purpose.
5. Press the conversation key again to end the
conversation.
B. Making a visual check
1. If the conversation key is pressed once without
anyone ringing you can check outside without
a sound being heard outside.
2. You can stop the picture by pressing the
conversation key again.
C. Changing functions
1. Press the menu key:
2. The luminosity can be adjusted on the LCD
screen. Increase or decrease the luminosity
using the arrows. There are 60 levels.
3. The colour intensity can also be changed on
the LCD screen. There are 63 different colour
intensities.
4. You can also change the contrast in the menu
in the same way. There are 60 levels.
5. The volume has 63 levels and can be changed
in the same way.
Guarantee conditions
The guarantee period for the PAC-110 amounts to 2
years and commences on the date of purchase.
During this guarantee period Eltra NV will repair any
defects attributable to material or production faults.
Eltra nv may choose to either repair or replace a
defective appliance.
ELTRA NV is not obliged to repair or replace
appliances if they have become defective as a result of
damage, inappropriate use, or modifications or
adaptations made after the purchase date.
Take any defective appliance together with the original
receipt back to the shop where the appliance was sold.
Always add a note with a description of the problem.
Damage
Eltra nv can under no circumstances whatsoever be
held responsible for damage of whatever nature if the
appliance was not correctly installed according to the
specified installation instructions, nor for damage as a
result of unforeseen circumstances such as natural
disasters, lightening strike, etc. All such resulting costs
are consequently at the expense of the buyer and are
not covered by the guarantee conditions.
www.profile.eu
Eltra nv, Pachtgoedstraat 2, 9140 Temse, BELGIUM
Eltra DIYeuronet, Frontstraat 14, 5405 AM Uden,
THE NETHERLANDS

Other Profile Telephone manuals

Profile PAC-106 User manual

Profile

Profile PAC-106 User manual

Profile PAC-112 User manual

Profile

Profile PAC-112 User manual

Popular Telephone manuals by other brands

switel Vita DCT 5007x Combo operating instructions

switel

switel Vita DCT 5007x Combo operating instructions

Gigaset DE700 IP PRO quick start guide

Gigaset

Gigaset DE700 IP PRO quick start guide

Panasonic KX-A120EX/E operating instructions

Panasonic

Panasonic KX-A120EX/E operating instructions

Cisco 7961 Quick reference guide

Cisco

Cisco 7961 Quick reference guide

Cyber CY2656BK user manual

Cyber

Cyber CY2656BK user manual

Gigaset A540h manual

Gigaset

Gigaset A540h manual

Viking E-1600-22-IP quick start guide

Viking

Viking E-1600-22-IP quick start guide

AT&T HS8255 user manual

AT&T

AT&T HS8255 user manual

Blueant S3 Compact user guide

Blueant

Blueant S3 Compact user guide

Nokia HF-300 user guide

Nokia

Nokia HF-300 user guide

Siemens HiPath 8000 Quick reference guide

Siemens

Siemens HiPath 8000 Quick reference guide

Aastra 5370 Quick user guide

Aastra

Aastra 5370 Quick user guide

NGM Facile top user manual

NGM

NGM Facile top user manual

Yealink T46G Skype For Business Edition Basic guide

Yealink

Yealink T46G Skype For Business Edition Basic guide

AT&T EL52103 user manual

AT&T

AT&T EL52103 user manual

Telematrix Marquis 3002MWS Installation and user guide

Telematrix

Telematrix Marquis 3002MWS Installation and user guide

Binatone Lyris 710 user guide

Binatone

Binatone Lyris 710 user guide

XONTEL XT-30G user guide

XONTEL

XONTEL XT-30G user guide

manuals.online logo
manuals.online logoBrands
  • About & Mission
  • Contact us
  • Privacy Policy
  • Terms and Conditions

Copyright 2025 Manuals.Online. All Rights Reserved.