ProFusion GD8115BP-L User manual

1
INFRARED ZONE HEATING SYSTEM
OWNER’S MANUAL
Model No. GD8115BP-L
PLEASE SAVE THESE INSTRUCTIONS
WARNING: READ THIS OWNER’S MANUAL CAREFULLY BEFORE USE.
This owner’s manual will provide you with valuable information necessary for the proper care
and maintenance of your new product. Please take a few moments to thoroughly read the
instructions and familiarize yourself with all the operational aspects of your new heater.

2
IMPORTANT INSTRUCTIONS
When using this electric unit, basic safety precautions should always be followed to reduce the
risk of fire, electric shock, and injury to persons, including the following:
1. Read ALL instructions before using this unit.
2. CAUTION: Risk of Electric Shock. DO NOT open or try to repair the heater yourself.
3. This heater may get hot when in use. To avoid burns, DO NOT let bare skin touch hot
surfaces. If provided, use handles when moving this heater.
4. Keep combustible materials, such as furniture, pillows, bedding, paper, clothes, and
curtains at least 3 ft from the front of the heater and keep them away from the sides, top,
and rear. DO NOT place towels or other objects on the heater.
5. Extreme caution is necessary when any heater is used by or near children or the disabled,
or when the heater is left operating and unattended.
6. DO NOT operate any heater with a damaged cord or after the heater malfunctions, has
been dropped or damaged in any manner. Return heater to authorized service facility for
examination, electrical or mechanical adjustment, or repair.
7. This heater is not intended for use in bathrooms, laundry areas and similar indoor
locations. NEVER locate heater where it may fall into a bathtub or other water container.
To protect against electrical hazards, DO NOT immerse in water or other liquids.
8. DO NOT touch the control panel or plug with a wet hand.
9. DO NOT run cord under carpeting. DO NOT cover cord with throw rugs, runners, or
similar coverings. Arrange cord away from traffic area and where it will not be tripped
over.
10. DO NOT insert or allow foreign objects to enter any ventilation or exhaust opening as
this may cause an electric shock or fire, or damage the heater.
11. To prevent a possible fire, DO NOT block the air intakes or exhaust in any manner. DO
NOT use on soft surfaces, like a bed, where openings may become blocked.
12. A heater has hot and arcing or sparking parts inside. DO NOT use in areas where
gasoline, paint, explosive and/or flammable liquids are used or stored. Keep unit away
from heated surfaces and open flames.
13. Always plug heaters directly into a wall outlet receptacle. Never use with an extension
cord or relocatable power tap (outlet/power strip).
14. To avoid fire or shock hazard, plug the unit directly into a 120 V AC electrical outlet.
15. To disconnect heater, turn controls to OFF, then remove plug from outlet. Pull firmly on
the plug, DO NOT unplug by pulling on the cord.
16. Always unplug the unit before moving or cleaning, or whenever the heater is not in use.
17. Use only for intended household use as described in this manual. Any other use not
recommended by the manufacturer may cause fire, electric shock, or injury to persons.
The use of attachments not recommended or sold by unauthorized dealers may cause
hazards.
18. Always use on a dry, level surface. Use on floor only.
19. DO NOT use outdoors.

3
20. WARNING: To reduce the risk of fire or electric shock, DO NOT use this unit with any
solid-state speed control device.
21. DO NOT attempt to repair or adjust any electrical or mechanical functions on this unit.
Doing so will void your warranty. The inside of the unit contains no user serviceable
parts. Qualified personnel should perform all servicing only.
22. Connect to properly grounded outlets only.
23. .Save these instructions.
SPECIFICATIONS
Voltage Rating
120 V (60Hz)
Power Consumption
1500W
Unit Size
8.6 in. (W) x11.5in. (D) x 18.2in. (H)
Unit Weight
14.55 lbs
SAFETY FEATURES
Tip-Over Safety Feature
This heater is equipped with a tip-over safety feature. Once the heater is tipped over, an
internal switch will automatically shut the heater off. Once the heater is restored to the upright
position, the heater will reset. To continue operation, turn on the heater using the supplied
remote control or the control panel on the heater.
Overheat Safety Feature
This heater is equipped with an overheat safety feature. When the heater’s internal components
reach a certain temperature that could cause overheat and possible fire, the heater will
automatically shut off.
WARNING: It is normal for the power cord to feel warm to the touch; however, a loose fit
between the outlet and the plug may cause overheating of the plug. If this occurs, try inserting
the plug into a different outlet. Contact a qualified electrician to inspect the original outlet for
damage.
IN THE BOX
·INFRARED ZONE HEATING SYSTEM
·REMOTE CONTROL (2 AAA Batteries Not Included)
·INSTRUCTION BOOKLET
4
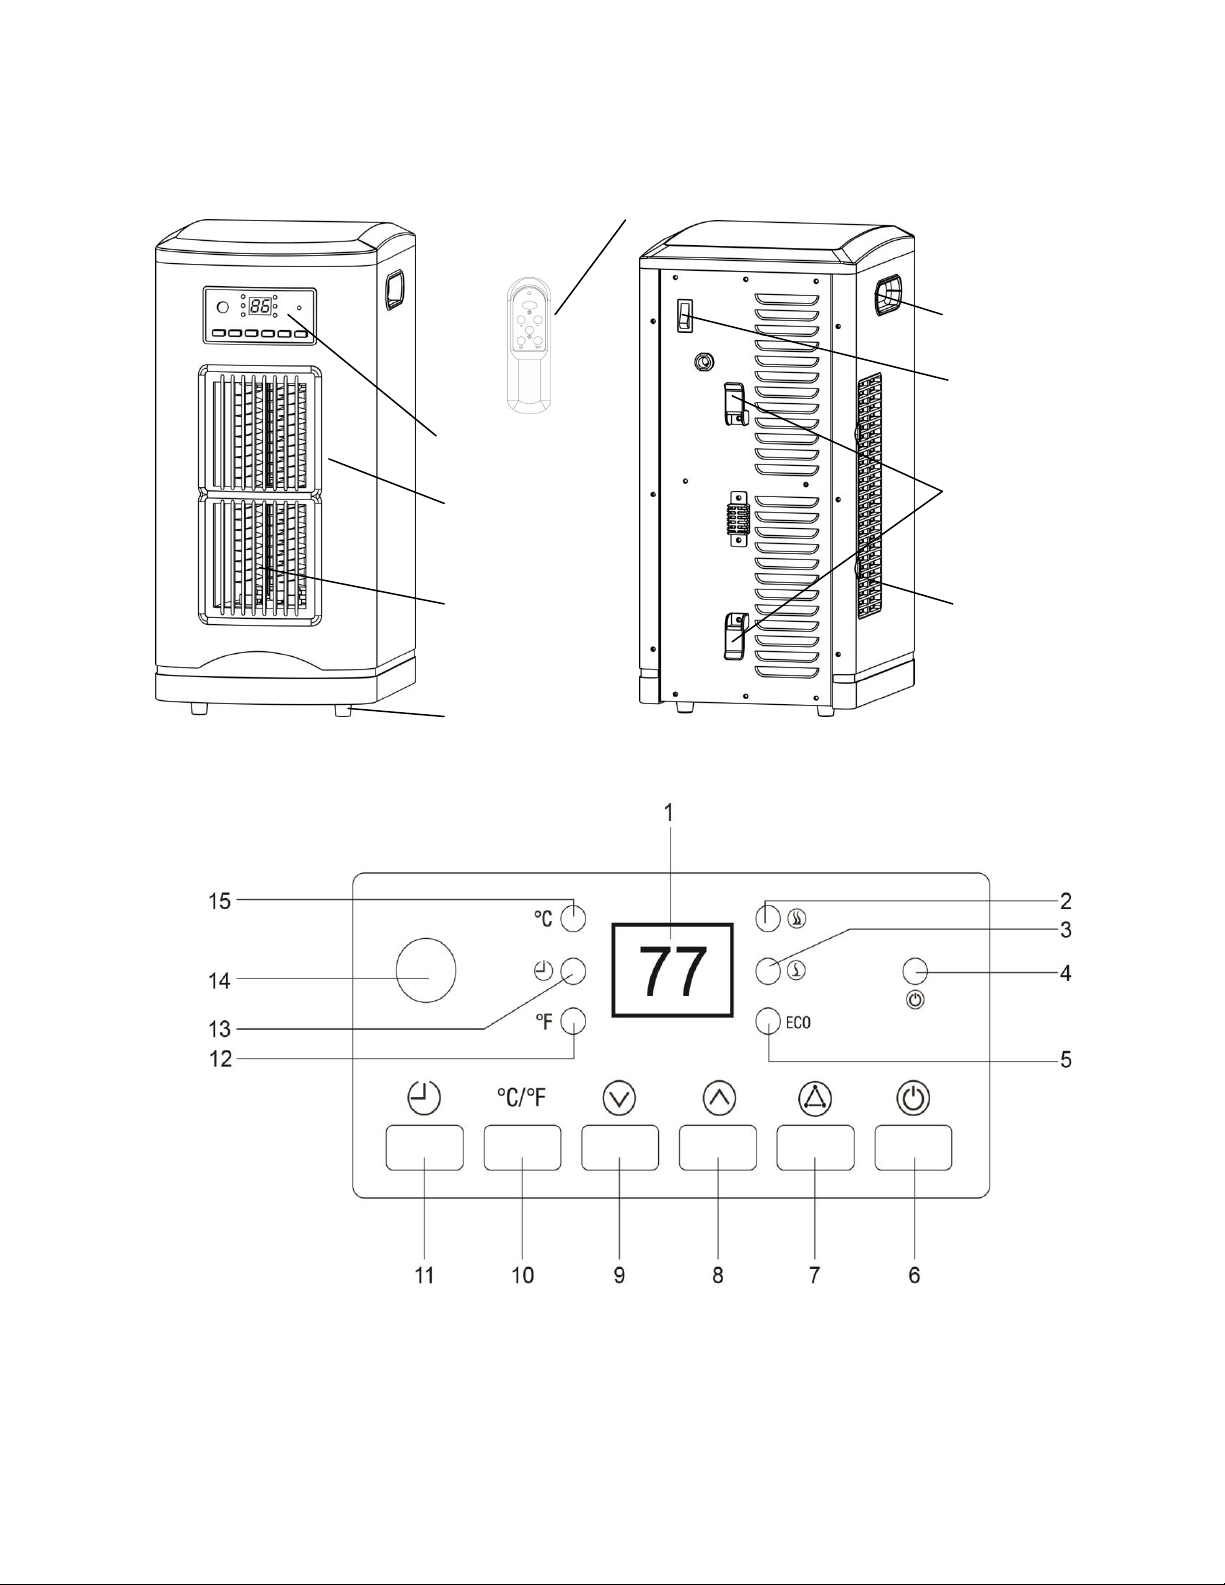
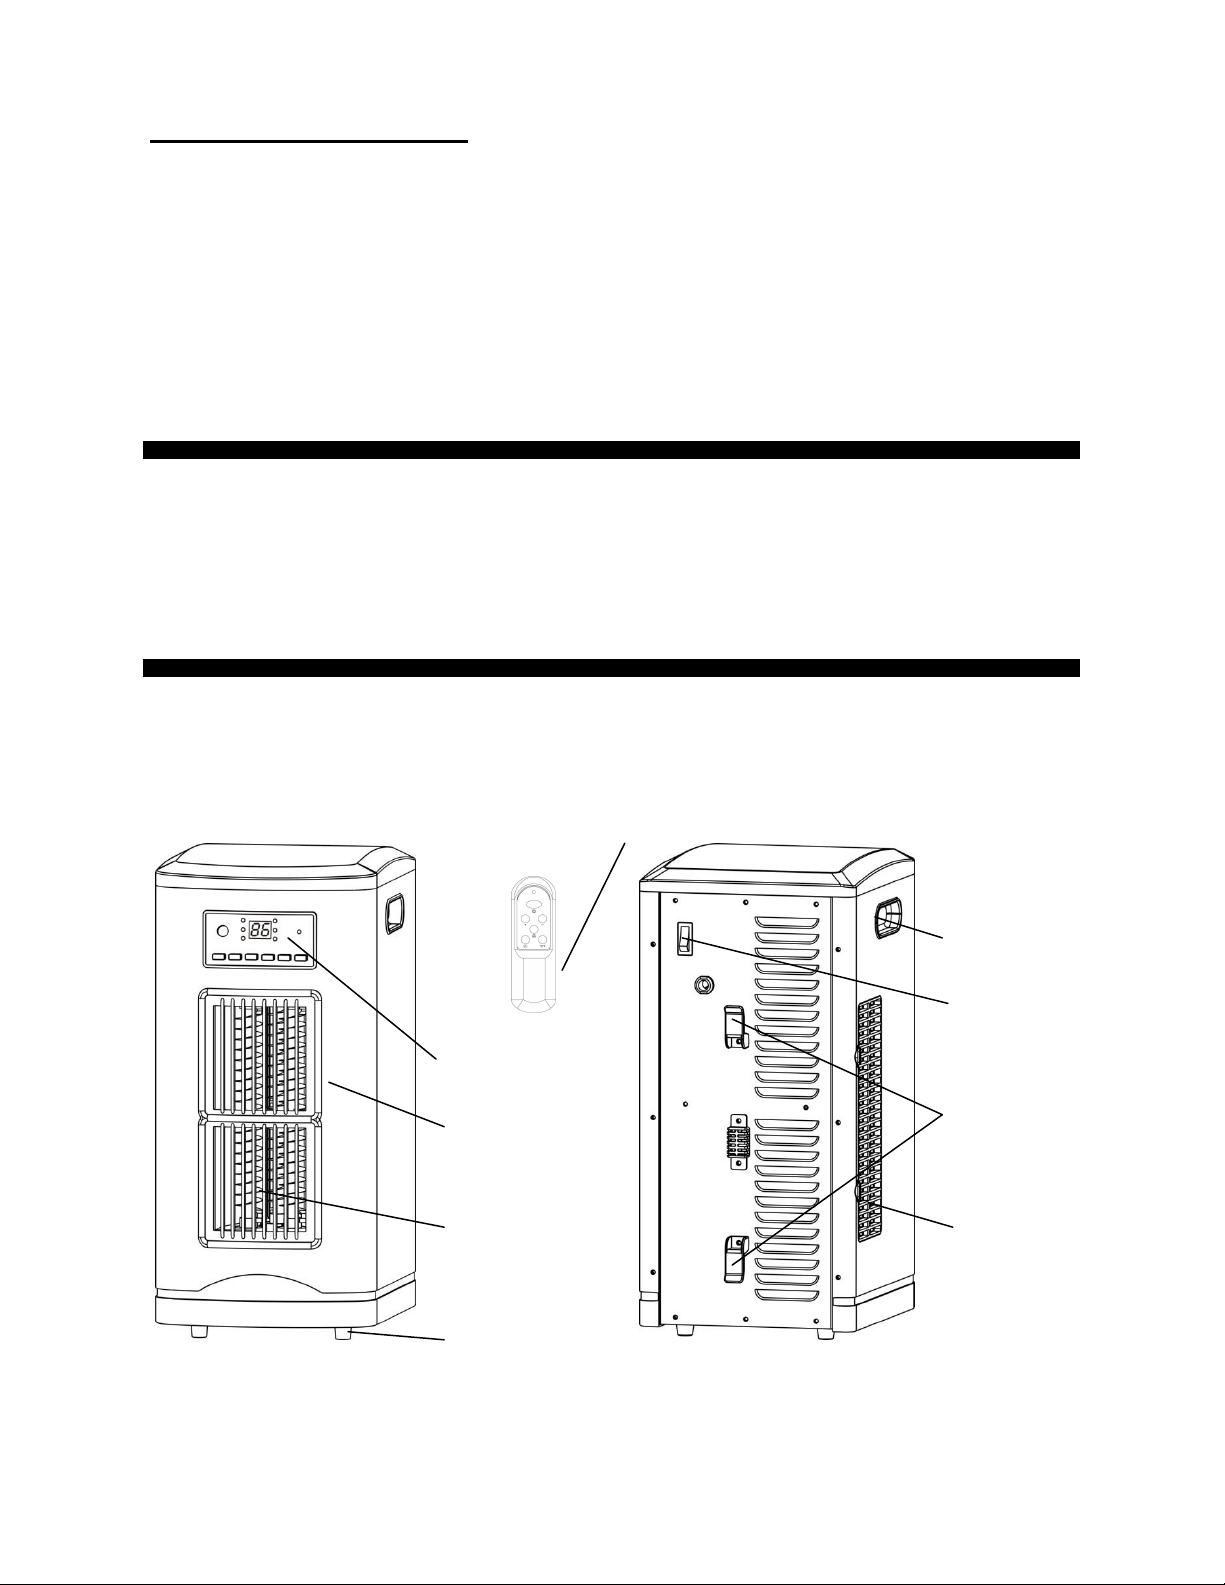
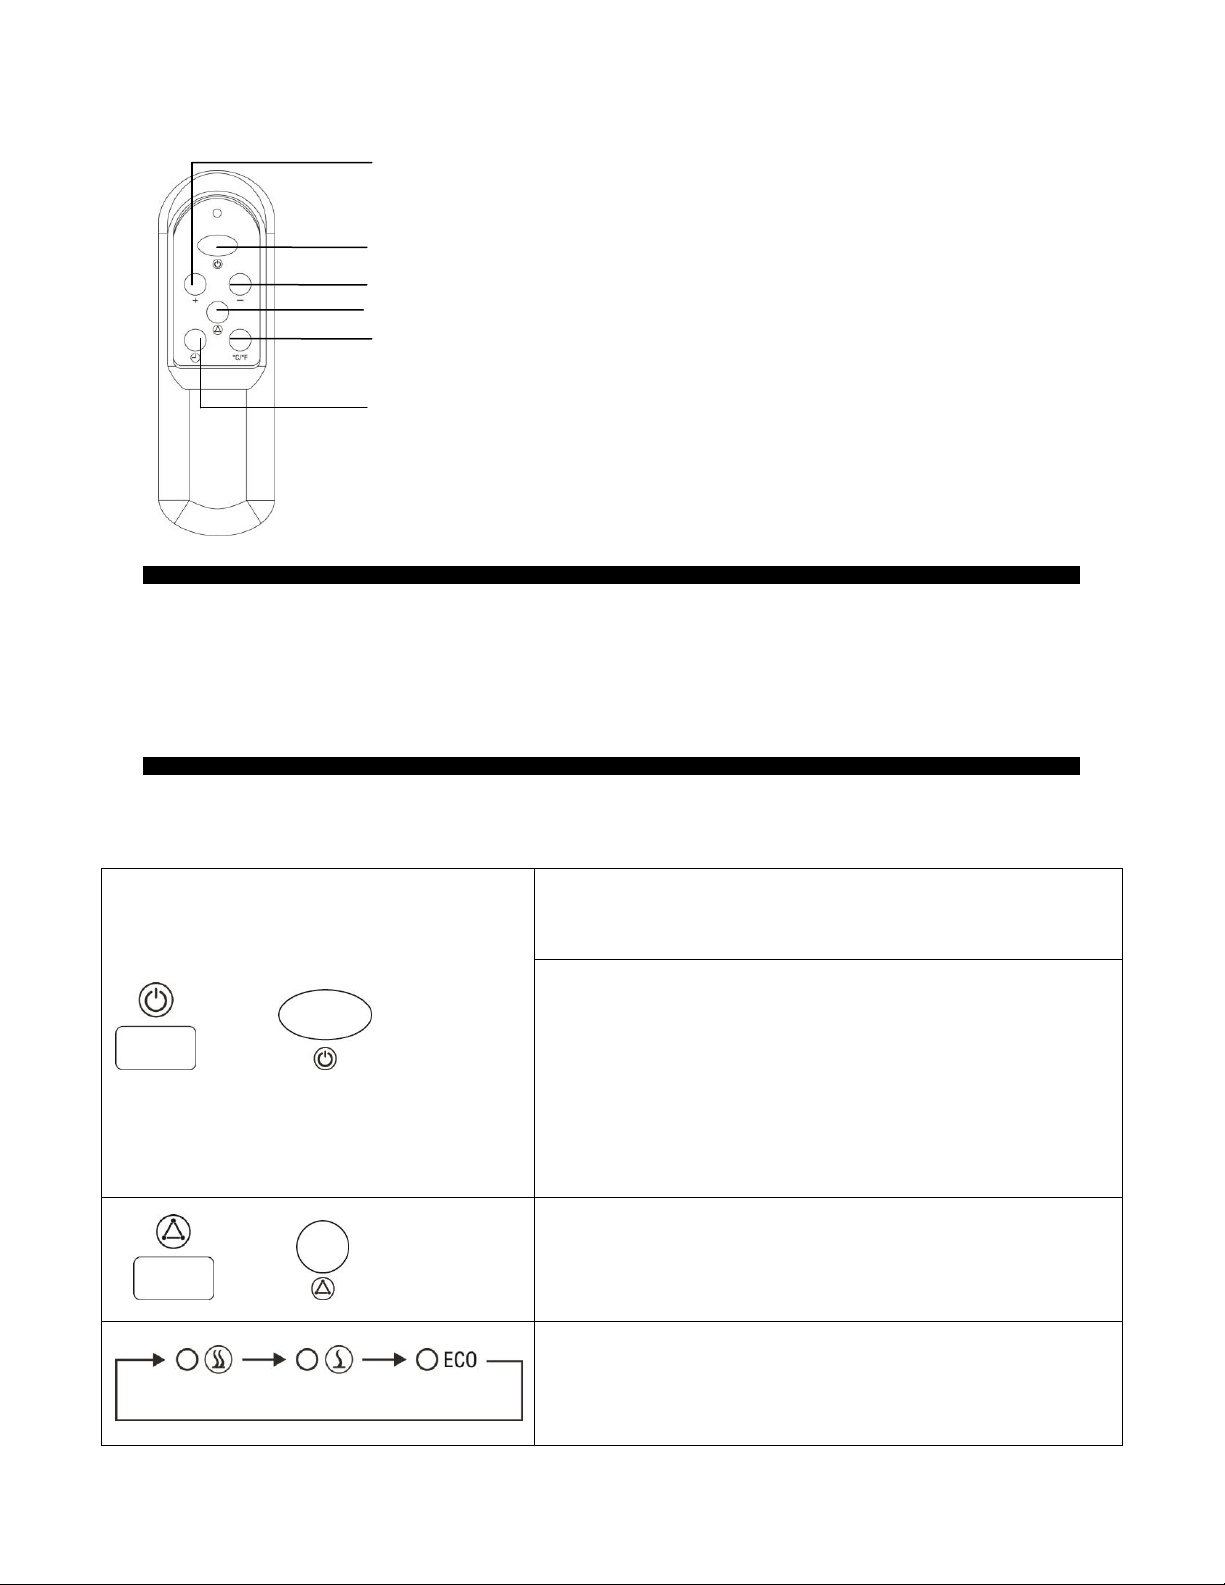
PRODUCT DIAGRAM
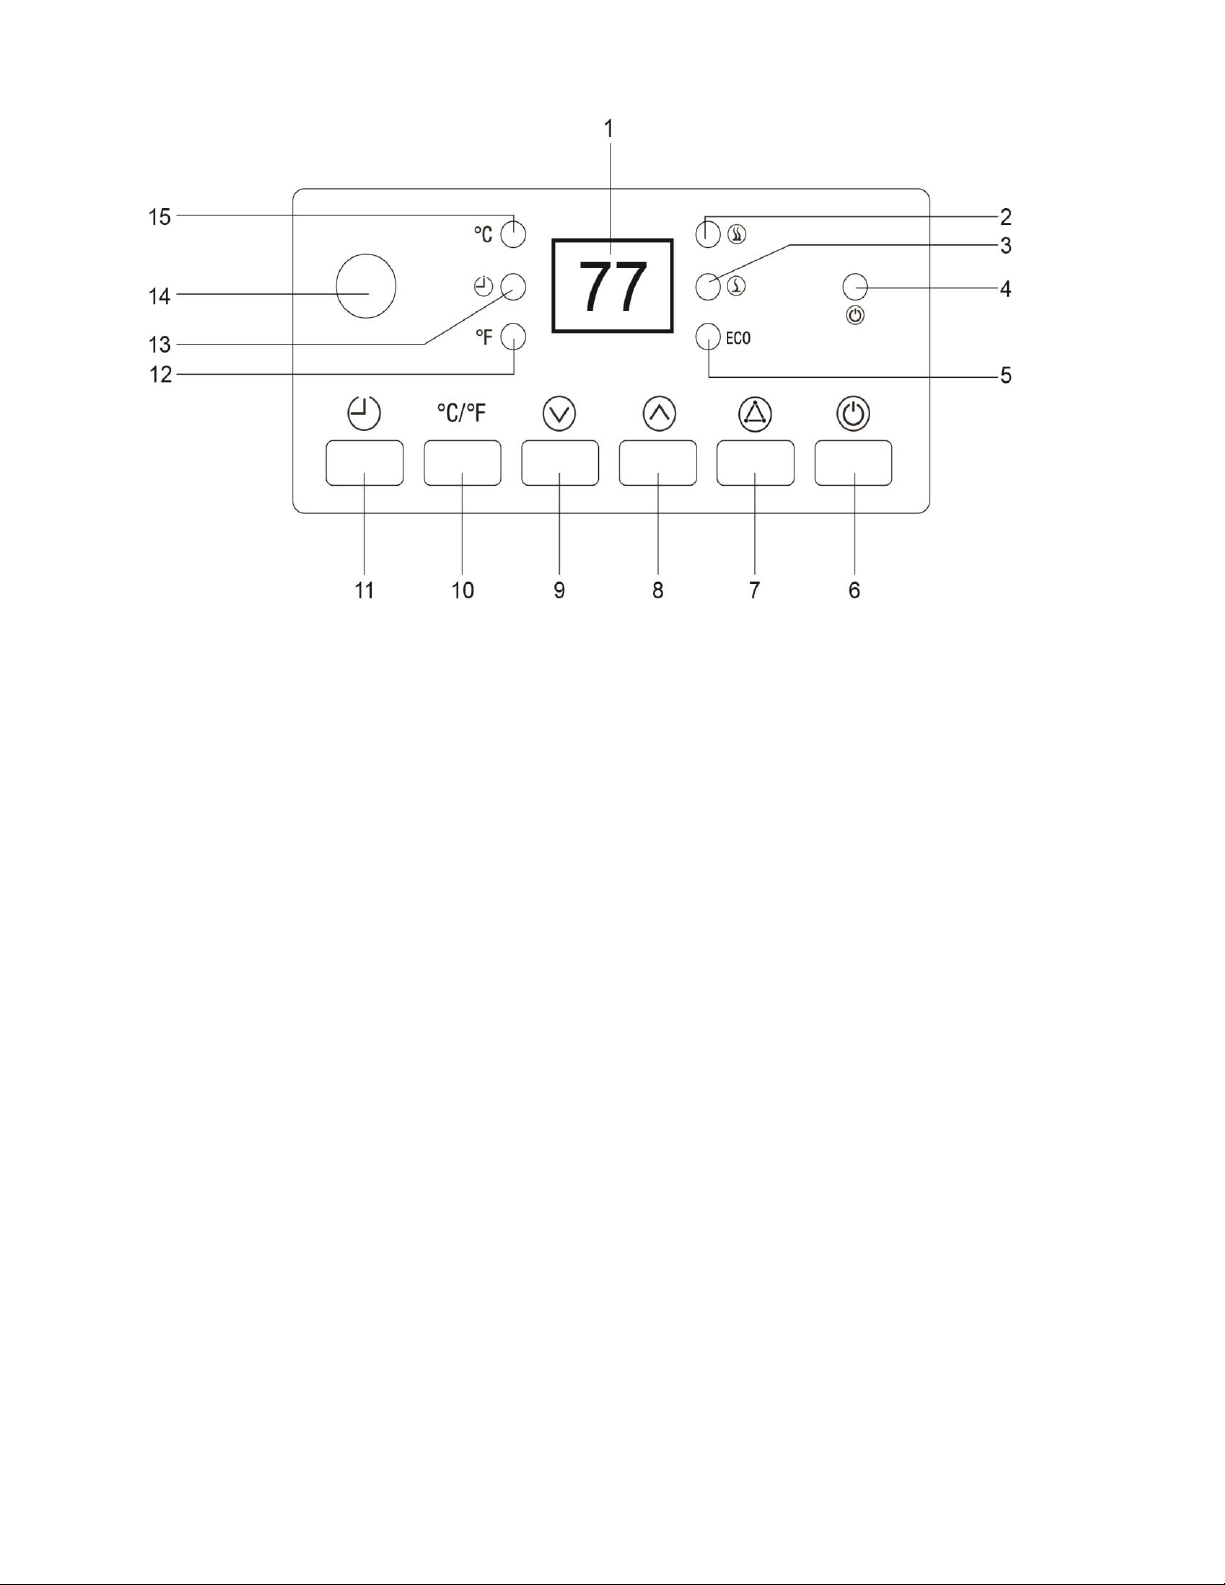
1. Digital display:Indicate set room temperature or time value according to the timer.
2. Heat-up mode indication light: The light’s on when heat-up mode goes.
3. Heat-down mode indication light: The light’s on when heat-down mode goes.
4. Power indication Light:Indicate when the unit connects to power supply.
5. Energy-saving mode:The light’s on when energy-saving mode goes.
6. ON/OFF switch button: For power-on or off.
Remote Control
Front Panel
Air Outlet
Foot pad
Control Panel
Air Intake
Cord Clamp
Control Panel
Power Switch
Handle grip
5
7. Mode button: For selecting running mode.
8. Temp up button: For setting temp upward.
9. Temp down button: For setting temp downward.
10. ℃/℉Button: Button for alternating between Fahrenheit and Celsius.
11. Timer button: Used for setting the timer and adjusting time value of the timer.
12. Fahrenheit indicating light
13. Timer indication light: The light’s on when timer functions.
14. Signal-receiving window: For receiving remote control signal.
15. Celsius indicating light
PREPARATION
Place the heater on a firm, level surface and plug into a grounded 120V 60Hz power outlet.
And turn on the power switch in the rear of the unit.
Insert 2 AAA batteries into the remote control before using (Batteries Not Included)
OPERATING INSTRUCTIONS
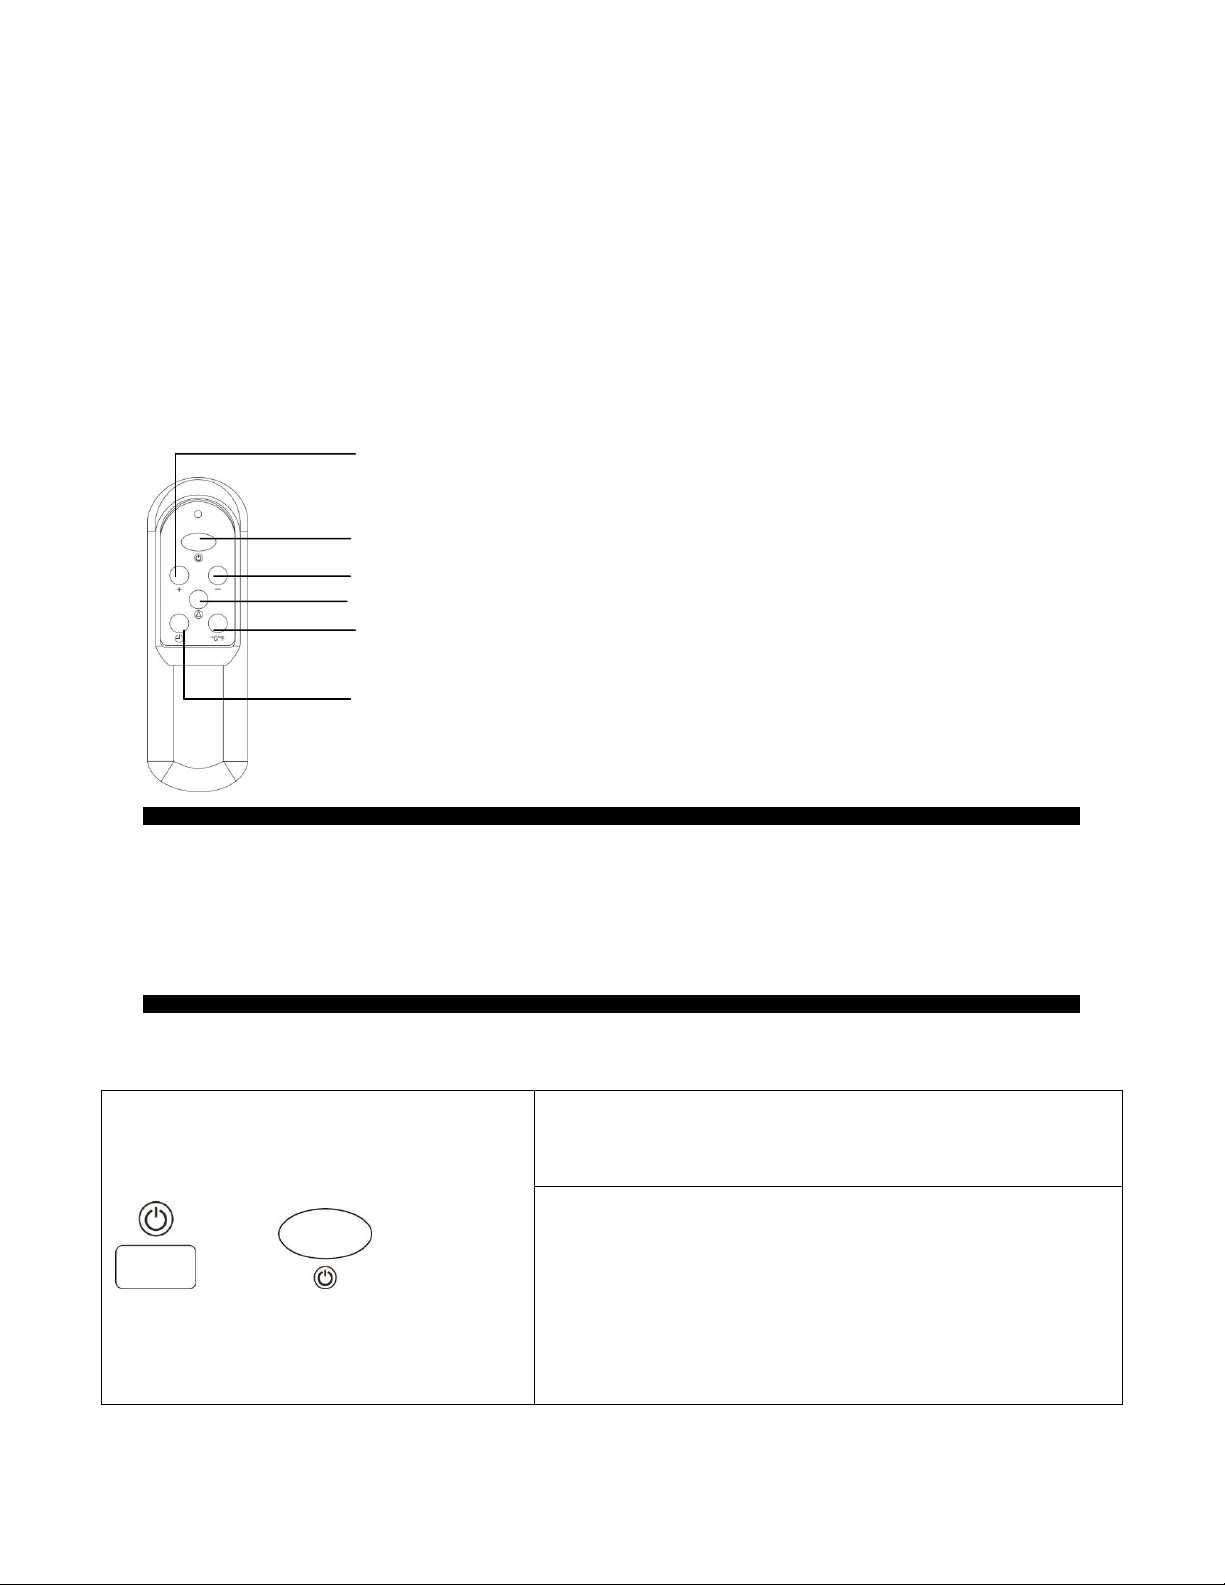
1. Start and select working mode
Or
Turn the heater on by pressing the ON/OFF button on the
control panel or by pressing the Power button on the
supplied remote control.
Turn the heater off by pressing the ON/OFF button on the
control panel or by pressing the Power button on the
supplied remote control.
Note: Powering off the heater will stop the heating process
only. The fan will continue to blow for approximately 3
more minutes to allow for the interior components to cool.
The fan will then turn off automatically.
Remote Control
Mode button: Used for mode selection
ON/OFF button: Used for power-on or power-off
Temp up button: To make set temperature rise
Temp down button: To make set temperature decline
Timer button: Used for setting timer and adjusting time value of the timer.
℃/℉button : Button for alternating between Fahrenheit and Celsius.
6
Or
Select a heat Mode.
Press the MODE button to toggle between the three heat
settings.
High Mode uses 1500W; Low Mode uses 1000W. ECO
mode is an Economic Energy Saving Function. When
ECO mode is chosen, the heater will set the temperature
automatically to 68℉(20℃) under this mode.
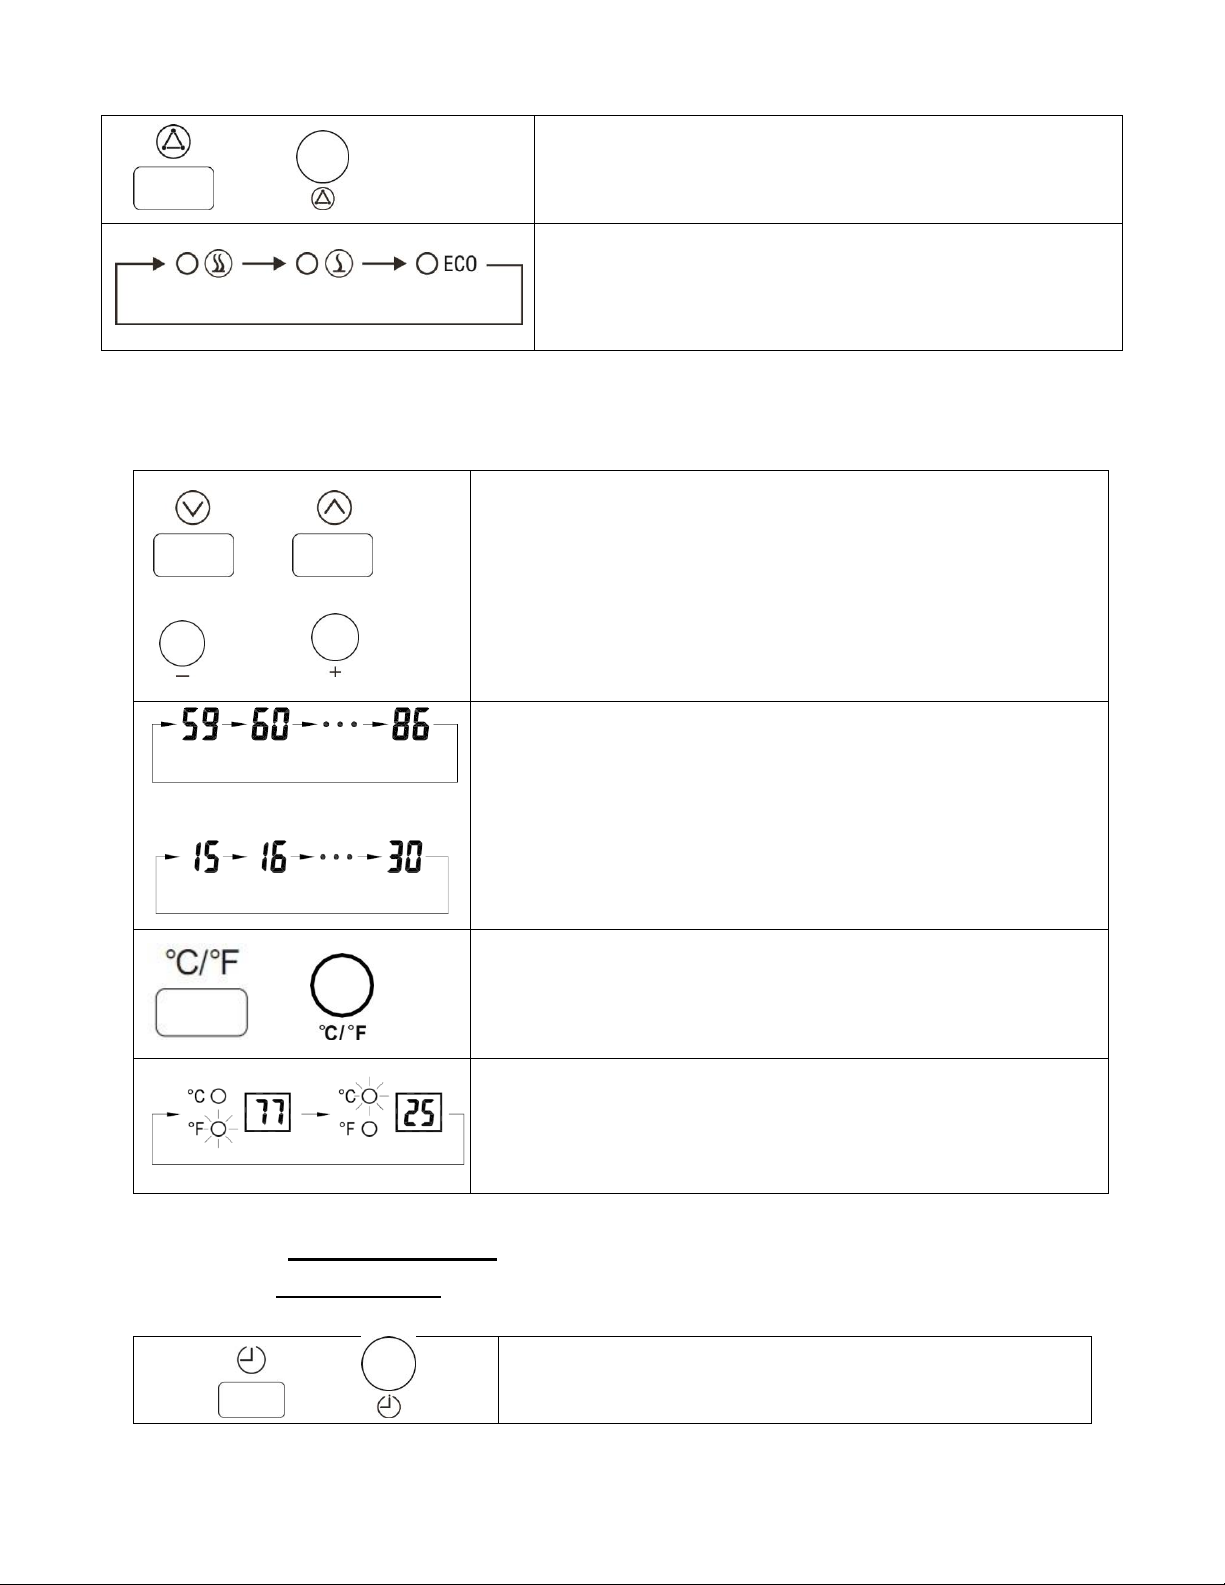
2. Set Desired Temperature
Or
Or
Adjust the desired temperature by pressing the Up/Down
arrows on the control panel or remote control.
Or
Desired temperature options vary from 59℉to 86℉, or from
15℃to 30℃. Once you have chosen the desired temperature,
the heater will remain on until the room temperature increases
to that temperature on the digital display. The heater will cycle
on and off to maintain that desired room temperature.
Or
Press ℃/℉button to change the display temperature between
Fahrenheit and Celsius.
The Fahrenheit indicator LED will light, when the temperature
is displayed in Fahrenheit.
The Celsius LED will light, when the temperature is displayed
in Celsius.
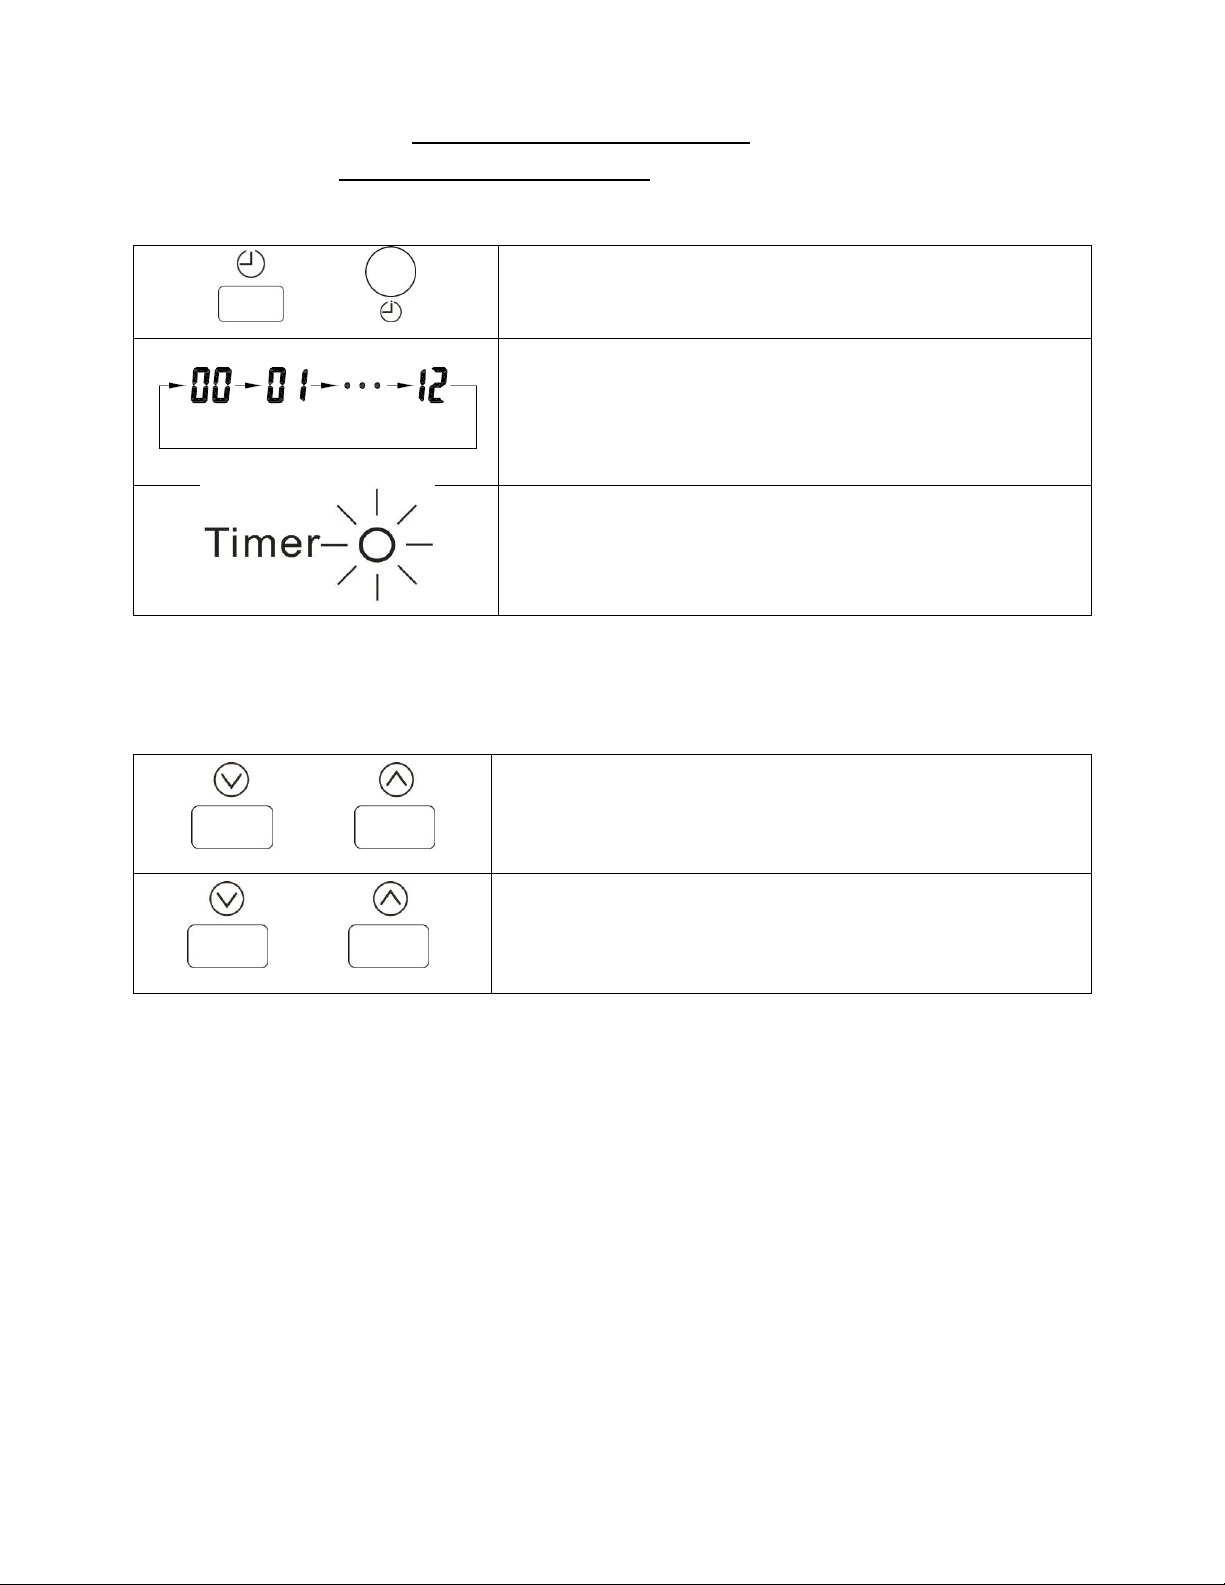
3. Set the POWER-OFF TIMER Function
Note: The Power-Off-Timer Function will allow for the heater to power OFF after a certain set
time, and can only be set while the heater’s display is in the “On” position.
Or
Turn the heater to the “On” position. Press the Timer
button on the heater’s control panel or the remote.
7
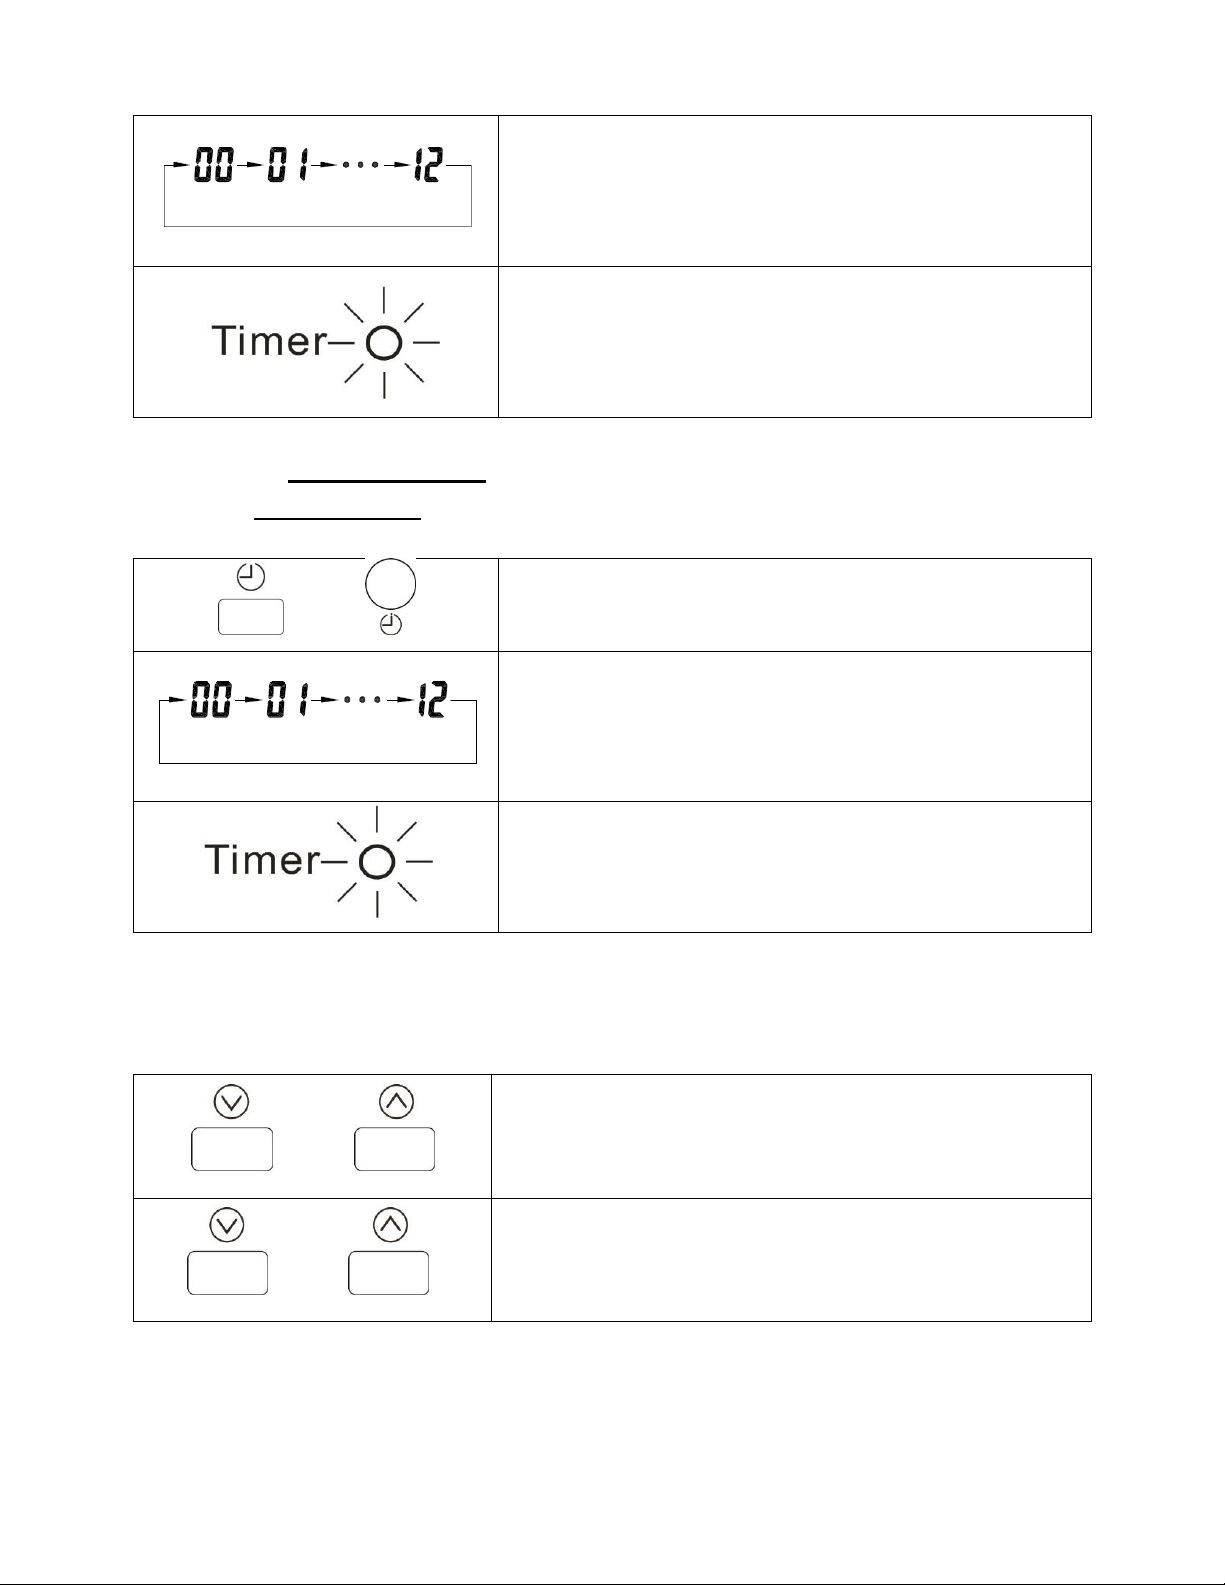
The digital display changes from the “temperature” to the
“hours” option for the timer. Continue to press the timer
button to change the number of hours you would like the
heater to run before powering itself off. The hour options
for the timer are from 0 to 12 hrs. (in 1 hr increment).
The selected hour increments will flash for a few seconds,
then revert back to the set desired temperature. The Timer
indicator light will remain lit as long as the Timer is set.
The heater will power OFF when the internal heater clock
counts down the hour increments you set.
4. Set the POWER-ON TIMER Function
Note: The Power-ON-Timer Function will allow for the heater to power ON after a certain set
time, and can only be set while the heater’s display is in the “Off” position.
Or
Turn the heater to the “OFF” position. Press the Timer
button on the heater’s control panel or the remote.
The digital display shows the “hours” option for the timer.
Continue to press the timer button to change the number of
hours you would like the heater’s internal clock to count
down before powering itself on. The hour options for the
timer are from 0 to 12 hrs. (in 1 hr increment).
The Timer indicator light will remain lit as long as the
Timer is set. The heater will power itself ON when the
internal heater clock counts down the hour increments you
set.
5. Set Electro Lock
The Electro Lock can help avoid the heater from being accidentally engaged by children. The
locking mechanism can be set in both the ON and OFF modes.
And
Press Temp Up and Temp Down buttons at the same time
for 3 seconds. Locking is complete when you hear a beep.
When locked, the functions of the control panel and remote
will be locked for use.
And
When you need to unlock it, press Temp Up and Temp
Down buttons at the same time for 3 seconds. You will hear
a beep. The control panel and remote control will become
functional again.
MAINTENANCE
1. Turn off the power switch in the rear of the unit.
2. Unplug the unit and let it cool completely
8
3. To keep the heater clean, the outer shell may be cleaned with a soft, damp cloth. You
may use a mild detergent if necessary. After cleaning, dry the unit with a soft cloth.
CAUTION: DO NOT let liquid enter the heater.
4. DO NOT use alcohol, gasoline, abrasive powders, furniture polish, or rough brushes to
clean the heater. This may cause damage or deterioration to the surface of the heater.
5. DO NOT immerse the heater in water.
6. Wait until the unit is completely dry before use.
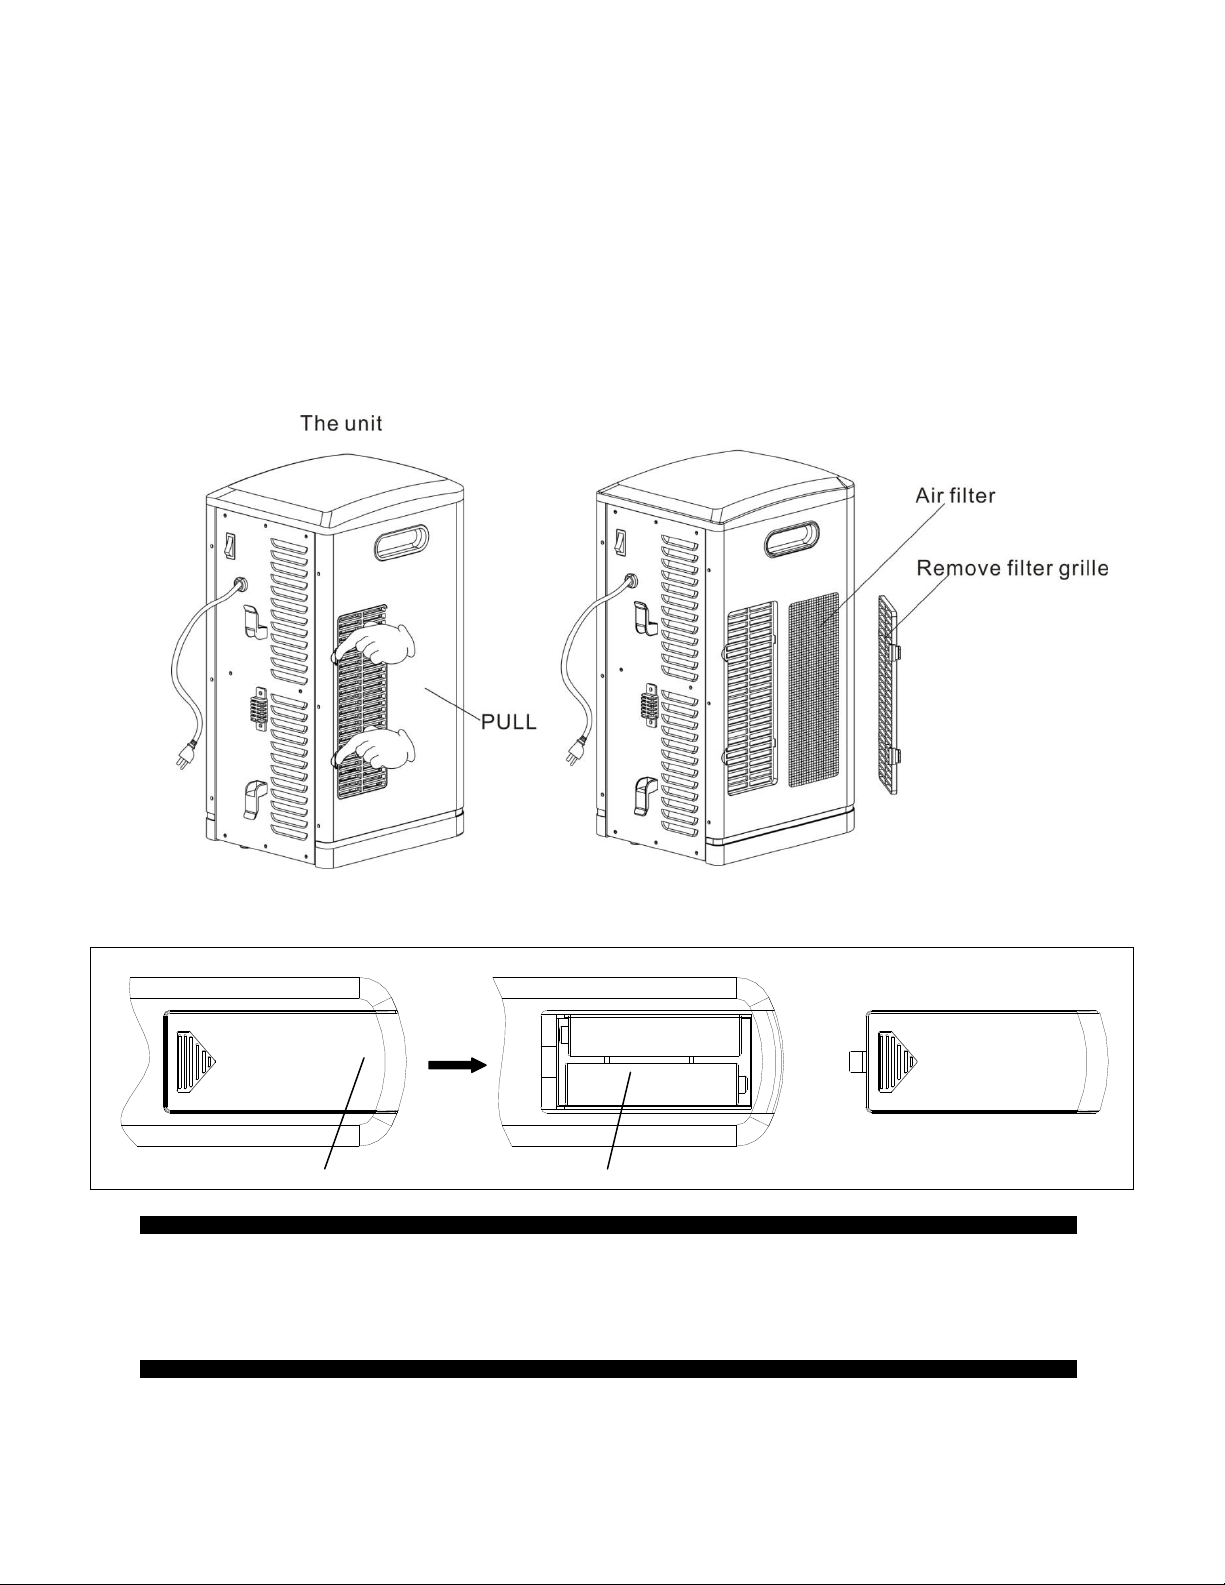
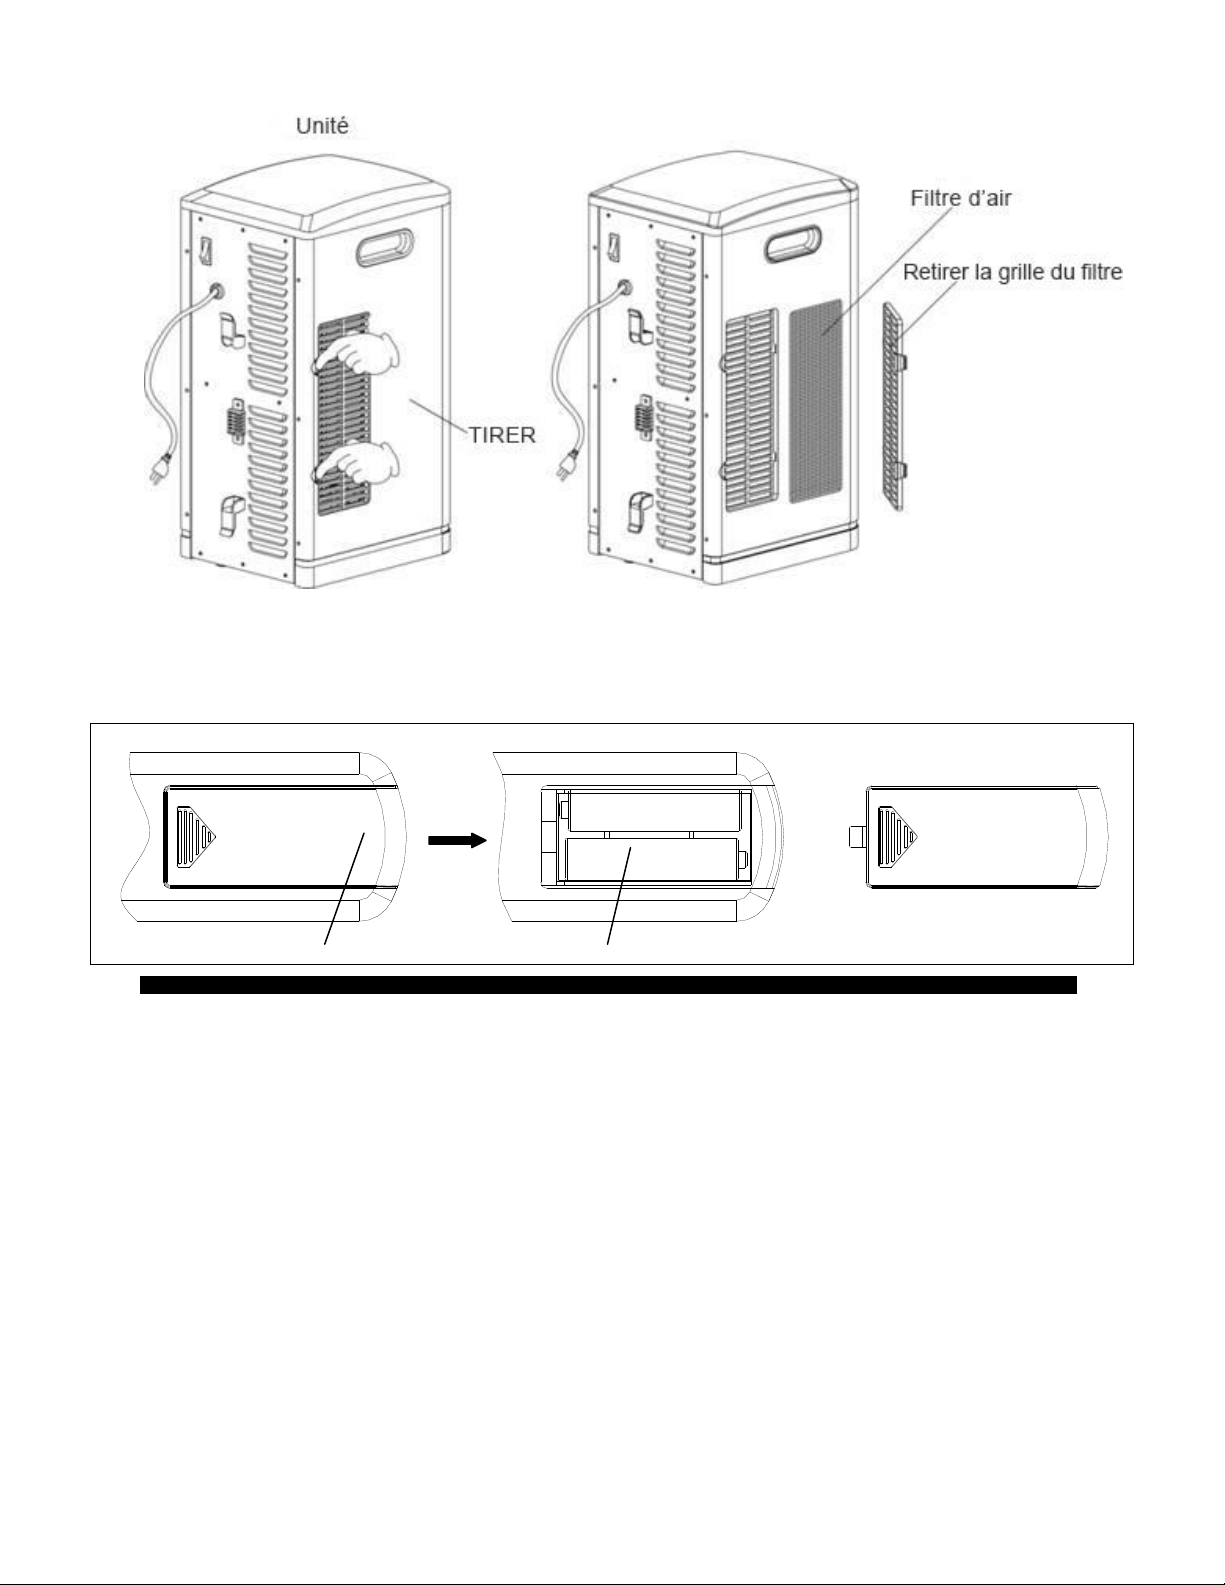
7. Air filter needs cleaning after 3 months of use. Please take off the filter according to the
2 steps in the drawing below. Flush and clean the filter with water, then, dry it out and
re-assemble.
8. If you do not use the heater for a long time, please take out the remote batteries (to
prevent corrosion) as shown below. Store the remote in a safe place.
STORAGE
Store the heater in a cool, dry location when not in use. To prevent dust and dirt build-up, use the
original packaging to repack the unit.
BASIC TROUBLESHOOTING
If the heater will not operate, please check the following before seeking repair advice:
PUSH
lid
Battery

9
1. Check if the power cord is plugged into an electrical outlet, if not, plug in.
2. Check if power to the main power switch (in the back) is working.
3. Check to see if the battery on the remote is placed correctly, undamaged, and if the
insulating film is pulled out.
NOTE: For the heater to function properly, the desired temperature on the heater must be set
a few degrees higher than the temperature in the room. If it seems to not be heating, increase
the desired temperature on the heater to engage the heat elements.
FREQUENTLY ASKED QUESTIONS
My heater emits an “odd” odor when I turn the heater on for the first time. Is this normal?
What is causing this?
Yes, this is normal. This heater is treated with a special heat safe/resistant coating. This odor will
sometimes be present when the box is opened. It is like opening a new gadget for the first time. Also,
similar to all hearth appliances (woodstoves, etc.), the coating, exposed to heat, will produce this
particular odor during the first few hours of operation. This smell will fade away after the break-in
period. If you are sensitive to odors, you may want to pre-burn the unit in a garage with the door
open until the initial odor fades away.
If I don’t have a grounded outlet, can I use adapters, a 2-prong power strip or remove the
ground prong from the cord?
CERTAINLY NOT! If you don’t have a grounded outlet, contact a certified electrician for advice.
Removing or altering any part of the heater’s original design or intent (including the power cord) will
not only void the warranty, but will make you liable for any unexpected or hazardous results.
This heater is 1500 Watts, how many BTU’s is that? Is that a lot of heat?
At 1500 Watts, your heater will use approximately 5100 BTUs. 5100 BTUs, compared to your home
furnace, is a very small amount of heat (this heater is intended to be used as supplemental heat in
areas most needed). It may take several minutes, to several hours to heat your area, depending on
various factors.
Can my heater really operate on less money per day? What are my operating costs?
Yes. If the heater is used as it is intended (as supplemental heat), it should cycle on and off, allowing
for it to heat a total of approximately 8 out of the 24 hours of the day. Using the national average of
approximately 10¢ per kWh (look at your electricity bill for exact cost per kWh), your average
heating cost (add a few cents just for having it plugged in) should be less per day compared to your
main furnace. The costs will increase if it is used as the single source of heat, or if heat somehow
escapes the room being heated, since the “on” cycle will run longer.
The Formula to determine the cost of this or ANY 1500 watt appliance, multiply 1.5 X your cost per
Kilowatt Hour to determine approximately how much it costs you to run the heater. Please contact
your electricity provider to get your cost per Kilowatt Hour.

10
I purchased my heater so that it could cut my heating costs but my electric bill has gone up.
Why?
This compact heater can definitely save you on heating costs, when compared to the existing central
heating system in your home, and when used as supplemental heat. Your heater is designed to give
your main heat source a supplement “boost,” or allow for you to have extra heat (in the form of soft
infrared waves) in locations where you would otherwise be short. It is meant to cycle on and off as it
provides the central heat the boost it needs. If you intend on using it as a single heat source,
especially in larger homes (which you may), expect the heater to 1) take as much as 24 hours to heat
the area, 2) stay on for longer periods of time (without cycling off) due to heat loss, and 3) increased
use time, and electric costs.
Once I plug the unit in and turn it on, how long will it take to heat my room?
The heating process in the heater begins instantly upon powering on, and setting the desired
temperature above the ambient temperature. A noticeable change in the room’s ambient temperature
will vary. Remember that with any type of heating process, there are many variables: where your
heater is located inside the home, floor plan and size of the room, how well the room is insulated,
how many doors/windows, how much bare concrete (acts as a heat sink with any type of heating), the
opening and closing of an exterior door, long hallways, high ceilings, etc. Customers with smaller
rooms experience quicker heat changes. Rooms with larger and open floor plans can expect up to 24
hours to completely heat up.
Why doesn’t the temperature on my heater match the temperature display on my wall, or
external thermostat?
This is completely NORMAL. The temperature display on your heater may vary from the
temperature display on another thermostat (like the one mounted to your wall or a purchased external
thermostat). This is because the temperature sensor on the heater reads the temperature directly
around the heater. With the heater near the cold floor (and heat rising), any readings on elevated or
external thermostats will differ in readings on the heater. THE BEST WAY to operate your heater is
just to set the unit on “High” and dial up to a temperature that feels comfortable to you. Then, leave it
at that temperature, regardless of the mismatch. The heater will cycle off when the set temperature is
met or exceeded slightly.
Can I use more than one heater at a time? Can I use the heater and another appliance at the
same time?
Yes. But make sure they are not plugged into the same circuit. Each heater (heaters are considered
appliances) requires its own minimum 15 amp circuit (with no other items plugged into that circuit or
outlet). If you are unsure if your circuit meets these requirements, verify with a certified electrician.
Risk of fire, damage to property, or injury may result if requirements are not met.
Why does my heater’s fan continue to run after the set temperature is reached or the power is
turned off?
This is NORMAL. The heater’s fan will continue to run, even after the heater automatically cycles
down. The fan continues to run so that every last bit of heat is blown out of the heat chamber, while
allowing the unit to continue filtering your air. Once the internal box/components cool completely,
the fan should then shut off on its own. In this case, allow a few minutes after the heat cycles off
(with power on). The fan will shut off faster when the power is turned off.

11
Why doesn’t the fan speed increase when I change the setting from Low to High?
This is NORMAL. The heater’s fan’s speed is not affected by the High/Low settings. The fan is
designed to vent the heat at one soft, comfortable, and energy efficient speed. What is affected by
the High setting is the heat output. In essence, in the High mode, the heater produces “more” heat,
rather than “faster” heat.
My heater has a temperature setting indicating ECO. It is supposed to be efficient, but it seems
to not heat as much. Why?
The ECO mode on your heater is a program that attempts to keep the temperature strictly at a
“warm” 68° F. This also helps with efficiency, as it is programmed to 1) Increase the wattage used to
1500W if the temperature drops below 64.4°F 2) Gradually reduce the wattage used as it approaches
66.2° F and 3) Stop heating when 68° F is achieved. This is considered an Economical function,
since in the ECO setting, the heater is almost never running on the full 1500 Watts. If this “warm”
heat is not plentiful or is “On” constantly, and you fear it will increase your electric bills, we
recommend you set it to the High or Low setting and have it cycle off when your set temperature is
achieved. You may also set the timer to allow your heater to shut off at the given hour increments
you desire. See User’s Guide to set the timer.
My Heater’s Power cord gets warm. My cord is showing signs of heat or melting at the outlet.
Is this normal?
A warm power cord is normal. All our power cords are rated safe for up to 105° C/ 221° F by the UL,
CSA, or ETL. The exception is, if you detect heat, smoke, or signs of melting at the contact point of
the wall outlet, it may be due to loose or worn wall contacts (or arcing). Please stop using the heater
immediately and contact a certified electrician to replace the wall outlet as soon as possible.
My home is not insulated very well. Can I use the heater if I have vaulted or cathedral ceilings?
I live in a structure that is larger than 1000 square feet. Will this heater help me? Can I use the
heater to heat multiple rooms at the same time? Will I be able to use the heater in a basement
or garage?
The answer to these is the same. YES. You will be able to use it, but keep in mind that
rooms/structures with open floor plans, minimal insulation, adjacent rooms, or high ceilings will not
retain the heat as efficiently and noticeable heat changes will come slowly. Also, the heater will stay
on for longer periods of time (since it takes so long to cycle off), and may increase your electric
costs. Note that if you do use it in a garage or basement, the moisture levels must be very low and the
heater must have a dedicated circuit (15 amps minimum) with no GFCI outlets being used. If unsure
what a GFCI outlet is, contact a certified electrician.

12
CHAUFFERETTE À INFRAROUGE
GUIDE DE L’UTILISATEUR
No. modèle : GD8115BP-L
VEUILLEZ CONSERVER CES INSTRUCTIONS
AVERTISSEMENT: LISEZ ATTENTIVEMENT CE GUIDE
AVANT D’UTILISER LA CHAUFFERETTE.

13
Ce guide d’utilisation vous fournira toutes les informations nécessaires pour installer
correctement et prendre soin de votre appareil. Veuillez prendre quelques minutes pour lire ces
instructions et vous familiariser avec les fonctions de votre nouvelle chaufferette.
INSTRUCTIONS IMPORTANTES
Lors de l’utilisation de tout appareil électrique, des mesures de sécurité de base doivent être
suivies pour réduire le risque d’incendie, de choc électrique, et de blessures corporelles, incluant
ce qui suit :
1. Lire toutes les instructions avant d’utiliser la chaufferette.
2. ATTENTION : risque de choc électrique. N’OUVREZ PAS la chaufferette et ne tentez
pas de la réparer vous-même.
3. Cet appareil est chaud lorsqu'il est en marche. Pour éviter des brûlures, ne pas laisser la
peau toucher aux surfaces chaudes. Utiliser la poignée (selon le modèle) pour le
déplacer.
4. Garder les matériaux inflammables, tels que meubles, oreillers, literie, papier, vêtements
et rideaux au moins 3 pieds (0,9 m) du devant, du haut, des côtés et de l'arrière de
l'appareil. NE PLACEZ PAS de serviettes ou d’autres objets sur l’appareil.
5. Ne laissez pas la chaufferette en marche sans surveillance. Une prudence et une
surveillance adéquates sont nécessaires si la chaufferette est utilisée par ou près des
enfants ou des invalides ou lorsqu'elle est utilisée sans surveillance.
6. Ne pas utiliser l'appareil si le cordon ou la fiche est endommagé, s’il ne fonctionne pas
convenablement ou s’il a été échappé ou endommagé de quelque façon que ce soit. Le
cas échéant, contacter le fabricant pour faire corriger le problème.
7. Ne pas utiliser cet appareil dans les salles de bain, buanderies et endroits humides. Ne
jamais placer l'appareil à un endroit où il pourrait tomber dans une baignoire ou autre
contenant d’eau. N’immergez JAMAIS l’appareil dans l’eau ou d’autres liquides pour
réduire le risque de choc électrique.
8. NE PAS TOUCHER au panneau de commandes ou à la fiche électrique avec les mains
mouillées.
9. Ne pas faire passer le cordon sous le tapis. Ne pas couvrir avec des carpettes, tapis de
passage ou articles semblables. Éloigner le cordon des endroits passants où les gens
pourraient trébucher sur le cordon.
10. Ne pas insérer ou laisser des objets étrangers pénétrer dans les ouvertures de ventilation
ou d’échappement car ceci pourrait causer un choc électrique, un incendie ou des
dommages à l’appareil.
11. Pour prévenir toute possibilité d’incendie, ne pas bloquer les entrées d’air ou ouvertures
d’échappement de quelque manière que ce soit.
12. Des pièces chaudes projetant des étincelles se trouvent à l’intérieur de la chaufferette. Ne
pas l’utiliser dans des endroits où de l’essence, de la peinture ou des liquides
inflammables sont utilisés ou entreposés. Garder l’appareil éloigné des surfaces chaudes
et des flammes nues.
14
13. Toujours brancher l’appareil directement dans une prise murale. ne jamais utiliser de
rallonge électrique ou de barre d’alimentation multiprises.
14. Pour éviter le risque d’incendie ou de choc électrique, brancher l’appareil directement
dans une prise murale de 120 V c.a.
15. Pour arrêter l’appareil, placez toutes les commandes à ARRÊT puis débrancher la fiche
de la prise. Tirer la fiche tout droit hors de la prise de courant. Ne pas débrancher
l’appareil en tirant sur le cordon.
16. Toujours débrancher l’appareil avant de le déplacer ou de le nettoyer, ou si l’appareil
n’est pas utilisé.
17. Utiliser l’appareil seulement dans un contexte domestique normal, selon les conditions
décrites dans ce guide. Tout usage non recommandé peut entraîner un risque d’incendie,
de choc électrique ou de blessures personnelles. L’utilisation d’accessoires non
recommandés ou non vendus par le fabricant peut entraîner des risques.
18. Placer toujours l’appareil sur une surface sèche et de niveau. Placer sur le sol seulement.
19. NE PAS utiliser à l’extérieur.
20. AVERTISSEMENT : Pour réduire le risque de choc électrique ou d’incendie, NE PAS
UTILISER cet appareil avec un dispositif de contrôle de vitesse à semi-conducteurs.
21. NE PAS TENTER de réparer ou d’ajuster les composantes électriques ou mécaniques de
cet appareil. Le faire annulerait la garantie. L’appareil ne contient aucune pièce
réparable par l’utilisateur à l’intérieur. Seul du personnel de service qualifié devrait
effectuer des réparations
22. Brancher la chaufferette à une prise murale avec mise à la terre seulement.
23. CONSERVER CES INSTRUCTIONS.
CARACTÉRISTIQUES TECHNIQUES
Tension nominale
120 V (60 Hz)
Consommation
électrique
1500 W
Dimensions de
l’appareil
8,6 po (larg) x 11,5 po (prof) x 18,2 po (haut)
Poids de l’appareil
14,55 lb
CARACTÉRISTIQUES DE SÉCURITÉ
Dispositif de sécurité antibasculement
Cette chaufferette est dotée d’un dispositif de sécurité en cas de basculement. Si la chaufferette
bascule, un commutateur interne arrête automatiquement l’appareil. Une fois que l’appareil est
remis en position verticale, il se remettra en mode de veille. Pour le remettre en marche, utilisez
l’interrupteur sur la télécommande ou le bouton sur le panneau de commandes de la chaufferette.
15
Protection contre la surchauffe
Cette chaufferette est aussi dotée d’un dispositif de sécurité contre la surchauffe. Si les
composantes internes de l’appareil atteignent une température trop élevée (ce qui pourrait
entraîner un incendie), l’appareil s’arrêtera automatiquement.
AVERTISSEMENT: Il est normal pour le cordon et la fiche de dégager un peu de chaleur au
toucher. Cependant, si la fiche n’est pas insérée dans la prise, cette dernière peut surchauffer. Sio
cela se produit, essayez de brancher l’appareil à une autre prise. Contactez un électricien pour
faire réparer la prise endommagée.
CONTENU DE LA BOÎTE
·CHAUFFERETTE À INFRAROUGE
·TÉLÉCOMMANDE (Requiert 2 piles AAA, non comprises)
·GUIDED DE L’UTILISATEUR
DIAGRAMME
Télécommande
Panneau
avant
Sortie d’air
Pieds
Entrée d’air
Serre-câble
Panneau de
commandes
Interrupteur
Poignée
16
1、Affichage numérique: Indique la température ambiante ou la valeur de temps (minuterie).
2、Voyant de chauffage élevé: le voyant s’allume quand l’appareil est en mode élevé de
chauffage.
3、Voyant de chauffage faible: le voyant s’allume quand l’appareil est en mode faible de
chauffage.
4、Indicateur d’alimentation: indique que l’appareil est branché à une source d’alimentation
électrique.
5、Mode d’économie d’énergie : le voyant s’allume lorsque l’appareil est en mode d’économie
d’énergie.
6、Bouton marche/arrêt (ON/OFF) ; pour mettre l’appareil en marche ou en arrêt.
7、Bouton de mode: pour sélectionner le mode de fonctionnement.
8、Bouton « haut » : pour augmenter le réglage de température.
9、Bouton « bas » : pour diminuer le réglage de température.
10 、Bouton ℃/℉: pour alterner de température Fahrenheit à Celsius.
11、Bouton de minuterie: pour régler la durée de fonctionnement de la minuterie.
12、Voyant indiquant la température en Fahrenheit
13、Voyant de minuterie: le voyant est allumé lorsque la minuterie est activée.
14、Récepteur du signal de la télécommande.
15、Voyant indiquant la température en Celsius
Panneau de commandes
17
PRÉPARATION
Placez la chaufferette sur une surface ferme et droite. Branchez-la dans une prise murale de 120
V, 60 Hz avec mise à la terre. Appuyez sur l’interrupteur principal, situé à l’arrière de l’appareil.
Insérez 2 piles AAA dans la télécommande avant l’utilisation (piles non comprises).
DIRECTIVES DE FONCTIONNEMENT
1、Démarrage et choix du mode de fonctionnement
Or
Mettez l’appareil en marche en appuyant sur le bouton
ON/OFF sur le panneau de commandes, ou le bouton
ON/OFF sur la télécommande.
Arrêtez l’appareil en appuyant sur le bouton ON/OFF sur
le panneau de commandes, ou le bouton ON/OFF sur la
télécommande.
Note : en arrêtant l’appareil, seule la production de chaleur
s’arrêtera. Le ventilateur continuera de souffler durant
environ 3 minutes dd plus, pour permettre aux
composantes internes de refroidir. Par la suite, le
ventilateur s’arrêtera automatiquement.
Or
Choisissez un mode de chauffage.
Appuyez sur le bouton MODE pour choisir parmi les trois
modes de chauffage.
Le mode “high” est à 1500 W; le mode “Low” est à 1000
W. Le mode ECO permet d’économiser l’énergie. Lorsque
le mode ECO est choisi, l’appareil réglera la température à
68℉(20℃) automatiquement.
Télécommande
Bouton « Mode »: pour choisir le mode de fonctionnement
Bouton « ON/OFF »: pour mettre en marche et arrêter l’appareil
Bouton « Temp up » : pour augmenter le réglage de température.
Bouton « Temp down » : pour diminuer le réglage de température.
Bouton « Timer » : pour régler la durée de fonctionnement de la minuterie
Bouton ℃/℉: pour alterner de température Fahrenheit à Celsius

18
2、Réglage de la température désirée
Or Or
Or
Ajustez le niveau de température désiré en appuyant sur les
boutons Haut/Bas sur le panneau de commandes ou la
télécommande.
Or
La température peut être réglée entre 59℉et 86℉, ou de 15℃à
30℃. Une fois la température réglée, la chaufferette
fonctionnera jusqu’à ce que la température ambiante
corresponde à celle indiquée à l’écran de l’appareil. L’appareil
se mettra alors en marche/arrêt périodiquement afin de
maintenir cette température.
Or
Appuyez sur le bouton ℃/℉pour afficher la température en
Fahrenheit ou en Celsius.
Le voyant à DEL Fahrenheit s’allume lorsque la température
est affichée en Fahrenheit.
Le voyant à DEL Celsius s’allume lorsque la température est
affichée en Celsius.
3、Réglage de la fonction d’arrêt par minuterie
Note : la fonction Arrêt par minuterie permet d’arrêter l’appareil automatiquement à
une période déterminée. Cette fonction ne peut être activée que lorsque l’appareil est en
marche.
Or
Mettez l’appareil en marche en appuyant sur le bouton
“On”. Appuyez sur le bouton de minuterie sur le panneau
de commande ou la télécommande.
L’écran numérique passera de la “température” à la
fonction de minuterie. Appuyez sur le bouton de la
minuterie jusqu’à ce que le nombre d’heures désiré avant
l’arrêt automatique soit obtenu. La minuterie peut être
réglée de 0 à 12 heures, en intervalles d’une heure.
Le nombre d’heures sélectionné clignotera durant quelques
secondes, puis l’affichage numérique retournera à la
température réglée. Le voyant de minuterie demeure
allumé tant que la minuterie est réglée. Lorsque la période
de temps réglée sur la minuterie est écoulée, l’appareil
s’arrête automatiquement.
19
4、Réglage de la fonction de mise en marche par minuterie
Note : la fonction Mise en marche par minuterie permet de mettre l’appareil en marche
automatiquement à une période déterminée. Cette fonction ne peut être activée que lorsque
l’appareil est en arrêt.
Or
Arrêtez l’appareil en appuyant sur le bouton “OFF”.
Appuyez sur le bouton de minuterie sur le panneau de
commande ou la télécommande.
L’écran numérique affichera la fonction de minuterie.
Appuyez sur le bouton de la minuterie jusqu’à ce que le
nombre d’heures désiré avant la mise en marche
automatique soit obtenu. La minuterie peut être réglée de
0 à 12 heures, en intervalles d’une heure.
Le voyant de minuterie demeure allumé tant que la
minuterie est réglée. Lorsque la période de temps réglée
sur la minuterie est écoulée, l’appareil se met en marche
automatiquement.
5、Réglage du verrouillage électronique
La fonction de verrouillage électronique permet de prévenir l’utilisation accidentelle par les
enfants. Cette fonction peut être activée que l’appareil soit en marche ou non.
And
Appuyez sur les boutons Haut et Bas en même temps
durant 3 secondes. Le verrouillage est confirmé par un bip
sonore. L’appareil et la télécommande sont alors verrouillés
et ne peuvent être activés.
And
Pour déverrouiller l’appareil, appuyez sur les boutons Haut
et Bas en même temps durant 3 secondes. Le déverrouillage
est confirmé par un bip sonore. L’appareil et la
télécommande peuvent alors être utilisés.
ENTRETIEN
1. Arrêtez l’appareil à l’aide de l’interrupteur principal, situé à l’arrière de l’appareil.
2. Débranchez l’appareil et laissez-le refroidir complètement.
3. Le boîtier externe de la chaufferette peut être nettoyé à l’aide d’un linge doux et
légèrement humide et d’un détergent doux. Séchez l’appareil à fond avec un linge doux
après le nettoyage. ATTENTION : NE LAISSEZ PAS de liquide couler dans l’appareil.
4. N’UTILISEZ PAS d’alcool, d’essence, d’abrasifs en poudre, de poli à meubles ou de
brosses à récurer pour nettoyer l’appareil. Ces produits abîmeraient les surfaces de
l’appareil et pourraient l’endommager.
5. N’IMMERGEZ PAS la chaufferette dans l’eau.
6. Attendez que l’appareil soit complètement sec avant de le réutiliser.
7. Nettoyez le filtre à air après 3 mois d’utilisation. Retirez le filtre selon les étapes
indiquées ci-dessous. Rincez le filtre à l’eau courante; puis, laissez-le sécher à fond et
remettez-le en place.
20
8. Si l’appareil ne sera pas utilisé durant une longue période, retirez les piles de la
télécommande (pour prévenir la corrosion) tel qu’illustré ci-dessous. Rangez la
télécommande dans un endroit sûr.
ENTREPOSAGE
Entreposez la chaufferette dans un endroit frais et sec lorsqu’elle n’est pas utilisée. Pour
empêcher l’accumulation de poussière et de saleté, il est recommandé de ranger l’appareil dans
sa boîte d’origine.
DÉPANNAGE DE BASE
Si la chaufferette ne fonctionne pas, vérifiez les points suivants avant de faire une demande de
service:
1. Vérifiez que le cordon électrique est bien branché dans une prise électrique. Branchez-le si ce
n’est pas le cas.
2. Vérifiez que l’interrupteur principal (à l’arrière) est bien en position de fonctionnement.
3. Vérifiez que la pile dans la télécommande n’est pas épuisée, et que la pellicule protectrice a
bien été enlevée.
NOTE : La chaufferette ne fonctionnera pas si la température ambiante est plus élevée que la
température réglée au thermostat. Pour faire fonctionner la chaufferette, augmentez le réglage du
thermostat à l’aide du panneau de commande ou de la télécommande.
POUSSER
Couvercle
Pile
Table of contents
Languages:
Other ProFusion Heating System manuals


Popular Heating System manuals by other brands


Marley
Marley MEnV 180 Operating & assembly instructions

Lincar
Lincar Monella 185 Using instructions and maintenance

AERMEC
AERMEC RePuro Series Usage manual

aerauliqa
aerauliqa QR280M Use and maintenance manual

AERMEC
AERMEC URX CF Selection and Installation Manual

International Thermal Research
International Thermal Research OASIS Chinook Installation and operating manual


