progeo AIR Phusio User manual
SELKÄTUET
IT - EN - FI - rev. 0 –2021/05
Manuale d’uso – User’s manual – Käyttöohje
PHYSIO 2
Proprietà ignifughe
Questo prodotto è stato collaudato in conformità alla norma
EN12183.
È inoltre conforme alla 7176-16:2012 - Resistenza all'accensione
dei dispositivi di supporto posturale, che prevede il test ISO 8191-
2:1988 di Valutazione dell'infiammabilità dei mobili imbottiti - Parte
2: Fonte di accensione: equivalente alla fiamma di un fiammifero
Fireproof property
This product has been tested in compliance with the rule EN12183.
It also complies with:
7176-16:2012 -> Resistance to ignition of postural support devices
ISO 8191-2:1988 -> Assessment of ignitability of upholstered
furniture —Part 2: Ignition source: match-flame equivalent.
Paloturvallisuus
Tämä tuote on testattu EN12183-säännön mukaisesti.
Se täyttää myös seuraavat vaatimukset:
7176-16: 2012 -> Asentoa tukevien laitteiden syttymiskestävyys
ISO 8191-2: 1988 -> Pehmustettujen huonekalujen syttyvyyden
arviointi - Osa 2: Syttymislähde: vastaa tulitikun liekkiä
.
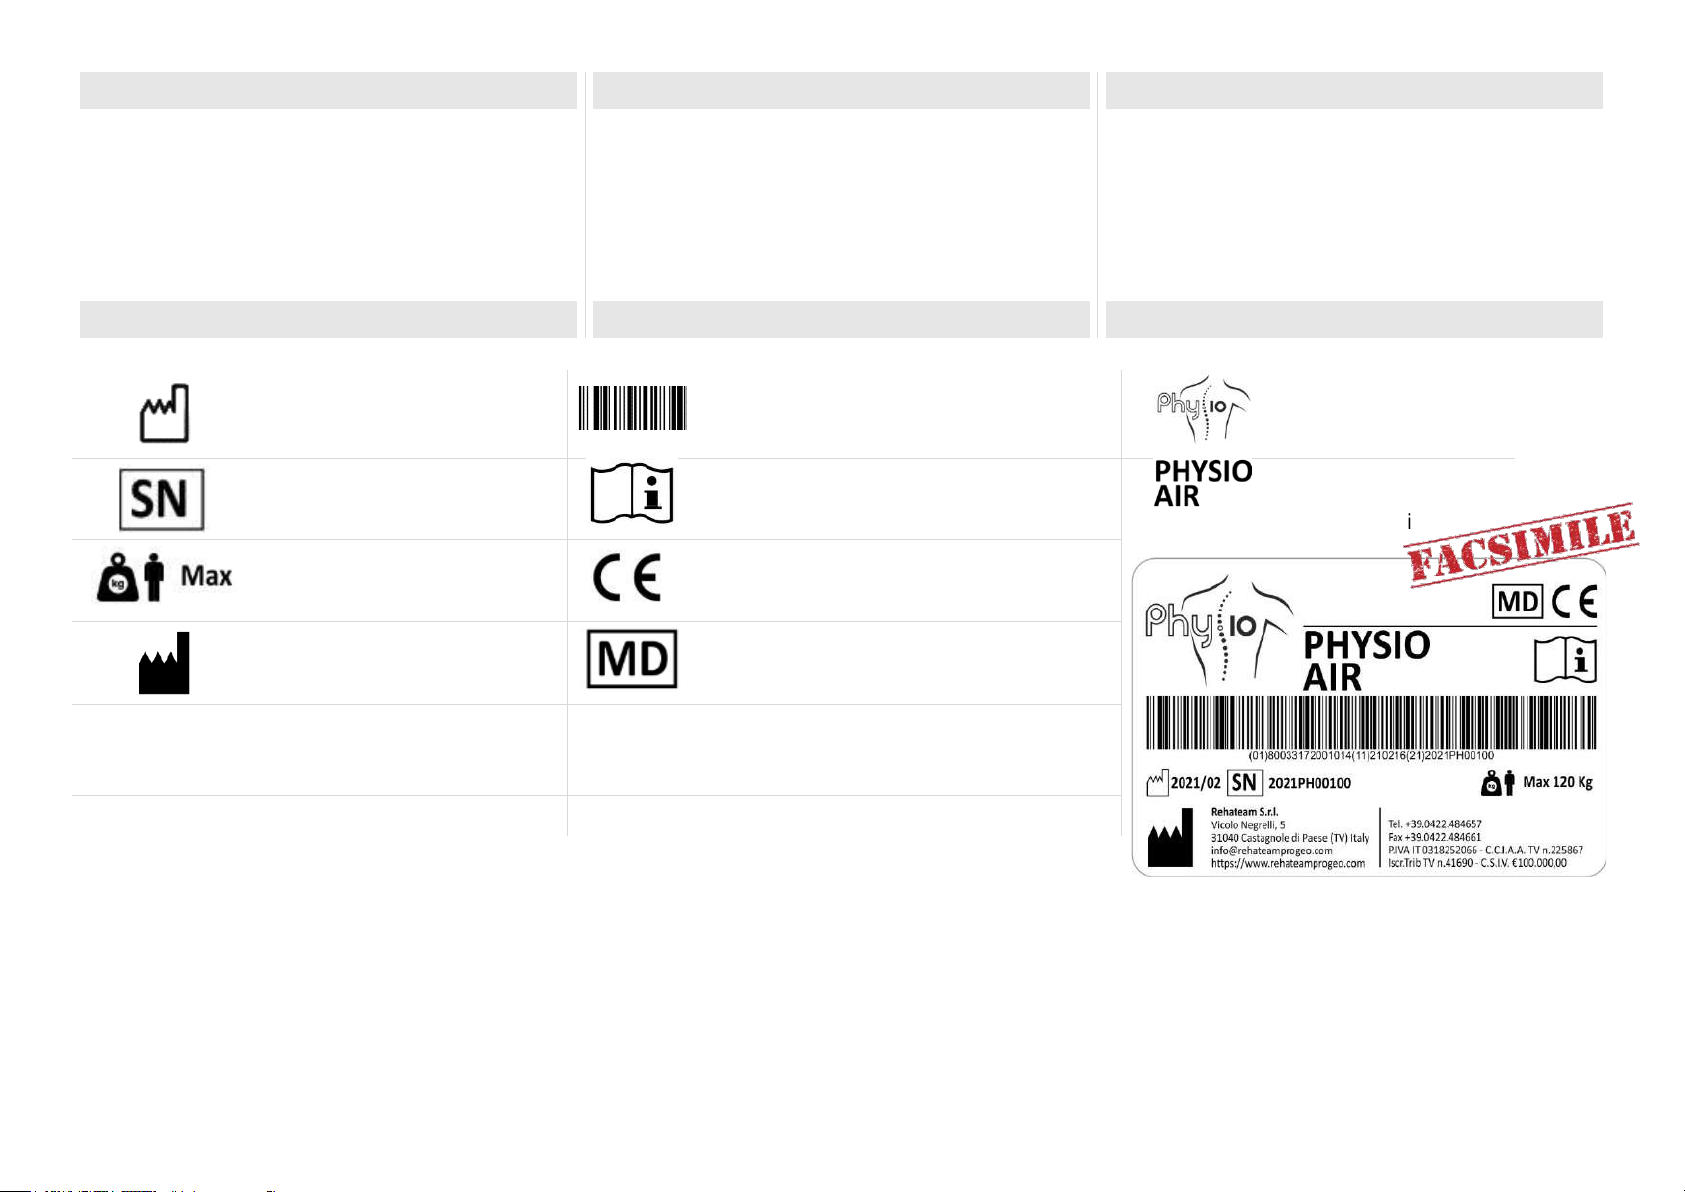
Etichetta prodotto
Product label
Tuotekilpi
Anno/mese di fabbricazione
Year/month of production
Valmistus vuosi/kuukausi
Codice UDI (Unique Device Identification)
UDI code (Unique Device Identification)
UDI koodi (Yksilöllinen laitetunnus)
Physio Logo
Numero di serie
Serial number
Sarjanumero
Leggere il manuale d’uso
Read the user’s manual
Lue käyttöohje
Nome del prodotto
Product name
Tuotteen nimi
Portata massima
Mamimum load
Maksimi kuormitus
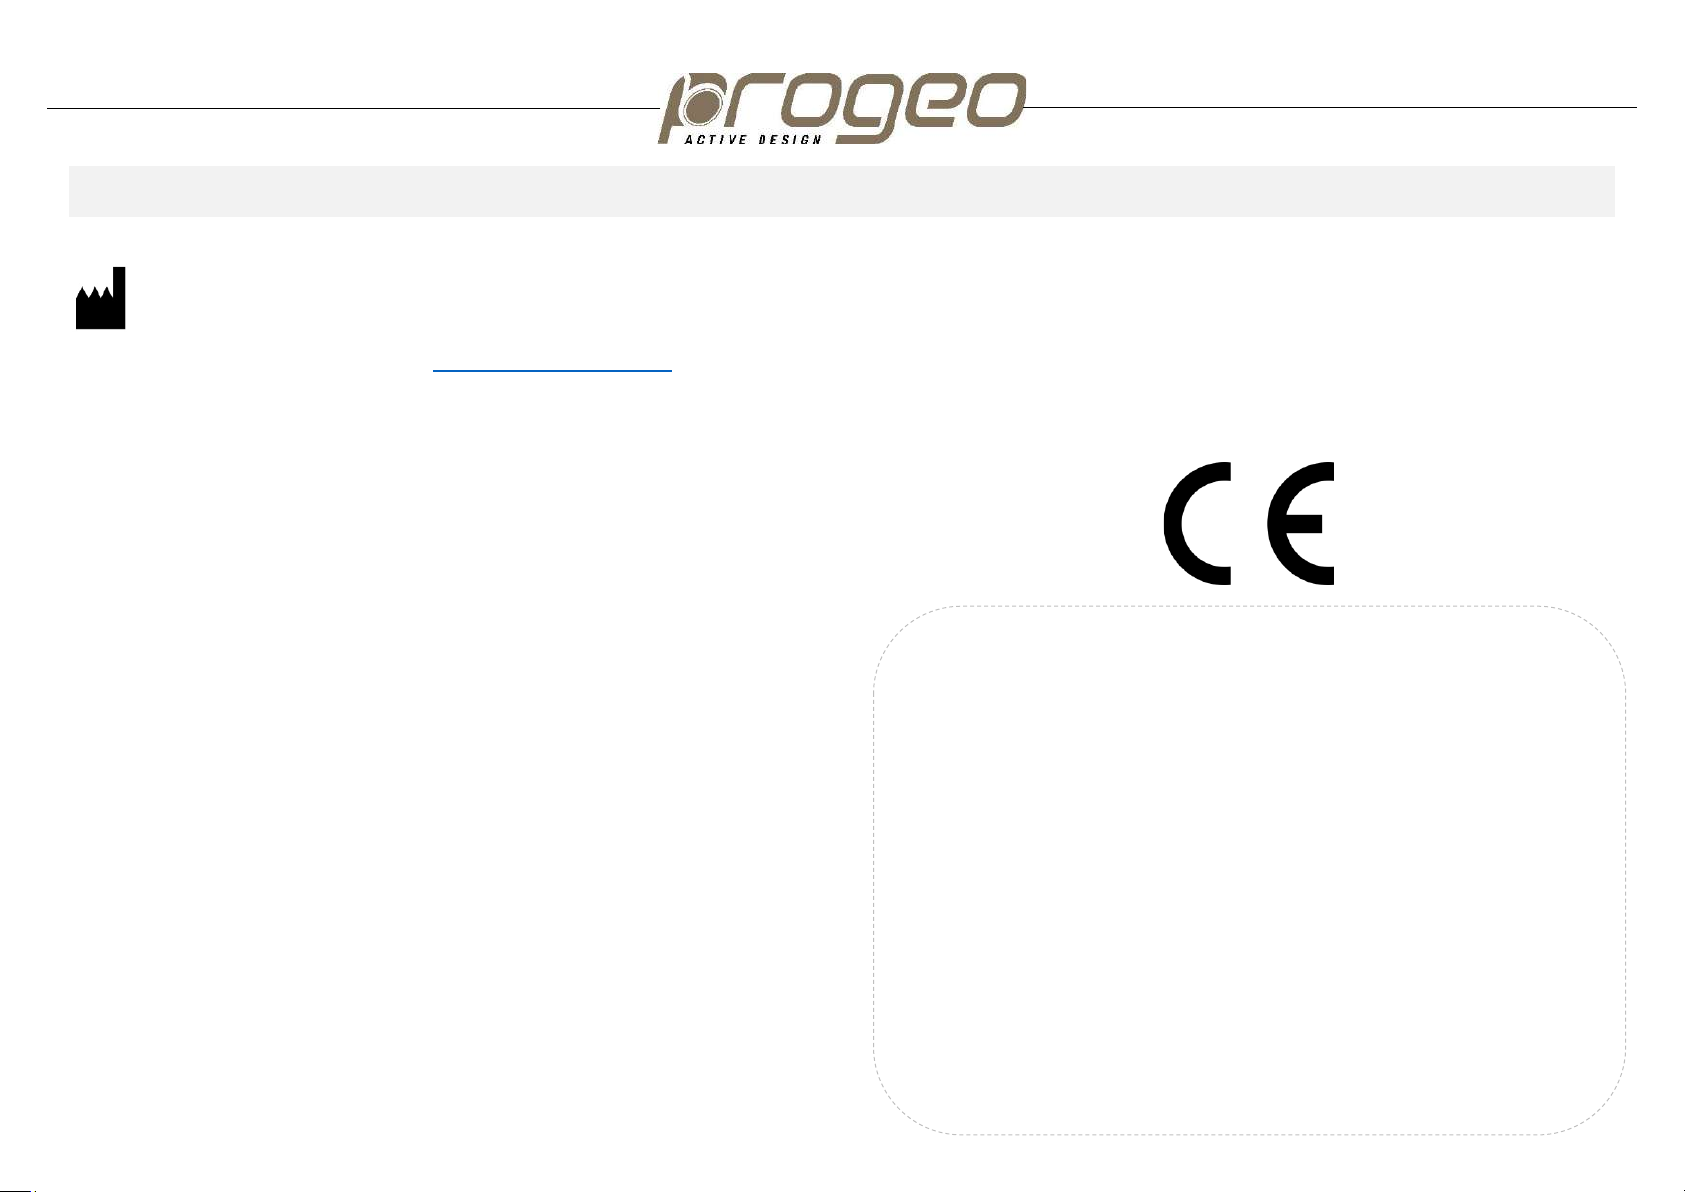
Marchio CE
CE mark
CE merkintä
Dati del fabbricante
Manufacturer data
Valmistajan tiedot
Marchio MD (Medical Device)
MD mark(Medical Device)
MD merkintä (Lääkinnällinen laite)
PHYSIO 3
n.
Indice
Contents
Sisällys
Proprietà ignifughe
Fireproof property
Paloturvallisuus
2
Etichetta prodotto
Product label
Tuotekilpi
2
1
Introduzione
Introduction
Johdanto
4
2
Simbologia
Symbols
Symbolit
4
3
Sicurezza
Safety
Turvallisuus
5
4
Descrizione delle parti
Description of parts
Osien kuvaus
7
5
Imbottitura schienale
Backrest upholstery
Selkätuen verhoilu
8
6
Montaggio / smontaggio schienale
Mounting / removing the backrest
Selkätuen kiinnitys / irrotus
10
7
Accessori
Accessories
Lisävarusteet
12
8
Installazione e regolazioni
Installation and adjustments
Asennus ja säätäminen
14
9
Manutenzione e pulizia
Maintenance and cleaning
Huolto ja puhdistus
15
10
Disinfezione e riuso
Disinfection and reuse
Desinfiointi ja uudelleenkäyttö
16
11
Stoccaggio prolungato
Storage
Varastointi
17
12
Smaltimento/riciclo dei materiali
Disposal/recycling of materials
Materiaalien hävittäminen / kierrätys
17
13
Dati tecnici
Technical data
Tekniset tiedot
18
14
Garanzia
Warranty
Takuu
19
PHYSIO 4
1 Introduzione
Lo schienale PHYSIO è stato progettato e sviluppato per
offrire un idoneo supporto alla schiena per un’ampia casistica
di utenti in carrozzina.
Ciò è reso possibile anche grazie ad una vasta scelta tra
modelli, misure e forme associate a leggerezza, confort e
funzionalità.
L’individuazione corretta dello schienale permette
all’utilizzatore di avere una maggiore mobilità e tolleranza alla
posizione seduta.
La Rehateam s.r.l. consiglia di rivolgersi ad un medico, un
terapista o a tecnico della riabilitazione esperto in sistemi di
postura per determinare l’idoneità all’uso dello schienale
PHYSIO.
Lo schienale PHYSIO, in virtù del tipo di aggancio utilizzato, si
adatta perfettamente alla maggior parte delle carrozzine,
siano esse pieghevoli o rigide.
PER IL RIVENDITORE: Il presente manuale DEVE essere
consegnato all’utilizzatore di questa carrozzina.
PER L’UTILIZZATORE e/o PER L’ACCOMPAGNATORE:
leggere questo manuale nella sua interezza e conservarlo
come possibile riferimento futuro.
Questo documento è presente anche in formato PDF per gli
ipovedenti sul sito www.rehateamprogeo.com
2 Simbologia
Indica una situazione potenziale di pericolo, che, se non
viene evitata, può produrre lesioni non gravi alla persona
o danni alla proprietà.
Indica un’azione vietata
Indica istruzioni importanti o informazioni particolari.
1 Introduction
The PHYSIO backrest is designed and developed to provide a
suitable support for a wide variety of wheelchair users.
That is possible thanks to a wide choice among models, sizes
and shapes combined to light weight, comfort, and
functionality.
Choosing the correct backrest helps the user to maximize
function and increase the sitting tolerance.
Rehateam s.r.l. recommends that a clinician such as a doctor
or therapist experienced in seating and positioning be
consulted to determine if a PHYSIO backrest is appropriate.
The PHYSIO backrest, by virtue of its hardware, perfectly
adapts itself to most folding or rigid wheelchairs.
FOR THE DEALER: this manual MUST be handed to the
user of this wheelchair.
FOR THE USER and/or FOR THE ATTENDANT: read this
manual in all its parts and keep it for possible future
reference.
For visually impaired people, this document is also available
in PDF format on our web site www.rehateamprogeo.com.
2 Symbols
It indicates a potentially hazardous situation, which, if not
avoided, may cause minor personal injuries or property
damage.
It indicates a prohibited action.
It indicates important instructions or special information.
1 Johdanto
PHYSIO -selkänoja on suunniteltu ja kehitetty tarjoamaan
sopiva tuki monenlaisille pyörätuolin käyttäjille.
Tämän mahdollistaa laaja valikoima eri malleja, kokoja ja
muotoja yhdistettynä keveyteen, mukavuuteen ja
toimivuuteen.
Oikean selkänojan valitseminen auttaa käyttäjää
maksimoimaan toiminnot ja lisäämään istumismukavuutta.
Rehateam s.r.l. suosittelee neuvottelemista terveydenhuollon
asiantuntijan, kuten lääkärin tai terapeutin kanssa, jolla on
kokemusta istumisesta ja hyvän istuma-asennon tukemisesta,
selvittääkseen, onko PHYSIO –selkätuki sopiva käyttöön.
PHYSIO -selkänoja soveltuu kiinnitystapansa ansiosta
täydellisesti useimpiin ristikko- tai kiinteärunkoisiin
pyörätuoleihin.
MYYJÄLLE: tämä opas on annettava tämän selkätuen
käyttäjälle.
KÄYTTÄJÄLLE ja/tai AVUSTAJALLE: lue tämä opas ja sen
kaikki osat ja säilytä se myöhempää tarvetta varten.
Näkövammaisille tämä asiakirja on saatavana myös PDF -
muodossa verkkosivustollamme www.rehateamprogeo.com.
2Symbolit
Osoittaa mahdollisen vaarallisen tilanteen, joka, ellei
sitä vältetä, voi aiheuttaa lieviä henkilövahinkoja tai
omaisuusvahinkoja.
Kielletty toiminta.
Tärkeä ohje tai eritysitieto.
PHYSIO 5
3 Sicurezza
L’istallazione e la regolazione degli schienali Physio
deve essere eseguita solamente da personale
qualificato ed autorizzato da Rehateam s.r.l.
La regolazione dello schienale può determinare un
cambiamento del punto di equilibrio della carrozzina
ed è opportuno verificarne la stabilità e, se
necessario, applicare un dispositivo antiribaltamento.
Portata massima 120 kg.
Controllare molto frequentemente le condizioni della
pelle dopo l’installazione di un nuovo sistema
posturale ed eventualmente consultare il proprio
medico o terapista.
Se il posizionamento dello schienale non
corrisponde alle esigenze personali, a seconda del
caso, consultare il proprio medico, terapista o il
fornitore del dispositivo.
PERICOLO DI USTIONI! I componenti della
carrozzina possono riscaldarsi se sono esposti a
forti radiazioni solari.
Non utilizzare lo schienale, i pad di contenimento e
le spinte laterali swing-away, a contatto diretto con
la cute; si consiglia che l’utilizzatore indossi
indumenti con il fine di evitare possibili allergie e/o
irritazioni della cute.
Non utilizzare lo schienale se non fosse ben fissato
nella posizione di utilizzo altrimenti potrebbero
derivarne lesioni o danni. Se non fosse ben fissato,
consultare il fornitore del dispositivo.
3 Safety
Physio backrests have to be assembled and adjusted
only by personnel who is qualified and authorized by
Rehateam s.r.l.
Installing a back support on a wheelchair may affect
the centre of gravity of the wheelchair. It is suggested
to check its stability and, if necessary, install an anti-
tip device.
Maximum load 120 kg
Check your skin conditions very frequently after the
installation of a new postural system and possibly
consult your doctor or therapist.
If the backrest positioning does not correspond to
personal needs, as appropriate, consult your doctor,
therapist, or device supplier.
BURN HAZARD! The components of the wheelchair
may heat up if they are exposed to strong solar
radiation.
Do not use the backrest, side support pads and
swing-away laterals, in direct contact with the skin; it
is recommended that the user wears clothing with
the aim of avoiding possible allergies and/or
irritations of the skin.
Do not use the backrest if this is not well fixed in the
position of use, in fact, that may lead to damage or
injury. If the backrest is not well fixed, consult device
supplier.
3 Turvallisuus
Physio -selkänojat saa koota ja säätää vain
Rehateam s.r.l. -yhtiön pätevä ja valtuuttama
henkilöstö.
Selkänojan asentaminen pyörätuoliin voi vaikuttaa
pyörätuolin painopisteeseen. On suositeltavaa
tarkistaa sen vakaus ja tarvittaessa asentaa
kaatumiseste.
Maksimikuormitus 120 kg.
Tarkista ihosi kunto usein uuden selkätuen
asentamisen jälkeen ja ota tarvittaessa yhteyttä
terveydenhuollon ammattilaiseen.
Jos selkänojan asento ei vastaa henkilökohtaisia
tarpeita, ota tarvittaessa yhteys terveydenhuollon
ammattilaiseen tai tuotteen toimittajaan.
.
PALOVAARA! Selkätuen osat voivat kuumentua, jos
ne altistuvat voimakkaalle auringon säteilylle
Älä käytä selkänojaa, sivutukityynyjä ja kääntyviä
vartalotukia suorassa ihokontaktissa; käyttäjän on
suositeltavaa käyttää vaatteita, jotta vältetään
mahdolliset allergiat ja/tai ihon ärsytykset
Älä käytä selkänojaa, jos se ei ole kunnolla
kiinnitetty käyttöasentoon, sillä se voi aiheuttaa
vaurioita tai vammoja. Jos selkänoja ei ole kunnolla
kiinnitetty, ota yhteys laitteen toimittajaan.
Älä koskaan käytä selkänojaa pyörätuolin
työntämiseen tai nostamiseen. Virheellinen käyttö
voi vahingoittaa selkänojaa ja vahingoittaa
PHYSIO 6
Non utilizzare lo schienale come punto di presa per
sollevare o spingere la carrozzina, un utilizzo
improprio potrebbe causare danni allo schienale ed
anche al paziente.
Le istruzioni presenti in questo manuale si riferiscono
ai modelli: Physio Air (guscio in carbonio)
Physio Posture (guscio in alluminio)
Physio Kid (guscio in alluminio).
Avvisare il produttore nel caso di qualsiasi incidente
grave che sia relazionato al dispositivo.
Produttore:
Rehateam s.r.l., Vicolo Negrelli 5,
31038 Castagnole di Paese TV, Italia,
tel. 0039 0422 484657,
mail: info@rehateamprogeo.com
Never use the backrest to push or lift the wheelchair.
An improper use may cause damage to the backrest
and injury to the user.
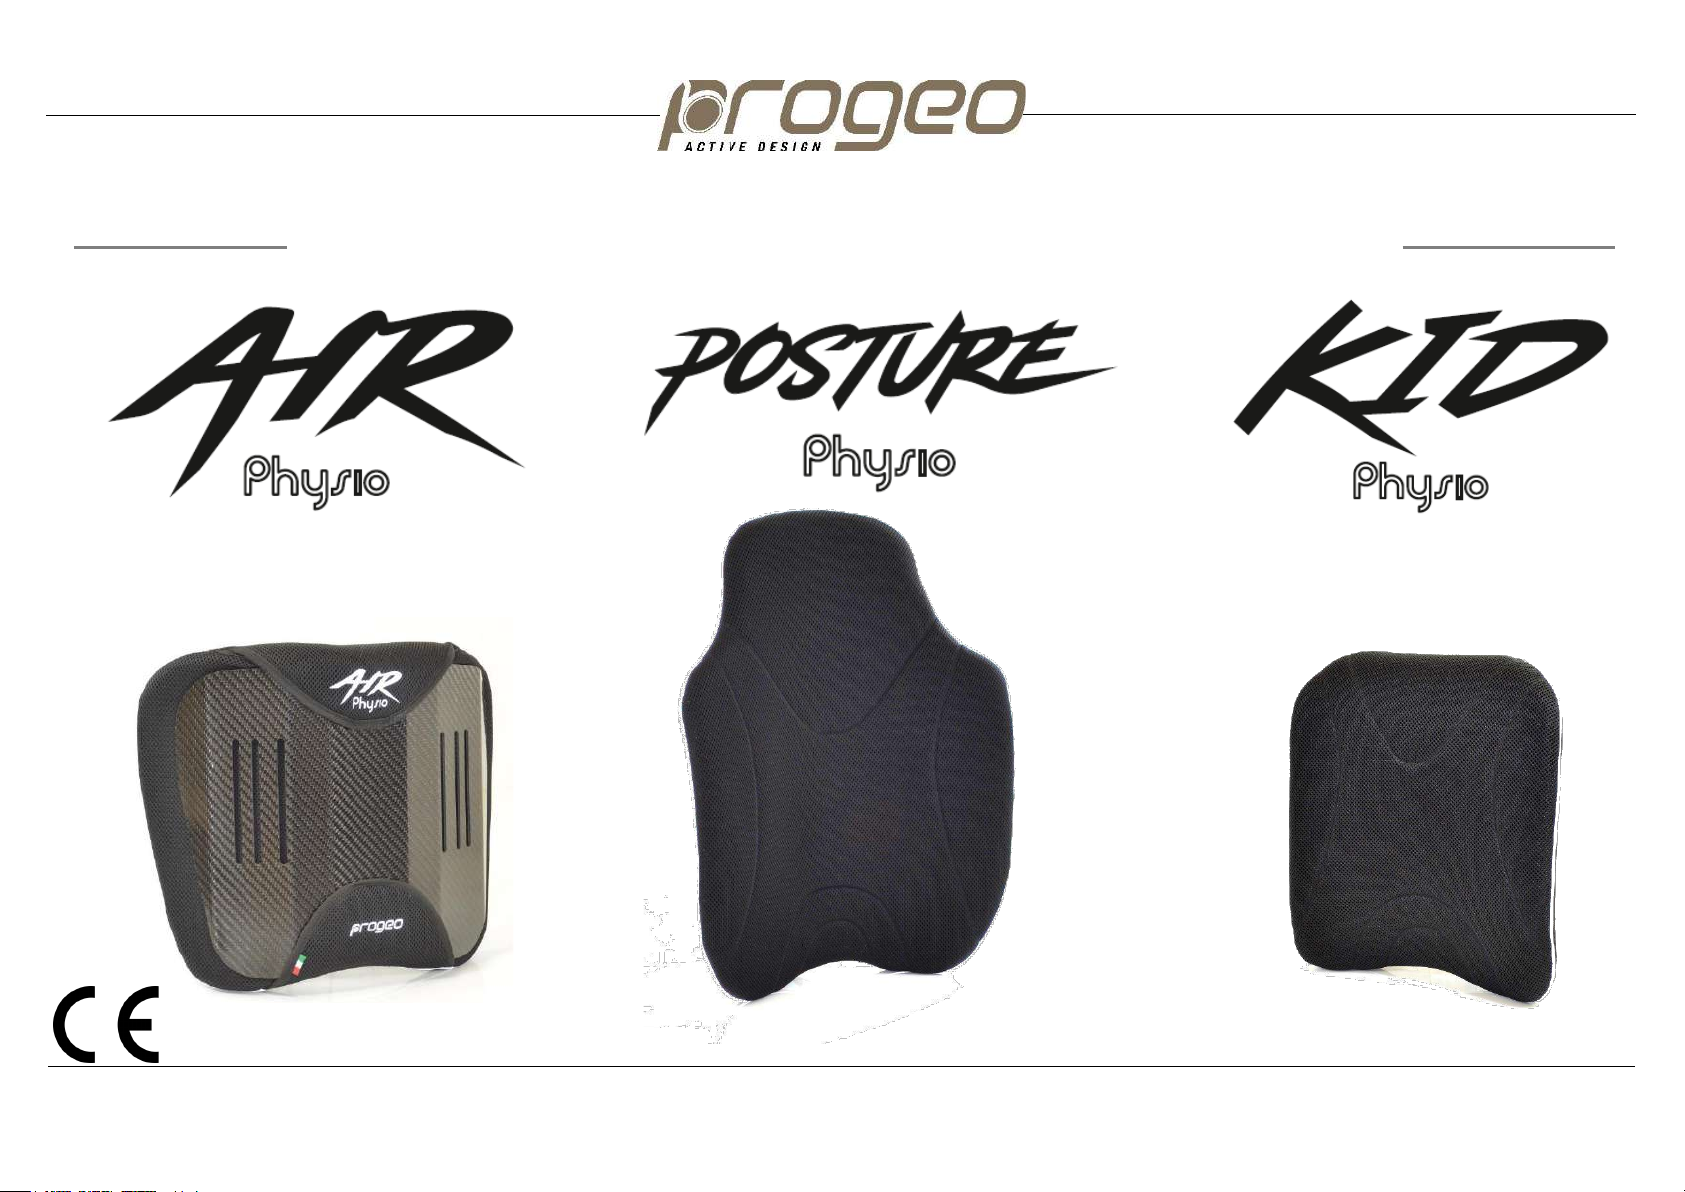
The instructions in this manual refer to the models:
Physio Air (carbon shell)
Physio Posture (aluminum shell)
Physio Kid (aluminum shell).
Notify the manufacturer in case of serious accidents
that occurred in relation to the device.
Manufacturer:
Rehateam s.r.l., Vicolo Negrelli 5,
31038 Castagnole di Paese TV, Italia,
tel. 0039 0422 484657,
mail: info@rehateamprogeo.com
käyttäjää.
Tämän oppaan ohjeet koskevat malleja:
Physio Air (hiilikuitukuori)
Physio Posture (alumiinikuori)
Physio Kid (alumiinikuori).
Ilmoita valmistajalle laitteeseen liittyvistä vakavista
onnettomuuksista.
Valmistaja::
Rehateam s.r.l., Vicolo Negrelli 5,
31038 Castagnole di Paese TV, Italia,
tel. 0039 0422 484657,
mail: info@rehateamprogeo.com
PHYSIO 7
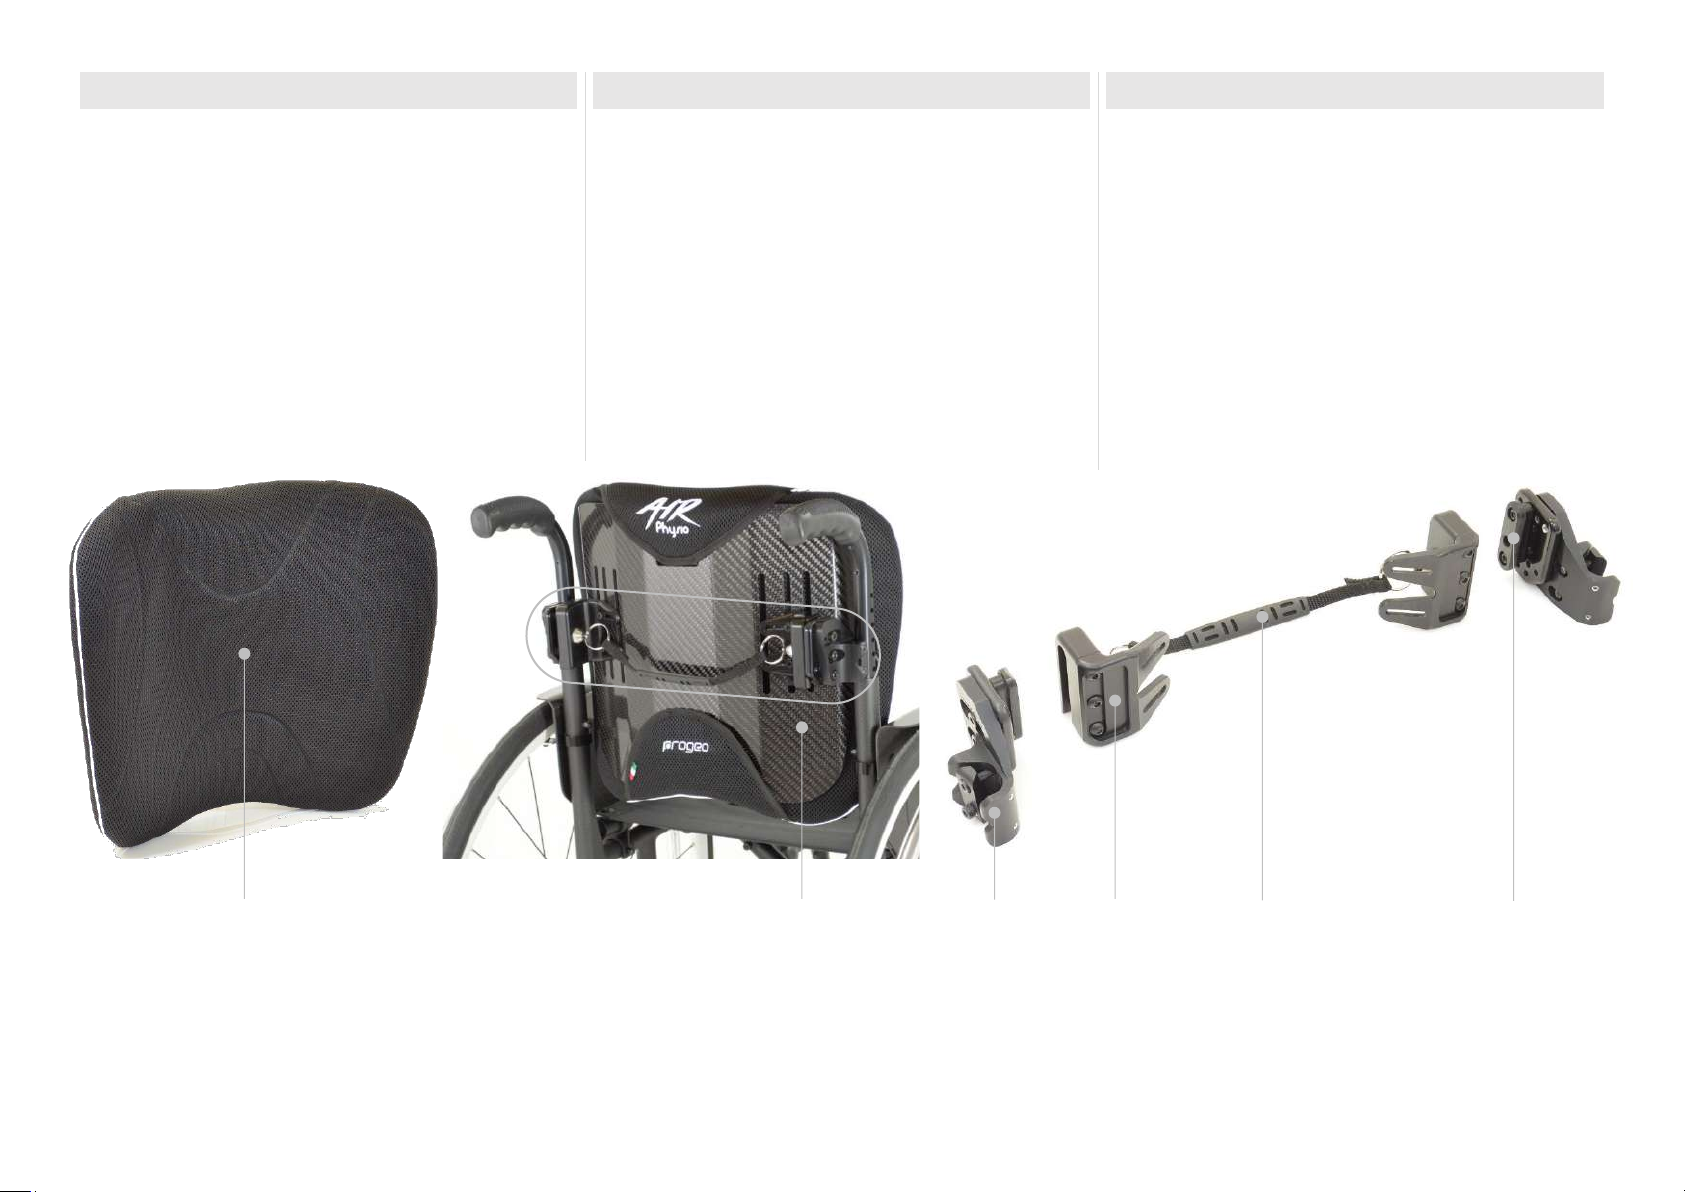
4 Descrizione delle parti
1 imbottitura schienale
2 guscio (alluminio o carbonio)
3 hardware
4 morsetto
5 cordino di sgancio
6 piastra di regolazione con pattino di aggancio
4 Description of parts
1 backrest upholstery
2 shell (aluminium or carbon)
3 hardware
4 clamp
5 release string
6 adjustment plate and locking wedge
4 Osien kuvaus
1 selkätuen verhoilu
2 kuori (alumiini tai hiilikuitu)
3 runkokiinnike
4 kiinnike selkätukeen
5 vapautusnauha
6 säätölevy ja lukituskiila
3
1 2 3 4 5 6

PHYSIO 8
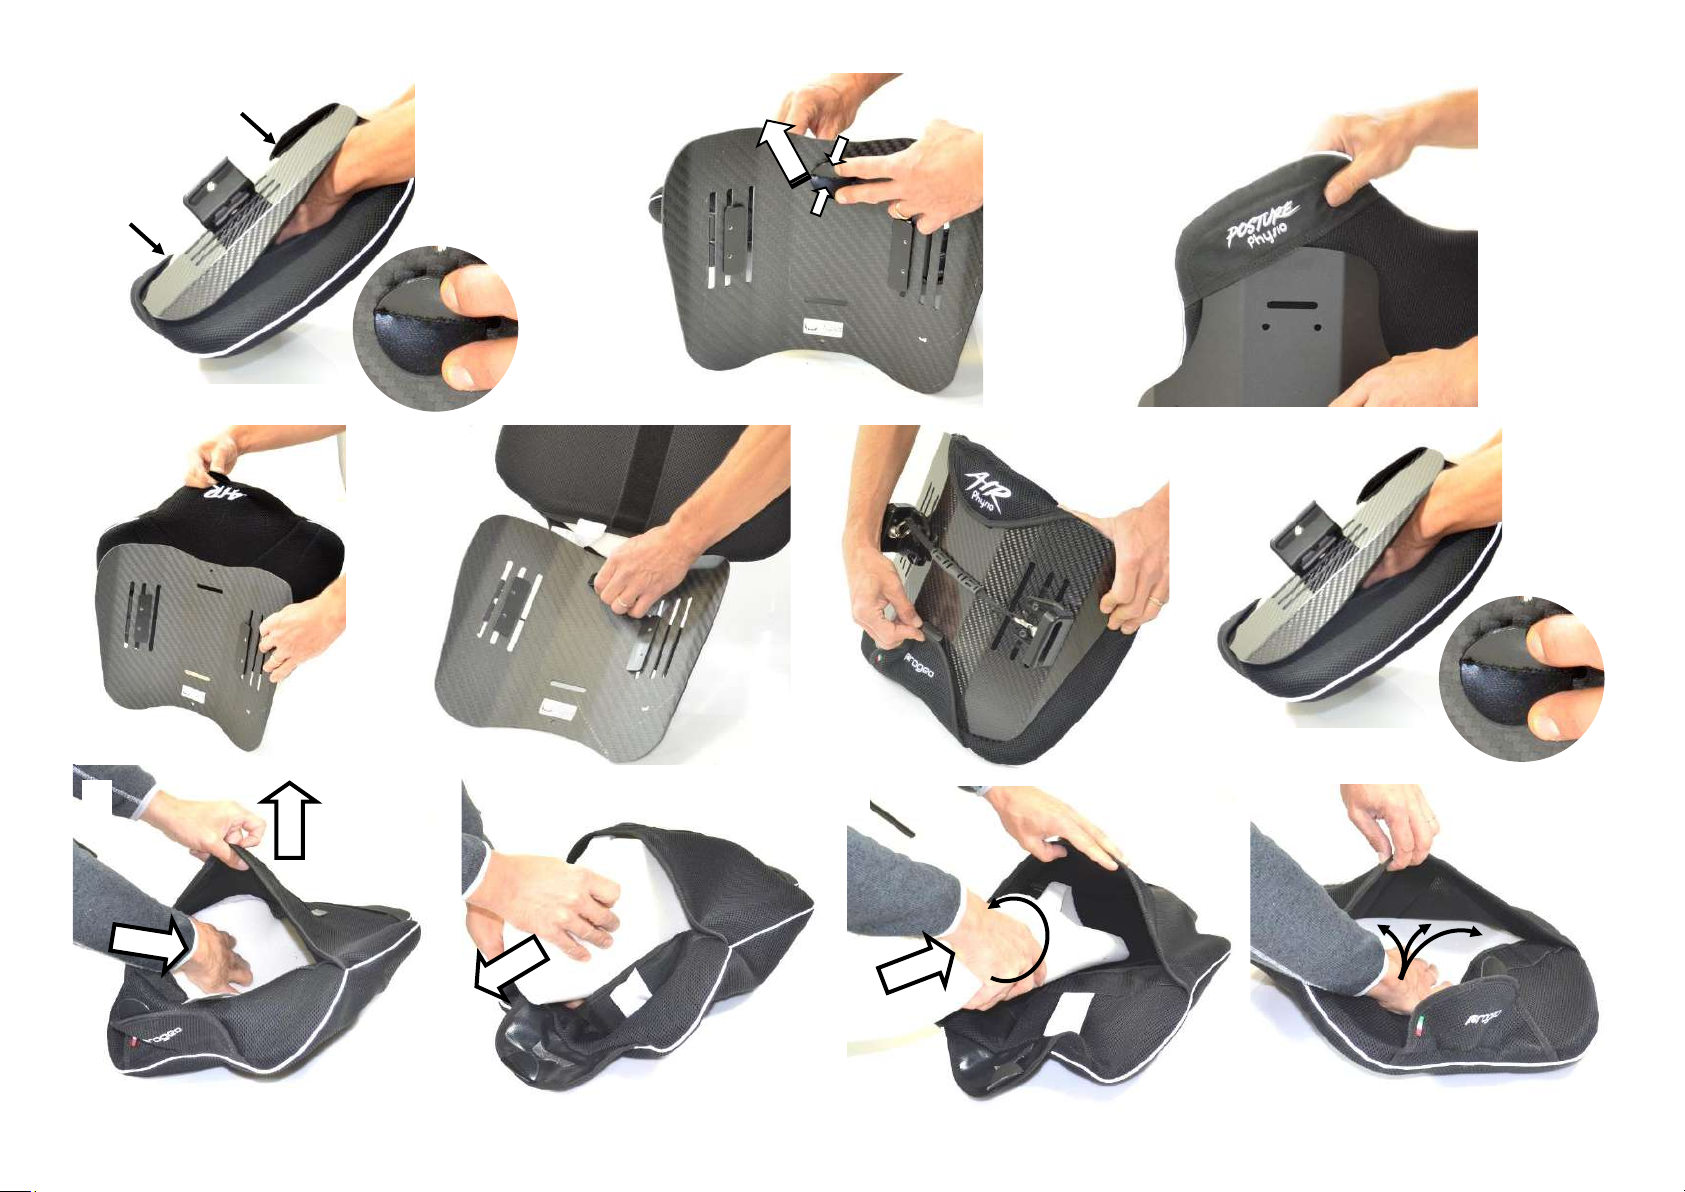
5 Imbottitura schienale
Rimozione dell’imbottitura
1) Inserire la mano tra l’imbottitura ed il guscio fino
raggiungere una delle due doppie linguette A. Unire le due
linguette e spingerle fuori.
2) Sollevare l’imbottitura e, ora con maggior facilità,
sganciare il secondo punto di fissaggio a doppia linguetta.
3) Lo schienale alto 52 cm presenta il fissaggio doppia
linguetta nella parte inferiore ed un fissaggio calzante nella
part superiore. Una volta sganciata la doppia linguetta come
descritto sopra, l’imbottitura si sfila subito.
Montaggio dell’imbottitura
4) Fare attenzione alla parte alta e bassa dell’imbottitura che
deve corrispondere con quella del guscio.
5) Unire la doppia linguetta A di uno dei due risvolti, inserirla
nella rispettiva asola e divaricarla per ottenere il fissaggio.
6) Accompagnare l’imbottitura verso l’altra estremità, portare
il risvolto verso l’esterno del guscio, unire le due linguette,
farle passare attraverso l’asola e mantenerle in posizione.
7) Inserire la mano tra l’imbottitura ed il guscio fino
raggiungere la doppia linguetta e divaricarla per ottenere il
fissaggio.
Per lo schienale alto 52 cm, fissare la parte inferiore con la
doppia linguetta come descritto sopra e poi calzare la parte
alta.
Rimozione e inserimento della gomma schiuma
8) Per estrarla, aprire la tasca nella parte posteriore della
fodera per inserire una mano.
9) Afferrare la gomma schiuma, avvicinare le due estremità
laterali della stessa e tirarla fuori.
10) Per inserirla, aprire la tasca, arrotolare la gomma
schiuma e spingerla all’interno della fodera.
11) Distribuire uniformemente la gomma schiuma per tutto il
perimetro interno della fodera.
5Backrest upholstery
Removing the upholstery
1) Insert your hand between the upholstery and the shell until
you reach one of the two double tabs A. Join the two tabs
and push them out.
2) Lift the padding and, now with greater ease, release the
second double tab fixing point.
3) The 52 cm high back has a double tab fastening in the
lower part and a fitting fastening in the upper part. Once the
double tab has been released as described above, the
padding comes off immediately.
Mounting the upholstery
4) Pay attention to the upper and lower part of the upholstery
which must correspond with that of the shell.
5) Join the double tab A of one of the two flaps, insert it in the
respective slot and spread it apart to fasten it.
6) Accompany the upholstery towards the other end, bring
the flap towards the outside of the shell, join the two tabs,
pass them through the slot and keep them in place.
7) Insert your hand between the upholstery and the shell until
you reach the double tab and spread it apart to fasten it.
For the 52 cm high back, fasten the lower part with the
double tab as described above and then put on the upper
part.
Removing and inserting the foam
8) To remove it, open the pocket in the back of the cover to
insert a hand.
9) Grasp the foam rubber, bring the two side ends of it
together and pull it out.
10) To insert it, open the pocket, roll up the foam and push it
inside the cover.
11) Evenly distribute the foam around the inside perimeter of
the cover.
5Selkätuen verhoilu
Verhoilun irrottaminen
1) Työnnä kättäsi verhoilun ja kuoren väliin, kunnes saavutat
yhden kahdesta kaksoiskielekkeestä A. Yhdistä kaksi
kielekettä ja työnnä ne ulos.
2) Nosta pehmuste ja vapauta toinen kaksoiskielekkeen
kiinnityskohta.
3) 52 cm korkeassa selkätuessa on kaksoiskiinnitys
alaosassa ja sopiva kiinnitys yläosassa. Kun kaksinkertainen
kieleke on vapautettu yllä kuvatulla tavalla, pehmuste irtoaa
välittömästi.
Verhoilun asentaminen
4) Kiinnitä huomiota verhoilun ylä- ja alaosaan, joiden on
vastattava selkätuen kuoren vastaavia osia.
5) Yhdistä toisen läpän kaksinkertainen kieleke A, aseta se
vastaavaan aukkoon ja levitä se erilleen kiinnittääksesi sen.
6) Seuraa verhoilua toista päätä kohti, vie läppä kuoren
ulkopuolelle, yhdistä kaksi kielekettä, vie ne aukon läpi ja
pidä ne paikallaan.
7) Työnnä kättäsi verhoilun ja kuoren väliin, kunnes saavutat
kaksoiskielekkeen ja levitä se erilleen kiinnittääksesi sen.
Kiinnitä 52 cm korkean selkätuen alaosa kaksoiskielekkeellä
yllä kuvatulla tavalla ja aseta sitten yläosa päälle.
Verhoilun pehmusteen poistaminen ja asettaminen
paikalleen
8) Irrota vaahtomuovipehmuste avaamalla päällisen takana
oleva tasku ja aseta käsi sen sisään.
9) Tartu pehmusteeseen, tuo sen kaksi sivupäätä yhteen ja
vedä se ulos.
10) Aseta pehmuste avaamalla tasku, rullaa pehmuste ylös
ja työnnä se päällisen sisään.
11) Asettele pehmuste tasaisesti paikoilleen päällisen sisälle.
PHYSIO 9
A
A
A
1
2
3
4
5
6
7
8
9
10
11

PHYSIO 10
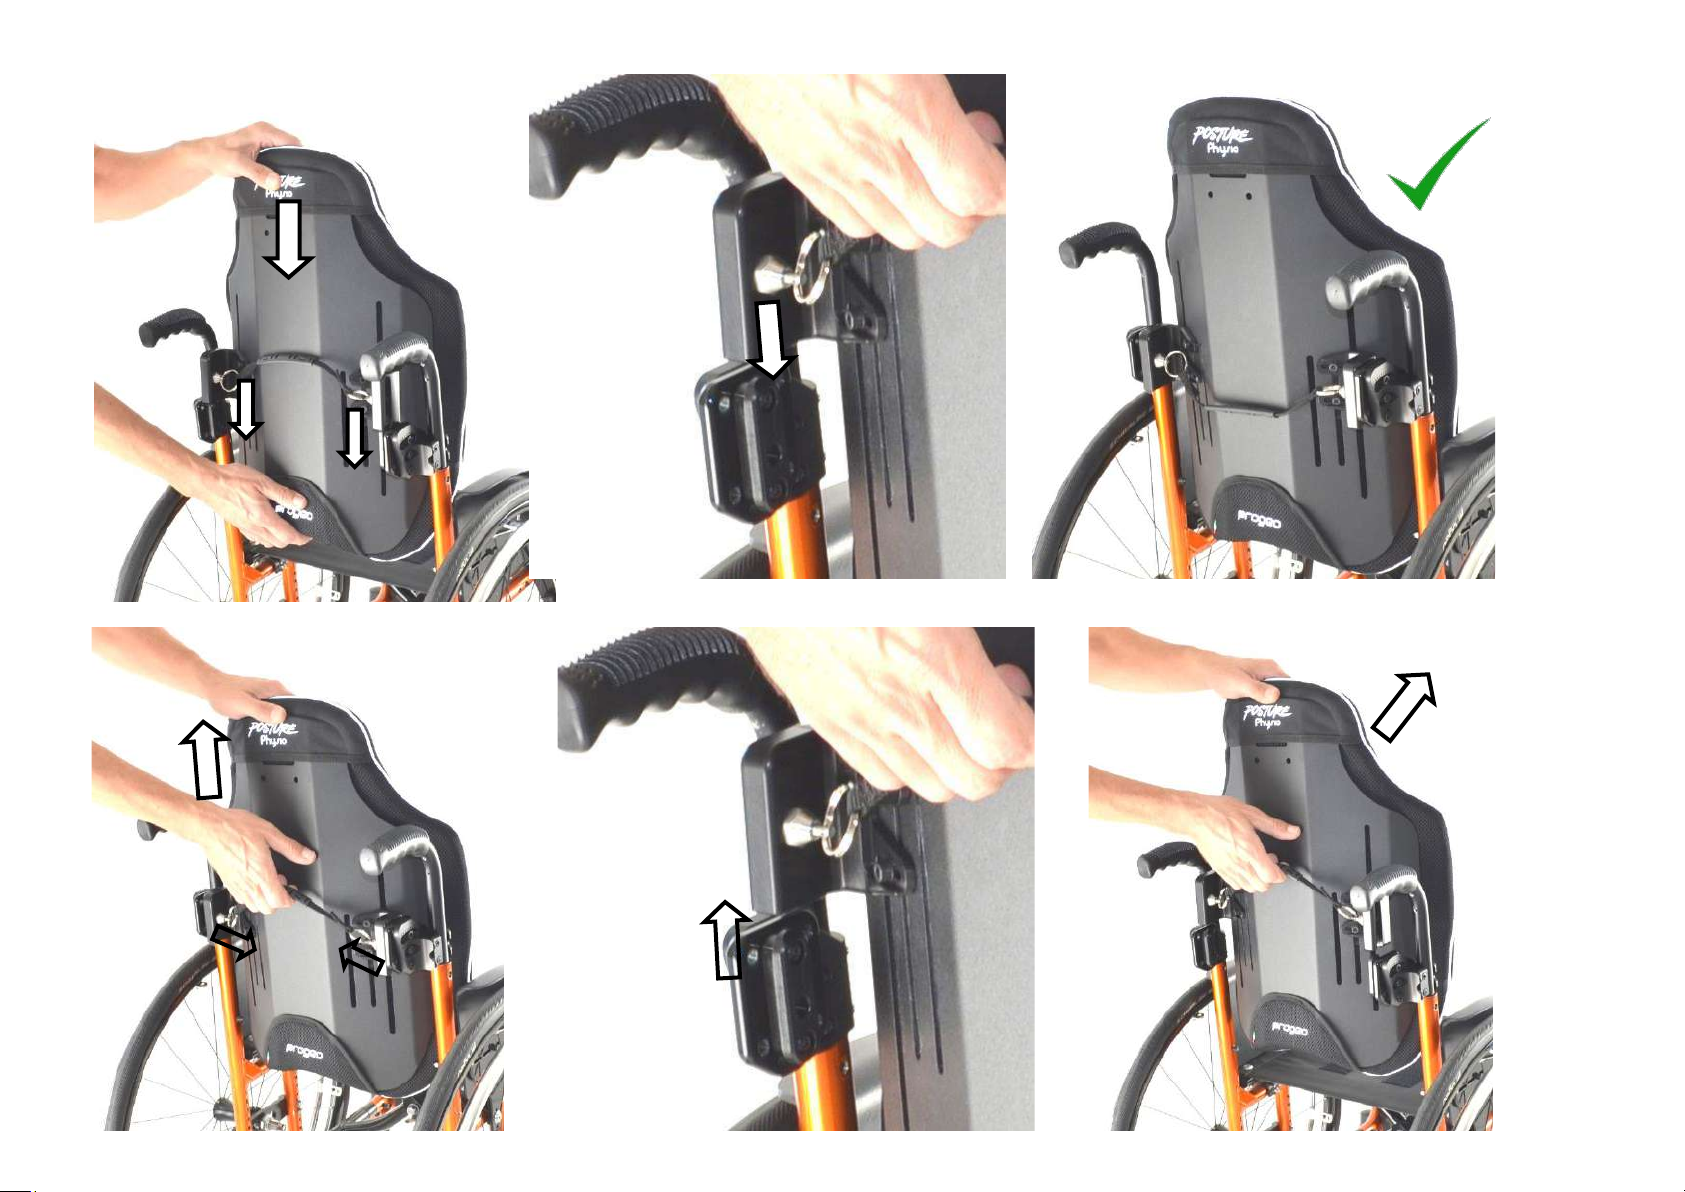
6 Aggancio / sgancio schienale
Lo schienale Physio è stato studiato con un sistema di
aggancio/sgancio molto semplice e sicuro.
Aggancio
1) Afferrare lo schienale nella sua parte alta e bassa.
2) Allineare i due blocchetti di aggancio con i due cunei di
aggancio.
3) Far scorrere i due blocchetti verso il basso fino
all’avvenuto aggancio automatico.
Sgancio
4) Con una mano afferrare il cordino di sgancio nella sua
parte centrale e tiralo verso l’alto per sbloccare i perni di
aggancio.
5) Allo stesso tempo, accompagnare il movimento verticale
afferrando, con l’altra mano, la parte alta dello schienale fino
a far uscire entrambi i blocchetti di aggancio dai cunei di
aggancio.
6) Togliere lo schienale. Lo sgancio risulta molto agevole se
il movimento verticale dello schienale è parallelo ai tubi dello
schienale.
Verificare sempre l’avvenuto aggancio prima di
utilizzare la carrozzina. Per far ciò, afferrare lo
schienale e, tirandolo verso l’alto, deve rimanere
bloccato.
Non afferrare il cordino di sgancio per movimentare
la carrozzina con o senza persona seduta, lo
schienale potrebbe sganciarsi e causare lesioni o
danni.
Se l’operazione di aggancio/sgancio risultasse
difficile, consultare il fornitore del dispositivo.
6Mounting / removing the backrest
The Physio backrest is designed with a very simple and safe
mounting/removing system.
Hooking
1) Take hold of the backrest on its upper and lower sides.
2) Align the two locking blocks with the two lock wedges.
3) Scroll the two locking blocks down until the systems
automatically locks.
Removal
4) With one hand, take hold of the release string in the
middle and pull it upwards to release the locking pins.
5) At the same time, taking hold of the upper side of the
backrest, guide the vertical movement until the two locking
blocks get off the lock wedges.
6) Finally, remove the backrest. The removal results very
easy if the vertical movement of the backrest is parallel with
the backrest tubes.
Always check the backrest is locked before using
the wheelchair. To do so, take hold of the
backrest and, while pulling it upward, it should not
move.
Do not grab the release string to move the
wheelchair with or without the person sitting on it,
the backrest may release and cause injury or
damage.
If mounting/removing operation results difficult,
consult your device supplier.
6 Selkätuen kiinnitys / irrotus
Physio- selkätuessa on erittäin yksinkertainen ja turvallinen
kiinnitys-/irrotusjärjestelmä.
Kiinnittäminen
1) Tartu selkänojasta sen ylä- ja alapuolelta.
2) Kohdista kaksi lukituskappaletta kahden lukituskiilan
kanssa.
3) Paina kahta lukituslohkoa alaspäin, kunnes järjestelmät
lukittuvat automaattisesti.
Irrottaminen
4) Tartu yhdellä kädellä keskellä olevasta vapautusnauhasta
ja vedä sitä ylöspäin, jotta lukitustapit vapautuvat.
5) Ota samalla selkänojan yläpuolelta kiinni ja ohjaa
pystysuoraa liikettä, kunnes kaksi lukituskappaletta irtoavat
lukituskiiloista.
6) Irrota lopuksi selkänoja. Irrotus on erittäin helppoa, jos
selkänojan pystysuora liike on yhdensuuntainen selkänojan
putkien kanssa.
Tarkista aina selkänojan lukitus ennen
pyörätuolin käyttöä. Tarkistaaksesi pidä kiinni
selkänojasta ja yrittäessäsi vetää sitä ylöspäin,
se ei saa liikkua.
Älä tartu irrotusnauhasta siirtäesäsi pyörätuolia
siinä istuvan henkilön kanssa tai ilman, selkänoja
voi irrota ja aiheuttaa vammoja tai vaurioita.
Jos selkätuen kiinnitys/ irrotus tuntuu hankalalta
eikä onnistu, ota yhteys laitteen toimittajaan.
PHYSIO 11
click
click
1
2
3
4
5
6

PHYSIO 12
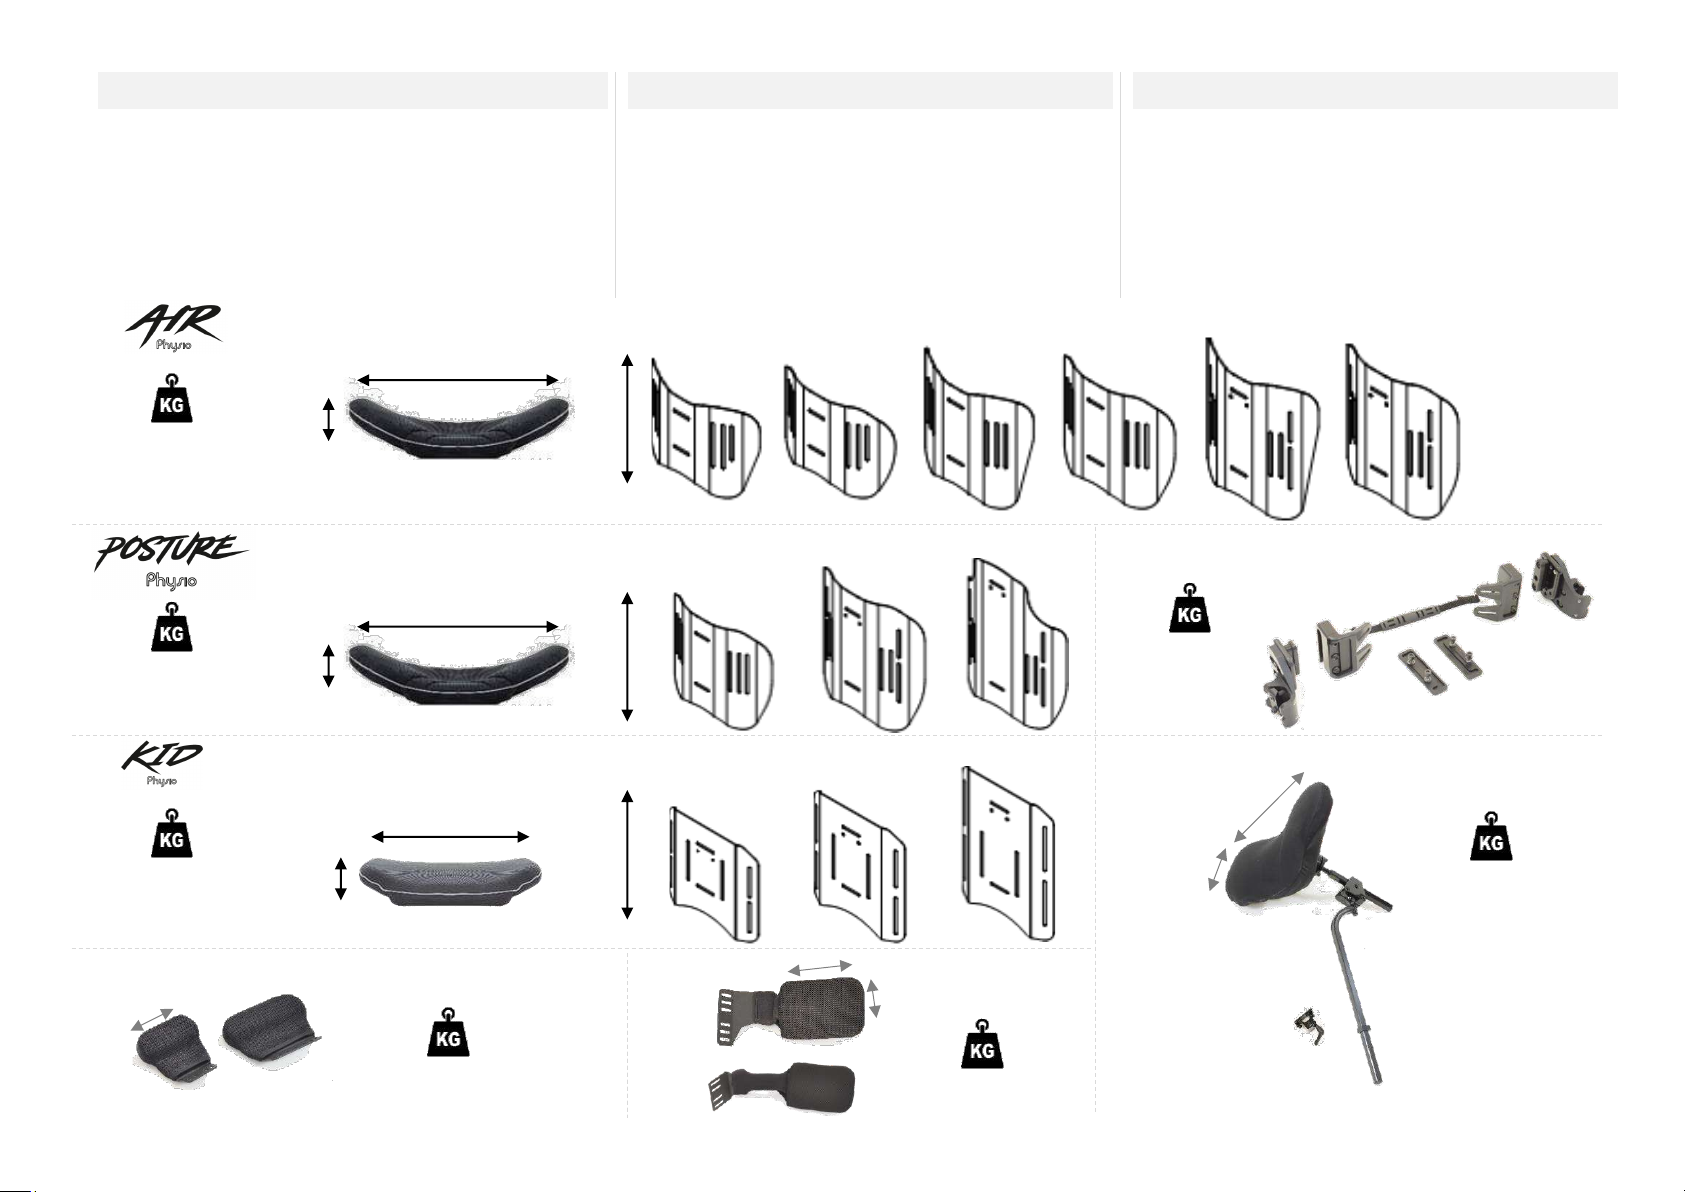
7Accessori
Gli accessori Physio sono appositamente progettati
e costruiti per essere utilizzati in combinazione con
gli schienali Physio Air, Physio Posture e Physio
Kid. Accessori progettati da altri costruttori non sono
stati collaudati da Rehateam s.r.l., pertanto se ne
sconsiglia l’uso.
L’installazione e l’utilizzo di accessori non originali
fanno decadere la garanzia sul prodotto.
Pad di contenimento deep (00)
Il pad di contenimento laterale (ambidestro) consente di portare
il contenimento laterale a 15 cm in uno o in entrambi i lati dello
schienale.Il pad rimane fisso sullo schienale.
Spinte laterali swing-away (01)
1) Per far girare la spinta swing-away verso l’esterno,
afferrarla nella sua parte inferiore, tirarla verso l’alto e poi farla
ruotare.
2) Per ricollocare la spinta in posizione di utilizzo, tirarla verso
l’alto e farla girare verso l’interno fino all’avvenuto aggancio
verso il basso.
Verificare che la spinta sia agganciata prima di
utilizzare la carrozzina.
Appoggiatesta (02)
3) Per montare l’appoggiatesta, allentare la leva Aed inserire
l’asta Bnel supporto e farla scorrere fino a che l’anello di fine
corsa Csi appoggia al supporto stesso. Stringere la leva B.
4) Per togliere l’appoggiatesta, allentare la leva Be sfilare
l’intero appoggiatesta.
Verificare che la leva A stringa bene l’asta B
prima di utilizzare la carrozzina.
7Accessories
Physio accessories are specially designed and
manufactured to be used in combination with
Physio Air, Physio Posture and Physio Kid
backrests. Accessories designed by other
manufacturers have not been tested by
Rehateam s.r.l.. Therefore, it is not
recommended to use them. The installation and
use of non-original accessories make the
warranty on the product void.
Side support deep pad (00)
The side support pad (ambidextrous) allows you to bring the
side support to 15 cm on one or both sides of the backrest.
The side support pad for all backrests fits the same way.
Spinte laterali swing-away (01)
1) To turn the swing-away lateral outwards, take hold of it in
its lower part, pull it upwards and then rotate it.
2) To put the lateral in the position of use, pull it upward and
swing it inside until it will lock with a downward movement.
Always check the pad is locked before using
the wheelchair.
Headrest (02)
3) To mount the headrest, loosen the lever Aand insert the
tube Binto the support until the stop ring Cleans on the
support. Tighten lever B.
4) To remove the headrest, loosen the lever Aand remove
the entire headrest.
Always check the lever A securely tighten the
tube B before using the wheelchair.
7Lisävarusteet
Physio selkätuen lisävarusteet on erityisesti
suunniteltu ja valmistettu käytettäväksi yhdessä
Physio Air, Physio Posture ja Physio Kid –
selkänojien kanssa. Rehateam s.r.l ei ole
testannut muiden valmistajien suunnittelemia
lisävarusteita. Siksi niiden käyttöä ei suositella.
Muiden kuin alkuperäisten lisävarusteiden
asennus ja käyttö mitätöivät tuotteen takuun.
Sivutuki syvä tyyny (00)
Sivutuella (ei puolieroa) voi syventää selkätukea 15cm
joko vain toiselta tai molemmilta puolilta.
Sopii käytettäväksi kaikkiin kolmeen selkätukimalliin.
Sivulle kääntyvä sivutuki (01)
1) Avaa kääntyvä sivutuki ulospäin tarttumalla sen
alaosasta, vetämällä sitä ylöspäin ja kiertämällä sitä.
2) Aseta sivutuki käyttöasentoon vetämällä sitä ylöspäin ja
kääntämällä sitä sisäänpäin, kunnes se lukittuu.
Tarkista aina, että sivutuki on lukittu ennen
pyörätuolin käyttöä.
Niskatuki (02)
3) Päätuen asentamiseksi löysää vipua Aja työnnä putki
Btukeen, kunnes pysäytysrengas Cnojaa tukeen. Kiristä
vipu B.
4) Irrota päätuki löysäämällä vipua Aja irrottamalla koko
niskatuki.
Tarkista aina,että vipu A kiristää putken B
kunnolla paikoilleen ennen pyörätuolin käyttöä.

PHYSIO 13
2
00
01
02
12
9
STD + EXT
STD
14
14
3
1
2
B
A
B
C
A
C
4

PHYSIO 14
8Installazione e regolazioni
L’installazione e le regolazioni possono essere
effettuate solo da personale qualificato ed
autorizzato da Rehateam s.r.l.
Si proibisce di apportare modifiche allo
schienale (anche se possibili) diverse da quelle
di origine.
Le regolazioni e/o modifiche effettuate da personale non
autorizzato fanno immediatamente decadere la garanzia del
prodotto e sollevano la Rehateam s.r.l. da qualsiasi
responsabilità su eventuali malfunzionamenti e/o danni
riconducibili alle regolazioni e/o modifiche stesse.
Per particolari esigenze o modifiche è necessario sempre
contattare direttamente Rehateam s.r.l. e i suoi tecnici, per
valutare le modifiche e verificare che non compromettano il
normale utilizzo in sicurezza della carrozzina.
Al termine di ogni regolazione apportata allo schienale,
controllare in modo scrupoloso che tutte le parti siano ben
fissate (controllare la chiusura di viti e bulloni e il buon
funzionamento delle parti in movimento). Eseguire sempre
un test di collaudo, dopo ogni regolazione, prima di
riprendere il consueto utilizzo della carrozzina possibilmente
in presenza di un accompagnatore o persona competente.
Le regolazioni possibili per tutti gli schienali Physio sono:
ALTEZZA –PROFONDITÀ - INCLINAZIONE
Le istruzioni per eseguire correttamente
l’installazione e le regolazioni sono contenute nel
relativo MANUALE DI SERVIZIO disponibile nel
sito internet www.rehateamprogeo.com
8Installation and adjustments
The installation and any adjustment can be
carried out exclusively by qualified and
authorized by Rehateam s.r.l. personnel.
It is forbidden to carry out any modifications,
even when possible, to the original design.
Any adjustments and/or any modification that is carried out
by non-authorized personnel will immediately void the
warranty on the product and it relieves Rehateam s.r.l. from
any responsibility on any malfunctioning and/or damage due
to such adjustments/modifications.
Always contact Rehateam s.r.l. and its technicians for any
non-standard requirements or modifications to allow them to
evaluate such modifications and verify that they will not
compromise the normal and safe use of the wheelchair.
After every adjustment made to the backrest, check carefully
that all parts are correctly fixed. Check that all screws and
nuts are tightened and that all moving parts are functioning
correctly.
After any adjustment, always test the wheelchair before
normal use, possibly assisted by an attendant or a
technician.
The possible adjustments for all Physio backrests are:
HEIGHT –DEPTH –ANGLE
The instructions to properly carry out the
installation and the adjustments, are included in
the corresponding SERVICE MANUAL that is
available on the web site
www.rehateamprogeo.com
8Asennus ja säätäminen
Asennuksen ja mahdolliset säädöt voivat
suorittaa vain Rehateam s.r.l. :n valtuuttamat
henkilöt.
Alkuperäiseen suunnitteluun on kiellettyä tehdä
muutoksia, vaikka se olisi mahdollista.
Kaikki valtuuttamattoman henkilöstön tekemät säädöt ja/tai
muutokset tuotteeseen mitätöivät välittömästi tuotteen
takuun ja vapauttavat Rehateam s.r.l. :n vastuuta tällaisista
säädöistä/muutoksista johtuvista toimintahäiriöistä ja/tai
vaurioista.
Ota aina yhteyttä Rehateam s.r.l. ja sen teknikoihin
mahdollisista epätyypillisistä vaatimuksista tai muutoksista,
jotta he voivat arvioida tällaiset muutokset ja varmistaa,
etteivät ne vaaranna pyörätuolin normaalia ja turvallista
käyttöä.
Tarkista jokaisen selkänojan säädön jälkeen, että kaikki osat
on kiinnitetty oikein. Tarkista, että kaikki ruuvit ja mutterit on
kiristetty ja että kaikki liikkuvat osat toimivat oikein.
Testaa selkätuki aina säädön jälkeen ennen normaalia
käyttöä, mahdollisesti avustajan tai teknikon avustuksella.
Mahdollisia säätöjä kaikille Physio -selkänojille ovat:
KORKEUS - SYVYYS - KULMA
Ohjeet asennuksen ja säätöjen suorittamiseksi
oikein, sisältyvät vastaavaan huoltoohjeeseen,
joka on saatavilla verkkosivustolla
www.rehateamprogeo.com
PHYSIO 15
9Manutenzione e pulizia
Rehateam s.r.l. raccomanda di eseguire un
controllo di tutto il sistema una volta alla settimana
per assicurarsi che lo schienale possa esser
utilizzato in sicurezza.
Nel caso di anomalie o di alcune parti
danneggiate o rotte, non utilizzare il prodotto e
contattare immediatamente il fornitore del
dispositivo.
Per la pulizia della fodera dello schienale, rimuovere
l’imbottitura interna come descritto nel capitolo 5 ”Imbottitura
schienale”e rivoltarla . Lavare a mano con acqua a 30°. Il
prodotto tessile non sopporta il trattamento con cloro, non
deve essere stirato e deve essere asciugato solo all’aria a
temperatura moderata (non con macchina asciugatrice).
L’imbottitura può essere lavata con acqua fredda e
detergente neutro e va asciugata all’aria aperta.
Quando la fodera e l’imbottitura sono asciutte inserire
l’imbottitura come descritto nel capitolo 5 ”Imbottitura
schienale”.
Il guscio ed i supporti per il posizionamento possono essere
puliti semplicemente con acqua e sapone. Non immergere
alcuna parte in acqua.
9Maintenance and cleaning
Rehateam s.r.l. recommend making a general
check of the whole system once a week to ensure
the backrest can be used in complete safety.
In case of any anomaly or damaged or broken
parts, do not use the product and immediately
contact the device supplier.
To clean the cover, remove the foam pad following the
instructions on the chapter 5 “Backrest upholstery” and turn
the cover inside out. Hand wash in lukewarm water (30°).
This textile product must not be treated with chlorine, must
not be ironed, should be dried in moderate warm air (never
in drier machine).
The foam can be washed with cold water and neutral
detergent and should be dried in the open air.
When the cover and the foam are dry, insert the foam pad as
described in chapter 5 “Backrest upholstery”.
The shell and the hardware can be wiped clean with soap
and water. Do not immerse any part of the hardware
underwater.
9Huolto ja puhdistus
Rehateam s.r.l. suosittelee tarkistamaan koko
järjestelmän kerran viikossa, jotta selkänojaa
voidaan käyttää täysin turvallisesti.
Mahdollisen poikkeavuuden sattuessa tai osien
vaurioituessa tai rikkoutuessa, älä käytä tuotetta ja
ota välittömästi yhteyttä laitteen toimittajaan.
Puhdista päällinen poistamalla vaahtomuovityyny luvun 5
“Selkänojan verhoilu” ohjeiden mukaan ja kääntämällä
päällinen nurinpäin. Käsinpesu haaleassa vedessä (30 °).
Tätä tekstiilituotetta ei saa käsitellä kloorilla, sitä ei saa
silittää, se on kuivattava kohtuullisen lämpimässä ilmassa
(ei koskaan kuivausrummussa).
Vaahtomuovityyny voidaan pestä kylmällä vedellä ja
neutraalilla pesuaineella, ja sen annetaan kuivua vapaasti
esim. ulkona.
Kun päällinen ja vaahtomuovityyny ovat kuivia, aseta
vaahtomuovityyny paikalleen luvussa 5 “Selkänojan
verhoilu” kuvatulla tavalla.
Kuori ja kiinnitysosat voidaan pyyhkiä puhtaaksi saippualla
ja vedellä. Älä upota mitään kiinnitysosaa osaa veden alle.

PHYSIO 16
10 Disinfezione e riutilizzo
Durante l’utilizzo del sistema Physio, tutte le superfici che
vengono a contatto con l'utente dovrebbero essere trattate
frequentemente, o comunque ogni qualvolta si presenta la
necessità, con un disinfettante spray.
Normalmente non è possibile garantire una disinfezione
sicura sulle cuciture.
Pertanto, raccomandiamo di cambiare ed eliminare in
modo appropriato la fodera in caso di contaminazione
batterica, in modo conforme alle normative vigenti.
In caso di riutilizzo dello schienale, lo stesso tipo di
trattamento deve essere eseguito con molta attenzione
prima di riutilizzare lo schienale stesso.
La prima cosa che dovreste sapere è che la pulizia non è
la stessa cosa della disinfezione. Con la pulizia
rimuoviamo i germi e lo sporco dalle superfici, ma non
uccidiamo i germi, sebbene rimuoverli diminuisca la
quantità e il rischio di diffondere le infezioni.
Con una disinfezione, al contrario, ciò che facciamo è
uccidere i microrganismi come i batteri attraverso l'uso di
prodotti chimici. Questo processo non pulisce
necessariamente le superfici sporche, ma uccidendo i
germi sulla superficie, riesce a ridurre ulteriormente il
rischio di diffusione dell'infezione.
Tenendo presente questo, il processo corretto da seguire
con la carrozzina è quello di effettuare prima una pulizia
ordinaria e poi di disinfettarla usando un disinfettante
per superfici sanitarie. Questi prodotti sono battericidi e
virucidi.
È possibile trovare maggiori informazioni su questi prodotti
sul sito web del Ministero della Salute o di altre fonti
attendibili. Consigliamo inoltre di leggere attentamente le
istruzioni del produttore per un uso e una disinfezione
corretti nonché per evitare possibili eventuali
controindicazioni.
10 Disinfection and reuse
While using the Physio system, all surfaces that come into
contact with the user should be treated frequently, or
whenever the need arises, with a spray disinfectant.
It is not normally possible to guarantee safe disinfection on
the sewing.
Therefore, we recommend that the seat and back covers
be changed and appropriately discarded in the event of
bacterial contamination, in compliance with current
regulations.
In case of reuse of the backrest, the same type of
treatment must be carried out very carefully before using
the backrest again.
The first thing you should know is that cleaning is not the
same as disinfecting. By cleaning we remove germs and
dirt from surfaces, but we do not kill germs, although
removing them decreases the amount and risk of
spreading infections. On the other hand, with a
disinfection, what we do is kill microorganisms such as
bacteria through using chemicals.
This process does not necessarily clean dirty surfaces, but
by killing germs on the surface, it can further reduce the
risk of spreading the infection.
Keeping that in mind, the correct process to follow with the
wheelchair is to first perform routine cleaning and then
disinfect it using a sanitary surface disinfectant.
These products are bactericidal and virucidal.
You can find more information about these products on the
website of the Ministry of Health or other reliable sources.
We also recommend that you carefully read the
manufacturer's instructions for correct use and disinfection
as well as to avoid possible contraindications.
10 Desinfiointi ja uudelleenkäyttö
Käyttäessäsi Physio -selkätukea, kaikki pinnat, jotka
joutuvat kosketuksiin käyttäjän kanssa, on käsiteltävä usein
tai aina tarpeen vaatiessa sumutetulla desinfiointiaineella.
Ompeleiden turvallista desinfiointia ei yleensä voida taata.
Siksi suosittelemme, että istuimen ja selkänojan päälliset
vaihdetaan ja hävitetään asianmukaisesti
bakteerikontaminaation sattuessa voimassa olevien
määräysten mukaisesti.
Jos selkänoja otetaan uudelleenkäyttöön, samantyyppinen
käsittely on suoritettava erittäin huolellisesti ennen
selkänojan käyttöä.
Ensimmäinen asia, joka sinun pitäisi muistaa, on se, että
puhdistus ei ole sama asia kuin desinfiointi.
Puhdistamalla poistamme bakteereja ja likaa pinnoilta,
mutta emme tapa bakteereja, vaikkakin vähennämme niiden
määrää ja infektioiden leviämisriskiä. Desinfioinnilla
tapamme mikro -organismeja, kuten bakteereja, kemikaalien
avulla.
Tämä prosessi ei välttämättä puhdista likaisia pintoja, mutta
tappamalla pinnalla olevia bakteereita se voi edelleen
vähentää infektion leviämisriskiä.
Oikea prosessi pyörätuolin kanssa on ensin puhdistaa
rutiininomaisesti ja desinfioida se sitten hygieniapintojen
desinfiointiaineella.
Nämä tuotteet ovat bakterisidisiä ja virusisidisiä.
Löydät lisätietoja näistä tuotteista paikallisen
terveysviranomaisen verkkosivuilta tai muista luotettavista
lähteistä. Suosittelemme myös, että luet huolellisesti
valmistajan ohjeet tuotteiden oikeasta käytöstä ja
desinfioinnista sekä mahdollisten vasta -aiheiden
välttämisestä
PHYSIO 17
11 Stoccaggio prolungato
Nel caso in cui lo schienale non venga utilizzata per un
periodo medio lungo (oltre i 4 mesi), si consiglia di
immagazzinarlo pulito in un luogo asciutto e coperto ed
all’interno di uno scatolone (preferibilmente quello
dell’imballaggio originale). Nel momento del riutilizzo, è
necessario eseguire un controllo generale dello schienale
seguendo gli stessi punti del paragrafo 9 “Manutenzione e
pulizia”.
12 Smaltimento/riciclo materiali
Nel momento in cui lo schienale dovrà essere smaltito (fine
vita del prodotto), è necessario considerare le eventuali
normative locali vigenti per lo smaltimento dei rifiuti o il
riciclaggio. Questo include la pulizia o la disinfezione dello
schienale prima dello smaltimento.
Qui sotto, una descrizione dei materiali usati.
•Alluminio: hardware, guscio
•Acciaio: viti di fissaggio, perni
•Plastica: cuneo di fissaggio
•Carbonio: guscio
•Rivestimenti: tessuto con gomma
schiuma espansa.
•Imballaggio: sacchetti plastica, cartone.
Per lo smaltimento o il riciclaggio rivolgersi ad un centro di
smaltimento autorizzato. In alternativa, lo schienale può
essere restituita al rivenditore per essere smaltito.
In caso di smaltimento, fare attenzione ad
eventuali parti rotte o danneggiate che
possono creare una situazione di potenziale
pericolo di ferite da taglio o pizzicamento.
Si consiglia di utilizzare protezioni adeguate.
11 Storage
If the wheelchair is not used for a medium-long period (over
4 months), it is advisable to store it clean in a dry and
covered place and inside a box (preferably that of the
original packaging). At the time of re-use, it is necessary to
carry out a general check of the wheelchair following the
same points of paragraph 9 “Maintenance and cleaning”.
12 Disposal/recycling of materials
When the backrest is to be disposed of (end of life of the
product), it is necessary to consider any local regulations
in force for waste disposal or recycling.
This includes cleaning or disinfecting the backrest before
disposal.
Below, a description of the materials used.
•Aluminum: hardware, shell
•Steel: bolts and nuts, pins
•Plastic: lock wedge
•Carbon fiber: shell
•Upholstery: textile with expanded
foam
•Packaging: plastic bags, cardboard
Contact your authorized disposal centre for disposal or
recycling. Alternatively, the backrest can be returned to the
retailer for disposal.
In the case of disposal, be aware of any
broken or damaged parts which could create
a situation of potential danger of cutting or
pinching injuries.
It is recommended to use suitable
protections.
11 Varastointi
Jos selkänojaa ei käytetä pitkään aikaan(yli 4 kuukautta), on
suositeltavaa säilyttää se puhtaana kuivassa ja peitetyssä
paikassa laatikon sisällä (mieluiten
alkuperäispakkauksessa). Uudelleenkäytön yhteydessä
selkätuki on tarkastettava yleisesti kohdan 9 "Huolto ja
puhdistus" kohdan mukaisesti.”.
12 Materiaalien hävittäminen / kierrätys
Kun selkänoja on hävitettävä (tuotteen käyttöiän loppu), on
otettava huomioon kaikki paikalliset jätteiden hävittämistä tai
kierrätystä koskevat määräykset.
Tämä sisältää selkänojan puhdistamisen tai desinfioinnin
ennen hävittämistä
Alla kuvaus käyetyistä materiaaleista :
•ALumiini : kiinnikkeet, kuori
•Teräs : pultit, mutterit,tapit
•Muovi : lukituskiila
•Hiilikuitu : kuori
•Verhoilu : tekstiili, jossa vaahtomuovia
•Pakkaus : muovipussit, pahvi.
Ota yhteyttä valtuutettuun jätteenkäsittelykeskukseen
hävittämistä tai kierrätystä varten. Vaihtoehtoisesti selkänoja
voidaan palauttaa jälleenmyyjälle hävitettäväksi.
Hävittämisen yhteydessä ole tietoinen kaikista
rikkoutuneista tai vaurioituneista osista, jotka
voivat aiheuttaa leikkuu- tai puristumisvaaran.
On suositeltavaa käyttää sopivia suojaimia.
PHYSIO 18
13 Dati tecnici
13 Techical data
13 Tekniset tiedot
PHYSIO AIR –guscio in carbonio
PHYSIO POSTURE –guscio in alluminio
PHYSIO KID –guscio in alluminio
HARDWARE
PAD DI CONTENIMENTO DEEP (1)
SPINTA LATERALE SWING AWAY (2)
APPOGGIATESTA (3)
PHYSIO AIR –carbon fibre shell
PHYSIO POSTURE –aluminium shell
PHYSIO KID –aluminium shell
HARDWARE
SIDE DEEP PAD SUPPORT (1)
SWING AWAY LATERAL (2)
HEADREST (3)
PHYSIO AIR –hiilikuitukuori
PHYSIO POSTURE –alumiinikuori
PHYSIO KID –alumiinikuori
KIINNIKEOSAT
SIVUTUKI SYVÄ TYYNY (1)
SIVUTUKI SIVULLE KÄÄNTYVÄ (2)
PÄÄTUKI (3)
280 A 280 R 340 A 340 R 400 A 400 R
7.5
360 390 420 450
Min. 0.65 kg
Max. 1.15 kg
340 R 400 R 520 R
7.5
360 390 420 450 480
Min. 1.05 kg
Max. 1.90 kg
Min. 0.75 kg
Max. 1.25 kg
3.5
300 330 360
290 R 340 R 400 R
2
1
0.83 kg
HARDWARE
0.13 kg –0.18 kg
h. 130 –h. 200
h
.
0.50 kg –0.75 kg
180x120 - 140x90
3
1.55 kg –1.75 kg
240x140 - 340x140

PHYSIO 19
14 Garanzia
Ogni schienale Physio viene attentamente ispezionato e testato
per dare un’ottima performance. Ogni schienale è garantito per
il suo normale utilizzo contro i difetti per un periodo di 24 mesi
dalla data di acquisto. Qualora un difetto di fabbricazione o di
materiali dovesse presentarsi entro i 24 mesi dalla data di
acquisto originale, la Rehateam s.r.l., a sua discrezione, riparerà
o sostituirà lo schienale gratuitamente. Questa garanzia non è
applicabile per forature, strappi e bruciature e nemmeno per le
fodere estraibili.
I reclami e le riparazioni saranno gestiti dal
rivenditore/distributore autorizzato locale. Fatta eccezione per
le garanzie qui sopra espresse, tutte le altre garanzie per
adattamento o per impiego per scopi particolari sono escluse.
Non ci sono garanzie che vanno oltre le garanzie descritte
sopra. I rimedi di questa garanzia contro i difetti sono limitati
alla riparazione o sostituzione del prodotto. In nessun caso, i
danni da difetti coperti da garanzia, includono qualsiasi danno
consequenziale o che ecceda il costo originale dello schienale.
14 Warranty
Every Physio backrest is carefully inspected and tested to
provide optimum performance. Each backrest is guarantees
to be free from defects for a period of 24 months from the date
of purchase. Should a defect in material or workmanship
occur within 24 months of the original date of purchase,
Rehateam s.r.l., at its own option, repair or replace it free of
charge. This warranty does not apply to punctures, tears or
burns, nor to the removable cushion cover.
All warranty claims must be made through the dealer/retailer
where the cushion was purchased. Except for express
warranties made herein, all other warranties of fitness or use
are excluded. There are no warranties that extend beyond the
warranties provided above.
Remedies for breach of this warranty are limited to repair or
replacement of goods. In no event shall damages for breach
on any warranty include any consequential damages or
exceed the original cost of the backrest.
14 Takuu
Jokainen Physio -selkänoja tarkastetaan ja testataan
huolellisesti optimaalisen suorituskyvyn takaamiseksi.
Jokainen selkänoja on taattu virheettömäksi 24 kuukauden
ajan ostopäivästä. Jos materiaali- tai valmistusvirhe ilmenee
24 kuukauden kuluessa alkuperäisestä ostopäivästä,
Rehateam s.r.l. korjaa tai vaihtaa sen oman valintansa
mukaan maksutta. Tämä takuu ei koske lävistyksiä,
repeämiä tai palovaurioita eikä irrotettavaa tyynynpäällistä.
Kaikki takuuvaatimukset on tehtävä jälleenmyyjän kautta,
josta tyyny on ostettu. Lukuun ottamatta tässä annettuja
nimenomaisia takuita, kaikki muut kunto- tai käytön takuut
ovat poissuljettuja. Ei ole mitään takuita, jotka ylittävät yllä
annetut takuut.
Tämän takuun korjaukset vikoja vastaan rajoittuvat tuotteen
korjaamiseen tai vaihtamiseen.. Takuun kattamien vikojen
aiheuttamat vahingot eivät missään tapauksessa sisällä
vaurioita, jotka ovat välillisiä tai jotka ylittävät selkänojan
alkuperäiset kustannukset.
PHYSIO 20
CERTIFICATO DI GARANZIA - WARRANTY CERTIFICATE - TAKUUTODISTUS
Rehateam S.r.l.
Vicolo Negrelli,5 - 31038 Castagnole di Paese (TV) Italy
Tel. +39 0422 484657 ra -Fax +39 0422 484661
http//www.rehateamprogeo.com [email protected]
Azienda certificata TÜV Rheinland secondo la norma UNI CEI EN 13485 : 2016
Certified company TÜV Rheinland in compliance with directive UNI CEI EN 13485 : 2016
Sertifioitu yritys TÜV Rheinland conformément à la directive UNI CEI EN 13485 : 2016
Luogo di produzione - Production place - Valmistuspaikka : Castagnole di Paese (TV) ITALY
DISTRIBUTORE / RIVENDITORE
DEALER / RETAILER
JÄLLEENMYYJÄ/TOIMITTAJA
Data di consegna all’utilizzatore
Date of delivery to user
Toimituspäivä käyttäjälle ___________________________
Timbro distributore / rivenditore
Stamp of distributor / dealer
Jälleenmyyjän/toimittajan leima
ETICHETTA PRODOTTO
PRODUCT LABEL
TUOTEKILPI
Dispositivo Medico Classe I
Medical Device Class I
Lääkinnällinen laite Luokka I
This manual suits for next models
2
Table of contents
Popular Personal Care Product manuals by other brands


Beurer
Beurer BR 60 Instructions for use

Beurer
Beurer MP 42 Instructions for use

Ergosante Technologie
Ergosante Technologie HAPO V1 instruction manual

Adaptive Sound
Adaptive Sound ASM1002 ASTI owner's manual

mitoredlight
mitoredlight MitoPERFORM user manual

cecotec
cecotec BAMBA CERAMICCARE 10IN1 STYLER instruction manual