Projector Phantom PPR/2000 Manual

Phantom
POWER ASSISTED RESPIRATOR PPR/2000 Model
Operating and Maintenance Instructions
GEBLÄSEFILTER-ATEMGERÄT MODELL PPR/2000
Betriebs- und Wartungsanleitung
AANGEDREVEN RESPIRATOR TYPE - PPR/2000
Gebruiks- en onderhoudsaanwijzingen
APPAREIL RESPIRATOIRE ASSISTE - MODELE PPR/2000
Instructions d'utilisation et d'entretien
RESPIRADOR ASISTIDO Modelo - PPR/2000
Instrucciones de Funcionamiento y Mantenimiento
RESPIRADOR COM POTÊNCIA AUXILIAR Modelo PPR/2000
Instruções Operacionais e de Manutenção
RESPIRADOR ASISTIDO Modelo PPR/2000
Instrucciones de Funcionamiento y Mantenimiento
ELFORSYNINGS ASSISTERET RESPIRATOR - PPR/2000 Model
Operations og vedligeholdelses instruktioner
BATTERIDRIVET ANDNINGSSKYDD - Modell PPR/2000
Bruksanvisning och skötselinstruktioner
KRAFTTILFØRT ÅNDEDRETTSVERN - Modell PPR/2000
Bruks- og vedlikeholdsveiledning
MOOTTOROITU HENGITYKSENSUOJAIN - Malli PPR/2000
Käyttö- ja huolto-ohjeet
.Part No.
084.575.00
Iss A Apr 98

2
Protector Respiratory
Protector Technologies Europe
Pimbo Road, West Pimbo,
Skelmersdale Lancashire WN8 9RA
United Kingdom
Tel: +44 (0) 1695 711711,
Fax: +44 (0) 1695 50819

1
WARNINGS.
Refer to BS 4275 1997 for guidance in
the selection of appropriate respiratory
devices. Do not use when
concentrations or contaminants are
unknown.
THIS RESPIRATOR DOES NOT
SUPPLY OXYGEN Do not use in an
oxygen deficient atmosphere
containing less than 19% by volume
under normal atmospheric pressure.
Do not use in an explosive atmosphere,
where the explosion hazard requires
the use of Intrinsically Safe respiratory
protective equipment.
The wearing of beards, sideburns,
moustaches or spectacles may
adversely affect sealing of the mask to
the wearers face or the operation of the
exhalation valve.
At very high work rates, pressure
inside the facemask may become
negative at peak inhalation.
Altering or modifying this respirator
invalidates all approvals and may
reduce wearer protection.
In the unlikely event of power failure
while in use, do not remove respirator,
breathe normally. The respirator will
continue to provide a high degree of
protection, acting as a standard
negative pressure filter equipment.
Exit the hazardous area immediately
and report the fault.
1. IMPORTANT POINTS TO NOTE
Please read carefully. Should you require clarification
of the instructions given in this manual, please contact
Protector or an approved Protector distributor.
The instructions for pre-use, donning, after use cleaning
service and maintenance given in this manual must be
fully understood and followed carefully to ensure wearer
protection. Special attention must be given to the notes,
important notes, cautions, warnings and labels on the
respirator before use. Failure to do so may reduce
respirator effectiveness and result in serious injury, or
death.
Notified Body
Inspec Certification Ltd (Number 0194),
Upper Wingbury Courtyard, Wingrave, Aylesbury,
Buckinghamshire, HP22 SLO, UK
1.1 GENERAL PRECAUTIONS TO BE
OBSERVED DURING SERVICING AND
MAINTENANCE.
1. All assemblies must be serviced and maintained
strictly in accordance with the instructions given in
this manual.
2. Use only Protector spare parts when servicing
and maintaining this respirator.
3. Use only the correct tools, as specified, taking
care to avoid damage to components.
4. Keep service and maintenance area clean. Make
certain that all components are clean before
reassembly.
5. Carefully examine each component for signs of
wear or damage, and replace where necessary.
6. Use only recommended lubricant where specified
and apply sparingly, wiping off all surplus.
7. For identification of items numbered in
instructions, refer to exploded views and parts list.
8. This respirator with filter (4) is only for protection
against solid and liquid aerosols of negligible
volatility and decomposition.
1.2 TRAINING AND SERVICING.
a) This manual is not suitable for the purpose
of training respirator wearers or
maintenance personnel who have no
previous practical experience of respiratory
protective equipment.
b) Training and servicing programmes are
available upon request. Please contact
Protector or your approved distributor for
further details.
2. GENERAL DESCRIPTION
Phantom is a TM3 power assisted respirator conforming
to prEN 147 Rev 1995 with a nominal protection factor
of 2000. It has been Type Approved by lnspec
Certification CE 0194. Certificate No. 069.
The respirator comprises: a full facemask with an
integral blower, a mask mounted filter and waist belt
mounted battery.
The blower draws air into the facemask through the filter
and directs the filtered air up to the left side of the visor.

2
The constant flow of air keeps the visor clear of misting,
removes perspiration and provides air to the face.
Exhaled breath leaves the facemask out through the
exhalation valve in the side of the mask.
Wearers are able to decontaminate and shower after
work, whilst still wearing the respirator.
Weight: Facemask, with blower and filter
755g.
Battery
745g.
Temperature:
Operating: -5 to +60°C.
Storage: -30 to +70°C.
In accordance with BS4275 it is advisable that
respirators of this class are not used in contaminant
concentrations exceeding 40 x Occupational Exposure
Limit.
2.1 Facemask
The facemask is moulded in non-dermatitic silicone
rubber.
The visor complies with the optical and impact
requirements of EN166 Grade 1B.
2.2 Flowrate
The constant flowrate of the standard Phantom when
used with a PF251/2 filter exceeds 160 litres/minute for
not less than 6 hours and a minimum flowrate of 120
litres/minute. Maximum duration 8 hours.
2.3 Blower
The blower has a radial fan driven by a DC motor,
connected by coiled cable to a polarised bayonet plug.
The airflow produced is directed by a contoured grill
over the inside of the visor eliminating the need for an
inner mask.
Motor Life: 1000+ hours.
2.4 Phantom Filters
Specially developed for the power assisted respirator the
filter has a deep pleated internal structure, giving a large
surface area, which minimises clogging and the
resistance to breathing.
The louvred entry port, which deflects water droplets
during showering, has a raised lip for attaching the air
flow indicator required for pre-use checks. The lip also
retains the filter sealing cap used during facemask
donning and filter disposal.
If required a pre-filter is available.
2.5 Tornado Gas and Combined Filters
Phantom may be used with gas and combined filters
from the Tornado range. They MUST be used in pairs,
attached to a PHA94 hose adaptor. Complete
instructions are provided with the hose adaptor.
WARNING
Gas or combined filters MUST NOT be fitted
directly to the facemask. This will endanger
wearers and invalidate all approvals.
2.6 Battery
The nickel cadmium re-chargeable battery, has a
polarised bayonet socket which ensures correct and
positive connection. Internal electronics extend battery
life by controlling the power output over the full duration
of discharge.
Battery Life: 500+ recharge cycles.
2.7 Battery Charger
The battery charge with polarised bayonet plug has a
light emitting diode (L.E.D.) charging indicator.
Charging Time: 14 hours approximately.
2.8 Spectacle Frames(Optional Extra)
For spectacle wearers an approved spectacle frame,
which fits wholly within the face mask without
interfering with the mask to face seal, is available from
Protector or a Protector distributor (Part No.
036.007.00).
3. PRE-USE PROCEDURES
3.1 Unpacking
Check that all the following are present:
1) Facemask
2) Blower
3) Filter TMP3
4) Battery
5) Flow Indicator
6) 0-ring/Seal tool
7) Grease
Battery Charger, Holdall and Waistbelt options will be
supplied with Phantom if ordered.
3.2 Preparation and Pre-Use Check List
NOTE:
Ensure that the user has read and fully
understands this operating and maintenance
instruction manual.
3.3 Battery:
To ensure full duration, the battery should be charged for
at least 14 hours.
3.4 Blower
Ensure that the 0-ring is lightly lubricated with grease
(13) and correctly positioned in the forward groove on
the outside of the blower assembly.
Ensure that the filter seal is in position at the bottom of
the threaded port in the blower assembly.
Install the blower by feeding the plug and cable from
inside the facemask through the front opening. Press the
blower fully into its housing at the front of the facemask
and lock in place by firmly screwing in the filter.
Blower O-Ring
Filter Seal
Connect the plug into the battery by aligning the larger
of the two bayonet ears on the plug, with the larger of the
two slots in the battery socket.
The plug is keyed so that it will only enter the socket in
the battery neck when correctly aligned.
3
Push down and turn the plug clockwise 45° to the OFF
intermediate position.
The plug is now retained in the socket, ready to be
switched ON.
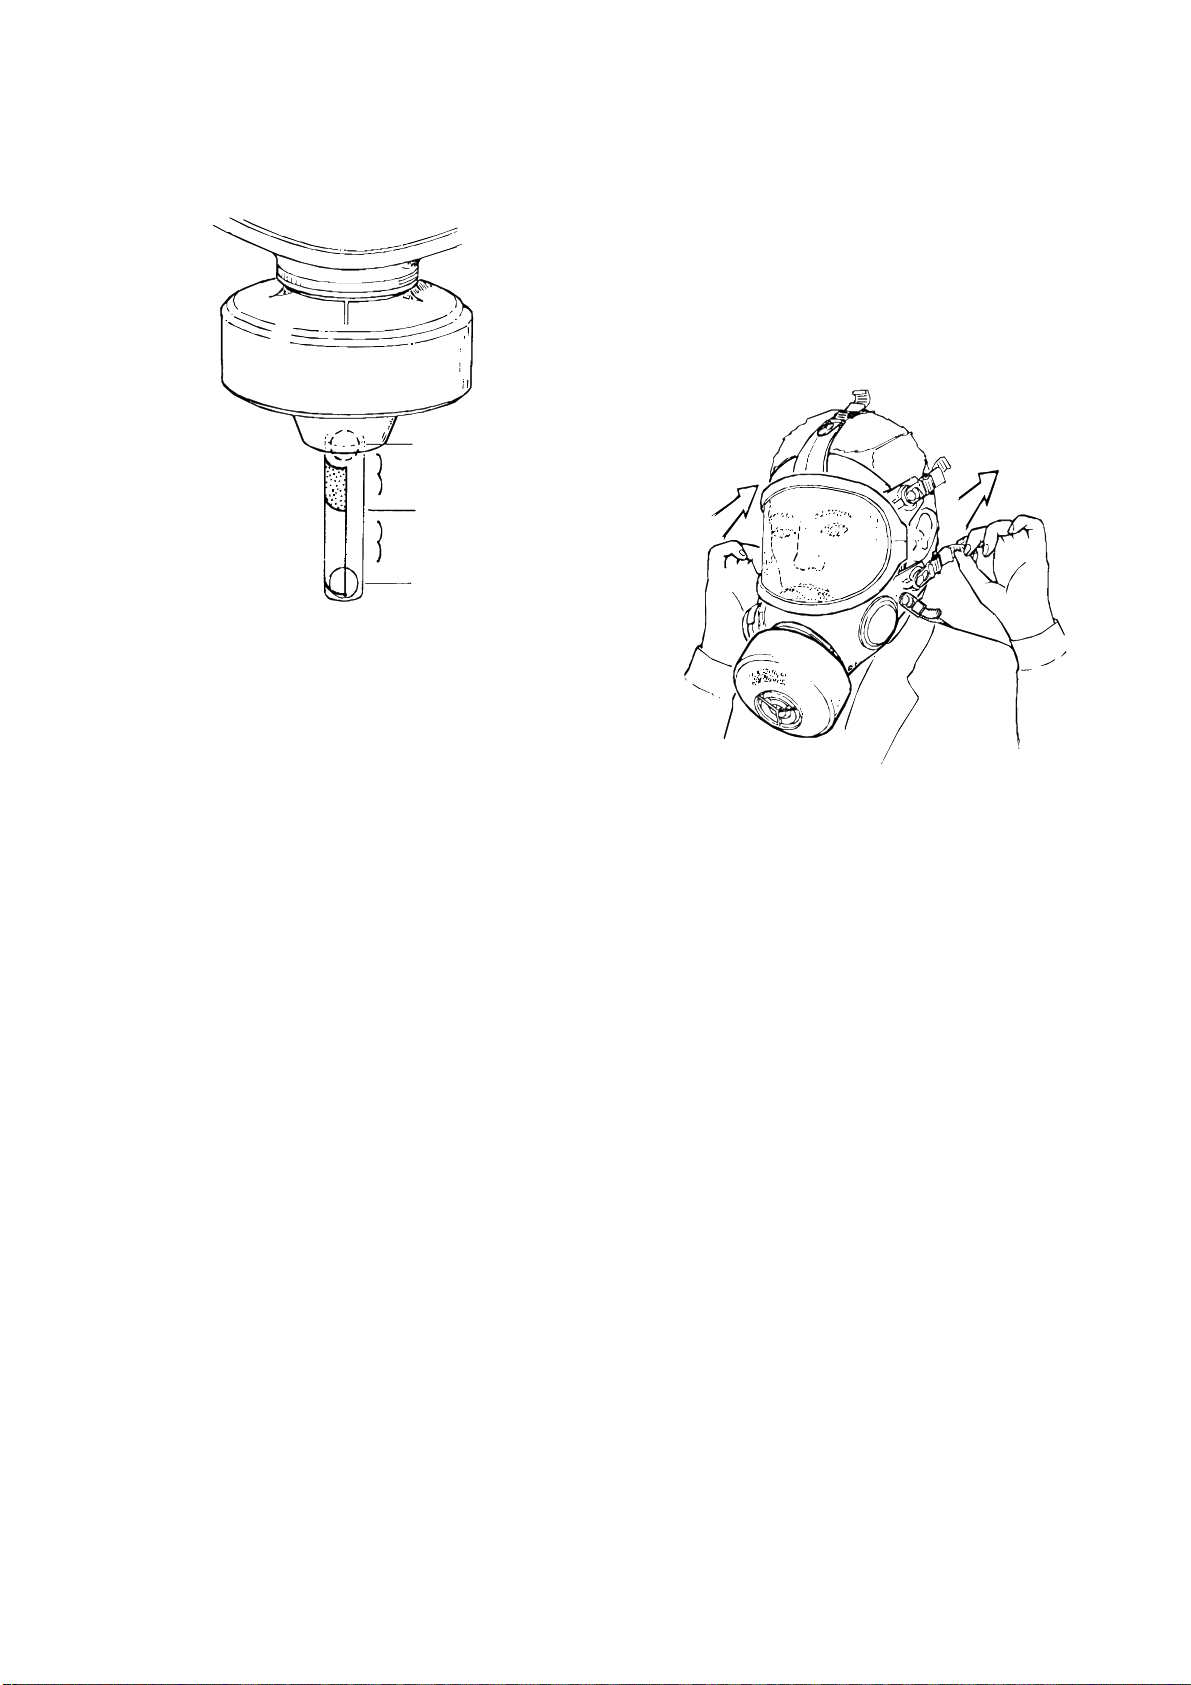
3.5 Flow Test
Final
Fail
Start
Flow Indicator.
IMPORTANT:
The flow indicator is a measuring device. Check
for damage, ensure that it is clean and dry
before flow test.
Remove the filter cap and connect the end of the flow
indicator to the lip of the louvred port on the front of the
filter.
Hold the facemask such that the flow indicator is
pointing vertically downwards. The float should fall to
the bottom of flow indicator tube.
Operate Phantom by rotating the battery plug fully
clockwise to the ON position.
Correct functioning is shown by the float rising to the top
of the flow indicator tube.
If the float does not rise to the top of the tube a low flow
is indicated. To determine the probable cause carry out
the following fault analysis:-
i) Renew filter and re-test - If the test now indicates
sufficient air flow the original filter was clogged
and should be discarded.
ii) If the flow is still insufficient, replace the battery
with one that is freshly charged - If the test now
indicates sufficient flow the original battery should
be recharged.
iii) If the flow is still insufficient, return the complete
respirator to an approved distributor for repair.
The flow indicator is removed by grasping the tab and
pulling directly away from the filter.
Replace the filter cap.
WARNING:
DO NOT use respirators that fail the flow test.
4. DONNING PROCEDURES
IMPORTANT:
Before using the respirator, ensure that a new
filter has been firmly screwed into place, the
battery is fully charged and the flow test has
been satisfactorily completed.
4.1 Donning
Attach the battery to a waistbelt through the loop
retainer.
Insert the plug on the end of the cable into the battery
socket and rotate clockwise to the intermediate OFF
position.
Check that the filter is firmly attached to the facemask
and remove the filter cap.
Adjust all head harness straps to the fully slackened
position and put neckstrap around the neck.
With thumbs inside the facemask, put chin into facemask
first and pull straps over head. Position facemask so that
chin fits snugly into chin-cup.
Gently tighten the head harness, lower straps first. Do
not overtighten.
4.2 Check Facemask Leakage
Place the filter cap, or palm of the hand over the filter’s
louvred entry port.
Inhale gently until the facemask collapses slightly
against the face.
Hold breath for 10 seconds. If the facemask falls away
from the face a correct seal has not been achieved.
Remove the filter cap, adjust the facemask, re-tighten the
head harness strap and repeat previous procedure.
When a correct seal is achieved, remove filter cap. DO
NOT use facemasks that do not seal.
5. CLEANING
WARNING:
When cleaning the respirator, suitable
precautions must be taken against the
inhalation of any harmful dusts and
contaminants that may be present on the outer
surfaces.
Cautions:
DO NOT use abrasive cleaning materials.
DO NOT use: detergent, petroleum spirit,
chlorinated degreasing fluids (e.g.
trichloroethylene) or organic-based solvents to
clean any part of the apparatus.
At the end of each work shift, the respirator must be
cleaned and, if necessary, decontaminated. These
procedures must always be carried out in a safe area.
Disconnect the plug from the battery.

4
Replace filter cap on the used filter, remove and dispose
of safely in accordance with any plant or safety authority
instructions.
Gently push the blower assembly out of the facemask
and feed the cable through the mask opening.
5.1 Facemask
Caution: Wash the facemask in tepid soap and
water solution. Use toilet soap not detergent.
Rinse thoroughly in clean running water, paying
particular attention to the exhalation valve.
After rinsing, shake the mask vigorously to remove
excess water and allow to dry away from direct heat or
sunlight. To avoid damage to the visor, do not place the
mask face down on rough surfaces.
Caution:
Dry the respirator thoroughly if it is to be stored
at temperatures below freezing.
Note:
Where disinfection is required, after rinsing, use
TriGene solution. Rinse the facemask
thoroughly in clean water.
When dry, polish the visor inside and out with a clean
lint-free soft cloth. Replace the visorguard for
protection.
Inspect individual parts of the facemask and replace
missing or damaged parts. Fully slacken the head
harness ready for use.
5.2 Blower
Cautions:
DO NOT immerse the blower assembly.
The blower is a sealed unit and cannot be
serviced beyond o-ring and filter seal
replacement.
Wipe the blower with a damp cloth or disinfectant wipe.
Inspect the O-ring and filter seal and replace if damaged.
(Refer to Servicing and Maintenance)
5.3 Battery
Caution:
DO NOT immerse the battery assembly.
The Battery may be wiped with a damp cloth.
The battery is a sealed unit and cannot be serviced.
6. MAINTENANCE
6.1 Charging Battery
Batteries must be charged in a safe area.
Optimum performance with new battery packs is
achieved after they have completed three charge cycles.
To maintain the optimum performance Protector
recommend that the battery pack is fully discharged
approximately once every fifty uses.
Plug the battery charger into a suitable mains supply.
Plug the charging lead into the battery socket and turn
fully clockwise to the ON position.
The red LED on the battery charger should illuminate
indicating that the battery is being charged. After normal
use (8 hours working), the battery should reach a full
charge in approximately 14 hours.
IMPORTANT:
The battery charger is a sealed unit and cannot
be serviced.
Store the respirator in a clean, dry area protected from
direct sunlight and extremes of temperature.
6.2 Facemask
6.2.1 Exhalation Valve
To remove the cover (14f) grasp the edge of the cover
and pull off. Inspect the exhalation valve flap (14d) for
debris, damage, or to see that it is flat and correctly
seated. Replacement is necessary at least yearly
regardless of condition.
Replace the exhalation valve cover by aligning it with
the base and depressing until it snaps into place.
6.2.2 Visor Replacement
Unscrew the two visor clamp screws and remove clamps
(2) from facemask.
Remove the visor (1) from the facemask.
Replace in reverse order, ensuring that moulding witness
marks on the visor and clamps are in line with the centre
line of the facemask. Lubrication of the inside groove of
the visor clamps with a soap and water solution will
assist assembly.
Both facemask and visor must be perfectly clean to
prevent leaks. The mask should be leak tested by a
Protector agent after visor replacement.
6.3 Blower Seals
The respirator has an o-ring (14a) between the blower
and the facemask, and a seal (14c) between the filter and
the blower. Both must be inspected for wear after each
use and replaced annually.
To replace the O-ring (14a) between the facemask and
the lower, the respirator must be dismantled as described
in CLEANING.
Lightly lubricate the new O-ring with grease (13) and
push it into the forward groove of the blower assembly.
The seal between the filter and the blower (14c) is
replaced by loosening the seal inwards from its flange,
using the seal tool provided.

5
Position the new seal in the cavity with the moulded
number downwards (So that it cannot be seen). Using
the seal tool, push the seal until it slips over the flange
and snaps into place. Continue around the seal until it is
evenly seated.

6
Phantom POWER ASSISTED RESPIRATOR
(Part No. PPR2000-Std)
62
1
3
4
14d
14c
11
16
10 57
9
8
14b
14a 15
Item Part No. Description
1071.102.90 Visor And Visorguard
2071.105.99 Clamp and Screw Pack, Visor
3071.345.03 Facemask
4PF251/2 Filter TMP3
5071.126.99 Neckstrap
6071.120.98 Head Harness
7071.270.99 Button Spares Pack (7)
8008.017.99 Buckle Spares Pack (5)
9PPR2000/Motor Blower
10 PPR/BATT/1 Battery
11 RXPBC/2000/3 Battery Charger for UK.
RXPBCM/2000/2 Battery Charger for Europe
13 074.101.02 Grease
Item Part No. Description
14 095.048.00 Service Pack Annual with:
14a Blower 0-ring (1)
14b Filter Seal (1)
14c Exhalation Valve Cover (1)
14d Exhalation Valve Flap (1)
14e Grease (1)
15 071.302.99 Support (5)
16 ECWB Waistbelt
17 BAG/PPR Holdall
089.176.02 Flow Indicator
071.151.99 Clear Visor Cover (20)
084.090.02 Instruction Manual
PHPF Prefilter (10)

7
Table of contents


