Prolux X8 Lite User manual
1

Prolux X8 Backpack Vacuum
For your safety please read the owner’s manual in its entirety before use.
Congratulations on purchasing your very own Prolux X8 Lite Backpack Vacuum Cleaner.
This high-end kit is designed to cut cleaning time in half without breaking the bank. Keep
your floors clean, and prolong the life of your flooring in just a few easy steps. Prolux….
Cleaning Reinvented! Welcome to the Prolux family and don’t forget to register for your
lifetime warranty at www.proluxcleaners.com.
Table of Contents
2

Quick Assembly 4
Specifications 5
Warranty 6
Safety Precautions 7-9
Description of Parts 10-11
Unpacking and Assembly
Assembly 12
Operation
Using the Attachments 13
Hose Operation 14
Using Your Vacuum 15
Maintenance
Replacing the HEPA Dust Bag 16
Replacing the Cloth Dust Bag and Filters 17
Frequently Asked Questions 18
Troubleshooting 19
Warranty 20-21
3


Specifications
●Lightweight - Canister only weighs 10 pounds.
●10 Amp Motor - Powerful deep cleaning with 140 CFM of Airflow. (most vacuums have
around 80)
●Dependable - LIFETIME motor warranty and 3-year body warranty. (LIFETIME/3 year
warranty pertains to registered machines only)
●4 Stages of Filtration - Cloth Bag, HEPA Filter, Exhaust filter along with superior
performance HEPA bag, make sure the air leaving the vacuum is as clean as it should be.
●50’ Extension Power Cord.
●Durable Hose - 6 Foot crush proof hose with heavy duty ends and suction relief valve.
●32mm Commercial Grade Attachment Set with Button Locks.
●Comfortable and Adjustable Straps and Harness.
●Optional Electric Powerhead Kit Available.
●Complete Home Care Tool Kit - Includes a tool for every vacuuming need.
5

WARRANTY
Here at Prolux we take pride in the quality of our products, so the majority of our time and
money is spent on R&D rather than advertising. Because of this we feel very confident in the
quality of our products and feel very comfortable being able to offer a LIFETIME motor
warranty and a 3 year body warranty. We only require that you MUST register your machine
within 90 days of purchase. If a machine is not registered then we will only offer a 1 year
warranty, which will cover both the motor and body. When you register your machine not
only will you receive the LIFETIME/3 year warranty you will also receive:
●FREE shipping on any warranty claims.
●FREE shipping on any order returned within the 61 day return period.
●Mailing list notifications - The #1 thing that kills vacuums is not keeping up on
maintenance, so when you register your product we will provide reminders when it’s
time to replace your filters, buy bags, etc.
●Coupons and offers for discounts on supplies.
Registering is simple. Just go to the warranty section of our website below and fill out the
form. Once registration is complete you’ll then be covered.
https://proluxcleaners.com/pages/warranty
With over 20 years in business, superior products, an honest, hardworking team, unparalleled
leadership and many years spent on Utah's fastest growing business list, you can rest assured that
Prolux will be here to back up our warranty claims. We strive to provide responsive and pleasant
customer service experiences and to develop exceptional products that you can count on! When we
say lifetime…we mean lifetime. - PROLUX
6

IMPORTANT SAFETY INSTRUCTIONS
Vacuum Safety
Read the owner's manual in its entirety before using this product.
Failure to do so can result in serious injury or death. Prolux takes no
responsibility for damages/injuries due to violations of the following
operating instructions.
To reduce the risk of fire, electric shock, or injury:
Keep the operating manual for reference. Include the operating manual if you pass the
appliance to third parties.
When using an electrical appliance, basic precautions should always be followed, including
the following:
Notices Given:
Notices for your safety are specially marked. Always observe these notices to avoid any
damage to the appliance.
WARNING: Warning concerning health hazards describing possible risks of injury.
ATTENTION: Warning concerning possible dangers to the appliance or other objects.
NOTE: Highlights tips for you.
WARNING - To reduce the risk of fire, electric shock, or injury:
1. Do not leave the vacuum cleaner plugged in. Unplug from outlet when not in use, or
before servicing.
2. Use only as described in this manual. Use only the recommended attachments and
replacement parts.
3. To reduce the risk of electric shock, do not use outdoors, on wet surfaces, and do not
use it for wet pickup/cleanup.
4. Do not use the vacuum with a damaged cord or plug. If it is not working as it should,
has been dropped, damaged, left outdoors, or dropped into water, take it to a service
center before use.
5. Do not use cord as a lasso to round up loose children and pets.**
**Yes, yes, we have intentionally placed a couple “interesting” warnings in hopes that you
would read them all… But in all seriousness these warnings MUST be observed!!!
7

SAFETY CONTINUED
6. Do not pull or carry the vacuum by its power cord, do not use the power cord as a
handle, do not close the door on the power cord, or pull the power cord around sharp
edges or corners. Do not run the vacuum cleaner over the power cord. Keep the power
cord away from heated surfaces.
7. Only use extension cords suited to the power requirements of the appliance.
8. Never immerse the appliance in water or other liquids.
9. Only operate the appliance if your outlet voltage is the same as indicated on the
appliance's nameplate. Using the wrong voltage can destroy the appliance.
10. Do not unplug the power cord from your wall by pulling on the cord. To unplug,
grasp the end of the plug, not the cord.
11. Do not handle the power cord/plug or vacuum cleaner with wet hands.
12. Do not put any object into the openings of the vacuum. Do not use the vacuum with
any openings blocked. Keep openings free of dust, lint, hair and anything that may
reduce airflow.
13. Keep hair, loose clothing, fingers, and all body parts away from openings and moving
parts of the vacuum.
14. Turn all controls off before unplugging the vacuum.
15. Do NOT wield the telescopic wand as if it were a lightsaber**
16. Use extra care when cleaning on stairs.
17. Do not use it to pick up flammable or combustible liquids, such as gasoline or in areas
where they may be present.
18. Hold the end of the plug on the power cord when rewinding the cord into the cord
reel. Do not allow the plug to whip when rewinding.
19. Unplug the vacuum before connecting the hose.
20. Do not pick up anything that is burning or smoking, such as cigarettes, matches, or
hot ashes.
21. Do not use the unit without bags and/or filters in place.
22. If the power cord is damaged, the manufacturer or an authorized service center must
replace it, in order to avoid a hazard.
23. This appliance is not intended for use by persons (including children) with reduced
physical, sensory or mental capabilities, or lack of experience and knowledge, unless
they have been given supervision or instructions concerning the use of the appliance
by a person responsible for their safety.
**Yes, yes, we have intentionally placed a couple “interesting” warnings in hopes that you
would read them all… But in all seriousness these warnings MUST be observed!!!
8

Do not vacuum or clean:
- Hair and other parts of the body. They could be sucked in and cause injury.
- Pieces of Clothing (e, g, shoe laces, scarves, etc.). They could be sucked in and cause
injury.
- Water and other liquids, especially moisture from carpet cleaning agents. Moisture
inside the appliance can lead to short-circuiting.
- Toner dust (from laser printers. copying-machines. etc.). There is danger of fire or
explosion.
- Pointed objects such as glass shards, nails, etc. Such objects destroy the filters.
- Plaster, cement, and fine drilling-dust, makeup. etc. The filters may clog causing
damage to the appliance.
- Never use the appliance near flammable or explosive materials -- there is danger of
fire or explosion.
-Never use the appliance outdoors -- there is danger of rain and dirt destroying the
appliance.
Children
Never leave the appliance unattended, and always take special precaution if children or
persons who cannot judge dangers are nearby.
Proper storage, supervision and keeping children at a safe distance during operation will help
avoid the following dangers:
- Strangulation by cord.
- Tripping accidents.
- Getting hair, appendages or clothing stuck in vacuum ports.
- Other unforeseen boo boos of various severity.** Though silly, this one is true!
Persons (including children) who are unable to safely operate the appliance on account of
physical, sensory, or mental abilities, or lack of experience or knowledge should only use this
appliance under supervision or instruction of a responsible person. Packing materials are not
toys. There is danger of suffocation, KEEP OUT OF REACH OF CHILDREN.
**Yes, yes, we have intentionally placed a couple “interesting” warnings in hopes that you
would read them all… But in all seriousness these warnings MUST be observed!!!
9
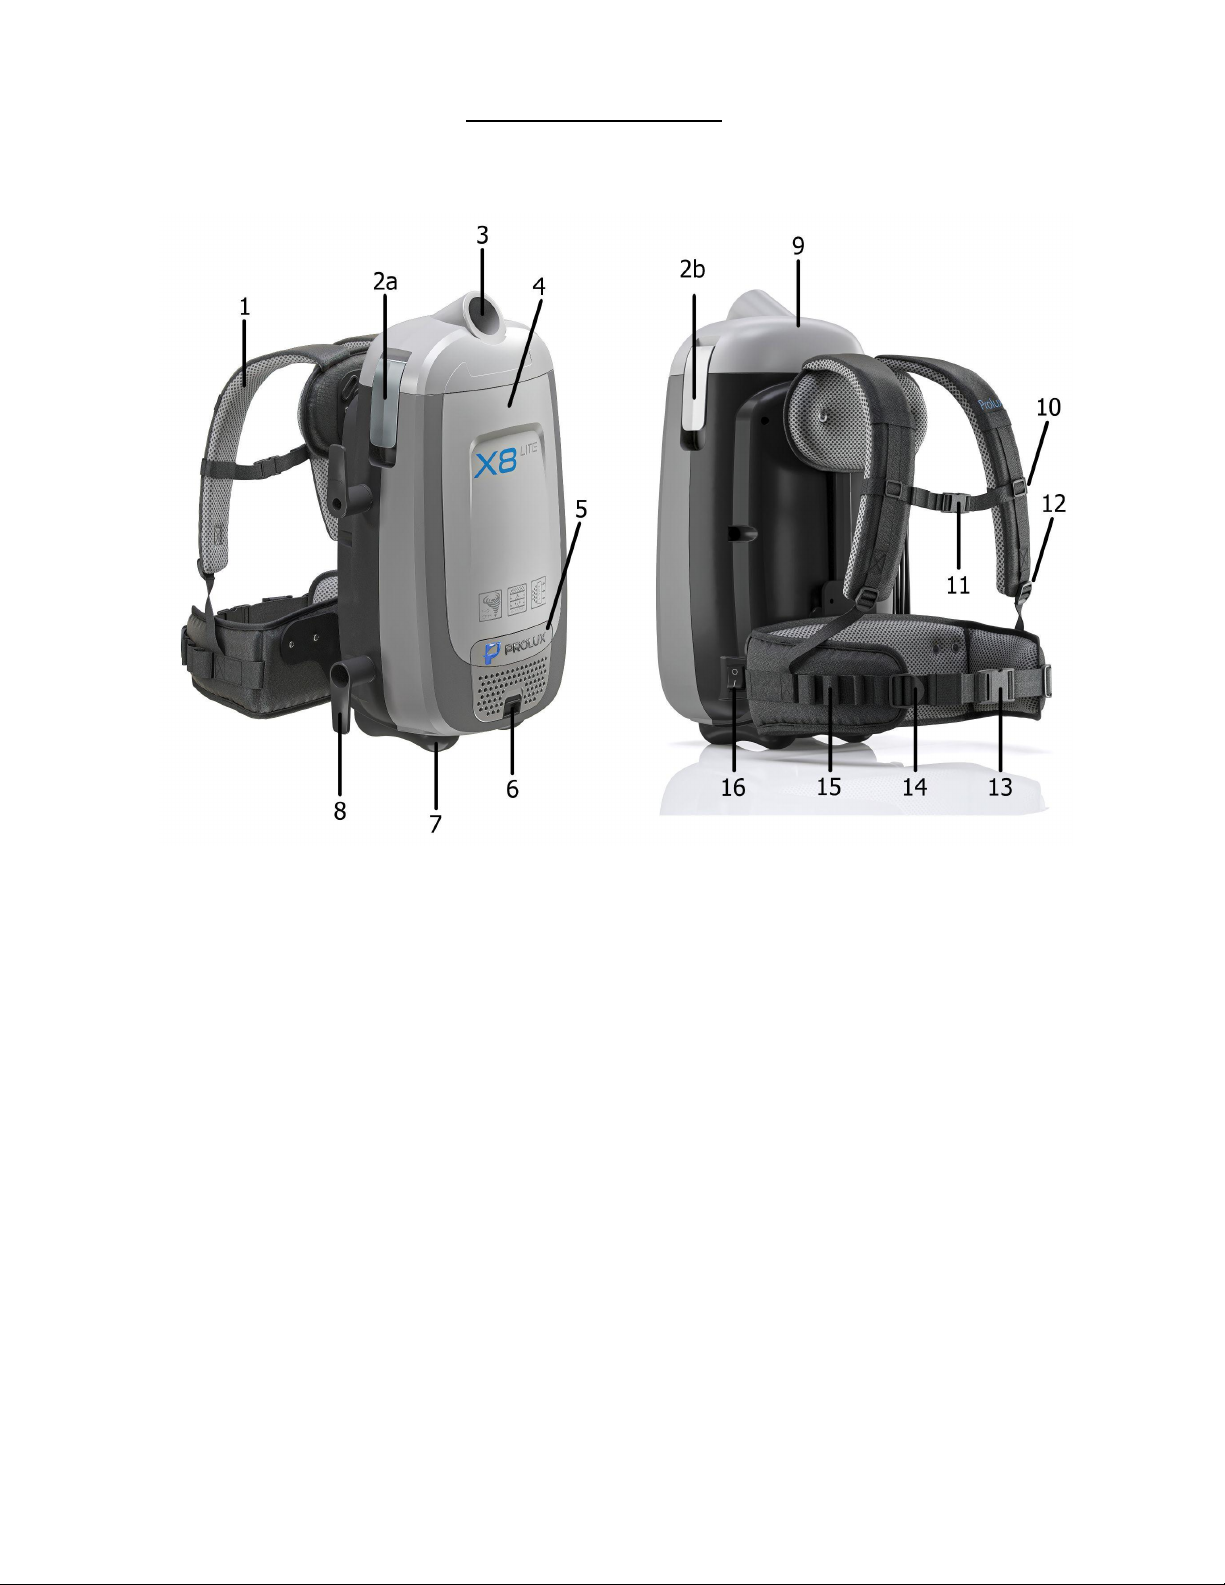
Description of Parts
1. Breathable Cushioned Straps 9. Canister Lid
2a-b. Lid Latches 10. Chest Support Adjustment
3. Suction Port 11. Chest Clip Adjustment
4. Main Unit 12. Shoulder Strap Adjustment
5. Exhaust Filter Cover 13. Waist Support Clip
6. Exhaust Cover Release 14. Waist Support Adjustment
7. Reinforced Bottom 15. On Waist Tool Storage
8. Cord Wrap 16. ON/OFF Switch
10

Description of Attachments
1. Upholstery Tool 8. Suction Relief Valve
2. Duster Brush 9. Wand Button Lock
3. Crevice Tool 10. Telescopic Wand Release
4. Slide Off Bristles 11. Stainless Steel
5. Floor Brush Tool 12a-b. Storage Mount
6. Easy Glide Floor Tool 13a-e. Button Lock Release
7. Soft Scratch Proof Wheels
11

ASSEMBLING YOUR VACUUM
Once all items have been removed from the shipping box first INSERT THE HEPA DUST
BAG BEFORE USING
Important: For best results do not use the vacuum without all filters, cloth dust bag, and the
HEPA dust bag in place.
NOTE: This model can be used with the cloth dust bag only, however it is not recommended and MUST BE
cleaned after every use if no HEPA bag is installed to assure proper air flow.
1. Turn off the power with the switch and remove the flexible hose if attached.
2. To open the canister lid press on the canister lid tabs on each side of the unit and lift the
canister lid. (Fig.1)
3. Pull the tab on the HEPA dust bag holder out slightly and flip upwards. (Fig 2)
4. While holding the HEPA dust bag in your hand, slide it firmly between the slots in the bag
holder. (Fig 2)
5. The cardboard face of the new bag should rest securely in the dust bag cover guide. (Fig 3)
6. Ensure that the cloth bag is in place. (Fig. 4)
7. Flip the patented HEPA bag holder over, pressing the tab on the bag holder until it clicks
then replace the canister lid.
12

Using The Attachments
Prolux is proud to include the highest quality attachments available! Through research and
development and trial and error… Prolux has finally perfected vacuum attachments, matching
durability with functionality! This is Cleaning…Reinvented!
●Carpet/Floor Tool - High quality carpet and rug tool glides effortlessly across all
carpeted surfaces. (Fig 5) *Expert Tip: For greater longevity of the tool regularly clean hair that may
get caught in between the wheels and body of the tool.
●Hard Floor Tool - Wide, soft bristled hardfloor brush ensures quick cleaning without the
worry of damaging even delicate floor surfaces. (Fig 6)
●Dusting Brush - The dusting brush is your answer to dusting furniture, wood or laminate
blinds and fan blades. (Fig 7) *Warning: NEVER attempt to dust a fan while it is moving.
*Note: Never press hard into delicate surfaces. Allow only the brushes to move lightly across
surfaces.
●Crevice Tool - Perfect for radiators, crevices, corners, baseboards and in-between
cushions. (Fig 8)
●Upholstery Tool - Best used for couches, cars, stairs, pet hair & more. (Fig 9)
Note: This tool is not a grooming tool and should not be used on animals.
Note: Do Not use The Upholstery tool on delicate or woven Fabrics that may snag.
Note: Do Not use The Upholstery tool on wooden floors as this accessory might cause
mild scratching.
13
Attaching the Flexible Hose to the Vacuum
Attach the flexible hose to the vacuum before strapping the unit on.
1. To connect the flexible hose into the hose inlet, insert the end of the flexible hose into the
hose inlet and press firmly until the hose feels secure in the inlet.
2. Put the main canister on in the same way you would put on a backpack. Then adjust the
shoulder straps and hip belt to the proper size to fit. Turn on the switch by reaching behind
you and flipping the switch to the ON position.
3. To connect the hose to the telescopic wand, simply line up button lock with the indentation
on the wand and push until they click together.
4. To remove the wand press the black button (10 on page 11 of this manual) and pull apart
carefully.
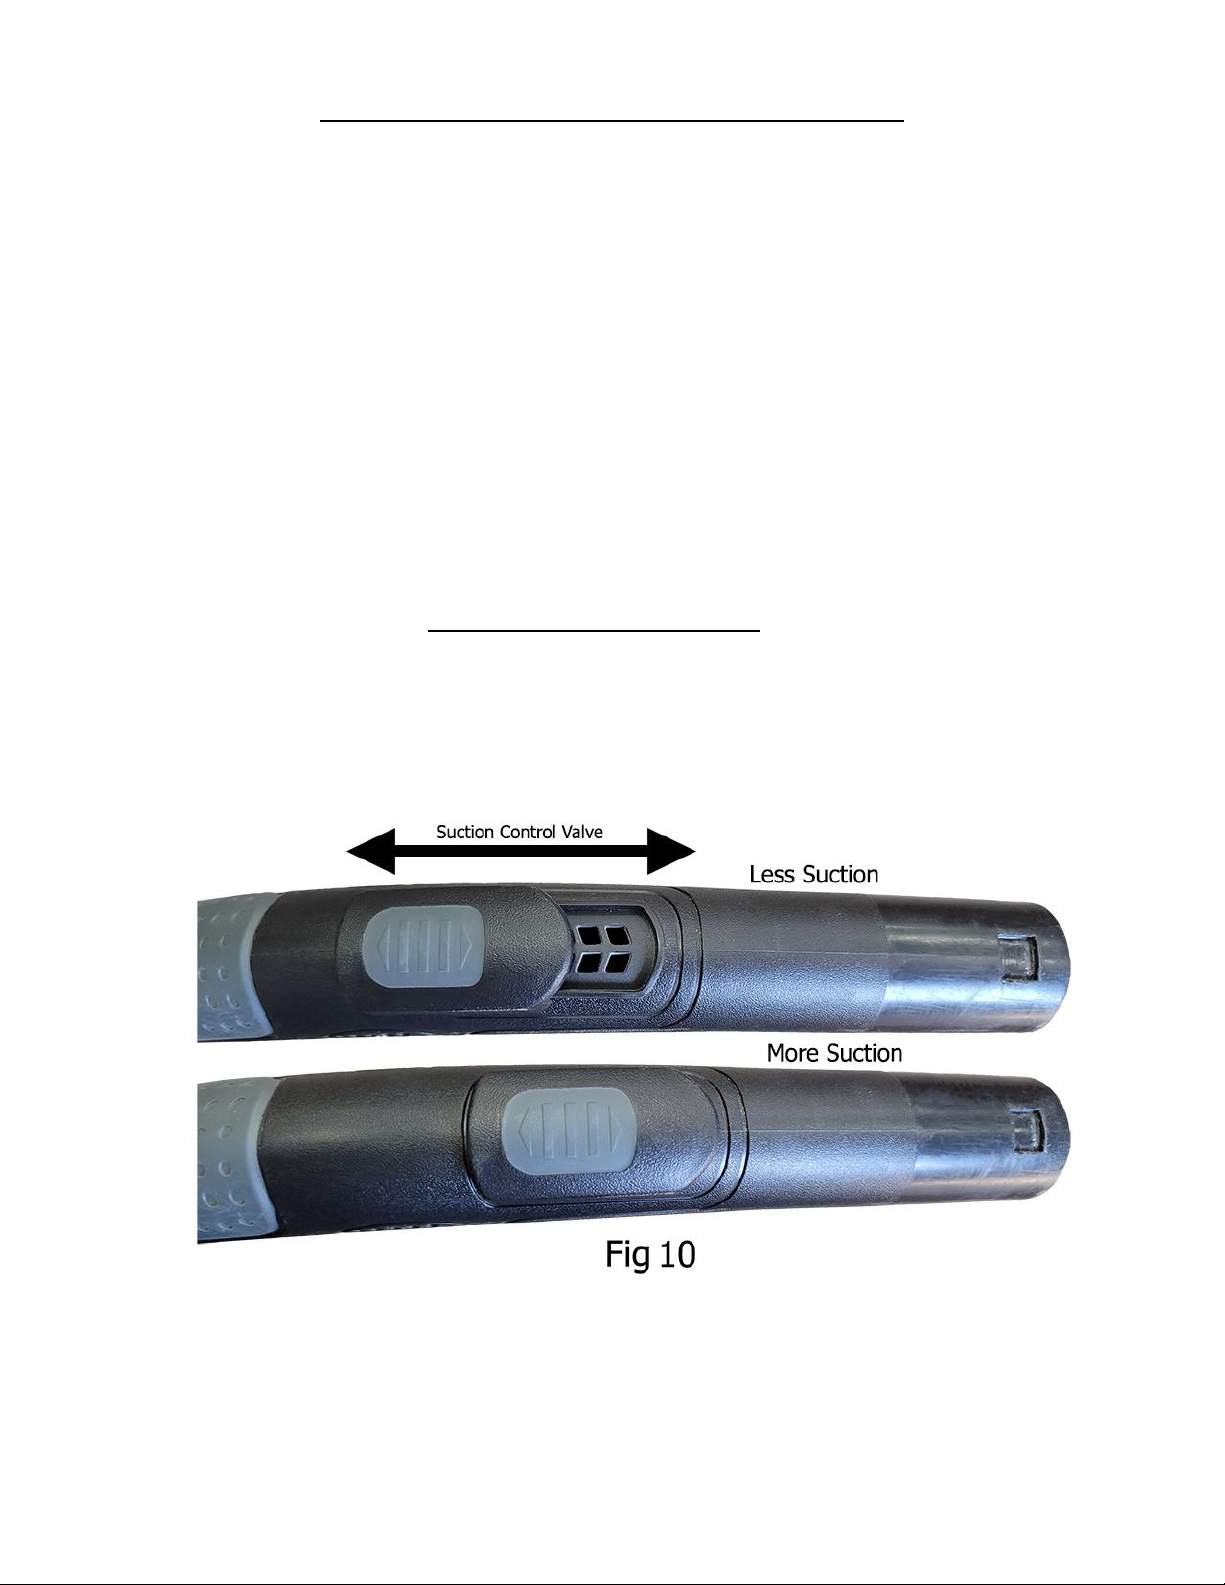
Manual Suction Control
Your vacuum cleaner includes a manual variable suction control on the flexible hose
handle. The suction power can be adjusted by moving the suction regulator to the desired
position between open and closed. The more open the valve is, the more it will reduce the
suction. (Fig 10)
14
Using Your Vacuum
1. Ensure all bags and filters have been installed prior to using the vacuum.
2. Connect hose to top lid assuring you have pressed the friction fit hose firmly into place.
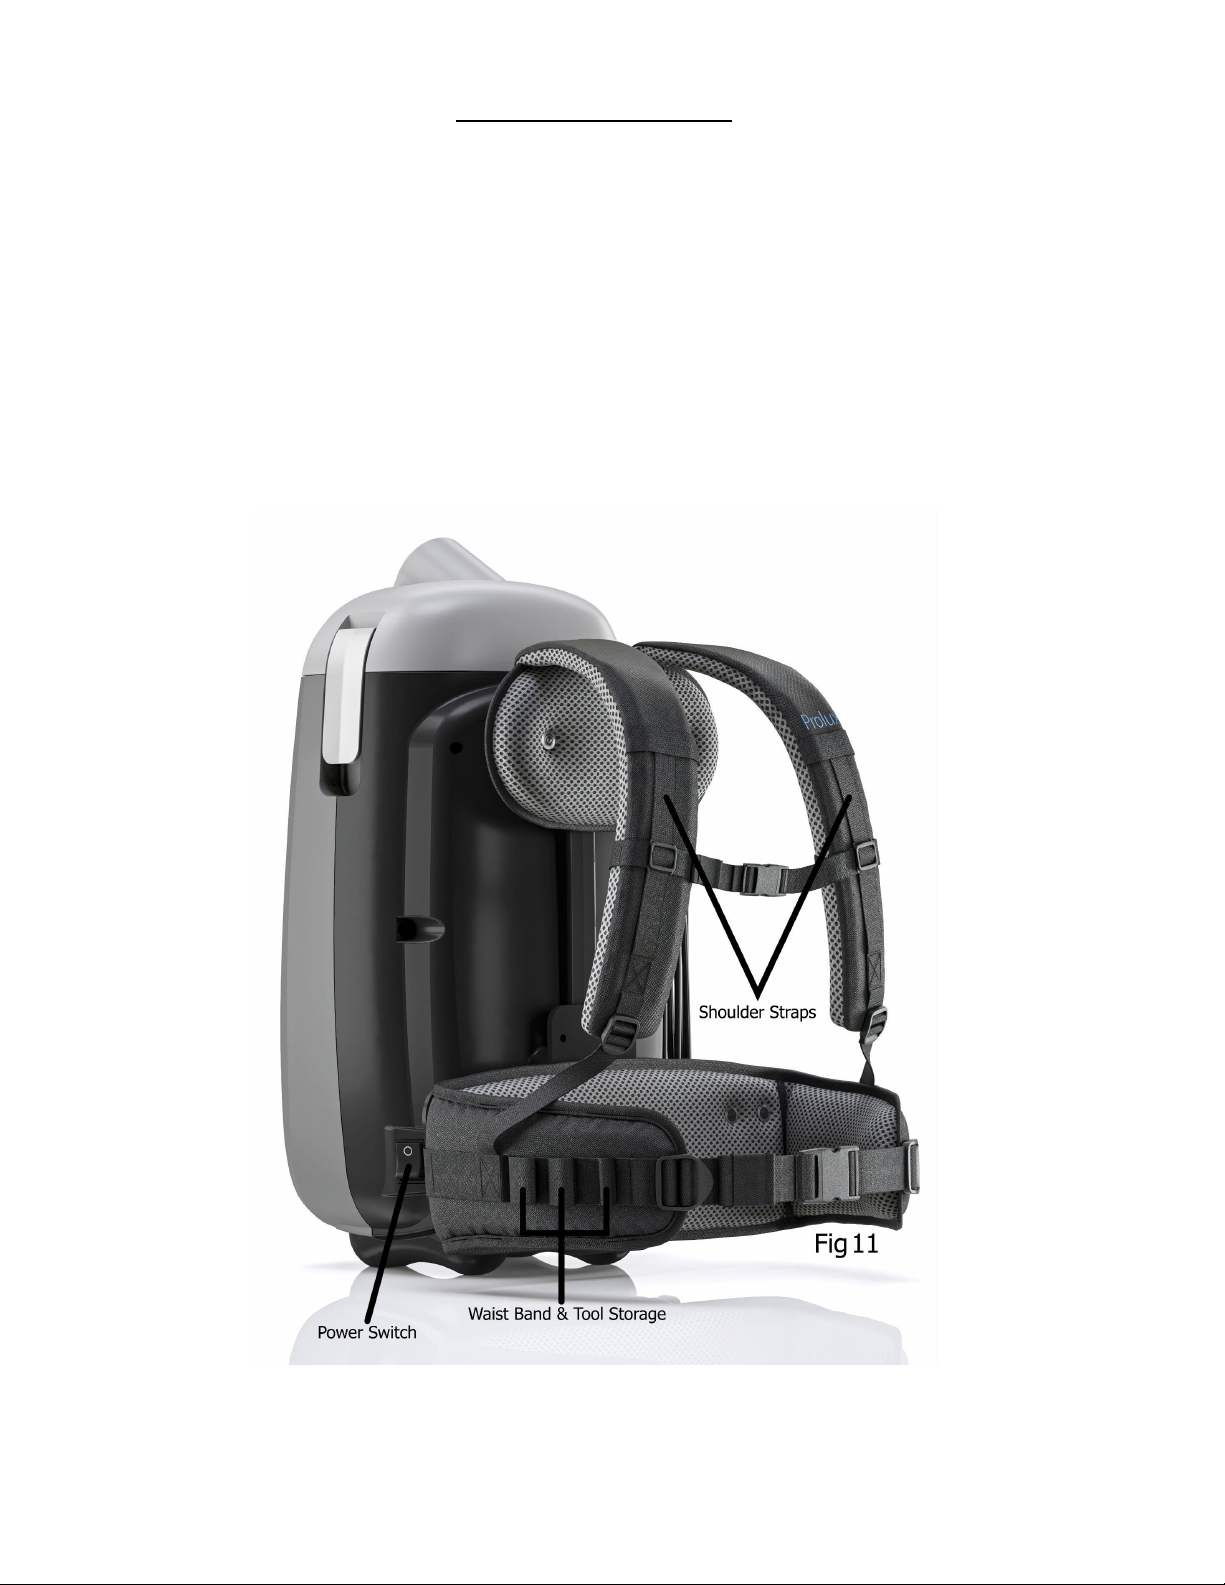
3. Correctly place shoulder straps on each shoulder and secure the waistband with hook and
loop strips. (Fig.11)
Caution: If the waistband and both shoulder straps are not properly and securely in
place the unit could fall off your back causing damage or injury.
4. Select the desired attachments and connect them to the hose or wand.
5. Power the unit on by pressing the switch located near the base of the right hand side of the
unit. (Fig.11)
15

Removing & Replacing HEPA Dust Bag
Important: For best performance DO NOT use the vacuum without all filters, cloth dust
bag, or without the HEPA dust bag in place.
1. To remove the HEPA dust bag, press on the canister latches on each side of the unit and
then lift the canister lid off. The dust bag will come out when the lid is removed (Fig 12)
2. Pull the tab on the HEPA dust bag holder out slightly and lift upwards. (Fig 13)
3. Holding the HEPA dust bag top in your hand, slide it out from the slots in the bag holder.
Hold carefully to avoid having dust fall out of the HEPA dust bag.
4. Replace the HEPA dust bag with a new bag by inserting the cardboard bag top into the bag
holder and sliding it in. Do not reuse the same vacuum bag.
5. The cardboard face of the new bag should rest securely in the dust bag cover guides. Flip
the bag holder over and press the tab until it clicks, locking the bag into place.
6. Cleaning the cloth bag is recommended at this time. Once cleaned, place the clean cloth
dust bag into the vacuum.
7. Insert the HEPA bag back into the vacuum and replace the canister lid locking it into place
by latching the lid clips back down.
NOTE: Never overfill the HEPA Dust bag – replace when bag is full and clean the cloth dust
bag and filter each time the HEPA dust bag is replaced.
16

Note: Clean the cloth dust bag outdoors when changing the HEPA dust bag. Optimum
filtration is achieved by using the HEPA dust bag in conjunction with the cloth dust bag
●Cleaning the Cloth Dust Bag When Using HEPA Bags :
1. Remove the cloth dust bag by grabbing the top lip of the bag and lifting upward and out of
the vacuum. Shake out vigorously outdoors over a garbage receptacle until there is no more
dust. Blowing the bag out using compressed air also works well.
2. Inspect the cloth dust bag regularly for tears or damage. Replace the cloth dust bags if
damage or tears are present.
●Cleaning the Cloth Dust Bag when Used Alone (not suggested):
1. Remove the cloth dust bag, empty into trash can, and shake vigorously outdoors until there
there is no more dust.
2. The cloth dust bag is hand washable in lukewarm water.
3. Allow to air dry for 24 hours. The cloth dust bag should be replaced when needed.
Never place the bag into the vacuum if still wet.
Note: If used often without HEPA dust bag, replacement and washing will be required
more often.
4. Replace with the clean cloth dust bag and close the canister lid.
●Cleaning the HEPA Pre-Motor Filter
Important! Please Note: The HEPA pre-motor filter will stop most of the tiniest dust
particles and airborne allergens from re-entering the air you breathe. In fact it stops
99.97% of all particles as small as 0.3 microns. That is smaller than a human hair!
Because of this incredible filtration performance, the HEPA pre-motor filter will accumulate
many fine dust particles that are difficult to see. Be assured that the HEPA pre-motor filter
is doing the job. Clean the HEPA pre-motor filter often as described in this section.
1. Remove the lid and cloth dust bag from the canister. The HEPA pre-motor filter is located
underneath the cloth dust bag in the bottom of the bag chamber. To remove the HEPA
pre-motor filter lift from the sides of the HEPA filter and lift upward.
2. Vigorously “TapClean” the HEPA pre-motor filter on a hard surface to remove any
residual dust that might still be on the HEPA pre-motor filter.
3. You can wash the HEPA pre-motor filter by running it under the tap and allowing the
water to run on the dirty side when it appears dirty or suction is reduced. Blowing the filter
out with compressed air also works very well.
Never use your vacuum with a wet filter in place. Let the filter dry completely before
placing it back into the vacuum.
●Cleaning the Exhaust Filter
1. Remove the exhaust filter cover to access the filter and pull the filter out
2. To clean the filter tap the filter over a dust bin or spray the filter with compressed air
3. Inspect the filter for any damage and reinstall the filter
4. Install the filter cover and lock it into place
17

Frequently Asked Questions
1. Why is my vacuum not picking up?
- Vacuum bag is full. Open top of the unit and check bag capacity.
- Clog in the hose or wand. Remove the hose from the vacuum. Seperate the
hose from the wand. Check for clog. If clog is found using compressed air at a
low pressure is the ideal means of removal.
- Clogged filter not allowing proper airflow. Remove and clean your filters by
lightly tapping on the edge of a garbage can.(preferably outdoors) You may
also use compressed air at a low pressure.
2. Why is my vacuum not turning on?
- Check if it is plugged in, check if the button on your surge protector is set to
on… We know, We know, but you would be surprised how many customer
service inquiries are solved with that sentence. Happens to the best of us.
3. Why is my vacuum getting hot?
- Vacuum bag is full. Open top of the unit and check bag capacity.
- Clog in the hose or wand. Remove the hose from the vacuum. Separate the
hose from the wand. Check for clog. If clog is found using compressed air at a
low pressure is the ideal means of removal.
- Clogged filter not allowing proper airflow. Remove and clean your filters by
lightly tapping on the edge of a garbage can.(preferably outdoors) You may
also use compressed air at a low pressure.
4. Can I use an electric powerhead with this model?
- Yes. It can be purchased separately at:
https://proluxcleaners.com/products/prolux-x8-backpack-electric-powerhead-kit
5. How often should I replace the vacuum's filters?
- 3-12 months depending on use and the state of your home. Most people will
need replacement filters around 6 months but if you live in an exceptionally
dusty environment or have multiple shedding furry friends you will want to
change them more frequently.
6. Where do I purchase replacement bags, filters and parts?
-proluxcleaners.com
7. I need help with something regarding this vacuum, who do I contact?
8. Can one suck a ghost into this vacuum?
- We can not be certain… but we do know ectoplasm is no good for filters, Bust
responsibly.
18

Troubleshooting
WARNING: Never use a defective appliance. Always switch off the appliance and disconnect it from the
outlet or remove the battery before you start to troubleshoot.
Fault
Possible Cause(s)
Solution
The vacuum will not turn on.
The plug is not connected to the
electrical wall outlet or the
appliance is not switched to the
“on” position.
Insert the plug into an electrical
wall outlet and flip the “on/off”
switch to the “on” position. See
section “Vacuum Cleaning.”
Electrical wall sockets do not
carry current.
Test the vacuum cleaner on
another outlet that you are sure is
carrying current.
The power cord is damaged.
Replace with a new cord by an
authorized service center or
professional technician.
Suction power is low.
The bag or filter is full or
clogged.
Change or clean the bag/filter
The power nozzle, attachment
wand, or suction hose is clogged.
Remove the debris that is causing
the clog. If necessary, use a long
wooden stick (e.g. a broomstick)
or coat hanger to do this.
The bag or filter is installed
incorrectly.
Remove the bag and filter and
reinstall; making sure these are
correctly put into place when
reinstalling.
The tool attachment being used
does not work properly on the
surface you are vacuuming.
Attach the appropriate tool for the
surface you are vacuuming. See
page 14.
Dirty filter(s).
Change/clean the filter(s). See
page 19.
The vacuum makes unusual
noises, or is louder than usual.
The power nozzle, attachment
wand, suction hose, or filters are
clogged.
Remove any clogs. If necessary,
use a long wooden stick (e.g. a
broomstick) or coat hanger to do
this.
19

Why do I have to register my warranty within 90 days to get my
Lifetime Warranty?
Great question! Do you know what normally kills a vacuum cleaner?
1. Vacuum Bag being overfilled which causes the motor to overheat.
2. Improper cleaning and not replacing filters, which overheats the motor.
3. Improper brush roll maintenance; such as not regularly clearing hair and carpet fibers
that wrap around it, overheating the motor.
LOL, do you see a trend? In other words, proper maintenance will add years to your
vacuum’s life. When you register your warranty, we will email you maintenance tips, remind
you when it is time to maintain your vacuum, provide product info updates, and coupons for
more carpet shampoo or fragrances for your water. We do not ever require you to purchase
anything OR to prove that you are maintaining your vacuum to be covered by the lifetime
warranty. All we care about is that you are getting our reminders. Normally we send out
maintenance email reminders once every 6 months.
To register for your Lifetime Warranty, go to
https://proluxcleaners.com/pages/warranty
or scan below with your phone
20
Table of contents
Other Prolux Vacuum Cleaner manuals

Prolux
Prolux 2.0-PRO Technical manual

Prolux
Prolux Ion User manual

Prolux
Prolux AllVac User manual

Prolux
Prolux 2.0 Technical manual

Prolux
Prolux X8 Elite User manual

Prolux
Prolux CTX User manual

Prolux
Prolux RS7 User manual

Prolux
Prolux QX-90 User manual

Prolux
Prolux Lite User manual

Prolux
Prolux 2.0-B User manual


Popular Vacuum Cleaner manuals by other brands

Porter-Cable
Porter-Cable PCX18125P owner's manual

Moosoo
Moosoo R3 instruction manual

Dustcontrol
Dustcontrol DC 3800 Original instructions

Panasonic
Panasonic PerformancePlus Platinum MC-V7428 operating instructions

Linea 2000
Linea 2000 DOMO DO1111SV Instruction booklet

Panasonic
Panasonic MCV5297 - UPRIGHT VACUUM operating instructions


