Prolux QX-90 User manual


2
Prolux QX90 Canister Vacuum
For your safety, please read the owner’s manual in its entirety before use.
Congratulations on purchasing your very own Prolux QX90 Series Canister Vacuum Cleaner.
This high-end vacuum is designed to provide ample power and superior filtration. Keep your
floors clean and prolong the life of your flooring in just a few easy steps. Prolux…. Cleaning
Reinvented! Welcome to the Prolux family and don’t forget to register for your warranty at
www.proluxcleaners.com

3
Table of Contents
Quick Assembly 4
Specifications 5
Warranty 6
Safety Precautions 7-9
Description of Parts 10
Unpacking and Assembling
Unpacking & Assembly 11-12
Using Accessories and Tools 13
Power Nozzle 14
Operation
Vacuum Cleaning 15
Setting the Suction Power 16
Switching off and Retracting Power Cord 16
Transport and Storage 17
Maintenance
Powerhead Maintenance 18
Changing the Dust Filter Bag 19
Changing the Filters 19-21
Cleaning the Housing 21
Frequently Asked Questions 22
Troubleshooting 23-24
Warranty 25-26

4
Quick Assembly
To view some videos on unboxing, assembling, and using your new vacuum you can find them at the link
below, or scan the QR code to go to our YouTube page to see all our videos:
https://proluxcleaners.com/pages/qx

5
Specifications
●12 Amp Motor - Deep cleaning with 116 CFM of Airflow on MAX power (Most
vacuums have around 80 CFM)
●Dependable - LIFETIME motor warranty and 5-year body warranty. (LIFETIME/5-year
warranty pertains to registered machines only)
●3 Stages of Filtration - HEPA Intake Filter, Pre Motor Micron filter and HEPA Exhaust
filter ensure the air leaving the vacuum is as clean as it should be.
●25’ Self Retracting Power Cord.
●Prolux EBK 360 powerhead with 5 Height Settings and LED headlights
●Durable Hose - 6 Foot crush proof electric hose with heavy duty ends and handle control
switch
●Premium Attachment Set with Button Locks.
●EZ roll wheels for superior maneuverability.
●Complete Home Care Tool Kit - Includes a tool for every vacuuming need.

6
WARRANTY
Here at Prolux we take pride in the quality of our products, so much of our time and money is
spent on R&D rather than advertising. Because of this we feel very confident in the quality of
our products and feel very comfortable being able to offer a LIFETIME motor warranty and a
5-year body warranty. We only require that you MUST register your machine within 90 days of
purchase. If a machine is not registered then we will only offer a 1-year warranty, which will
cover both the motor and body. When you register your machine not only will you receive the
LIFETIME/5-year warranty you will also receive:
●FREE shipping on any warranty claims.
●FREE shipping on any order returned within the 61 days return period.
●Mailing list notifications - The #1 thing that kills vacuums is not keeping up on
maintenance, so when you register your product, we will provide reminders when it’s
time to replace your filters etc.
●Coupons and offers for discounts on supplies.
Registering is simple. Just go to the warranty section of our website below and fill out the form.
Once registration is complete, you’ll then be covered.
https://proluxcleaners.com/pages/warranty
With over 20 years in business, superior products, an honest, hardworking team, unparalleled leadership,
and many years spent on Utah's fastest growing business list, you can rest assured that Prolux will be here
to back up our warranty claims. We strive to provide responsive and pleasant customer service
experiences and to develop exceptional products that you can count on! - PROLUX

7
IMPORTANT SAFETY INSTRUCTIONS
Vacuum Safety
Read the owner's manual in its entirety before using this product.
Failure to do so can result in serious injury or death. Prolux takes no
responsibility for damages/injuries due to violations of the following operating
instructions.
To reduce the risk of fire, electric shock, or injury:
Keep the operating manual for reference. Include the operating manual if you pass the appliance
to third parties.
When using an electrical appliance, basic precautions should always be followed, including the
following:
Notices Given:
Notices for your safety are specially marked. Always observe these notices to avoid any damage
to the appliance.
WARNING: Warning concerning health hazards describing possible risks of injury.
ATTENTION: Warning concerning possible dangers to the appliance or other objects.
NOTE: Highlights tips for you.
WARNING - To reduce the risk of fire, electric shock, or injury:
1. Do not leave the vacuum cleaner plugged in. Unplug from outlet when not in use, or
before servicing.
2. Use only as described in this manual. Use only the recommended attachments and
replacement parts.
3. To reduce the risk of electric shock, do not use outdoors, on wet surfaces, and do not use
it for wet pickup/cleanup.
4. Do not use the vacuum with a damaged cord or plug. If it is not working as it should, has
been dropped, damaged, left outdoors, or dropped into water, take it to a service center
before use.
5. Do not use cord as a lasso to round up loose children and pets.**
**Yes, yes, we have intentionally placed a couple “interesting” warnings in hopes that you
would read them all… But in all seriousness these warnings MUST be observed!!!

8
SAFETY CONTINUED
6. Do not pull or carry the vacuum by its power cord, do not use the power cord as a handle,
do not close the door on the power cord, or pull the power cord around sharp edges or
corners. Do not run the vacuum cleaner over the power cord. Keep the power cord away
from heated surfaces.
7. Only use extension cords suited to the power requirements of the appliance.
8. Never immerse the appliance in water or other liquids.
9. Only operate the appliance if your outlet voltage is the same as indicated on the
appliance's nameplate. Using the wrong voltage can destroy the appliance.
10. Do not unplug the power cord from your wall by pulling on the cord. To unplug, grasp
the end of the plug, not the cord.
11. Do not handle the power cord/plug or vacuum cleaner with wet hands.
12. Do not put any object into the openings of the vacuum. Do not use the vacuum with any
openings blocked. Keep openings free of dust, lint, hair, and anything that may reduce
airflow.
13. Hold cord and use self-rewind in a controlled slow-paced manner. Do not allow the cord
to whip and rewind at full speed.
14. Keep hair, loose clothing, fingers, and all body parts away from openings and moving
parts of the vacuum.
15. Turn all controls off before unplugging the vacuum.
16. Do NOT wield the telescopic wand as if it were a lightsaber**
17. Take extra care when cleaning on stairs.
18. Do not use it to pick up flammable or combustible liquids, such as gasoline or in areas
where they may be present.
19. Hold the end of the plug on the power cord when rewinding the cord into the cord reel.
Do not allow the plug to whip when rewinding.
20. Unplug the vacuum before connecting the hose.
21. Do not pick up anything that is burning or smoking, such as cigarettes, matches, or hot
ashes.
22. Do not use the unit without filters in place.
23. If the power cord is damaged, the manufacturer or an authorized service center must
replace it, in order to avoid a hazard.
24. This appliance is not intended for use by persons (including children) with reduced
physical, sensory, or mental capabilities, or lack of experience and knowledge, unless
they have been given supervision or instructions concerning the use of the appliance by a
person responsible for their safety.
**Yes, yes, we have intentionally placed a couple “interesting” warnings in hopes that you
would read them all… But in all seriousness these warnings MUST be observed!!!

9
Do not vacuum or clean:
-Hair and other parts of the body. They could be sucked in and cause injury.
-Pieces of Clothing (e, g, shoelaces, scarves, etc.). They could be sucked in and cause
injury.
-Water and other liquids, especially moisture from carpet cleaning agents. Moisture inside
the appliance can lead to short-circuiting.
-Toner dust (from laser printers. copying machines. etc.). There is danger of fire or
explosion.
-Pointed objects such as glass shards, nails, etc. Such objects destroy the filters.
-Plaster, cement, and fine drilling-dust, makeup. etc. The filters may clog causing damage
to the appliance.
-Never use the appliance near flammable or explosive materials -- there is danger of fire or
explosion.
-Never use the appliance outdoors -- there is danger of rain and dirt destroying the appliance.
Children
Never leave the appliance unattended, and always take special precautions if children or persons
who cannot judge dangers are nearby.
Proper storage, supervision and keeping children at a safe distance during operation will help avoid
the following dangers:
-Strangulation by cord.
-Tripping accidents.
-Getting hair, appendages or clothing stuck in vacuum ports.
-Other unforeseen boo boos of various severity.** Though silly, this one is true!
Persons (including children) who are unable to safely operate the appliance on account of physical,
sensory, or mental abilities, or lack of experience or knowledge should only use this appliance
under supervision or instruction of a responsible person. Packing materials are not toys. There is a
danger of suffocation, KEEP OUT OF REACH OF CHILDREN.
**Yes, yes, we have intentionally placed a couple “interesting” warnings in hopes that you
would read them all… But in all seriousness these warnings MUST be observed!!!
10
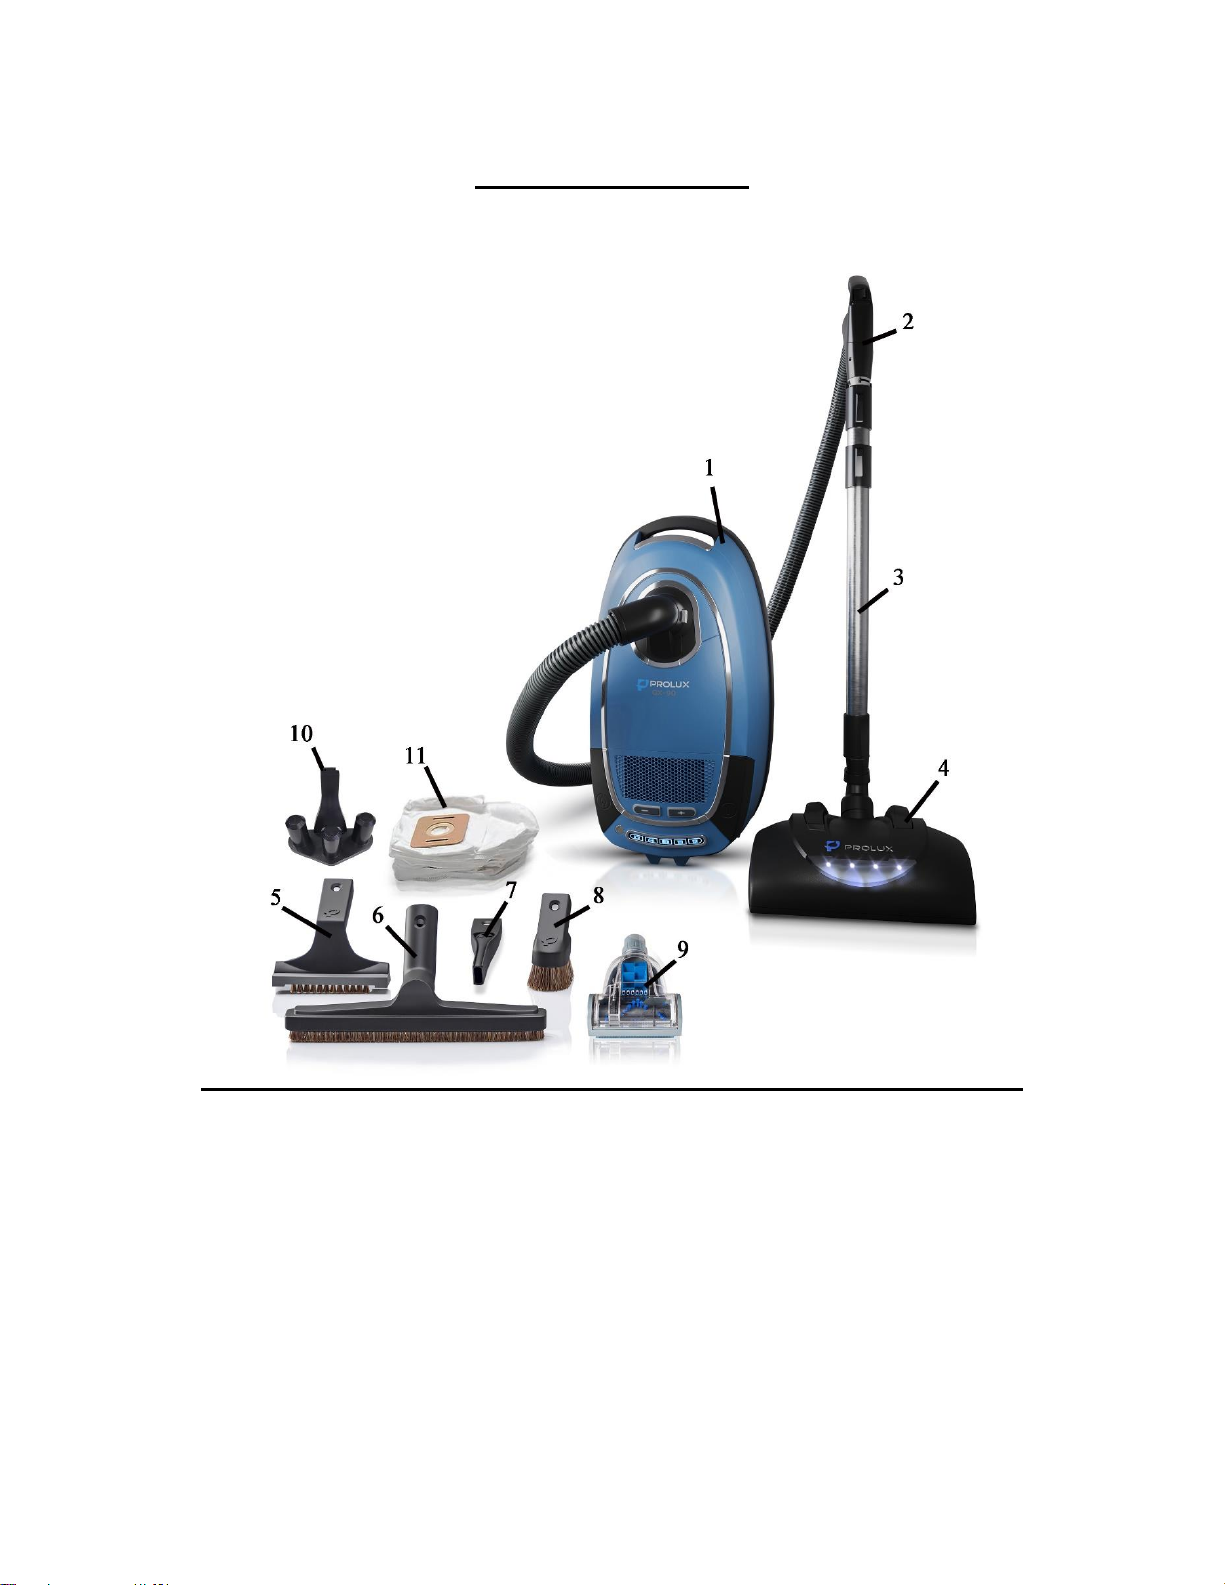
Description of Parts
1. Main Vacuum 7. Crevice Tool
2. Main Hose 8. Duster Brush
3. Extendable Wand 9. Mini Turbo Head
4. Electric Powerhead 10. Tool Caddy
5. Upholstery Tool 11. HEPA Bags
6. Floor Tool
11
Assembling and Using Your Vacuum Cleaner
Important:
●Check the vacuum cleaner and the power cord each time before using it. A damaged
appliance must not be used. There is danger of injury.
●For the best results do not use the vacuum without all filters properly installed and
conditions are dry.
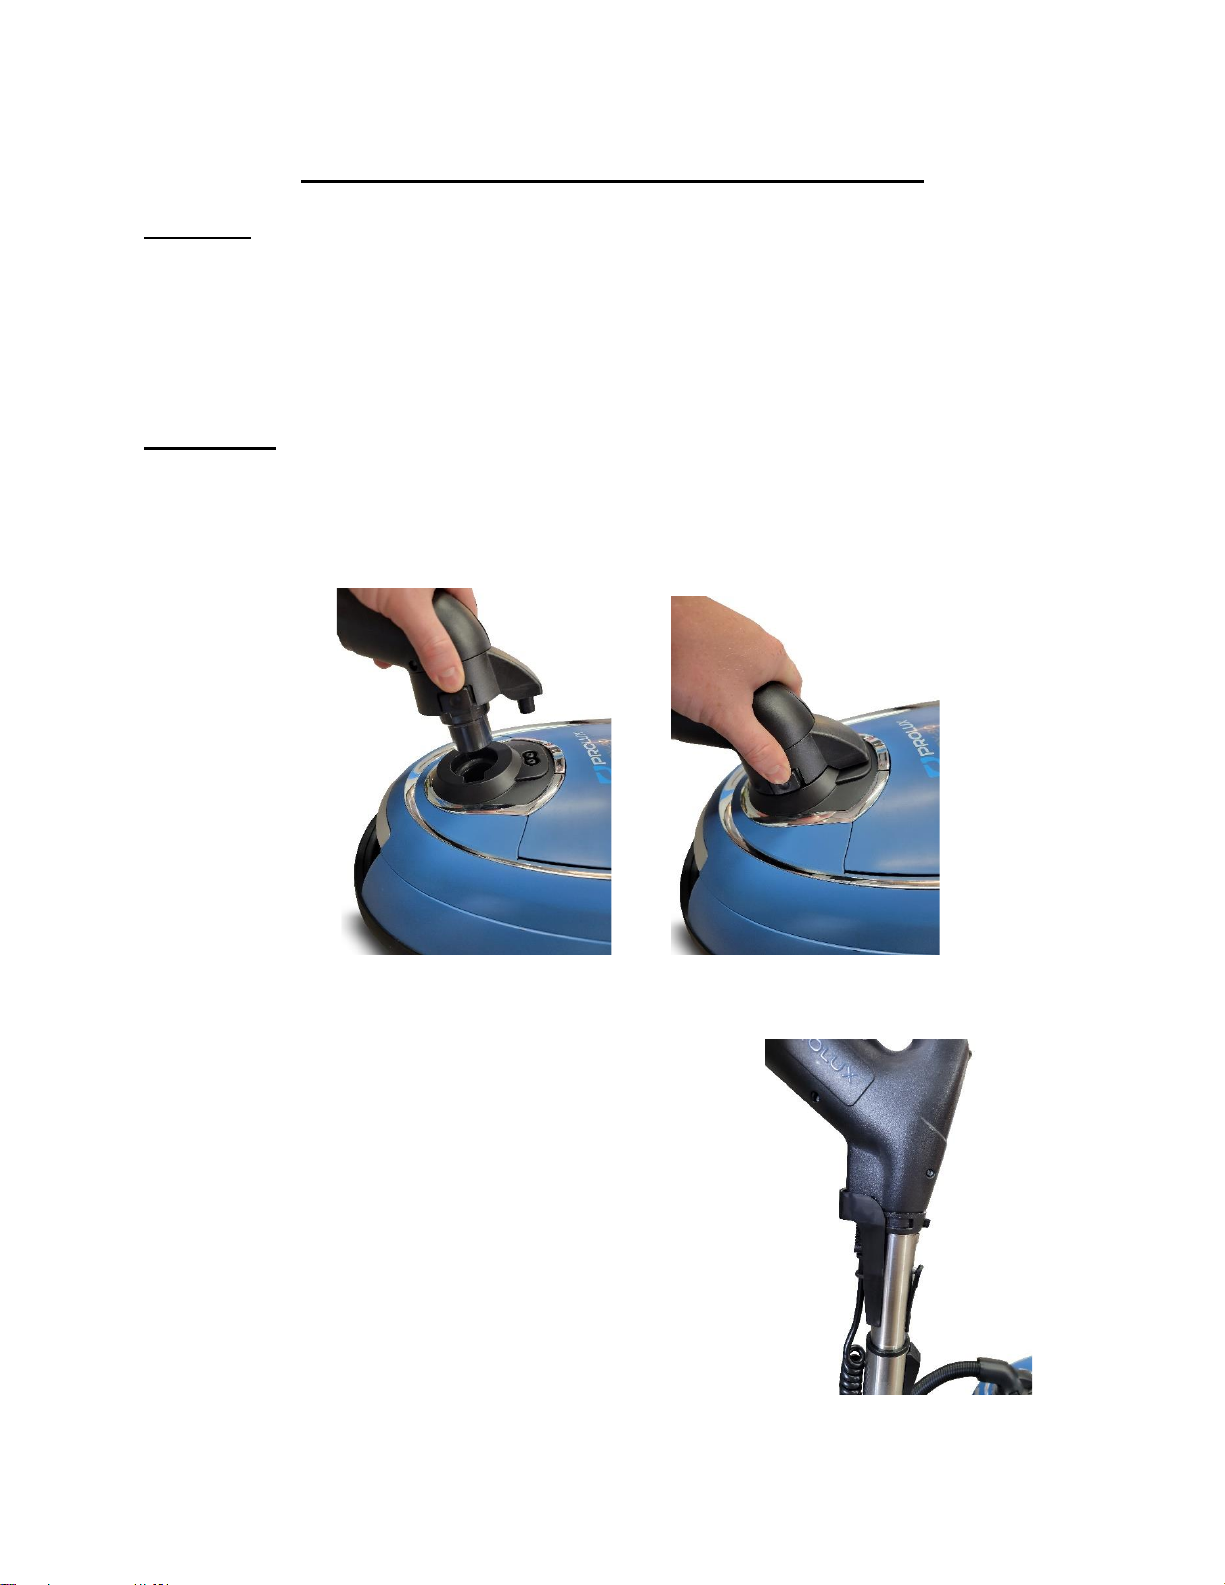
Assembly
1. Insert canister end of hose into suction port making sure the electric plug side is insert
correctly into the suction port plug in. This is what provides power to the hose for the power
head.
2. If you’re using the extandable wand with the powerhead or
another attachment insert the handle end of hose into the
extendable wand and press together to lock them in place. If
no wand is needed you can attach the attachments directly to
the hose end

12
3. Insert the extendable wand end into the powerhead pivot and press down lightly to lock the
wand end into the powerhead pivot.
4. Extend the wand by pressing the tab on wand and pulling the
hose handle upward to extend the wand to the proper length. Once
the proper length has been desired release the wand tab and the
wand will lock into place.
5. Turn on the powerhead with the hose handle switch and
release the powerhead pivot to disengage the safety switch on
the head. The pivot must be released in order to turn on for
your safety.
13
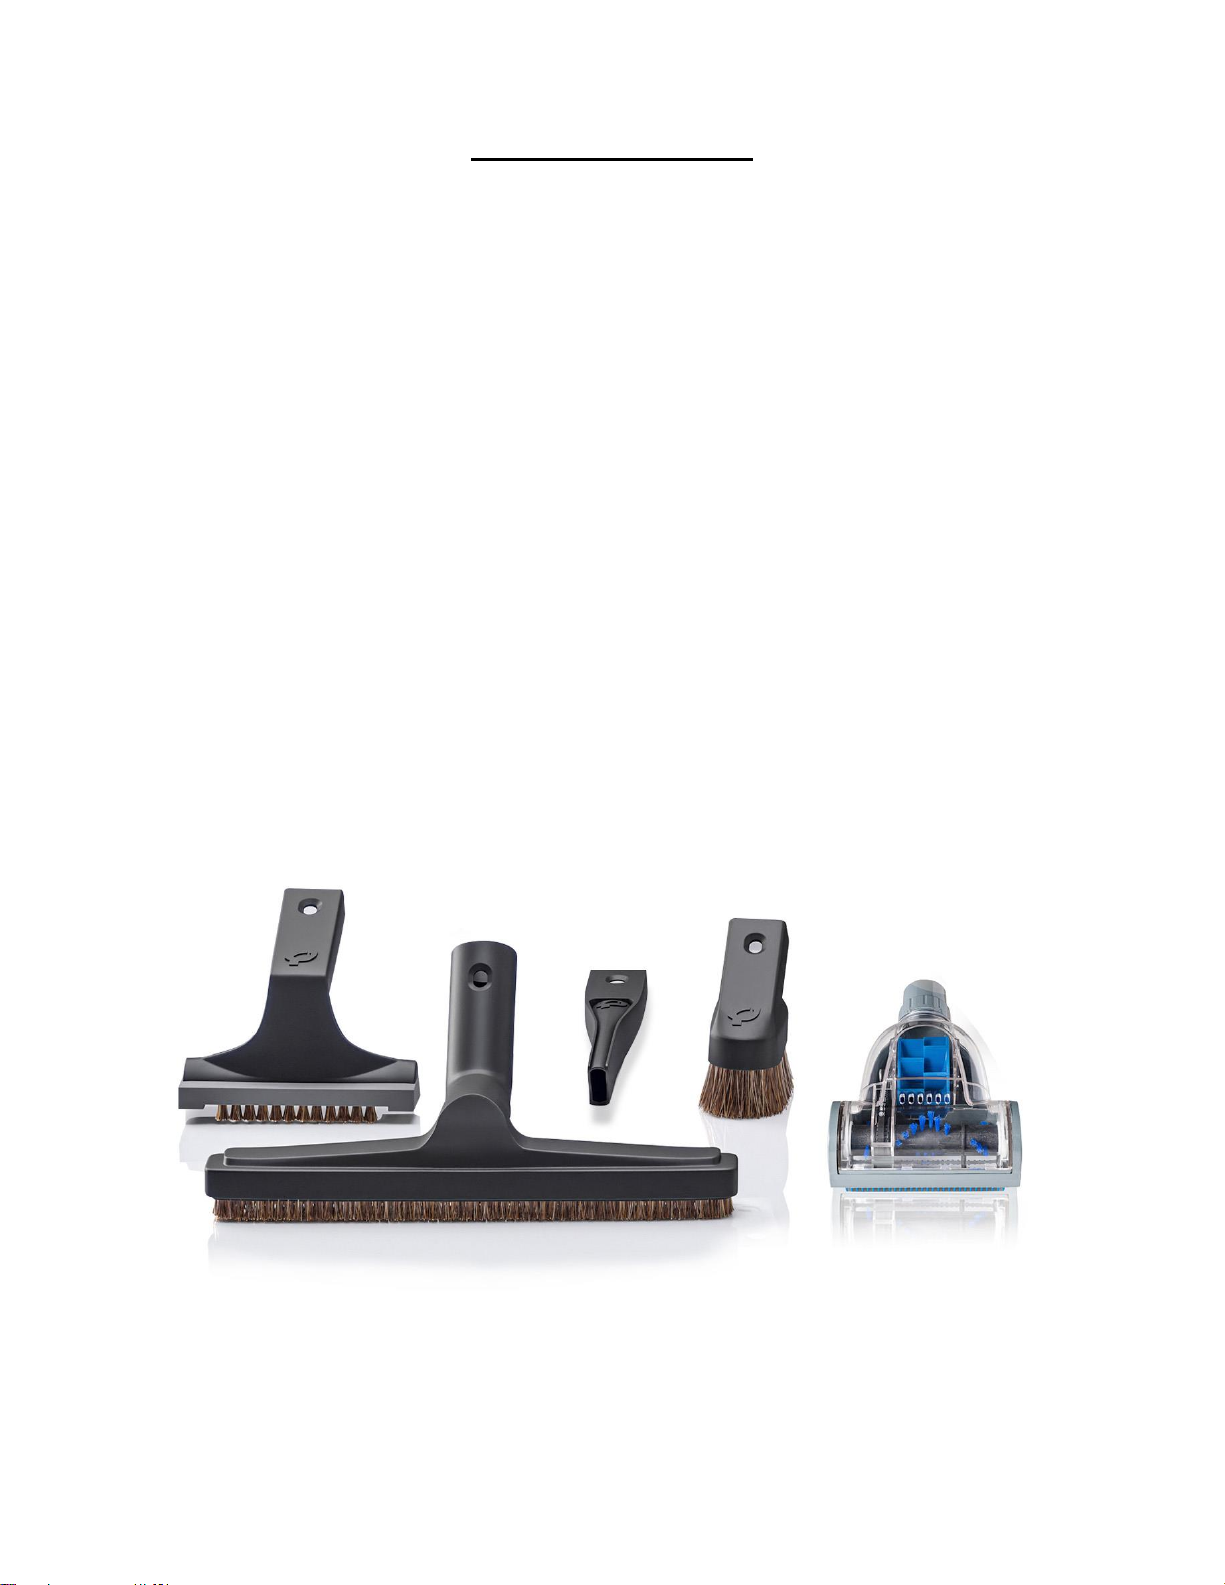
Using The Attachments
Prolux is proud to include the highest quality attachments available! Through research and
development and trial and error… Prolux has finally perfected vacuum attachments, matching
durability with functionality! This is Cleaning…Reinvented!
●Dusting Brush -The dusting brush is your answer to dusting furniture, wood or laminate
blinds and fan blades.
●Warning: NEVER attempt to dust a fan while it is moving.
●Note: Never press hard into delicate surfaces. Allow only the brushes to move lightly across
surfaces.
●Crevice Tool -Perfect for radiators, crevices, corners, baseboards, and in-between cushions.
●Upholstery Tool -Best used for couches, cars, stairs, pet hair & more.
●Note: This tool is not a grooming tool and should not be used on animals.
●Note: Do Not use The Upholstery tool on delicate or woven Fabrics that may snag.
●Note: Do Not use The Upholstery tool on wooden floors as this accessory might cause
mild scratching.
●Hard Floor Tool - Wide, soft bristled hard floor brush ensures quick cleaning without the
worry of damaging even delicate floor surfaces.
●Mini Turbo - Perfect tool for upholstery, stairs, vehicles, and any other hard to reach places.
Think of it as a mini powerhead
14
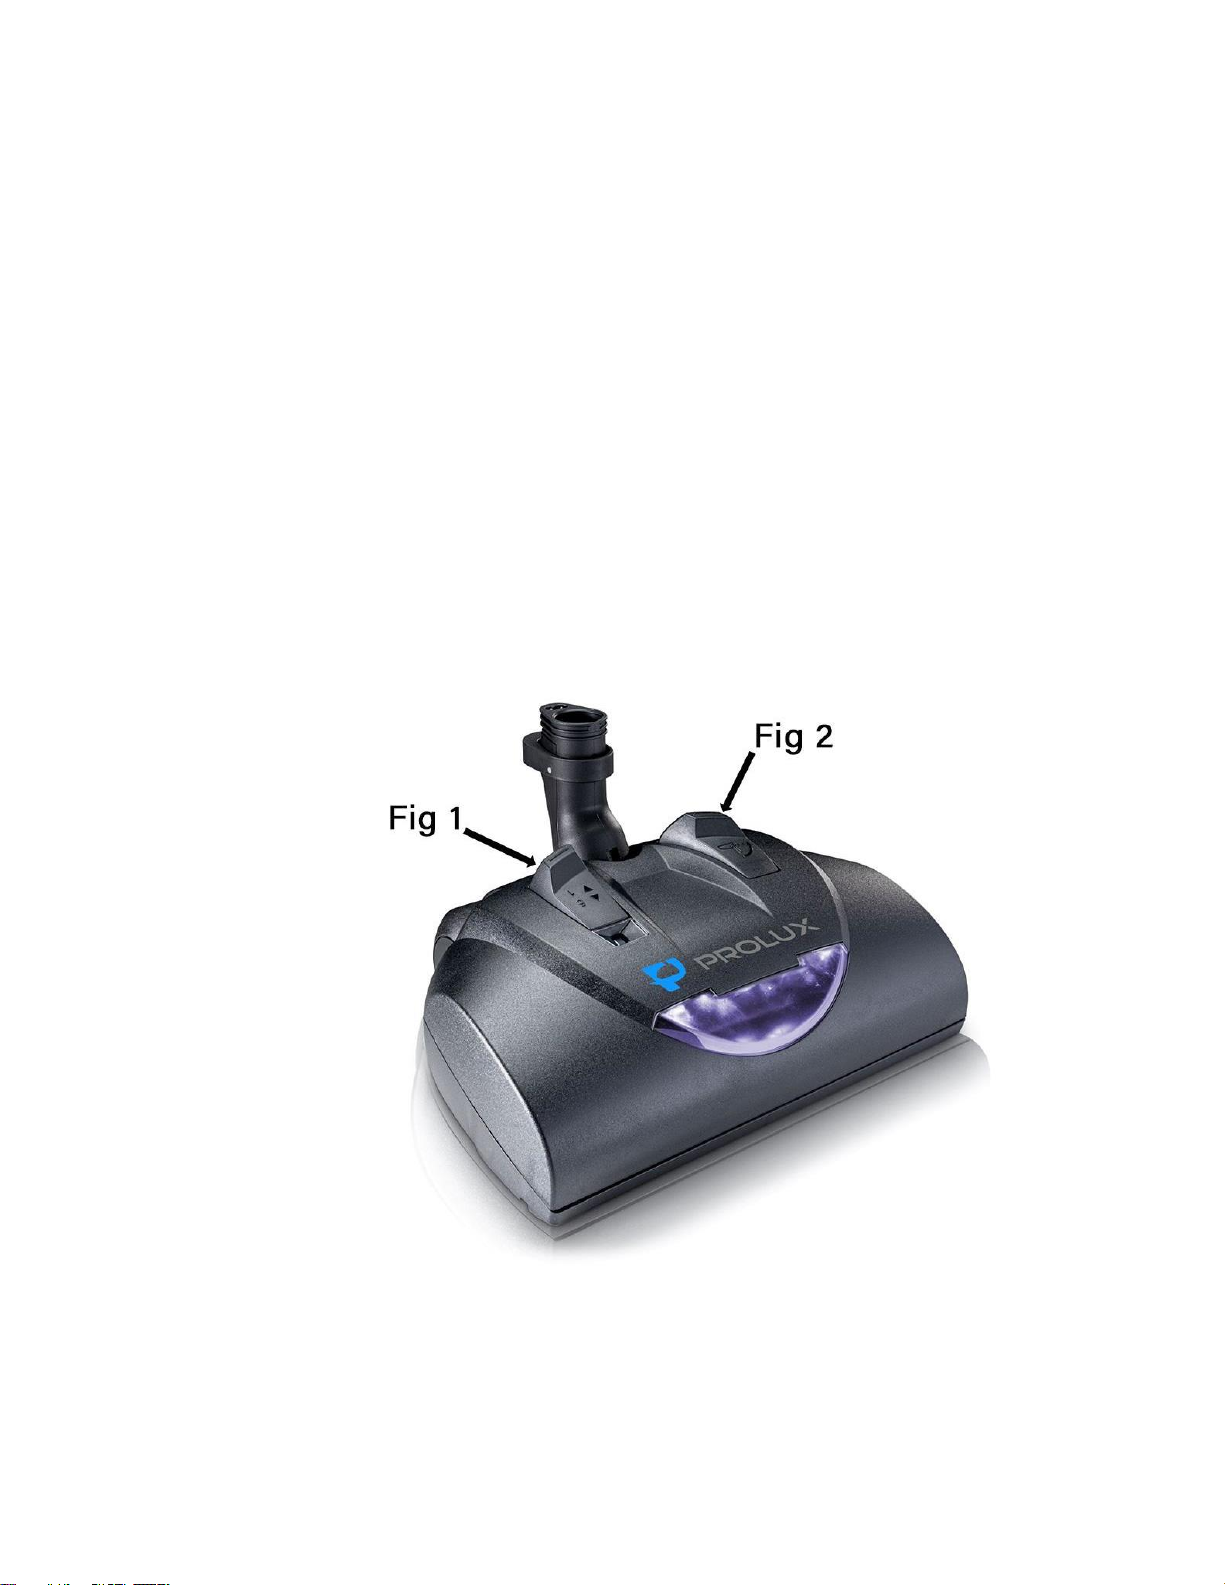
Electric Powerhead -
Use the powerhead for all types of floor cleaning. Whether it be hard floors or carpet this head
can handle it all. Just attach the head to the extendable wand, flip the switch on the hose handle
and you’re ready to clean. You can control the brush roll with the hose handle switch, which
when cleaning hard floors at times it’s best to turn the brush roll off and use only the suction. To
do this simply turn the powerhead off with the hose handle switch and leave the vacuum on.
This will allow you to bypass the brush roll and use only the vacuum’s suction.
The QX90 powerhead is equipped with 2 buttons on the top which will be the height adjuster
(Fig 1) and the pivot release (Fig 2). The height adjuster will give you 5 height settings which
you can adjust based on the surface you’re cleaning. The higher the number the greater the head
height will be. The pivot release is a safety feature, which when you have the pivot in the
upright position the power will be cut to the head, so the brush roll is not spinning. This makes it
so nothing can be put up into the brush roll area while the vacuum is stationary. To power up the
head simply release the pivot and power will be put into the head.
15
Operation
WARNING: Check the vacuum cleaner and the power cord each time before using it. A damaged
appliance must not be used. There is danger of injury, fire, warranty void, etc.
ATTENTION: Only use the vacuum cleaner with all filters intact, in dry condition and correctly placed.
Make sure that the openings of the vacuum cleaner are not clogged or obstructed. Otherwise, the vacuum
cleaner might overheat or become damaged.
NOTE: Your vacuum cleaner is equipped with a thermal safety switch to prevent overheating. It
automatically cuts off the power supply if the motor is overheated. In this case, switch off the vacuum
cleaner and disconnect it from the outlet. Remove the cause of the overheating and wait for about 45
minutes. After it has cooled off, you may use the vacuum cleaner again.
Your vacuum is also equipped with a motor bypass valve. The purpose of this feature is if your vacuum
bag is too full, filters are too dirty, or if there is a clog in the vacuum the valve opens. When the valve
opens it allows air to enter in the motor chamber, reducing suction to the hose but making certain the
motor does not overheat and burn up. The Prolux QX90 is a high-end vacuum designed to last many years
and this feature protects the motor and allows it to be used for many years to come. When the motor
bypass valve opens you will notice less suction and a different motor sound. When this happens turn
the vacuum OFF and unplug the cord from the electrical outlet. Then solve the problem by
changing the bag, filters or removing any clogs.
Vacuum Cleaning
1. Attach the desired nozzle or attachment. See section
“Assembly” or ``Using the Attachments.”
2. Pull the power cord until the yellow marking is visible.
3. Switch on the vacuum cleaner with the on/off switch.
WARNING: If the red marking shows on the cord, retract the cord by pushing the retract button to pull in
the cable (Fig. 11/2) up to the yellow mark again. If the cord is pulled past the red mark the cord might
break. Also, there is danger of an electric shock.

16
4. When working with the vacuum cleaner, pull it after you like a sled. Follow the respective
recommendations of the flooring manufacturers.
NOTE: When using it with the electrical power nozzle for carpet the power nozzle may be turned on with
the hose handle switch (on/off switch) AND by pressing the pivot release button on the power nozzle
itself. If the power nozzle will not turn on when the canister is turned on check both of those switches
AND make sure the hose, wand, and power nozzle are firmly connected.
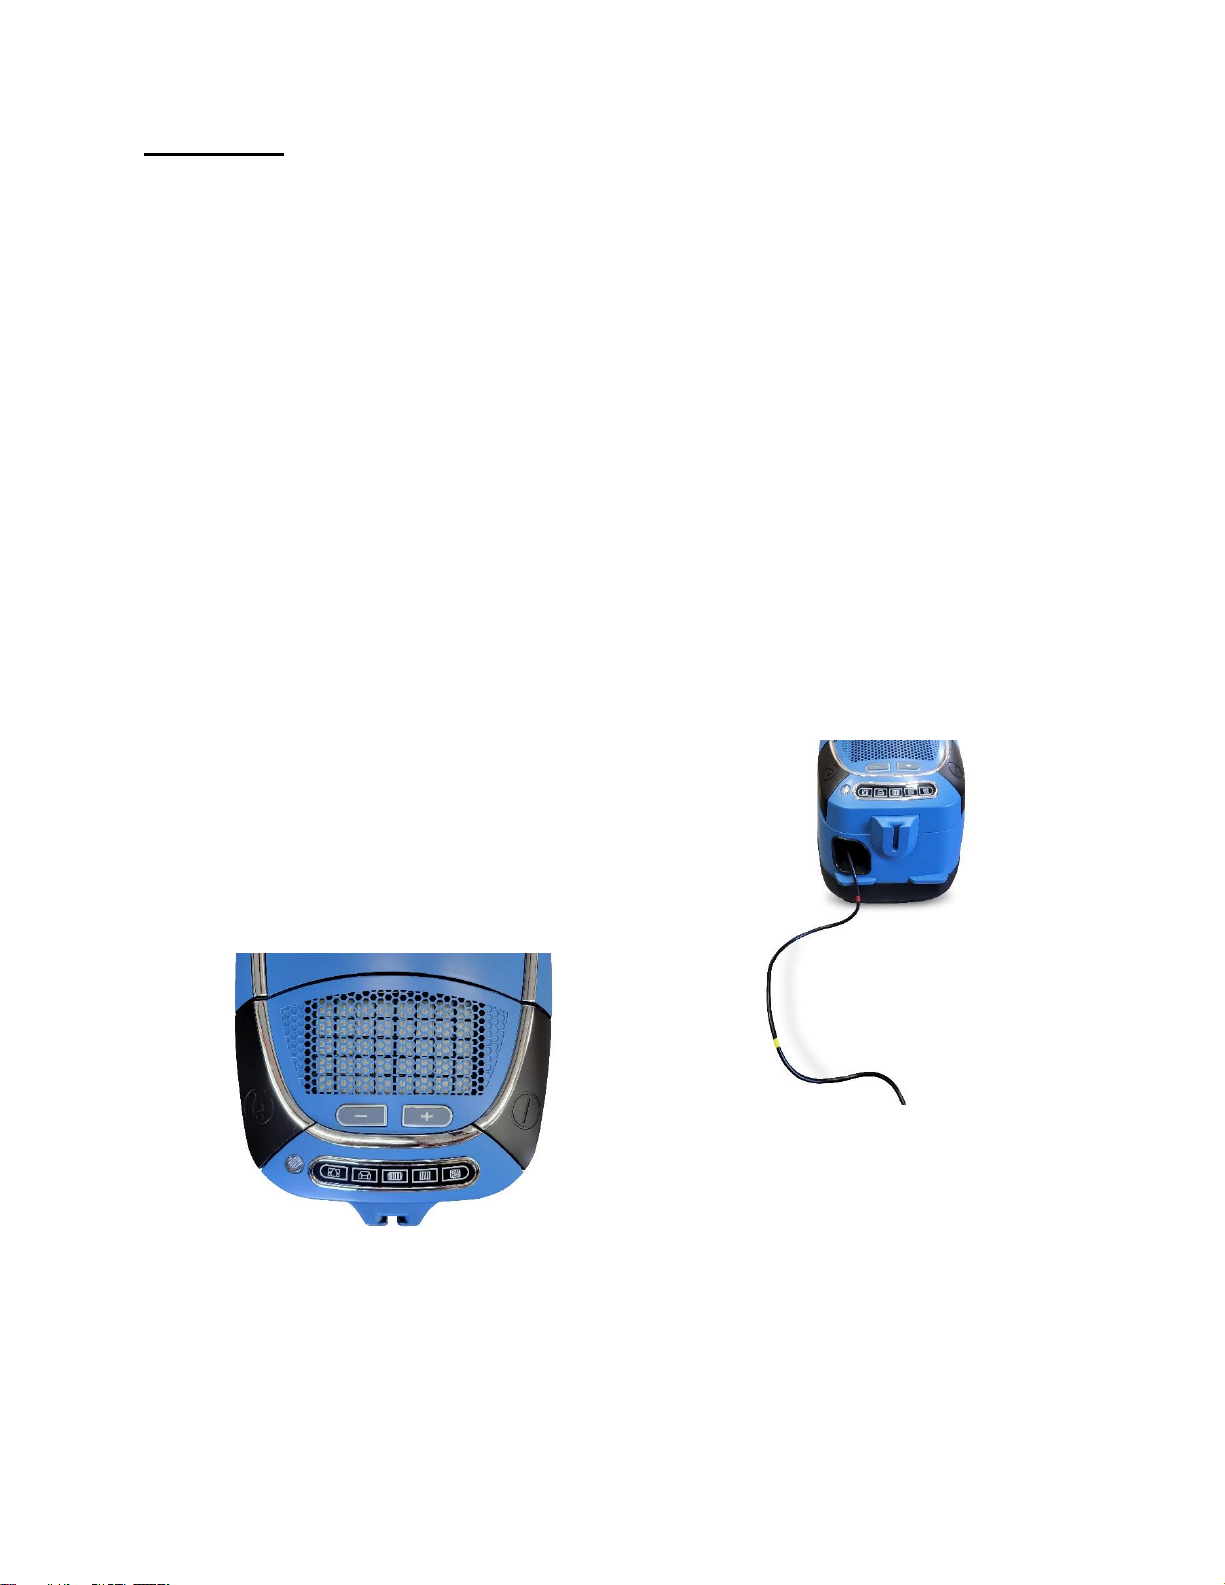
Setting the Suction Power
You can adjust the suction power of the unit to suit the type of surface being cleaned. Use the symbols on
the suction power display as a guideline.
●Delicate dusting for Curtains, Fabric (lowest setting)
●Upholstery, Cushions
●Hard Floor Surfaces like Tile, Hardwood etc.
●Low Pile Carpet and Rugs
●Thick Pile Carpet and Rugs.
You may select a higher setting based on what
you’re cleaning. For example, if you are cleaning
upholstery which is very dirty you may use it on the
highest settings if you feel it needs the extra suction
power.
1. To set the desired power setting, press the + button
or the - button several times until the desired setting
lights up on the suction power display.
- + button increases suction power button reduces suction power
Switching Off and Retracting Power Cord
1. Switch off the vacuum cleaner with the on/off switch
and pull the plug from the outlet.
2. Keep the plug in your hand.
3. To retract the power cord, push the cord retracting
button.
WARNING: During retraction the cord can whip around,
become an obstacle or overthrow objects if not held.

17
Transport and Storage
To transport the vacuum cleaner, you can set the vacuum upright and carry it by the top handle. The
hose, wand and powerhead can remain attached to the main canister and can be carried in your other hand
by holding the extendable wand.
WARNING: When leaving your working-area, switch off the appliance and mind the notices at section
“Switching Off and Retracting Power Cord.”
ATTENTION: Never store the appliance next to heat sources (e.g., stoves or radiators). Avoid exposing
it to direct sunlight. The heat may damage the appliance and cause fading.
Crevice, duster, and upholstery attachments can be stored on the tool caddy. The tool caddy can be
attached to the back of the main canister. The floor tool and mini turbo head can be stored loose from the
vacuum.
If you want to Store the appliance for a prolonged period, remove the dust filter bag and dispose of it
properly. Also, clean or dispose of the filters before prolonged storage.
Always store the appliance in a cool, dry place.

18
Maintenance
Powerhead Maintenance
The brush roll can be cleaned from the outside for a quick clean by using a razor blade or
scissors to cut the built-up hair, string, etc. and then pull it off of the brush roll through the brush
roll area opening. The outside cover can be wiped down with a damp rag, or a light cleaning
solution can be used to clean off any built-up dust. A can of compressed air will also work well
to get rid of any dust on the outside or in any cracks and crevices.
To do a deep clean of the inside of the head, which we recommend doing frequently, the head
will need to be disassembled to gain access to the brush roll, belt and inside of the head. Built up
hair on the brush roll will eventually seize up the brush roll bearing, so we recommend cleaning
the brush roll once a month depending on the amount of buildup on the brush roll. To
disassemble the head, turn the head over so you can see the underside and remove all the visible
screws. This will allow you to remove the top cover to gain access to the inside area. For a
more in depth look at how to take the head apart we have a how-to video which you can find
here: https://youtu.be/b6iO2B4X9wA
19
Changing the Dust Filter Bag
Change the dust filter bag as soon as the bag change indicator shows “red”, or the suction power has
decreased.
l. Open the bag compartment cover by unlatching
and subsequently raising it.
2. Raise the bag compartment cover until it locks in
the highest position and remains open by itself.
NOTE: Be careful when removing the dust filter
bag so that no dust escapes.
3. Pull the dust filter bag up and out of the bag
holder.
4. Remove any dust that may have collected in the
bag compartment.
NOTE: You can dispose of the dust filter bag with your regular domestic trash if it contains no prohibited
waste materials.
5. Push the new dust filter bag into the bag
holder.
6. Close the bag compartment cover until you
hear it audibly click locking it into place.
NOTE: The bag compartment cover can only be
closed with a dust filter bag in place.
20
Changing Filters
Your vacuum cleaner is equipped with the following filters:
-Motor protection filter prevents larger particles from destroying the motor in case the dust filter bag is
defective. Change as needed or if the vacuum overheats or the bypass valve opens.
-H12 HEPA exhaust filter removes microscopic particles from the exhaust air. Clean at least every 6
months. Replace once a year.
The filters can become clogged over time and reduce the vacuum's performance. This is why it is
important to adhere to the above cleaning intervals.
Damaged filters must be removed immediately.
ATTENTION: These filters are not washable. The exhaust filter may not be re-used. Never run the
vacuum without the bag and filters installed.
NOTE: If the motor protection filter is only slightly dirty, it can help to beat out the dust over a dustbin.
However, we recommend changing the motor protection filter each time you open a new box of dust
bags. Using compressed air to blow the motor protection filter also works well.
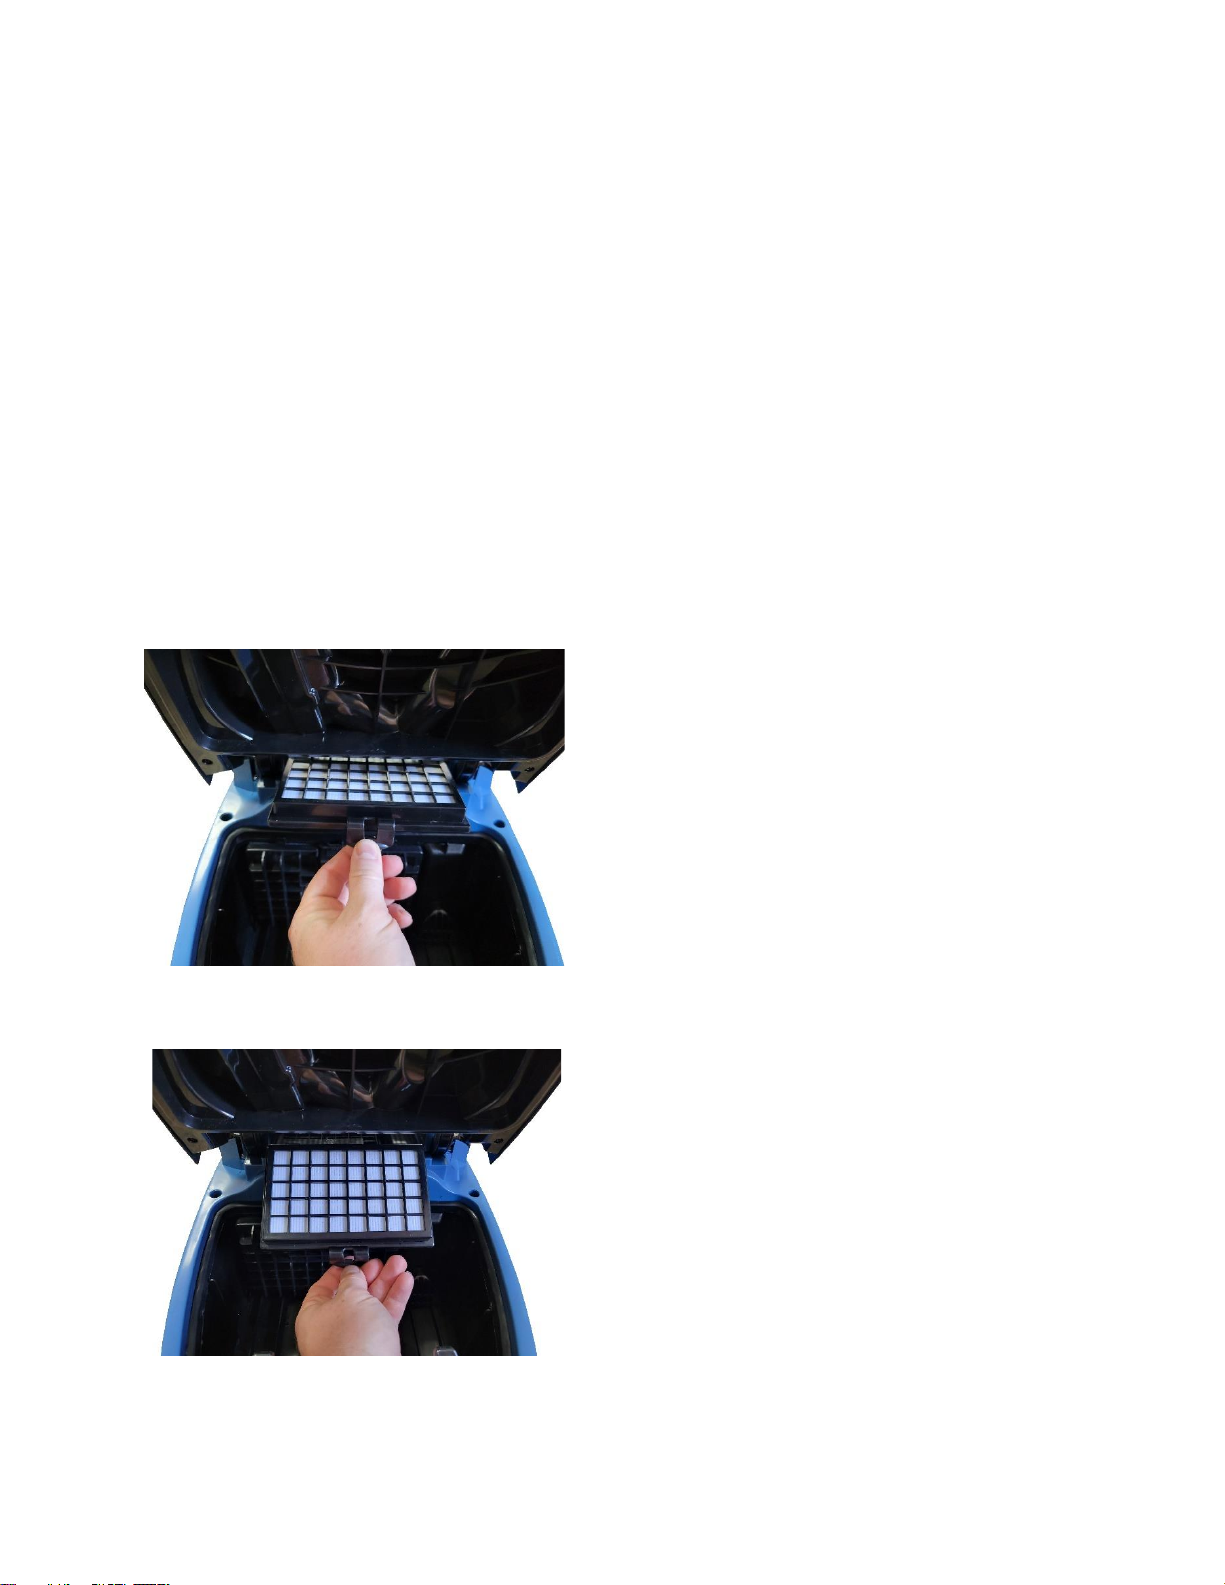
Changing the H12 HEPA Exhaust Filter
1. Switch off the vacuum cleaner.
2. Open the bag compartment to access the filter.
Remove the filter by lifting up the tab with your fingers,
then lift up the H12 HEPA filter and move it out
3. Insert a new exhaust filter and push it down slightly
until the tab locks into place.
4. Replace the dust filter bag and close the filter
compartment cover. The cover clicks into place
audibly.
NOTE: Make sure that the exhaust filter is always
properly locked into position, otherwise the exhaust air
will not be properly filtered.
Table of contents
Other Prolux Vacuum Cleaner manuals

Prolux
Prolux 2.0-PRO Technical manual

Prolux
Prolux X8 Lite User manual

Prolux
Prolux AllVac User manual

Prolux
Prolux XC15J Technical manual

Prolux
Prolux Ion User manual

Prolux
Prolux X8 Elite User manual

Prolux
Prolux iFORCE User manual

Prolux
Prolux TerraVac User manual

Prolux
Prolux Stealth User manual

Prolux
Prolux 2.0-B User manual


Popular Vacuum Cleaner manuals by other brands


Sencor
Sencor SVC 45BK-EUE3 user manual

DeLonghi
DeLonghi Colombina XLF 1500NBM instructions

Hoover
Hoover FloorMate, SpinScrub Floor Mate Spin Scrub Hard Floor... instruction manual

Electrolux
Electrolux INTENSITY Z 5021 manual

Electrolux
Electrolux ERGORAPIDO user guide

Eureka
Eureka 4870 Series owner's guide