Prolux Flight -C Technical manual
- 1 -
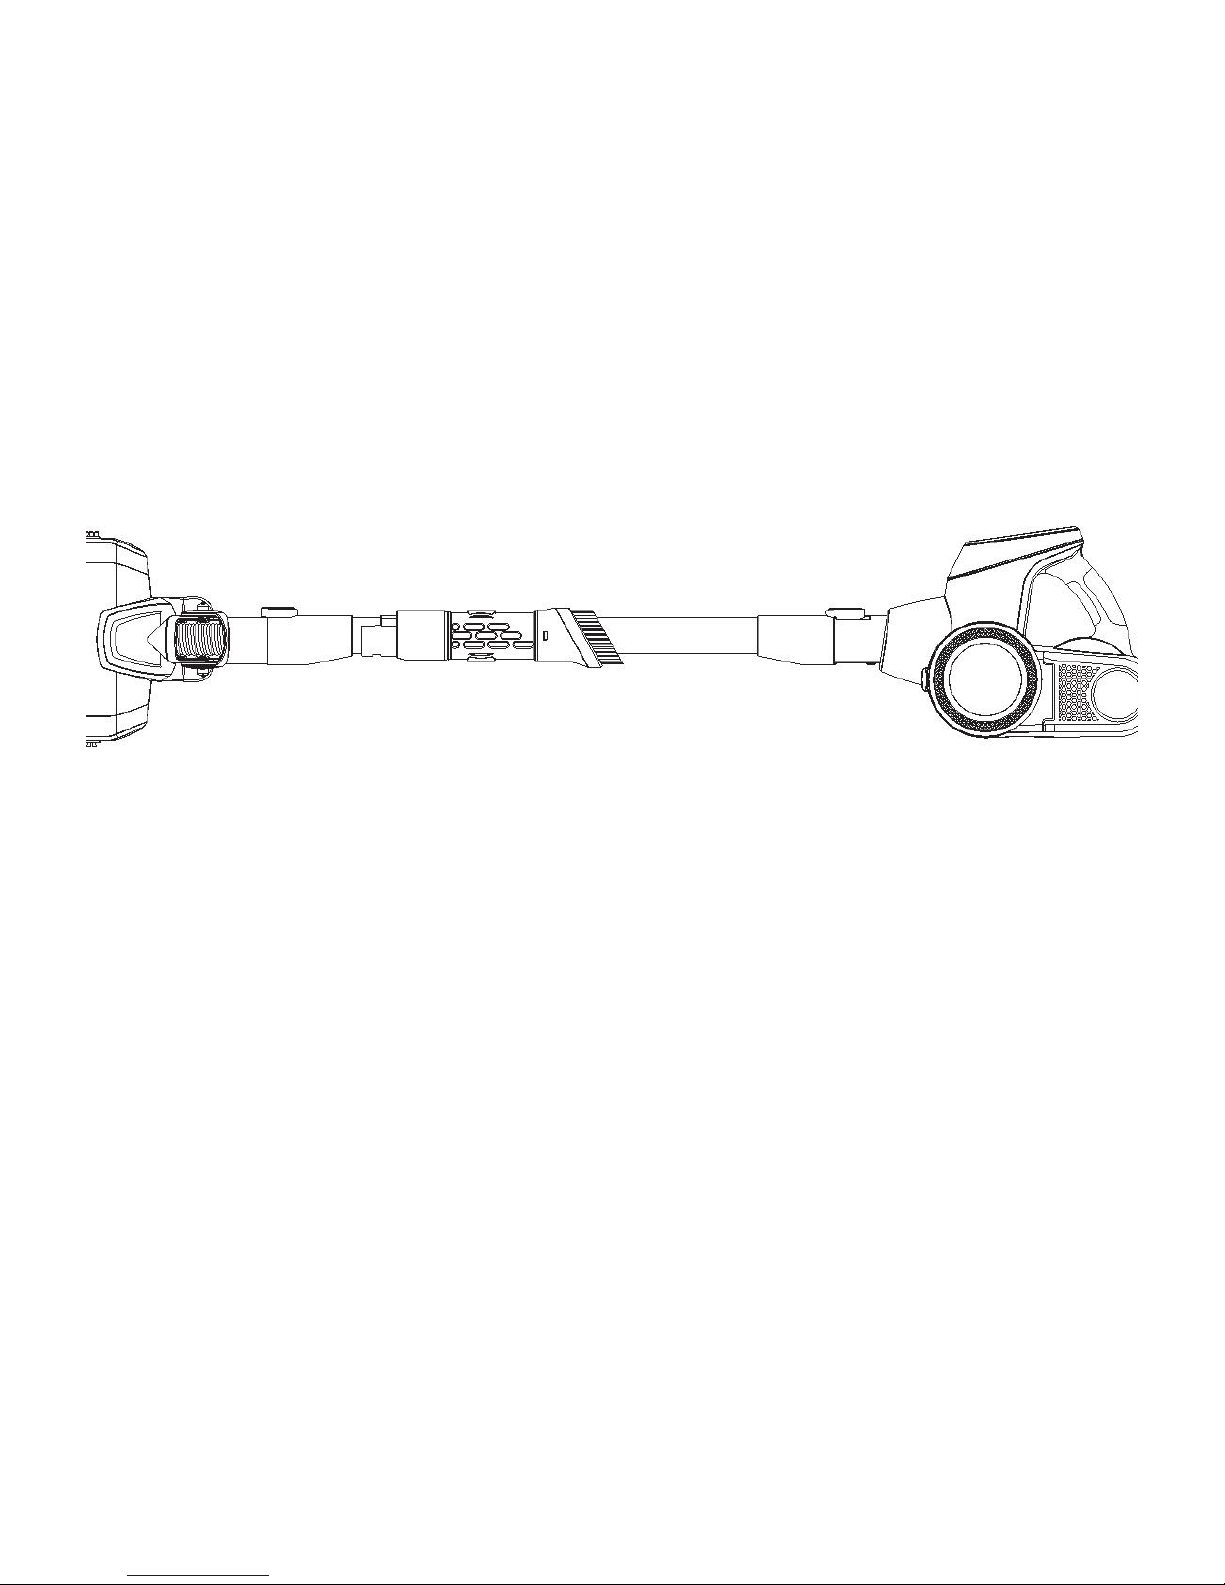
PROLUX FLIGHT
HANDHELD VACUUM CLEANER
MODEL: FLIGHT-C
Operation Instruction
Read all instructions before using this appliance
(For your safety please read owners manual in its entirety before use.)

- 2 -
Congratulations on your purchase of your new Prolux Flight Handheld Vacuum! The Prolux Flight
is the lightweight alternative for your cleaning needs! This highly compact, powerful, and easy to
store vacuum, is designed to be the quickest and easiest vacuum you have ever used. A bagless
design also adds to the ease of cleaning your home. The multi surface Floor Nozzle with electric
brushroll can be used in the upright setting to vacuum your hardwood floors, tile and carpet. Also
the detachable handheld version is perfect for cleaning your vehicle and other hard to reach areas,
which other vacuums are just not capable of. This high-end vacuum is designed with you in mind
and has been built to last for many years to come.

- 3 -
Table of contents
Specifications ............................................................................................................................... 3
Safety Precautions................................................................................................................... 4-5
Assembly/Operation
Getting To Know Your Vacuum ............................................................................................................... 6
Using The Accessories & Tools ................................................................................................................ 7-9
Operating Instructions ............................................................................................................................... 7-10
Maintenance
Emptying The Dust/Dirt Container ........................................................................................................... 10
Changing/Cleaning The HEPA Filter........................................................................................................ 10-11
Cleaning The Housing ............................................................................................................................... 11
Troubleshooting ........................................................................................................................ 11-12
Warranty......................................................................................................................................... 12-13
Specifications
•Lightweight – Only weighs 5 lbs.
•Powerful, low maintenance motor – Quiet operation & dependable design.
•HEPA FILTRATION
•30ft Power Cord.
•On-Board tools. Includes Crevice Tool & extendable Duster Brush
•Convenient Wall-Mounted storage – Easily store your vacuum anywhere in your home with the
included wall mount.

- 4 -
IMPORTANT SAFETY INSTRUCTIONS
When using an electrical appliance, basic precaution should always be followed, including the following:
READ ALL INSTRUCTIONS IN THIS OPERATING MANUAL
BEFORE USING THIS APPLIANCE.
Keep the operating manual for reference. Include the operating manual if you pass the appliance to third parties.
Violations of the operating instructions can lead to severe injuries as well as damages to the appliance. Prolux takes
no responsibility for damages due to violations of these operating instructions.
The Notices Given
Notices for your safety are especially marked. Always observe these notices to avoid any damages to the appliance.
WARNING: Warning concerning health hazards describing possible risks of injury.
ATTENTION: Warning concerning possible dangers to the appliance or other objects.
NOTE: Highlights tips for you.
WARNING-To reduce the risk of fire, electric shock, or injury:
1. Do not leave the vacuum cleaner when powered on. Unplug from outlet when not in use, and before
servicing.
2. Use only as described in this manual. Use only the recommended attachments, and replacement parts.
3. To reduce the risk of electric shock, do not use outdoors, on wet surfaces, and do not use for wet
pickup/cleanup.
4. Use only as described in this manual. Use only the manufactures recommend attachments.
5. Do not use with damaged cord or plug. If vacuum cleaner is not working as it should, has been dropped,
damaged, left outdoors, or dropped into water, take it to a service center before use.
6. Do not unplug the power cord from your wall by pulling on the cord. To unplug, grasp the end of the plug, not
the cord.
7. Do not handle the power cord/plug, or vacuum cleaner with wet hands.
8. Do not put any object into the openings of the vacuum. Do not use the vacuum with any openings blocked.
Keep openings free of dust, lint, hair and anything that may reduce airflow.
9.Keep hair, loose clothing, fingers and all parts of body away from openings and moving parts of the vacuum.
10.Turn all controls off before unplugging the vacuum.
11.Use extra care when cleaning on stairs.
12.Do not use to pick up flammable or combustible liquids, such as gasoline, or use in areas where they may be
present.
13. Do not allow end of power plug to whip when winding up the power cord.
14.Unplug the vacuum before connecting the hose or attachments.
15.Do not pick up anything that is burning or smoking, such as cigarettes, matches, or hot ashes.
18.Do not use without dust bag and/or filter in place.
19.If the supply cord is damaged, the manufacturer or an authorized service center must replace it, in order to
avoid a hazard.
20.This appliance is not intended for use by persons (including children) with reduced physical, sensory or
Mental capabilities, or lack of experience and knowledge, unless they have been given supervision or
instructions concerning the use of the appliance by a person responsible for their safety. Children should be
supervised to ensure they do not play with the appliance.

- 5 -
Do not vacuum or clean:
- Hair and other parts of the body. They could be sucked in and cause injury.
- Pieces of Clothing (e, g, shoe laces, scarves, etc.). They could be sucked in and cause injury.
- Water and other liquids, especially moisture from carpet cleaning agents. Moisture inside the
appliance can lead to short-circuiting.
- Toner dust (from laser printers. copying-machines. etc.). There is danger of fire or explosion.
- Hot ash, burning cigarettes or matches. This could cause a fire.
- Pointed objects such as glass shards, nails, etc. Such objects destroy the filters.
- Plaster, cement, and fine drilling-dust, makeup. etc. The filters may clog causing damage to the
appliance.
Never use the appliance near flammable or explosive materials -- there is danger of fire or explosion.
Never use the appliance outdoors -- there is danger of rain and dirt destroying the appliance.
Never stick objects into the appliance's openings -- it could cause the appliance to overheat.
Cord Connection
The vacuum runs on electricity, that means there is always danger of electric shock, so please observe the following;
-Never touch the plug with wet hands.
-Always pull directly with the plug, if you want to disconnect the appliance from the outlet. Never pull on the cord,
as it might break.
-Take care that the power cord is not bent, pinched, rolled over or gets in contact with heat sources.
-Use only extension cords suited to the power requirements of the appliance.
-Never immerse the appliance in water or other liquids.
-Only operate the appliance if your outlet voltage is the same as that indicated on the appliance's nameplate.
Using the wrong voltage can destroy the appliance.
-If the power cord of this appliance is damaged it must be replaced by the manufacturers, their authorized service
representative or a similarly qualified person to avoid danger to the user.
Never use a defective appliance or operate an appliance with a defective power cord. There is a major risk of injury.
Children
Never leave the appliance unattended and use it with special precaution if children or persons who cannot judge dangers
are nearby. People (including children) who are unable to safely operate the appliance on account of their physical,
sensory or mental abilities or their lack of experience or knowledge should only use this appliance under supervision or
instruction of a responsible person. Packing-materials are not toys. There is danger of suffocation, KEEP OUT OF
REACH OF CHILDREN.

- 6 -
GETTING TO KNOW YOUR BACK PACK VACUUM
1. Comfortable Handheld Grip
2. On/Off Button
3. HEPA Filter/Dust Chamber
4. Wand Release Button
5. Onboard Tool Caddy for Duster & Crevice Tool
6. Extendable Duster Brush
7. Crevice Tool
8. Power Nozzle
- 7 -
ASSEMBLY INSTRUCTIONS
Assembling your Prolux Flight vacuum cleaner
NOTE: Always remove the power plug from the wall outlet before assembling or removing accessories.
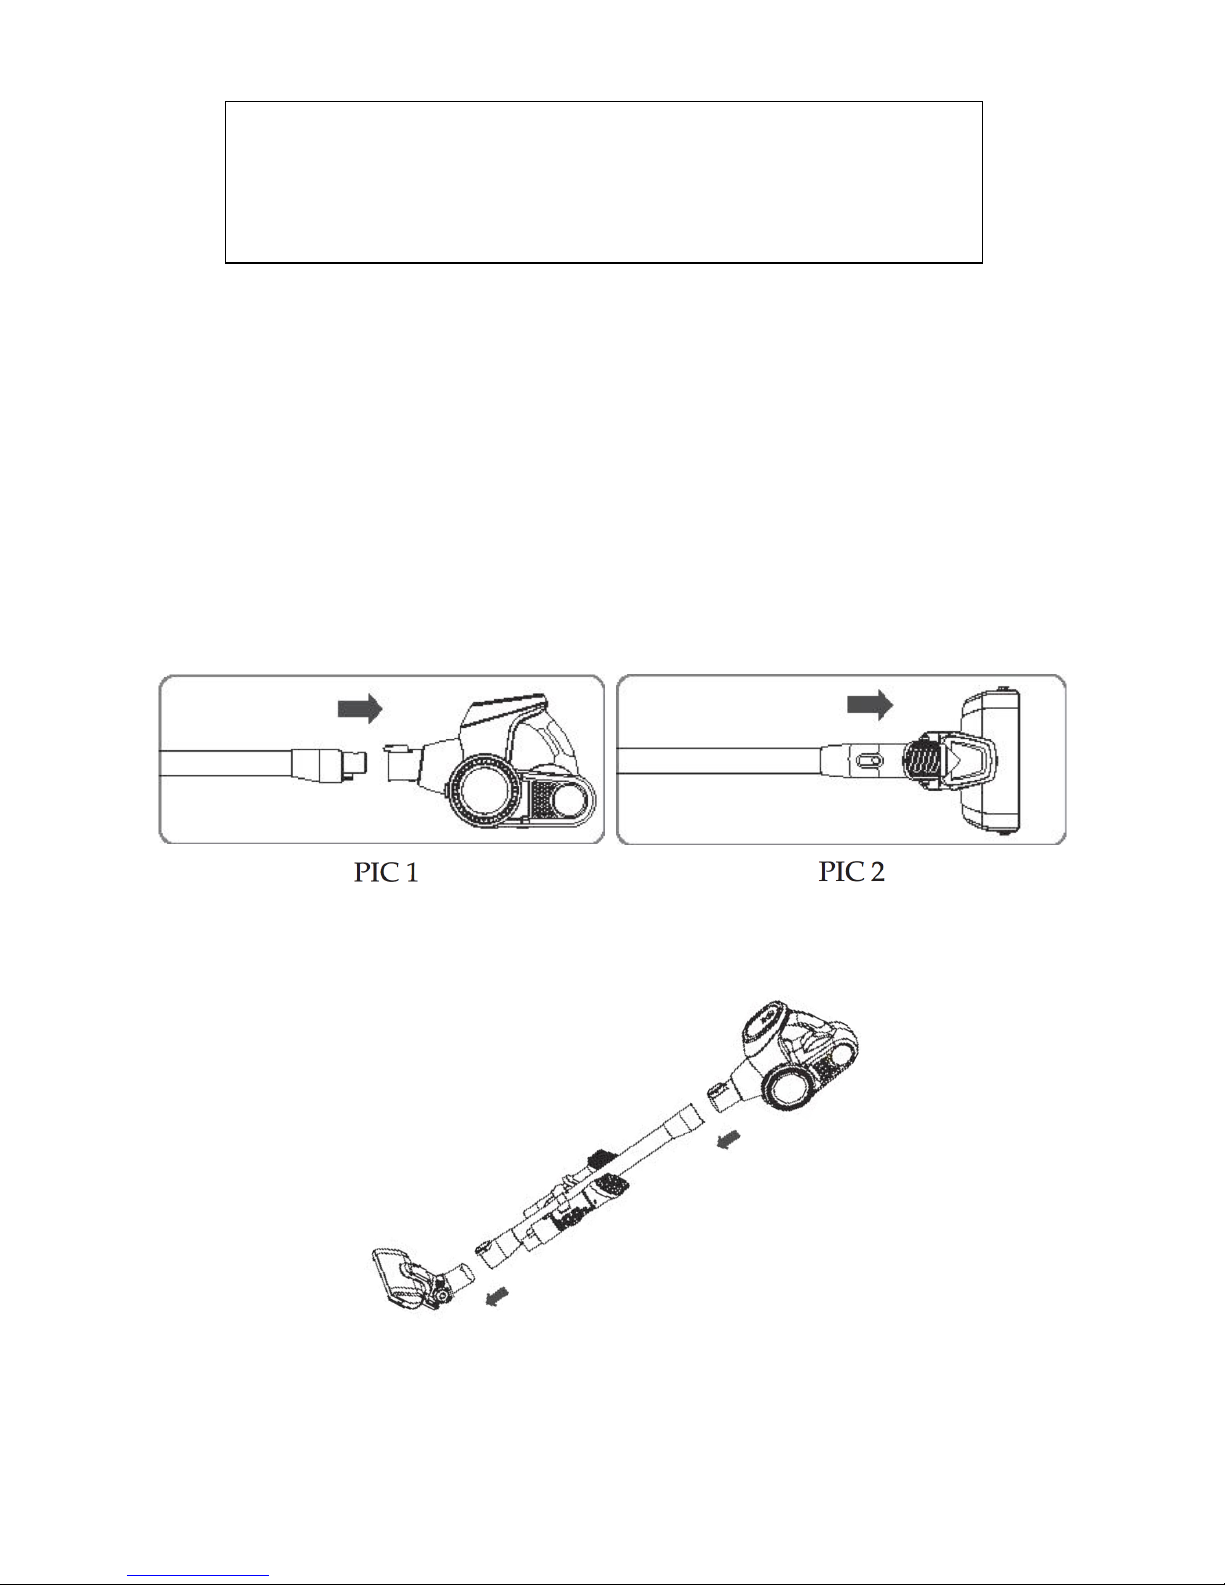
1. Insert the male end of the aluminum wand into the main handheld motor unit and press together, until you
head an audible “click”. (PIC 1)
2. Insert the power nozzle into the female end of the aluminum wand and press together until you head an
audible “click”. (PIC 2)
3. Attach the Onboard tool caddy to the aluminum wand, and secure the caddy to the wand by aligning the hole
on the caddy to the hole on the wand and install the included screw to hold it into place. Then press the
attachments onto the caddy.
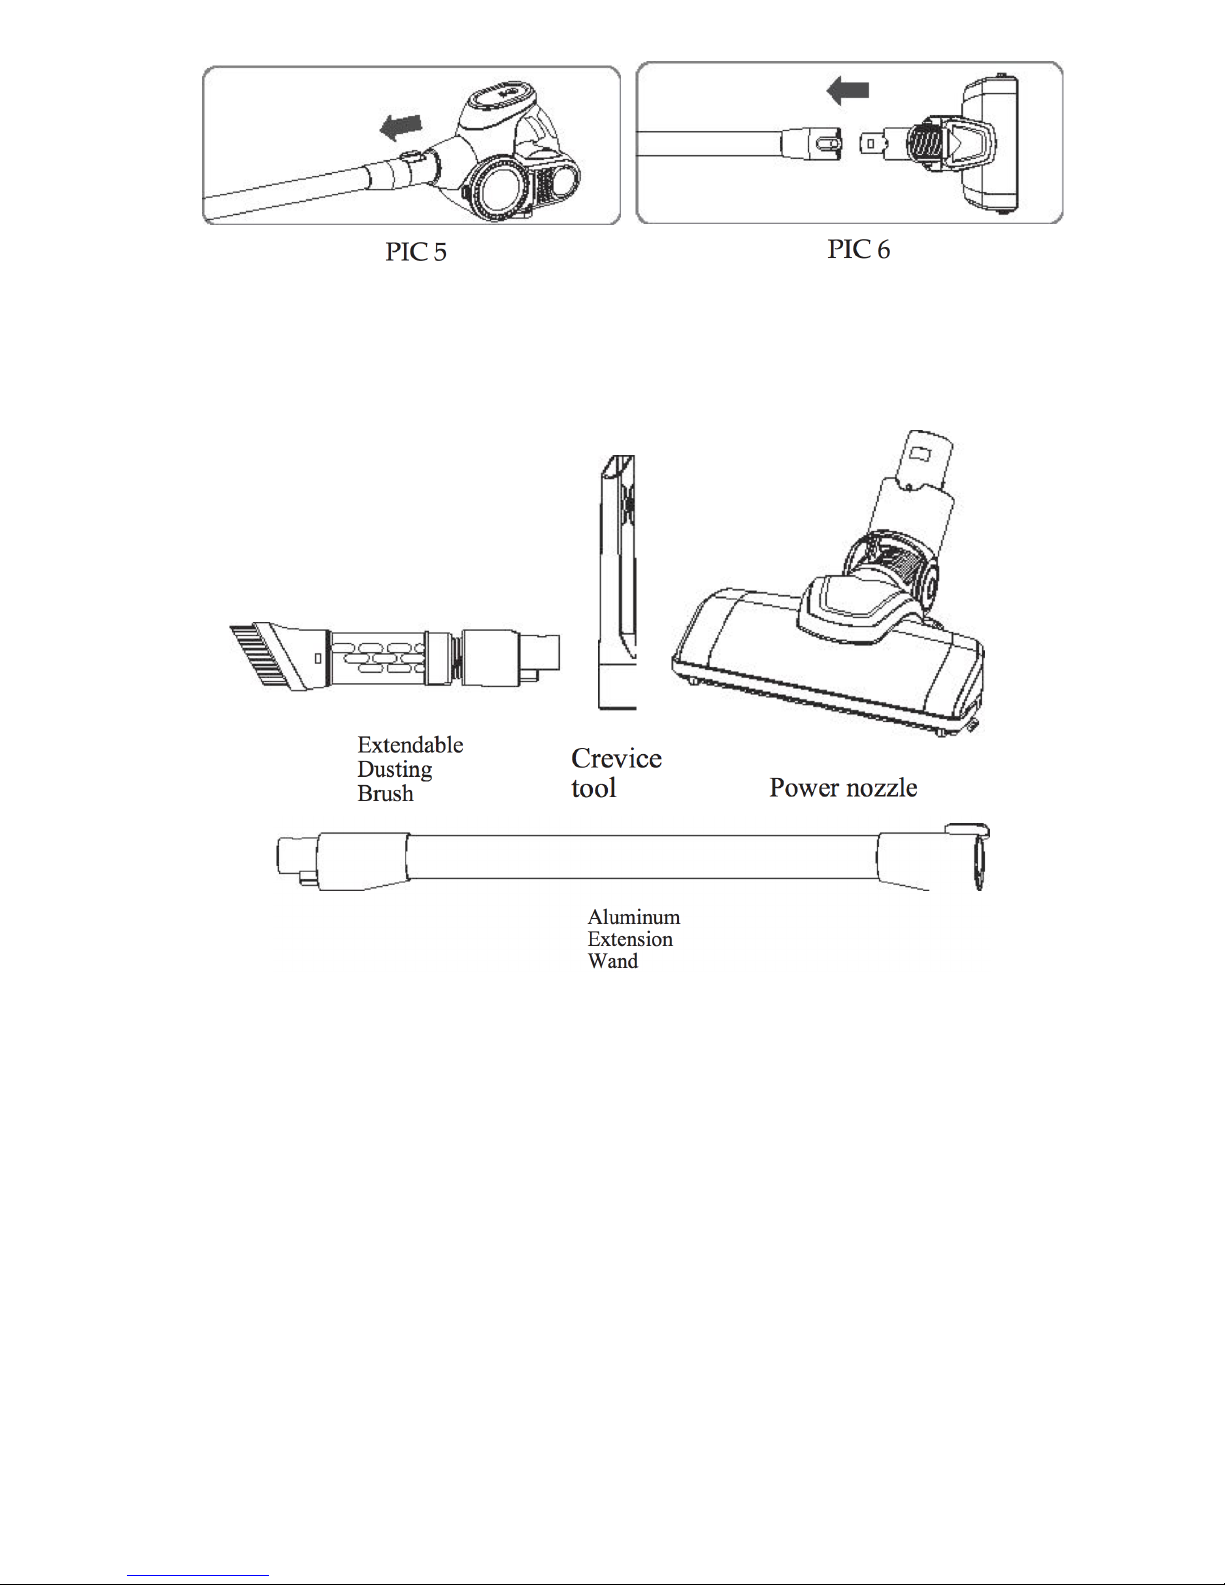
4. To disassemble the main handheld unit and power nozzle from the main aluminum wand, you will press the
release buttons, which are located on each end of the wand, and pull the handheld unit or power nozzle away
from the wand. (PIC 5 – PIC 6)
WARNING
To reduce the risk of electric shock, the power cord must be disconnected before
removing the dust container, changing the filters or performing maintenance or
troubling shooting checks
- 8 -
USING THE ATTACHMENTS
EXTENDABLE DUSTING BRUSH
The Extendable Flexible Dusting Brush can be used on all types of furniture.
CREVICE TOOL
Use for cleaning radiators, cracks & crevices along corners, and baseboards and in-between cushions.
POWER NOZZLE
The Power Nozzle is the main attachment that is used on any type of floor surface, from Hardwood/Tile floors, to
Carpet.
ALUMINUM EXTENSION WAND
The Aluminum Extension Wand is used with the Power nozzle, and to extend the reach when using the Duster
Brush or Crevice Tool.
!Connecting the attachments to your Vacuum to use as a handheld
To connect the attachments to your vacuum, you will simply insert the attachment into the
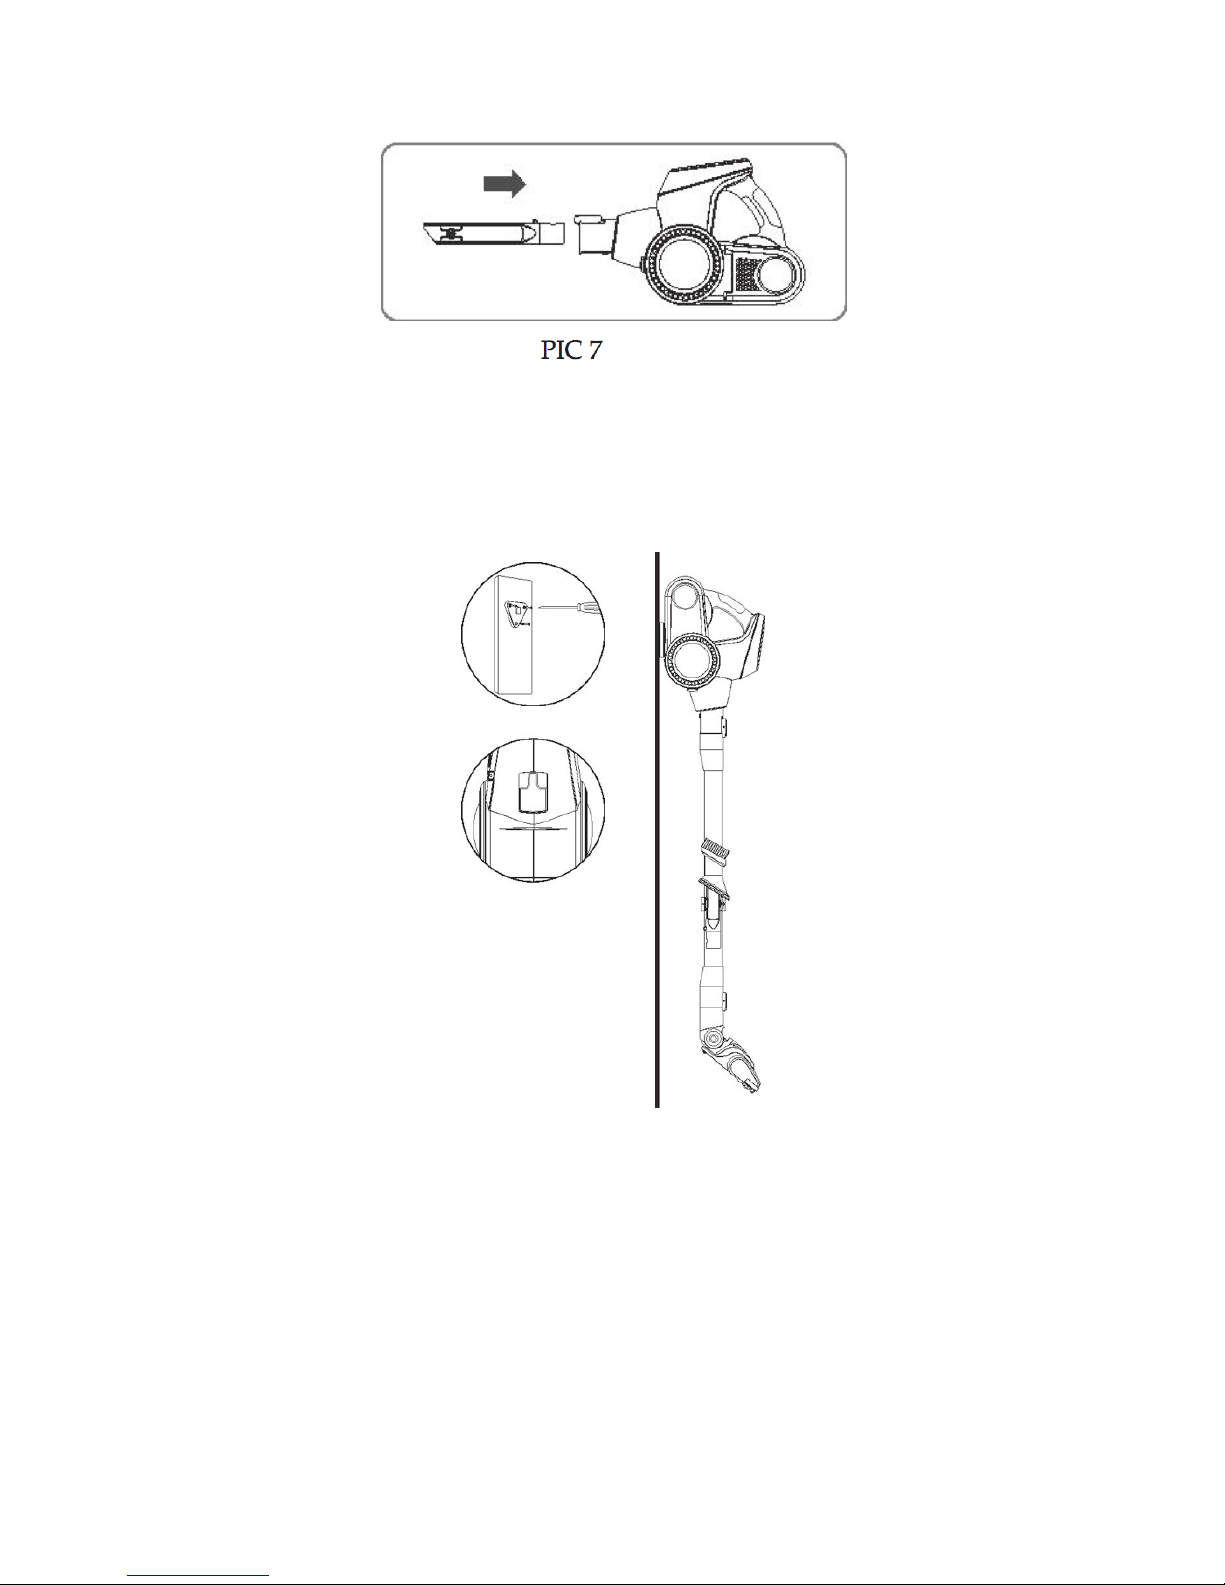
- 9 -
suction end of the vacuum or extension wand, until you hear an audible “click” (PIC 7)
WALL-MOUNTED STORAGE
The Prolux Flight includes an easy access wall mount, to store your vacuum in the most convenient location in your
home.
!USING YOUR VACUUM
1. Make sure that the aluminum wand and the appropriate attachment or power nozzle is properly installed.
2. Turn the vacuum on/off using the power button located on the top of the main handheld unit above the
handle.
(PIC 10)

- 10 -
!HOW TO EMPTY THE DUST CONTAINER/GENERAL MAINTAINANCE
You will want to empty the dirt in the dust container as soon as it has reached the “FULL” mark indicated on the
outside of the Dust Container.
WARNING: Do not fill the Dust Container above the “FULL” mark. This can cause the filters to clog and
result in poor performance of you vacuum cleaner.
To empty the Dust Container, please follow the instructions below.
1. Ensure the vacuum cleaner is in the “Off” position and disconnected from any plug or wall outlet.
2. Hold the dust container low over your trash receptacle, to avoid dust falling onto your floors.
3. Release the left side dust container door, by pressing on the release tab. (PIC 11)
4. Close the dust container door. (PIC 12)
!HOW TO CLEAN AND REPLACE THE HEPA FILTER
(When the HEPA filter is dirty and the suction power is reduced, you must clean or replace the HEPA filter.)
1. Release the “Right” side dust container door (Just as you would with the Left side door, shown in PIC 11
above).
2. Once the door is released, you simply pull the filter out of the vacuum. (PIC 13)
3. Clean the filter using warm water and a mild hand soap, thoroughly rinse the filter, then allow the filter to air
dry completely. Once the filter has completely air dried, then assemble the filter back into the container. Or, if
the filter is too dirty or in an unusable condition, replace the filter with a new one.

- 11 -
Cleaning the Housing
WARNING: Always switch off the appliance and disconnect it from the outlet before cleaning it.
ATTENTION: Do not use Alcohol, cleaning or scouring agents to clean your machine, as these may damage the
appliance and its finish. Clean the outside of the housing using only a slightly damp washcloth.
Troubleshooting
WARNING: Never use a defective appliance. Always switch off the appliance and disconnect it from the outlet before
you start to troubleshoot.
Fault
Possible Cause(s)
Solution
The vacuum will not turn on.
The plug is not connected to the
electrical wall outlet or the power
cord is damaged.
Insert the plug into an electrical
wall outlet and press the “on/off”
switch to engage the “on” position.
Or if the power cord is damaged,
replace with a new cord by an
authorized service center or
professional technician.
The vacuum is turned off.
Make sure the power button is
pressed down firmly, to ensure the

- 12 -
vacuum is being turned on.
Suction power is low.
The Dust/Dirt bin is full or
clogged.
Empty/clean the Dust/Dirt bin.
The power nozzle, and or
attachment wand is clogged.
Remove the debris that is causing
the clog. If necessary, use a long
wooden stick (e.g. a broomstick) or
coat hanger to do this.
The Dirt/Dust container is leaking.
Ensure that both side doors/lids to
the Dirt/Dust container are
properly closed and free from
debris, so that they close properly.
The tool attachment being used,
does not work properly on the
surface you are vacuuming.
Attach the appropriate tool for the
surface you are vacuuming. (see
pages 8-9)
Dirty filter(s).
Change/clean the filter(s). (See
page 10).
The vacuum makes unusual noises,
or is louder than usual.
The power nozzle, attachment
wand, suction hose, or filters are
clogged.
Remove any clogs. If necessary,
use a long wooden stick (e.g. a
broomstick) or coat hanger to do
this. Change the debris around
the brushroll as well.
THREE-YEAR (3) YEAR LIMITED WARRANTY
Prolux warranties this product’s motor free from defects in material and workmanship for a period
of three (3) years on the motor, and one (1) year on the body of the vacuum, free from
manufacturer defects in material and workmanship from the original date of purchase, when
utilized for normal household use.
Subject to the following conditions, exclusions, and exceptions:
What is Not Covered by the Prolux Warranty - Warranty Exclusions. This limited warranty does
not extend to and expressly excludes:
1. Normal wear and tear and/or replacement attachments or accessories, including, without
limitation, cords, hoses, filters, switches, chargers and other attachments to the Vacuum.
2. Damage or burnout of the motor resulting from failure to clear a blockage occurring during the
normal course of use.
3. Loss or damage to the body of the vacuum resulting from conditions beyond the control of
Prolux including without limitation, misuse, accidents, abuse, neglect, negligence from the customer,
overuse beyond capacity of the vacuum, or unauthorized modification and/or alteration.
4. Loss or damage to the vacuum resulting from failure to follow the required maintenance
schedule, or failure to use the vacuum in accordance with written instructions from Prolux,

- 13 -
guidelines or the terms of its Owner’s Manual.
5. Using the vacuum for commercial use.
If your appliance fails to operate properly while in use under normal household conditions within
the warranty period, please contact your authorized PROLUX dealer you purchased the unit from.
Non-durable parts including, without limitation, filters, accessories, brushes, belts, and electrical
parts, which normally require replacement, are specifically excluded from warranty.
This warranty is limited solely to the cost of the repair or replacement of the unit at Prolux’s option.
This warranty does not cover normal wear of parts and does not apply to any unit that has been
tampered (by unauthorized user) with or used for commercial purposes. This limited warranty
does not cover damage caused by shipping damage, misuse, abuse, negligent handling, or
damage due to faulty packaging or mishandling in transit.
This warranty is extended to the original purchaser of the unit only and is not transferable. This
warranty gives you specific legal rights, and you may also have other rights, which vary from state
to state. *IMPORTANT: Before sending your unit back for warranty work, contact your
authorized PROLUX retailer you bought the unit from first for instructions on how to send
your unit in for warranty work. Unauthorized warranty claims will result in delayed service
and may be returned.
For Authorized Warranty Claims: PROLUX shall be responsible for all parts and labor
associated with the warranty claim and the customer shall be responsible for all shipping
charges to the PROLUX service center.
In the event of a warranty claim, Prolux will replace any parts associated with the warranty
claim, and return the unit back to working order, before sending the item back to the
customer.
Prolux is constantly striving to improve our products. Therefore, the specifications contained
herein are subject to change without notice.
Product Warranty Registration
Please follow the link below to register your Prolux product.
www.proluxcleaners.com
For more information on this product, including warranty info and to contact Prolux Customer
Service, Please follow the link below:
http://www.proluxcleaners.com/flight.html
Environmental tips
Once any electronic product is no longer functional, it should be disposed of in such a way as to cause minimum
environmental impact, in accordance with the regulations of your local authority. In most cases you can take
such products to your local recycling station.
Table of contents
Other Prolux Vacuum Cleaner manuals

Prolux
Prolux Ion User manual

Prolux
Prolux AllVac User manual

Prolux
Prolux CTX User manual

Prolux
Prolux 2.0-PRO Technical manual

Prolux
Prolux Lite User manual

Prolux
Prolux 2.0-B User manual

Prolux
Prolux TerraVac User manual

Prolux
Prolux iFORCE User manual

Prolux
Prolux X8 Elite User manual

Prolux
Prolux 2.0-G User manual


