Prolux Lite User manual
Lite
Garage Vacuum
Instruction Manual

Congratulations on the purchase of your new Prolux Lite Wet/Dry Garage Vacuum!
The Prolux Lite Garage Vacuum is powerful, epen able, has a tool for nearly every
job an is light an compact enough to be store in nearly any Garage. It can
vacuum up irt, woo chips, saw ust, water, snow as well as blow, inflate, shampoo,
spray an wash. With its 30 foot hose it is esigne to keep your Garage, Shop or
Cars clean when you nee it. Please take the time to rea this owners manual an
get familiar with your new appliance!
2

Contents
Safety Instructions ----------------------------------------------------------------4
Vacuum Description & Parts -----------------------------------------------------5
Assembly Instructions/Mounting Instructions------------------------------------7
Operating Instructions ------------------------------------------------------------10
Using the Tools -------------------------------------------------------------------12
Maintenance ----------------------------------------------------------------------16
Trouble Shooting -----------------------------------------------------------------18
A itional Available Parts--------------------------------------------------------18
Technical Data -------------------------------------------------------------------19
Warranty Information ------------------------------------------------------------19
Congratulations on the purchase of your Prolux Wet Dry Garage Vacuum!
The Prolux Wet Dry is attractive, powerful an makes your life easier.
Powerful – 90 cubic feet-per-minute of air flow & 98.5 inches of water lift.
3-Year Factory Warranty
Vacuums up ry irt or water (can hol up to 2.1 Gallons of Water an 4
gallons of irt)
In icator tells you when irt bin nee s emptying or water change
Auto shut-off when full of water
A tool for nearly every job
Can be use to vacuum, blow, inflate, clean wet spills, or shampoo
Easily mounts on your wall for easy, out-of-the-way storage
3

Important Safeguards!
When using an electrical appliance, always follow basic precautions, including
the following:
REA ALL INSTRUCTIONS BEFORE USING THIS APPLIANCE
Warning:
To reduce the risk of fire, electric shock, or injury:
o not use outdoors
Close supervision is necessary when any appliance is used by or near
children.
o not allow cleaning system to be used as a toy or to run unattended at
any time.
o not allow any objects to be put into hose inlet.
o not pick up anything that is burning or smoking, such as cigarettes,
matches, or hot ashes.
o not use to pick up flammable or combustible liquids such as gasoline
or fine wood sanding or use in areas where they may be present.
Avoid picking up sharp objects.
o not use without filter in place. Empty dirt container and clean filter
frequently when picking up very fine materials such as powder.
o not put any objects into openings. o not use with any openings
blocked.
Keep free of dust, lint, hair, and anything that may reduce airflow.
o not pull or carry by cord, use cord as a handle, close a door on cord
or pull cord around sharp edges or corners. o not run appliance over
cord. Keep cord and appliance away from heated surfaces.
Always disconnect cord from electrical outlet before servicing the power
unit.
o not unplug by pulling on cord. To unplug, grasp the plug, not the
cord. Never handle plug or appliance with wet hands.
Turn off all controls before unplugging. Unplug cleaner when not in use.
o not use with damaged cord or plug. If appliance is not working as it
should, has been dropped, damaged, left outdoors, or dropped into
water, take it to a Professional Vacuum Service Center or Prolux
Authorized Vacuum Service ealer.
Use vacuum cleaner only for its intended use as described in this
owner’s manual. Use only attachments recommended by the
manufacturer. Other attachments may cause hazards.
This appliance is provided with double insulation. Use only identical
replacement parts. Servicing a double-insulated appliance requires
extreme care and knowledge of the system and should be done only by
qualified service personnel.
Keep hair, loose clothing, fingers, and all parts of body away from the
opening and moving parts.
4
Save these instructions!
WARNING
Operate cleaning system only at voltage specified on power unit.
This system is intended for residential use.
WARNING
To reduce the risk of electric shock, this appliance has a polarized plug (one
blade is wider than the other). This plug will fit in a polarized outlet only one
way. If the plug does not fit fully in the outlet, reverse the plug. If it still does
not fit, contact a qualified electrician to install the proper outlet. o not change
the plug in any way.
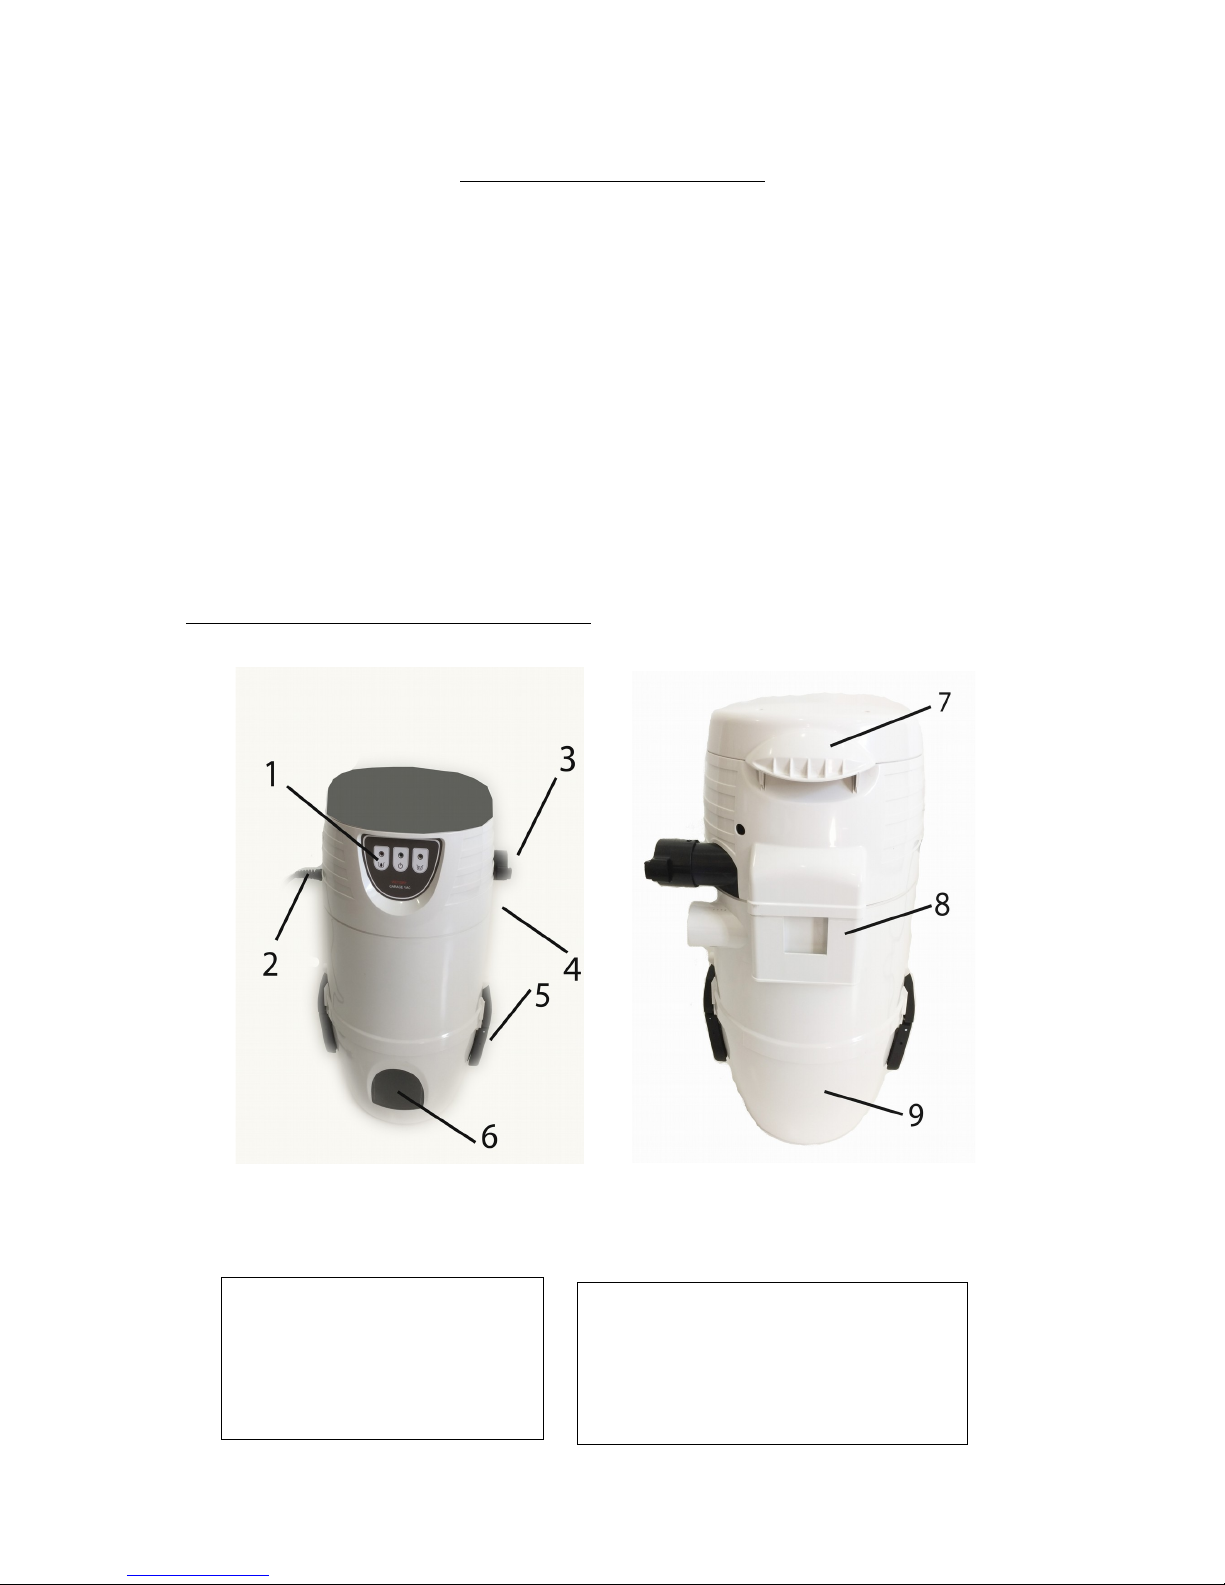
Vacuum escription & Parts
5
1. Control Panel
2. ON/OFF Switch & Power
Cor
3. Blower Hose Outlet
4. Suction Hose Outlet
5. Dirt Container Latches
6. Dirt Viewing Win ow
7. Carrying Han le
8. Mounting Area
9. Dirt Container
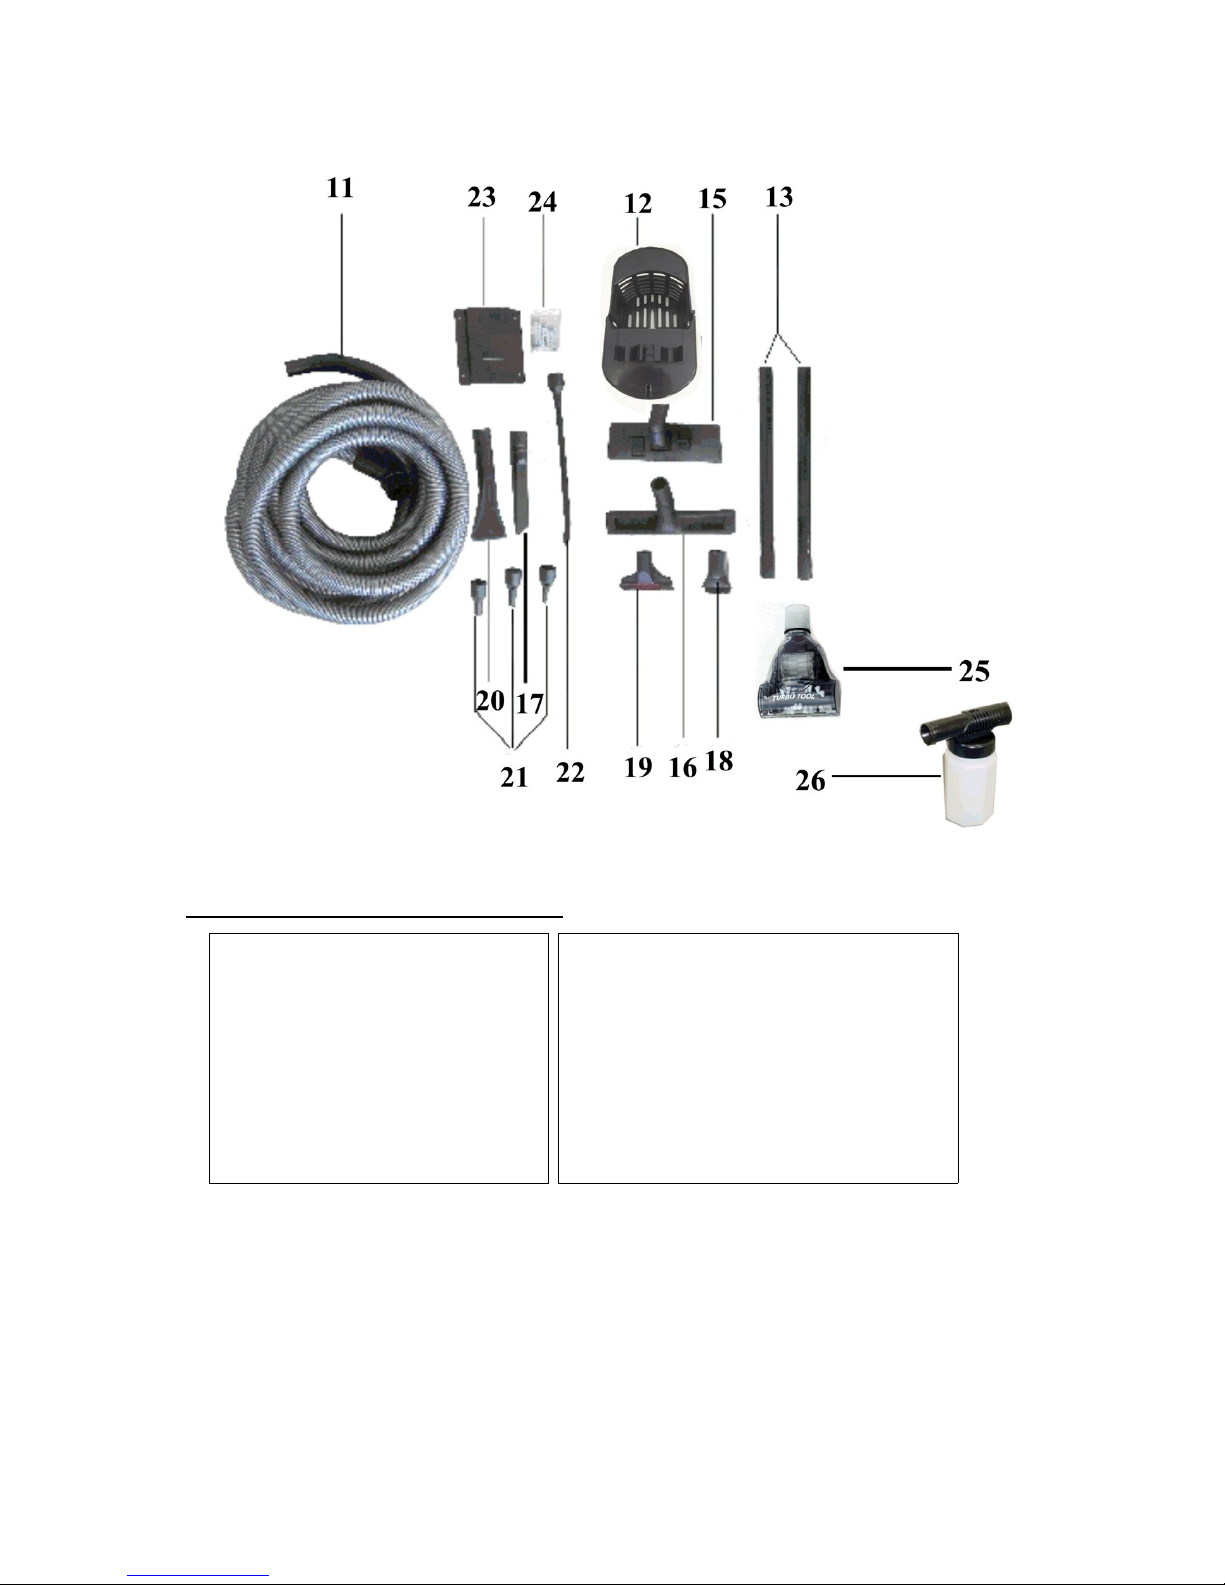
Included Accessories & Parts
A detailed description of how to use the above tools is listed on page number 9.
6
11. 32ft Flexible Wet/Dry Hose
12. Hose & Tools Hol er
13. Extension Wan s
15. Multi-Surface Floor Tool
16. Wet Pickup Squeegee Floor
Tool
17. Crevice Tool
18. Dusting Brush
19. Upholstery Tool
20. Extraction Shampooer Suction Tool
21. 3 Sizes of Detailing & Inflator Tools
22. Long Detailing Precision Blower Tool
23. Wall Mounting Bracket
24. Screws
25. Mini Hea with Spinning Brushroll
26. Su s Gun Sprayer Washer

Assembly Instructions
1. Remove the irt tank by pulling up on both han les to unlatch. Lift upper half of
unit to remove.
2. Remove all accessories an parts store in the bottom of the tank prior to use.
3. If the round funnel comes out of dirt tank, set back inside the dirt tank
before reassembling.
4. To reassemble, place the top of the unit on the dirt tank so the edges fit
together and latch the handles to secure the top and bottom of unit.
5. Mount to wall (see instructions below).
Mounting & Installation Instructions
Mounting on drywall or plaster wall with stud (fasteners
included)
1. Locate a stu in your ry wall an rill a 1/8” pilot hole.
2. Mount the bracket with a #10-16 x 1-3/4” screw.
3. Ensuring your bracket is aligne correctly with the stu , rill a secon pilot hole
using the next hole as a gui e. Securely fasten with a screw.
4. Repeat step 3 for remaining hole.
Note: mount near a wall outlet, making sure the cord provided will reach the
outlet.
5. Mount the vacuum unit by making sure the square hole on the vacuum (#8 on
Page 5) sli es over the bracket lip. Also see “Hanging the Unit” on Page 9
below.
See Mounting Images on the next page.
7

Mounting on concrete wall (fasteners included)
You will nee : (4) 3/8” x 2-1/4” concrete sleeve anchors. 4 holes
1. Drill a 3/8” x 1-3/4” hole with a masonry rill bit.
2. Insert a bolt an anchor sleeve into the hole.
3. Align the bracket over the hole an mark the remaining hole locations using the
(4) holes of the mounting bracket. Remove the bracket an rill remaining holes.
4. Mount the bracket starting at top corner hole, tightly securing sleeve anchor
with hex nut.
5. Repeat for three remaining holes.
6. Mount the unit by making sure the two square slots on backsi e of unit are
sitting on the two hooks on the mounting bracket.
8

Mounting the Hose & Tool Holder (fasteners included)
1. Determine esire location for hose hol er an screw supplie screw into
stu . (If mounting into rywall with no stu available, use supplie rywall
anchors.)
2. Attach the 4 screws in the backsi e of the Hose & Tool hol er in the 4 holes.
If you want to make the Hose & Tool Hol er removable from your wall make
the screws slightly loose an the Hose & Tool Hol er can unsnap from your
wall by pushing up on the Hose & Tool Hol er.
3. Hang hose on unit an attach 3 of your most use tools to the 2 places where
they snap in on the outsi e of the Hose & Tool Hol er. The rest of your tools
can be place insi e the unit.
Hanging the Unit
Hang your unit by putting the unit slots to the
mounting bracket. Mounting Bracket may look slightly
ifferent than what is shown in the picture.
Note: Make sure the unit fits securely on the
mounting bracket and won’t fall down.
9
Operating Instructions
Wet/dry vacuuming mode
1. Plug in unit an attach the hose connector into the air inlet. See picture ‘A’
below. Attach extension wan , if esire , to en of hose by pushing it firmly
into the hoses an firmly twisting. All hose an tool connections are attache
by friction fit metho (shoving together an twisting to the right for firm
connection).
Attach a itional wan s or tools as esire . Switch the power on an start
vacuuming.
Note: the power switch is locate on the top left si e of the vacuum.
To turn vacuum on, (I) press up.
To turn vacuum off, (O) press own.
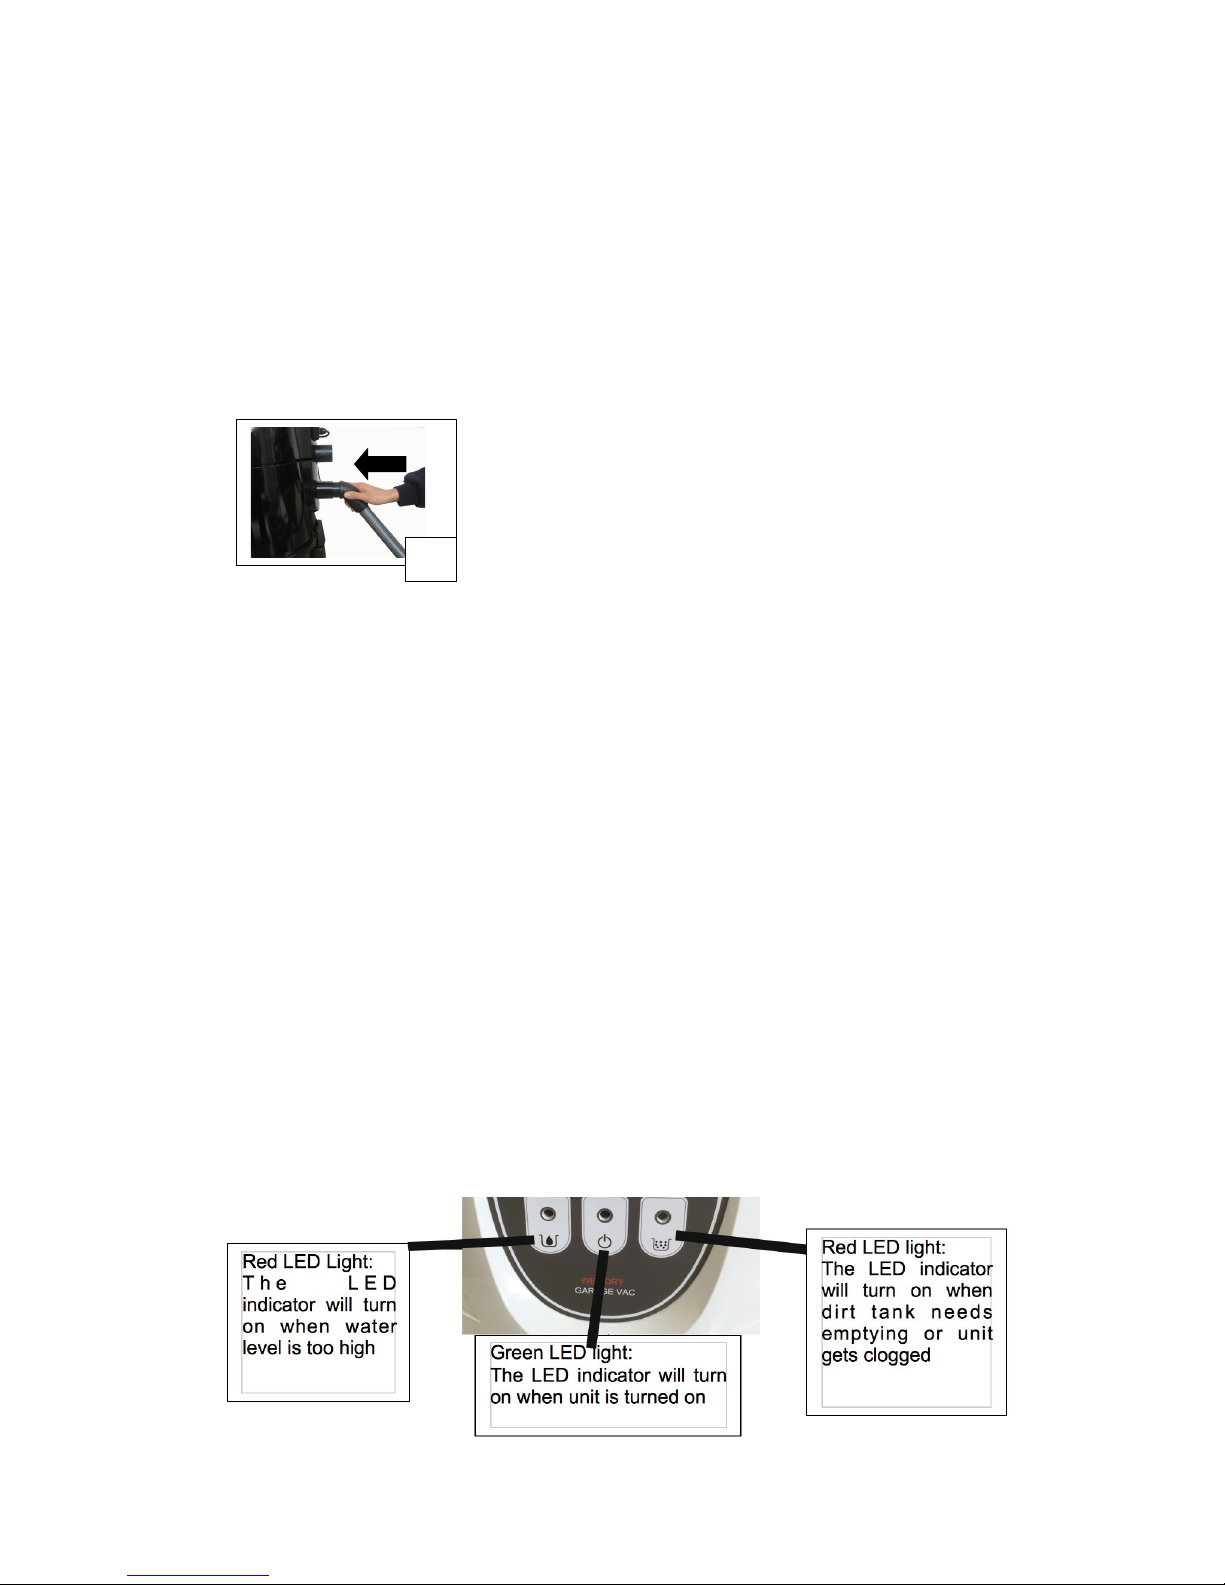
2. If the mi le in icator turns green on the in icator screen, it in icates that the
appliance is powere on an working as it shoul .
3. If the re in icator light in icator is on, it means canister is full of irt or
clogge . Switch off immediately when the light turns red.
Solution:
① Empty the ust canister (See “Unit Cleaning” below)
② Clean the HEPA filter an cloth filter (See “Unit Cleaning” below) or check
for clogs in the hose.
It is suitable to clean the ust canister an the filter regularly (every 15 to 30
ays).
4. Left re light is the water full in icator. The unit stops sucking up when the
in icator turns re , meanwhile the motor will automatically turn the unit off. To
change simply unplug the unit an empty the water from the ust canister. (See
“Unit Cleaning” below) The unit will start again after replacing the ust canister.
10
A
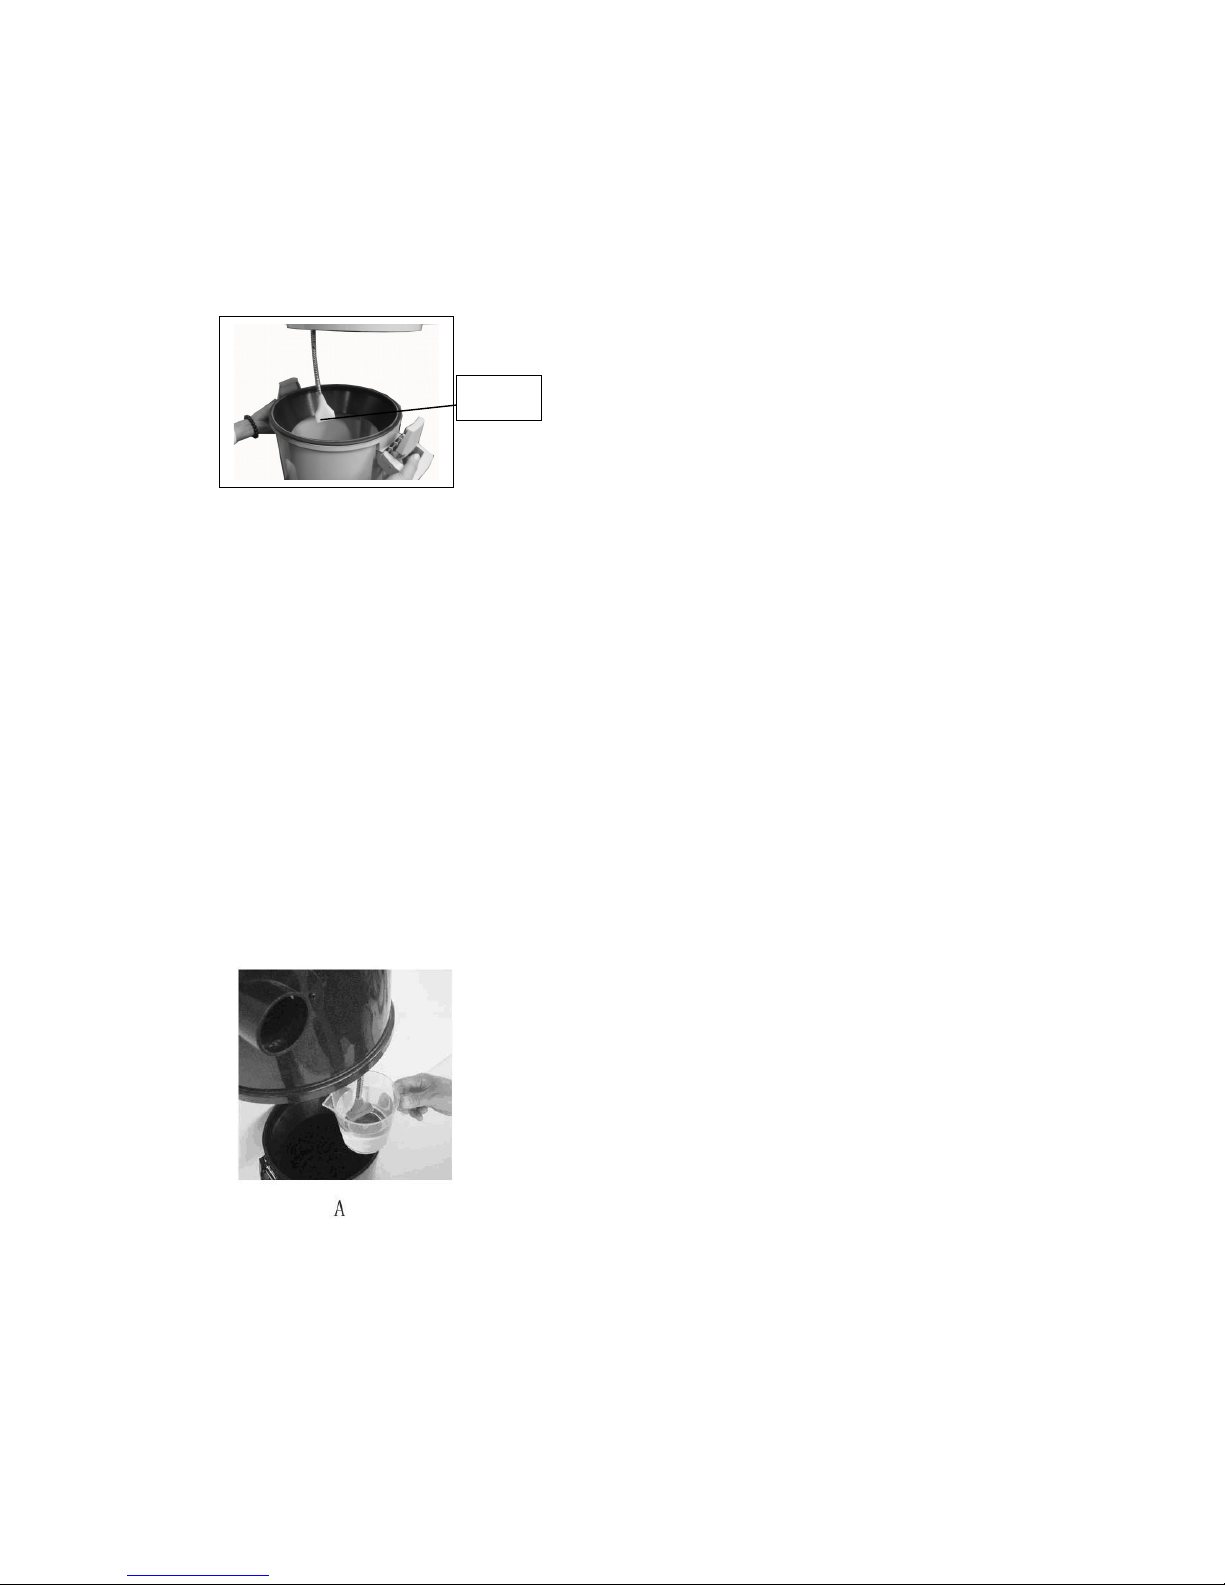
Important:
a. Unplug the unit when the in icator turns re an wait at least 5 secon s before
attempting to resume the appliance.
b. Empty the ust canister before vacuuming again. Two copper sensor poles on
the probe shoul be clean, otherwise the sensing function of the probe will be
affecte .
c. After sucking up water, make sure the filters are ry before attempting to
vacuum ust or irt.
. When the ust canister is full of water, remove the ust canister by hol ing the
ust canister han le an rising up by a 10mm istance. Then turn off the hook
an pull the ust canister towar s you. Do not attempt this task by one han an
notice the ust canister cannot be gra ient, which can cause the ust canister to
come off easily.
e. If the appliance water excee s 2.11 Gallons an it oesn’t power off, it means
the appliance has a problem, so imme iately power it off. Pour off the water in
the bucket, check the copper pole of the etector an etermine whether it’s
clean. Clean the copper pole by taking a bottle of water, open the appliance, an
then submerge the etector with the water. If the appliance is powers off, then
the problem was because the copper pole was irty an choke . The appliance
shoul now be ok. If not, there are other problems an it shoul be sent to repair.
(See picture A)
Vacuuming Liquids:
a. After vacuuming liqui s, keep the appliance running up to 3 minutes. Also,
keep tubes on to eliminate any liqui spills.
b. If the filter has water in it an it flows to the motor, cut off the power
imme iately. Please contact a authorize service center.
c. Never vacuum any liqui s up other than water.
11
Probe

Blower Mode:
This appliance also functions as a blower, sprayer, an shampooer. Attach to the
blower hose to the outlet by inserting the gap in the tube plug to the hook of the
exhaust an turn 90 egrees. See picture ‘A’ below. Attach extension wan , if
esire , to en of hose by pushing it firmly into the hose. Attach a itional wan
or tool, if esire , by firmly inserting onto the wan . Start the appliance an begin
blowing. Plug in the unit an push the power switch up to begin blowing.
Safety device:
1) The appliance has a protection evice to automatically power off when the
water is full. It prevents water from reaching the motor. If this happens, the re
light will turn on in icating the tank nee s imme iate emptying.
2) A motor temperature protection evice has been installe . When the
temperatures excee the rate limit, it will power off for protection. If this
happens, clean filters an wait 30 minutes before reusing.
3) In the event of a clogge or full irt tank, the re light will turn on in icating the
irt tank an filter nee cleaning. To ensure best performance, clean the tank an
filter every 15-30 ays.
Using the Tools
Make sure the tools are secure to the hose or
wand before using.
1. Attach extension wan to en of hose by
pushing it firmly onto the hose an twisting.
2. Attach a itional wan or tool, if esire ,
by firmly inserting onto the wan an twisting.
3. Use the hose an wan alone or attach any
of the tools to the en of the hose wan .
12
A

Accessories:
32 ft flexible crush-proof hose
Hose hol er
Accessory Ca y
Mounting Bracket
Floor cleaning:
(2) Extension wan s
Use with esire attachment for a longer reach.
Wet Pickup Squeegee Floor tool.
Multi-surface floor tool
Small Tool Cleaning:
Crevice tool
Upholstery Tool
Dusting brush
13

Auto Clean & Inflating:
Water Extraction Suction tool.
Precision blower tool for etailing
Small, me ium an large etailing an
inflating tools.
Spraying & Scrubbing:
Mini Turbo Nozzle with Spinning Brushroll
Han Hel Sprayer/ Shampooer
TOOL USE
11. 32ft Flexible Crush-Proof Hose – Connects to the vacuum on suction si e or
blow si e.
12. Hose Holder – 32 ft hose can be neatly store here.
13. Extension Wands – 2 extension wan s can be use for har -to-reach places.
Also it is use with floor tools.
14. Accessory Tool Caddy – When tools are not in use they may be store in the
tool ca y. The tool ca y can be wall-mounte .
15. Multi-Surface Floor Tool - May be use on both carpets/rugs or har floor
surfaces. For use on carpets, make sure the tab is in the own position .
This will hi e the soft outer brushes. For har floor surfaces, press the opposite tab
in the own position . This will engage the soft outer brushes.
16. Wet Pickup Squeegee Floor Tool – May be use to vacuum har floor surfaces.
Also is use to vacuum up wet spills or mop an scrub your floor with an suck up
the irty water. For example – in the winter time, you rive your car into the garage
14

an because it was snowing outsi e, the snow rops to the floor an creates wet
pu les. Simply take this floor tool an quickly suck up the irty water in a matter of
secon s. For mopping or cleaning your floor you coul tilt the brush forwar so the
nylon scrub brushes are making contact an scrub your floor. Then bring the brush
back to its normal level an suck all the irty water an irt into the vacuum.
17. Crevice Tool – use to vacuum in small tight spaces like between seats,
cushions or win ow tracks.
18. usting Brush – use for usting an cleaning table-type surfaces.
19. Upholstery Tool – use to vacuum upholstery couches, cushions, car seats an
floor mats.
20. Extraction Shampooer Suction Tool – use to vacuum up small wet spills an
can also be use to shampoo your car interior (see shampooing section below).
21. 3 Sizes of etailing & Inflator Tools – these 3 ifferent sizes of inflator or
blowing tools can be use to inflate mattresses or etailing to blow irt out of small
har -to-reach surfaces.
22. Long etailing Precision Blower Tool – blower etailing tool with long skinny
reach for those har -to-reach places.
23. Wall Mounting Bracket – allows you to mount your vacuum on a wall surface.
24. Screws – wall mounting screws.
25. Mini Turbo Head with Spinning Brushroll – this tool has many uses. This is a
tool about 5 inches wi e with suction an a spinning brushroll. It can be use to
vacuum upholstery, car seats, throw rugs, upholstery couches, carpet, stairs an
har -to-reach places. It especially works well for pet hair pickup or where you nee
more scrubbing power. It may also be use for scrubbing action in shampooing
upholstery (see shampooing instructions below).
26. Suds Gun Sprayer Washer – when attache to the hose on the blowing si e the
su s gun may be use to wash objects or to shampoo upholstery. Plain water may
be use in it or any cleaning chemical like stan ar shampooer extraction chemical.
It sprays water or other chemicals simply by hol ing your finger over the hole.
HOW TO SHAMPOO UPHOLSTERY
You may shampoo on upholstery surfaces (like upholstery seats in your car--follow
your car’s manufacturer gui elines for shampooing) with the Prolux Lite Wet Dry
vacuum by following the instructions below:
1. Attach the hose to the blow or exhaust si e of the vacuum.
2. Attach the Su s Gun Sprayer tool (#26) to the hose. Fill the Su s Gun with
water an the right amount of correct extraction shampoo (available at most
stores).
15

3. Spray the surface to be cleane .
4. Connect the hose to the suction si e of the vacuum.
5. Use extraction tool #20 to scrub your surface an suck out the irty water.
For more scrubbing power you may also use the mini hea tool #25. The
extraction tool #20 will suck the most water out.
Then you’re one an that is how you shampoo your upholstery surfaces with the
Prolux Wet Dry Garage vacuum.
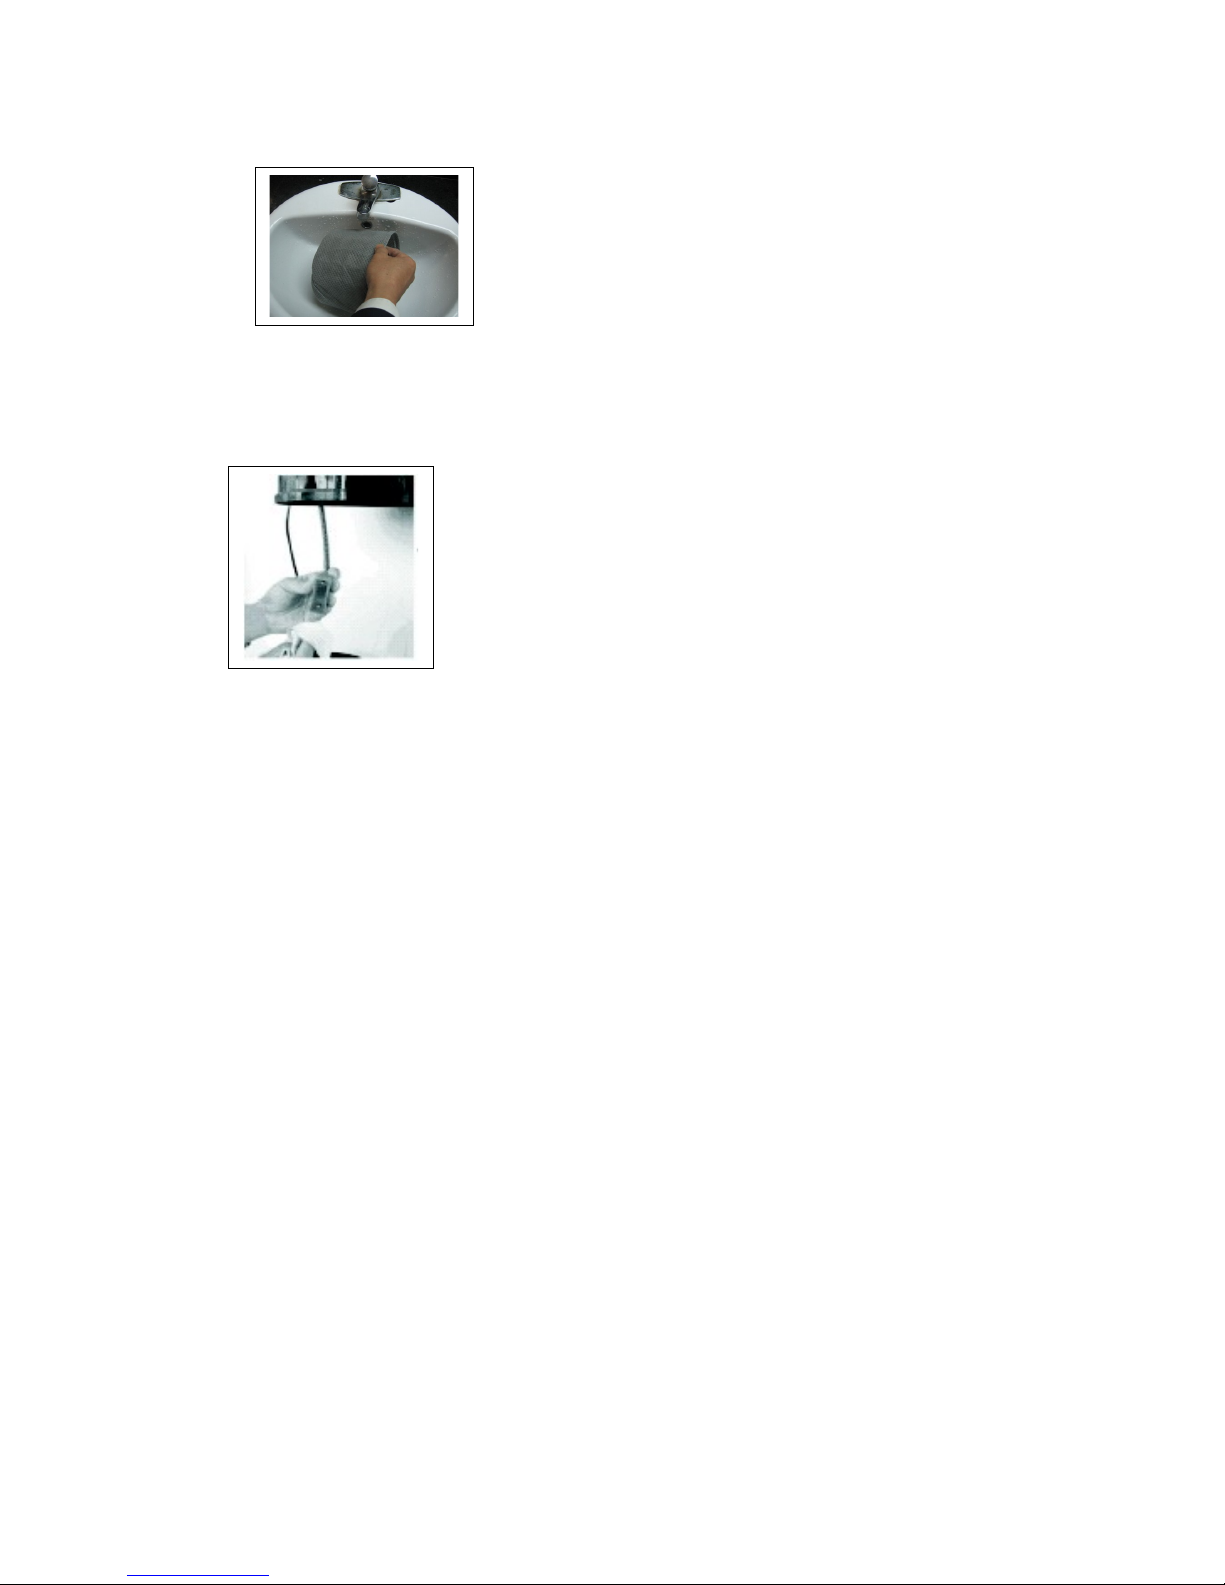
Cleaning and Maintenance
Unit cleaning:
Follow the steps below to get your filter, cloth filter an copper probe poles cleane .
16
A. Remove the ust
bucket
B. Take out the irt
tank an empty it.
C. Unscrew an take out the cloth filter
D. Remove an take out the cloth filter to wash
(see image below)
Filter Maintenance:
From ordinary use the circular filter (not the cloth filter) should be replaced
or cleaned once every year or when warning light comes on (and dirt bin is
clean). Replacing a dirty filter does improve suction performance.
Cleaning clogs:
Low suction or poor pickup may be ue to a clog in the vacuum. If this occurs,
the LED full irt tank in icator warning light will come on an in icate airflow is
restricte .
If there is no suction or if suction is re uce at the hose, follow these steps to
clear the clog:
1. Unplug vacuum from electrical outlet.
2. Check the filter an clean as necessary (see unit cleaning above).
3. Check to see if irt tank is full. Empty if nee e .
4. Check wet/ ry or blower outlet for clogs.
5. Check hose an wan s for clogs.
If the clog is containe near the top of the hose (close to the unit), follow these
steps:
1. Attach hose to the wet/ ry inlet an turn the power on.
2. This shoul islo ge the clog by sucking in ebris.
If the clog is containe near the bottom of the hose (close to where tools are
attache ), follow these steps:
1. Remove wan or tool.
2. Attach hose to the blower outlet an turn the power on.
3. This shoul islo ge the clog by blowing out ebris.
17
E. Wash the filters an allow to properly ry before reinstalling
G: Clean the two copper
poles of the probe

If the above metho s are not successful, fin the clog by han , then squeeze the
hose an shake until the ebris islo ges.
Troubleshooting
1) Limited suction power:
If you fin the suction power is limite or not working to capacity, follow the
steps below to fix:
a. First check the ust tank. Clean the filter an empty the ust tank.
b. After cleaning, if problem persist check for clogs.
c. If problem continues an there is no clog, replace or clean filters.
2) If appliance fails to start:
a. Pull out the plug an wait for 60 minutes.
b. Check electrical outlet to ensure power to the source.
c. Turn on the power switch.
3) Low suction and/or clog:
a. Please rea section “cleaning clogs” above in the owners manual as well
as #1 above.
b. You may also use your han to open an close suction. Increase the
airflow on the hole blocke --this may cause the object to be sucke in. Or,
use a hanger to islo ge the object.
Additional Parts that may be purchased from Prolux
Turbo Hea with spinning brushroll for carpet cleaning.
Replacement hose, a itional filters, extension wan s, floor tools, crevice tool, uster
tool, upholstery tool, mini hea , sprayer etc., may also be purchase a itionally.
Technical Data
Motor Size 12 AMPS Rate voltage 120V
Rate frequency 60Hz
Power 90 C F M , 9 8 . 5
inches of water
lift.
Color White
Reservoir
volume
4 Gallons Noise ≤73 B
Warranty 3 year Motor Warranty, 2 Year Bo y Warranty
18

THREE (3) YEAR LIMITE WARRANTY
Prolux warrants this pro uct free from efects in material an workmanship for a
perio of three (3) years on the motor an (2) years on the bo y of the appliance.
Warranty perio starts from the ate of the original purchase, when utilize for
normal househol use, subject to the following con itions, exclusions, an
exceptions:
If your appliance fails to operate properly while in use un er normal househol
con itions within the warranty perio , please contact your authorize Prolux ealer
you purchase the unit from. You may also contact Prolux at the a ress below.
Non- urable parts inclu ing, without limitation, filters, accessories, brushes, belts,
an electrical parts, which normally require replacement, are specifically exclu e
from warranty.
This warranty is limite solely to the cost of the repair or replacement of the unit at
our option. This warranty oes not cover normal wear of parts an oes not apply to
any unit that has been tampere with or use for commercial purposes. This limite
warranty oes not cover amage cause by misuse, abuse, negligent han ling, or
amage ue to faulty packaging or mishan ling in transit. This warranty oes not
cover amage or efects cause by or resulting from amages from shipping or
repair, service or alterations to the pro uct or any of its parts, which have been
performe by a repairperson not authorize by Prolux.
This warranty is exten e to the original purchaser of the unit. It exclu es all other
legal an /or conventional warranties. In no event, is Prolux or its ealers liable for
inci ental or consequential amages of any nature whatsoever. Some states o not
permit the exclusion or limitation of inci ental or consequential amages, so the
above may not apply to you.
*IMPORTANT: Before sending unit back for warranty work contact your
authorized Prolux retailer you bought the unit from first. Unauthorized
warranty claims may be sent back. Authorized Warranty claims: Prolux shall
be responsible for all parts and labor and the customer shall be responsible for
all shipping charges to and from the Prolux service center.
We are constantly striving to improve our pro ucts. Therefore, the specifications
containe herein are subject to change without notice.
Contact Information for Prolux is service@proluxcleaners.com
For your recor s:
Please recor your Mo el Number: ___________________
Please recor your Purchase Date: ___________________
Note: Please keep your original sales receipt. It provides proof of purchase
date in the event of a warranty claim.
Prolux………..High-En Cleaners that Work!
19
Table of contents
Other Prolux Vacuum Cleaner manuals

Prolux
Prolux 2.0-B User manual

Prolux
Prolux QX-90 User manual

Prolux
Prolux 2.0 Technical manual

Prolux
Prolux TerraVac User manual

Prolux
Prolux Tritan User manual

Prolux
Prolux Ion User manual

Prolux
Prolux XC15J Technical manual

Prolux
Prolux RS7 User manual

Prolux
Prolux X8 Elite User manual

Prolux
Prolux AllVac User manual


