Promovec MK FIVE User manual
USER MANUAL
MK FIVE
April 2020


Tabel of contents
Introduction ...................................................................................................................... 4
Product description .................................................................................................... 4
How to get started ...................................................................................................... 5
Display – LCD Mini Display w/buttons ........................................................ 6
Display .................................................................................................................................. 6
Turn display on and o ............................................................................................. 6
Light ....................................................................................................................................... 7
Battery indicator ............................................................................................................ 7
Assist functions .............................................................................................................. 8
Trip counter/Odometer ........................................................................................... 9
Troubleshooting ............................................................................................................ 10
Battery - mounting/dismounting .................................................................... 11
Charger/Charging ....................................................................................................... 12
Canopy/Mounting canopy .................................................................................... 13
Storage ................................................................................................................................. 18
Capacity and use .......................................................................................................... 18
Warning ............................................................................................................................... 18
Disposal of battery ...................................................................................................... 19
Battery registration ..................................................................................................... 19
Maintenance .................................................................................................................... 20
Transportation of electric bike ........................................................................... 20
Road trac law ............................................................................................................... 21
Insurance ............................................................................................................................ 21
Frame No. ........................................................................................................................... 21
Technical data ................................................................................................................. 22
Battery specications ................................................................................................ 23

4
Introduction
Congratulations with your new 3-wheeler Ridgeback MK FIVE e-bike.
The new generation of e-bikes are designed and developed based on many
years of experience in the e-bike area.
Before you start using the e-bike, please read this manual, as it contains some
important information concerning the use and maintenance of an e-bike.
Ridgeback MK FIVE e-bike is manufactured according to the most advanced
production technology. Through tests and test driving a high quality standard is
ensured.
Ridgeback MK FIVE has a strong frame and great performance and is adapted to
the Nordic weather conditions.
You will achieve an easier and more fun way to transport yourself.
Product description
Your bike is produced according to the guidelines in European standard:
Machinery directive 2006/42/EC and the electric components according to
EN 15194:2017 EPAC Bicycles.
Ridgeback MK FIVE is the perfect choice if you want an electric bike that can be
used for transportation of children, dogs or luggage. The bike is equipped with to
seats and four seatbelts. It is possible to cover the cargobox with the canopy.
The frame is produced in aluminum, which provides a sti and robust construction
and its low weight is maintained. The motor is integrated in the rear wheel and the
battery is integrated under the carrier.
In that way the weight distribution is optimal. The electrical bicycle can also function
as a regular bike.

5
How to get started
When the battery is installed, the system can be powered on by using the on/o
button on the display. When using the pedals, the engine will start to assist you,
depending on the chosen assist level. The engine operates as follows:
Electronic controller applies the assist when the sensor detects a movement on
the pedals.
The assist power can be controlled by pre xed assist levels and can be used to
adjust to current needs.
Driving uphill gives you the full ability to use the assist function and can be turned
o when driving downhill.
The controls automatically disonnects the engine, when there isn't any movement
on the pedals or when the speed exceeds 25km/h.
For further details see the "Functions" on the next page.
To ride the bike it is necessary to be aware of how the weight is distributed. Make
sure of the control of the bike when you make turns.
Info
* Place the weight in the box as close to the handlebare as possible to increase the
stability of the bike.
* The bike does not turn like a normal bike.
* Gear down when driving in hilly terrain.
* The battery must be fully charged before each drive.
* Avoid maneuvering at high speed.
* The tires must be suciently pumped.

6
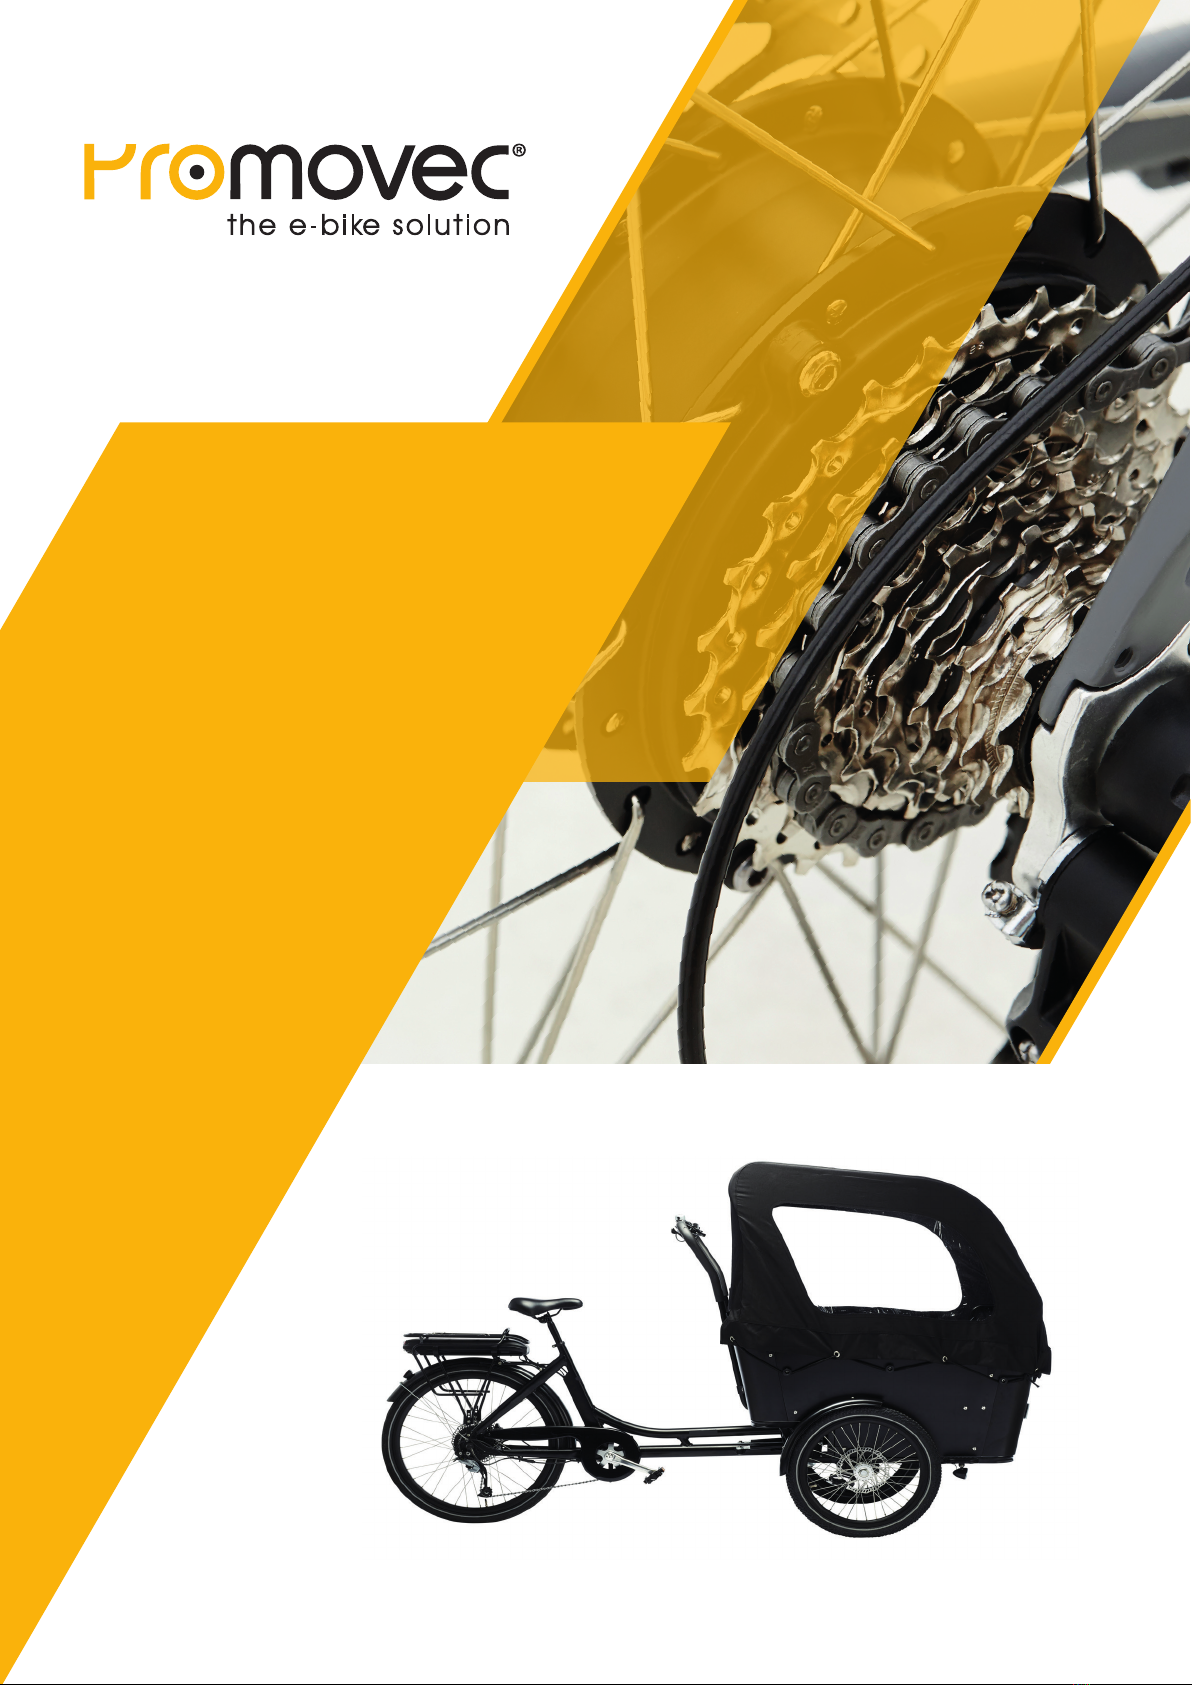
Display - LCD Mini Display with buttons
Display
Turn display on and o
The display is turned on and o by pressing the on/o button for 2 seconds.
The display is mounted on the handlebar and function both as battery indicator and
assist level function. Use the 3 buttons on left side to navigate.
Battery indicator
Level down
On/O
Level up
Speed
Trip counter
Assist level
On/O
7
Battery indicator
The battery indicator is shown on the left side of the display and allows you
to see the approximate battery level using 4 segments.
When reaching the lowest level, it will start ashing.
Please note that the battery level may vary depending on whether you
drive uphill or downhill.
Battery indicator
Light
Turn on/o the light by pressing the "level up" button for 1-2 seconds.
Level up

8
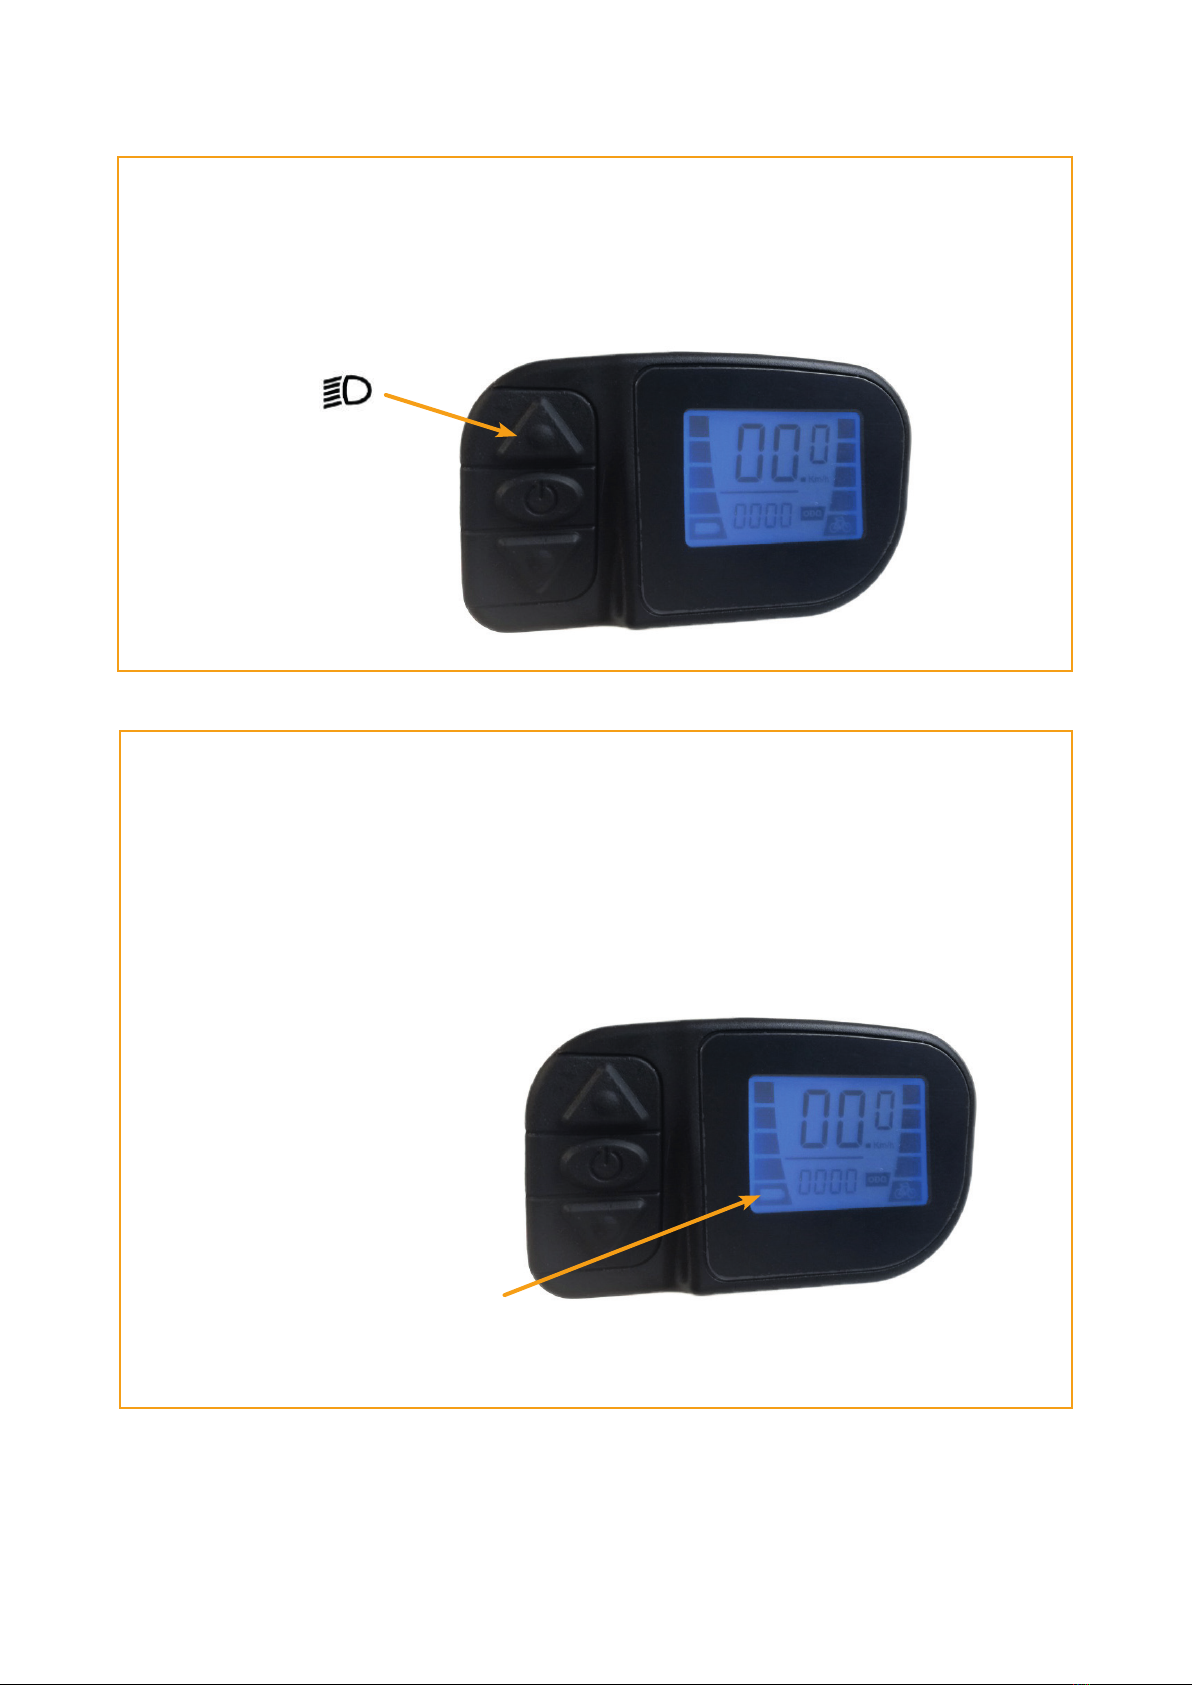
Trip counter / Odometer
This display can change between trip counter and odometer (total distance):
Change between trip counter and odometer by pressing the "power button"
shortly. The odometer cannot be reset.
Resetting the trip counter:
Keep "On/O" and "Level down" pressed simultaneously for 2-3 seconds.
Level down
On/O
Trip counter

9
Assist functions
The display has 2 dierent assist functions:
* Assist levels (1-4) - selectable by using the "level up" and "level down" buttons.
Level 4: Highest level
Level 1: Lowest level
Level 0: Assist function disabled
* Walk assist:
If the bike support this, it is activated by holding down the "level down" button.
Using the walk assist function allows you to drive the bike up to 6 km/h
without the use of the pedals and regardless of the assist level setting.
This function is useful when pushing the bike uphill.
Level down/
walk assist
Level up
Assist level
10
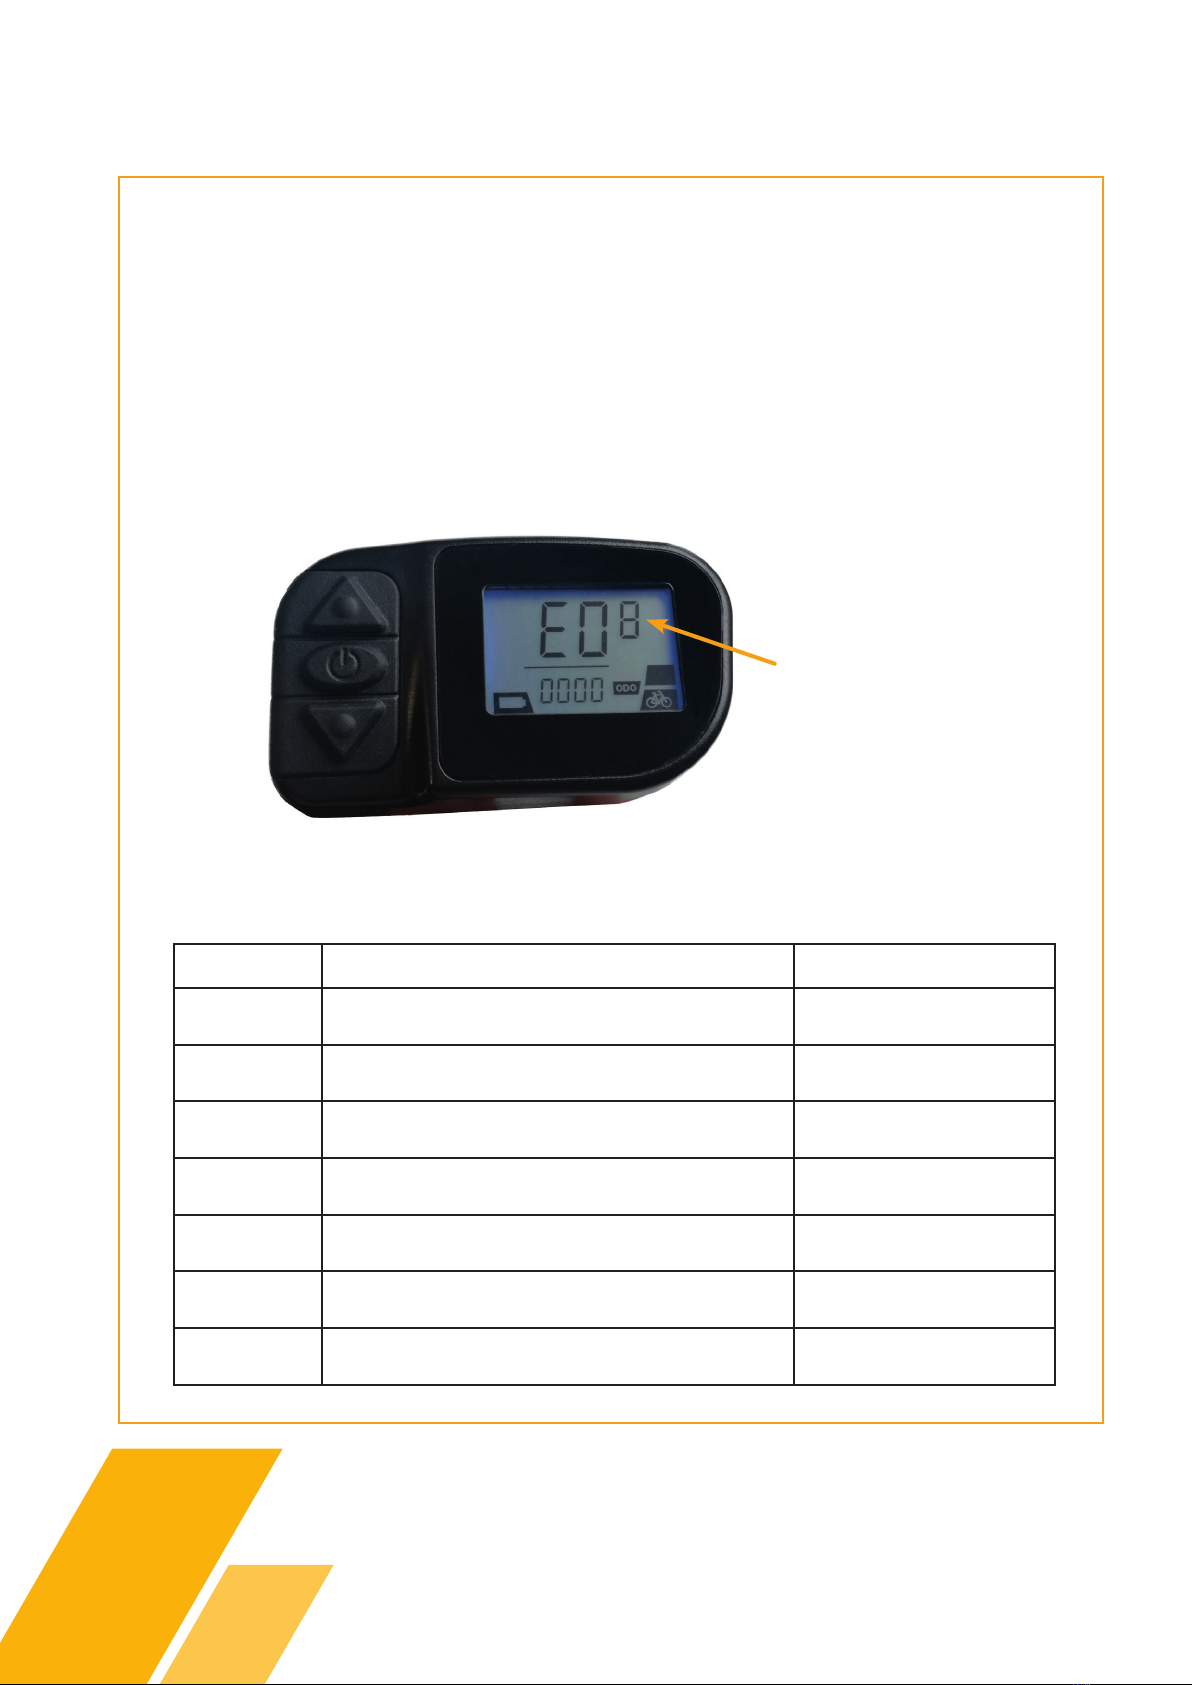
Error codes Description Possible solution
E02Indicates errors in power consumption Contact your dealer
E03Indicates errors in the controller Contact your dealer
E04Indicates errors in the display Contact your dealer
E05Indicates errors in the brake sensor Contact your dealer
E07Indicates error in the wheel speed sensor Contact your dealer
E08Low battery voltage Charge the battery
E09Overvoltage Contact your dealer
The error indicator has the following error codes
Troubleshooting
An error code appears on the display in case of any system errors.
The error is indicated by a number, which will be displayed.
Error codes from E02to E09 indicate the type of error. The nal diagnosis
of errors requires professionals. Contact your dealer for assistance.
Error code

11
Battery - Mounting/Dismounting
* The battery is mounted under the carrier of the bike.
* Connect the battery by sliding the battery across the rail.
* When the battery is inserted, the electrical system is turned on automatically.
* Turn the key to the right, to lock the battery in.
* Turn the key to the left to release the battery.
ATTENTION: USB connector is NOT for charging a mobil phone!
On/o button
The on/o button on the battery is used when you turn the
bicycle on or o. Press 1 time to turn on, press and hold to turn o.
Push the battery

12
Charger/Charging
Before using the battery, it has to be fully charged with the supplied
charger for at least 24 hours.
We recommend to charge the battery every time it has been used,
as many frequent charging helps to prolong the battery life.
It is recommended to sometimes leave the battery connected for
minimum 24 hours after the green diode lights up. This allows better
balance out the cells in the battery, to maximise capacity.
Charging must be done indoors or under a pent roof, as the charger
is only splashproof. Preferably at a temperature of 18-20°.
You can either leave the battery on the bicycle or remove it for charging.
• Insert charger plug in the battery, and the mains plug in the
socket - and check to confirm that the charger is on.
• When the “charge” and “power” are red, it indicates that battery is
charging.
• When the “charge” light is green, and “power” light is red -
it indicates the battery is fully charged.
Charging must only be done with the supplied charger - see picture below.
If charging does not begin immediately, check to make sure the
charger is connected correctly.
CAUTION:
- Only allow children at least 8 years old to use the battery charger. Give
suffiecient instruction so that the child is able to use the battery charger
in a safe way and explain that it is not a toy and must nut be played with.
- Instuct the child not to try and recharge non-rechargeable batteries
because of the danger of eruption.
- Examine the battery charger regularly for damage, especially the cord,
plug and eclosure. If the battery charger is damaged, it must not be used
until it has been repaired.

13
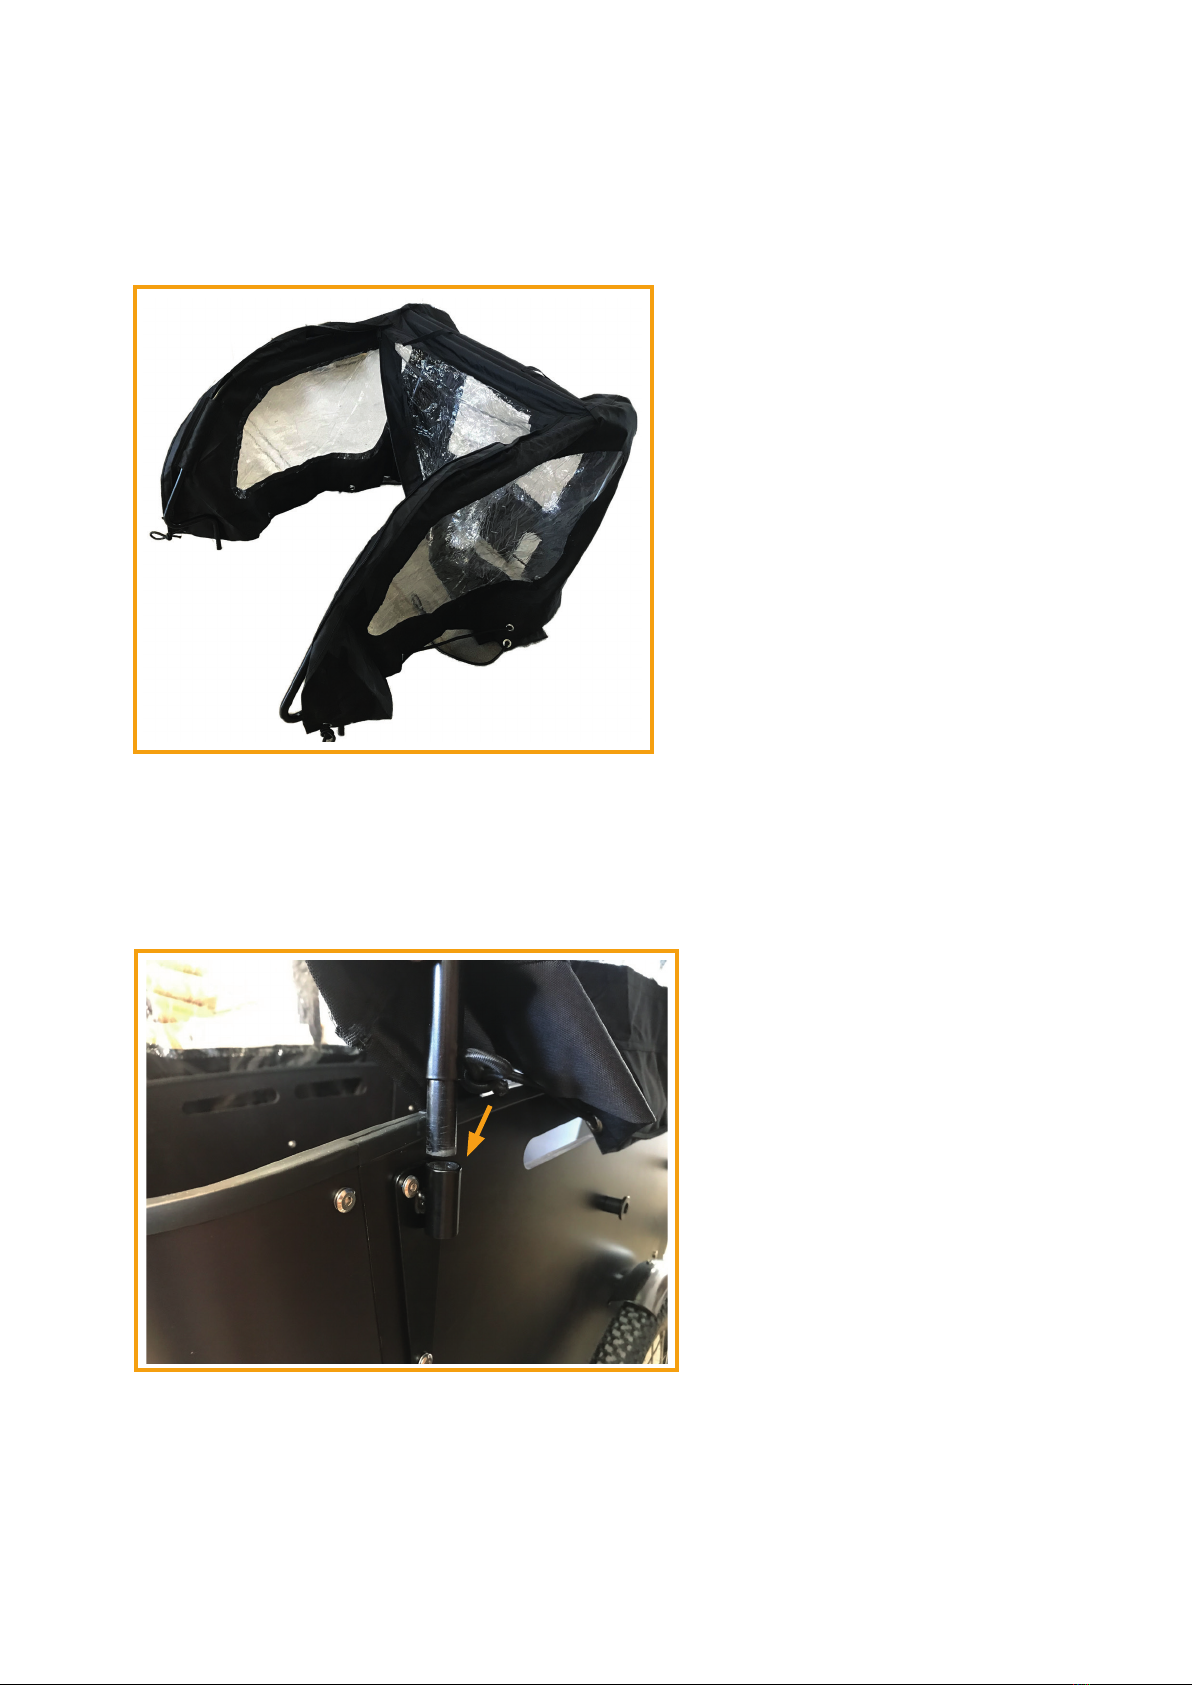
Canopy/Mounting canopy
The Canopy is easy to mount. It consists of:
2 hangers
1 cross brace
1 canopy
Step 1
Unpack the canopy and zip up both sides.
Place the canopy on a level surface.
14
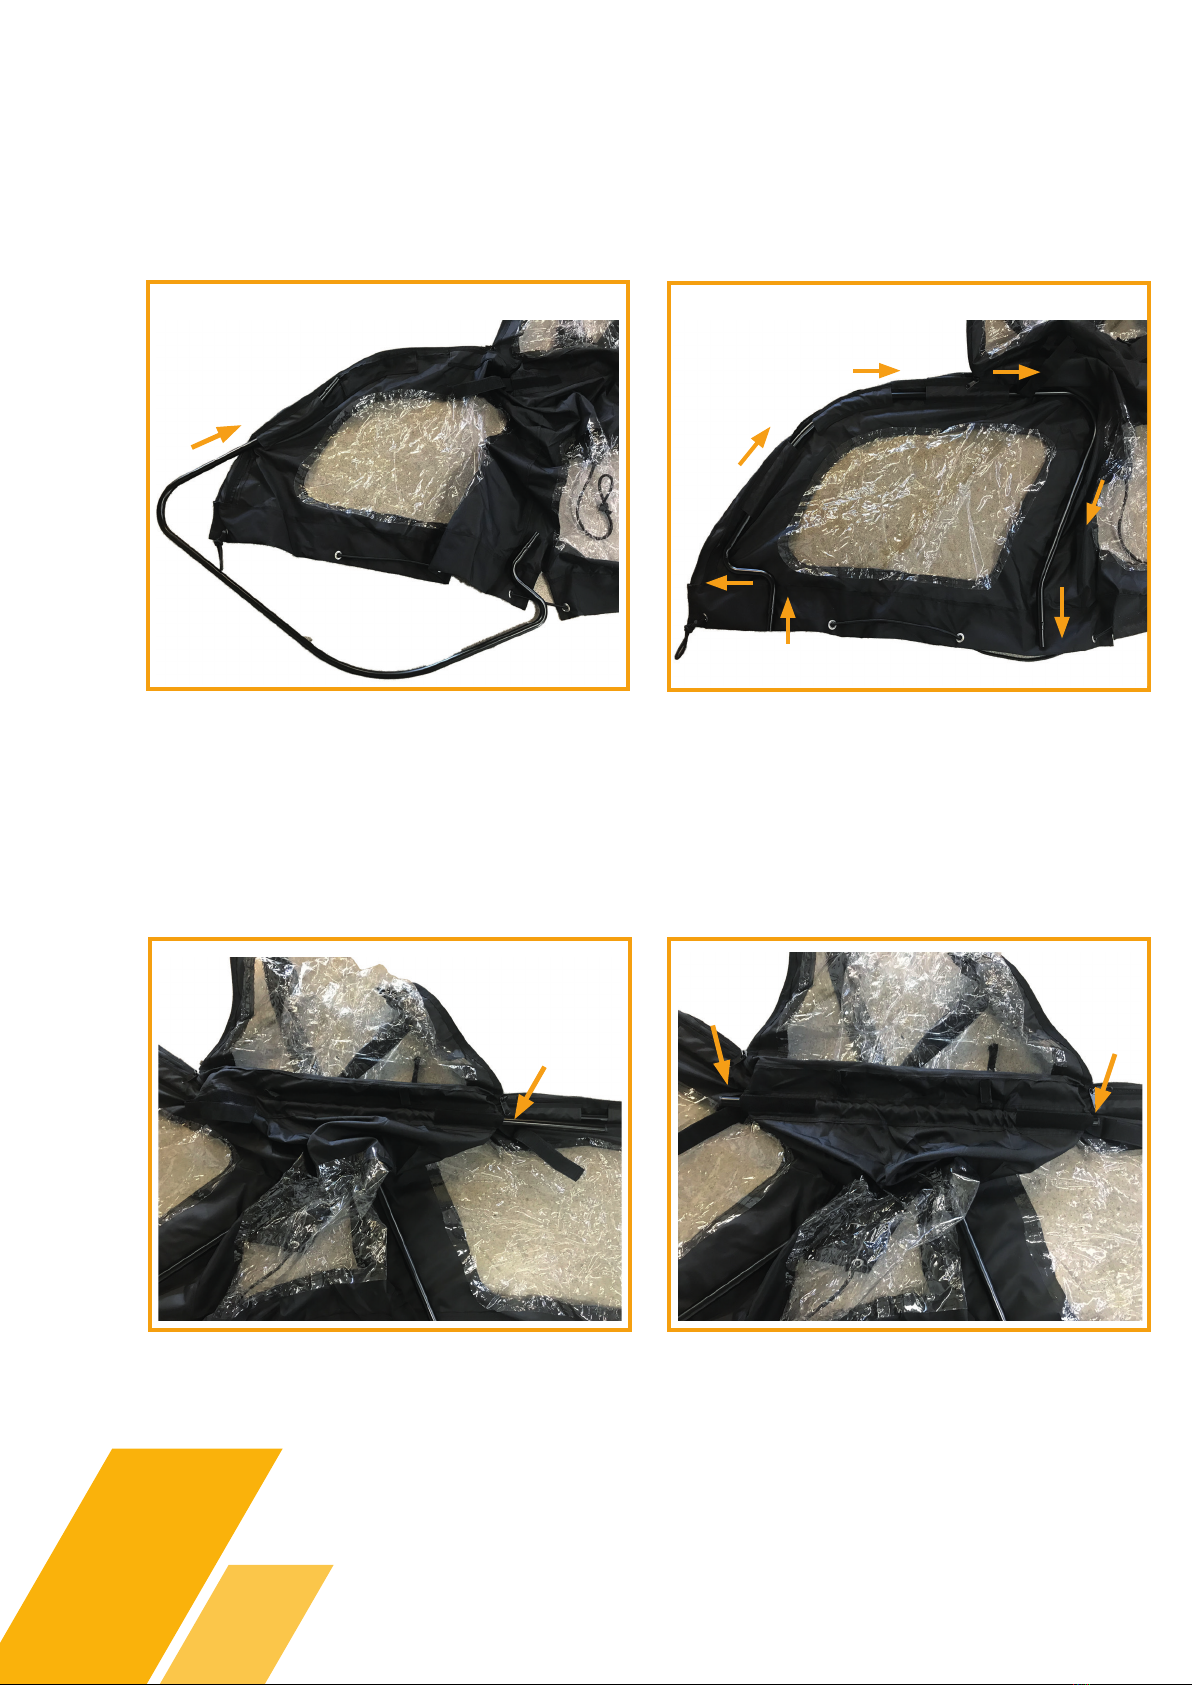
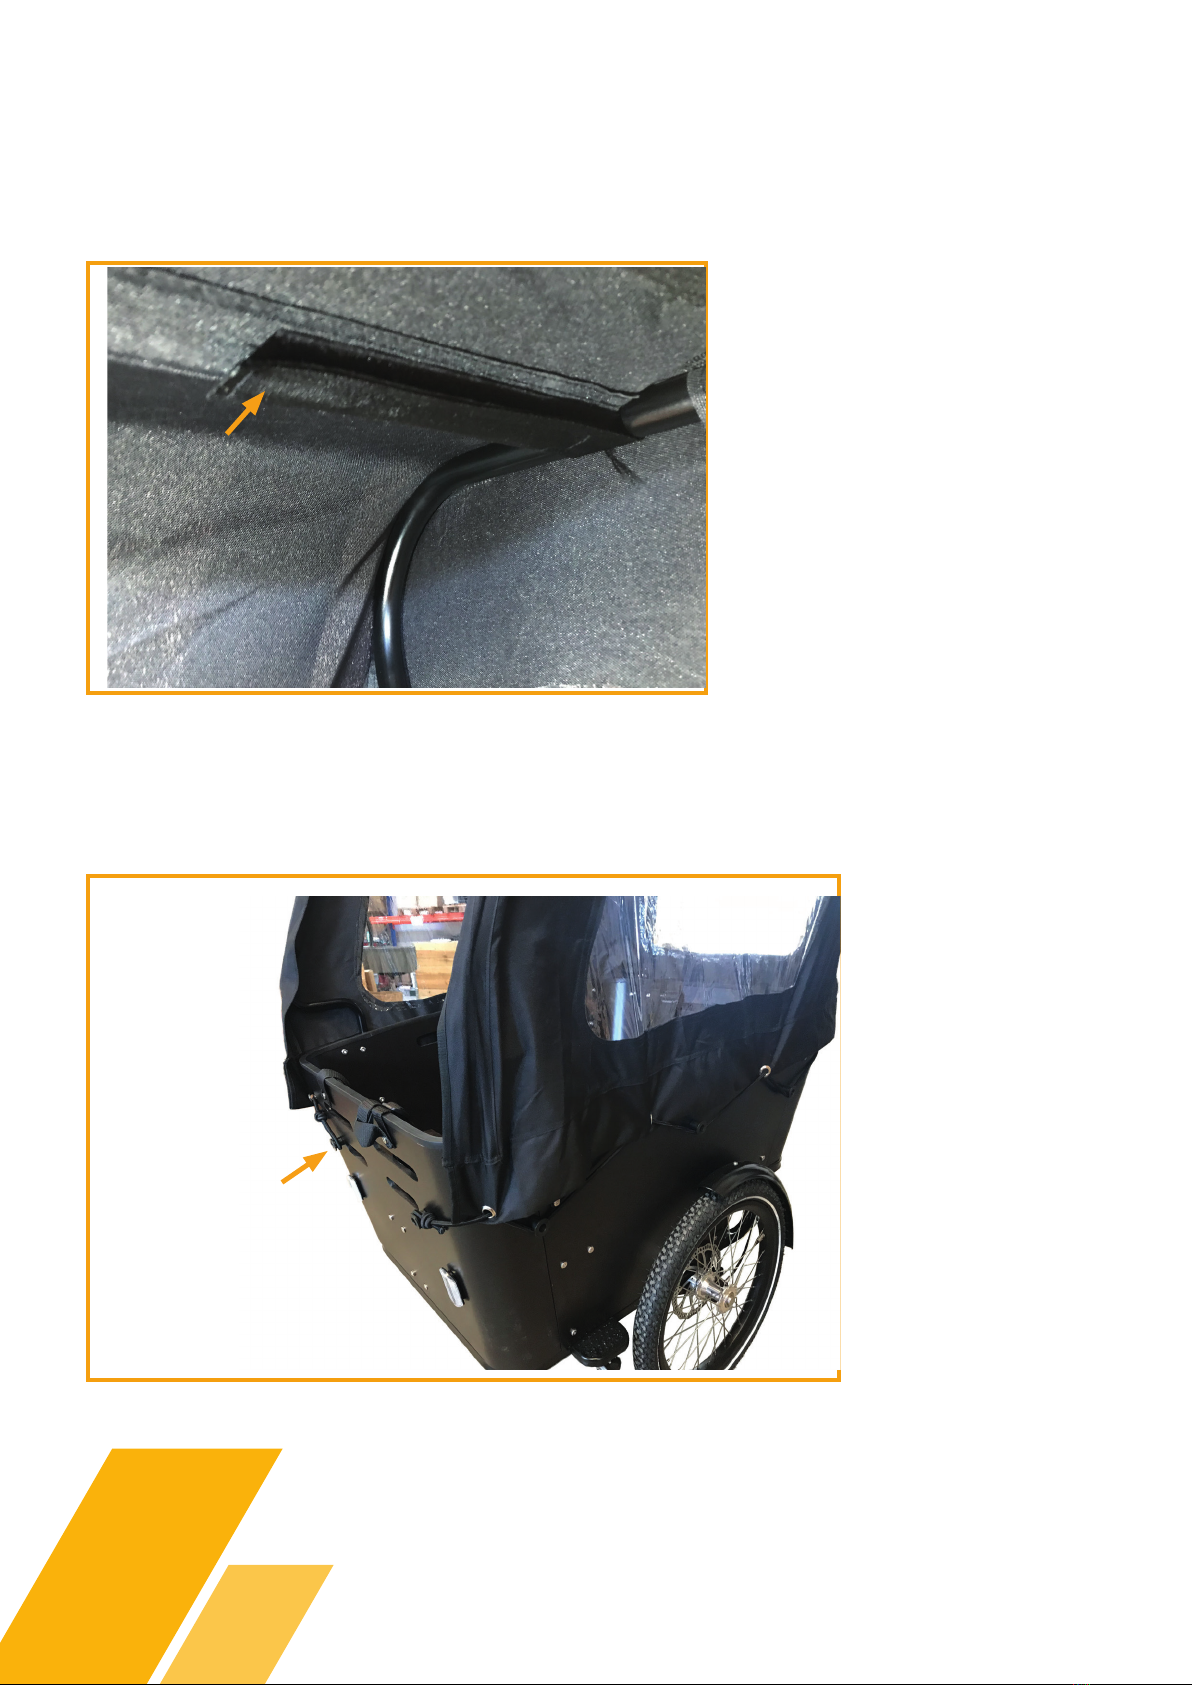
Step 2
Insert the hangers in the threads along the zipper as shown in the pictures.
Step 3
Insert the hangers in the cross brace below the top shown in the pictures.
The cross brace must be visible on both sides of the aisle.
15
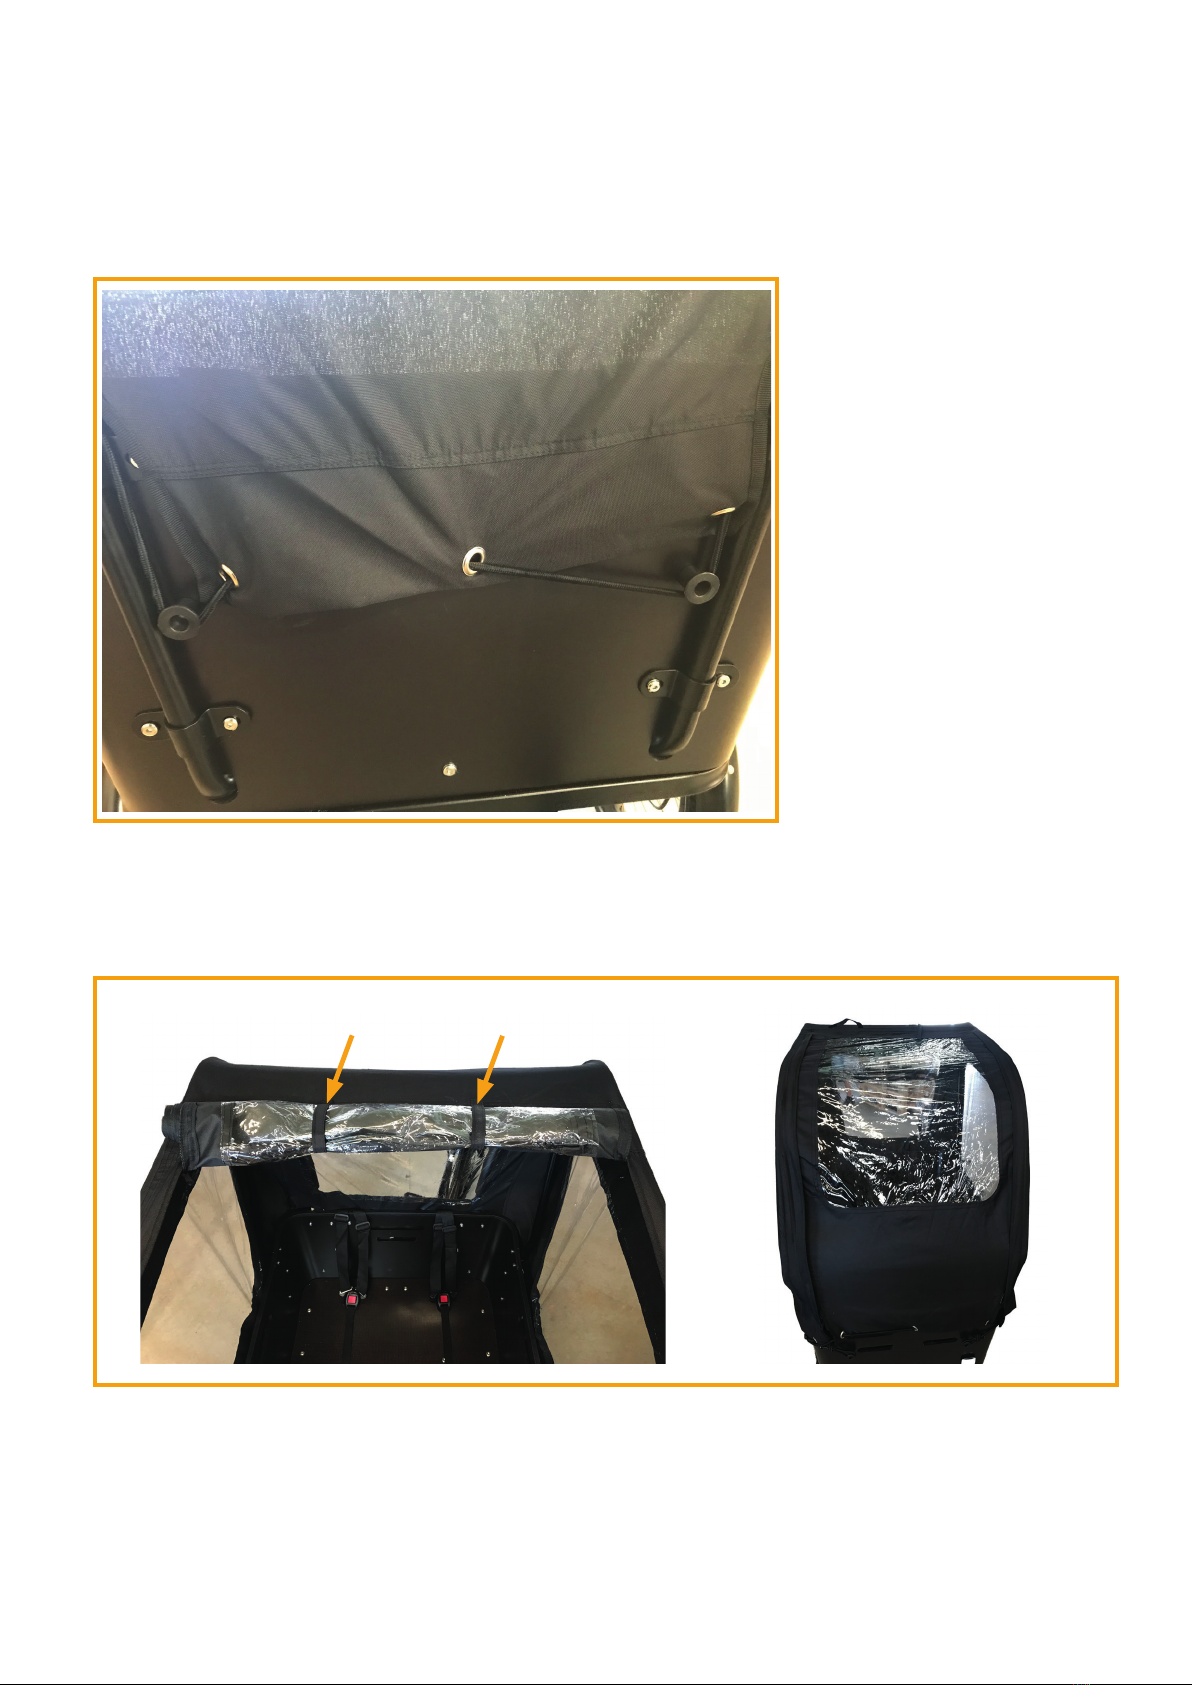
Step 4
Raise the canopy with the outside facing out.
Step 5
Eassiest to mount if you are two people.
16
Step 6
Velcro, at the ends of cross brace, folds around the hoop and tightens well.
Step 7
Tighten the canopy with the elastic bands.
Use all 10 buds
17
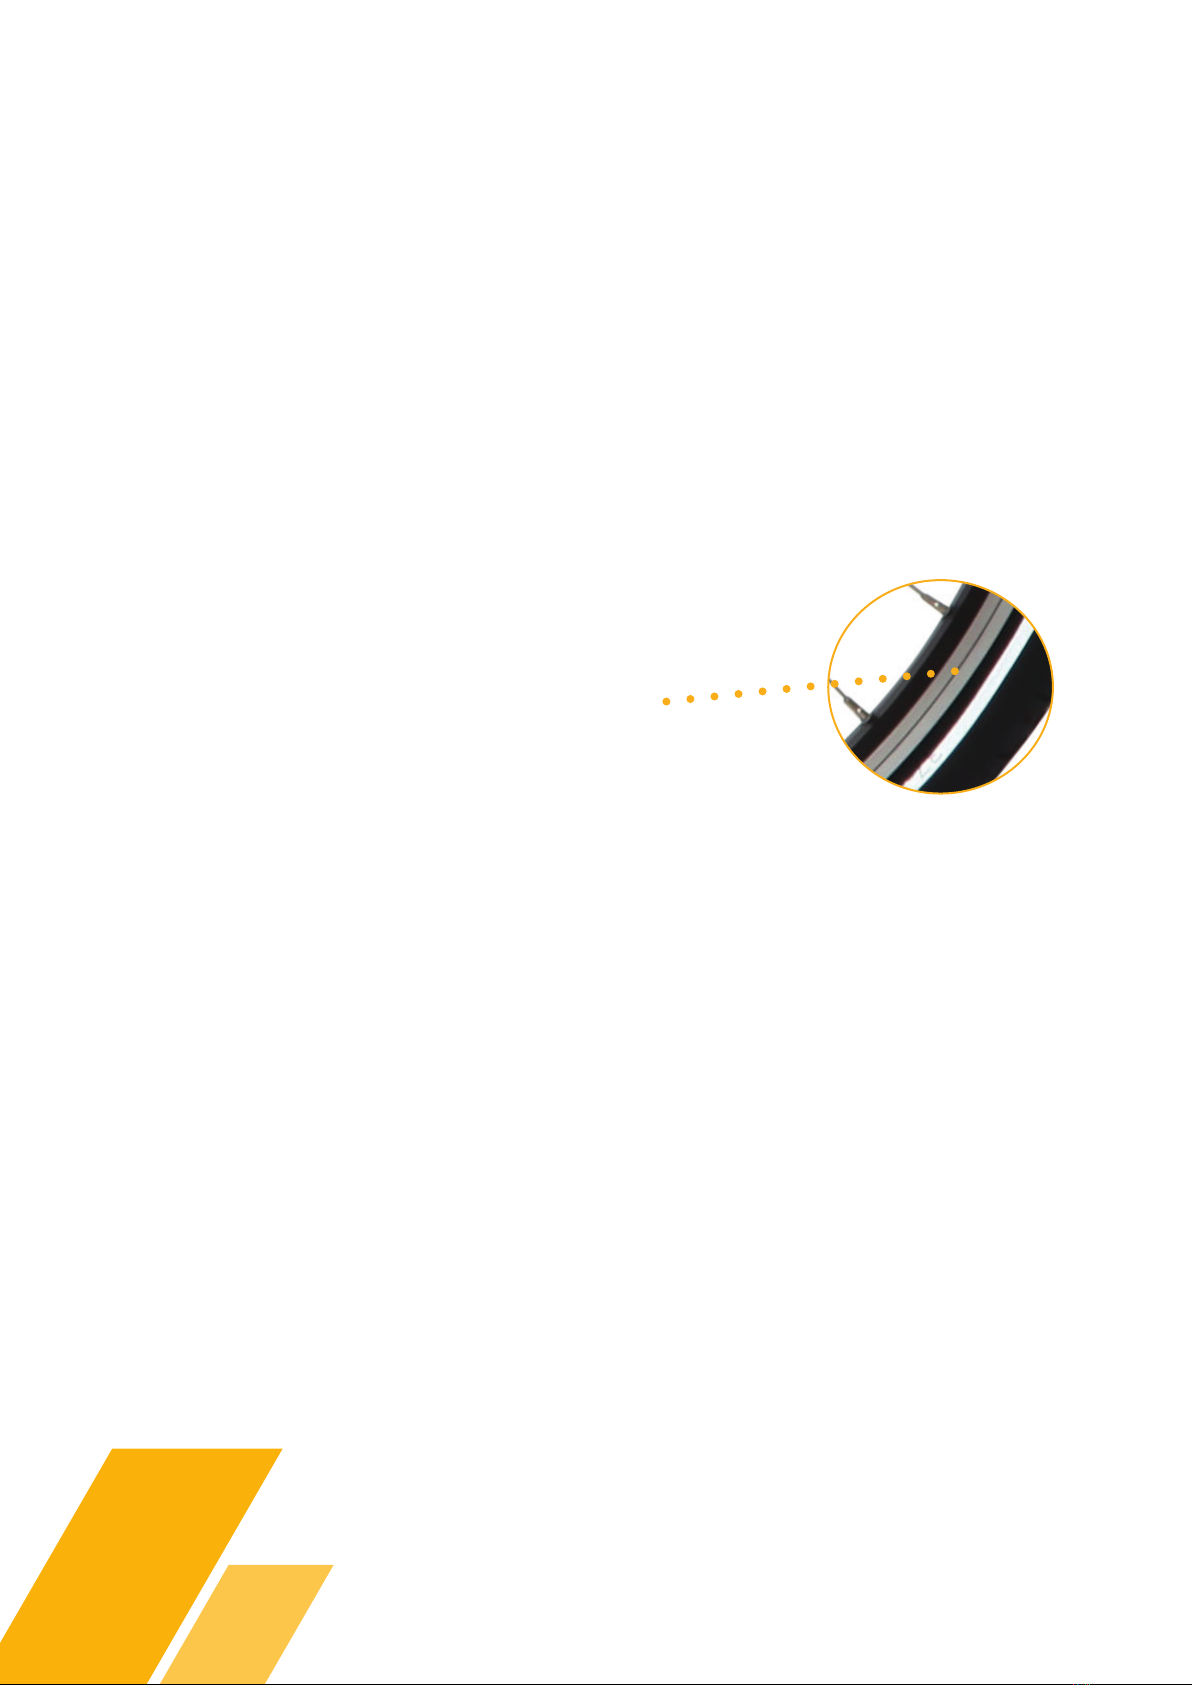
Step 8
The elastics by the handlebar, are mounted as shown in the picture.
Step 9
Open door/Closed door
Use the velcro to keep the door open.

18
Storage
If the e-bike is set aside for storage (more than one month), it will be enough
to recharge one time per month. If your e-bike is stored outdoors or in an
unheated room, we recommend removing the battery and storing / charging
it at room temperature.
The batteries should always be fully charged in storage since they cannot
aord to stand discharged completely or partially for a long time.
Capacity and use
• The e-bike uses a maintenance-free Li-ION battery.
• The battery is supplied approx. 60% charged from the factory. Before using
taking the battery must be fully charged with the supplied charger.
• Optimum charging of the battery takes place at 18-20ºC.
• Many frequent charging of the Li-Ion battery can extend battery life.
• Be aware that the capacity of the batteries decreases over time and
at lower temperatures. Too little tire pressure, weather and wind, road
characteristics, user weight and own eort aect the range of the battery.
• Batteries have, in normal use, a life of up to 600 recharges and discharges.
Warning
• Do not heat, short circuit, puncture, or otherwise mistreat the battery.
• The battery must not be dismantled or destroyed.
• Do not throw the battery into re.
• Do not immerse the battery in water or any other liquid.
• The battery can only be charged with the included charger.
• Never charge the battery at temperatures below 0ºC or above 45ºC.

19
Disposing of battery
Batteries contain substances that can be harmful to human
health and the environment if not handled properly.
Batteries are marked with the crossed-out garbage. It
symbolizes that wasted batteries must not be disposed of with
normal household waste but must be collected separately.
It is important that you submit your used batteries to the collection systems
established. In this way, you help to ensure that the batteries are recycled in
accordance with the law and will not harm the environment.
All municipalities have established collection systems, where wasted portable
batteries can be collected from households or free can either be submitted at
recycling stations and other collection sites. Additional information is available
from your local authorities.
Battery registration
Register your battery via Promovecs website and obtain 2-year capacity
waranty. In addition to the prevailing sale of goods 2-year warranty
provided, Promovec A/S oer a 2-year capacity warranty on all batteries for electric
bikes equipped with Promovecs electrical system and intended for
private use.
The waranty covers a guaranteed minimum capacity of 70% in 2 years from date of
purchase.
To qualify for this 2-year capacity waranty the battery must be registered via the Pro-
movec website. Registration must take place within 8 days from the date of purchase.
20
Maintenance
The bike and the electrical system does not require any special maintenance. It is
recommended to clean the bike and lubricate moving parts at regular intervals.
Be aware, that wearing parts such as tire, chain, brake pads are replaced as needed.
Models equipped with v-brake has a wear indicator engraved as a line or dot
indicating the wearing time. If the dot or line is no longer visible, the rim must be
replaced.
The rim is changed when the
wear indicator is no longer visible
In order to maintain and preserve electric bike’s condition, we recommend an
inspection two times a year, however, at least once a year by a professional workshop.
Table of contents
Other Promovec Scooter manuals


