Propel Trampolines Tornado V2 User manual

INSTALLATION GUIDE
Tornado V2 | CODE: TORNADO V.2 | Updated: 13/09/2022 PROPELINDUSTRIES.CO.NZ
380
All installations should be carried out by a qualified tradesman in compliance with the National Plumbing
& Draining Code or Local Authority Regulations, in accordance with AS/NZS 3500 series of standards and
AS/NZS 6400. All Measurements are in millimeters and are subject to change without notice. For ceramic
products, please allow +/- 10mm tolerance for manufacturing variance. Please refer to propelindustries.co.nz
for the latest product specification.
Pan
Description
Pan Connector
Seat
Inlet Valve
Tank
Bolt Kit
Donut Seal
Tornado V.2-P
Code
PC-60
SSC
TV.2-SIV
Tornado V.2-T
CTPFBB
TV.2-TPDS
Parts List
CHECK GOODS THOROUGHLY BEFORE INSTALLATION
Installation of received goods that are damaged, warped or faulty will void
warranty. Ensure all items meet your plumbing requirements.
Tornado V2
Back-to-wall
toilet suite
TORNADO V.2
• Tornado action flush
• Soft close lid
• Comfort height pan
• Non-marking surface
• 4 star water efficiency rating
TORNADO V.2-GW
Gloss White
TORNADO V.2-MW
Matte White
TORNADO V.2-GB
Gloss Black
TORNADO V.2-MB
Matte Black
INSTALLATION GUIDE
Tornado V2 | CODE: TORNADO V.2 | Updated: 13/09/2022 PROPELINDUSTRIES.CO.NZ
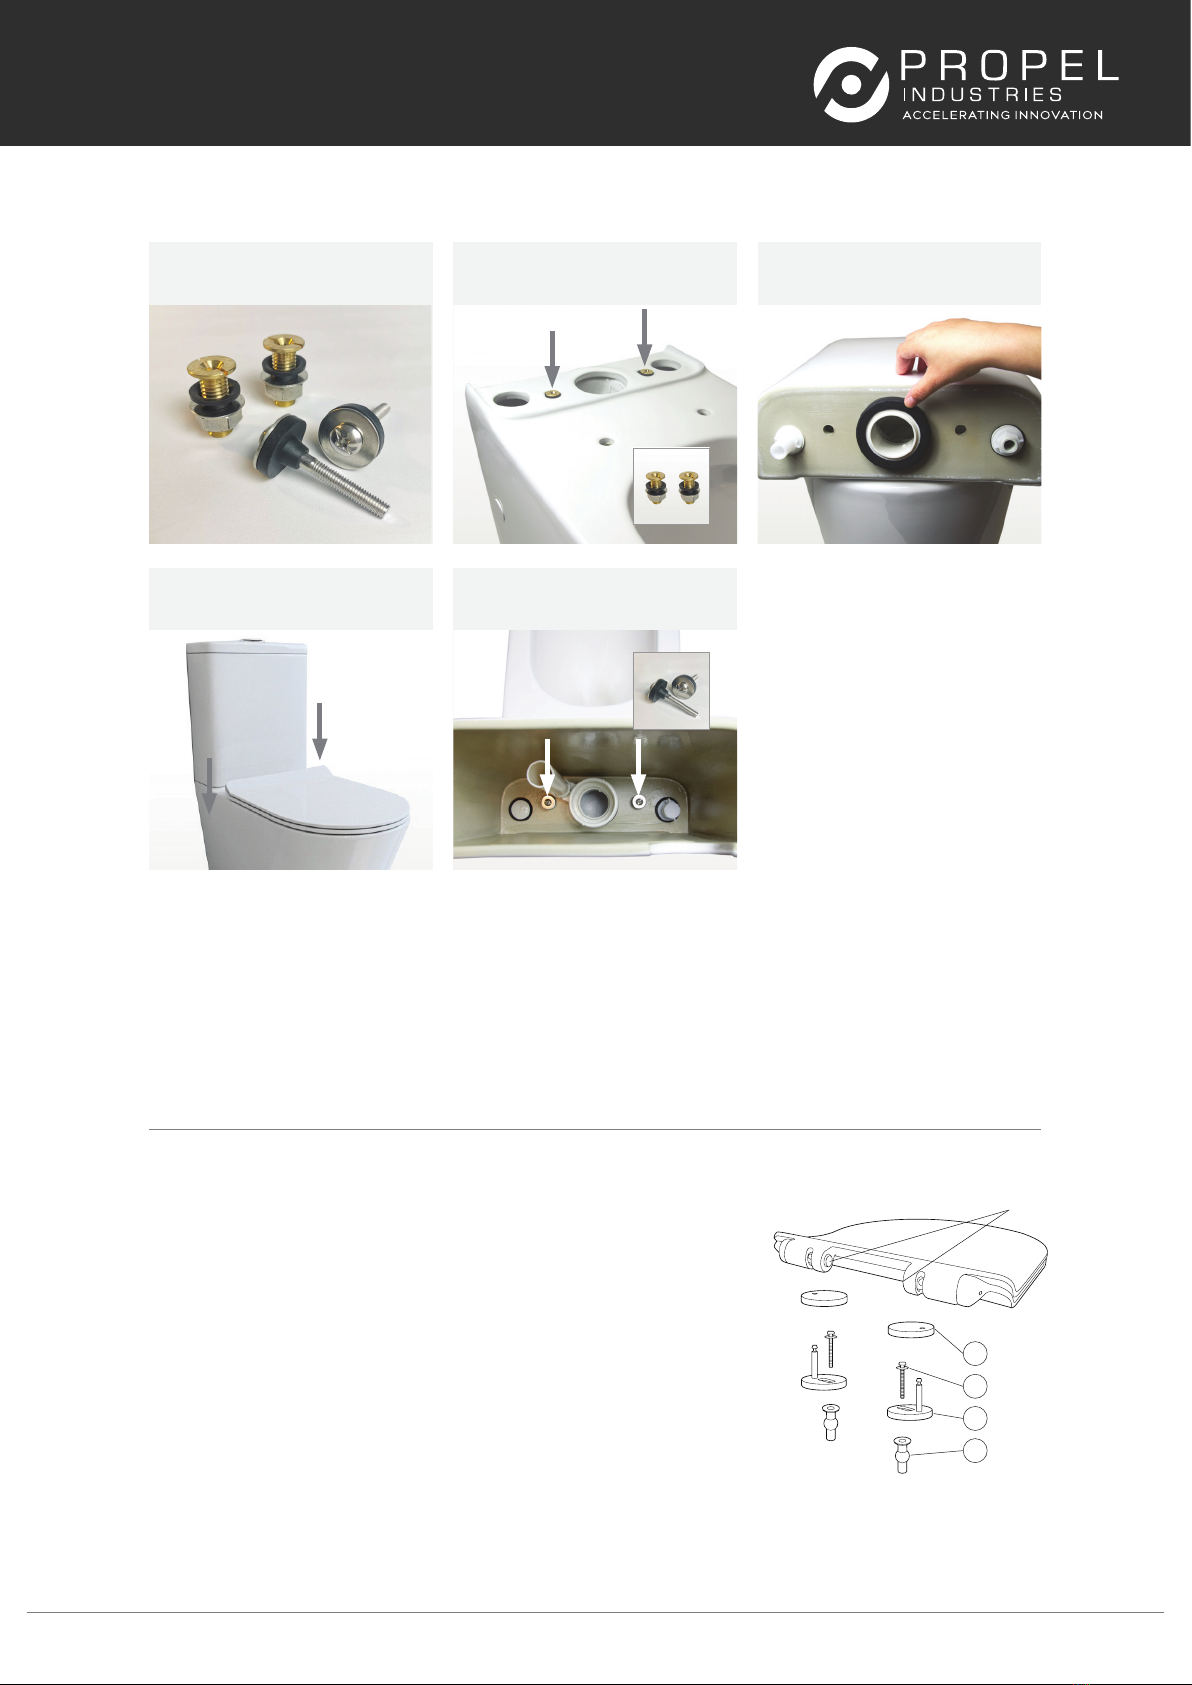
Cistern Installation
S-Trap Installation
Seat Installation
PLEASE DO NOT SILICONE PAN TO FLOOR UNTIL TOILET HAS BEEN CHECKED FOR LEAKS.
1. Parts required to mount
tank to pan.
2. Attach tank bolts to pan.
Tighten from underneath.
3. Ensure outlet rubber is
fitted to tank.
4. Sit tank onto pan.
1. The S-pipe should be put into position and cut to suit your set out, then attached to the wall using the
thread bolt and plate provided.
2. Now push the pan hard into position to ensure the ceramic outlet is pushed into the S-pipe by approx
50mm. This is so the rubber inside the S-pipe gets a good seal to stop water leaking.
1. Open the box and check all components.
2. Insert the expansion fittings (4) into the seat bolt holes in the pan.
3. Assemble hinge fixings (3) and bolts (2) as shown in the diagram.
Leave loosely attached.
4. Align the hinge housing of the seat with the hinge fixings and adjust
the seat to desired position.
5. Remove the seat by depressing the release buttons and lifting upwards.
6. Tighten the bolts with a Phillips head screwdriver ensuring that the
expansion fittings are secure. Put the decorative cap in the position
then attach the seat on the hinges.
5. Use supplied bolts to fasten
tank to pan.
All installations should be carried out by a qualified tradesman in compliance with the National Plumbing & Draining Code or Local Authority
Regulations, in accordance with AS/NZS 3500 series of standards and AS/NZS 6400. All Measurements are in millimeters and are subject to
change without notice. For ceramic products, please allow +/- 10mm tolerance for manufacturing variance. Please refer to propelindustries.co.nz
for the latest product specification.
NOTE: There should be no play
or movement between the pan
and the tank after you have
tightened the screws.
PLEASE, MAKE SURE YOU
DO NOT OVER TIGHTEN
THE SCREWS AS THIS
MAY CRACK OR DAMAGE
THE WASHERS
1 Decorative Cap
Release Buttons
3 Hinge Fixing
2 Bolt
4 Expansion Fixing
INSTALLATION GUIDE
Tornado V2 | CODE: TORNADO V.2 | Updated: 13/09/2022 PROPELINDUSTRIES.CO.NZ
WARNING
Do not use chlorine/chemical sanitisers in the cistern tank. Such use may
result in damage to tank componenets and will void the product warranty.
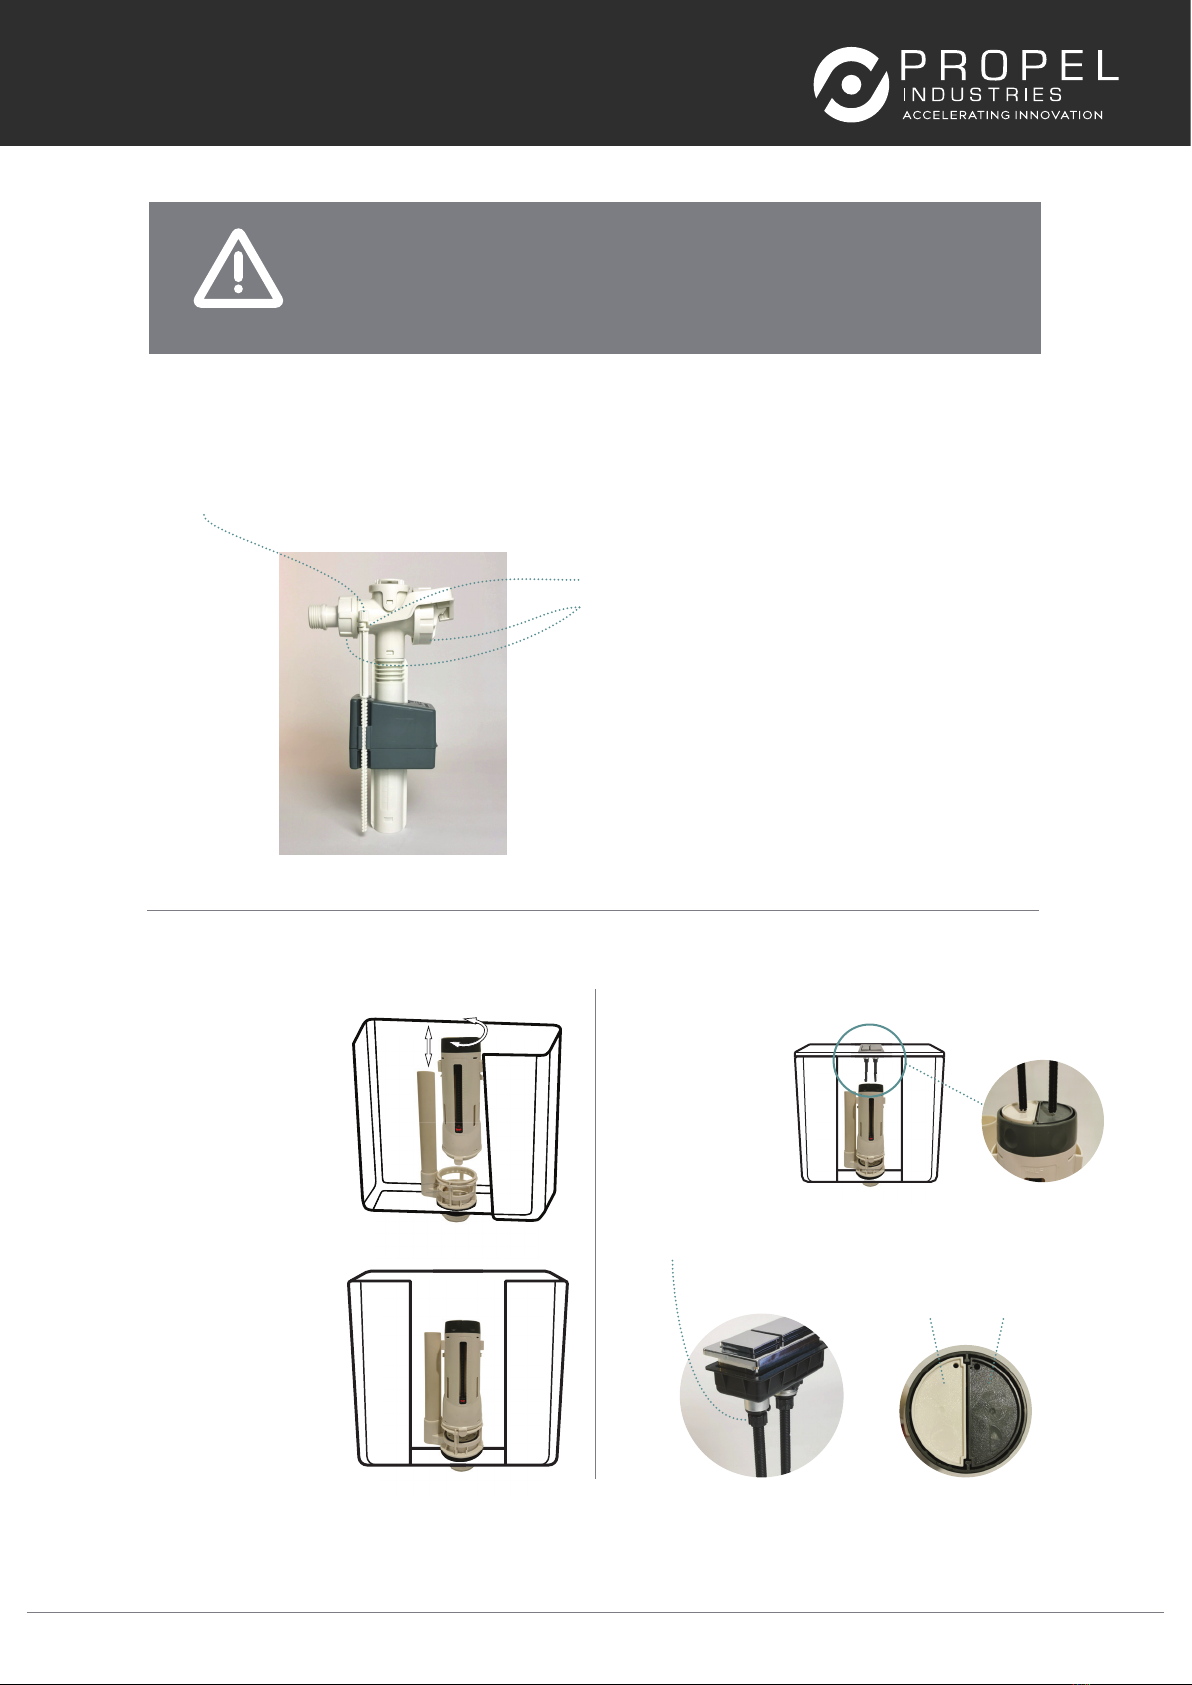
Inlet Valve Service
1. Water Level Adjustment 2. Cleaning the Diaphragm
All installations should be carried out by a qualified tradesman in compliance with the National Plumbing & Draining Code or Local Authority
Regulations, in accordance with AS/NZS 3500 series of standards and AS/NZS 6400. All Measurements are in millimeters and are subject to
change without notice. For ceramic products, please allow +/- 10mm tolerance for manufacturing variance. Please refer to propelindustries.co.nz
for the latest product specification.
Outlet Valve Service
1. Unclip the float arm from the adjustment screw
2. Twist the plastic top-assembly firmly anti-clockwise
and remove it from the valve body
3. Inspect both rubber diaphragm and valve seat
4. Rinse under running water to remove debris
5. Re-assemble in reverse order
It is possible for dirt/debris to prevent the valve shutting off. To
remedy this the diaphragm may be cleaned as follows:
Turn screw to raise/lower the float
Removal
Valve may be removed for
service - twist to unlock
Assembly
Hoses are not shown on
this diagram
Push Button Rod Settings
Button rods must
be just clear of the
valve pads
Button rods can be adjusted
by screwing up or down
Ensure that buttons
match valve pads
Half
flush
Full
flush

INSTALLATION GUIDE
Tornado V2 | CODE: TORNADO V.2 | Updated: 13/09/2022 PROPELINDUSTRIES.CO.NZ
All installations should be carried out by a qualified tradesman in compliance with the National Plumbing & Draining Code or Local Authority
Regulations, in accordance with AS/NZS 3500 series of standards and AS/NZS 6400. All Measurements are in millimeters and are subject to
change without notice. For ceramic products, please allow +/- 10mm tolerance for manufacturing variance. Please refer to propelindustries.co.nz
for the latest product specification.
Vitreous China
Range
TOILETS*
R&T Cisterns (Valves)
R&T Cisterns (Tanks
& Frames
Accessories & Spare
Parts
5 years replacement parts or
products
Warranty Period
5 years replacement parts or
products
5 years replacement parts or
products
5 years replacement parts or
products
Parts List
Warranties
Cleaning & Care
Warranty Periods
Applies to domestic and commercial uses of Propel Industries
products, such as private dwellings and retirmenets villages as well
as including, but not limited to: commercial food premises such as
restaurants; commecrial accommodations such as hotels; hospitals
and healthcare facilities; public amenities; and industrial, laboratory
and manufacturing facilities.
Conditions for On-Site
Warranty Service Calls
Propel Industries will charge a service fee for each visit to an
installation by its technician where it is determined that the fault
is due to poorly executed or unlicensed installation work or where
the product is not a genuine Propel Industries product or where the
product is outside the warranty period. This may be paid in advance
by credit card over the phone to a Propel Industries technician
attending the site and will be refunded if the Propel Industries
product is found to be at fault.
Warranty Conditions
• Installation has been carried out by a licinsed plumber in
accordance with the plumbing code of New Zealand.
• All maintenance and adustments to the product after the
installation have een carried out by a licensed plumber.
• No additives have been introduced to the cistern tank.
• Only mild household detergents and soft (non-abrasive) cloth
has been used to clean the product.
• All goods of sustandard quality manufacture (excluding
imperfections permitted within AS1976 - Vitreous China used
in Sanitary Applications) will be credited or replaced by Propel
Industries when advised within the warranty period, subject to
prior inspection and agreement.
• Proof of purchase is required for warranty claims.
Warranty Limitations
To the extent permitted under the Trade Practices Act and other
relevant legislation, Propel Industries liability is limited to:
• The cost of replacing the goods, or
• The cost of obtaining equivalent goods, or
• The cost of having the goods repaired
• Propel Industries is not responsible for any lack of operation or
performance of goods (or any loss or damage) where goods
are used or adapted for use with other goods not supplied by
Propel Indusries.
• It is the responsibility of the customer and installer before
installation to ensure that all componenets are correct and free
of obvious visible faults.
• Propel Industries is not responsible for the labour and
rectification costs incurred in the above circumstance.
• The toilet seat may be removed for cleaning - depress the
release buttons and lift up.
• Clean only with a soft cloth or sponge using warm water and
mild soap or detergent. Do not use any abrasive cleaning
materials.
• Do not use any solvents or corrosive liquids.
• Note that the use of clip-on deodorisers will affect flushing
performance on rimless suites.
*Excludes parts subject to wear and tear such as rubber seals.
Labour is not included unless otherwise specified.
For warranty support, please contact Propel Industries
P0800 427 335 Eorders@propelindusries.co.nz
www.propelindustries.co.nz
Popular Toilet manuals by other brands

DURAVIT
DURAVIT SensoWash Starck f 218901 20 05 Mounting instructions

Moen
Moen ET900 owner's manual

Roca
Roca MULTICLEAN A804001 Series manual

Separett
Separett Villa 9210 installation instructions

La Playa
La Playa D-35410 Operation and safety notes

Swiss Madison
Swiss Madison Sublime II SM-2T257 installation instructions

Icera
Icera St. Thomas Series Installation & Care Guide

Camargue
Camargue CLEAN & DRY installation guide

Swiss Madison
Swiss Madison SM-WK449-01W installation instructions

Toto
Toto WH172AAT Series installation instructions

ECOWAY
ECOWAY KOMFY300 user manual

Dometic
Dometic MASTERFLUSH MF7100 quick start guide


