ProRac K340W User manual

K340W
Fitting Kit
EN Fitting Instructions for Basic Carrier
CZ Pokyny pro montáž základních nosičů
HU Felszerelési útmutató a tetőcsomagtartóhoz
SK Pokyny pre montáž základných nosičov
x 1 x 4 x 4 x 4
x 4
Revision No: 4C 1
Fitting Kit K340W
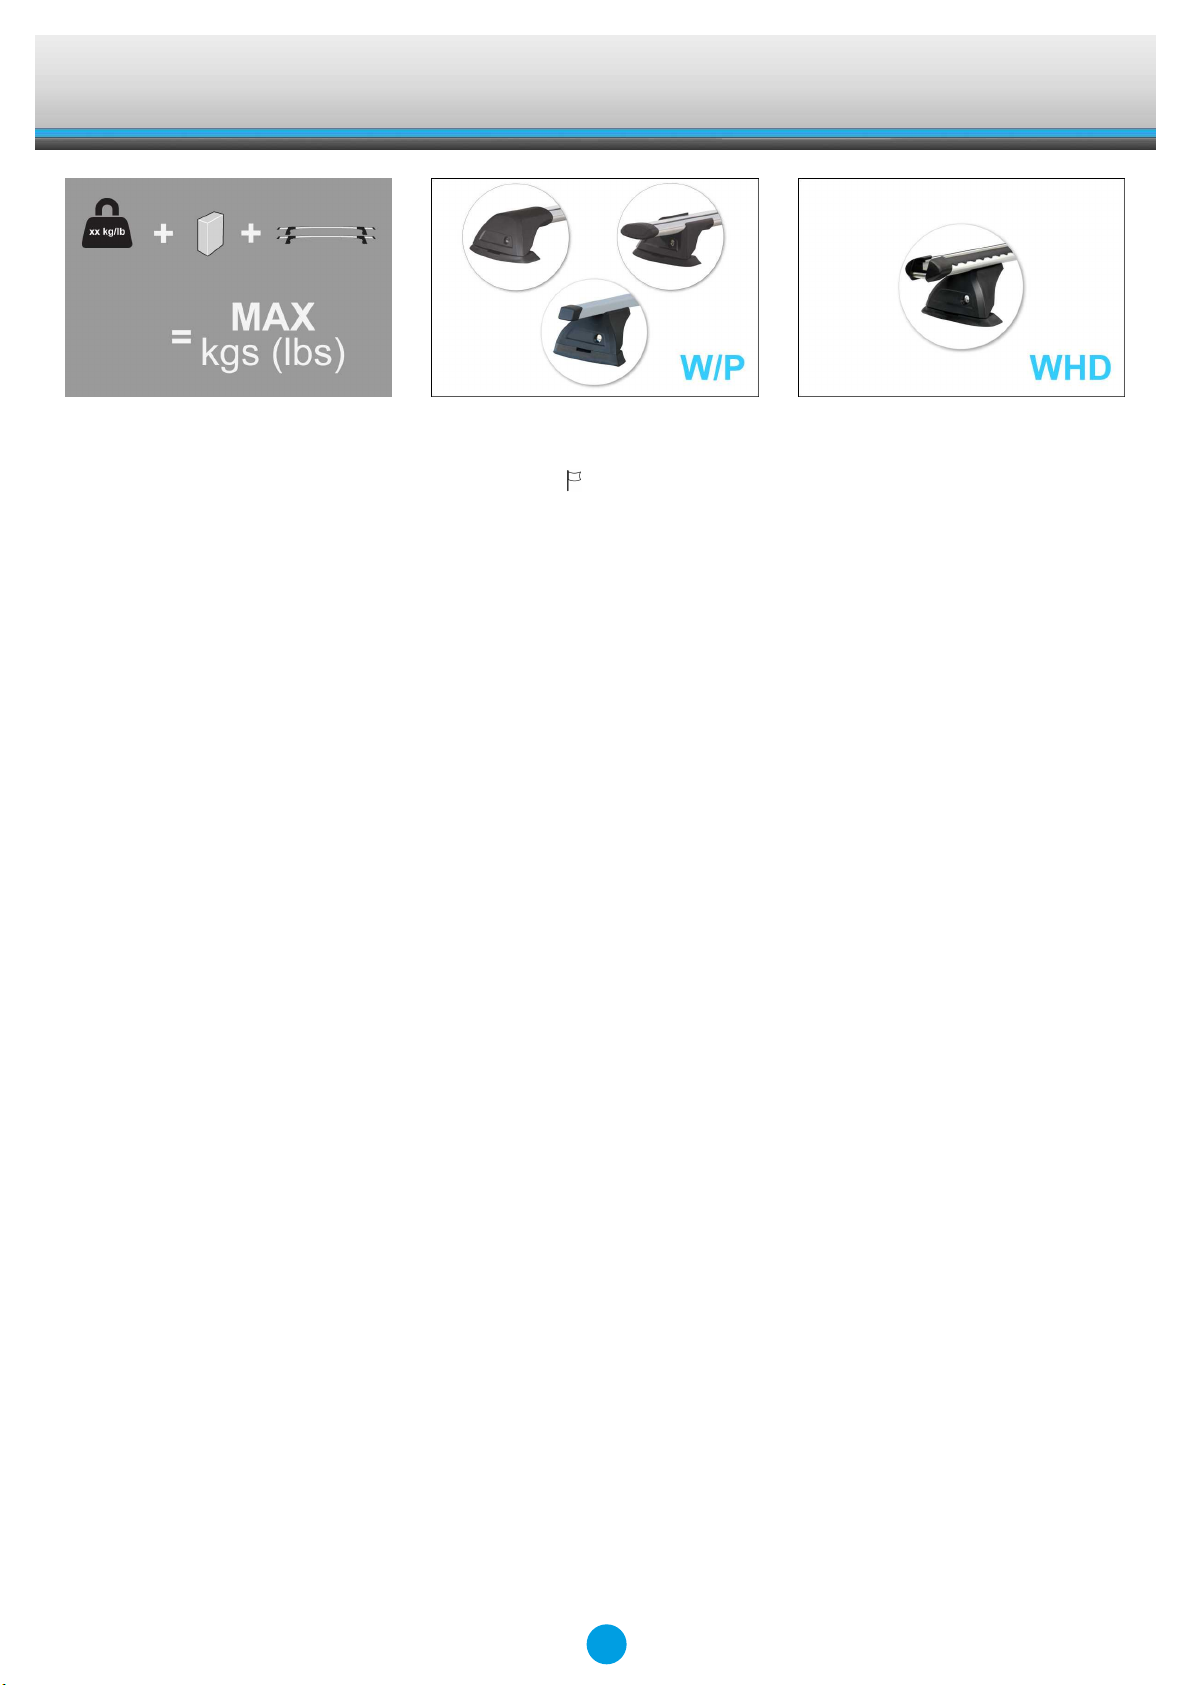
MAX kgs (lbs)
W/P WHD
Mazda
3 , 4dr Sedan 04-09 ZA 75 kgs (165 lbs) 75 kgs (165 lbs)
3 , 4dr Sedan 04-09 US 75 kgs (165 lbs) 75 kgs (165 lbs)
3 , 4dr Sedan 04-09 EU 75 kgs (165 lbs) 75 kgs (165 lbs)
3 , 4dr Sedan Jan 04-Apr 09 NZ 75 kgs (165 lbs) 75 kgs (165 lbs)
3 , 4dr Sedan Jan 04-Mar 09 AU 75 kgs (165 lbs) 75 kgs (165 lbs)
3 , 5dr Hatch 04-09 ZA 75 kgs (165 lbs) 75 kgs (165 lbs)
3 , 5dr Hatch 04-09 EU 75 kgs (165 lbs) 75 kgs (165 lbs)
3 , 5dr Hatch 04-09 US 75 kgs (165 lbs) 75 kgs (165 lbs)
3 , 5dr Hatch Jan 04-Apr 09 NZ 75 kgs (165 lbs) 75 kgs (165 lbs)
3 , 5dr Hatch Jan 04-Mar 09 AU 75 kgs (165 lbs) 75 kgs (165 lbs)
6 , 4dr Sedan 02-07 EU 75 kgs (165 lbs) 75 kgs (165 lbs)
6 , 4dr Sedan 02-08 ZA 75 kgs (165 lbs) 75 kgs (165 lbs)
6 , 4dr Sedan 03-08 US 75 kgs (165 lbs) 75 kgs (165 lbs)
6 , 4dr Sedan 07-+ EU 75 kgs (165 lbs) 75 kgs (165 lbs)
6 , 4dr Sedan 08-+ US 75 kgs (165 lbs) 75 kgs (165 lbs)
6 , 4dr Sedan Aug 02-Jan 08 AU 75 kgs (165 lbs) 75 kgs (165 lbs)
6 , 4dr Sedan Feb 08-+ AU 75 kgs (165 lbs) 75 kgs (165 lbs)
6 , 4dr Sedan Feb 08-+ NZ 75 kgs (165 lbs) 75 kgs (165 lbs)
6 , 4dr Sedan Jun 02-Jan 08 NZ 75 kgs (165 lbs) 75 kgs (165 lbs)
6 , 5dr Estate 02-07 EU 75 kgs (165 lbs) 75 kgs (165 lbs)
6 , 5dr Hatch 02-07 EU 75 kgs (165 lbs) 75 kgs (165 lbs)
6 , 5dr Hatch 02-08 ZA 75 kgs (165 lbs) 75 kgs (165 lbs)
6 , 5dr Hatch 04-08 US 75 kgs (165 lbs) 75 kgs (165 lbs)
6 , 5dr Hatch 08-+ US 75 kgs (165 lbs) 75 kgs (165 lbs)
6 , 5dr Hatch Aug 02-Jan 08 AU 75 kgs (165 lbs) 75 kgs (165 lbs)
6 , 5dr Hatch Feb 08-+ NZ 75 kgs (165 lbs) 75 kgs (165 lbs)
6 , 5dr Hatch Feb 08-+ AU 75 kgs (165 lbs) 75 kgs (165 lbs)
6 , 5dr Hatch Jan 02-Jan 08 NZ 75 kgs (165 lbs) 75 kgs (165 lbs)
6 , 5dr Liftback 07-+ EU 75 kgs (165 lbs) 75 kgs (165 lbs)
6 , 5dr Wagon 04-07 US 75 kgs (165 lbs) 75 kgs (165 lbs)
6/Atenza , 5dr Wagon Jun 02-Feb 08 AU 75 kgs (165 lbs) 75 kgs (165 lbs)
6/Atenza , 5dr Wagon Jun 02-Feb 08 NZ 75 kgs (165 lbs) 75 kgs (165 lbs)
CX-7 , 5dr SUV 06-+ EU 75 kgs (165 lbs) 75 kgs (165 lbs)
CX-7 , 5dr SUV 07-+ US 75 kgs (165 lbs) 75 kgs (165 lbs)
CX-7 , 5dr SUV Nov 06-+ NZ 75 kgs (165 lbs) 75 kgs (165 lbs)
CX-7 , 5dr SUV Nov 06-+ AU 75 kgs (165 lbs) 75 kgs (165 lbs)
2

Fitting Kit K340W
Ford
Fusion , 5dr Hatch 02-05 EU 50 kgs (110 lbs) 50 kgs (110 lbs)
3

Fitting Kit EN
K340W
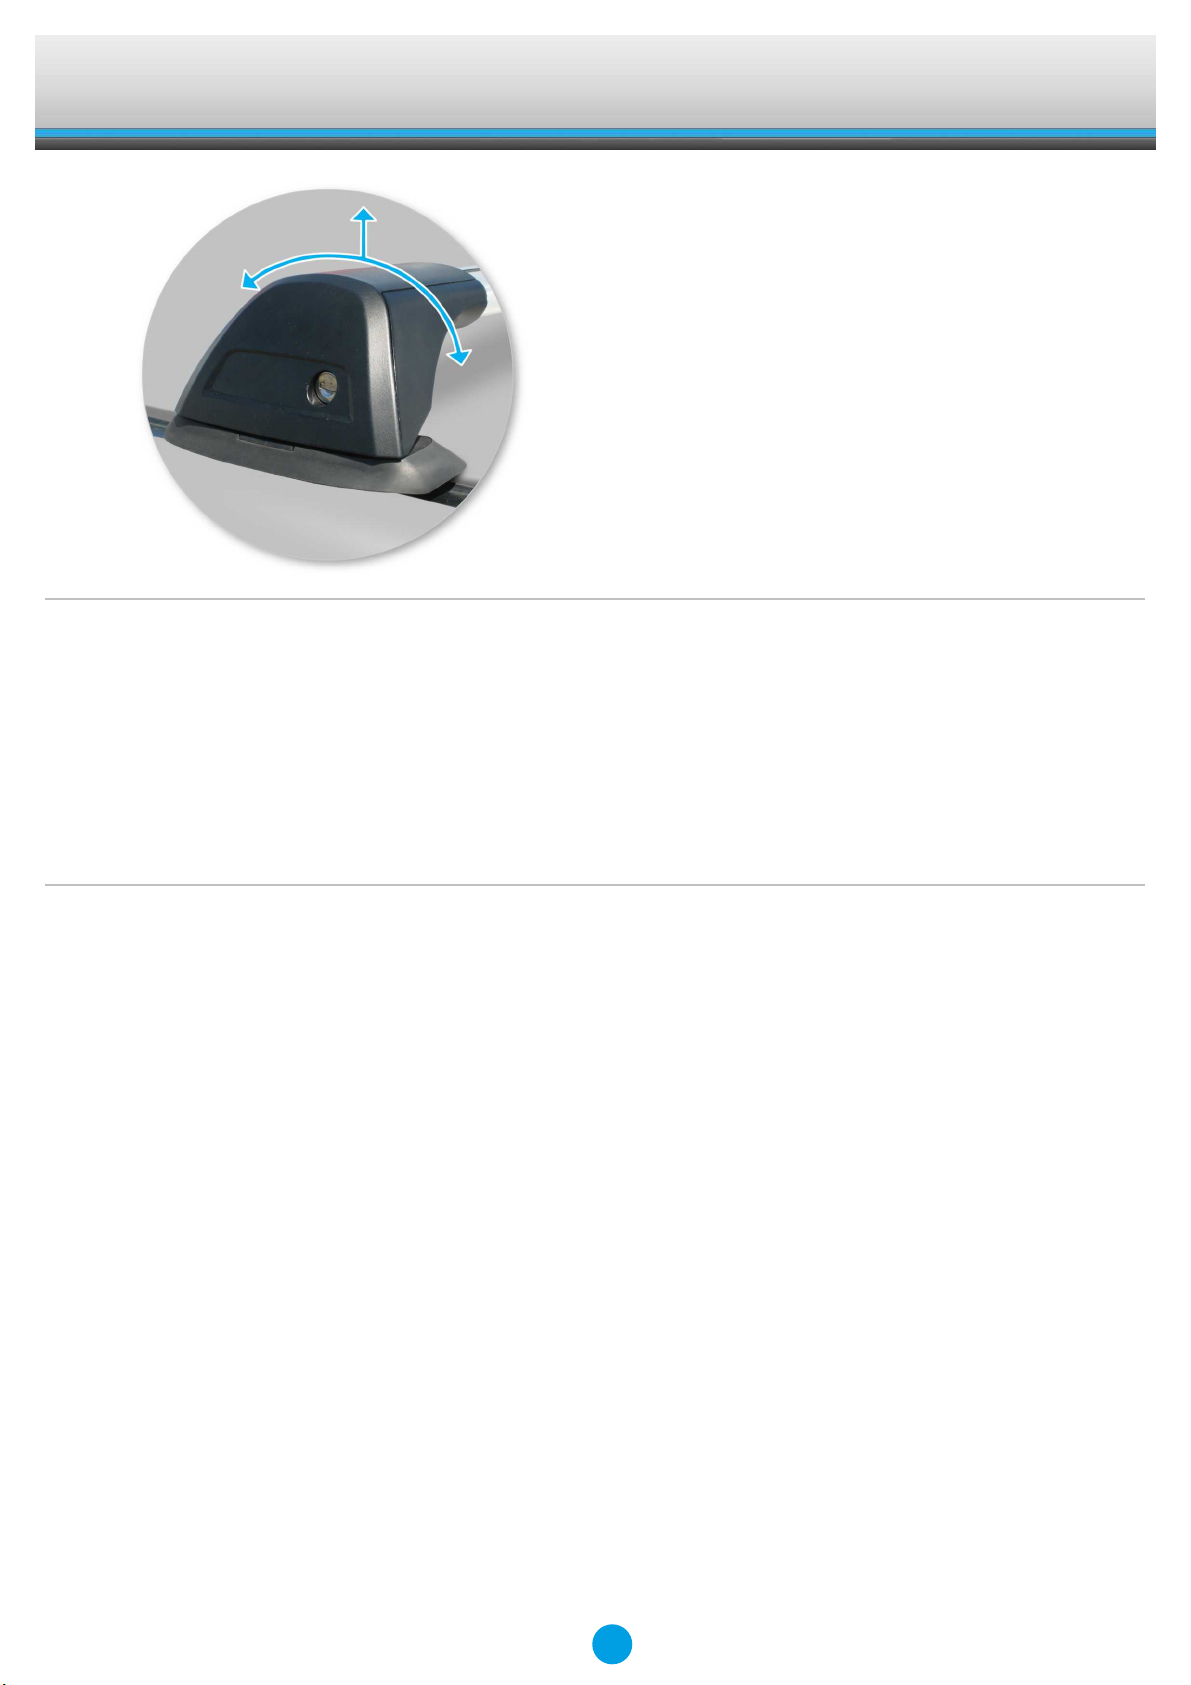
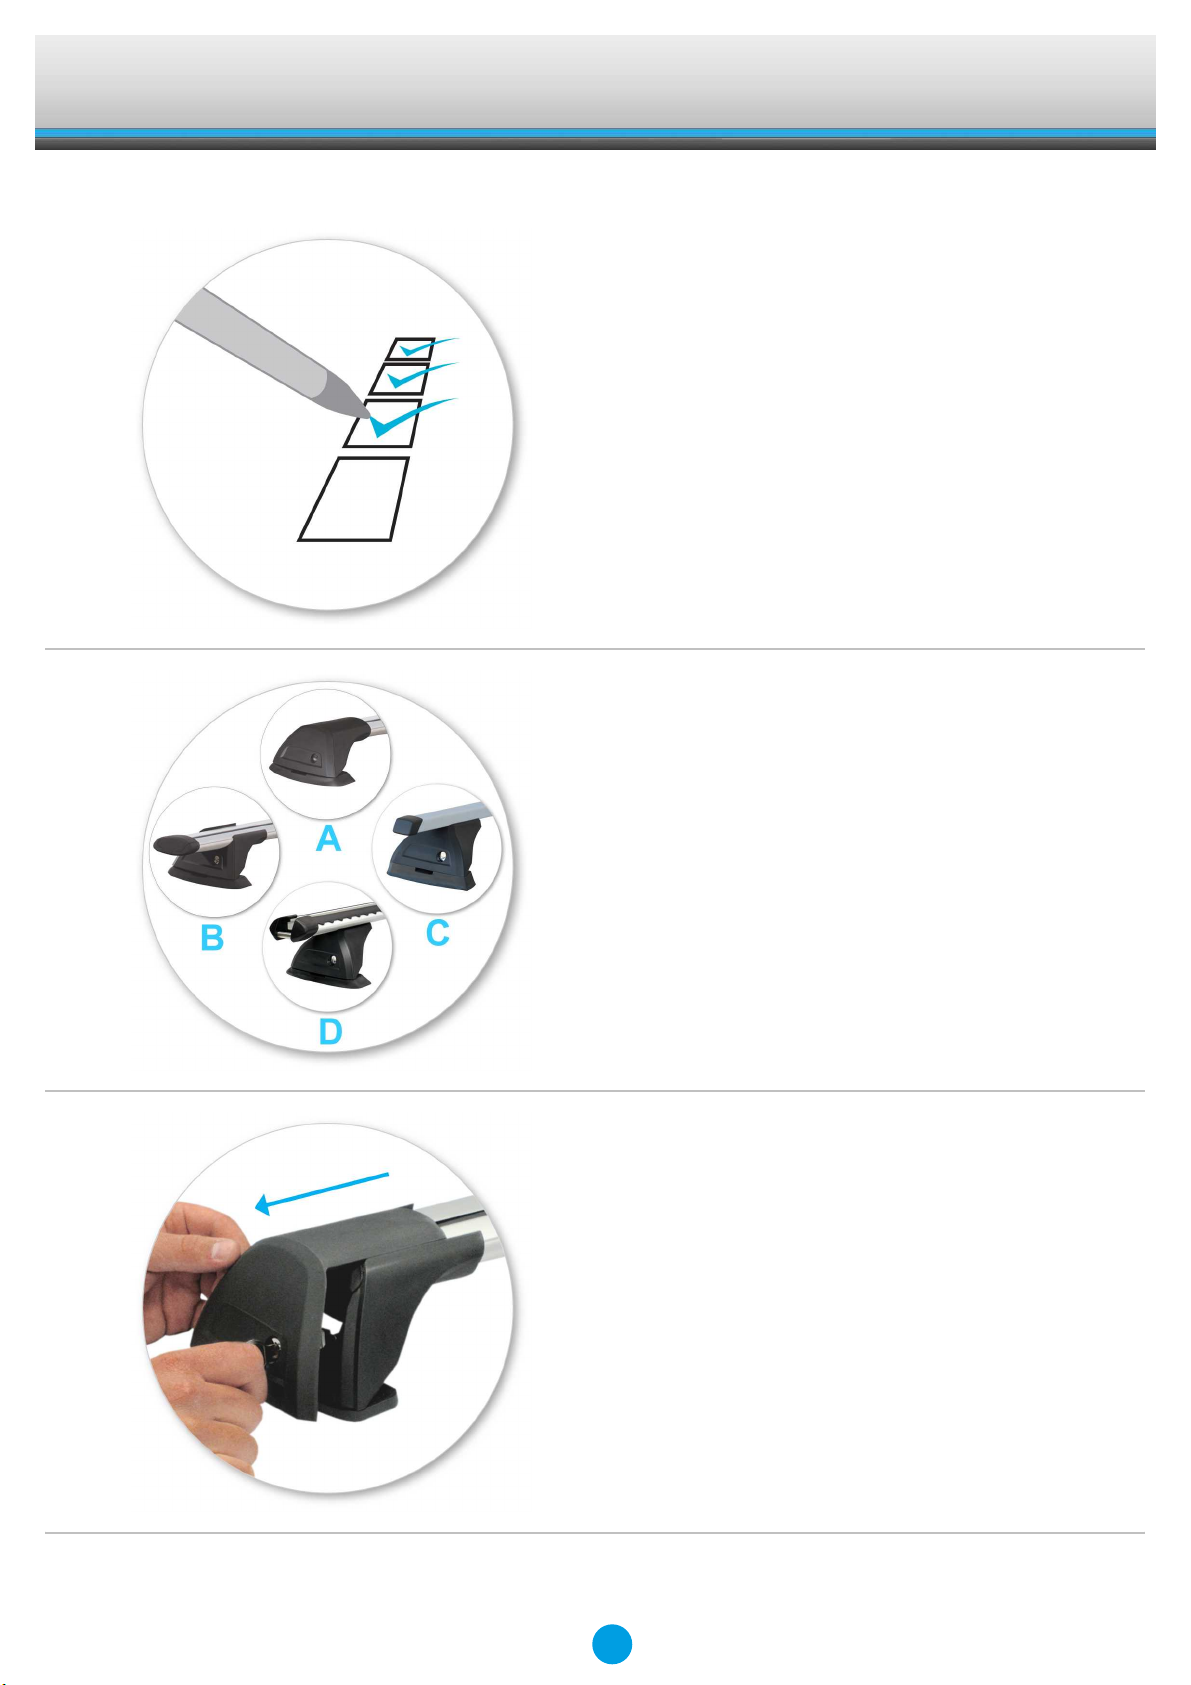
First Time Installation
●Remove parts from inside the package and
check. Contact your dealer if any parts are
missing or damaged.
●This kit fits type A, B, C and D.
●These instructions show type A crossbar
fitted. They also apply to type B, C and D.
●Use keys to remove covers.
4

Fitting Kit EN
K340W
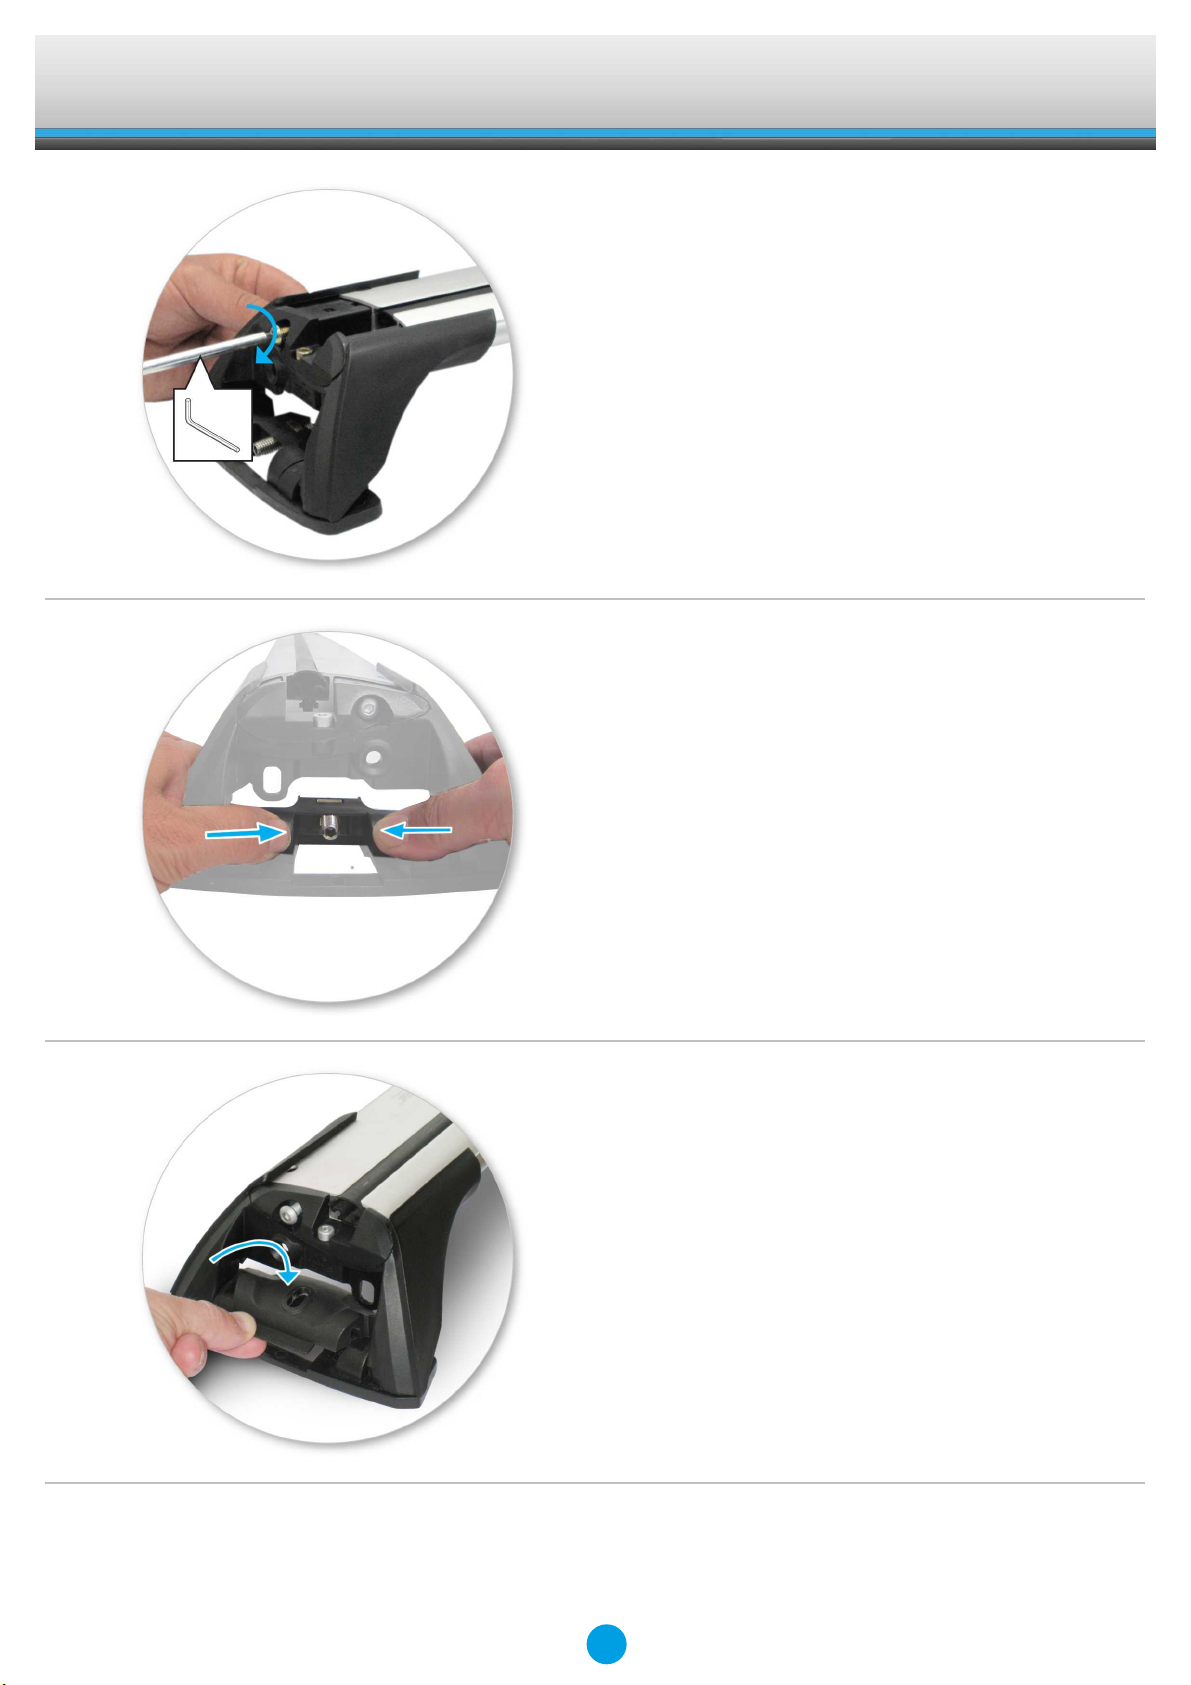
●Use hex screwdriver to reverse adjusting
screw 10 turns.
●Press adjusting screw and pull crossbar
legs out. Refer to the crossbar instructions
for crossbar adjustment.
●Ensure each end of the crossbar is
adjusted equally.
●Adjust crossbar in or out to suit vehicle.
Refer to the crossbar instructions for
crossbar adjustment.
●Attaches to factory-fitted mounting points
●Please check the rear of this manual for
information relating specifically to your
vehicle.
5
Fitting Kit EN
K340W
●Tighten adjusting screw to 5 Nm (3.7 ft lb).
●Remove plastic clamp block by gripping bar
leg with fingers and push firmly with
thumbs until clamp block drops out behind
leg.
●Select plastic internal block (from fitting kit)
and insert into foot.
●Repeat for all legs.
6

Fitting Kit EN
K340W
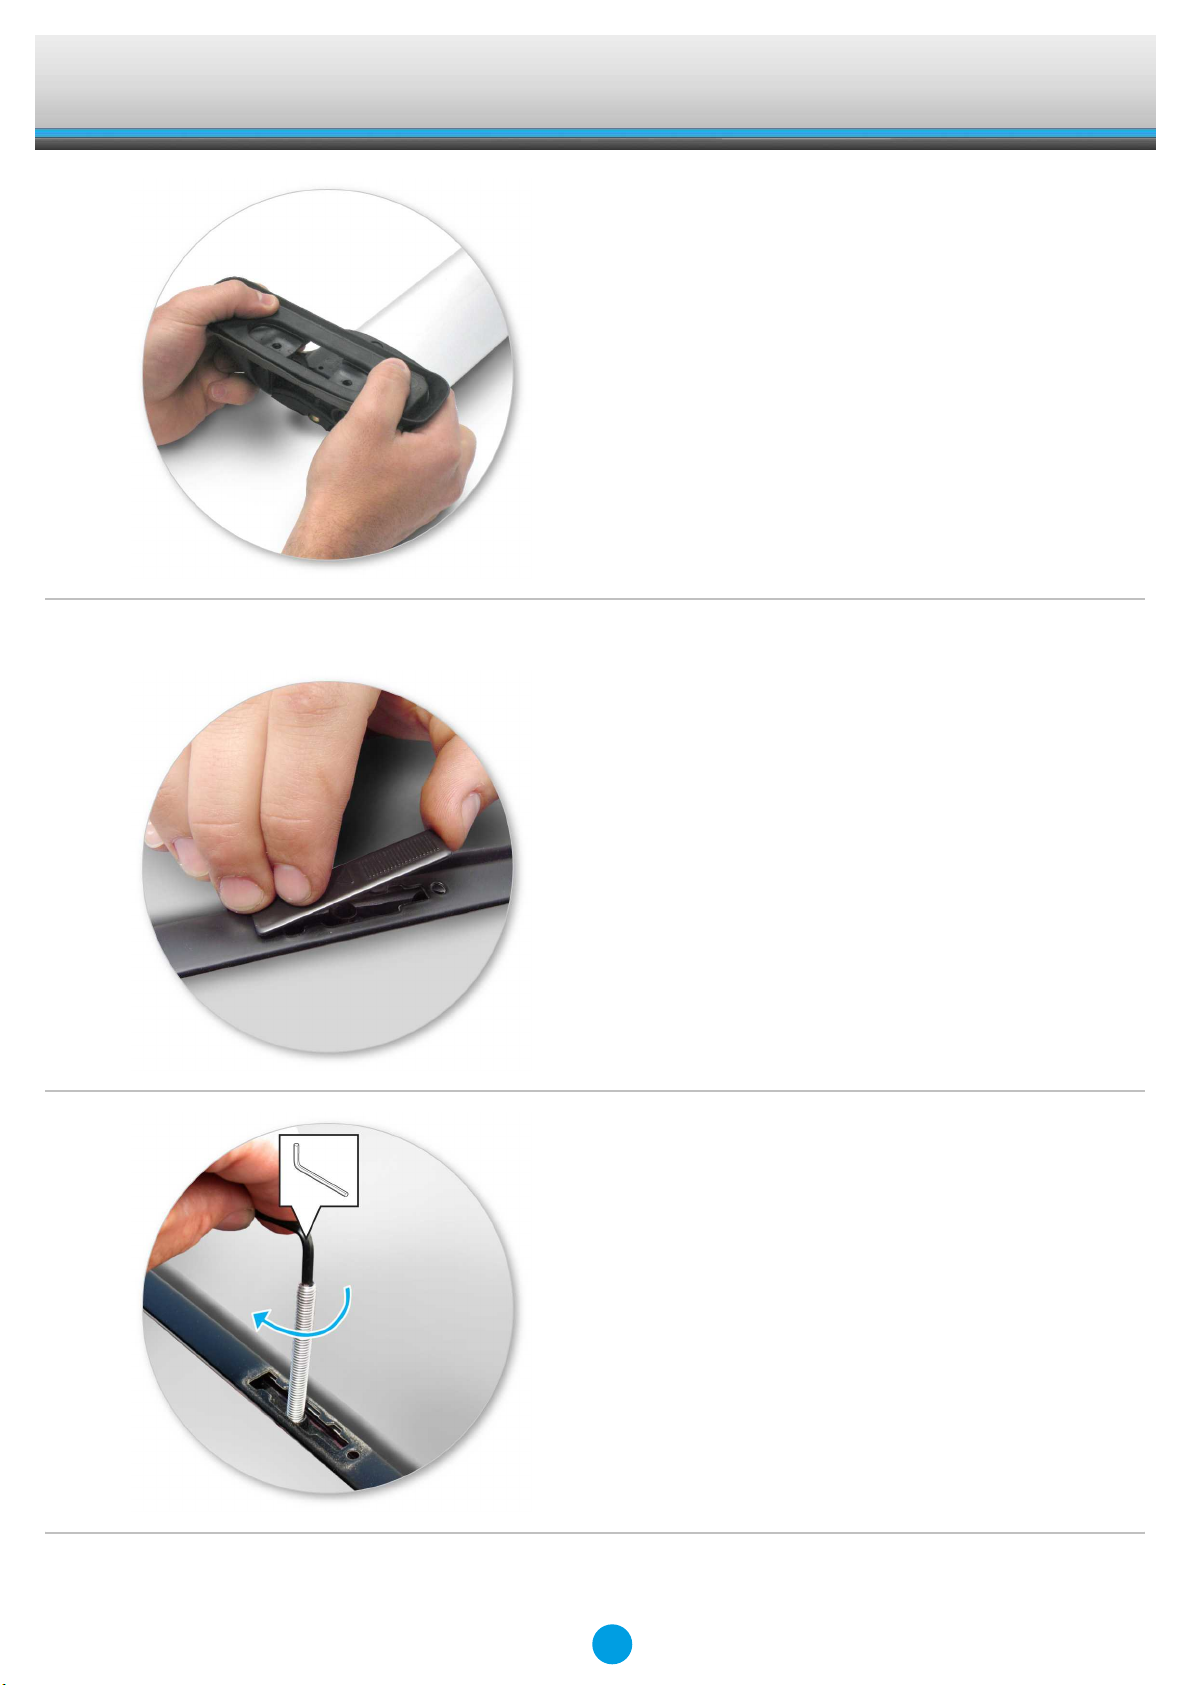
●Fit rubber pads (supplied with fitting kit) to
foot. Pad may vary in shape to that shown.
●Make sure the pad fits into the holes
underneath the foot.
Fitment
●Open or remove fixed-point covers.
●Select grubscrews and screw into the
vehicle's fixed points.
●Do not over tighten.
●Repeat for all four positions.
7

Fitting Kit EN
K340W
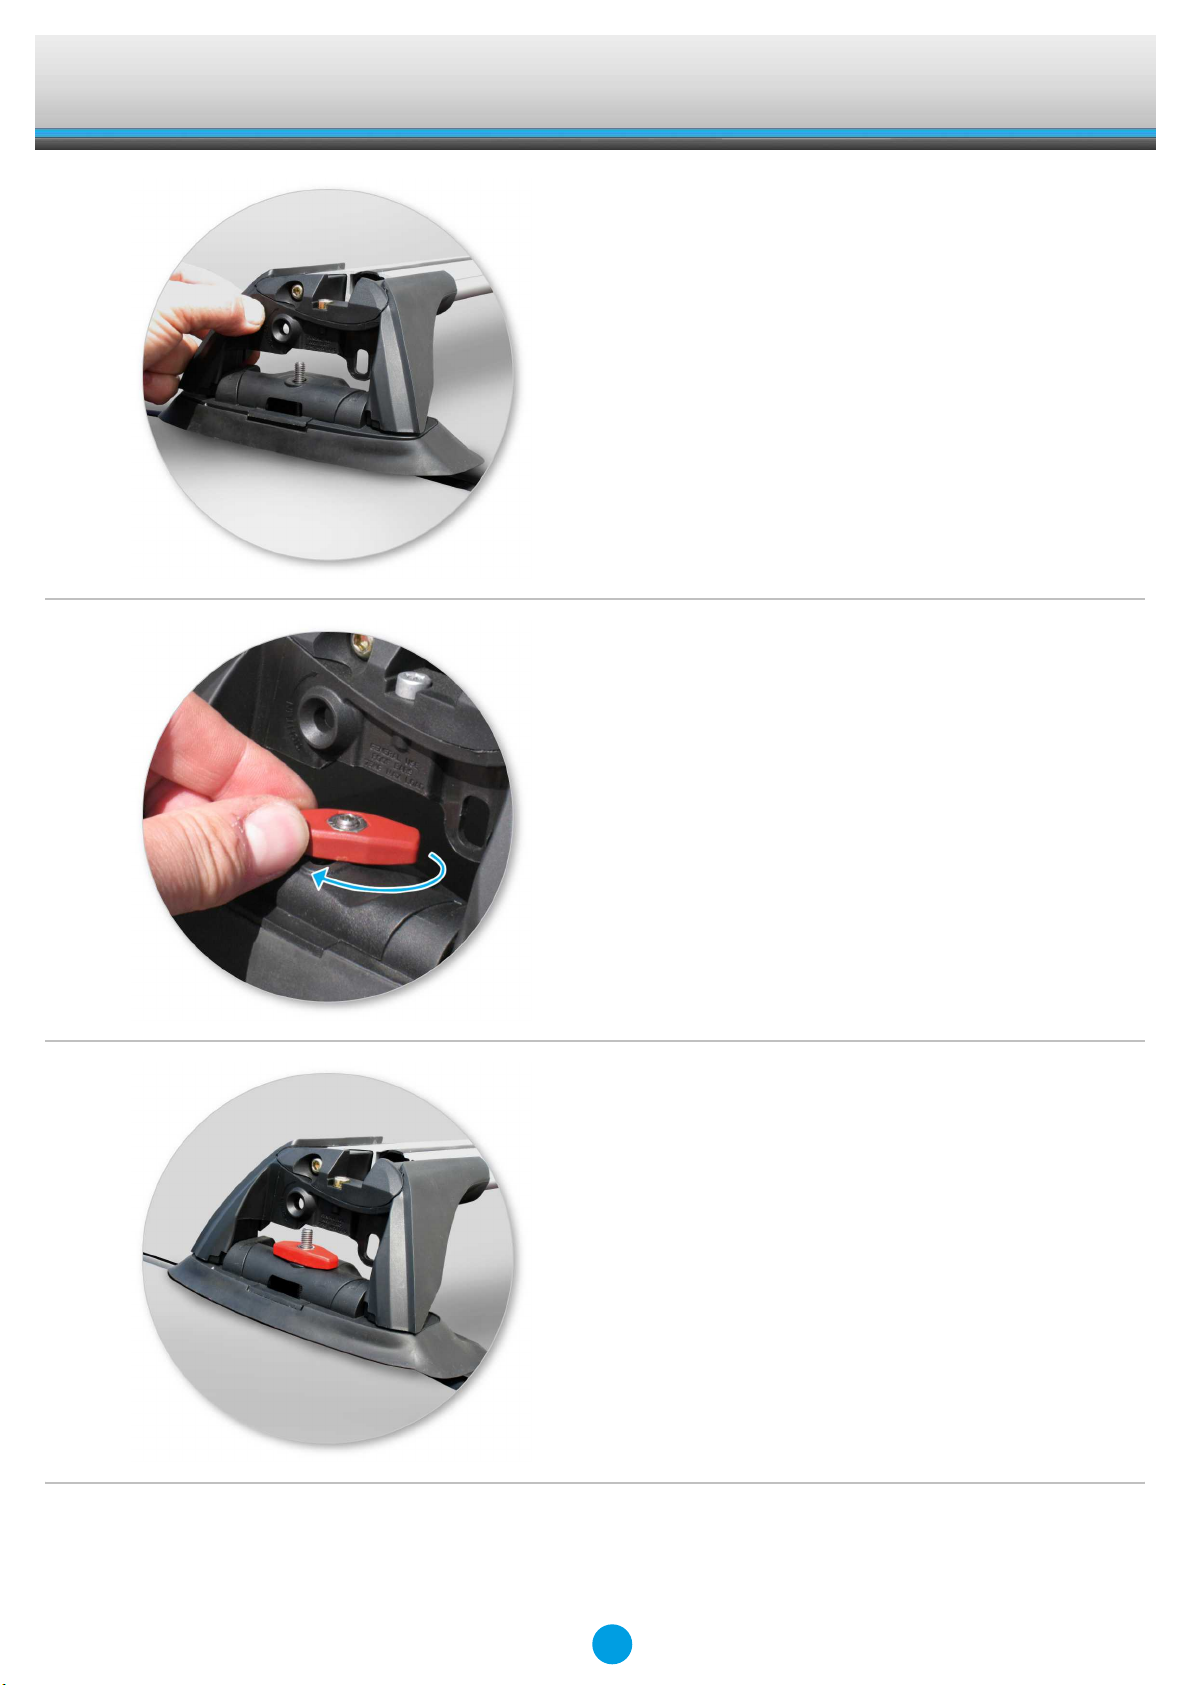
●Place crossbar foot over grubscrews.
●Tighten the red plastic knob. The side with
the nut showing should be facing up.
●Ensure the red plastic knob is in the
position shown when fully tightened.
●Repeat for all legs.
8

Fitting Kit EN
K340W
●Check crossbar is securely attached to the
vehicle.
●Use keys to fit and lock covers
CAUTION: Recheck all fasteners immediately after
a load is applied to the crossbars.
Regularly check screws are tight.
9

Fitting Kit EN
K340W
Maintenance
●Clean the car roof and surfaces of the
product that will be in contact with the car
roof.
●Follow the fitting instructions for fitting the
product to your vehicle. Make sure all steps
are carried out in order.
●Set crossbars a minimum distance of
700mm (27 1/2") apart where no other
distance is specified in the fitting
instructions. This is especially important
when carrying long loads.
●Check unit is securely attached whenever
you refit it to the vehicle. If the unit feels
loose, refer to the fitting instructions and
readjust.
●Some glass/panoramic roofs and radio
antennae may not be able to be used when
the product is fitted.
●Do not modify this product.
●Refer to the maximum permitted load
capacity specified in the fitting instructions.
Do not exceed the vehicle manufacturers
roof load rating if it is lower than the
maximum load capacity specified in the
fitting instructions.
●Loads should not overhang the sides of the
product and be evenly distributed with the
lowest possible centre of gravity.
●Long loads should be secured with non-
elastic straps to the front and rear of the
vehicle.
●Objects with pointed ends (e.g. ski poles)
should be carried with the pointed ends to
the rear of the vehicle.
●Remove all loose or removable objects
from the load prior to loading.
●Make sure all loads are securely fastened
with non-elastic straps. Check regularly
during longer journeys.
●A loaded roof rack system can alter the
performance of your vehicle. Be especially
aware of the effects of side winds,
changing of direction, and braking
performance. Avoid rapid acceleration and
deceleration. Drive carefully.
●Note that the total height of the vehicle
increases when upright loads are carried.
●Products should be locked during transport
if they have locks fitted.
10

Fitting Kit EN
K340W
●Check and replace worn out or defective
parts.
●Keep the product clean and maintained.
●Never drive into a car wash with the roof
rack system fitted.
●Lubricate locks and adjusting screws at
regular intervals.
●Remove the products from the vehicle
when not in use. Make sure all loose parts
are stored safely.
●Yakima Products, Inc.
15025 SW Koll Pkwy.
Beaverton, OR 97006-6056
USA
www.whispbar.com
www.whispbar.ca
www.whispbar.eu
www.whispbar.co.uk
www.whispbar.co.za
11

Fitting Kit CZ
K340W
Montáž kitu
●Vyjměte jednotlivé díly z balení
azkontrolujte je. Chybí-li některý díl anebo
je poškozen, kontaktujte svého prodejce.
●Tento kit je vhodný pro typy nosičů A, B, C
a D.
●Tento manuál zobrazuje montáž pro typ A.
Rovněž platí i pro typ B, C a D.
●Pomocí klíče demontujte kryty patek.
12

Fitting Kit CZ
K340W
●Šestihranným šroubovákem uvolněte
nastavovací šroub cca o 10 otáček.
●Zatlačte nastavovací šroub dolů a
potáhněte patku směrem ven. Pro
nastavení správné délky sledujte montážní
manuál nosičů.
●Nastavte oba konce tyče souměrně.
●Délku nosiče nastavte tak, aby vyhovovala
rozměrům střechy. Pro nastavení sledujte
montážní manuál nosičů.
●Uchycení do továrně předpřipravených
montážních bodů.
●Podívejte se do přílohy 1 pro informace
týkající se konkrétně Vašeho vozidla.
13

Fitting Kit CZ
K340W
●Nastavovací šrouby dotáhněte silou 5 Nm /
3.7 ft lb.
●Z patky vyjměte plastovou redukci jejím
zatlačením dozadu.
●Do patky vložte plastovou redukci
dodávanou s montážním kitem.
●Zopakujte pro všechny patky nosičů.
14
Fitting Kit CZ
K340W
●Nasaďte gumové podložky (dodávané s
montážním kitem) na patky nosiče. Tvar
podložky se může lišit od obrázku.
●Ujistěte se, že podložka zapadá do otvorů
na spodní části patky nosiče.
Uchycení na auto
●Otevřete nebo vyndejte krytku montážních
bodů na autě.
●Vyberte šrouby bez hlavy a zašroubujte je
do montážních bodů na vozidle.
●Nedotahujte příliš silně.
●Opakujte pro všechny čtyři pozice.
15
Fitting Kit CZ
K340W
●Nasaďte patku nosiče přes šroub.
●Utáhněte červenou plastovou matici.
Strana s viditelnou kovovou maticí musí
směřovat nahoru.
●Ujistěte se, že červená plastová matice je
při plném dotažení v pozici, jak je uvedeno
na obrázku.
●Zopakujte pro všechny patky nosičů.
16
Fitting Kit CZ
K340W
●Zkontrolujte nosič, zda je na vozidle pevně
přichycen.
●Pomocí klíče namontujte a zamkněte kryty
na patkách.
UPOZORNĚNÍ: Ihned po zatížení opět zkontrolujte
všechny upevňovací prvky aplikované na střešním
nosiči.
17

Fitting Kit CZ
K340W
Důležité upozornění
●Očistěte střechu a jednotlivé části výrobků,
které budou v kontaktu se střechou
vozidla.
●Postupujte podle montážního návodu pro
Vaše vozidlo. Ujistěte se, že dodržujete
jednotlivé postupy podle daného pořadí.
●Vzdálenost tyčí by měla být minimálně 700
mm (27 1/2") od sebe, pokud není v
montážním manuálu uvedena jiná. To je
důležité zejména při přepravě dlouhého
nákladu.
●Zkontrolujte, zda jsou nosiče pevně
namontovány pokaždé, když je dáváte na
auto. Je-li cokoliv uvolněno, opravte to
podle montážního manuálu.
●Některá střešní okna a autoantény
nemůžete používat, je-li nosič
namontovaný.
●Neupravujte tento produkt.
●Zkontrolujte maximální zatížení nosičů
uvedené v montážním návodu. Nikdy
nepřekračujte maximální zatížení střechy
povolené výrobcem auta, ani v případě,
kdy je nižší než přípustné zatížení nosičů.
●Náklad by neměl přesahovat nosiče do
stran, měl by být rozmístěn rovnoměrně a
těžiště by mělo být co nejníže.
●Přepravované dlouhé objekty musí být
upevněny neelastickými popruhy k přední i
zadní části vozidla.
●Objekty se špičatými konci (lyže) by měli
být přepravovány špišatým koncem
dozadu.
●Odstráňte všechny volné části nákladu
před jeho naložením.
●Ujistěte se, že je náklad na nosičích
bezpečně uchycen neelastickými popruhy.
Při delších cestách pravidelně kontrolujte
uchycení.
●Upozorňujeme, že vozidlo s
namontovaným střešním nosičem a
převáženým nákladem je náchylnější na
boční vítr, reaguje rozdílně na brždění a
akceleraci a má jinou směrovou stabilitu.
Jezděte se zvýšenou opatrností.
●Uvědomte si, že celková výška vozidla se
zvýší, jakmile naložíte náklad.
●Výrobek by měl být uzamčen i během jízdy
(je-li uzamykatelný).
18

Fitting Kit CZ
K340W
●Pravidelně kontrolujte a vymeňte chybné
nebo poškozené díly.
●Udržujte výrobek čistý a v dobrém stavu.
●Nikdy nejezděte do automyčky s
namontovaným střešním nosičem.
●Pravidelně promazávejte zámky a šrouby.
●Odmontujte produkty z vozidla, pokud je
právě nepoužíváte. Ujistěte se, že jsou
všechny díly nosičů bezpečně odložené.
●Yakima Products, Inc.
15025 SW Koll Pkwy.
Beaverton, OR 97006-6056
USA
www.whispbar.eu
19
Fitting Kit HU
K340W
Első használatba vétel
●A csomagolás kibontása után vegye
szemügyre doboz tartalmát. Hiányosság,
sérülés esetén lépjen kapcsolatba a
forgalmazóval.
●A kitek "A", "B", "C" és "D" típushoz
tartozik.
●Az útmutató a "A" kereszttartót mutatja
felszerelve. A lépések ugyanúgy
érvényesek "B", "C" és "D" típusnál is.
●A takaróelemek levételéhez használja a
kulcsot.
20
Table of contents
Languages:
Other ProRac Automobile Accessories manuals


