Prorelax SUPER DOU plus User manual

1
OPERATING INSTRUCTION
SUPER DUO
TENS + EMS
plus
1639

2 3
3
Signs and symbols
4
Package Content
5
Getting to know your device
7
Important notes
12
About the device
13
Step by step operation guide for training
13
Connecting the Cable to The Device
14
Inserting/Changing the Batteries
15
Placement of the Electrode Pads for TENS
17
Turning On/ O the Device
17
Selecting TENS/EMS Treatment Mode
18
Selecting the program for TENS
19
Selecting the program for EMS
21
Selecting the Treatment Time
21
Selecting the Therapy Intensity Level
23
Special Features
24
Cleaning and storage
25
Replacement parts and wearing parts
26
Notes on electromagnetic compatibility
27
Technical Data
27
Disposal
28
Warranty
ENGLISH
Read these instructions for use carefully and keep them for
later use, be sure to make them accessible to other users and
observe the information they contain.
Signs and symbols
WARNING
Warning instruction indicating a risk of injury or damage to health
IMPORTANT
Safety note indicating possible damage to the device/accessory
Note
Note on important information
Observe the instructions for use
IP22
Protected against ingress of solid foreign objects greater than
12.5mm in diameter. Protected against drops of water falling at up to
15° from vertical.
Serial number
Application part, type BF
Disposal in accordance with the Waste Electrical and Electronic
Equipment EC Directive – WEEE
1639
The CE labelling certies that the product complies with the essential requirements
of Directive 93/42/EEC on medical products.
Manufacturer
The manufacturer wants to signal that it complies with the regulations
of the Packaging Ordinance.

4 5
Getting to know your device
What is a TENS+EMS SuperDuoPlus unit and what can it do?
EMS/TENS units fall into the electrostimulation device category. They
provide three basic functions suitable for combined operation:
1. Electrical stimulation of nerve tracts (TENS)
2. Electrical stimulation of muscle tissue (EMS)
3. A massage eect triggered by electrical signals
The unit also features two independent stimulation channels and four self-
adhesive electrodes. It oers a wide range of functions for increasing gene-
ral well-being, pain relief, maintaining physical tness, relaxation, muscle
revitalisation and combating tiredness. For these purposes, you can either
choose from pre-set programs or specify your own to suit your individual
needs.
The principle of electrostimulation devices is based on the imitation of im-
pulses in our bodies that are transferred to nerve and muscle bres using
electrodes via our skin. The electrodes can be applied to many parts of the
body; the electrical impulses are completely harmless and virtually painless.
In certain applications you will merely notice a slight tingling or vibrating
sensation. The electrical impulses that are sent into the tissue inuence the
transmission of stimulation into nerves, nerve centres and muscle groups in
the application area.
Electrostimulation usually only has an eect after regular applications. With
regard to muscles, electrostimulation does not replace regular training.
However, it is a sensible, supplementary training element.
TENS, or transcutaneous electrical nerve stimulation, relates to the electrical
stimulation of the nerves via the skin. TENS is an eective non-pharmacolo-
gical method of treating dierent types of pain that have a variety of causes.
It has no side-eects if administered correctly. The method has been clini-
cally tested and approved and can be used for simple self-treatment. The
pain-relieving or pain-suppressing eect is achieved by inhibiting the trans-
ference of pain to nerve bres (caused mainly by high-frequency impulses)
and by increasing the secretion of endorphins in the body. Their eect on
the central nervous system reduces the sensation of pain. The method is
4
Package Content
1. TENS+EMS SUPER DUO PLUS
2. Self Adhesive Electrodes,
Size: 50x50mm, 4 pcs/bag
3. 3 AAA batteries
4. 2 lead wires (Electrodes)
5. 1 storage bag
6. 1 Clipholder
7. 2 large buttery electrode pads
8. 2 lead wires (large electrodes)
9. 1 therapy belt
10. 1 arm sleeve
2
5
3
6
9
7 8
10
1

6 7
scientically substantiated and approved as a form of medical treatment.
Any symptoms that could be relieved using TENS must be checked by your
GP. Your doctor will also give you instructions on how to carry out a TENS
self-treatment regime.
TENS is clinically tested and approved to treat the following com-
plaints:
• Back pain, particularly in the lumbar/cervical spine area
• Sore joints (e.g. knee, hip and shoulder joints)
• Neuralgia
• Menstrual cramps in women
• Pain resulting from injury to the musculoskeletal system
• Pain caused by circulatory disorders
• Chronic pain with various causes.
Electrical muscle stimulation (EMS) is a widespread and generally recog-
nised method and has been used in sports medicine and rehabilitation
for years. In sports and tness, EMS is used to complement conventional
muscle training, to increase the performance of muscle groups and to ad-
just physical proportions to achieve the desired aesthetic results. There are
two dierent types of EMS application: one is for targeted strengthening of
the muscles (activating application), and the other is to achieve a relaxing,
restful eect (relaxing application).
The activating application involves:
• Muscle training to increase endurance and/or
• Muscle training to support the strengthening of specic muscles or muscle
groups, and to achieve the desired changes to physical proportions
The relaxing application involves:
• Muscle relaxation for easing muscle tension
• Improving symptoms of muscular fatigue
• Acceleration of muscle regeneration after high muscle performance (e.g.
after a marathon)
Thanks to integrated massage technology, TENS+EMS SuperDuoPlus units
are also able to relieve muscle tension and combat fatigue with a program
based on the sensation and eects of a real massage.
The positioning suggestions and program tables in these instructions for
use allow you to quickly and simply determine the corresponding applicati-
on (depending on the aected area of the body) and set the unit to achieve
the desired eects.
Thanks to the two separately adjustable channels, the TENS+EMS Super-
DuoPlus unit oers you the advantage of being able to set the intensity of
the impulses independently from each other for two treatment areas on the
body, for example to cover both sides of your body or to evenly stimulate
larger areas of tissue. The option to individually set the intensity of each
channel also enables you to treat two separate areas of the body simulta-
neously instead of having to treat the individual areas in turn, which saves
you time.
Important notes
The device is not a substitute for medical consultation and treatment. Con-
sult your doctor rst if you are experiencing any pain or are suering from
an illness.
WARNING!
To avoid damage to health, we strongly advise against using the TENS+EMS
SuperDuoPlus unit in the following situations:
• With implanted electrical devices (such as a pacemaker)
• In the case of metal implants
• If you use an insulin pump
• If you have a high temperature (e.g. > 39°C)
• If you have a known or acute cardiac arrhythmia, or disorders of the he-
art’s impulse and conduction system
• If you suer from a seizure disorder (e.g. epilepsy)
• If you are pregnant
• If you have cancer
• After an operation, if strong muscle contractions could aect the healing
process

8 9
• The device must never be used near to the heart. The stimulation elec-
trodes must not be placed on any part of the front ribcage (where the
ribs and breastbone are located), especially not on the two large pecto-
rals. this can increase the risk of ventricular brillation and induce cardiac
arrest.
• On the skeletal skull structure, or around the mouth, throat or larynx
• In the neck/carotid artery area
• In the genital area
• On acutely or chronically diseased (injured or irritated) skin (e.g. inamed
skin – whether painful or not, reddened skin, rashes, e.g. allergies, burns,
bruises, swellings, both open and healing wounds, and post-operative
scars where the healing process could be aected)
• In humid environments (e.g. in the bathroom) / when bathing or showering
• Do not use after consuming alcohol
• If connected to a high-frequency surgical device
• In the case of acute or chronic diseases of the gastrointestinal tract
• The stimulation should not be applied above or through the head, direct-
ly onto the eyes, covering the mouth, to the front of the neck (especially
not to the carotid artery), or with the electrode surfaces placed on the
chest and upper back or across the heart.
Before using the device, consult your doctor if any of the following
applies to you:
• Serious illnesses, in particular if you suspect or have been diagnosed
with high blood pressure, a blood coagulation disorder, propensity to
thrombo-embolic conditions or recurrent malignant growths
• Any skin conditions
• Unexplained chronic pain in any part of the body
• Diabetes
• Any sensory impairment that reduces the feeling of pain (e.g. metabolic
disorders)
• If you are receiving medical treatment
• In the event of complaints linked to stimulation treatment
• If you suer from persistently irritated skin due to long-term stimulation
at the same electrode site
IMPORTANT!
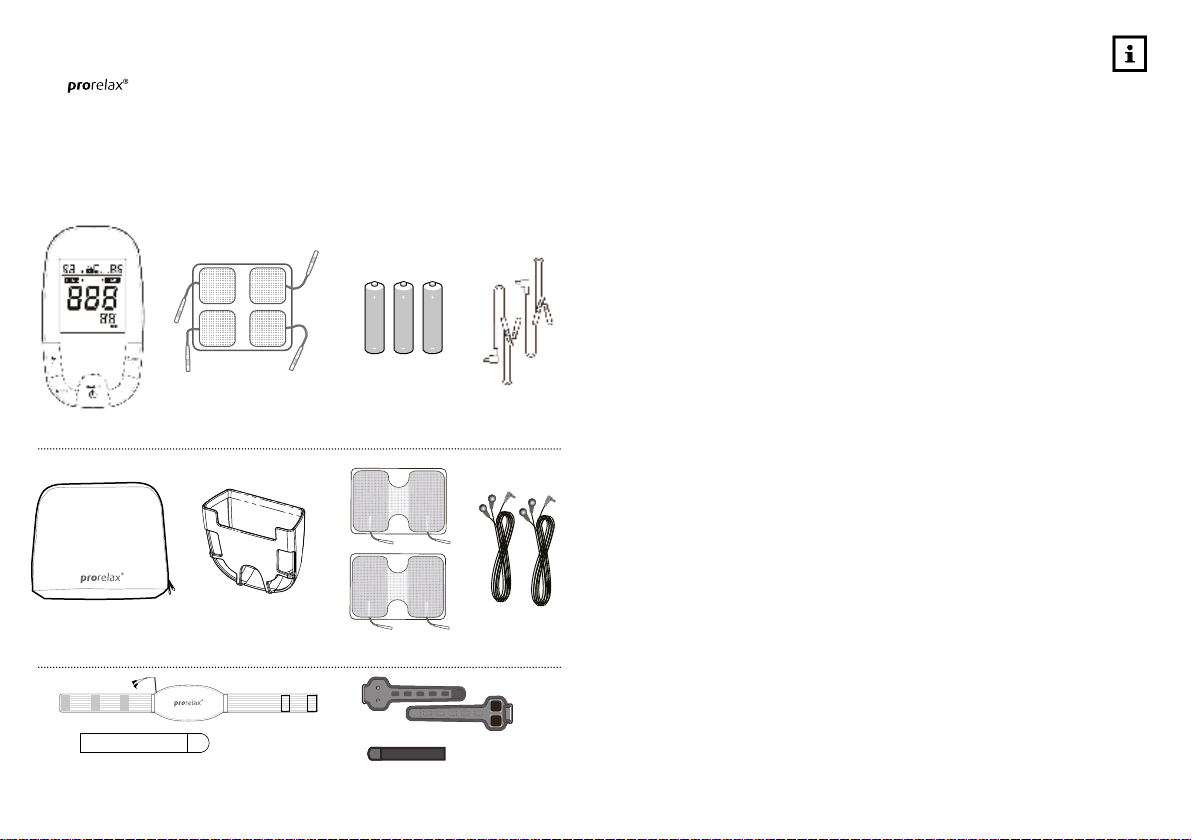
Only use TENS+EMS SuperDuoPlus units:
• On adults
• For the intended purpose and as specied in these instructions for use.
Improper use can be dangerous.
• For external use
• With the original accessories supplied, which can be re-ordered. Failure
to do so invalidates the warranty.
PRECAUTIONS:
• Always pull rmly on electrodes to remove them from the skin to prevent
injuries in the unusual case of highly sensitive skin.
• Keep the device away from sources of heat and do not use it in close
proximity (approx. 1 m) to shortwave or microwave devices (e.g. mobile
phones), as doing so can result in unpleasant current peaks.
• Do not expose the device to direct sunlight or high temperatures.
• Protect the device from dust, dirt and humidity.
• Never immerse the device in water or other liquids.
• The device is suitable for self-treatment.
• For hygiene reasons, the electrodes may only be used on one person.
• If the device does not work properly, or you feel unwell or experience
pain, stop using it immediately.
• Switch o the unit or the respective channel rst before removing or re-
locating electrodes to prevent unintentional stimulation.
• Do not modify electrodes (e.g. by cutting them). This increases the
current intensity, which is potentially hazardous (max. recommended
output value for the electrodes is 9 mA/cm², an eective current intensity
beyond 2 mA/cm² requires increased awareness).
• Do not use the device whilst asleep, driving a vehicle or operating machi-
nery.
• Do not use whilst undertaking any activity where an unexpected reaction
(e.g. strong muscle contractions even at low intensity) could be dange-
rous.

10 11
• Ensure that no metallic objects (e.g. belt buckles or necklaces) come
into contact with the electrodes during stimulation. If you are wearing
jewellery or have piercings in the area to be treated (e.g. a navel piercing),
these must be removed before using the device. Failure to do so could
result in spot burns.
• Keep the device away from children.
• Make sure not to confuse the electrode cables including contacts with
your headphones or other devices and do not connect the electrodes to
other devices.
• Do not use the device whilst using other devices that transmit electrical
impulses into your body.
• Do not use in the vicinity of highly ammable substances, gases or ex-
plosives.
• Do not use rechargeable batteries and always use the same battery types.
• During the initial few minutes, use the device while sitting or lying down
to minimise the risk of injuries as a consequence of isolated cases of vagal
responses (feeling of faintness). If you feel faint, immediately switch o
the device, lie down and support the legs in an elevated position (approx.
5-10 min).
• Treatment of the skin with moisturising lotions or ointments beforehand
is not recommended as this considerably increases the electrode wear
and may cause unpleasant current peaks.
• This device is not intended for use by people with restricted physical, sen-
sory (e.g. reduced sensitivity to pain) or mental skills or a lack of experien-
ce and/or lack of knowledge, unless they are supervised by a person who
is responsible for their safety or are instructed by such a person in how to
use the device.
• If the adhesive capability of the adhesive electrodes decreases, please
replace them immediately. Only use the device again with new adhesive
electrodes. Otherwise the unequal adhesion of the adhesive electrodes
may lead to skin injuries. Replace the electrodes with new ones after
having used them 20 times at the latest.
Damage
• If the device is damaged, do not use it and contact your retailer or the
specied Customer Services address.
• In order to perform the eectiveness of function by the device, do not
drop the device or disassemble the device.
• Check the device for signs of wear and tear or damage. If there are such
signs of wear and tear or damage or if the device was used improperly, it
must be returned to the manufacturer or retailer before further use.
• Switch the device o immediately if it is faulty or not working properly.
• Do not attempt to open and/or repair the device yourself. Repairs may
only be carried out by Customer Services or authorised retailers. Failure
to comply will result in voiding of the warranty.
• The manufacturer is not liable for damage resulting from improper or
careless use.
Notes on handling batteries
• If your skin or eyes come into contact with battery uid, rinse the aected
areas with water and seek medical assistance.
• Choking hazard! Small children may swallow and choke on batteries.
Store the batteries out of the reach of small children.
• Observe the plus (+) and minus (-) polarity signs.
• If a battery has leaked, put on protective gloves and clean the battery
compartment with a dry cloth.
• Protect batteries from excessive heat.
• Risk of explosion! Never throw batteries into a re.
• Do not charge or short-circuit batteries.
• If the device is not to be used for a relatively long period, take the batte-
ries out of the battery compartment.

12 13
About the device
1. Power On/O key
2. CH key
3. Mode key
4. Up + key
5. Down – key
6. Therapy Mode
7. Program number
8. Therapy time remaining
9. CH1 intensity level
10. CH2 intensity level
11. Lock status indicator
12. Battery status indicator
13. Battery compartment
14. Battery cover
15. Output Socket
Front view Rear view
Top
Step by step operation guide for training
PREPARING THE SKIN FOR RUNNING A SESSION
Proper preparation of the skin covered by the electrodes allows more stimu-
lation to reach targeted tissues, prolongs electrode life, and reduces the risk
of skin irritation. After connecting the lead wire(s) to the stimulator, use the
following steps to prepare your skin at the electrode placement sites:
1. Determine the placement sites for the electrodes.
2. Wash the area with mild soap and water (do not use alcohol). Rinse and dry
thoroughly.
3. Trim excess body hair from the area with scissors (do not shave).
4. Optionally, apply skin prep to the area to form a protective barrier on your
skin. Apply, let dry, and apply electrode as directed.This will both reduce the
chance of skin irritation and extend the life of your electrodes.
5. When removing electrodes, always remove by pulling in the direction of hair
growth.
6. It may be helpful to apply skin lotion on electrode placement area when not
wearing electrodes.
Connecting the Cable to The Device
Connecting the lead wire to the electrodes before applying to the Skin.

14 15
Inserting/Changing the Batteries
1. Open the battery compartment at the back of the device by pushing the
battery cover labelled “Open” downward (this area features raised marks for
easy identication).
2. Insert 3 AAA (1.5 V) batteries in the battery compartment; make sure to match
up the symbols (+/–).
3. Close the battery cover by carefully placing the stud into the slot in the rear
area and sliding it upward, applying slight pressure.
4. Follow the same procedure when replacing the battery at a later date.
Note:
For important precautions regarding the batteries, please be informed:
• Always use only 3x1.5V(AAA) batteries.
• Keep away from children.
• Do not recharge.
• Do not short-circuit.
• Do not throw into a re.
• Please recycle. Do not dispose of old batteries with your household waste; dis-
pose of them safely at your recycling centre or business where the batteries were
purchased.
Note:
1. When stimulating the muscles of the arms or legs
bear in mind that the muscles contraction may
cause involuntary limb movement, which could
cause injury to you or others. Always ensure the
limb is secured to prevent movement.
2. Do not turn the unit on until all electrodes and lead
wires are properly attached.
Placement of the Electrode Pads for TENS
(Treatment of Pain)
Note:
You may need help placing the Electrode Pads
onto hard to reach areas (lower & upper back)
LOWER BACK
Place a pair of pads
horizontally on each
side of your back in
the lower back area.
SHOULDER
Place one half of the
pad on the top part of
you shoulder and the
other half on the side.
UPPER BACK
Place a pair of pads
horizontally on each
side of your back in
the upper back area.
BACK OF THIGHS
Place a pair of pads
horizontally on each calf
muscle. Do not place
the pads too low on the
leg, as this can lead to
unpleasant contractions.
BUTTOCK
Place the pads horizon-
tally on the buttocks,
halfway between the
centre line and the side
of your body.
CALF MUSCLES
Place a pair of pads
horizontally on each calf
muscle. Do not place the
pads too low on the leg,
as this lead to unpleasant
contractions.
FRONT THIGHS
Place the pads on the
buttocks horizontal,
halfway between the
center line and the
side of your body.
CH1 CH2
CH1 CH2
CH1 CH2
CH1
CH2
CH1
CH2
CH1 CH2
CH1
CH2
or
Shoulder
Calf
Muscle
Low
Back
Upper
Back
Buttock
ABS
Back of
Thighs
Front of
Thighs

16 17
Turning On/ Off the Device
To Turn On/O the device, Press and hold the On/O button for
one (1) second to turn on the device.
1. The most recently selected treatment time and program will
display on the screen
2. The device turns o automatically after the therapy session
time has elapsed.
Note : Do not turn the unit on until all electrodes and lead
wires are properly attached.
Note : When stimulating the muscles of the arms or legs bear
in mind that the muscle contraction may cause involuntary
limb movement which could cause injury to you or others.
Always ensure the limb is secured to prevent movement.
Note : In an emergency you may also pull the connector(s)
from the device and then remove the electrodes.
Note : To prevent unpleasant electric shocks, never remove
the device while it is still turned on..
Placement of the Electrode Pads for EMS
1. Connecting the lead wire to the electrodes
before applying them to the Skin. Use the large
Electrode Pads for EMS.
2. The pad placement chart hereafter illustrates
the correct placement of the pads for a selection
of target muscles.
Note:
1. When stimulating the muscles of the arms or legs bear in
mind that the musclecontraction may cause involuntary
limb movement, which could cause injury to your or oth-
ers. Always ensure the limb is secured to prevent move-
ment.
2. Do not turn the unit on until all electrodes and lead wires
are properly attached. Always start with a low intensity
level, increase gradually. You may use any of the modes
for EMS
SHOULDERS
Place one half of the
pad on the front of your
shoulder and the
otheron the side.
BACK OF THIGHS
Place each pair of pads
horizontally across
your hamstring.
ABS
Place each pair of pads
horizontally either side
of your nevel.
CALF MUSCLES
Place each pair of pads
horizontally across calf
muscle. Do not place
them too low on the leg,
as this can result in an
uncomfortable contraction.
LOWER BACK
Place a pair of pads
horizontally either side
of your spine on the lower
part of the back.
UPPER BACK
Place a pair of pads
horizontally either side
of your spine on the
upper part of the back.
BOTTOM
Place a pair of pads
horizontally across the
buttocks halfway
between the midlone
and side of your body.
FRONT THIGHS
Place a pair of pads
horizontally across
each thighs muscles.
Shoulder
Calf
Muscle
Low
Back
Upper
Back
Bottom
ABS
Back of
Thighs
Front of
Thighs
Selecting TENS/EMS Treatment Mode
The Device oers 8 dierent preset treatment programs
respectively for TENS /EMS modes ; the programs
dier with respect to varying pulse widths and frequencies.
1. Press MODE , the preset (default) therapy mode TENS/EMS
will display on the screen.
2. Use the button Up+ ,or Down – , for choice of therapy
mode. therapy mode.
3. Press Mode again, the numeric number of program is then
ashing.Press the button Up + (to increase) or the button Down
– (to decrease) for choice of program of the selected modality.
4. Press MODE again to save your selection.
Note : If you change programs during the course of a
therapy session, the treatment time will not reset unless you
manually reset it by performing the steps described above.

18 19
Selecting the program for TENS
The device oers 8 dierent preset treatment programs (P1~P8) respectively for
TENS /EMS modes ; P9 is self-programmable program by the user to desirable
pulse width between 50~260uS and frequency at 2~60Hz (for TENS) and 7~70Hz
(for EMS).
Choice of the appropriate mode
The mode you choose determines the kind of work that is imposed upon the stimu-
lated muscles. Choose the mode that is appropriate to your needs or gives you the
greatest pleasure.
For TENS programs:
When using any of the 8 programs for pain relief always start with the lowest inten-
sity and gradually increase the level of intensity until you feel a“tingling”sensation.
All programs are dierent and therefore feel dierently.
You may try all 8 programs in the beginning and choose one that feels pleasant.
Never increase the intensity to a level so that it hurts, always stay under the point of
discomfort. Start with short sessions of 5 or 10 minutes until your body gets used
to the stimulation.
Program
Pulse width (uS) Pulse rate (Hz) Waveform Type
P1
P2
P3
P4
P5
P6
P7
P8
P9
260
260
260
260~156
260~156
260
260~156
50~ 260 uS
15
60
60
2~60
60
7~60
60
Constant
Burst
Constant
Dense-Disperese
Modulation Pulse Width
SD Pulse Rate
SD Pulse Width
2~60 Hz
Recycle ( P1~P7)
Self programmable
All electrical specication ±20%
Selecting the program for EMS
When using the device for muscle stimulation (EMS) any of the 8 programs may be
used. The intent is to cause a muscle to contract, and then release. All 8 programs will
achieve contraction and vary mainly by the rate and duration of the contractions. As
with any exercise regiment, start out slowly with low intensity levels for a warm-up
(5~10min). You may increase intensity level and treatment time as you progress with
your muscle performance. Use the device regularly over a longer period of time as to
maintain the benet you may have gained during“exercise”.
Program
Pulse Width
(uS) Ramp up
(sec) Ramp down
(sec) Pulse rate
(Hz) Function
Mode
O Time
(sec)
Hold on
(sec)
P1
P2
P3
P4
P5
P6
P7
P8
P9
2
2
2
2
2
2
2
2
2
2
2
2
2
2
3
4
5
6
2
4
6
2
3
4
5
6
8
10
S
S
S
S
A
A
A
S/MR
70
60
50
50
50
60
70
7~60
260 uS
(Fixed)
50~260 uS 7~70 Hz
Self
programmable

20 21
Press MODE after treatment mode is set.
1. To choose Program (P1~P8), use Up + (to increase) or the button Down – (to
decrease).
2. Program P9, it is self –programmable mode. To set up desirable pulse width
between 50~260uS and frequency at 2~60Hz (for TENS) and 7~70Hz (for EMS) :
2.1. Press Mode button, the preset (default) Pulse Width is then ashing.
Press the button Up + (to increase) or the button Down – (to decrease) for choice
of the selected Pulse Width .
2.2. Press Mode button again, the preset (default) Pulse Rate is then ashing.
Press the button Up + (to increase) or the button Down – (to decrease) for
choice of the selected Pulse frequency.
3. Press MODE again to save your selection. The treatment program you selected
will appear on the display the next time you turn the device on.
➠➠
➠➠
Selecting the Treatment Time
1. Press MODE. The preset (default) treatment time will ash on the display.
2. To increase or decrease the treatment time, press the button ON + (to increase)
or the button OFF – (to decrease) repeatedly until the desired duration appears
on the display.
3. Press MODE again to save your selection. The treatment time you selected will
appear on the display the next time you turn the device on.
Note: If you change programs during the course of a therapy session,
the treatment time will not reset unless you manually reset it by performing
the steps described above.
Selecting the Therapy Intensity Level
This device oer a maximum of 25 intensity levels.
The intensity of the electrical current determines the number of working bers in
the stimulated muscles. The lower the current intensity the lower the number of
working bers in the muscle. The higher the current intensity the greater the num-
ber of working bers in the muscle.
If using the device for help with temporary relief of pain associated with sore and
ching muscles then you will nd that setting the current intensity to your own com-
fortable and pleasing level will give you much satisfaction. This level is dierent for
each user so adjusts slowly and accordingly.
If you desire to stimulate healthy muscles (EMS) in order to improve and facilitate
muscle performance then you want to achieve a signicant number of working
bers. You require a minimum intensity (approx. 30mA) to accomplish this .
This can be achieved relatively quickly (2 to 3 sessions) by progressively increasing
the intensity during the session. Once this threshold is reached, continue to pro-
gressively increase the current intensity making the session more eective.
➠
➠

22 23
Selecting the Therapy Intensity Level
1. Intensity is adjustable according to the channel selected. Select the channel you
wish to adjust by pressing Ch button, it will ash on the display.
2. To increase or decrease the intensity, press Up + (to increase) or Down – (to
decrease) repeatedly until the desired intensity level ashes on the display.
3. Press MODE to save your selection.
Note: You will feel the intensity increase or decrease as you select the intensity level.
You can use this as a guide to select a level that is comfortable for you.
Note: If you change therapy mode/program during the course of a therapy session,
the intensity level will reset to“0” showing on the screen, for safety reason.
➠
➠
➠
➠
Special Features
TENS/EMS stimulator with back light
The device oers duoTENS/EMS device featured with 8 presets programs and 1 pro-
gram adjustable on the Pulse Width and Pulse Frequency. All the treatment status
displays clearly on the big LCD screen, with backlight for 10 seconds ,with each
entry of button.
Last Treatment Mode/Time Memory
The device oers 12 preset times: 5, 10, 15, 20, 25, 30, 35, 40, 45, 50, 55 and 60 min-
utes. Time will countdown on the display in 1-minute increments for the duration
of your session.
• The device turns o automatically when the therapy time has elapsed.
• The most recently set therapy time is stored.
• If you alter the program mode during your therapy, the therapy time won’t restart,
unless you reset the therapy time.
• The last treatment program you used will appear on the display, when you turn on
the device.
Lock Function
Press and hold the UP + and Down – buttons simultaneously for 1 second to lock/
unlock the device.
Automatic Shut o
• The device automatically turns o when no button is pressed for 60 seconds.
• The device automatically turns o when the time for your therapy session has
elapsed.
Intensity Level Reset
For your safety and comfort, the intensity level will reset to ”0”each time the device
turns o, including after therapy sessions.
The treatment will discontinue if the electrodes are not properly placed well, and/
or any entry for changing the mode setting during therapy session, it shall initiate
to lowest intensity level, showing“0”on the screen.
Low Battery Status Indicator
The battery status indicator will light whenever the battery is low. This means that
soon you have to replace the batteries.

24 25
Cleaning and storage Replacement parts and wearing parts
Stimulator
The stimulator may be wiped clean with a small amount of soapy water on a clean
cloth. Do not submerge the stimulator in liquids or expose it to large amounts of
water.
• Never use aggressive cleaning products of sti brushes to clean the device.
• Remove the batter before cleaning the device.
• Do no use the device again until it is completely dry.
• Do not expose the device to direct sunlight and protect it from dirt and moisture.
Cabels
• Disconnect the cables from the stimulator and electrodes.
• Do not pull on the cables, but on the connectors attached to the ends of the cables.
• Store the stimulator with the cables in a clean, dry place.
Electrode
The electrode pads are disposable and use an adhesive that will dry after prolonged
usage or storage. Pads should be replaced when they lose their adhesive quality, or
you sense a change in stimulation sensation.
If you’re in doubt about the integrity of the pads, order fresh pads please order on-
line at www.euromedics.de or contact authorized distributor(s).
How to Store Your System
1. Store your System at room temperature in a dry place, out of the reach of children.
2. If the stimulator will not be used for more than a week, remove the battery from
the stimulator.
www.healthy-at-home.de

26 27
Technical DataNotes on electromagnetic compatibility
WARNING!
The device is suitable for use in all environments listed in these instructions
for use, including domestic environments.
The use of the device may be limited in the presence of electromagnetic dis-
turbances. This could result in issues such as error messages or the failure
of the display/device. Avoid using this device directly next to other devices
or stacked on top of other devices, as this could lead to faulty operation. If,
however, it is necessary to use the device in the manner stated, this device
as well as the other devices must be monitored to ensure they are working
properly.
The use of accessories other than those specied or provided by the manu-
facturer of this device can lead to an increase in electromagnetic emissions or
a decrease in the device’s electromagnetic immunity; this can result in faulty
operation.
Keep portable RF communication devices (including peripheral equipment,
such as antenna cables or external antennas) at least 30 cm away from all
device parts, including all cables included in delivery. Failure to comply with
the above can impair the performance of the device. Failure to comply with
the above can impair the performance of the device.
Disposal
WARNING!
The empty, completely at batteries should be disposed of through specially
designated collection boxes, recycling points or electronics retailers. You are
legally required to dispose of the batteries. *
For environmental reasons, do not dispose of the device in the hou-
sehold waste at the end of its useful life. Dispose of the unit at a
suitable local collection or recycling point. Dispose of the device in
accordance with EC Directive – WEEE (Waste Electrical and Electronic
Equipment). If you have any questions, please contact the local aut-
horities responsible for waste disposal.
** All electrical specications are ±20%
Channel: Dual, isolated between channels.
Output Voltage: 0~40V peak into 500Ω load each channel.
Pulse Amplitude: Adjustable 0 – 80mA.
Pulse Rate: As pre-programming operation mode.
Pulse Width: As pre-programming operation mode.
Software ramp up feature: Pulse width ramp up when change mode.
Timer : 5~60 min. selectable.
LCD: Show modes, pulse rate, pulse width, timer, CH1/CH2, intensity level.
Wave Form: Symmetrical Bi-Phasic square pulse.
Max Charge per Pulse: 20.8 micro-coulombs maximum.
Operating Conditions: + 50°F (10°C) to +104° (40°C), 40-90% max.
Relative humidity
Transport & Storage Temperature: +14°F (-10°C) to +140° (60 °C), 30-95% max.
Relative humidity
Weight: 120 g (battery included)
Dim. : 122 x 66 x 30 mm
Power Source: 3 x AAA / 4.5 Volt batteries
*Note
The codes below are printed on batteries containing harmful substances: Pb = Battery
contains lead, Cd = Battery contains cadmium, Hg = Battery contains mercury.

28 29
EUROMEDICS GmbH, Hauptstraße
169 D-59846 Sundern, Germany
(hereinafter called “EUROMEDICS”)
provides a warranty for the prorelax®
TENS+EMS SUPER DUO PLUS (herein-
after called the “Product”) subject to
the following preconditions and in
the scope described below.
The warranty conditions described
below do not aect the legally pre-
scribed warranty obligations of the
seller from the contract of purchase
with the buyer. Moreover, the war-
ranty applies irrespective of manda-
tory legal liability provisions, such
as those according to the product
liability law, or in cases of mala de
intent or gross negligence, or owing
to injury to life and limb, or to health
by EUROMEDICS or its agents.
EUROMEDICS guarantees the de-
fect-free operability and the com-
pleteness of the product, especially
that the product is free of material
defects, manufacturing defects and
construction defects. The decisive
factor in this regard is the state of the
art of the science and technology at
the time of manufacturing. The pro-
duct must have manifested the de-
fect that caused the damage at that
time itself.
If the purchaser wishes to file a war-
ranty claim, he must first contact
EUROMEDICS customer service:
EUROMEDICS Customer Service
Grandkaule 3
Tel: +49 (0)2208/9217999
D-53859 Niederkassel
E-Mail: [email protected]
The purchaser will then get further
information on how to process the
guarantee case, for example, where
he can send the device free of cost
and what documentation is required.
Filing a warranty claim can only come
into
consideration if the buyer can submit
- a copy of the invoice/proof of
purchase and
- the original product
to EUROMEDICS or to a service cen-
tre nominated by EUROMEDICS upon
demand.
The warranty period is 2 years from
the date of purchase of a new, un-
used product by the purchaser.
The warranty applies worldwide, i.e.
regardless of the country in which
EUROMEDICS has marketed the pro-
duct and the purchaser has purcha-
sed it.
This warranty only applies to pro-
ducts that the purchaser has procu-
red as a consumer and exclusively for
personal purposes in the framework
of domestic use (i.e. not for products
that were procured or used in the
framework of a commercial or inde-
pendent professional activity).
If the product is found to be decient
in operability in accordance with the
following provisions during the war-
ranty period, EUROMEDICS will pro-
vide a free replacement according to
these warranty conditions.
Expressly excepted from this warran-
ty are
- products that are used, cleaned,
stored or maintai- ned incorrect-
ly and/or not in compliance with
the conditions laid down in the
operating manual, as well as pro-
ducts that were opened, repaired
or modied by the purchaser or by
a service centre not authorised by
EUROMEDICS;
- products that were sold as second
quality or used articles;
- consequential damages arising
from a defect in the product (ho-
wever, in this case, there may be
entitlements from product liability
or from other mandatory legal lia-
bility regulations).
Warranty

30
MDSS GmbH
Schiffgraben 41, D-30175
Hannover, Germany
Well-Life Healthcare Ltd.
6F., No. 168, Lide St., Jhonghe District,
New Taipei City, 23512, Taiwan
EXCLUSIVELY IMPORTED AND
DISTRIBUTED IN EUROPE BY: EUROMEDICS GmbH
Hauptstraße 169 D-59846 Sundern Germany
[email protected] www.euromedics.de
prorelax.com
1639
Table of contents
Other Prorelax Fitness Equipment manuals