ProScan PSB3713-B User manual

37" SOUND BAR SPEAKER
USER MANUAL
MODEL:PSB3713-B
PLEASE READ BEFORE OPERATING THIS EQUIPMENT.

1
SAFETY INSTRUCTIONS
1.Read these instructions.
2.Keep these instructions.
3.Heed all warnings.
4.Follow all instructions.
5.Do not use this apparatus near water.
6.Clean only with a slightly damp cloth.
7.Do not block any ventilation openings.
8.Install in accordance with the manufacturer’s instructions.
9.Do not install or operate near any heat sources such as radiators,stoves,or other apparatus
that produce heat
10.Unplug this apparatus during lightning storms or when unused for long periods of time.
11.Servicing is required when the apparatus has been damaged in any way, such as the
power-supply cord or plug is damaged,liquid hasbeenspilledorobjectshavefallenintotheapparatus,
the apparatus has normally, or has been dropped.
Warning:
Do not expose this product to rain or moisture. The product must not be exposed to dripping
splashing and no object filled with liquids should be placed on the product.
Caution:
Changes or modifications not expressly approved by the manufacturer could void the user’s
authority to operate this device.
Caution:
Usage of controls or adjustments or herein may result in hazardous exposure.
Refer all servicing to qualified service personnel.
Caution:
To reduce the risk of fire or electrical shock.No fire sources such as candles should be
placed on the products.

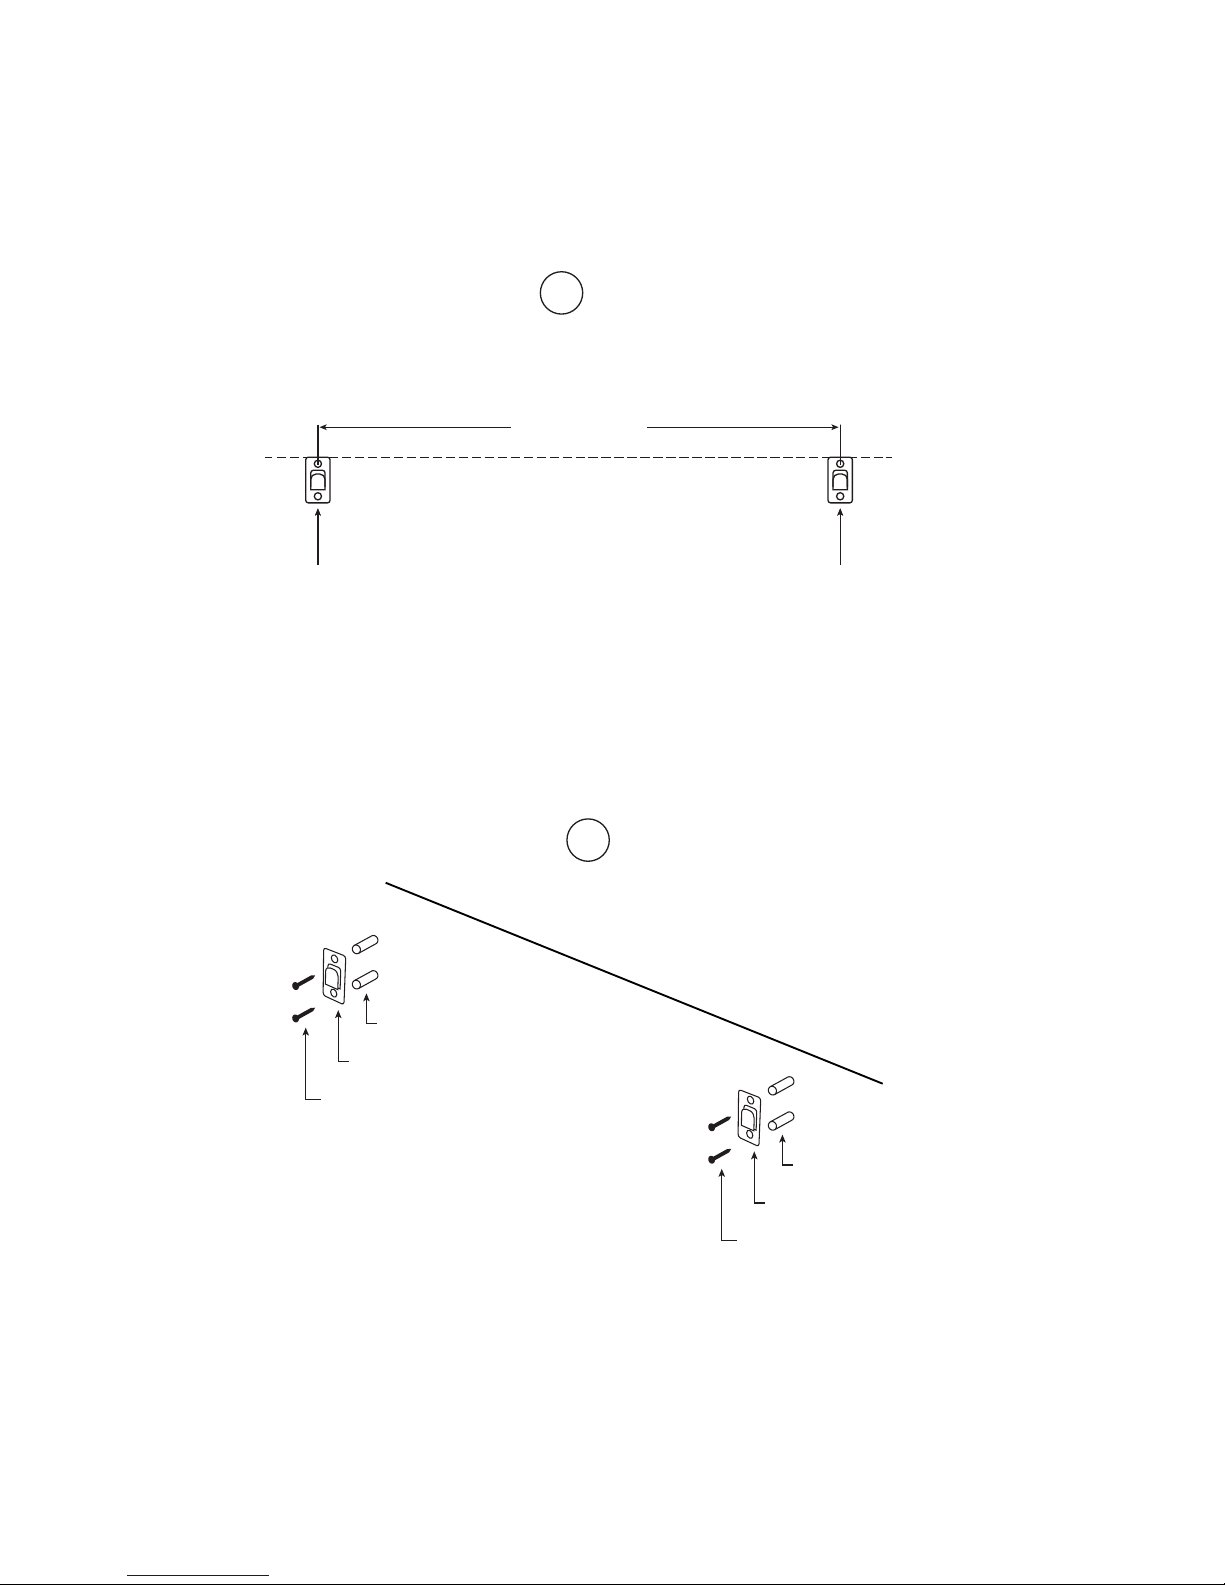
MOUNTING
1. Follow the figure 1 above to determine the positions where the screws should be mounted.
Make sure the two brackets are mounted in the same level.
2. Insert the fixing plugs into the screw holes and insert screws to fix the metal bracket onto the
wall.
2
1
734 mm
+/- 3 mm
Metal Bracket Metal Bracket
2
Metal Bracket
Metal Bracket
Fixing Plug
Screw
Wall
Fixing Plug
Screw

3. Hang the unit on the wall
Note:
The gap between the metal bracket and plastic mounting holder on the rear of the unit is designed
for simple mounting, which will make the unit movable.
3
3
Unit
Wall
Metal Bracket

PRODUCT OVERVIEW
Front View
1. LCD Display 6. Remote Sensor
3. Tune- Button 8. Volume- Button
4. Tune+ Button 9. Speakers
Rear View
4
1
2
3
4
6
7
8
9
TUN- TUN+
VOL- VOL+
AUX IN 1
MODE
TUN- TUN+
VOL- VOL+
AUX IN 1
MODE
5
2. Standby/MODE Button
JackIN1
ANT
R
L
AUX 2
R
L
AUX IN2
DC IN
10 11 11 12
12.FM Antenna11.RCA Audio Input Jacks
10.DC IN Jack
5. AUX
Button7. Volume+

Remote Control
4. TUNE-Button 9. TREBLE- Button 15. Play/Pause Button
BATTERY INSTALLATION
- Before installation
Remove and discard the insulation tab.
-Replace battery for the remote control
1. Push and slide out the battery holder as Figure 1 below.
2. Replace the battery with a new CR2025 button cell with the polarity (+) side upward.
3. Slide into the battery holder.
Battery precautions
• Never recharge the batteries, apply heat to them or take them apart.
• Battery shall not be exposed to excessive heat such as sunshine, ire or the like.
• Do not throw the batteries in ire!
• Attention should be drawn to the environmental aspects of battery disposal.
• If the remote control is not going to be used for a long time, remove the battery
to avoid damage caused by battery leakage corrosion.
5
2
3
5
7VOL+
FM SCAN
TUN-
M+ EQ
VOL-
BASS- BASS+
TREBLE-
TREBLE+
TUN+
8
9
4
6
1
10
11
12
13
14
16
15
CLOCK
MO/ST
MODE
Button on Button6. EQ Butt1.MODE
2. Standby Button 7. VOL-(Volume-) Button 13. VOL+ (Volume+) Button
5. M+(Memory+) Button 10. Mute Button 16. TREBLE+ Button
11. TUNE+ Button
12. CLOCK/MO/ST
3. FM SCAN Button 8. BASS- Button 14. BASS+ Button

POWER CONTROL
- To turn the unit on
·
·Press STANDBY button to turn on the unit.
- To turn the unit off
·Press STANDBY button on the remote control or hold STANDBY button in the front of the unit.
NOTE:
If the unit is not used for a long period of time, disconnect the power adapter.
TIME SETTING
1. Place the unit to standby mode.
2. Hold CLOCK/MO/ST button on the remote control until the hour digit flashes.
3.Then press TUNE+ or TUNE- button on the unit or remote control to adjust the hour.
4. Press CLOCK/MO/ST button on the remote control to confirm the hour setting and the minute
digit will flash.
5. Then press TUNE+ or TUNE- button on the unit or remote control to adjust the minute.
6. Press CLOCK/MO/ST button on the remote control to confirm the minute setting.
FM RADIO
display.
- Search and store the stations
1. Hold TUNE+ or TUNE- button to search stations forward or backward. The unit will stop if a
station is found. Then press FM SCAN button, “CH XX” will flash and then use M+ button to
select the place you want the station stored to. Press FM SCAN button to confirm. Or
2. Hold FM SCAN button then release the unit will search and store the stations automatically.
- Listen to the preset stations
PressM+buttonrepeatedlytoselectthedesiredpresetstationstolistento.
NOTE:
If the received FM stations are in stereo mode, the unit will play in stereo mode automatically.If
reception is weak, press the CLOCK/MO/ST button to turn the unit to mono mode. Press again to
turn to stereo mode again.
6
MODE
Power on the unit and press button repeatedly until the FM frequency appears on the
Connect the supplied power adapter.

AUX IN
- AUX IN source may include:
·Personal audio players
·Personal computers or laptops
- AUX IN connection:
1. Connect a stereo 3.5mm jack cable (supplied) between the headphone or LINE/Audio output of
Set your personal audio player/computer to play.
NOTE: If there is no sound or if the volume is not loud enough, you may increase the setting on
the source.
- During playback
·Press MUTE button to turn off the sound. Press again to resume the sound.
·Press VOLUME+/- buttons to adjust the volume level.
·Press BASS+/- buttons to adjust bass level.
·Press TREBLE+/-buttons to adjust treble level.
·Press EQ button to switch between POP/JAZZ/CLASSIC/ROCK/NORMAL.
7
MODE2. Power on the unit and press button repeatedly until "AUX1" appears on the display.
the personal audio player and the jack on the front of the unit.AUX IN1
POWER
RESET
Computer
MP3
Supplied audio
connection cable To AUX IN 1 Jack
Connect to the output
socket of external
audio devices (MP3,
Computer,ext.)
on the unit
TUN- TUN + VOL- VOL +
AUX IN 1
MODE

·TV/DVD/VCR
NOTE:
- During playback
·Press MUTE button to turn off the sound. Press again to resume the sound.
·Press VOLUME+/- buttons to adjust the volume level.
·Press BASS+/- buttons to adjust bass level.
·Press TREBLE+/-buttons to adjust treble level.
·Press EQ button to switch between POP/JAZZ/CLASSIC/ROCK/NORMAL.
8
RCA AUX IN
-RCA AUX IN sources may include
-RCA AUX IN connection
2. Press MODE button repeatedly until or
appears on the display.
AUX IN1 jack in the front of the unit.
1
or jack on the rear of the unit.
1 connection, make sure the AUX IN cable is not inserted into the
AUX 2
"AUX1" (for connection) (forAUX "AUX 2" AUX 21
connection)
R
L
AUX 2
R
L
AUX 1
AUX 2
White
Red
Before AUX
1.Connect the RCA audio cable (supplied) to the audio output jack on DVD player and AUX

BLUETOOTH
- Paring:
2. Turn off the Bluetooth functionality of other devices that are paired with your unit.
3. Turn on Bluetooth functionality on your Bluetooth device. Typically, Bluetooth controls are
found on the device’s tools or settings menu (see your user manual).Turn on Bluetooth
connectivity and make your device “discoverable”.
4. Clean out the paring list on your Bluetooth device.
5. Choose “add a new Bluetooth device”or “setup Bluetooth device”on your device. It will start to
please enter 0000. If the pairing attempt fails or times out, please start pairing procedure again.
- During playback:
Make sure the Bluetooth connection between the unit and the device is activated.
·Press PLAY/PAUSE button to suspend momentarily the playing track. Press again to resume
playing.
·PressTUNE+buttontoskipforwardtothenexttrackandTUNE-buttontoskipbackwardtothe
previous track.
·Press MUTE button to turn off the sound. Press again to resume the sound.
·Press VOLUME+/- buttons to adjust the volume level.
·Press BASS+/- buttons to adjust bass level.
·Press TREBLE+/-buttons to adjust treble level.
·Press EQ button to switch between POP/JAZZ/CLASSIC/ROCK/NORMAL.
9
1.Press MODE button repeatedly until "BT" appears on the display.
search. Once “PROSCAN” shows on your device, select it. If your device prompts you for a pass
code,
6. After your device and the have connected each other “Du” sound can be heard., a
“PROSCAN”

SPECIFICATIONS
Power source of the remote control................................................ DC 3V, 1x CR 2025 button cell
Audio output........................................................................................................................ 10W x 2
Power consumption....................................................................................................................25W
Bluetooth working range............................................................................................................10M
FM coverage............................................................................................................ 87.5-108.0MHz
ACCESSORIES
1 x Instruction manual
1 x Remote control
1 x Stereo audio connection cable with 3.5mm stereo plug
1 x RCA audio cable
2 x Wall-mount metal brackets
4 x Screws
10
Output of the power adapter....................................................................................... .DC 16V 1.8A
1 x Power adapter

MANUEL DU PROPRIÉTAIRE
Modèle:
VEUILLEZ LIRE AVANT DE FAIRE FONCTIONNER CET APPAREIL.
37" BARRE DE SON
PSB3713-B

1
CONSIGNES DE SÉCURITÉ
1. Lisez cette notice d’utilisation.
2. Conservez cette notice d'utilisation.
3. Prenez en compte tous les avertissements.
4. Respectez toutes les consignes.
5. N’utilisez pas cet appareil près d’un endroit où il y a de l’eau.
6. Nettoyez l’appareil exclusivement avec un chiffon légèrement humidifié.
7. Ne bouchez aucun orifice de ventilation du produit.
8. Installez l’appareil en respectant les instructions du fabricant.
9. Ne placez pas et n'utilisez pas l’appareil près d’une source de chaleur, par exemple un radiateur,
un réchaud ou un autre appareil produisant de la chaleur.
10. Débranchez l’appareil quand il y a un orage et avant toute période d’inutilisation prolongée.
11. Faites systématiquement réviser le produit s’il a été endommagé de quelque manière que ce soit,
par exemple si son cordon d’alimentation ou sa fiche est endommagé, si du liquide a été
renversé sur l’appareil, si des objets sont tombés dessus, s’il ne fonctionne plus correctement, ou
s’il est tombé.
Avertissement :
N’exposez pas cet appareil à la pluie ou à l’humidité. L’appareil ne doit pas être exposé à des gouttes
ni à des éclaboussures et aucun objet contenant un liquide ne doit être placé dessus.
Attention :
Tout changement ou modification non expressément approuvé par le fabricant peut annuler la
garantie et l’autorisation faite à l’utilisateur d’utiliser cet appareil.
Attention :
L’utilisation de commandes ou la réalisation de réglages non décrits dans cette notice d'utilisation
peut engendrer des situations dangereuses. Pour toutes les réparations, faites appel à un réparateur
qualifié.
Attention :
Afin de réduire les risques d’incendie et de choc électrique, ne mettez pas de source de flamme nue,
par exemple une bougie, sur l’appareil.
2
INSTALLATION
Mur
1. Déterminez l’emplacement des vis dans le mur à l’aide du schéma 1.
Veillez à fixer les deux supports au même niveau.
2. Insérez les chevilles dans les trous, puis insérez les vis pour fixer les supports contre le mur.
1
734 mm
+/- 3 mm
2
Mur
Support métallique
Support métallique
Vis
Chevilles
Chevilles
Support métallique
Support métallique
Vis

3
Appareil
3. Accrochez l’appareil au mur.
Remarque :
L’espace entre les supports métalliques et le support de fixation en plastique au dos de l’appareil est
conçu pour faciliter l’installation et permettre de désinstaller l’appareil du mur.
3
Mur
Support mural

4
DESCRIPTION DU PRODUIT
Vue avant
1. Écran LCD6. Capteur infrarouge
2. Touche VEILLE/MODE7. Touche VOLUME +
3. Touche FRÉQUENCE -8. Touche VOLUME -
4. Touche FRÉQUENCE +9. Haut-parleurs
5. Entrée AUX IN 1
Vue arrière
10. Prise d’alimentation
(DC IN) 11. Entrées Audio RCA 12. Antenne FM
1
2
3
4
6
7
8
9
TUN- TUN+
VOL- VOL+
AUX IN 1
MODE
TUN- TUN+ VOL- VOL+
AUX IN 1
MODE
5
ANT
R
L
AUX 2
R
L
AUX IN2
DC IN
A1212090750000001
S/N:A1 2 1 2 0 9 0 7 5 0 0 0 0 0 0 0 1
10 11 11 12

5
Télécommande
1. Touche MODE6. Touche EQ (Égaliseur)12. Touche CLOCK/MO/ST
(Heure/Mo/St)
2. Touche VEILLE7. Touche VOL- (Volume)13. Touche VOL+ (Volume)
3. Touche FM SCAN8. Touche BASS- (Basses)14. Touche BASS+ (Basses)
4. Touche TUNE-
(Fréquence)9. Touche TREBLE- (Aigus) 15. Touche
LECTURE/PAUSE
5. Touche M+ (Mémoire+)10. Touche MUTE (Sourdine) 16. Touche TREBLE+
(Aigus)
11. Touche TUNE+
(Fréquence)
INSTALLATION DE LA PILE
-Avant l’installation
Retirez et jetez la languette isolante.
-Insérer une pile dans la télécommande
1. Appuyez sur le porte-pile et faites-le glisser vers l’extérieur (Image 1 ci-dessous).
2. Remplacez la pile avec une pile bouton CR2025 neuve en veillant à placer son côté (+) vers le
haut.
3. Réinsérez le porte-pile.
Précautions concernant la pile
•Ne rechargez jamais les piles, ne les exposez jamais à de la chaleur et ne les démontez pas.
•Les piles ne doivent pas être exposées à une chaleur excessive, par exemple à la lumière du
soleil, une flamme, etc.
•Ne jetez pas les piles dans un feu !
•Soyez attentif à l’impact environnemental de la mise au rebut des piles.
•Avant toute période d’inutilisation de la télécommande, retirez-en la pile pour
éviter que la télécommande ne soit détériorée si la pile se met à fuir.
2
3
5
7VOL+
FM SCAN
TUN-
M+ EQ
VOL-
BASS- BASS+
TREBLE-
TREBLE+
TUN+
8
9
4
6
1
10
11
12
13
14
16
15
CLOCK
MO/ST
MODE

6
ALLUMER/ÉTEINDRE L'APPAREIL
-Allumer l’appareil
·Branchez l’adaptateur secteur fourni.
·Appuyez sur la touche VEILLE pour allumer l'appareil.
-Éteindre l'appareil
·Appuyez sur la touche VEILLE de la télécommande ou appuyez longuement sur la touche
VEILLE du panneau avant de l’appareil.
REMARQUE :
Avant toute période d'inutilisation prolongée de l'appareil, débranchez l’adaptateur secteur.
RÉGLER L’HEURE
1. Mettez l’appareil en veille.
2. Appuyez sur la touche CLOCK/MO/ST de la télécommande jusqu’à ce que les chiffres des
heures se mettent à clignoter.
3. Puis réglez les chiffres des heures avec les touches TUNE+ et TUNE- de la télécommande.
4. Appuyez sur la touche CLOCK/MO/ST de la télécommande jusqu’à ce que les chiffres des
minutes se mettent à clignoter.
5. Puis réglez les chiffres des minutes avec les touches TUNE+ et TUNE- de la télécommande.
6. Appuyez sur la touche CLOCK/MO/ST de la télécommande pour confirmer le réglage des
minutes.
RADIO FM
Allumez l’appareil, puis appuyez plusieurs fois sur la touche MODE jusqu'à ce qu'une fréquence
radio FM s'affiche.
-Chercher et prérégler des stations de radio
1. Maintenez la touche TUNE+ ou TUNE- appuyée pour lancer la recherche automatique de la
station suivante ou précédente. L’appareil s’arrête quand il a trouvé une station. Puis appuyez
sur la touche FM SCAN, « CH XX » clignote à l’écran. Sélectionnez un numéro de mémoire
auquel affecter cette station de radio avec la touche M+. Appuyez sur la touche FM SCAN
pour confirmer. Ou
2. Maintenez la touche FM SCAN appuyée, puis relâchez-la pour que l’appareil recherche et
enregistre automatiquement les stations de radio.
-Écouter les stations préréglées
Appuyez plusieurs fois sur la touche M+ pour sélectionner la station préréglée que vous voulez
écouter.
REMARQUE :
Quand une station FM est reçue dans le mode stéréo, l’appareil la diffuse automatiquement dans le
mode stéréo. Si la réception est mauvaise, appuyez sur la touche CLOCK/MO/ST pour basculer
dans le mode mono. Appuyez à nouveau sur cette touche pour repasser dans le mode stéréo.

7
ENTRÉE AUX IN
-L’entréeAUX IN vous permet de brancher les sources audio externes suivantes :
•Lecteur audio portable
•Ordinateur portable ou de bureau
-Branchement de l’entréeAUX IN :
1. Branchez la fiche 3,5 mm d’un câble audio (fourni) dans la prise écouteurs ou la sortie
audio/ligne d’un lecteur audio portable et dans l’entrée AUX IN 1 du panneau avant de
l’appareil.
2. Allumez l’appareil, puis appuyez plusieurs fois sur la touche MODE jusqu'à ce que
« AUX1 » s’affiche à l’écran. Lancez la lecture sur la source audio externe branchée
(lecteur audio portable, ordinateur, etc.).
REMARQUE : S’il n’y a pas de son ou si le son est trop faible, montez le volume de la source audio
externe.
(lecteur MP3, ordinateur, etc.)
l’entrée AUX IN 1 de l’enceinte
-Pendant la lecture
·Appuyez sur la touche MUTE pour couper le son. Appuyez à nouveau sur cette touche pour
réactiver le son.
·Réglez le volume avec les touches VOLUME+/-.
·Réglez les basses avec les touches BASS+/-.
·Réglez les aigus avec les touches TREBLE+/-.
·Appuyez sur la touche EQ pour sélectionner l’un des préréglages de l’égaliseur :
POP/JAZZ/CLASSIQUE/ROCK/NORMAL.
POWER
RESET
MP3
TUN- TUN + VOL- VOL +
AUX IN 1
MODE
Ordinateur
Câble de branchement audio fourni Vers
Vers la sortie audio d'un appareil
audio externe

8
ENTRÉE AUX RCA
-L’entréeAUX IN RCAvous permet de brancher les sources audio externes suivantes :
·Téléviseur/Lecteur DVD/Magnétoscope
-Branchement de l’entréeAUX IN RCA
1. Branchez le câble audio RCA (fourni) dans la sortie audio d’un lecteur DVD et dans l’entrée
AUX 1 ou AUX 2 présente au dos de l’enceinte.
2. Appuyez plusieurs fois sur la touche MODE jusqu’à ce que « AUX1 » (branchement dans
l’entrée AUX 1) ou « AUX2 » (branchement dans AUX 2) s’affiche à l’écran.
REMARQUE : Avant de brancher une source audio externe à l’entrée AUX IN 1, vérifiez que le
câble AUX IN n’est pas branché dans l’entrée AUX 1 du panneau avant de l’enceinte.
Sorties audio d’un Téléviseur/Lecteur
DVD/Magnétoscope
Blanc
Rouge
-Pendant la lecture
·Appuyez sur la touche MUTE pour couper le son. Appuyez à nouveau sur cette touche pour
réactiver le son.
·Réglez le volume avec les touches VOLUME+/-.
·Réglez les basses avec les touches BASS+/-.
·Réglez les aigus avec les touches TREBLE+/-.
·Appuyez sur la touche EQ pour sélectionner l’un des préréglages de l’égaliseur :
POP/JAZZ/CLASSIQUE/ROCK/NORMAL.
R
L
AUX 2
R
L
AUX 1
AUX 2
Table of contents
Languages:
Other ProScan Speakers System manuals


