ProsKit FB-1688 User manual

FB-1688 Fiber Cleaver
FB-1688C Fiber Cleaver with Scrap Collector
User’s Manual
1st Edition,2022
© 2022 Prokit’s Industries Co., Ltd

2
Thanks for buying PRO’SKIT FB-1688 Fiber Cleaver. Please read
these instructions carefully before using the product.
This product has been designed and manufactured to assure
personal safety.
Improper use can result in bodily injury and serious damage to fiber
cleaver.
Please read and observe all warning instructions given in this
operation manual.
1. Do not disassemble or lubricate any parts of cleaver. Doing so
could cause serious damage to the cleaver.
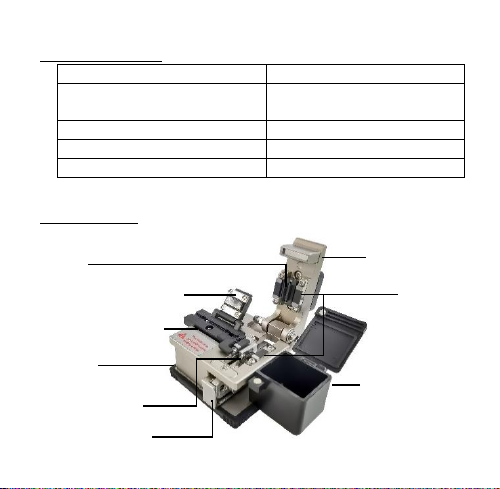
2. The FB-1688 is a precision tool. Do not impact the cleaver by
hitting or dropping it. Doing so may cause personal injury and
loss of cleaving performance.
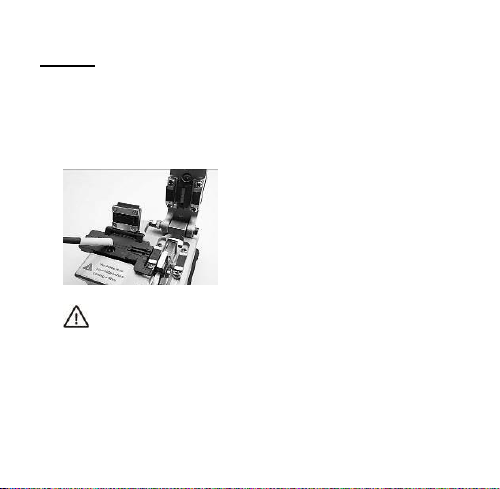
3. Glass fiber fragments are extremely sharp. Handle with care.
Wear safety glasses at all time during cleaving operation for
protection from glass fiber.
4. Dispose of glass fiber fragments properly.
5. The blade of cleaver is extremely sharp. Do not touch it with
bare hands.
6. Do not impact the clamp cover. Doing so could cause damage
to cleaver and loss of cleaver performance.
7. If cleaver is damage or problem occurs, please contact our
maintenance service center.

3
SPECIFICATION
Cladding Diameter
125μm
Fiber Count Coating Diameter
Single fiber 250μm / 900μm /
3mm & Drop cable
Cleaver length
5-20mm
Dimensions
62 x 60 x 56 mm
Cleaver Blade (5FB-1688-BLADE)
24 points
STRUCTURE
Fiber mat
Lid of the fiber holder
Clamp Cover
4 in 1 fiber holder
Scrap Collector
(#FB-1688C only)
Body
Block
Cutting blade
carriage
Blade carriage

4
4 in 1 FIBER HOLDER
4 in 1 fiber holder for 250μm, 900μm, 3mm and drop cable.
OPERATING PROCEDURE
1. Open the clamp cover and lid of the fiber holder. Please make
sure the blade carriage should be auto in the forward position.

5
2. Insert the fiber cable into the correct groove with the end of the
fiber coating.
3. Close the lid of the fiber holder and clamp cover.
4. Slide the blade carriage to rear side of the cleaver. The fiber will
be cleaved.

6
5. Open the clamp cover. Then open the lid of fiber holder and lift
the newly cleaver fiber. Lift the off-cut and dispose it properly.
6. For single fiber 250μm~900μm
7. For single fiber 3mm (patch cord)

7
8. For drop cable
Notice:
While cutting 3.0mm patch cord or 3x2mm drop cable, temporarily
store the groove in the bottom of the fiber holder.

8
CLEAN
To keep the cleaving quality at the beat performance, please clean the
fiber cleaver after each use. Using a cotton swab moistened with
isopropyl alcohol to clean the blade edge, the rubber pad of the clamp
and anvil, the fiber holder and the grooves.
CAUTION
Dust on the blade edge or clamp might cause loss of
cleaving performance or poor quality of fiber end face.
Do not clean them with any other kind of chemicals.
If the clamp cover is closed leaving an off-cut fiber on the
clamp, the rubber pad of clamp will have a trace of fiber,
causing loss of cleaving performance or poor quality of fiber
end face.

9
BLADE POSITION CHANGE
As the number of the cleaving increases, a symptom that fiber cannot
be cleaved or cracks will be occurred. If such symptom continues
appearing which means the cutting edge is worn out. Rotate the blade
according to the following procedures and use a new cutting position.
[Reference] 2,000 cleaves per position
1. Loosen the blade set screw. (circle mark)
2. Rotate the blade to the next position by pressing its side or edge
with cotton swab.
Rotate the blade in the direction indicated by the arrow.

10
CAUTION
Do not rotate the blade with hands.
Do not rotate the blade with metallic tweezers. Doing so
may damage the blade.
3. Tighten the blade set screw.
4. Try and cleave the fiber. Make visual check of the fiber end
face with splicer. If the fiber end face is poor, adjust the blade
height. (Refer to “blade height adjustment)
BLADE HEIGHT ADJUSTMENT
1. Loosen 2 hex screws(circle mark) with the attached hex. key
2. Turning the blade height adjustment slot screw(circle mark)
3. Tighten 2 hex screws(circle mark) with the attached hex key.

11
4. Cut fiber for testing the performance of cleaver, if not qualify
adjust the blade again until the optimal quality.
BLADE REPLACEMENT
1.Unscrew the blade set screw. (circle mark)
2.Remove the blade with tweezers.

12
CAUTION
The edge of a blade is manufactured precisely. If the edge is hit
against metallic object, it may crack or result in poor cleaving
performance. Handle with care.
When using metallic tweezers, be careful not to damage the blade.
Do not touch the blade with hands. Use gloves.
Dispose of old blade properly.
3. Insert a new blade in the cleaver so that “0” of the number is in the
top position. The hole of blade should be aligned with the hole of
blade receptacle.
4. Tighten the blade set screw completely.
5. Adjust the blade height, referring to “ blade height adjustment”

13
TROUBLESHOOTING
If the cleaving problem occurs, the followings are possible causes.
Situation
Solution
The fiber is placed obliquely in
cleaver.
Make sure that the fiber is placed
straight in the cleaver
The blade position is too high.
Adjust the blade height.
Dust or dirt remains on the
clamp.
Clean the clamp
Dust or dirt remains on the
blade.
Clean the blade.
Dust or dirt remains on the
fiber.
Remove the fiber coating and
clean the fiber.

14
FB-1688/FB-1688C 使用說明
感謝您購買和使用 PRO’SKIT FB-1688 光纖切斷刀,使用前
請仔細閱讀說明書,閱讀後請妥善保存,以備查閱。
使用方法和安全操作規則
1. 請不要自行拆解本產品,以免造成產品損壞
2. 切勿猛烈撞擊切割刀或跌落,以免成產品損壞或是影響切割
的精度
3. 使用時請戴手套以避免被刀片或是光纖的利角割傷
3. 切勿弄濕切割刀。
4. 切勿把切割刀放在潮濕或佈滿灰塵的地方。
5. 常溫下保存以免高溫引起變形。
6. 裸光纖留長約 12mm。

15
規格
裸光纖尺寸
125μm
適合光纖披覆外徑及光纖
線材
單芯 250μm & 900μm,
Φ3mm 光纖,3x2mm 皮線光纖
光纖切割長度
5-20mm
產品尺寸
62 x 60 x 56 mm
切割刀片 (5FB-1688-BLADE)
24 點
光纖夾具說明
本產品配置的夾具為四合一夾具,通過專門設計的可拆卸導向槽,
夾具適合 Φ0.2mm 及Φ0.9mm 裸光纖以及 Φ3mm 光纖線和
3x2mm 皮線使用

16
產品說明
集屑槽
(僅FB-1688C)
蓋板
光纖壓墊
切割滑塊
壓線板
4合1光纖夾具
刀體
枕塊
切割刀片

17
操作步驟
1. 打開壓纖板及蓋板,切割滑塊會自動推至前端(如圖)
2. 將剝除好塗覆層的裸光纖放置於夾具內(250μm /
900μm/Φ3mm 光纖線/3x2mm 皮線), 根據使用者需要
確定好切割長度。按下合上壓纖板及蓋板固定光纖。

18
3. 關上蓋板後確保光纖處於水準線上。
4. 切割滑塊一次性向後推動,完成切割。
5. 打開蓋板及壓纖板,取出光纖;光纖取出後光纖端面請勿
接觸任何物體,以免損壞光纖。

19
6. Φ0.2mm~ Φ0.9mm 裸光纖切割使用
7. Φ3mm 光纖跳線, 使用時將內部適合裸光纖線的導向槽
取出
8. 3x2mm 皮線光纖
使用時將內部適合裸光纖線的導向槽取出

20
請注意:
切割 3.0mm 尾纖或 3x2mm 皮線時,請將導向槽取出後收納於夾
具底部
清潔
1. 切割完成後,請清理切割後的斷纖,用棉花棒沾酒精清
潔壓纖板上的污垢,切勿用丙酮或或有腐蝕性的溶劑清
理壓纖板。切勿損壞刀片,以備日後使用。
This manual suits for next models
1
Table of contents
Other ProsKit Cutter manuals