Prunus J-401 User manual

EN

PREFACE
Thank you for purchasing PRUNUS J-401 digital radio. In
order to get the best from the radio please read this
manual carefully before using it and take special notice of
the section on precautions.
PRUNUS J-401 AM/FM/SW Digital Radio User Manual

ⅣHOW TO USE
4
5-7
5
6-7
1. Product Specifications
2. Functional Components
8
8
1. Battery Installation
2. Charging Method
8
9
10-12
13
14-15
16-18
19
1. Radio Settings
2. Radio Reception
3. Save and Delete the Channel Manually
4. Two Ways of Music Playing
5. Recording Function
6. Other Functions
9-19
20
ⅠPRECAUTIONS
ⅡPRODUCT INTRODUCTION
ⅢPOWER SUPPLY
ⅤAFTER-SALE SERVICE

1. You’re supposed to long press the power switch to turn
the radio on or off. However, given that during the setting,
the sudden shutdown will cause the loss of the data you
have set, so we have thoughtfully made a design that in
radio system and MP3 playback setting, the radio cannot
be turned off. Also, please don't take the battery out with
the radio on.
2. As long-distance transport may cause the battery to run
out automatically, please charge the radio if it does not
respond when you first turn it on.
3. Original lithium battery is recommended.
4. Please take the lithium battery out if you plan to not use
the radio for a long time, and charge it once a month.
5. Don’t get the radio wet or use it in a moist environ-
ment. E.g. Keep it out of rain and use carefully in
bathrooms and kitchens.
6. Keep the radio away from sources of heat such as
radiators, hot water pipes or fires. And do not leave it in
full sun.
7. Keep the radio away from any solvents, such as white
spirit, paraffin or petrol.
ⅠPRECAUTIONS

ⅡPRODUCT INTRODUCTION
1) Mode No: J-401
2) Memory Support of Recording&MP3 Playback:
TF Card (Up to 32G)
3) Screen Resolution: 128 x 64dpi
4) Audio Format: MP3, WMA
5) Band: AM: 520 - 1710KHz; FM: 87 – 108MHz;
SW: 4.75 – 21.85MHz
6) Number of Radio Stations Stored: AM: 60; FM: 80; SW: 100
7) Earphone Output: Standard 3.5mm Stereo
8) Audio Input: Standard 3.5mm Double Channels
9) Power: 2W
10) Lithium Battery: BL – 5C (1200mAh)
11) Dimension: 135*31*80mm
12) Weight: 170g(radio) + 21g(battery)
13) Package Included:
Radio*1, Rechargeable Li-ion Battery*1, USB Charging Cable*1,
AUX Cable*1, User Manual*1
1. Product Specifications

1) Mode No: J-401
2) Memory Support of Recording&MP3 Playback:
TF Card (Up to 32G)
3) Screen Resolution: 128 x 64dpi
4) Audio Format: MP3, WMA
5) Band: AM: 520 - 1710KHz; FM: 87 – 108MHz;
SW: 4.75 – 21.85MHz
6) Number of Radio Stations Stored: AM: 60; FM: 80; SW: 100
7) Earphone Output: Standard 3.5mm Stereo
8) Audio Input: Standard 3.5mm Double Channels
9) Power: 2W
10) Lithium Battery: BL – 5C (1200mAh)
11) Dimension: 135*31*80mm
12) Weight: 170g(radio) + 21g(battery)
13) Package Included:
Radio*1, Rechargeable Li-ion Battery*1, USB Charging Cable*1,
AUX Cable*1, User Manual*1
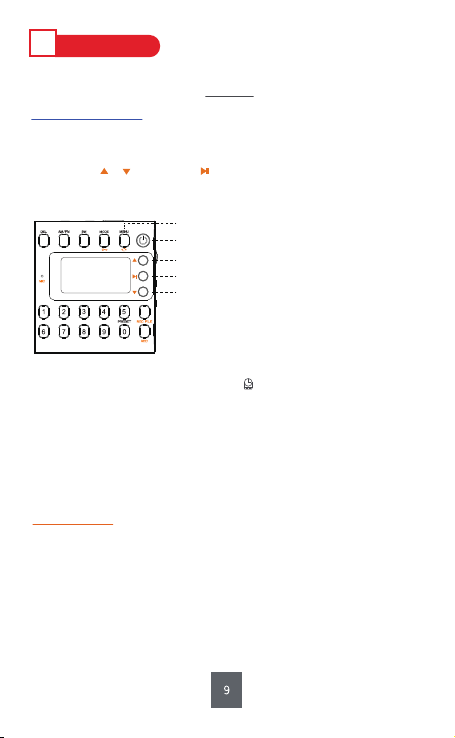
2. Functional Components
Front:
Top:
Back:
Right:
①
②③④
⑧
⑨
⑩⑪
⑬⑭
⑮
⑫
⑦
⑥ ⑤
㉑㉒㉓
㉔
J-401 AM FM SW Digital Radio
FM:87-108MHz
SW:4.75-21.45MHz
Three Recording Way
MP3 Music Playing
AM:520-1710KHz
㉕
⑳
⑱
⑲
⑰
⑯

① ON/OFF
② MENU
③ MODE/Lock Button
④ SW
⑤ AM/FM
⑥ DEL: Delete
⑦ Next
⑧ Play/Pause/Scan/Confirm
⑨ Previous
⑩ PRESET/Number Button 5
⑪ REC FILE: Recording File
⑫ REC: Recording
⑬ Number Buttons 0-9
⑭ MIC: Microphone
⑮ Speaker
⑯ Lanyard
⑰ Volume Knob
⑱ M+: Memo+
⑲ M-: Memo-
⑳ DC 5V Charging Jack
㉑TF-CARD
㉒AUX
㉓EAR: Earphone Jack
㉔Telescopic Antenna
㉕Battery Bin

ⅢPOWER SUPPLY
⑳ DC5V Charging Jack
Micro USB Cable
1. Battery Installation
Open the battery compartment cover. Then follow the electrode marks
inside to install the battery. Finally, replace the cover.
2. Charging Method
Low battery will affect the use of radio functions and its ability to search
channels. Please charge the radio when the battery icon " " flashes on
the screen.
Tips :
a. Please charge the battery for 6 hours on the first charge. After that, please charge it
for 4 hours.
b. To protect the radio, please charge the radio with standard DC5V/0.5-2A charger
(or other devices that can supply this type of power).
c. Usually, please charge the radio with the radio off. When charging, the battery icon
“ ” will flash on the display; in contrast, it will not flash when fully charged.
Once fully charged, it’s recommended to continue charging for 1-2 hours to
ensure the max power of the battery.
d. If an adapter is important for you, please send message “PRUNUS Charger” to
E-mail: [email protected] (reply in 1 working day) to get PRUNUS quality
charger with indicator at 60% discount.
A
BL-5C
Electrode marks
Opening
Long press <①ON/OFF> to turn the radio on.
(For convenience,please set your language first.)
ⅣHOW TO USE
① Long press: ON/OFF
② Long press: Setting Interface
⑧ Confirm
⑨ Previous
⑦ Next
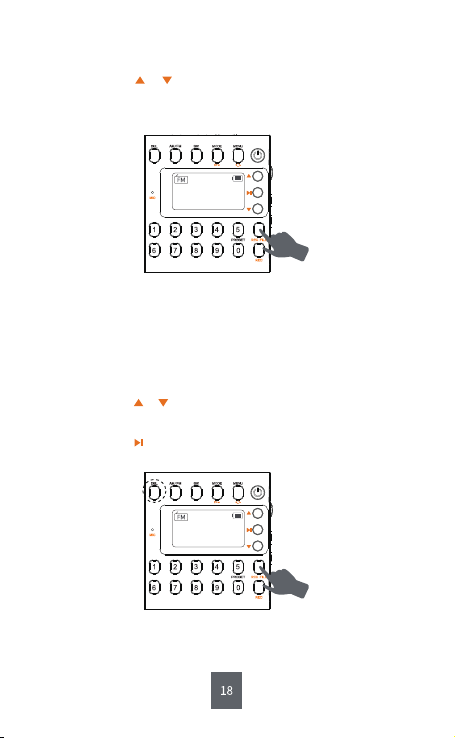
1. Radio Settings
1) Auto Off
Once the setting is finished, a clock icon will appear on the display,which
means the radio is counting down. Setting the time to 0 min or turning off
the radio will cancel the setting of Auto Off.
2) Contrast
Level of screen contrast: 1-15.
3) Backlight Time
Light Always, 5S , 10S , 15S , 20S, Light Off.
4) Language
简体中文(Chinese); English; 日本語(Japanese)
5) Record Set
Simple Record (64Kbs), Quality Record (96Kbs),
Super Record (128Kbs).
6) AM Stepping Set
9KHZ Stepping, 10KHZ Stepping. (Only in AM band can it be found in MENU;
In North America, the AM is 10KHz stepping, and Europe is 9KHz stepping;
The wrong AM stepping will affect the channel search. )
Step 1: Long press <②MENU> to setting interface.
(During setup, long pressing <②MENU> can back to menu homepage.)
Step 2: Press or to select, and to confirm.
(“Time and Contrast Setting” should be finished within 5s, otherwise,
the radio will back to the interface of radio listening.)
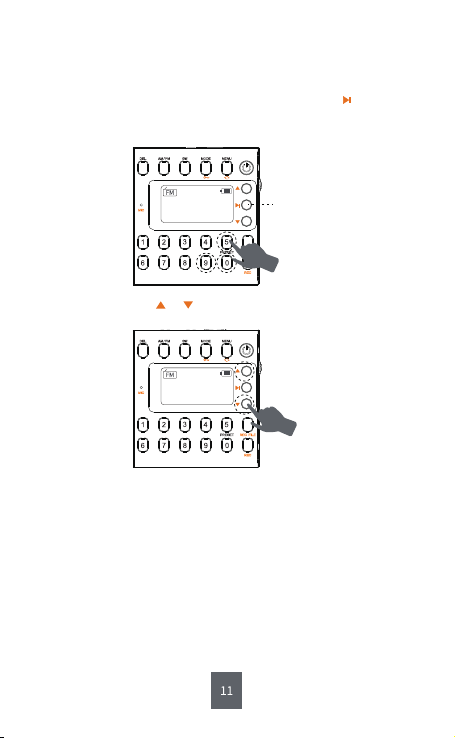
Step 1: Pull out the telescopic antenna.
Step 2: Short press <④SW> or <⑤AM/FM> to choose SW, AM or FM.
2. Radio Reception
A. Search with Button
Long press to automatically search, store and number the
channels. And the channels will be saved in an order as
“CH00”, “CH01”, “CH02” …
B. Search with Button and
Long press button or to search for the previous or next available
channel. When an available channel is detected, the radio will stop
searching and play the current channel automatically.
⑧ Full Search
⑨ Previous Search
⑦ Forward Search
1) How to Search the Channels Automatically?
⑱M+
⑲M-
Listen to the Stored Channels
B. Short press button or to search for channel.
A. Input the radio channel directly.
E.g. If the channel you want to listen to is 90.5MHz, then you could
press the number keys 9 + 0 + 5 in order and short press to confirm,
or wait for 5s, then the radio will automatically play the channel
90.5MHz.
2) How to Search the Channels Manually?
CH00
MHz
90.5
⑧ Confirm
CH00
MHz
90.5
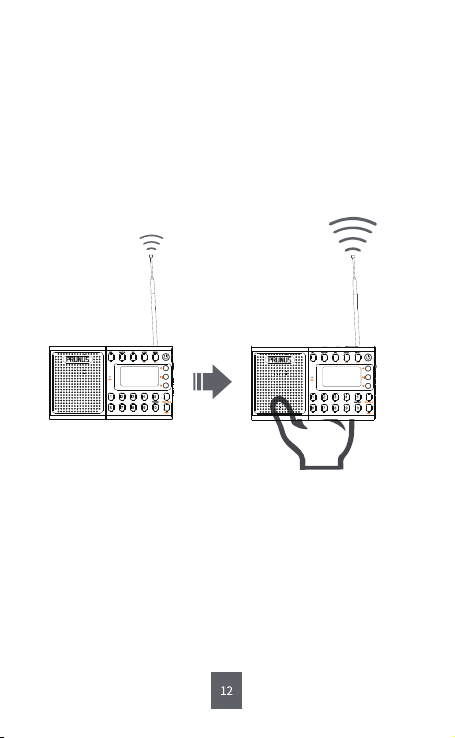
3) How to Get Better Reception?
A. Adjust the telescopic antenna while listening to FM/SW,
but reposition the radio while listening to AM.
B. When you’ re indoors, reposition the radio, or approach it to the
window and try to keep it away from the electronic devices, such
as computer, TVs, refrigerators, mobile phones, etc.
C. Hold the radio in hands, but the reception will be weak again
when your hands are away. This is a common phenomenon called
" Human Body Induction " among almost all the radios.
Telescopic
Antenna
Telescopic Antenna/
" Human Body Induction "
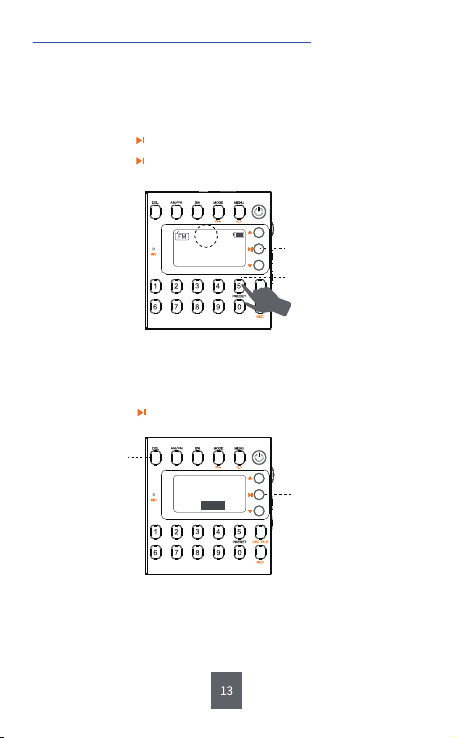
1) How Can I Save the Channel Manually?
Step1: Move to the channel you want to delete.
Step2: Long press <⑥DEL>.
Step3: Short press to confirm. Then the channel will be deleted
successfully.
2) How Can I Delete the Stored Channel Manually?
3. Save and Delete the Channel Manually
Tips :
a. Short press <⑰M+> or <⑱M-> to choose the stored channels you’d
like to listen to or the one you’d like to delete.
b. Every step above should be finished within 5s, otherwise, the radio
will back to the interface of radio listening.
CH10
MHz
90.5
⑩ Long press: PRESET
⑧ Short press: Confirm
Message
Delete station
OK
⑥ Long press: DEL
⑧ Short press: Confirm
Step1: Long press <⑩PRESET/Number Button 5> and “CH00” will
flash on the display.
Step2: Input the number you like, such as 10.
Step3: Short press to confirm.
Step4: Short press to confirm again. Then the channel named
CH10 is saved successfully.

㉑TF-CARD
Step1: Insert the TF card loaded with MP3 or WMA files into <㉑
TF-CARD>.If lyrics display is neccessary for you, then you should
insert the TF card loaded with both MP3/WMA files and LRC files.
Step2: Short press <③MODE> to play the music. In the meantime, the
display will show the song information simultaneously.
1) Played by TF Card
4. Two Ways of Music Playing
Tips :
a. Short press or to select the song you want to play. Long press to
fast forward or rewind down.
b. Short press to pause or play the music.
c. You could also input the serial number of the song directly to play the
music. And short press to confirm.
d.Short press <②MENU> to set the play mode. The different word under
the icon on the screen means different. “A” means All; “1” means
Repeat One; “F” means Repeat Folder; “R” means Random.
e. Long pressing can set the MP3/WMA playback. During setup, long
pressing can back to the homepage.
f. You can also switch the MP3/WMA playing to AM/FM/SW by short
pressing <⑤AM/FM > or <④SW>. Short pressing <③MODE> can back
to MP3/WMA playing.
MP3 LRC
TF
Song Lyric

Step1: Insert one end of the AUX cable into “AUX” jack of the radio and
the other end into the earphone jack of your mobile phone or
computer.
Step1: Open the music app/software on your phone to play the music.
2) Played by AUX
Tips :
You can also switch the AUX playing to AM/FM/SW by short pressing
<⑤AM/FM > or <④SW>. Short pressing <③MODE> can back to AUX
playing.
③④
⑤
㉒AUX

5. Recording Function
A TF card is required for sound recording. So please insert the TF card
into <⑳TF-CARD> first, and then start to make a recording.
1) How Can I Make a Recording?
A. Recording an External Sound
Step1: Short press <③MODE>.
Step2: Long press <⑫REC> to record the sound.
Step3: Short press <⑫REC> to finish the recording.
Warning:
A TF card loaded with MP3 file is required when recording
an external sound.
B. Recording with AUX
Step1: Connect the radio to your phone or computer with AUX cable.
Step2: Open the music app/software on your phone to play the music.
Step3: Long press <⑫REC> to record the sound.
Step4: Short press <⑫REC> to finish the recording.
00:00:01

C. Recording an AM/FM/SW Channel
Step1: Short press <⑤AM/FM > or <④SW> to “AM”, “FM” or “SW”.
Step2: Long press <⑫REC> to record the sound.
Step3: Short press <⑫REC> to finish the recording.
Tips :
a. In the process of recording, short press to pause the recording.
Pressing it again will resume the recording.
b. Once the recording is finished, the radio will automatically play
what you have recorded. And short pressing <⑤AM/FM > or <④SW>
directly can back to “AM”, “FM” or “SW”.
CH00
MHz
90.5
Step1: Short press < ⑪REC FILE >.
Step2: Short press or to choose the recording file you want to play.
Or input the serial number of the file directly and wait for 5s,
then the file will play automatically.
2) How Can I Get My Recording File?
Step1: Short press < ⑪REC FILE >.
Step2: Short press or to choose the recording file you want to delete.
Step3: Long press <⑥DEL: Delete >.
Step4: Short press to confirm. Then the recording file will be deleted
successfully.
3) How Can I Delete My Recording File?
Tips :
Short pressing <⑤AM/FM > or <④SW> directly can back to “AM”, “FM”
or “SW”.
Tips :
Short pressing <⑤AM/FM > or <④SW> directly can back to “AM”, “FM”
or “SW”.
CH00
MHz
90.5
CH00
MHz
90.5
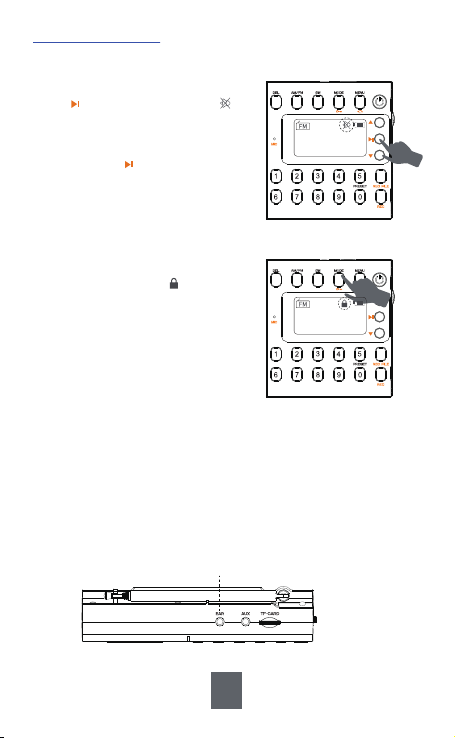
Long press <③MODE> to lock the other
buttons, then a lock icon will appear
on the display and other buttons can not
work until you long press this button
again to cancel the lock.
2) Lock Button
To not disturb others, you can listen to the radio with earphones.
1) Plug the earphones into earphone jack, and the radio will automati-
cally switch to earphone listening mode and the speaker will be muted.
2) When you pull out the earphones, the radio will back to speaker
mode. Please adjust the volume in time to fit the surrounding
environment and your own hearing need.
3) Earphones
1) Silent Mode
6. Other Functions
With the radio on, in any mode, short
press and then a silent icon will
flash on the display, which means the
radio has been muted.
Short pressing again will cancel the
silent mode.
CH00
MHz
90.5
CH00
MHz
90.5
㉓EAR: Earphone Jack
19
1. If the radio fails, please scan this QR code. Then click
“Ask a question” and log into Amazon to contact us.
We will provide you with the best service.
2. You can also send your messages to our customer
service e-mail: [email protected]
3. America Local Customer Support Number:
(805) 712-2661
US US CA CA
ⅤAFTER-SALE SERVICE
UK UK
20
Table of contents
Other Prunus Radio manuals

Prunus
Prunus J-777 User manual

Prunus
Prunus J-328 Mini User manual

Prunus
Prunus J-288 User manual

Prunus
Prunus J-180 User manual

Prunus
Prunus J-328 User manual

Prunus
Prunus J-777 User manual

Prunus
Prunus J-982 User manual

Prunus
Prunus R-818 User manual

Prunus
Prunus J-05 User manual

Prunus
Prunus J-166 User manual


