PSI Woodworking Products CML-DUP8 User manual

CML-DUPMAX
Mounted on a Commander Lathe
CML-DUPJ
Compatible with Jet & Delta Mini Lathes
CML-DUPU
Universal Duplicator
Scan for Video
Instructions
CML-DUP8
Universal Duplicator

PSI Woodworking Products Lathe Duplicator User’s Manual
2
Warranty
This product is warranted against defects in material and workmanship for a period of two years from the date of the purchase. The warranty applies to the
original purchaser of the product and is limited to the repair or replacement of the product or its components at the discretion of PSI Woodworking Prod-
ucts. Excluded are parts, which have been misused, abused, altered, or consumed by normal operation. Also, excluded are direct or consequential damages
to persons, properties, or materials. Your invoice serves as proof of purchase and must be referenced to authorize warranty repairs. Please call your dealer
for proper authorization prior to return.
PLEASE READ AND PRACTICE SAFE TURNING TECHNIQUES
Guidelines for Safe Turning
1. Always wear safety goggles or safety glasses and a full-face shield when needed. Use a dust mask in dusty working
conditions. Wear hearing protection during extended periods of operation.
2. Tie back long hair, do not wear gloves, loose clothing, jewelry or any dangling objects that may catch in rotating parts
or accessories.
3. Check the owner/operator’s manual for proper speed recommendations. Use slower speeds for larger diameter or rough
pieces, and increased speed for smaller diameters and pieces that are “true” or cylindrical. If the lathe is shaking or
vibrating, lower the speed. If the work piece vibrates, always stop the machine to check the reason.
4. Check that all clamping devises, such as on the tailstock and cutter holder are tight.
5. Rotate your work piece by hand to make sure it clears the template holder and bed before turning the lathe “on”. Be
sure that the work piece turns freely and is firmly mounted. Make adjustments with the lathe turned “off “.
6. Use only defect-free stock, without cracks, splits, checks or knots which could chip and fly out, causing serious injury.
7. Hold the cutter holder firmly on the tool rest.
8. Always move the cutter to the side before sanding or polishing.
9. Perform periodic maintenance on your lathe and duplicator. Keep cutter sharp. Check for damaged parts, alignment,
binding of moving parts, and other conditions that may affect its operation.
10. Don’t use your lathe in damp or wet locations. Do not use in presence of flammable liquids or gases. Keep your work
area well lit.
11. Remove chuck keys and adjusting wrenches prior to turning. Form a habit of checking for these before switching on
the lathe. Never leave the lathe running unattended. Turn power off. Don’t leave the lathe until it comes to a complete
stop.
Specifications:
Max Spindle Length
CML-DUP8, CML-DUPJ , CMLDUPU 9”
CML-DUPMAX 12”
Date Purchased: Invoice No.:


PSI Woodworking Products Lathe Duplicator User’s Manual
5
Duplicating Using an Original Work piece
If small enough, MAXmp the work piece to the follower as shown in Diagram 3. For layer pieces, cut the piece in half lengthwise and MAXmp (or glue) to the follower for
support.
Diagram 3- Copying an Original Work piece
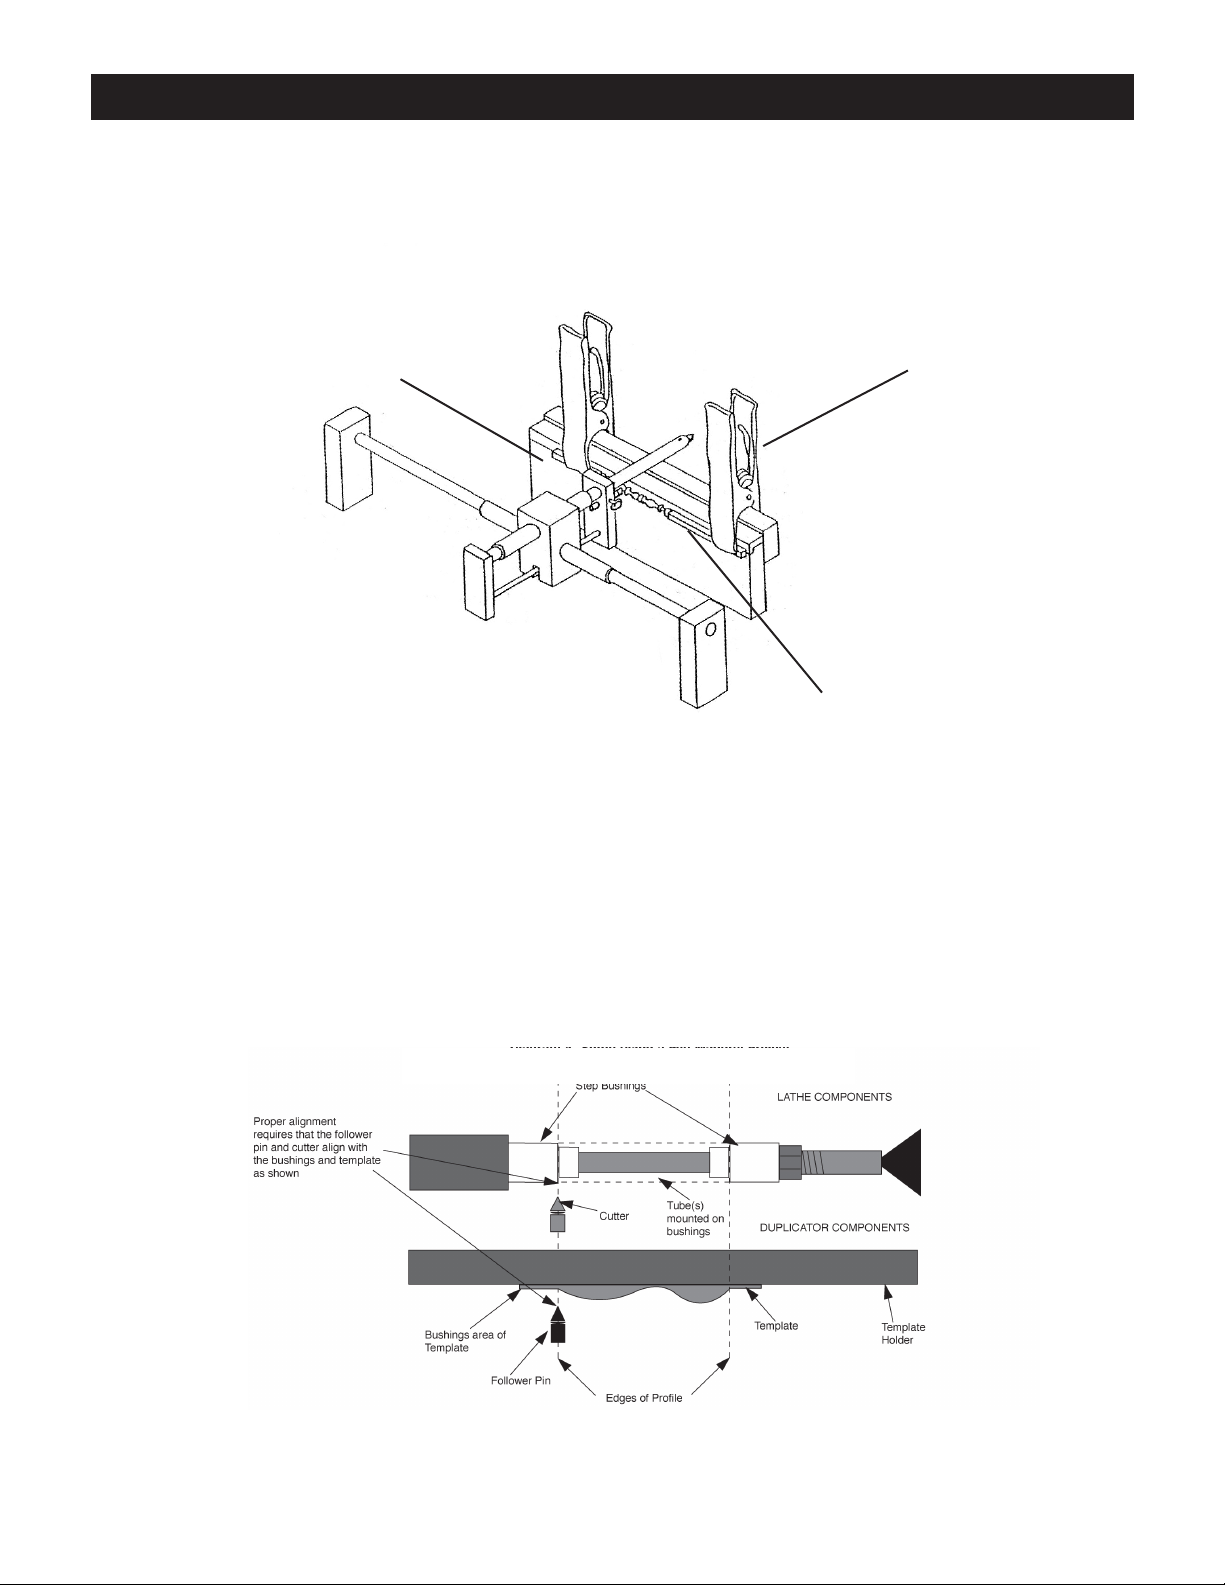
Using PSI Template Sets for Projects that Mount on a Mandrel (pen kits etc)
Preliminary Preparation
1. Select the kit you intend to make and remove the brass tubes. Mount the kit’s bushings and tubes onto the mandrel without wood (see Diagram 4 below)
2. Loosen the screws on the top of the template holder. Insert the steel template under the holder bar, press the template forward into the holder as far as possible. Hand
tighten down the bar to hold the template so that it slides left to right and front to back (under enough pressure not to fall out).
The PSI template profiles are designed to use the kit bushings as the primary setup indicator. The following steps discuss how to align the cutter to a bushing and then
position and secure the follower pin and template to ensure a precise setup. Note that this setup has to be done only one time (for a particular project).
Diagram 4- Setup Using a Pen Mandrel Project
Follower Support Clamp original to follower support
Original Work piece
Diagram 4- Setup Using a Pen Mandrel Project

PSI Woodworking Products Lathe Duplicator User’s Manual
6
Setting the Cutter Depth Alignment
3. Secure the bushings and tube(s) on the pen mandrel. Secure the tailstock to the mandrel and tighten the locking nut.
4. Position the point of the cutter exactly to the inside edges of the left hand bushing (if the bushings are step bushings, position the cutter exactly to the inside edges of
the left-most part of the wood blank will rest.) Refer to Diagram 4.
5. Loosen the follower pin wing bolt. The follower will slide freely front to back in its holder. Slide the template along the holder until the bushing area of the template is
in front of the follower’s point. (Do not tighten the template in its holder yet.) Slide the follower forward until it barely touches the template (somewhere in the bushing
area of the template.) You can now lock the follower pin in place. Note: you can use a plier to tighten the follower’s wing screw (but don’t over tighten it to avoid stripping
the bolt.)
Determining the Template Left to Right Alignment
6. With the cutter still positioned at the right outside edge of the left bushing, slide the template to the left until the left side of the cutting profile touches the point tip of
the follower pin. Refer to Diagram 4. (Note: some template profiles have straight edges and will not allow the point to match the left-hand template edges when the cutter
is positioned up against the bushing. In this case back off the follower before sliding the template into position.)
7. With the follower and template now in position, you can now lock the template in place by tightening down the locking screws. Slide the cutter to the right hand bush-
ing and check the depth of the follower point. You may have to adjust the template in the holder front to back to match the proper depth on both right and left bushings
(this may be necessary if the duplicator was not setup to be perfectly aligned to the lathe.)
Finishing the Setup
8. When preparing your kit’s wood blanks for turning a) Make sure that the blanks are exactly the same length as the brass tubes since all templates are designed to ex-
actly match these tube lengths. b) Cut your wood blanks thick enough to make sure the template profile does not extend beyond the outer surface of the blank. (You can
test your wood blank by following the procedure listed under 10b.) Note:PSI kits, bushings and templates have been designed to match every time. If the tubes or bushing
do not match then it is possible that another vendor supplied your kit or bushings. Contact PSI for bushings and kits that are guaranteed to match the template profile.
9. With the left hand bushing fixed in its setup position, assemble your blanks and bushings onto the mandrel (matching the template directions). To ensure proper setup
check these items:
a) With the cutter pressed against any bushing, the follower point should barely touch the template. If not, adjust the duplicator or template mounting as
necessary.
b) Check that your wood is thick enough to match the widest diameter of the template’s profile (see the Diagram 5 below). To do this, press the cutter point to
the flat of your wood blank and slide the cutter left to right across the surface. Do this for each of the four surfaces. The follower must clear the template across all of the
flats. If the follower hits the template, your wood is too narrow but all is not lost. You may be able to turn a thinner profile to match the minimum diameter of the blank.

PSI Woodworking Products Lathe Duplicator User’s Manual
7
To match the minimum diameter, push the cutter towards the point on the flat that results in largest gap between the flat and the cutter point (because the follower pin
will be hitting the template). Loosen the follower pin, press the cutter forward until it hits the wood flat, back off the follower pin so that it hits the template while the cut-
ter is still touching the wood. Tighten the follower. Follow step 10 b below to check whether or not your profile is too narrow.
Adjusting the Thickness of the Turned Profile
10.You can easily turn a thinner or thicker profile by adjusting the follower pin depth.
a) For a thinner profile (or this if your blank is not quite thick enough) you can back off the follower pin from the template. Note that the difference in your
workpiece’s finished diameter will be double the distance that you’ve backed off. You can check to make sure your profile is not too narrow as follows
b) With the profile diameter thinner there is now a chance that your cut may be too deep and hit the brass tube. Check this by mounting up a set of brass tubes
onto the bushings (without wood mounted on). Run the follower pin across the template profile and watch the cutter tip. If the tip hits the tube at any point then the
profile diameter is too thin and you will have to change to a set of thicker blanks or adjust the depth accordingly.
Cutting with the Duplicator (Diagram 6)
1. Pull tool holder back before turning the machine on. Never allow cutter to contact spur drive or chucks.
2. Place hands comfortably on each side of cutter assembly, with fingers guiding the cutter side to side and forward and back always keeping the tool holder down against
the plastic tool rest.
3. With the lathe on start at one end, slide cutter to the other end, removing a small amount of material with each pass. Cutting may be done in either direction.
4. When the guide pin comes into contact with the template or original turning, it will start to follow the contour as you cut.
5. Continue cutting, leaving the deepest cuts until last for increased stability. If the deepest cuts are made too soon, the work piece may flex and break.
6. Move the cutter from side to side as you progress into deep cuts to provide clearance for the cutter bit and to prevent binding.
7. After completing the cutting, make a final pass to clean up the surface.
8. If there are flat areas on your completed turning, it means the cutter needs to be adjusted to cut deeper. Do this by moving the guide pin back a tiny but (1/64” or less)
and turning the work piece again.
9. When your turning is complete, rest the cutter assembly off to one side, out of the way of the work piece and moving lathe parts.
10. Sand and finish your work piece on the lathe if desired.
Diagram 6- Cutting Technique Diagram 7- Depth Stop Bolt
Use the depth stop to micro-control your cut depth. The system also guarantees a straight cut. Turn the wing nut (J) towards the knob on the depth bolt
(G) to advance the follower in small increments. The end of the bolt will stop the cutting depth independent of the follower and template. As you cut, the depth stop
initially will create straight cuts as the wing nut is backed off. The follower pin will hit the template and cause the cutter to follow the template pattern.
Using the depth
stop bolt


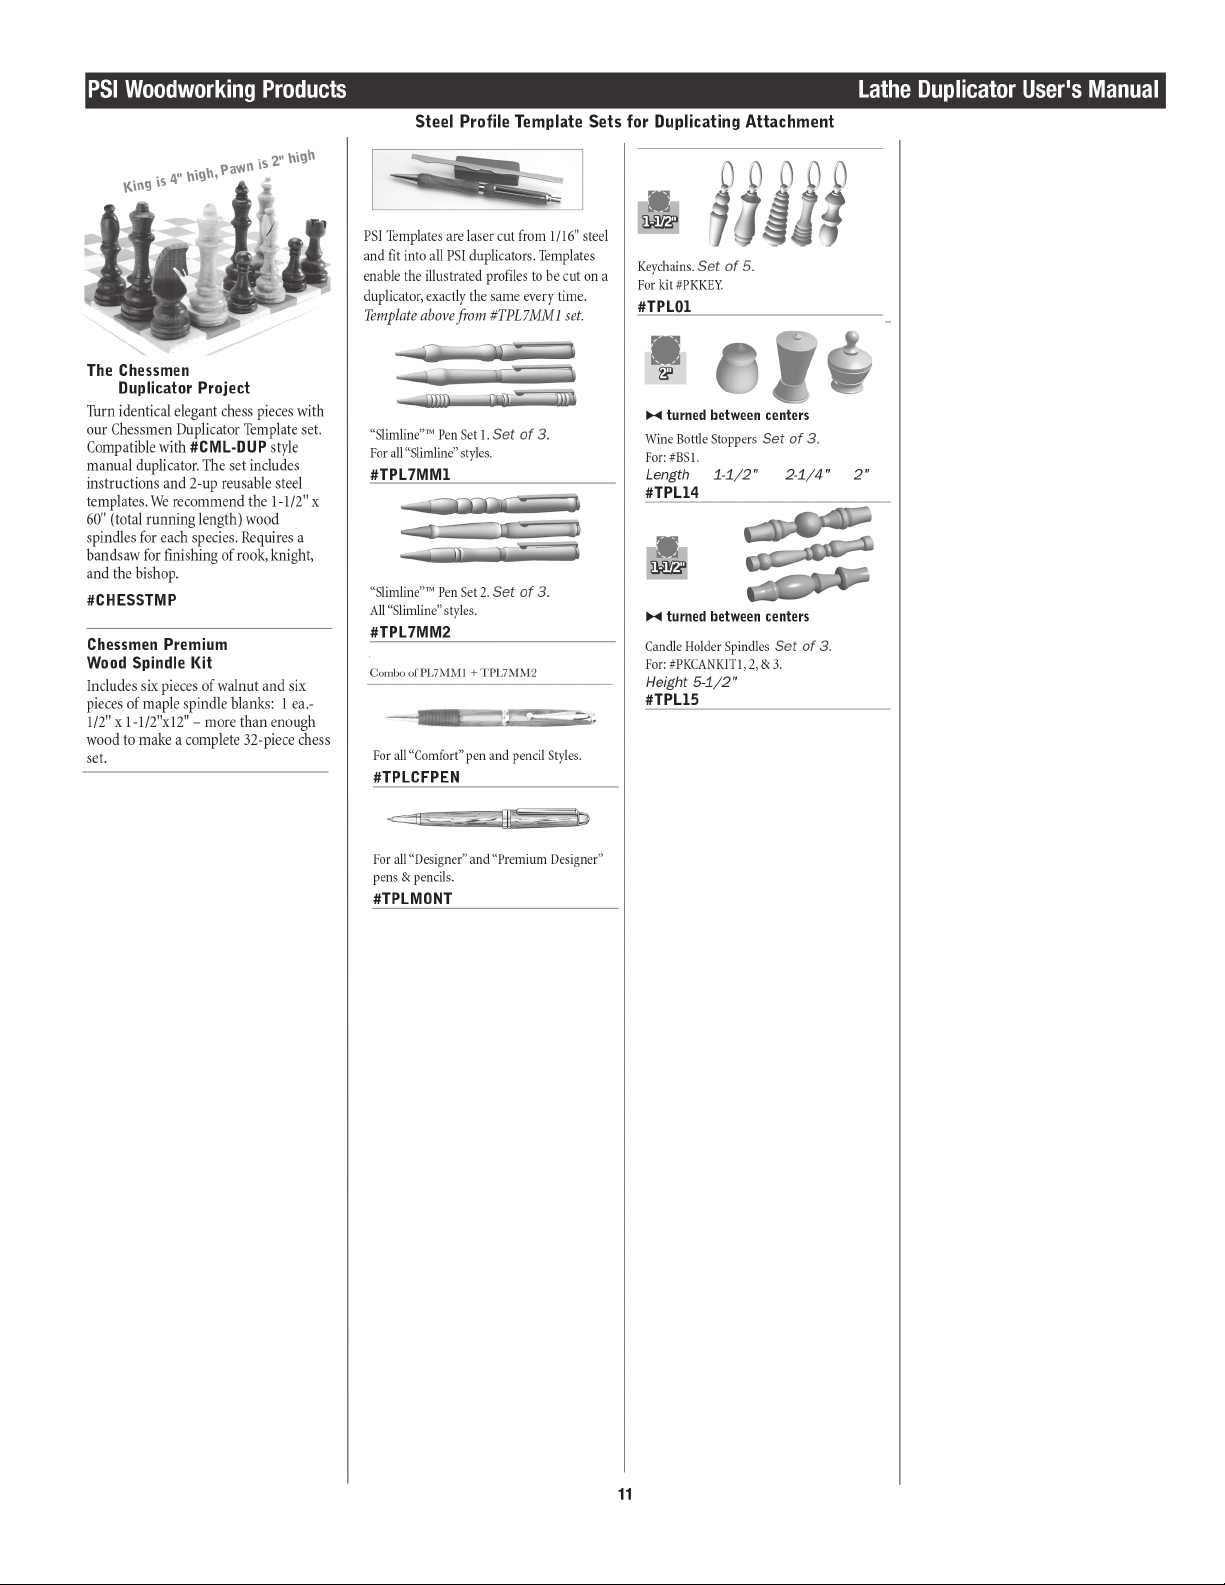
# TPL7MMX

This manual suits for next models
3
Table of contents
Other PSI Woodworking Products Lathe manuals


Popular Lathe manuals by other brands


Southbend
Southbend SB1012 owner's manual

Grizzly
Grizzly G0694 owner's manual

YoraHome
YoraHome MANDRILL 3036 user manual

Central Machinery
Central Machinery 98676 Set up and operating instructions

Craftsman
Craftsman 351.217170 Operator's manual

HOLZMANN MASCHINEN
HOLZMANN MASCHINEN ED 1000G operating instructions


