PSS CRIB TPRS Carrier User manual

2444 Baldwin Road, Cleveland, OH 44104
800.662.6338 |PSS-Innovations.com
CRIB®TPRS CARRIER LITERATURE CANISTER INSTALLATION GUIDE
BASE PIECES
1. CRIB TPRS Carrier (1 piece)
2. Literature Canister Lid (1 piece)
3. Literature Canister (1 piece)
4. Tube Mounting Hole (2 Locations)
BASE HARDWARE
5. 1/4-20 x 5/8" Screw (2 piece)
6. 5/8" Washer (2 pieces)
7. 1/4-20 Locknut (2 pieces)
TOOLS REQUIRED:
1. 7/16" Wrench 2. 5/32" Allen Wrench (Hex Key)
CRIB® TPRS Carrier Literature Canister Installation Guide
INTRODUCTION
Introducing another product improvement by PSS to CRIB TPRS Cargo Carrier--an easy-
open document and hardware canister. This canister allows for quick access to relevant
RoadQuake®literature and RoadQuake Breakaway Link Repair hardware. The supplied
canister will include the CRIB Canister Installation Guide, a “rollable” version of the
RoadQuake Best Practices, and one RoadQuake®Breakaway Link Repair Kit. Instructions
for installing your canister are printed on the reverse side of this document.
1. 4.
4.4. 5. 6. 7.
2. 3.
Overhead view
– MADE IN –
USA
PSS |2444 Baldwin Road, Cleveland, OH 44104 |800.662.6338 |PSS-Innovations.com |Copyright ®2020 8/20
We are a proud member of:
Follow us on:
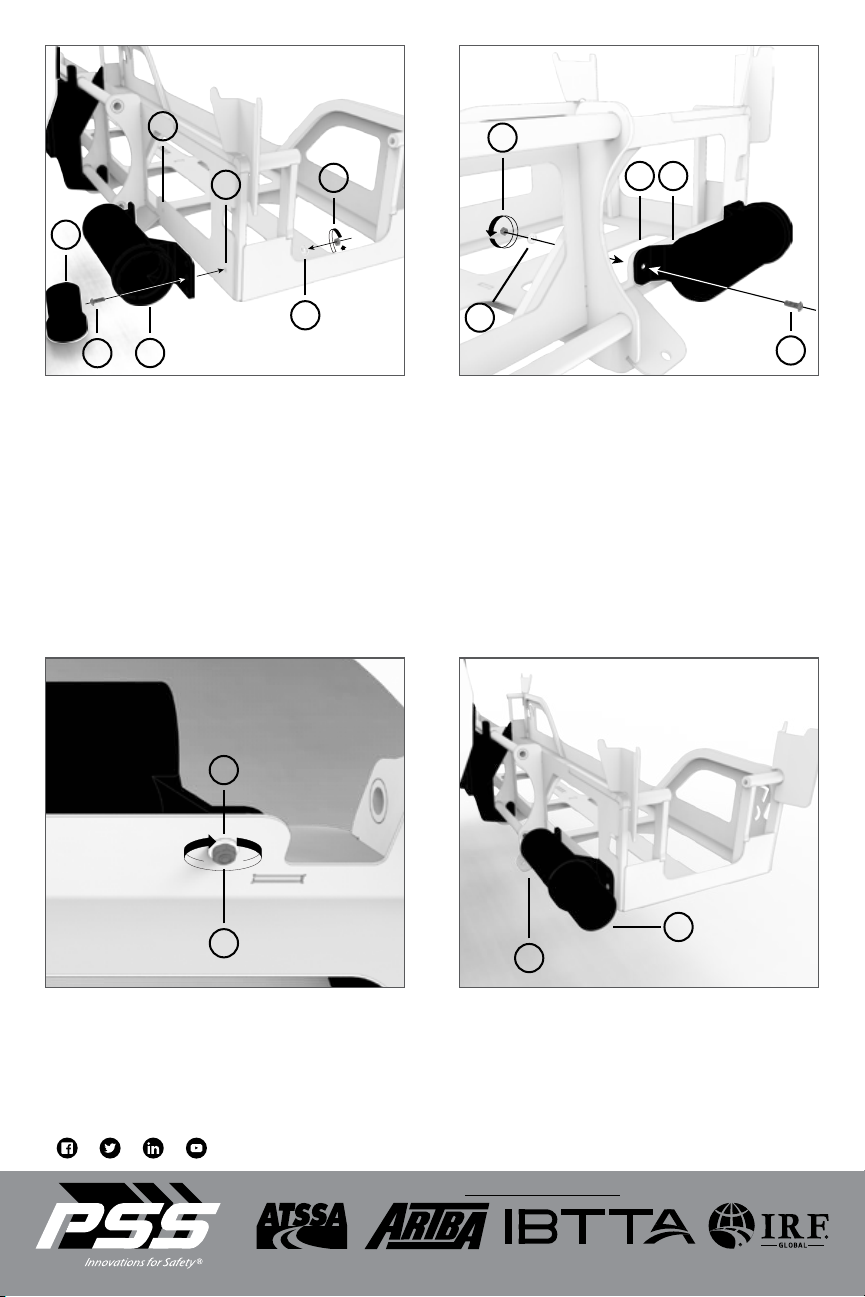
STEP 1
Locate the Tube Mounting Holes (#4) on
the driver side of a rear mounted CRIB.
Remove the Literature Canister Lid (#2).
Insert the 1/4-20 x 5/8" Screw (#5) with the
5/8" Washer (#6) through the center hole
on front mounting flange of the Literature
Canister (#3) and through the right Tube
Mounting Hole (#4). Finger tighten the 1/4"-
20 Locknut (#7).Be sure to have the open
side of Literature Canister facing outward.
STEP 2
While holding the Literature Canister (#3)
in place, insert the 1/4-20 x 5/8" Screw (#5)
with the 5/8" Washer (#6) through the hole
on back mounting flange of the Literature
Canister (#3) and through the left Tube
Mounting Hole (#4). Finger tighten the 1/4-
20 Locknut (#7).
STEP 3
Tighten both 1/4"-20 Locknuts (#7) on the
inside of CRIB while holding the 5/8" Washer
(#6). Be sure to not to scratch the paint.
STEP 4
Place all desired items inside the canister
and install the Literature Canister Lid (#2)
back on the Literature Canister (#3) .
2.
6.
7.
4.
2.
4.
7.
3.4.
5.
3.
6.
5. 3.
6.
7.
Popular Automobile Accessories manuals by other brands


ULTIMATE SPEED
ULTIMATE SPEED 279746 Assembly and Safety Advice

SSV Works
SSV Works DF-F65 manual

ULTIMATE SPEED
ULTIMATE SPEED CARBON Assembly and Safety Advice

Witter
Witter F174 Fitting instructions

WeatherTech
WeatherTech No-Drill installation instructions

TAUBENREUTHER
TAUBENREUTHER 1-336050 Installation instruction