PSS RoadQuake 2 User manual

Distributed by:
Plastic Safety Systems
RoadQuake 2TM
Temporary Portable Rumble Strip Product Guide
“On the Roadway for Safety”®
Download PSS
Product Catalog..

Page 2
Ideal for work zones where daily installation and removal of the work zone is
frequently required:
Our Rumble Strips Alert Drivers to Changing Road Conditions.
Designed to Reduce Accidents and Save Lives.
Temporary Portable Rumble Strips
• Pilot car or flagging operations
• Lane closures
• Traffic safety check-points
• Routine maintenance projects
• Paving operations
Our Rumble Strips are:
Temporary - No nails or glue are needed for
installation and use. Quick installation and removal,
and no clean-up.
Portable - No installation equipment needed.
A crew of 2 can install an array in minutes.
Durable - 3-5 year life under normal conditions.
Suitable for use in rain and colder temperatures.
For Use In: RoadQuake 2 & 2F
Posted Speed Limits: 75 MPH or less
Temperatures: from 0 to 180°F
Plastic Safety Systems, Inc. ♦800.662.6338 ♦www.plasticsafety.com Page 3
Modular Temporary Portable Rumble Strip
RoadQuake 2 is 45” long. 3 sections make 1 rumble strip, 11’ long when assembled, to traverse an entire lane.
Generates the same level of sound and vibration as milled strips, and higher levels than glue-down strips.
Measures 45” long X 13” wide X 3/4” thick. Weighs only 35 lbs. Ideal when transport and storage space is
limited. Fits in virtually any vehicle.
Features beveled edges on both sides for easy installation.
Ergonomic handles
US Patent No. 7,736,087, Other Patents Pending
Installs in minutes. No glue, adhesives or nails required.
No tools or equipment needed.
3 sections make 1 strip, 11’ long, that
traverses an entire lane.
Watch the
YouTube
RoadQuake 2
Assembly Video.
Download
the PSS
RoadQuake 2
Product Guide.
Assembles in minutes. No tools required.
For complete assembly instructions, see pages 4 & 5.
RoadQuake 2 is easy to transport and store.
Visit our
Rumble
Strip Page.
Watch
RoadQuake
Videos on
YouTube.
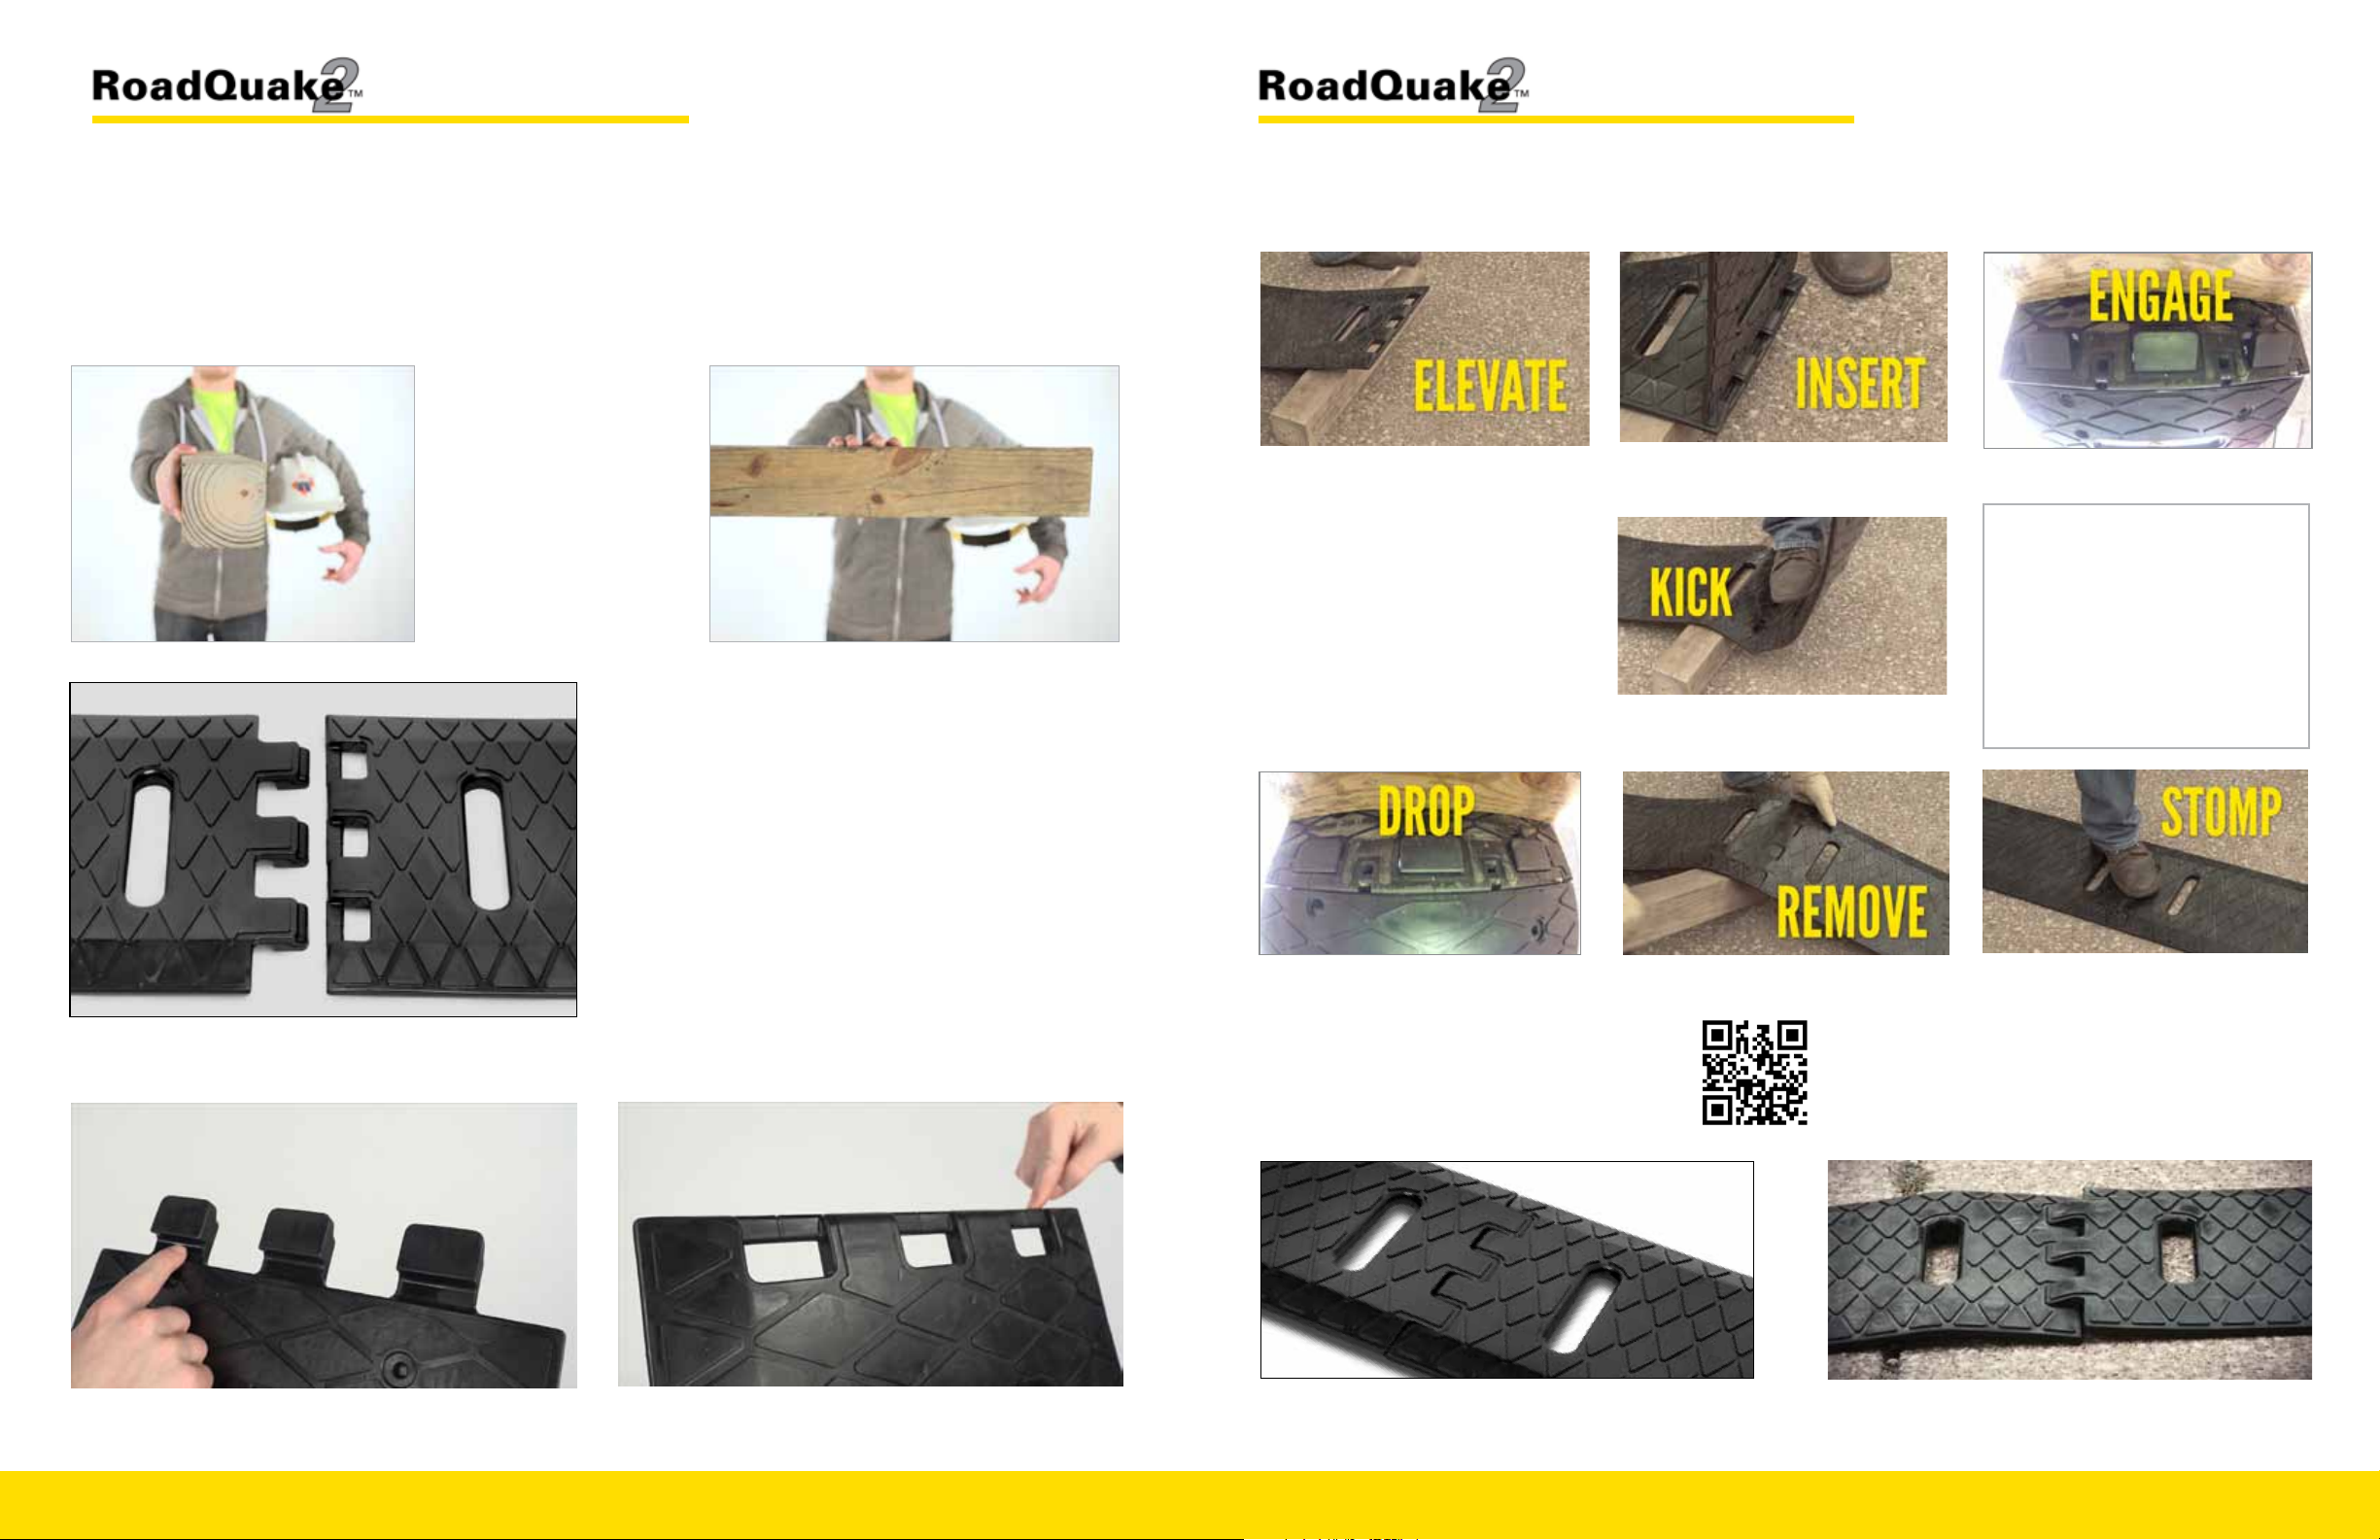
INSERT the tabbed end into the
elevated slotted section.
2.
Plastic Safety Systems, Inc. ♦800.662.6338 ♦www.plasticsafety.com
Watch the YouTube
RoadQuake 2
Assembly Video!
Temporary Portable Rumble Strip Assembly Instructions
Plastic Safety Systems, Inc. ♦800.662.6338 ♦www.plasticsafety.com Page 5Page 4
Put the 4x4 under the slotted end of
the first section.
The wood will ELEVATE the slotted
end.
Next, pick up the second section with
the tabbed end down and nameplate
facing you.
Straddle or stand next to the elevated
section.
Prior to assembly or
installation, sweep areas
clear of gravel and other
debris that may cause strips
to move.
The only tool you will need
for assembly is a 4x4 piece
of wood, or an object of
similar size.
RoadQuake 2 is a temporary device; no glue, adhesives or other fasteners are required
for installation. RoadQuake 2 simply conforms to the surface of the road.
Temporary Portable Rumble Strip Assembly Instructions
How to Assemble RoadQuake 2 Sections Assembly Steps (from our Video!)
5.
REMOVE the wood and...
6.
STOMP on it, to complete the
assembly.
You can now add a third section to
make a full 11 foot strip that spans an
entire lane.
7.
1.
Slowly DROP the section...
5.
KICK the section in your hand to
fully engage the channel on the rod.
4.
ENGAGE the rod on the slotted end.
3.
1. 2.
These sections have not been assembled correctly. Please
repeat the assembly steps. But first, watch the video!
Properly assembled sections should be smooth and
flat, as shown in the picture above.
The channel under the tabs, shown in Picture 1... …must engage the rod on the slotted end, shown in Picture 2.
The Goal of Assembly is to Properly Engage Tabs with Slots:
RoadQuake 2 is ready-to-assemble. No hardware is
required.
In the picture to the left, the section on the left is the
“tabbed” section; the section on the right is the “slotted”
section.
Note that both long edges are beveled, so that either edge
can face traffic.
Tabs and Slots:
Results: This…. ….Not This…
Kicking Style
Picture 4 shows a sideways, soccer-
style kick, using the instep of the
foot. Straight-on, football-style is
also acceptable. Simply straddle the
section on the ground, insert and
engage the section in hand, and kick
straight-on, in football-style. Then
proceed to Steps 5, 6 and 7.


