PTM Cassava Planter User manual


IDENTIFICATION
Dealer:
Owner:
Firm / Farm:
City: State:
No. of the Certificate of Guarantee:
Serial / No.:
Date: Invoice No.:
Product:
Notes:
1
Marchesan Implementos e Máquinas Agrícolas “TATU” S.A.
Introduction
The Model PTM Cassava Planter was specially developed for
small and medium properties, makes at once the furrow, fertilizing,
cutting the stems and planting.
With heavy duty main frame and absortion capacity and load
distribution, it’s easy to use. With independent wheels assembled in
the Main Frame side with springs for better flexibility, better following
the ground, avoiding intermittence during the planting.
The PTM are equipped with transversal fertilizer distributer, by
augers screw thread featuring an internal non slip cap, and special
profiles, for better regularity in spreading when used in slopes.
Another differential of this machine is the automatic cut of the
branches, thru the knives driven by tires and with only two operators
to supply the cassava branches guide, with a perfect distribution of
the stalks in the soil.
This Manual Contains the necessary information for the better
planting performance. The operator must be read with attention the
whole manual before operating for the first time, and be aware of the
safety recommendations.
To obtain any information, or in the eventuality of technical
problems, consult the dealer, as well as Marchesan’s customer service,
that will guarantee the planter full operation.

2Marchesan Implementos e Máquinas Agrícolas “TATU” S.A.
Index
1. To the owner 3
2. To the operator 4 to 8
3. Technical specifications 9
4. Components 10
5. Assembly 11 and 33
Platform assembly 11
6. Setup instructions 12 and 14
Preparing and Hitching to tractor 12
Spacing between rows and Positioning the row units in chassis 13
Procedures for changing the row spacing 13
To place the planter in transporting position 14
Procedure before planting and Ideal operation spped 14
7. Adjustments and operations 15 and 22
Stalks distribution 15
Prosedures for replace the stalks sprockets 16
Fertilizer distribution and Sprockets changing 17 to 18
Table of fertilizer distribution 18
Practical test of stalks and fertilizer distribution 19
Auxiliary calculation for fertilizer distribution 20
Row articulation and stalks proof 21
Coulter blades 21
Operation - Important points 22
8. Maintenance 23 and 27
Lubrication 23 to 24
Maintenance of the fertilizing metering 25
Maintenance of the openers bearing assemblies 26
How to replace the tires 26
Planter maintenance 27
9. Important 28
3
Marchesan Implementos e Máquinas Agrícolas “TATU” S.A.
General information
Important
To the owner
The Right and left sides of the planter are determining by facing in the direction of the
implement will moving forward.
When ordering parts, please be sure to inform the quantity, part number, and the name
of each part wanted. It is also important the mention the machine Serial Number, which is
placed on the chassis.
The acquisition of any TATU product assures to the original purchaser the following
rights:
• Warranty Certificate
• Instructions Manual
• Technical Assistance by the dealer on equipment delivery
The owner has the obligation of inspect the conditions of the product on delivery, as
well as knowing the warranty terms.
Special attention should be given to safety recommendations, operation cares and
maintenance of equipment.
Be sure to read and understand this instructions for adjusting and operating the
equipment as reported in this manual. Check each item referred to obtain an efficient
operation and maximum trouble free performance. Remember an equipment which is
properly lubricated and adjusted saves your time, labor and fuel. This manual should be
read by Operators and Maintenance Personel.
• Only people who own a full knowledge of the tractor and planter,
must operate them;
• Marchesan is not responsible for any damage caused by accident
on transporting, incorrect utilization or inadequate storage;
• After the operating season, clean and inspect your implement,
preventive maintenance pays dividends.
• Your Dealer has original equipment parts, which assure proper fit
and best performance.
The warranty shall not be applied to any equipment, or any part thereof
which has been altered elsewhere than at the place of manufacture, or
which the original purchaser thereof at retail, has used or allowed to be
used parts, not made or supplied by Marchesan S/A.
NOTE

4Marchesan Implementos e Máquinas Agrícolas “TATU” S.A.
To the operator
Dear User!
Respect the ecology. Don’t throw trash away. This gesture of
goodwill helps to protect our environment
Don’t spill combustible oil, batteries and filters. These Trashes
in contact with soil reach the sub – layer, which directly damage
the environment. Look for information to delivery this contaminate
elements, to who knows to re- cycle or re-use them.
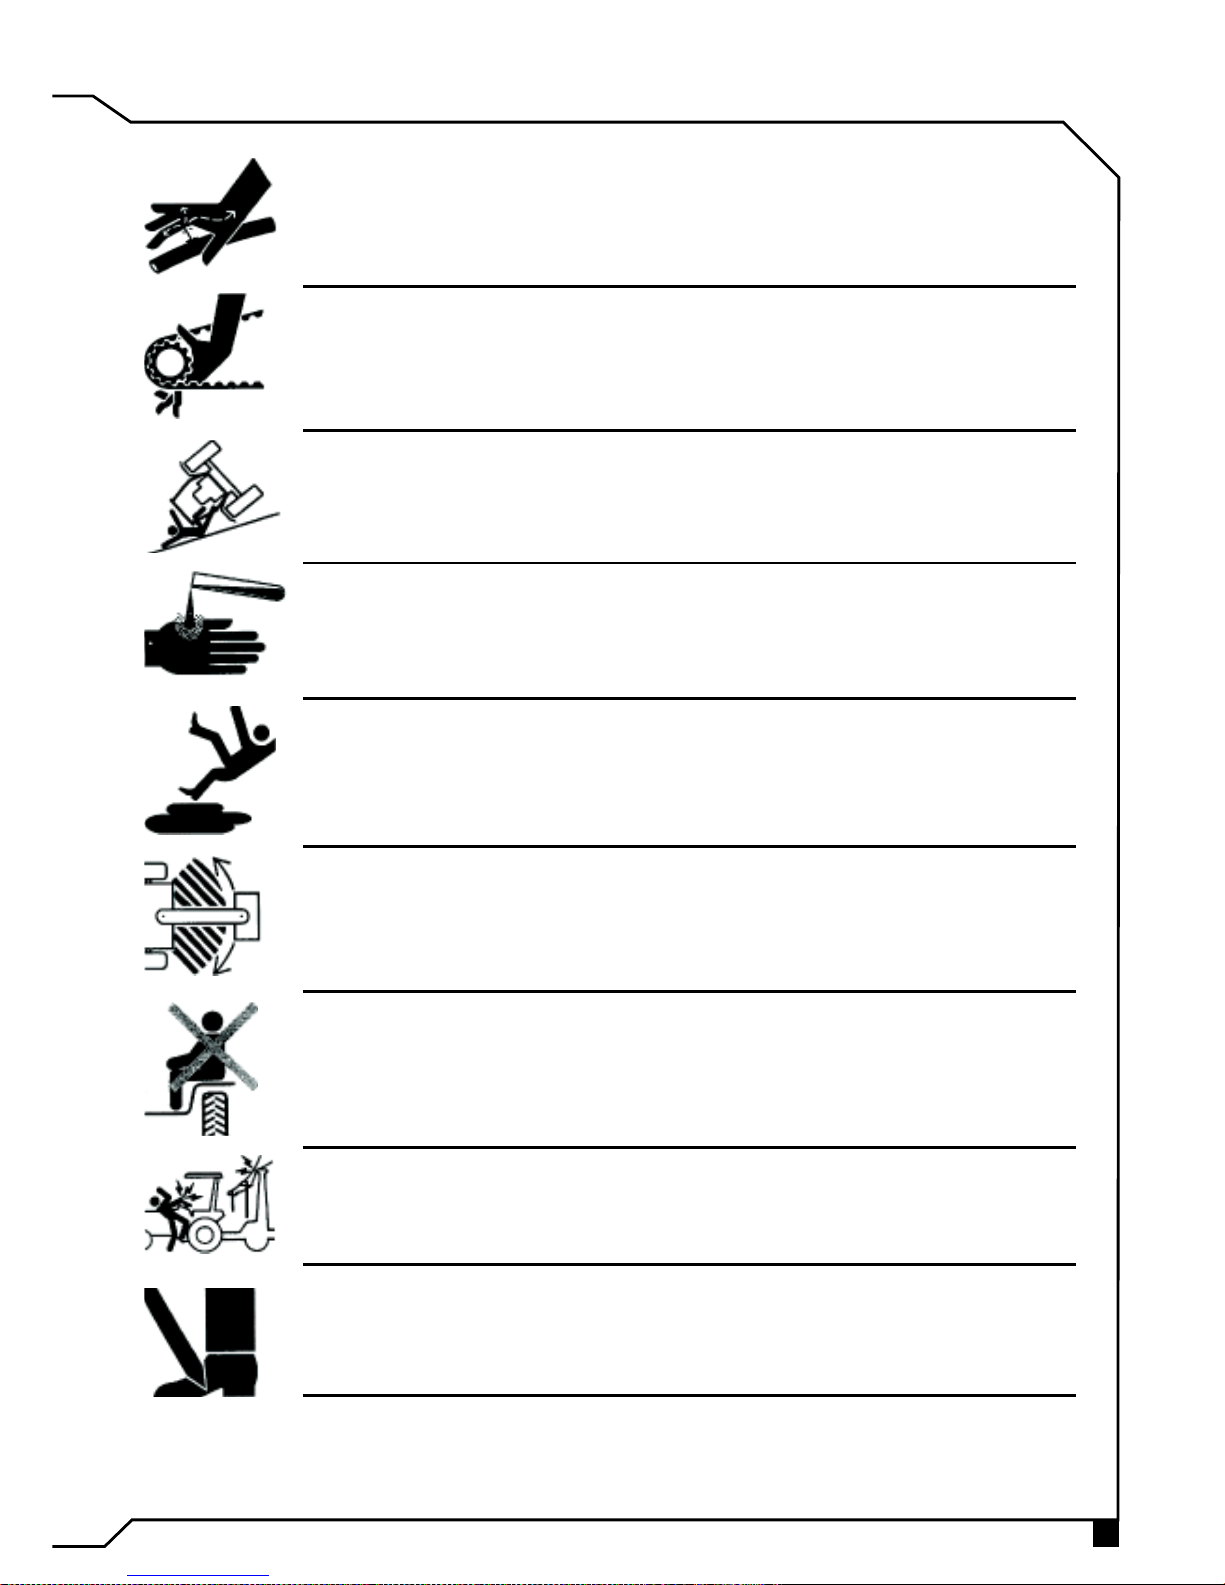
Operation Safety
• Only with the complete cooperation of the implement operator,
accidents can be prevented.
• This symbols is a warning device which should be kept
in place, always clean and visible, when transporting the
implement during day or night, use accessory lights and other
devices in order to give adequate warning to another vehicles
operators.
Read and understand the information about before realizing
adjustments and maintenance.
Be Careful with environment
The TATU planter are easy to operate, therefore some basic and
indispensable cares are required on their handling.
Always have in mind, the safety requires constant attention,
observation and prudence, during the operation, transport, maintenance
and storage of the planter.
5
Marchesan Implementos e Máquinas Agrícolas “TATU” S.A.
Never use your hands to check hydraulic leaks, escaping oil
under pressure, may have sufficient pressure and may have sufficient
force to penetrate the skin, maybe cause several injuries.
Never attempt to change the adjustments, clean or lubricate the
implement, when the same is turned on or in movement.
Be careful when moving in steep graders. Risk of Overturn.
Be careful about the use of fertilizer or chemicals. These
products in any contact with skin, can be cause any serious injury to
the body.
Keep the entrances and work places clean and safe from oil,
grease. Risk of accidents.
Never transport the implement on rough roads. When operating,
avoid to make sharp turns, that may cause tire contact with the
implement.
Never allow people on the tractor or implement if the additional
seat is not available.
Use extreme caution when circulating with the implement under
electrical power lines, any contact may result severe shocks, injuries
or death.
For your protection and safety, always wear adequate clothes
and shoes during operation of the implement.
To the operator
6Marchesan Implementos e Máquinas Agrícolas “TATU” S.A.
• During the operation or transport, don’t allow people on the tractor or in the
planter.
• Never allow children playing near or over the planter, even in operation,
transportation or storing of the equipment.
• Get a full knowledge of the area before starting planting. Delimit the danger
places or obstacles.
• Work and transport with suitable speed according to the local conditions.
• Always wear individual equipments for your own safety.
• Always wear adequate clothes and shoes, avoid large or loose clothes that
may twine on mobile parts.
• Never operate the equipment without the equipment protection devices.
• Be careful when hitching the planter to the tractor, hands and fingers may be
injured when caught between the hitch and the tractor.
• When putting the planter in transport position, verify if there aren’t people or
animals around or over the equipment.
• Never attempt change the adjustments, clean or lubricate with the planter in
movement.
• Please pay attention with transport width in narrow places.
• When disconnecting the planter, move it to a level area, preferably a hard
surface, on the field or in storage warehouse.
• Please look for the general safety instructions on the back cover of this
manual.
When transporting the Implement by Truck or Trailer
To transporting the equipment for long distances use truck or trailer, however,
the safety instructions should be followed carefully.
• Always use an adequate loading dock to load or unload the equipment, never
use a ditch bank, because this practice is very dangerous and could be result
in serious injuries or may causing death.
• Use a suitable Hoist when lifting the equipment to the truck or trailer.
• Use the park standing for correct support the equipment.
• Please Blocking suitable the wheels of the equipment.
• Use sufficient fastenings (cables, ropes, chains, cord, etc.) to immobilize the
equipment during transportation.
• After 8 to 10 kilometers of transporting, please inspect the cargo conditions.
Always Repeat this procedure for every 80 to 100 kilometers of transporting.
Give more attention when transporting on rough roads, steep graders, and
other adverse conditions.
• Be careful with transport height, specially when passing under electrical power
lines and bridges. Risk of shock and serious injuries.
• Observe all the laws and regulations about the height and width limits of cargo.
When transporting the implement by truck or trailer. If necessary, use banners,
lights and other devices to give the adequate warning for the drivers/operators
of another vehicles.
To the operator

7
Marchesan Implementos e Máquinas Agrícolas “TATU” S.A.
The safety stickers are a warning of some
points that require more attention in the equipment.
The safety stickers always should be kept in good
conditions. If they are damaged or become illegible,
should be replaced. Marchesan supplies this stickers
upon indication of the respective part numbers.
0 5 0 3 0 3 1 4 2 8
Leia o manual ante s d e i n i c i a r o
uso do equipamento.
Read the manual before attempting
to work with the equipment.
Lea el manual antes de iniciar el
uso del equipo.
Safety Stickers
Safety Stickers 05.03.06.1949
LUBRIFICAR E REAPERTAR DIARIAMENTE
LUBRICAR Y REAPRETAR DIARIAMENTE
L U B R I C AT E A N D T I G H T E N D A I L Y
0503031827
To the operator
P T M
Um adesivo
cada por jogo
Dois adesivos
cada por jogo
na lateral
Dois adesivos
cada por jogo
na lateral
P T M
Um adesivo
cada por jogo

8Marchesan Implementos e Máquinas Agrícolas “TATU” S.A.
To the operator
TABLE OF ADJUSTMENTS OF DISTANCE
BETWEEN STALKS
30 16 310
28 16 330
26 16 360
24 16 400
20 16 440
26 20 470
30 24 500
24 20 530
20 18 580
26 24 600
30 28 660
26 28 730
20 22 760
26 30 810
22 26 840
24 30 900
20 26 960
22 30 1000
Sprockets
Drive Shaft Driven Shaft Spacings (mm)
NOTE: For obtain another spaces, replace the sprockets according the list
above by drive shaft (wheel axle) x driven shaft (cutting system).
TABLE OF FERTILIZER DISTRIBUTION
NOTE: We suggest to make a practical test on the fertilizer distribution along of 50 linear
meters and compare with the 3rd column of the table. (Grams by 50 meters).
14 38 169 42 37
14 34 189 47 42
14 30 214 53 47
18 38 217 54 48
18 34 242 61 54
14 26 247 62 55
22 38 265 66 59
18 30 275 69 61
14 22 291 73 65
22 34 296 74 66
26 38 313 78 70
18 26 317 79 70
22 30 336 84 75
26 34 350 88 78
14 18 356 89 79
30 38 362 90 80
18 22 375 94 83
22 26 387 97 86
26 30 397 99 88
30 34 404 101 90
34 38 410 102 91
22 22 458 114 102
Sprocket
Drive
Shaft
Driven
Shaft
Grams
by 50
meters
Space between
row lines (mm)
Tabl e of distrib ution o f commerci al granula ted fer tilizer - Qu antity in kg /Hecta re
with screw thread for 1" (25,4 mm) STANDARD.
800 900
Sprocket
Drive
Shaft
Driven
Shaft
Grams
by 50
meters
Space between
row lines (mm)
800 900
38 34 512 128 114
34 30 519 130 115
30 26 528 132 117
26 22 541 135 120
22 18 560 140 124
38 30 580 145 129
18 14 589 147 131
34 26 599 150 133
30 22 624 156 139
26 18 661 165 147
38 26 669 167 149
34 22 708 177 157
22 14 720 180 160
30 18 763 191 170
38 22 791 198 176
26 14 850 213 189
34 18 865 216 192
38 18 967 242 215
30 14 981 245 218
34 14 1112 278 247
38 14 1243 311 276

9
Marchesan Implementos e Máquinas Agrícolas “TATU” S.A.
Technical specifications
PTM
02
800 - 900
223 liters - 250 kg
2700
1800
2077
1525
6,50 x 16 (60 psi)
580
60
Model
Number of rows
Row spacings (mm)
Fertilizer capacity
Working width (mm)
Transporting height (mm)
Transporting width (mm)
Total length (mm)
Tires
Net height (kilograms)
Tractor required (hp)

10 Marchesan Implementos e Máquinas Agrícolas “TATU” S.A.
Components
01 - Main frame
02 - Drawbar (three point hitch - category I and II)
03 - Fertilizer hooper
04 - Sprockets
05 - Branches deck
06 - Park standing
07 - Covering discs (notched)
08 - Operator's seat
09 - Branches conductor
10 - Wheels and tires
07
01
02
03
04
05
06
08
10
09
Detail of
stalk guide
11
Marchesan Implementos e Máquinas Agrícolas “TATU” S.A.
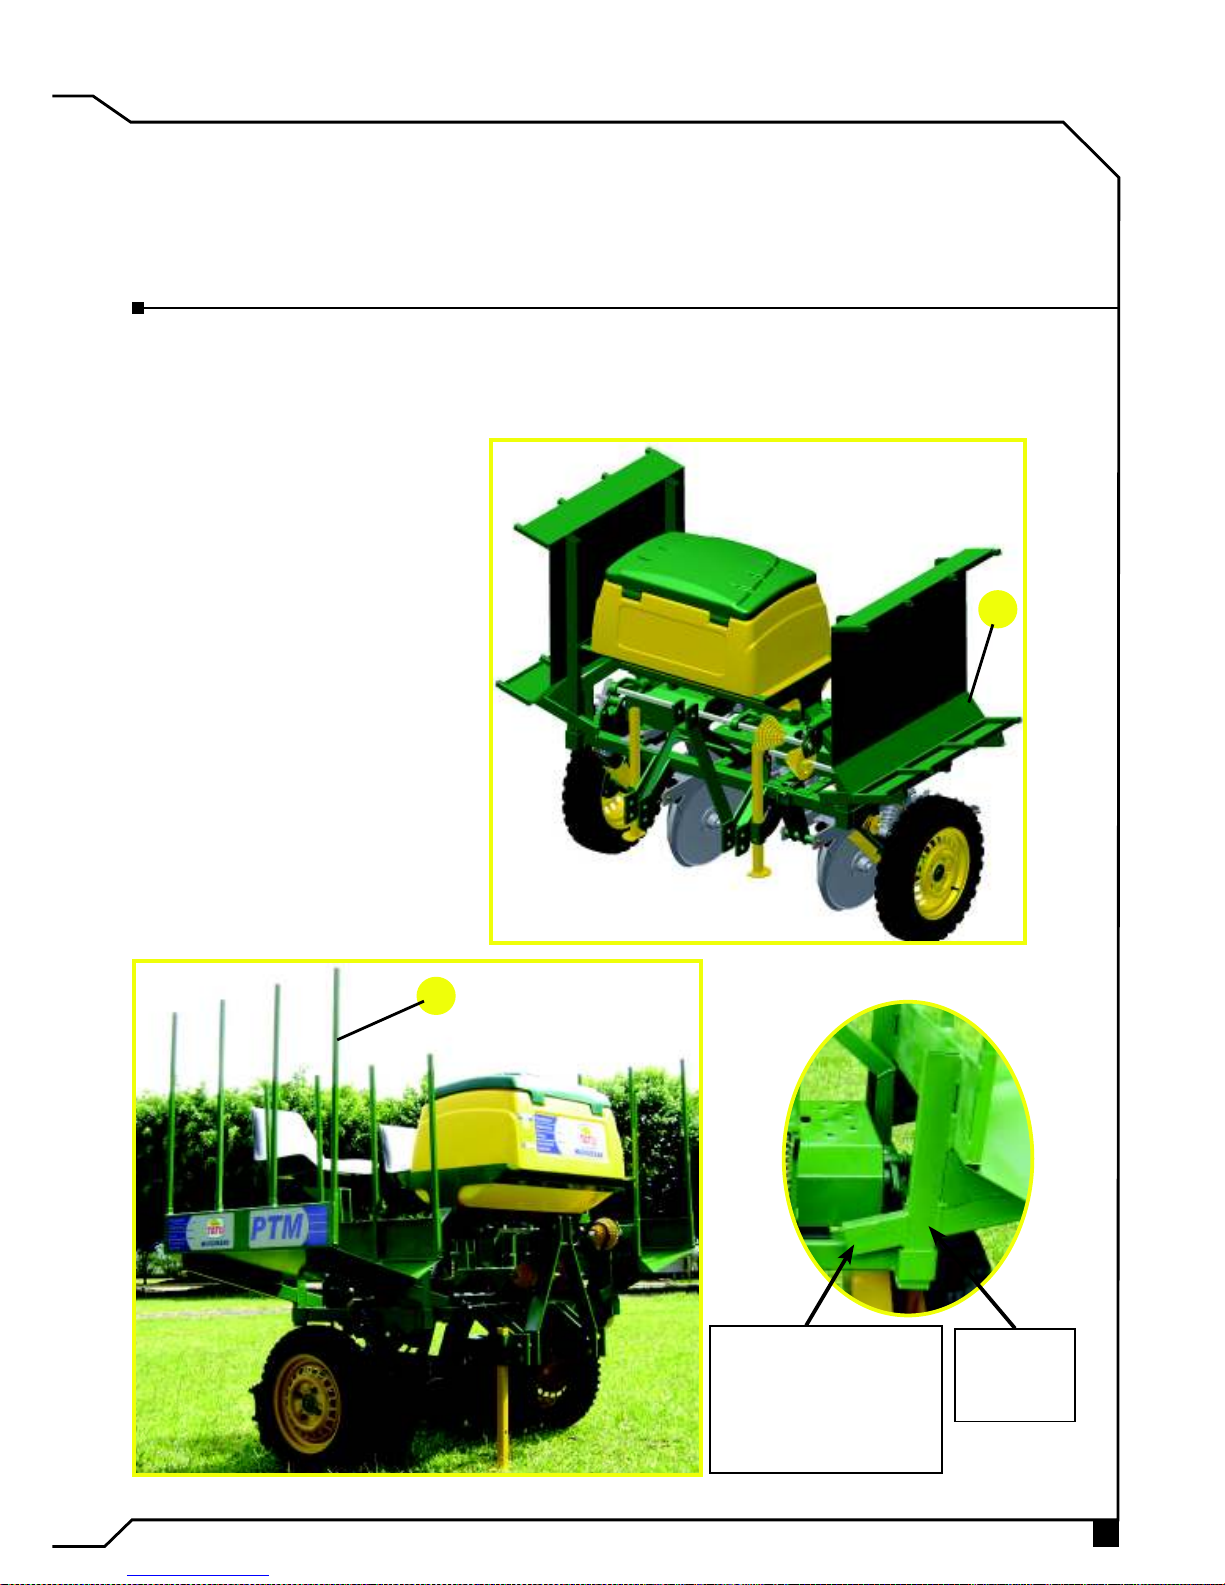
Assembly
For easy transport, the planter are assembled at factory, just remaining change the
branches platform of the transporting position for working position and placing the cassava
branches protect tubes in conformity with the information below.
Platform assembly
The branches platform (A), have a articulation system for easy transporting in narrow
roads or to storage the equipment. To place the platform in working position, just turn the
platform and fit in the main frame, for last, place the tubes(B), as showed below.
Detail of
working
position.
Transport position,
just turn the
platform and fits
in the front part of
main frame.
B
A

12 Marchesan Implementos e Máquinas Agrícolas “TATU” S.A.
Preparing the tractor
If necessary, add fill up with water or counterweights to the front of the tractor or in
rear wheels for better traction and better stability.
Please be careful with the instructions below, what should be followed to obtain better
working efficiency.
Hitching to the tractor
Setup instructions
For Hitching to the tractor, choose and taking the planter to a flat and leveling
place.
Come on with the tractor in slowly reverse gear to the planter, and be ready to push
the brake. So close, use the lever for hydraulic position control. So the lower left side arm
at the couple bolt planter same level.
1) Coupling the left and right side arms, what have up and down movements, with the
adjust of lower arm, and placing the cotter pins. At this time, the extension screw thread
of the high arm of the tractor can be used for nearing or move away the planter, facilitate
the coupling.
Third point
high arm with
extended
screw thread.
2) Putting the High Arm (third point) and putting the cotter
pin.
For a better coupling, the planter should be centralized with
the tractor, how do it of the follow maner.
• Align the planter drawbar with third point of the tractor.
• Raise up totally the planter.
• Verify if the distance of the lower arms and tires are the same
(measure “A”), and leveling in the both sides (measure “B”).
A
B
B
A

13
Marchesan Implementos e Máquinas Agrícolas “TATU” S.A.
IMPORTANT
Mark the center of chassis, from this mark you have to measure half spacing to right
and half spacing to left, installing in these points the rows.
For making the row spacing change, make this in a clean, plane and stable place.
The planter always should be coupled properly to the tractor.
1 – Lower the parking stands (A), and blocking the planter chassis, to prevent accidents
and several injuries.
2 – Loosen the Nuts (B), from the row lines front fixing, the nuts(C), what fixing the
back of the rows, loosen the bushing bolt (D), what hold the axle close to bearing to displace
whole components of the chassis. Note that these items work aligned, to procedure the
change, the whole assembly moves (See the pictures below).
Spacing between rows
The PTM are delivered with a row spacing to the request number of rows, with flexibility
for several row spacings, sure, if necessary.
Positioning the row units in chassis
Procedures for changing the row spacing
Makes the retighten of the assemblies, with a special attention:
• The retighten of the nuts that hold the rows on main frame should
be maid gradually, avoiding to tight totally at once each nut.
• Between these operations of tightening the nuts of one row and
passing to another row, should be lean the bushing (D), on the
bearing, and just enough tight to the correct align to avoid blocking
the axle.
Setup instructions
B
D
C
A

14 Marchesan Implementos e Máquinas Agrícolas “TATU” S.A.
- Raise the park standings (A).
- Never transport the planter only supported on the
tires.
- Be sure, always maintain the branches platform
in transporting position, to allow transporting in tight
places.
- Before planting, makes a general inspection on the planter, retighten all bolts and
nuts, also check all cotter pins and clamps, to avoid premature maintenance for better yield
of the planter. Please, repeat this operation after the first day of operation.
- Look for the tires calibration, always use the same inflation for both tires (60 psi).
- Please also verify if have any strange object inside the hoopers, that can damage
the fertilizer distribution system.
The TATU PTM Planter operate with larger efficiency at 5km/hour speed, never exceed
this speed for better efficiency.
Setup instructions
To place the planter in transporting position
Procedure before planting
Ideal operation speed
- We suggest fill the planter only at work place,
to avoid loading excess during the transport,
and for a good operation of the tractor and
planter.
- Warning, never transit with loading excess, risk
of accidents and serious personal injuries.
NOTE
A

15
Marchesan Implementos e Máquinas Agrícolas “TATU” S.A.
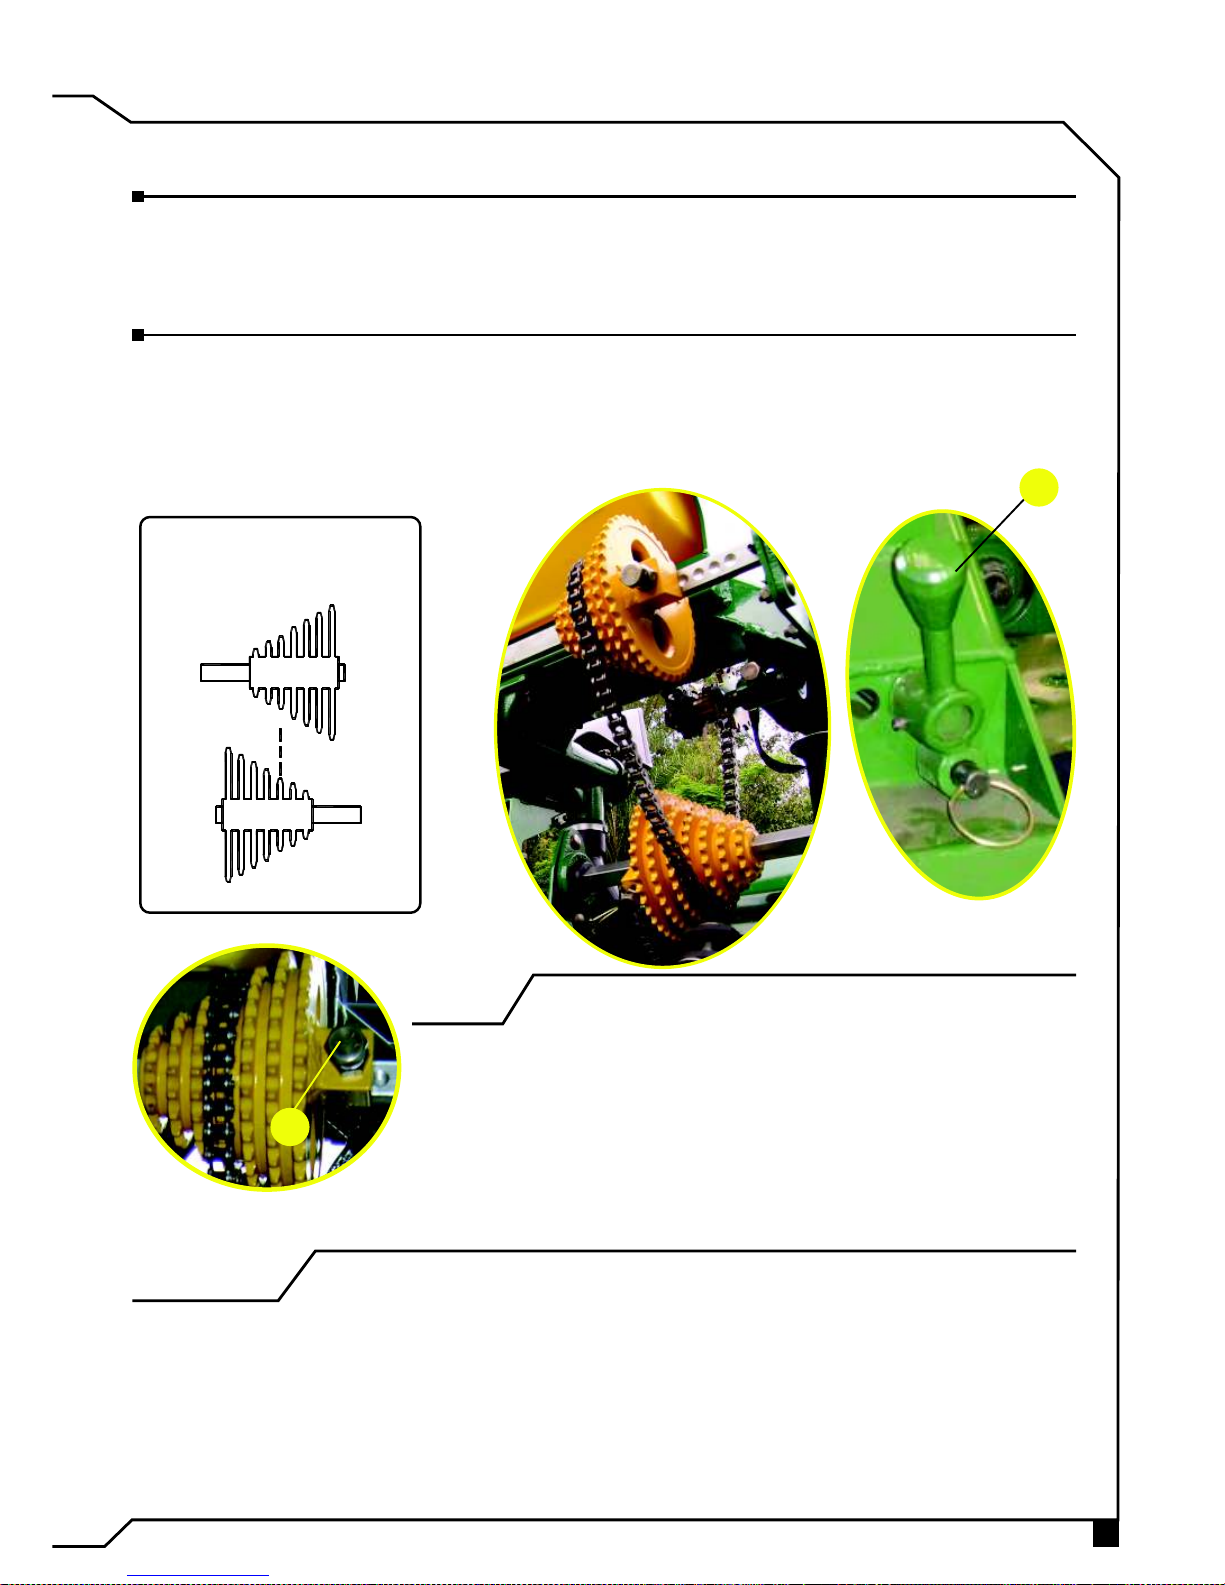
Adjustments and operations
The spacing between stalks are made through the sprockets change (drive) wheel
shaft and (driven) shaft of cutting system, that is placed in the planter side. The stalks
distribution also depends on the operation speed, that never should be faster than 5 km/
hour.
The planter are manufactured
with 2 sprockets of 20 teeth each one,
and goes with two sets of sprockets
of 18,22,24,26,28 and 30 Teeth. (See
picture below).
For adjusting of stalks distance,
take a look on the table and see the
number of sprockets for desired distance
(See the instructions on page 16).
This table is only reference for starting adjustments of the planter.
External factors like as slippage index of the planter carrying
wheels(skidding), working speed more than recommended (5
Km/hour), Tires inflation (Less than recommended), and field
conditions, can result in values a bit different from those indicated
in the table above.
Therefore, It is always indispensable to make the practical
distribution tests, as indicated in page 19 of this manual.
Stalks distribution
IMPORTANT
TABLE OF ADJUSTMENTS OF DISTANCE
BETWEEN STALKS
30 16 310
28 16 330
26 16 360
24 16 400
20 16 440
26 20 470
30 24 500
24 20 530
20 18 580
26 24 600
30 28 660
26 28 730
20 22 760
26 30 810
22 26 840
24 30 900
20 26 960
22 30 1000
Sprockets
Drive Shaft Driven Shaft Spacings (mm)
NOTE: For obtain another spaces, replace the sprockets according the list
above by drive shaft (wheel axle) x driven shaft (cutting system).
Detail of the
sprockets

16 Marchesan Implementos e Máquinas Agrícolas “TATU” S.A.
Adjustments and operations
- For replacing the sprockets, choose one and proceed according to the instructions
below:
• Take off the cotter pin (A), and safely move with the hands the chain tighter for
changing the sprocket of wheel axle.
• Loosen the bushing bolt (B), displace the axle, for making the changing of the
sprocket of cutting system, see the picture below.
• This procedure should be done on the both sides of the machine. As they are
independent system.
Procedures for replace the stalks sprockets
Detail of cotter pin
B
A
17
Marchesan Implementos e Máquinas Agrícolas “TATU” S.A.
Adjustments and operations
Fertilizer distribution
Procedure for sprockets changing
The fertilizer distribution is done through the steel auger and the different dosage
rates of fertilizer, by changing the sprocket of drive shaft {C} (14,18,22,26,30,34 and 38
teeth) and driven shaft {D} (14,18,22,26,30,34 and 38 teeth).
RECÂMBIO DE ENGRENAGENS
SPROCKET COMBINATIONS
CAMBIO DE ENGRANAJES
ADUBO FERTILIZER ABONO
EIXO MOVIDO
DRIVEN SHAFT
EJE MOVIDO
EIXO MOTOR
DRIVE SHAFT
EJE MOTOR
D
C
• Move the lever (A) to alleviate the chain tighter and lock with the locker pin in the
hole.
• Displace Manually the sprockets combination cone on the axle and align the choosing
sprocket with the chain.
• Loosen the lever for liberating the lock pin.
• The bolts (B) on the sprockets combination
cone of “TRA”, are calibrated in the factory,
allowing the sprockets change without use of any tool.
• In case of any sliding motion on cone shaft, just loose the
counter nut and made only once turn around the bolt, and
re-lock.
• In order to avoid damage to the spring and shafts, never
apply excessive torque when tightening the bolts and
nuts.
IMPORTANT
NOTES
B
A
Look in the following pages the different quantities of fertilizer,
according with the sprockets combination.
The fertilizer distribution table of this manual, should be used just like a reference to
start the planter calibration. Factors as slippage index of the planter carrying wheels
(skidding), work speed more than the recommended (5 km/Hour), tires inflation less
than recommended and field conditions, can introduce values a bit different from
those indicated in the tables. Therefore, it is always indispensable make the practical
distribution tests as indicated in page 19 of this manual.

18 Marchesan Implementos e Máquinas Agrícolas “TATU” S.A.
• The table Below indicates the obtained amount of the auger of
2”(Standard). This auger transports approximately 35 grams of
fertilizer per turn.
Auger of 1” coil
pitch optional
Auger of 2” coil
pitch standard
Table of fertilizer distribution
Adjustments and operations
ATTENTION
TABLE OF FERTILIZER DISTRIBUTION
NOTE: We suggest to make a practical test on the fertilizer distribution along of 50 linear
meters and compare with the 3rd column of the table. (Grams by 50 meters).
14 38 169 42 37
14 34 189 47 42
14 30 214 53 47
18 38 217 54 48
18 34 242 61 54
14 26 247 62 55
22 38 265 66 59
18 30 275 69 61
14 22 291 73 65
22 34 296 74 66
26 38 313 78 70
18 26 317 79 70
22 30 336 84 75
26 34 350 88 78
14 18 356 89 79
30 38 362 90 80
18 22 375 94 83
22 26 387 97 86
26 30 397 99 88
30 34 404 101 90
34 38 410 102 91
22 22 458 114 102
Sprocket
Drive
Shaft
Driven
Shaft
Grams
by 50
meters
Space between
row lines (mm)
Table of distribution of commercial granulated fertilizer - Quantity in kg/Hectare
with screw thread for 1" (25,4 mm) STANDARD.
800 900
Sprocket
Drive
Shaft
Driven
Shaft
Grams
by 50
meters
Space between
row lines (mm)
800 900
38 34 512 128 114
34 30 519 130 115
30 26 528 132 117
26 22 541 135 120
22 18 560 140 124
38 30 580 145 129
18 14 589 147 131
34 26 599 150 133
30 22 624 156 139
26 18 661 165 147
38 26 669 167 149
34 22 708 177 157
22 14 720 180 160
30 18 763 191 170
38 22 791 198 176
26 14 850 213 189
34 18 865 216 192
38 18 967 242 215
30 14 981 245 218
34 14 1112 278 247
38 14 1243 311 276
Table of contents
Other PTM Farm Equipment manuals

Popular Farm Equipment manuals by other brands


CORN
CORN MACDON C HARVESTEC 6000 installation manual

Roxell
Roxell Dozit user guide

MASSEY FERGUSON
MASSEY FERGUSON RB 4160 V Workshop service manual

Poettinger
Poettinger TOP 692 A Operator's manual

Dhollandia
Dhollandia DH-RK 33 installation manual

GREAT PLAINS
GREAT PLAINS MC5109 Max-Chisel Assembly manual