PTN D-3001 User manual

Digital Conference System
(Control Unit: D-3001)
All Rights Reserved
Version: Digital Conference System (Controlled by D-3001) 2014V2.0
User Manual

Digital Conference System (Controlled by D-3001)
NOTICE: Please read this user manual carefully and take notice of Safety
Operation Guide before using this product.
Update History
Version
Date
Update Content
1.0
2013.10.21
First version.
2.0
2014.01.20
Update version.
This manual is onlyfor operation instruction only,not for any maintenance usage.
The functions described in this version are updated till January2014.Anychanges
of functions and parameters since then will be informedseparately. Please refer to
the dealers for the latest details.
This manual is copyright PTN Electronics Limited.All rights reserved. No part of
this publication maybe copied or reproduced without the prior written consent of
PTN Electronics Limited.
All product function is valid till 2014-01.20.

Digital Conference System (Controlled by D-3001)
i
Table of Contents
1.Introduction..............................................................................................................................1
1.1 Introduction to Digital Conference System...............................................................1
1.2 Technology.....................................................................................................................1
1.3 Features.........................................................................................................................1
1.3.1 D-3001.................................................................................................................1
1.3.2 Discussion Unit..................................................................................................1
1.4 Package Contents........................................................................................................2
2.Central Control Unit (D-3001)...............................................................................................2
2.1 D-3001 ProductAppearance......................................................................................2
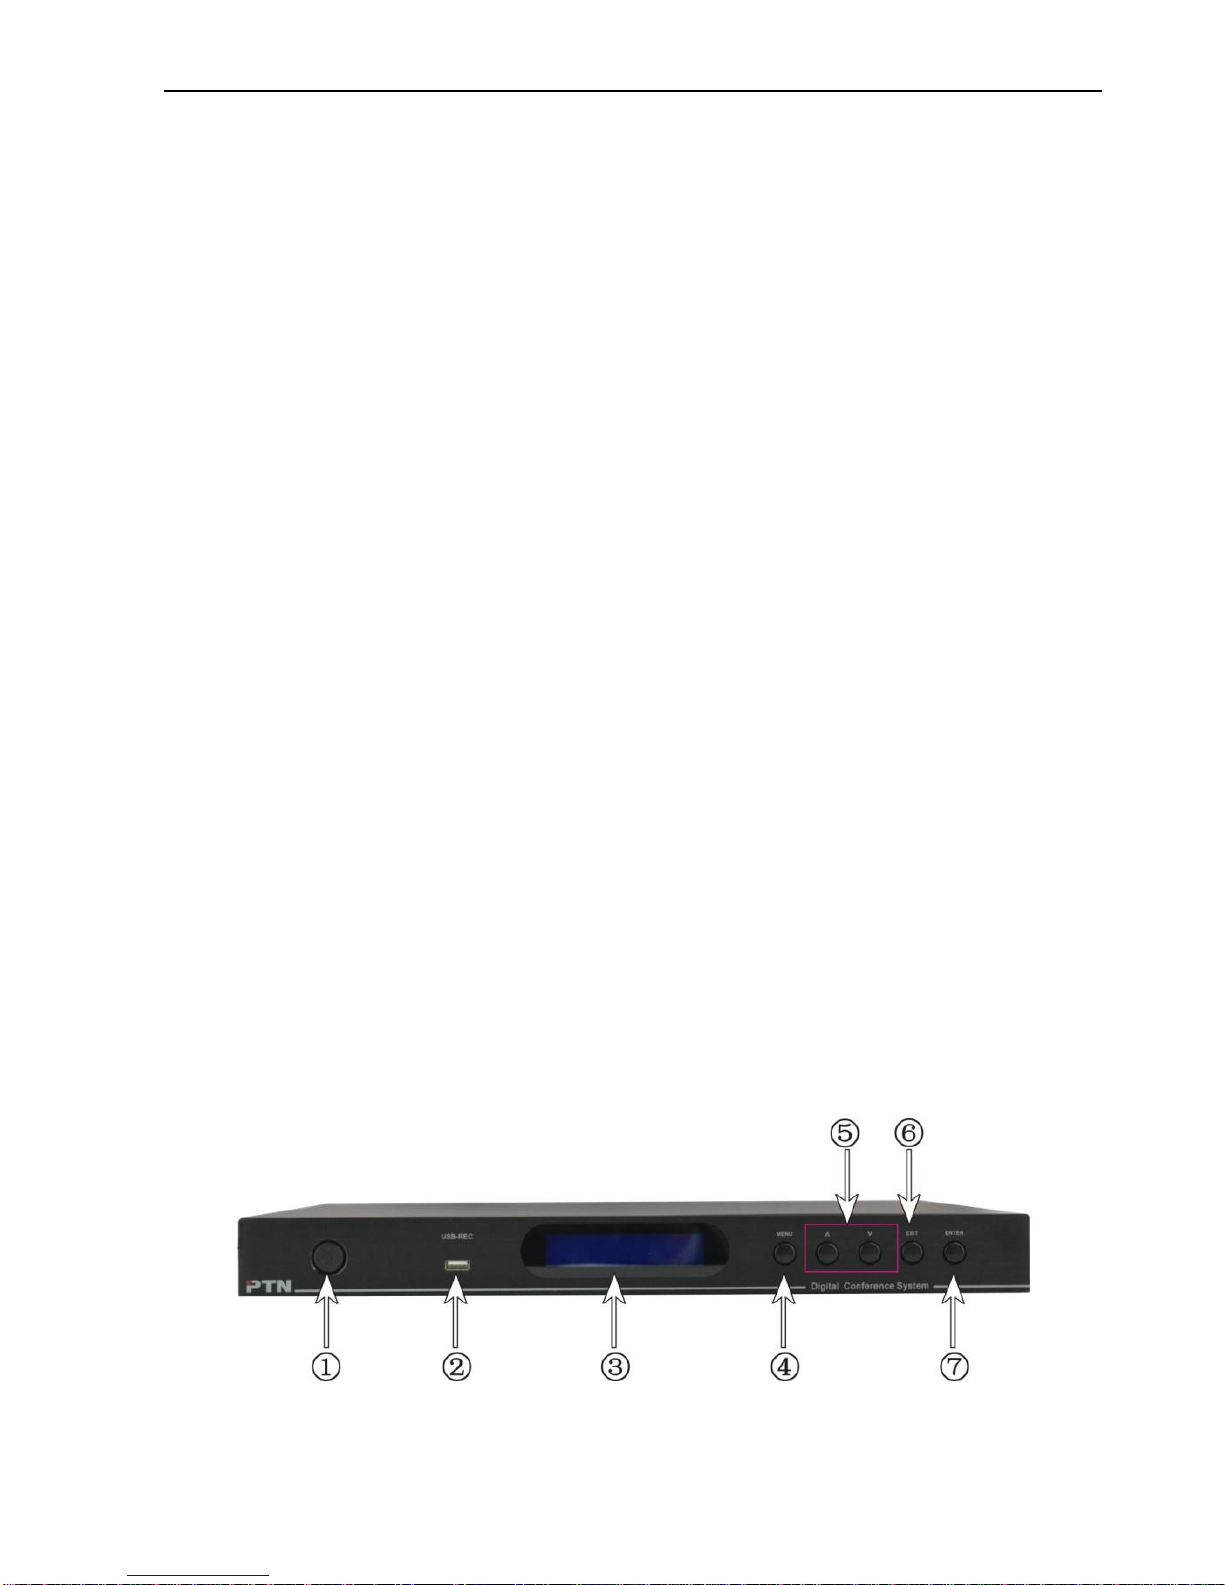
2.1.1 Front Panel.........................................................................................................2
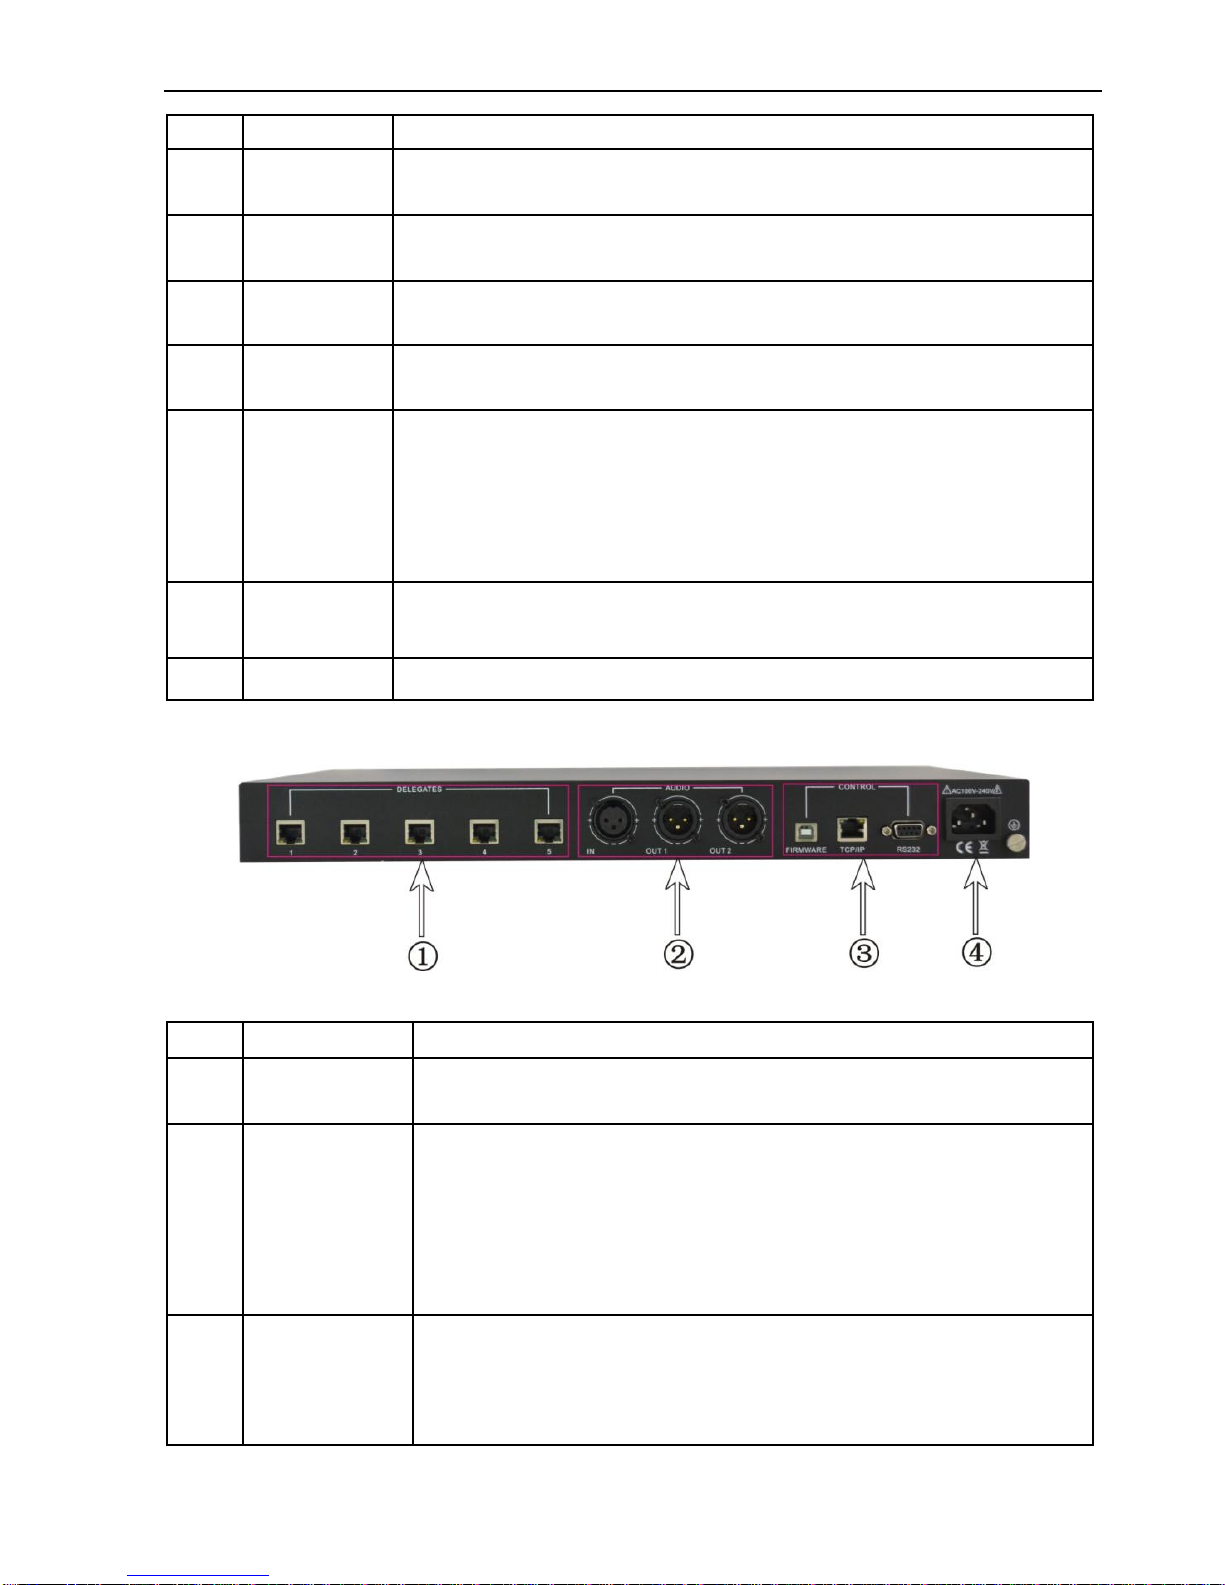
2.1.2 Rear Panel..........................................................................................................3
2.2 Connection.....................................................................................................................4
2.2.1 Connection Diagram .........................................................................................4
2.2.2 Connect with Discussion Unit..........................................................................4
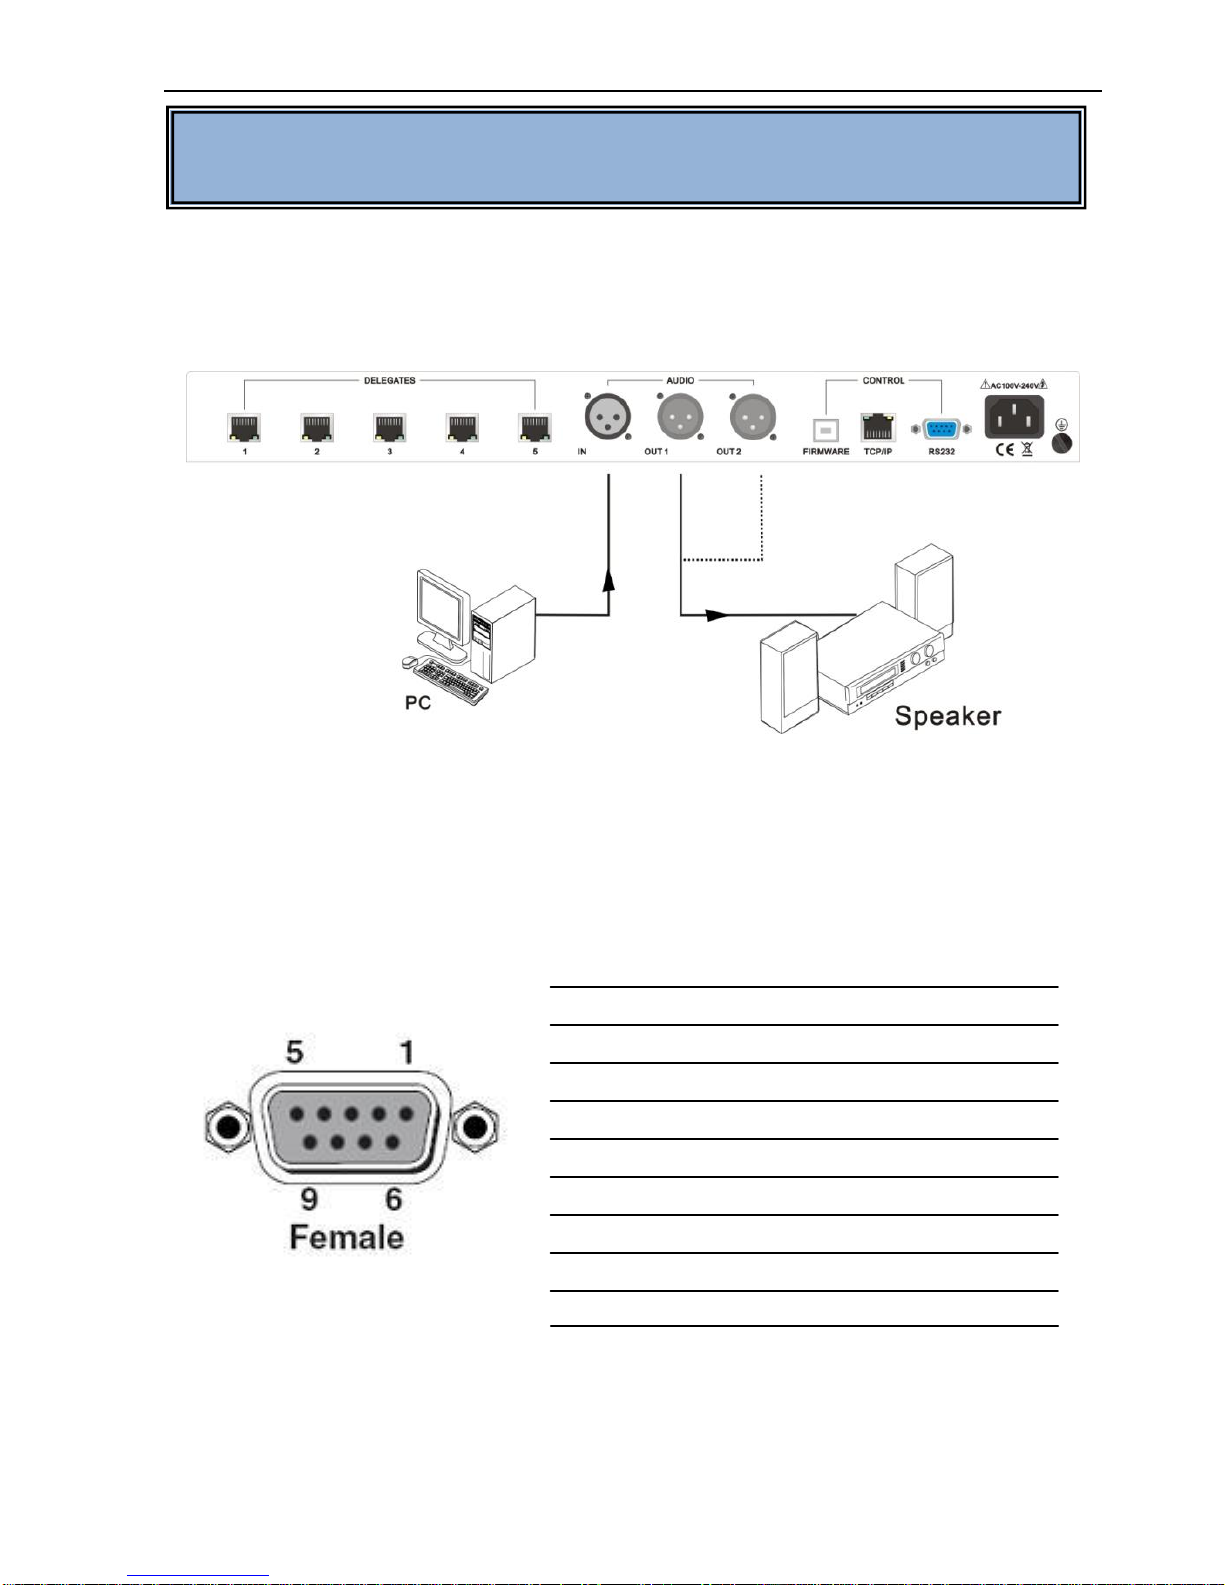
2.2.3 Connect withAmplifier......................................................................................5
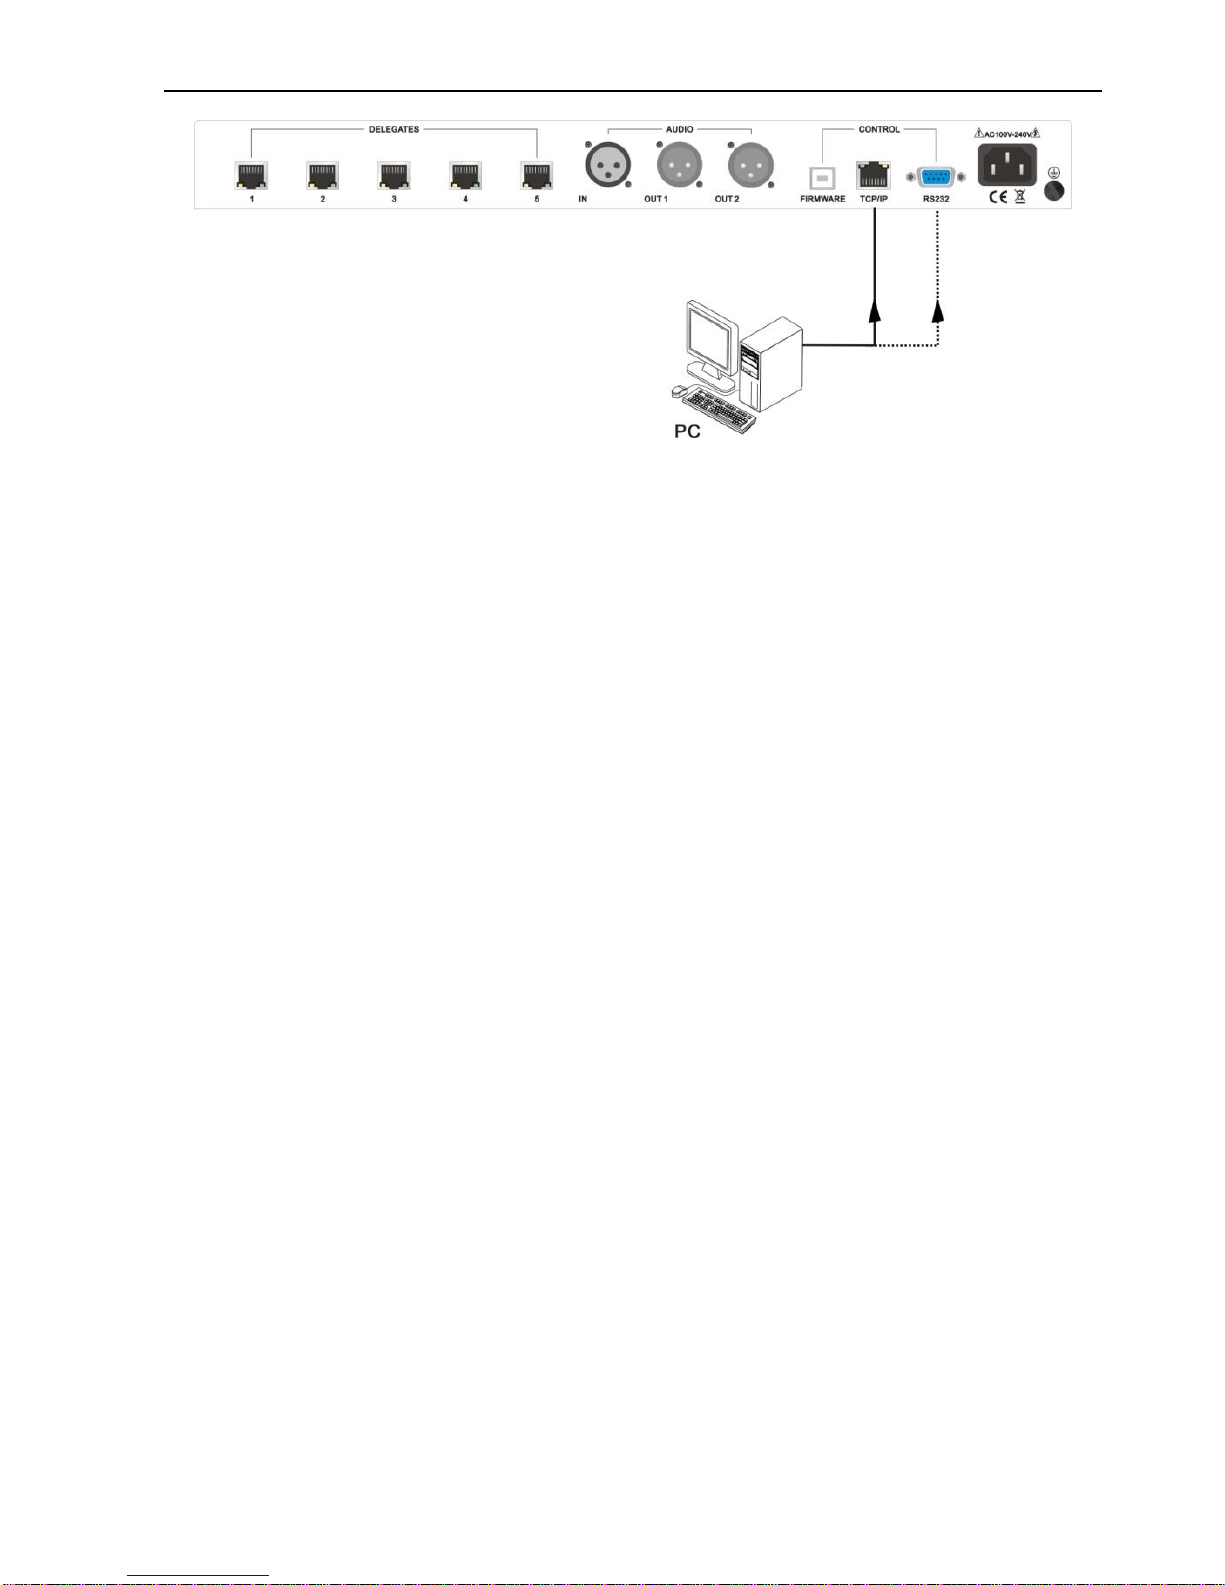
2.2.4 Connect with Computer....................................................................................5
2.3 D-3001 System Operations.........................................................................................6
2.3.1 D-3001 Initialization...........................................................................................8
2.3.2 Settings after Initialization................................................................................8
2.3.3 Enter into Main Menu......................................................................................10
Language Setting..........................................................................................15
Volume Setting...............................................................................................15
3.Discussion Unit......................................................................................................................19
3.1 Discussion unit Introduction......................................................................................19
3.1.1 Side Panel........................................................................................................20
3.1.2 Front Panel.......................................................................................................20
3.1.3 Rear Panel........................................................................................................22
3.2 Discussion unit Connection.......................................................................................22
3.2.1 Connection between Units.............................................................................22
3.2.2 Connection of Microphone.............................................................................23
3.3 Discussion unit Operation Introductions .................................................................23

Digital Conference System (Controlled by D-3001)
ii
3.3.1 Setting IDAddress...........................................................................................23
3.3.2 Enter in Off-line State.....................................................................................25
3.3.3 Sign in...............................................................................................................26
3.3.4 Vote....................................................................................................................27
3.3.5 Voice Adjustment.............................................................................................29
3.3.6 Speaking...........................................................................................................29
4.Specification...........................................................................................................................31
4.1 D-3001..........................................................................................................................31
4.2 Discussion Unit...........................................................................................................31
5.Troubleshooting & Maintenance.........................................................................................32
6.Safety Operation Guide.......................................................................................................33
7.After-sales Service................................................................................................................35

Digital Conference System (Controlled by D-3001)
1
1. Introduction
1.1 Introduction to Digital Conference System
Byusing the latest fullydigital technologies, network techniques and themulti-channel
digital audio technology, the PTN Digital Conference System revolutionizes conference
systems technologyand takes the leadership in digital conferencesystem solutions.
The PTN Digital Conference System is a table appliedsystem integrated with central
D-3001, discussion unit (including chairman unit and discussion unit), interpretation unit
and applicationsoftware.
The discussion unit integrates multi built-in functions such as discussion, 3-key-volting,
IC-Card sign-in and key-press sign-in, and with a big LEDscreen to show the present
status. Furthermore, this unit offers with a built-in speaker and a headphone with
manuallyvolume adjustment inside the unit.
With a simple installation way, the discussion unit is able to be applied in various
conference occasions and provides a perfect efficient conference system solution for
users.
1.2 Technology
The system uses digitalsignal processing and transmission technology. The high quality
audio signal, controlsignal and othersignal between different devices are transmitted
through twisted pair.
1.3 Features
1.3.1 D-3001
Built-in central D-3001 for integrated data processing and control.
Support audiosampling rate to 32 k, the frequencyresponse of each channel can
reach at 20Hz~ 20KHz.
Limited to 6microphone inputs at one time for discussion units.
Support various occasions as its multiple conferencemodes.
Supplypower to other units bythe D-3001 instead of using batteries.
LCDscreen to show system menus.
Support audio recording byusing PC software.
Controllable via RS232 & USB.
Support hot plug.
Easyto store and keep byinstalled in astandard 19 inches rack.
1.3.2 Discussion Unit
Digital audio for good sound quality.
3 keys and 3 ways for voting.
Voting: Yes/No/Abstention
LCDscreen to show the present working status.
Built-in high-fidelityspeaker with good audio qualityand automaticallymuting

Digital Conference System (Controlled by D-3001)
2
function when turn off the microphone to isolate noise.
Built-in IC card reader for IC-Card sign-in.
3.5mm headphone jack with volume controllable bybuttons.
Condensermicrophones with double-colored LED rings for discussion units.
Detachable microphone rod for easyoperation and maintenance, with Speak key
and indicator for control.
Resistant to interference of GSMsignal effectively.
The chairman unit has the highest priorityto keep order of the meeting. It can switch
off /pause the speaking of any discussion unit.
The chairman unit with ID A001 is able to control sign-in and voting function.
1.4 Package Contents
The amount of central D-3001, discussion unit contained in a digital conference system
depends on thescale and functions needed in a conferencesystem.
Central D-3001
Each D-3001 contains 1 power cord, 1 RS232 cable and 4 plastic cushions.
Chairman unit
Discussion unit
User manual
Notes:Please confirm if the product and the accessories are all included, if not, please
contact with the dealers.
2. Central Control Unit (D-3001)
The central D-3001 is the core of conference system,which is not justto provide power
to the other units, but also to realize the communication between the devices and the
control software. It can work independentlyand or in a complicatedmeeting room.
When it works in a complicated meeting room, a computer and controlsoftware is
needed for convenient operation, andso is a professional operator.
2.1 D-3001 Product Appearance
2.1.1 Front Panel
Figure 2-1 Front Panel of D-3001

Digital Conference System (Controlled by D-3001)
3
No.
Name
Description
①
Power
Switch
Press to turn on/off the device.
②
USB-REC
Designed to connect with U-disk or other storage devices to
save recorders.
③
LCD
Screen
Shows the system status of the D-3001 and the menus when
setting.
④
Menu
In initial interface, press it to enter the mainmenu.
In settingmode, press it to return to the initial interface.
⑤
Up/Down
Button
In different menu level, press it to enter the previous/next
level.
In speechmember setting and time limitation setting, press
it to increase/decrease the value.
In volume adjusting, press it for volume up/down.
⑥
Exit
Exit the menu level bylevel until it turn to the initialization
interface.
⑦
Enter
Press to confirm operations.
2.1.2 Rear Panel
Figure 2-2 Rear Panel of D-3001
No.
Name
Description
①
DELEGATE
5 RJ45 ports in total (cascade connection), to connect with
discussion units, use crossover twisted pairs only.
②
Audio input/
outputs
INPUT: 6.5mm jack, line audio input port, connects with
audio source device.
OUT1: 6.5mm jack, output port, mixed line audio input
andmicrophone, can connect with an amplifier.
OUT2: 6.5mm jack, microphone output port, can connect
with an amplifier.
③
Control
Ports
FIRMWARE: USB type B connector, connects to control
PC to enable conferencesoftware to upgrade firmware.
TCP/IP: Connects with PC, to control the whole
conference via PC software.

Digital Conference System (Controlled by D-3001)
4
RS232: Theserial port,9-pin female connector, connects
with PC to control the whole conference via PC control
software.
④
Power port
Connect withAC100V~AC240Valternating current power.
2.2 Connection
2.2.1 Connection Diagram
Figure 2-3 Connection Diagram
2.2.2 Connect with Discussion Unit
D-3001 has 5 RJ45 ports. Each discussion unit has 2 RJ45 ports. When use, please
connect one RJ45 port of D-3001 to anyone RJ45 port of the discussion unit.
Figure 2-4 Connect with Discussion Unit

Digital Conference System (Controlled by D-3001)
5
2.2.3 Connect with Amplifier
There are one 6.5mm audio input and two 6.5mm audio outputs at the rear panel of
D-3001. Output 1 is mixed with microphone input and line audio input. Output 2 is for
microphone. Each port can connect with an amplifier.As showed below:
Figure 2-5 Connect with Amplifier
2.2.4 Connect with Computer
The central control unit D-3001 can be controlled byRS232 communication port or
TCP/IP port. This RS232 communication port is a female 9-pin D connector. The
definition of its pins is as the table below.
No. Pin Function
1 N/u Unused
2 Tx Transmit
3 Rx Receive
4 N/u Unused
5 Gnd Ground
6 N/u Unused
7 N/u Unused
8 N/u Unused
9 N/u Unused
Please connect the TCP/IP /RS232 port of PC’s and D-3001 byusing the TCP/IP
/RS232 cable, and install the right application software.After you activating the software,
you are able to control thesystem. Showed as below:
Note:The amount of discussion unit can be applied in a digital conferencesystem
depends on the D-3001’s abilityof supplying power.

Digital Conference System (Controlled by D-3001)
6
Figure 2-6 Connect with PC
2.3 D-3001 System Operations
When you finish installation and connection, you need to set the related parameters of
D-3001(Central D-3001) before the meeting through the front panel buttons. The
structure ofmenu is as follow:

Digital Conference System (Controlled by D-3001)
7

Digital Conference System (Controlled by D-3001)
8
Note:
1) In off-line state, the onlyoperation unit is the chairman unit with ID A001.
2) Anychanges of parametersettings in different menus should be confirmed bythe
“Enter”button and then it will exit the present menu. The “Exit”button is used to
exit the presentmenu without saving present settings, except in menu “ID Setting,
Select First ID”, “Restore to Factory Setting”and “Language Selection”.
2.3.1 D-3001 Initialization
Press the Power button to turn on the D-3001, and then the LCD screen willshow the
initialization information,showed as below:
Figure 2-7 D-3001 Initialization
After the initialization, the LCD screen will displayrelated information, including menu,
speech capacityand speechmodeshown as follow:
Figure 2-8 Initialization Finished
2.3.2 Settings after Initialization
After initializing, press Enter button to enter into the mainmenu, and Use Up and Down
button to switch among the options.
After the initialization, you need to set the MIC’s value (live delegatemicrophones) and
Mode value (speechmode) for the conference.
MIC and Mode are to limit the discussion units. MIC determines the capacityof live
discussion units (total number of the ones who are able to hold aspeech synchronously
(exclude chairman units), we just call it “speech capacity”in the following content).And
Mode determines what the discussion unit can do when reaches at the maximum
speech capacityor not.
The following content will show you the detailed information aboutspeech capacityand
speechmode.
1) MIC Value Setting
Use Up and Down button to switch to the option “MIC”.
Press Enter button to enter into speech number setting interface.

Digital Conference System (Controlled by D-3001)
9
Use Up and Down button to increase/decrease the value of speech capacity, the
value ranges from 1 to 6.
2) Mode Value Setting
Use Up and Down button to switch to the option “Mode”.
Press Enter button to enter into speech mode selection interface.
Use Up and Down button to select the speech mode you need.
There are five speechmodes available, including FIFO, OPEN, APPLY, PPT, VOICE.
FIFO (first in first out)
a) Not at the maximum speech capacity, discussion unit presses Speak keyto begin
speech.
b) At the maximum speech capacity,the last discussion unit entered will replace the
first live discussion unit to keep the same capacity.
OPEN(queue)
a) Not at the maximum speech capacity, discussion unit presses Speak keyto begin a
speech.
b) At the maximum speech capacity, then other discussion units can onlyapplyfor the
priorityto speak. When one live microphone is off, then the discussion unit who
firstlyenter into the queue will be automaticallyturned on.
APPLY
a) Not at the maximum speech capacity, the discussion unit presses the Speak key, it
will enter into applying state, and its microphone can onlybe switched on bythe
chairman unit of highest right.
b) At the maximum speech capacity, discussion unit can still applya speech until
chairman unitA001 permit applying units up to the speech capacityto speak.At that
time, the applying operation of restdiscussion units will be automaticallyswitched
off.
PTT (push-to-talk)
a) Not at the maximum speech capacity, press and hold on the Speak keyon the
delegate, and then it will beswitched on. Release this button to finish speech.
b) At the maximum speech capacity, no more delegatemicrophone will be switched on.
VOICE (voice-activated)
a) Not at the maximum speech capacity, speak and focus closed to the microphone,
and then it will recognize your voice andswitch on your microphone.After you finish
your speech, the microphone will be automatically switched off when it reaches at
Value Description

Digital Conference System (Controlled by D-3001)
10
the limitedspeech time.
b) At the maximum speech capacity, no more delegatemicrophone will be switched on.
The LED rings on latter applying delegate units will twinkle green (join the waiting
queue, or you can exit bypressing Speak Key), when a live delegate unit is off, the
first unit in the waiting queue will be switched on.
2.3.3 Enter into Main Menu
Press Menu button on front panel to enter into themainmenu, see as below:
The main menu includes PrioritySetting, Unit Status, Voting Display, Speech Time,
Speech Record, System Setting.
Figure 2-9 Main Menu
Press Menu button to enter into themainmenu. You can press up/down button to
switch among the items, press Enter button to confirm selection.
Use Up and Down button to switch to the menu you need toselect. In a menu, Up
and Down buttons are used to select one option (e.g. values like Yes, No orsome
other options) or increase/decrease the value (e.g. volume, speech capacity, time
limitation , ID etc) you want to change.
Press Exit button to exit the present menu level bylevel until it return to the initial
interface.
1) Priority Setting
Select “1.PrioritySetting”in the main menu, and press Enter button to enter into Priority
setting interface. See as below:
Note:
1. When you use Up and Down button toselect one option in amenu, if the
value you select is “No”, it will return to the previous menu. If it is “Yes”or
some other option, please press the Enter button, and then it will confirm
your setting and enter into the next interface.
2. You need to press Enter button to confirm your selection or change of
settings.

Digital Conference System (Controlled by D-3001)
11
Figure 2-10 Enable/Disable Priority key
Yes: Enable Prioritykey, then the chairman unit will be able tomute or switch offany
live delegate microphone when press this button.
No: Disable Prioritykey,it will take no action when press Prioritybutton.
Switch to “Yes”and press Enter button to confirm and enter into the next interface. See
as below:
Figure 2-11 PrioritySetting
Mute: If the chairman unit presses the Prioritykey, all live delegate microphones will
be mute until the chairman unit releases the Prioritykey.
Off: If the chairman unit presses the Prioritykey, all live delegatemicrophones will
be switched off until the chairman unit releases the Prioritykeyand the delegates
need to press Speak keyagain to continue speaking.
2) Unit Status
Select “2.Unit Status”in themain menu and press Enter button to enter into the
following interface.
You can check the status of all discussion units: unit amount,live microphone amount
etc.
Figure 2-12 Unit Status
3) Voting Display Setting
Select “3.Voting Display”in the main menu and press Enter button to enter into Voting
Displaysetting interface.

Digital Conference System (Controlled by D-3001)
12
Figure 2-13 Vote Result Display Setting
Yes: Displayvote result, includes the number of approval,against, abstention and
no press in detail.
No: Not displayvote result, does not show the number of voted, but just show that
you’ve already voted except chairman units.
4) Speech Time Setting
Step1. Select “4.Speech Time”in the main menu and press Enter button to enter into
time limitation setting interface. See as below:
Figure 2-14 Enable/Disable Time Limitation
On: Enable time limitation, the delegate microphone will beswitched off when it
reaches at the limit.
Off: Disable time limitation, the delegate can speak as long as he wants to.
Step2. Use Up and Down button toswitch to “On”, and press Enter button to enter into
time limitation setting interface. See as below:
Figure 2-15 Time Limitation Setting
Step3. In time limitationsetting interface, use Up and Down button toselect the value
you need, and use Enter button to confirm your selection.
Step4. Press Exit button to exit setting interface and it will enter into the following
interface:

Digital Conference System (Controlled by D-3001)
13
Figure 2-16 Time Limitation Confirmation
Step5. Use Up and Down button toswitch between Yes and No. Yes is to confirm your
settings andexit this menu, No is to exit this menuwithout saving yoursettings.
5) Speech Record Setting
Step1. Select “5.Speech Record”and press Enter button, it will enter into audio record
setting interface,see as below:
Figure 2-17 Audio Record Setting
Step2. Use Up and Down button to switch between Storage and Open, select one
option, and press Enter button to enter into audio record setting interface.
a) Select Storage in Figure 2-18:
Figure 2-18 Storage Location Selection
Use Up and Down button to scan the two options (Ports and Capacity), select the
option you need and press Enter button to confirm your selection.
Ports (for storage location):
Select the storage location you need (it will be set as the default location for recorders).
Capacity (for checking the remaining storagespace):
Notice: After you set Speech Time, D-3001 will remember the setting and carryit
on until you set it again. The value of Speech Time should exceed 00:00, or it will
automaticallyswitch to No Time Limit.

Digital Conference System (Controlled by D-3001)
14
Figure 2-19 Storage Capacity Checking
You can check the size of the recording file and its remaining time.
b) Select Open in Figure 2-17, it will enter the interface shown as below:
Figure 2-20 Begin/stop Audio Recording
Start: start to record Stop: stop recording
When you insert your storage (USB flash disk), thesystem will pop up an interfacelike
Figure 2-19 andshow you the capacityof this storage and the remaining recording
time.After 30 seconds orso, it will exit this interface.
While there is no remaining storage space, it will prompt you to change for other
storage, showed as below:
Figure 2-21 Full Storage Space Prompt
6) System Setting
Select “6.System Setting”and press Enter button, it will enter into the following interface:
Figure 2-22 System Setting
The menu System setting includes language, volume, voice mode, address and system
parameters.
The defaultsetting ofmicrophone gain is low, you need to set it higher
before recording. Set following thesteps: System SettingVolume MIC
Gain.

Digital Conference System (Controlled by D-3001)
15
Language Setting
Use Up and Down button to switch to “language”, and then press Enter button to enter
into the following interface:
Figure 2-23 Language Selection
D-3001 supports two system languages: Chineseand English. Select one language and
then press Enter button to confirm.
Volume Setting
Use Up and Down button to switch to “Volume”, and then press Enter button to enter
into the following interface:
Figure 2-24 Volume Selection
a) Unit Mute Setting
Use Up and Down button to switch to “UnitMute”in Figure 2-24, press Enter button to
enter the following interface:
Figure 2-25 Enable/disable Unit Volume Output
Select On or Mute as you need, and then press Enter button.
On: enable delegatemicrophone audio output.
Mute: mute the delegate microphone audio output.
Note: When delegatemicrophones aremuted, there is no audio output on the units’
Note: Languagesetting mentioned in this document is formenu language and
the language shown on discussion units.
Note: You can also use the button VOLUME to enter this interface directly.

Digital Conference System (Controlled by D-3001)
16
built-in speakers, but extended speakers willstill output the audios normally.
b) Output Volume Setting
Use Up and Down button to switch to “Output VOL”in Figure 2-24, press Enter button to
enter the following interface:
Figure 2-26 Output Volume Adjustment
Use Up and Down button to adjust the line volume, Up is for volume up, Down is for
volumedown, press Up/Down button and hold for fewseconds to increase/decrease the
volume quickly.
c) Line In Volume Setting
Use Up and Down button to switch to “Line In VOL”in Figure 2-24, press Enter button to
enter the following interface:
Figure 2-27 Line In Volume Adjustment
Use Up and Down button to adjust the line volume, Up is for volume up, Down is for
volume down, long press Up/Down button to increase/decrease the volume quickly.
d) MIC Gain Setting
Adjust gain for all MICs or active MICs synchronously.
Use Up and Down button to switch to “MIC Gain”in Figure 2-24, press Enter button to
enter the following interface:
Figure 2-28 Begin to Adjust Microphone Gain
You can choose to adjust MIC gain for All MIC or Active MIC, press Enter to enter in the
setting interfaceshown as below, then you are able to press Up/Down button to
increase/decrease MIC gain for All MIC or Active MIC.
Table of contents
Other PTN Conference System manuals