pts Diagnostics CardioChek User manual

User Guide
For Self-Testing Use
Portable Whole BloodTest System

3
1 Introduction: CardioChekTest System Intended Use ........................ 5
2 About the CardioChek Test System. . . . . . . . . . . . . . . . . . . . . . . . . . . . . . . . . . . . . . . . 8
The CardioChek Test System ................................................... 8
The MEMo Chip................................................................ 10
PTS Panels Self-Test Strips..................................................... 11
3 Setup ......................................................................... 12
Battery Use and Replacement................................................. 12
When to Replace the Batteries ................................................ 12
How to Install/Replace the Batteries .......................................... 13
CardioChek Analyzer Menus................................................... 13
How toTurn O the Analyzer .................................................. 16
How to the Set Language. . . . . . . . . . . . . . . . . . . . . . . . . . . . . . . . . . . . . . . . . . . . . . . . . . . . . . 16
How to the SetTime........................................................... 17
How to the Set Date ........................................................... 18
How to the Set Units........................................................... 19
How to the Set Sound ......................................................... 20
4 Checking the System ....................................................... 21
Analyzer Check Strip........................................................... 21
How to Use the Analyzer Check Strip .......................................... 21
5 Quality Control Testing..................................................... 23
Quality Control ................................................................ 23
How to Run a Quality Control Test ............................................. 24
6 Running a Test............................................................... 25
BloodTesting .................................................................. 25
Testing Supplies ............................................................... 25
Helpful Hints on Getting a Good Drop of Blood................................ 25
How to Obtain a Blood Sample from a Fingerstick ............................ 26
Quick Reference - How to Run a Test......................................27
Table of Contents
Materials Provided
REF 1709 CardioChek® analyzer system (1)
Materials Needed but Not Provided
PTS Panels® self-test strips
Product availability will vary per country
Lot-specic MEMo Chip® included with test strips
Refer to self-test strip package insert for more information.
PTS Collect™ capillary tubes, 15 µL, included with test strips
Appropriate sterile, disposable, auto-disabling, single-use lancet included with
test strips
Alcohol wipes
Gauze pads or cotton balls
Bandages

4 5
CardioChek Test System Intended Use
Thank you for selecting a CardioChek analyzer from PolymerTechnology Systems, Inc.
(PTS Diagnostics).
The CardioChek test system (consisting of the CardioChek analyzer and PTS Panels
self-test strips) is for the measurement of glucose, total cholesterol, HDL (high density
lipoprotein) cholesterol and triglycerides in capillary whole blood from the ngertip
and is intended for self-testing use. This system should only be used with single-use,
auto-disabling lancing devices. This system is for in vitro diagnostic use only.
• Cholesterol measurements are used in the diagnosis and treatment of disorders
involving excess cholesterol in the blood and lipid and lipoprotein
metabolism disorders.
• HDL (lipoprotein) measurements are used in the diagnosis and treatment of lipid
disorders (such as diabetes mellitus), atherosclerosis, and various liver and
renal diseases.
• Triglycerides measurements are used in the diagnosis and treatment of patients
with diabetes mellitus, nephrosis, liver obstruction, other diseases involving lipid
metabolism or various endocrine disorders.
• Glucose measurements are used in the diagnosis and treatment of carbohydrate
metabolism disorders including diabetes mellitus, neonatal hypoglycemia, and
idiopathic hypoglycemia, and of pancreatic islet cell carcinoma.
The CardioChek analyzer from PTS Diagnostics is intended for in vitro diagnostic use to
test whole blood.
This user guide includes all the information that you need to run tests using the
CardioChek system. Before you begin testing, please read this entire user guide and the
package inserts, which are included with the PTS Panels self-test strips.
Introduction
1
7 Results........................................................................ 28
8 Memory ...................................................................... 29
How to Review Results Stored in Memory ................................29
How to Clear Results Stored in Memory.....................................30
9 Care and Cleaning........................................................... 31
Storage and Handling...................................................31
Cleaning and Disinfection ...............................................31
Cleaning Instructions ...................................................33
Disinfection Instructions ................................................34
10 Troubleshooting ............................................................ 36
11 Unexpected Results......................................................... 38
12 Specications................................................................ 39
13 Contact Information........................................................ 40
Help...................................................................40
14 Warranty ..................................................................... 41
15 Explanation of Symbols .................................................... 42
16 Index.......................................................................... 43

6 7
CAUTION: Do not take any decision of medical relevance without rst
consulting your healthcare practitioner.
If the device is being used for the monitoring of an existing disease, only
adapt the treatment if you have received the appropriate training to do so.
The CardioChek analyzer is fast, portable, and reliable.This analyzer is a component of
a test system that includes PTS Panels self-test strips.The PTS Panels self-test strip box
includes a MEMo Chipthat contains the assay calibration curve and other important
information about the assay.The PTS Panels self-test strip box also includes PTS Collect
capillary tubes (15 µL) and auto-disabling, single-use lancets. PTS Panels self-test
strips are sold separately and are available as single-analyte self-test strips.
This test system uses reectance photometry technology. An enzymatic reaction on the
test strip produces a color change that is detected by the analyzer after whole blood
is applied.
Please remember to return the enclosed warranty card to PTS Diagnostics to ensure that
you receive product updates and other important information.
For questions or additional assistance with your CardioChek test system, please contact
PTS Diagnostics (Hours: 6:00 a.m. to 9:00 p.m. US EST) using the following contact
information:
PTS Diagnostics
7736 Zionsville Road, Indianapolis, IN 46268 USA
Direct: +1-317-870-5610 ·Toll-free inside the US: 1-877-870-5610
Fax: +1-317-870-5608
Important Safety Instructions
This is a medical device and needs to be treated with care. In particular there is the risk
of disease transmission when using blood glucose monitoring systems and they should
be used with caution and care.1,2
The analyzer and lancing device are for single patient use. For safety reasons, do not
share them with anyone including other family members. Do not use on multiple
patients.
All parts of your device come into contact with your blood and are biohazardous.
Kit parts can potentially transmit infectious diseases, even after being cleaned and
disinfected.
Always wash your hands thoroughly with soap and water and dry well after handling
the analyzer, test strips, or your lancing device.
Always consult your diabetes healthcare professional and follow his or her guidance
about your blood glucose monitoring routine.
Blood samples and blood products are potential sources of hepatitis and
other infectious diseases. Handle all parts of your device with care. Do not
share your analyzer. It is for single-patient use only. Any items that are used
to conduct a test such as test strips, lancets, and alcohol swabs, must be
disposed of safely to avoid the risk of infection. Please follow your healthcare
provider’s instructions for proper disposal.
References:
1. “FDA Public Health Notification: Use of Fingerstick Devices on More than One Person Poses Risk for Transmitting
Bloodborne Pathogens: Initial Communication”(2010).
http://www.fda.gov/MedicalDevices/Safety/AlertsandNotices/ucm224025.htm.
2. “CDC Clinical Reminder: Use of Fingerstick Devices on More than One Person Poses Risk for Transmitting Bloodborne
Pathogens”(2010). http://www.cdc.gov/injectionsafety/Fingerstick-DevicesBGM.html.
8 9
The CardioChekTest System
The CardioChek test system consists of three main parts.These include the analyzer,
PTS Panels self-test strips, and a MEMo Chip.
When a blood sample is applied to the test strip, a chemical reaction occurs producing a
color change.The analyzer measures the color reaction and compares the information to
the calibration curve stored in the MEMo Chip. The analyzer converts this color reading
into a test result that is displayed on the screen.
A
B
C
D
E
About the CardioChek
Test System
2
99
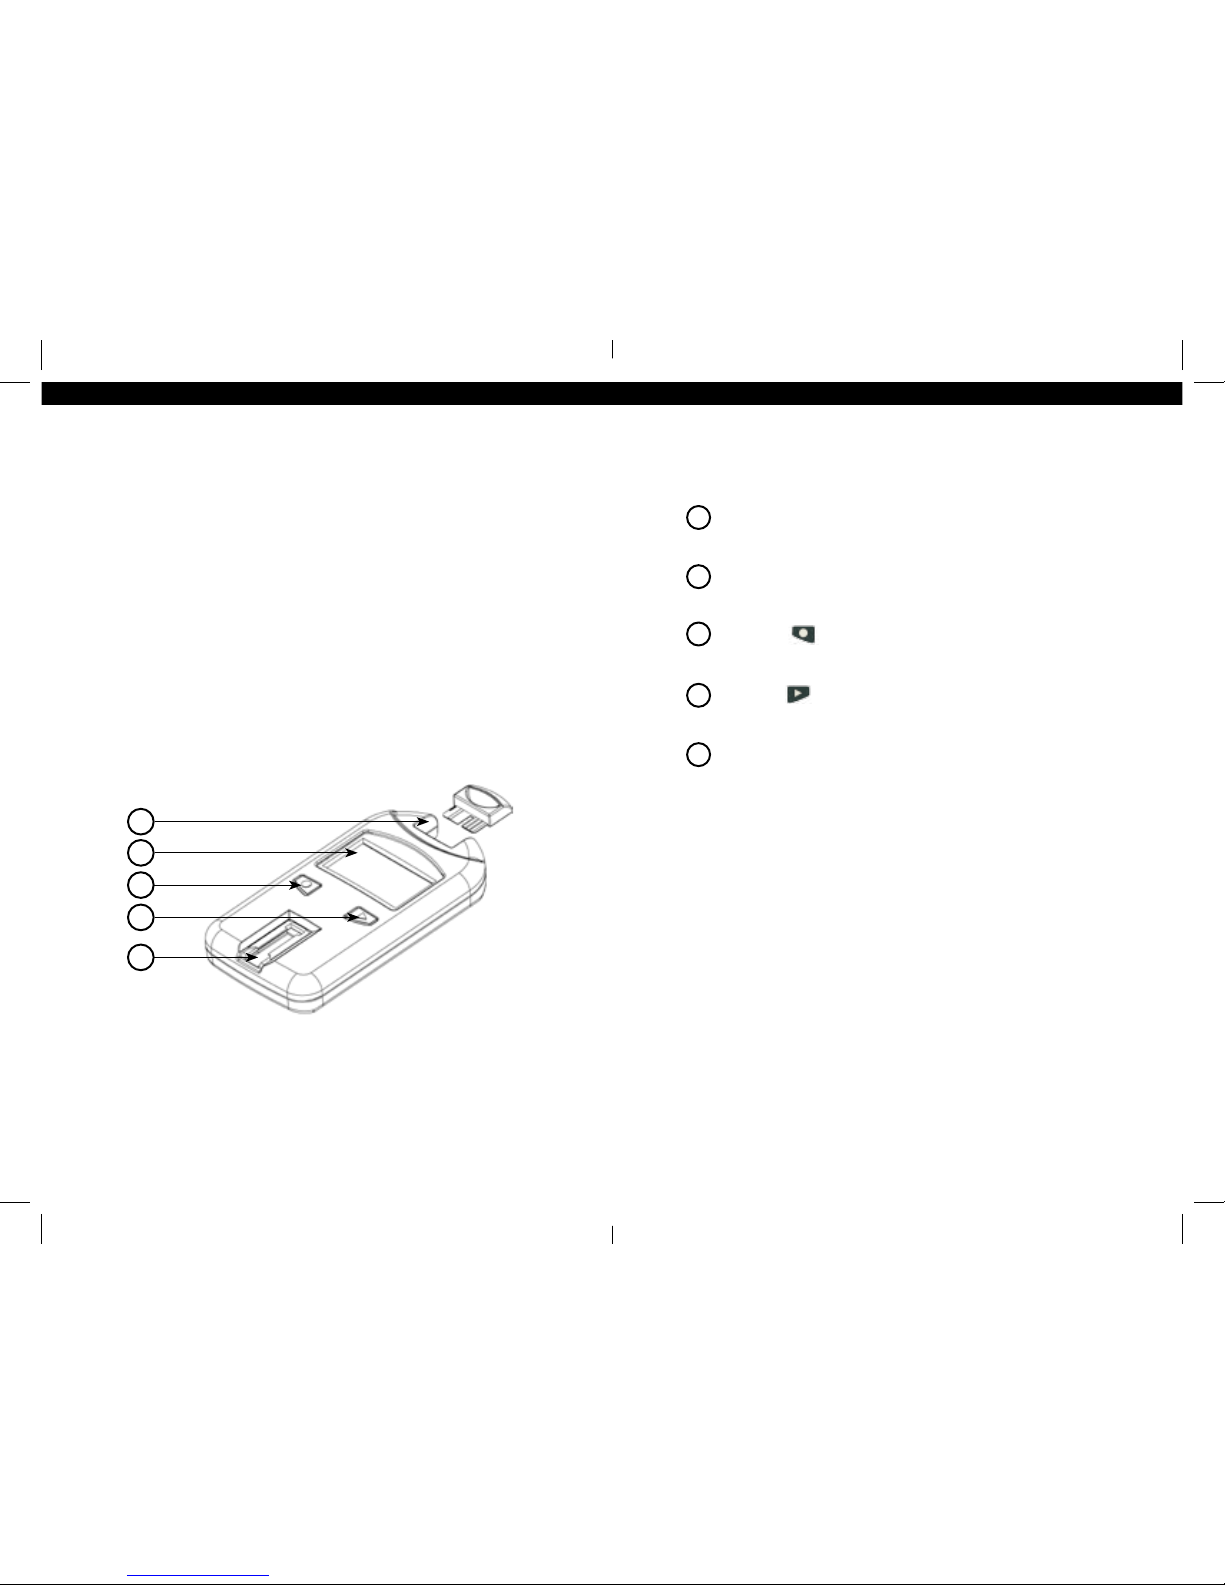
MEMo Chip Port
The MEMo Chip port is located at the top of the analyzer.
Display
Display shows test results, messages, time, date, and stored results.
Enter Button
Press this button to turn on the analyzer or to accept the current menu choice.
Next Button
Press this button to turn on the analyzer or to advance to the next menu option.
Test Strip Slot
The test strip slot is positioned in the lower front of the analyzer. The test
strip and/or check strip is inserted here with the raised lines facing up.
A
B
C
D
E

10 11
The MEMo Chip port is located at the top center of the
analyzer.The MEMo Chip is inserted into this port
with the lot number facing down. Push rmly, but
gently, until the MEMo Chip is fully inserted.
Important: Be careful not to bend the connector.
PTS Panels Self-Test Strips
To test blood on a CardioChek analyzer, use test strips specic for each test. A test strip is
inserted into the analyzer, then then blood is applied to the blood application window.
A chemical reaction occurs producing a color change, which the analyzer measures and
compares the information to the calibration curve stored in the lot-specic MEMo Chip.
The analyzer converts this color reading measurement into a test result, displayed on
the screen. Each PTS Panels self-test strip box contains a package insert that provides
instructions for use and information specic for each test. Please read the instructions
completely before testing.
The MEMo Chip
Each package of PTS Panels self-test strips contains a color-coded, lot-specic MEMo
Chip. The MEMo Chip contains the settings for each test.The bottom has a label with the
test name and lot number. Always make sure you insert the MEMo Chip into the port
with the nger notch facing up.
What does the MEMo Chip do?
The MEMo Chip contains proper settings
for the test strip lot you are using.
The MEMo Chip:
• Stores the test strip expiration date
• Tells the analyzer which test(s) to run
• Contains the calibration curve and the lot number for the specic test strip lot
• Controls test sequences and timing
• Provides the measuring range for the test
Guidelines for using the MEMo Chip
• The MEMo Chip must be inserted to run a test.
• Use only the MEMo Chip that is included with eachpackage of test strips.The lot
number code on the test strip vial, MEMo Chip, and analyzer display must match.
• If the expiration date in the MEMo Chip has passed, the analyzer will display
EXPIRED LOT.
• If your MEMo Chip is lost or misplaced, please call PTS Diagnostics Customer
Service for a replacement (or use another MEMo Chip from another vial of the
same lot number).
Apply blood to
application window
Example of a reectance self-test strip
The CardioChek system has various analyte test strips available for use.
Not all test strips are available for use in all countries. Please refer to the
package insert of each PTS Panels self-test strip prior to use.
Finger Notch
Lot#
X000
Cholesterol

12 13
Battery Use and Replacement
The CardioChek analyzer requires two (2) AAA 1.5 volt high-quality alkaline batteries.
When to Replace the Batteries
The analyzer will give you an indication on the display that the batteries need to be
changed.When the display reads REPLACE BATTERIES, no more tests can be run until the
batteries are changed. Always replace the batteries with high-quality alkaline batteries.
It is recommended to keep a spare set of batteries on hand.To extend battery life,
remove the test strip as soon as a result is displayed.The time/date and results stored in
memory will not be erased when the batteries are changed.
When the REPLACE BATTERIES message is displayed, replace the batteries with 2 new
AAA alkaline batteries of the same brand.
Do not use NiCad or rechargeable batteries.
Caution: Improper installation of batteries can result in decreased battery life or
damage to the analyzer.
Setup
3
How to Install/Replace the Batteries:
1. Open the battery door on the back of the CardioChek analyzer by pressing and
sliding it in the direction of the arrow (toward the MEMo Chip port).
2. Remove old batteries from the compartment and properly discard.
3. Insert the new batteries into the battery compartment with the positive (+)
terminals correctly facing as marked on the inside compartment.
4. Replace the battery door. To make sure the batteries were installed correctly, push
either of the two buttons on the front of the analyzer to turn on the CardioChek
analyzer.
Warning: Dispose of the old batteries properly.
CardioChek Analyzer Menus
The following diagram provides a layout of the menus within the CardioChek analyzer.
Detailed information on the use of each menu follows. Use the following buttons to
navigate the menus:
Enter Button
Press this button to turn on the analyzer or to accept the current menu choice.
Next Button
Press this button to turn on the analyzer or to advance to the next menu option.
Note: Hold and down at the same time for three seconds to turn o
the analyzer.

14 15
CHOL
USE CODE
INSERT STRIP
RUN TEST
MEMORY
CHEM*
( to select)
CONTROL
( to select)( to select)
EXIT return to MEMORY
return to CHEM
GLU
HDL
TRIG
EXIT
**If the units are locked, the UNITS screen does not appear.*Memory results will only be shown for chemistries that have been run.
CHECK STRIP
RUN CONTROL
CLEAR MEMORY
EXIT
UTILITY SETTINGS
( to select)
return to UTILITY
return to CHECK STRIP
( to select)
SOUND
SETTIME
SET DATE
UNITS**
EXIT return to SETTINGS
return to SOUND

16 17
How to Turn O the Analyzer
To turn o the analyzer, press both buttons (Enter and Next) at the same time for three
seconds. After three minutes of idle time (without a test strip or check strip inserted)
the analyzer will perform a 10 second count down and turn o. To stop shutdown, press
either button.You can also remove the batteries to turn o the analyzer.
Setting Language
The rst time the analyzer is turned on, you will be required to set the language, date,
and time.The language menu consists of the following choices: English (ENGLISH),
Spanish (ESPAÑOL), Italian (ITALIANO), German (DEUTSCH), French (FRANÇAIS),
Portuguese (PORTUGSE), and Dutch (NEDERL).
Note: Languages may vary based on analyzer version used.
How to Set the Language (First-Time Use)
1. Turn on the analyzer by pressing either button (Enter or Next).
2. The display will read LANGUAGE. Press Enter.
3. ENGLISH will be displayed. Press Enter if English is desired.
4. For other languages press Next until the desired language is displayed, then press
Enter. To set the date and time, proceed to How to Set the Time and How to
Set the Date sections.
How to Reset the Language
1. Turn off the analyzer.
2. Press and hold Enter down for approximately 5 seconds during the analyzer
power-up stage until LANGUAGE is displayed.
3. Press Enter. Press Enter again to select English or press Next to scroll through the
language choices.
4. Press Enter to select the desired language that is displayed.
How to Set the Time
1. If the analyzer is off, press either button to turn on the analyzer. Wait for the
display to read either INSTALL MEMO CHIP (if a current MEMo Chipis not installed)
or INSERT STRIP (if a current MEMo Chip is installed). Press Enter. The display will
read RUN TEST.
2. Press Next until SETTINGS is displayed.
3. Press Enter. Press Next until SET TIME is displayed.
4. Press Enter and the clock format is displayed: 12/24 HR.
5. Press Next to alternately display the 12 hour AM/PM clock or the 24 hour clock.
Press Enter to accept the displayed clock format. The display will read HOUR and
the numerical hour. If 12 hour clock was chosen, AM/PM appears in the upper right
hand corner of the display.
6. Press Next to increment the hour.
7. Press Enter to accept the displayed hour. The display will read MINUTE and the
numerical minute.
8. Press Next to increment the minutes.
9. Press Enter to accept the displayed minute. The display will read SET TIME. To set
the date, proceed to How to Set the Date.
10. To exit, press Next until EXIT is displayed. Press Enter.
11. Press Next to return the display to RUN TEST.

18 19
How to Set the Date:
1. If RUN TEST is displayed, go to Step 3. If the analyzer is off, press either button to
turn on the analyzer. Wait for the display to read INSTALL MEMO CHIP or
INSERT STRIP.
2. Press Next. The display will read RUN TEST.
3. Press Next until SETTINGS is displayed. Press Enter.
4. Press Next until SET DATE is displayed.
5. Press Enter and the numerical month is displayed.
6. Press Next to increment the month.
7. Press Enter to accept the displayed month. The display will read DAY and the
numerical day of the month.
8. Press Next to increment the day.
9. Press Enter to accept the displayed day. The display will read YEAR and the
numerical year.
10. Press Next to increment the year.
11. Press Enter to accept the displayed year. The display will read SET DATE. To set the
units, proceed to UNITS.
12. Press Next until EXIT is displayed. Press Enter.
13. Press Next to return the display to RUN TEST.
How to Set the Units:
The CardioChek analyzer may be shipped with preset units of measure (e.g. mg/dL).
Note:
• If the SETTINGS menu does not display UNITS the instrument is locked in
preset units
• The units cannot be changed if the system has been locked
• To conrm current conguration of the analyzer’s units run a check strip in the
RUNTEST mode and observe the units that are displayed
If your analyzer’s units have not been preset, follow the steps listed below to
change your units to mg/dL, mmol/L, or g/L:
1. If RUN TEST is displayed, go to Step 3. If the analyzer is off, press either button to
turn on the analyzer. Wait for the display to read INSTALL MEMO CHIP or
INSERT STRIP.
2. Press Enter. The display will read RUN TEST.
3. Press Next until SETTINGS is displayed.
4. Press Next until UNITS is displayed. If UNITS is not shown on the display, the units
on this analyzer have been locked and cannot be changed. If UNITS appears on the
display screen, proceed to the next step.
5. Press Enter. The display will read mg/dL. If mmol/L or g/L is desired, press Next
until the desired unit appears on the display screen.
6. Press Enter to select the desired units. The display will then read UNITS.
7. Press Next until EXIT is displayed.
8. Press Enter to return to SETTINGS.
9. Press Next to return to RUN TEST.

20 21
How to Set the Sound
The CardioChek analyzer sound has been preset to BEEP ON.To turn the sound on or o,
please follow the steps listed below:
1. If RUN TEST is displayed, go to Step 3. If the analyzer is off, press either button to
turn on the analyzer. Wait for the display to read INSTALL MEMO CHIP or
INSERT STRIP.
2. Press Next. The display will read RUN TEST.
3. Press Next until SETTINGS is displayed.
4. Press Enter, then Next until SOUND is displayed.
5. Press Enter. The display will read BEEP ON or BEEP OFF .
6. Press Next to select either BEEP ON or BEEP OFF .
7. Press Enter to accept the sound choice displayed.
8. Press Next until EXIT is displayed.
9. Press Enter to return display to SETTINGS.
10. Press Next to return to RUN TEST.
Analyzer Check Strip
A gray analyzer check strip (included in the analyzer carrying case) can be used to verify
proper functioning of the CardioChek analyzer’s electronic and optical systems.The
check strip provides a color standard read by the analyzer.When the check strip is not in
use, please store it in the analyzer carrying case. It is recommended
that you check your analyzer with the check strip when:
• You rst receive it
• You drop the analyzer
• You get a result that is not expected
How to Use the Analyzer Check Strip:
1. Turn on the analyzer by pressing either button.
2. When INSTALL MEMO CHIP or RUN TEST is displayed, press Next until UTILITY is
displayed. Press Enter.
3. Press Enter when CHECK STRIP is displayed.
4. Hold the check strip at base of strip and insert the check strip, ribbed side up, into
the test strip slot when INSERT STRIP is displayed.
5. The analyzer should display PASSED. (If the display reads FAILED, see the note
at the end of this section.) Remove the check strip and store it in the analyzer
carrying case.
6. Press Next until EXIT is displayed. Press Enter.
7. Press Next until RUN TEST is displayed.
8. Press Enter. The analyzer is ready to run tests.
Checking the System
4
Check Strip

22 23
Note: If the analyzer displays FAILED:
1. Clean the CardioChek analyzer test strip slot (where the strip is inserted into the
analyzer). See Section 9, Care and Cleaning.
2. Inspect the check strip to make sure it is not dirty or damaged. Use the spare check
strip and repeat.
3. See Section 10, Troubleshooting.
Quality Control
Controls (also known as“liquid quality control materials”) are solutions used to ensure
all the parts of the test system are working properly together and the test results are
accurate and reliable within the limits of the system. A quality control material, or
control, is a liquid containing an analyte known to be within a certain range. Use quality
control materials provided by PTS Diagnostics. Contact Customer Service for ordering
information.
Refer to the range card provided with the controls or visit
http://www.ptsdiagnostics.com for control specications.
Home users should run quality control materials:
• With each new lot number
• If it has been more than a month since using the lot of test strips
• Or as desired
Important: Check the expiration date printed on the control bottles. Do not use control
solutions that have expired.
For performing a quality control test, see the instructions below.
To perform a control test you need:
• CardioChek analyzer
• PTS Panels self-test strips
• Quality control materials
• Quality control instructions
• Quality control range card
Quality Control Testing
5

24 25
How to Run a Quality Control Test
Refer to the instructions for use provided with your quality control materials.
If Quality Control Results Are Not in Range
IMPORTANT: Tests should not be performed until control results are
within range.
1. Ensure test strip slot area is clean.
2. Make sure neither the test strips nor the controls
are past the expiration date printed on the label.
3. Make sure the MEMo Chip matches the test strip lot.
4. Repeat the test again using fresh materials.
5. Call Customer Service for assistance.
Blood Testing
A test strip package insert is included with each box of test strips. Please read the test
strip package insert along with this section of the user guide completely and carefully
before testing.
Testing Supplies
To perform a blood test you need:
• CardioChekanalyzer
• PTS Panelsself-test strips
• Lot-specic MEMo Chip
• Sterile lancet
• Capillary blood collector or pipet
• Gauze or cotton balls
• Alcohol wipe (optional)
This analyzer requires whole blood for testing. Do not operate the analyzer in direct
light. See Section 9, Care and Cleaning for more information.
Helpful Hints on Getting a Good Drop of Blood
1. Wash hands in warm, soapy water.
2. Rinse well and dry completely. If an alcohol wipe is used, let the finger air dry
before testing. Clean gauze may be used to dry alcohol.
3. Warm the fingers to increase blood flow.
4. Let the arm hang down at the side briefly to allow blood flow to the fingertips.
Running a Test
6
26 27
How to Obtain a Blood Sample from
a Fingerstick
1. Use either the middle or ring finger for fingersticking.
2. Select the site to allow for convenient collection.
3. Clean the finger. Be sure the finger is completely dry.
4. Use a new sterile, disposable lancet to puncture the skin.
5. Apply gentle pressure to the finger with lancet
and stick the finger left or right of center. See picture.
6. Use cotton or gauze to wipe away first drop of blood
for each test strip used.
7. Gently apply pressure (squeeze and release) to the
finger to produce a large drop of blood. Note: Avoid
milking the finger. This may cause tissue fluid dilution
or hemolysis and affect the accuracy of results.
8. Hold the capillary tube just below the bulb and
level with the angle of the finger. Note: Do NOT
squeeze the bulb of the capillary tube during collection
if applicable.
9. Place the tip just touching the drop of blood allowing
the capillary action to draw the blood into the capillary tube
until sample reaches the fill line.
10. Follow the specific instructions found in the test strip package insert for each
test for sample application and volume ranges. Use of a capillary pipet or blood
collector ensures a sufficient volume of blood has been applied to the test strip
11. Make sure the test strip is inserted all the way into the test strip slot.
12. Use the test strip and lancet one time only. Dispose of properly.
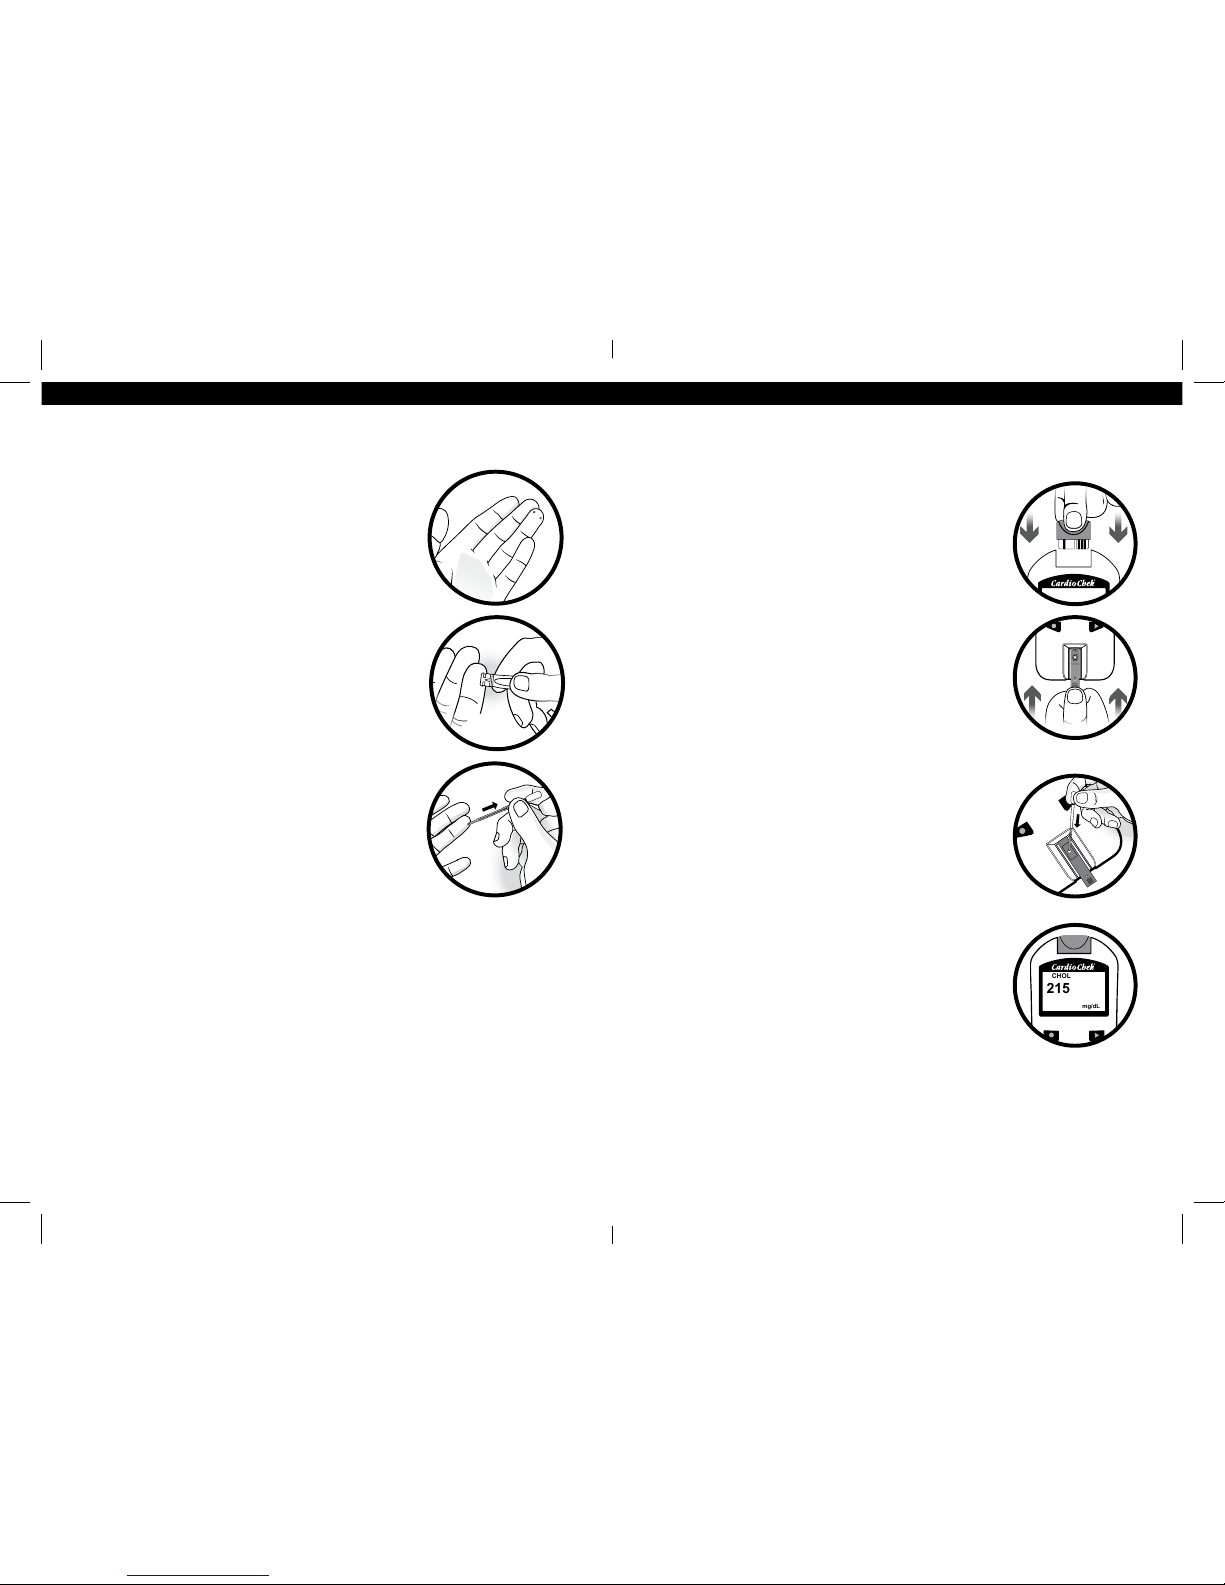
Quick Reference - How to Run a Test
1. Press either button to turn the analyzer on.
2. Remove the MEMo Chip from the box of test strips.
3. Insert the MEMo Chip in the port at the top of the
analyzer with the lot code number facing down.
4. When INSERT STRIP is displayed, remove a test strip
from the vial and immediately replace the cap.
5. Insert the strip. Ensure that the test strip is inserted
fully and the display reads APPLY SAMPLE.
6. Obtain a blood drop following the correct technique.
(Immediately collect sample with capillary tube or
precision pipet and dispense correct volume* as
specified in test strip instructions for use (package
insert) on to the test strip.)
7. Hold the capillary tube by the bulb and position above
the blood application window on the test strip. Use
care to avoid touching the test strip with the capillary
tube. Squeeze the bulb gently to deposit the entire
sample on the strip.
8. Once the sample is applied, results will appear on the
analyzer display in as little as 45 seconds depending
on type of test strip.
9. Remove test strip and dispose of properly.
Each test strip is for a single test only. Do not reuse the
test strips. Use a new test strip each time you test.
10. If the analyzer is idle for more than 3 minutes, it will
count down 10 seconds and automatically turn off.
CHOL
mg/dL
215
* Refer to each specic test strip package insert for sample volume and sample
application instructions.

28 29
Results for each test are in units of measure specic to each test and your location.The
measuring range for each test is listed in the test strip instructions.This is the range
that your CardioChek analyzer will display. Results higher or lower than this range will
display as > or < followed by a number.
The expected values listed in the instructions are the ranges expected for the majority of
healthy persons (persons not diagnosed with any disease).
Important Test Considerations
1. Make sure that you read and follow the instructions. If you are not sure how
to run the test, call PTS Diagnostics Customer Service for assistance
before testing.
2. If any result is not as expected, questionable for any reason, above or below
the measuring range or expected values range, always repeat the test with a
new, unused test strip.
3. Always consult your healthcare provider or medical practitioner and follow
their advice.
4. Never make any changes in how you take your medication or make any
medical decisions based on the results from this device unless instructed by
your healthcare provider.
Results
7
Test results are automatically stored in the CardioChek analyzer’s memory.The analyzer
can store up to 30 results of each chemistry and at least 10 results for control tests.The
analyzer allows review of the results in order from the most recent to the oldest. Each
result is displayed with time and date. Results stored in memory are not deleted when
the batteries are changed.
How to Review Results Stored in Memory:
1. Press either button to turn on the analyzer. If the display reads INSTALL
MEMO CHIP, go to Step 2. If the display reads INSERT STRIP press Enter.
2. Press Next until MEMORY is displayed.
3. Press Enter. CHEM is displayed.
4. Press Enter, then Next to select the desired chemistry.
Note: Until the chemistry has been run at least once, the test name is
not displayed.
5. Press Enter to view the test result including time and date.
a. To recall quality control results, press Next until EXIT is displayed. Press Enter.
Press Next until CONTROL is displayed.
b. Press Enter when the desired quality control test is displayed.
c. For example, to review cholesterol results, from the CHEM display, press Next
until CHOL is displayed, then Enter. The time and date will be displayed. Press
Enter when the desired test time and date is displayed. Press Next to scroll
through results.
6. To exit, press Next until the display reads EXIT, then press Enter. Repeat this step
until you return to RUN TEST.
Memory
8

30 31
How to Clear Results Stored in Memory
1. Press either button to turn on the analyzer. Wait for the display to read either
INSTALL MEMO CHIP or INSERT STRIP.
2. Press Enter, then press Next until UTILITY is displayed. Press Enter.
3. Press Next until CLEAR MEMORY is displayed. Press Enter.
4. Press Next until the display reads CLEAR YES. Press Enter. The display will read
ERASE and then CLEAR MEMORY.
5. To exit, press Next until the display reads EXIT, then press Enter. Press Next until
you return to RUN TEST.
Storage and Handling
• Handle the CardioChek analyzer with care; do not drop.
• Do not store or operate the analyzer in direct light, such as sunlight, spotlight,
under a lamp, or by a window.
• Do not expose the analyzer or any of the supplies or accessories to high humidity,
extreme heat, cold, dust, or dirt. The analyzer may be stored at a temperature of
50-104º F (10-40º C) and 20-80% Relative Humidity (RH). Do not freeze.
• If storage temperature is below 68º F (20º C) allow the device to warm to room
temperature 68º F (20º C) before using. If the analyzer has been stored under
excessive conditions or above 86º F (30º C), allow at least 30 minutes at room
temperature for the analyzer to equilibrate to these temperatures.
• Do not scratch or damage the surface of the check strip.
• Please read the test strip package insert for storage and handling information that
applies to each test strip.
Cleaning and Disinfection
Cleaning and disinfection of analyzers that come in contact with blood or blood
products is critical to avoid transmitting bloodborne pathogens. This analyzer is
intended to be used by a single person and should not be shared.
IMPORTANT SAFETY INSTRUCTIONS: It is critical to properly clean and disinfect
analyzers that are used with blood products each time they are used.
Additionally, to avoid transmissions of bloodborne pathogens, only use auto-
disabling single-use lancing devices. Please see references at the end of this
section for further information.
Care and Cleaning
9

32 33
Frequency: Always clean after each use. Always clean and disinfect before storing
and between each user. Please read the disinfectant manufacturer’s product label.
Recommended Disinfectant: Super Sani-Cloth® wipes only or any disinfectant with
the same EPA Reg. No. (EPA Reg. No. 9480-4, Professional Disposables International, Inc.
(PDI), Orangeburg, NY), concentration of active ingredients (0.25%) and with a contact
time of 2 minutes.The active ingredients in this disinfectant are n-Alkyl dimethyl
ethylbenzyl ammonium chlorides. Super Sani-Cloth was tested and found to be
eective per recommended guidelines when used with this system. Please only use
this disinfectant. Use of other disinfectants may cause damage to your
analyzer. Do not use bleach, peroxide, or window cleaners on this analyzer.
If you have any questions or need to know where to purchase the disinfectant wipes,
call PTS Diagnostics Customer Service at 1-877-870-5610 (US) or +1-317-870-5610.
There are a large number of distributors of this disinfectant. If you cannot obtain from
the distributor who supplies your other supplies, please contact us for assistance.
A
B
C
D
E
The entire case surface should be cleaned and disinfected.
Cleaning Instructions
Cleaning removes visible soil, organic material, and most importantly, blood products.
Always clean before disinfecting.
1. Please see picture above. Clean and disinfect all surfaces of this analyzer.
2. Obtain recommended wipes.
3. Using a fresh wipe, wring out excess liquid and carefully wipe to clean.
4. Allow to air dry or dry with cotton gauze.
MEMo Chip Port
Display
Enter Button
Next Button
Test Strip Slot
A
B
C
D
E

34 35
Disinfection Instructions
After cleaning, the next step is to disinfect. Always both clean and disinfect.
1. Using a fresh wipe, wring the wipe to remove excess liquid and wipe all
areas thoroughly.
2. Keep area wet for 2 minutes to ensure disinfectant remains in contact for a
sufficient time to kill all bloodborne pathogens.
3. Allow to air dry completely.
Note: It is important that the analyzer be thoroughly dry before using.
4. The optical glass should be carefully wiped clean with an alcohol wipe and dried
with gauze to remove any residue from the disinfectant.
5. Inspect the glass and ensure it is clean when held at different angles. If it is not,
repeat Step 4.
Following cleaning and disinfection, inspect the analyzer for the following signs of
deterioration.These include:
• Scratches on optical glass
• Etching on optical glass
• Liquid under optical glass
- liquid intrusion, or
- condensation
• Loss of adhesion on optical glass
• Liquid under display lens
• Loss of adhesion on display lens
• Deterioration of painted surfaces (polymer crazing, cracking, swelling, softening,
peeling, etc.)
• Any loose parts
IMPORTANT: Keep area wet with disinfectant for two minutes. DO NOT soak, saturate,
or immerse the analyzer or allow liquid to collect on any surface. Always make sure the
analyzer is dry before use.
After disinfection, user’s gloves should be removed and hands should be thoroughly
washed with soap and water.
The CardioChek analyzer has been validated for 1,825 cleaning and disinfection cycles.
Please obtain a new analyzer after cleaning and disinfecting once the lifetime of the
analyzer (5 years) has been reached, whichever comes rst.
Stop using the analyzer and contact Customer Service for a replacement analyzer
immediately if you notice any signs of deterioration.
If you have any questions, call PTS Diagnostics Customer Service.
Direct: +1-317-870-5610 ·Toll-free inside the US: 1-877-870-5610
Fax: +1-317-870-5608
References:
1. “FDA Public Health Notification: Use of Fingerstick Devices on More than One Person Poses Risk for Transmitting
Bloodborne Pathogens: Initial Communication”(2010).
http://www.fda.gov/MedicalDevices/Safety/AlertsandNotices/ucm224025.htm.
2. “CDC Clinical Reminder: Use of Fingerstick Devices on More than One Person Poses Risk for Transmitting Bloodborne
Pathogens”(2010). http://www.cdc.gov/injectionsafety/Fingerstick-DevicesBGM.html.
3. Biosafety in Microbiological and Biomedical Laboratories (BMBL) found at http://www.cdc.gov/biosafety/
publications/bmbl5/.“Protection of LaboratoryWorkers From Occupationally Acquired Infections; Approved
Guideline-Third Edition”Clinical and Laboratory Standards Institute (CLSI) M29-A3.

36 37
Message or Issue Probable Cause What to Do
Desired language is
not displayed.
Language has been set incorrectly. Turn o analyzer. See Section 3, Setup – How to
Reset the Language.
The wrong date and/or time
is displayed.
Date and time have not been
set correctly.
See Section 3, Setup – How To Set the Date
and/orTime.
FAILED is displayed during a
check strip test.
Analyzer needs to be cleaned.
Wipe the test strip slot with a clean, damp, and
lint-free cloth.
Check strip is dirty or damaged. Use spare check strip. If check strip still fails,
call Customer Service.
TOO MUCH LIGHT Test is being performed in direct light
or outside.
Test inside, away from windows, and away from
direct lamp light.
MEMO CHIP ERROR MEMo Chip is defective. Use another MEMo Chip from the same lot.
TEST ERROR Insucient sample has been added
to test strip.
Test again with a new test strip and make sure the
correct volume of sample is used.
LANGUAGE Analyzer is new or language option
has not been set.
See Section 3, Setup - Setting the Language.
TEST NOT
ALLOWED
Test selected by MEMo Chip installed
cannot be run on your analyzer.
Check MEMo Chip and make sure that the correct
MEMo Chip is inserted. Call Customer Service.
LOW TEMP Analyzer is below acceptable
operating temperature.
Move to warmer environment and test after
analyzer reaches proper temperature.
HIGHTEMP Analyzer is above acceptable
operating temperature.
Move to acceptable environment and test after
analyzer reaches proper temperature.
INSTALL MEMO CHIP MEMo Chip is not properly inserted
or is defective.
Insert same or new MEMo Chip properly.
Troubleshooting
10
Message or Issue Probable Cause What to Do
EXPIRED LOT Test strips are expired, wrong MEMo
Chip is inserted, or date is not
set properly.
Check test strip expiration date and make sure
correct MEMo Chip is inserted. Check date setting –
see Section 3, Setup – How To Set the Date and/or
How to Set theTime.
REPLACE BATTERIES Batteries need to be replaced. Replace all batteries with new high-quality AAA
batteries. (The analyzer will not run tests until
batteries are replaced.)
TEST ABORTED Test strip was not properly inserted or
was removed before test was complete.
Test again with a new test strip.

38 39
High or low results that are incorrect may have serious medical consequences. If the
result reads > (greater than) or < (less than) or results are not as expected, always
repeat the test correctly with a new unused test strip. If a test result is displayed that
is not expected, consult the following table. Any result which is inconsistent with
your medical history should immediately be reported to your physician or healthcare
provider.
Message or Issue Probable Cause What to do
Results are not
as expected.
Test strips improperly stored. Repeat test, using a dierent vial of test strips. Run
controls, conrm that results are in range.
Batteries are defective. Change batteries.
The analyzer was improperly stored. Make sure analyzer was not exposed to high or low
temperatures or humidity and repeat test.
Test strip insert opening is dirty. Clean the test strip insert opening.
MEMo Chip and test strips are not the
same lot number.
Use MEMo Chip and test strips with the same
lot number.
A displayed result
reads < (less than)
a value.
Result is below the measuring
range of the test.
If you have symptoms call a healthcare professional
immediately. Repeat the test. Run controls and
conrm that controls are in range.
A displayed result
reads > (greater than)
a value.
Result is above the measuring
range of the test.
If you have symptoms call a healthcare
professional immediately. Run test again. Run
controls and conrm that controls are in range.
Display reads ”_ _
_ _”or N/A.
Result is not available due to a
missing value from a calculation, or
a value is outside the
measuring range.
Run test again. Run controls and conrm that
controls are in range.
Unexpected Results
11
CardioChek Analyzer
Calibration Curve: Input from MEMo Chip per test strip lot
Battery: 2 AAA 1.5 volt alkaline
Operating Temperature Range: 50-104°F (10-40°C)
Note: The analyzer temperature must be within the test strip temperature range
to function as a system. See test strip package insert for more details.
Humidity Range: Between 20 and 80% RH
Dimensions:
Width: 3.0 inches (7.62 cm)
Length: 5.5 inches (13.97 cm)
Height: 1.0 inches (2.54 cm)
Weight (without batteries): 4-6 oz. (113.4 - 170.1 g)
PTS Panels Self-Test Strips
Please read the instructions (package insert) included with the test strips for
information specic to each test.
Specications
12
Table of contents
Other pts Diagnostics Measuring Instrument manuals


