pullman Ermator S-Line Series User manual

ORIGINAL OPERATING
INSTRUCTIONS
S-Line Dust Extractor
S13
S26
S36
Rev. 5 2017-05-10
READ ALL INSTRUCTIONS BEFORE USE

Introduction
Dear Customer,
Thank you for choosing Pullman Ermator as your supplier.
We hope that the S-Line dust extractor will be to your satisfaction and meet your expectations.
Pullman Ermator have manufactured professional dust extractors since 1966 and has over the years
acquired a genuine technical knowledge in this area. We are continuously striving to improve our
products in our product segment and will continue to supply the market with new equipment.
Notice!
These instructions are only for S-Line Dust Extractors.
The S-Line Dust Extractors are designed to clean construction areas and be connected to small
electrical machines such as drills, grinders etc. The machine is suitable for picking up dry, non-
flammable dust and debris in and indoor environment. It is not suitable for picking up liquids.
The S-Line Dust Extractors are intended for both household and commercial use.
Pullman Ermator will not be held responsible if the dust extractor is used for other applications
or been used in ways other than those outlined in this instruction manual.
Please pay particular attention to the safety regulations.
Read the complete instruction manual before using your dust extractor.
All spare parts used with the dust extractors must be those specified by Pullman Ermator.
Table of contents
1
SAFETY INSTRUCTIONS
8
WARRANTY
2
UNPACKING
9
PROBLEM SOLVING
3
FUNCTION
10
TECHNICAL DATA
4
FILTER CLEANING
11
PLUGS
5
DUST STORAGE SYSTEM
12
DECRALATION OF CONFORMITY
6
FILTER CHANGE
13
EXPLODED VIEWS
7
SERVICE
14
CONTACT INFO

1. SAFETY INSTRUCTIONS
When using an electrical appliance, basic precautions should always be followed, including the following:
WARNING –To reduce the risk of fire, electric shock or injury:
•Cables damaged through crushing or splitting can be dangerous if used and should be replaced immediately. Risk
of personal injury.
•Make sure the assembly area is firm, so the dust extractor does not tip over. Risk of personal and material injury.
•Risk of pinching when handling the toggle fasteners.
•The machine must not be used in environments where explosive gases may be present. Serious risk of explosion.
•Improper connection of the equipment-grounding conductor can result in a risk of electrical shock. Check with a
qualified electrician or service person if you are in doubt as to whether the outlet is properly grounded. Do not
modify the plug provided with the machine. If it will not fit the outlet. Have a proper outlet installed by a qualified
electrician.
•Before using the machine, make sure that the power & voltage corresponds with the voltage shown on the
machines rating plate.
•Do not leave machine when plugged in. Unplug cord from outlet when not in use and before cleaning or servicing
machine.
•Do not use outdoors or on wet surface, this machine is for indoor and dry use only.
•Do not allow to use as a toy. Close attention is necessary when used by or near children.
•Use only as described in this manual. Use only manufacturers recommended attachments.
•Operators shall be adequately instructed on the use of the machine
•This machine is not intended for use by persons (including children) with reduced physical, sensory or mental
capabilities, or lack of experience and knowledge.
•Do not use with damaged cord or plug. If the machine is not working as it should, has been dropped, damaged, left
outdoors or dropped in water. Make sure it is repaired by a qualified person.
•Do not pull or carry by cord, use cord as handle, close a door on cord, or pull cord around sharp edges
or corners. Do not run the machine over cord. Keep cord away from heated surfaces.
•Do not unplug by pulling on cord. To unplug, grasp the plug. Not the cord.
•Do not handle plug or machine with wet hands.
•Regularly inspect cord and plug for damage. If cord is damaged, it must be replaced by a qualified
person in order to avoid hazard.
•Do not put any object into openings. Do not use with any opening blocked (accept during filter cleaning
procedure). Keep free of dust, hair and anything that may reduce airflow.
•Keep hair, loose clothing, fingers and all parts of body away from openings and moving parts.
•Turn off all controls before unplugging.
•Do not use to pick up flammable or combustible liquids, such as gasoline, or use in areas where they
may be present.
•Do not pick up any type of liquids.
•Do not pick up anything that is burning or smoking, such as cigarettes, matches or hot ashes.
•Use extra care when cleaning on stairs.
•Do not use without dust bag and/or filters in place. Replace collection system and/or filters as described
in manual.
•If using an extension cord make sure the cord rating is suitable for this machine.
•Do not modify machine from its original design.
•Keep children and unauthorized persons away from machine when in use.
•All repairs must be performed by a qualified service person. Use only manufacturer-supplied or
equivalent replacement parts.
•Do not expose machine to rain or moisture. Store indoors only.
•Connect to a properly grounded outlet only. See grounding instructions.
THERMAL PROTECTION
•The dust extractor is equipped with a safety thermal protector to prevent motor from overheating.
Should thermal protector activate, turn off machine, unplug power cord and check for full dust bag,
vacuum hose clog or filter blockage. It may take up to 45 minutes for the thermal protector to reset.
GROUNDING INSTRUCTION
•The dust extractor must be grounded. If it should malfunction or breakdown, grounding provides a path
of least resistance for electric current to reduce the risk of electric shock. The dust extractor is equipped
with a cord having an equipment-grounding conductor and grounding plug. The plug must be inserted
into an appropriate outlet that is properly installed and grounded in accordance with all local codes and
ordinances.
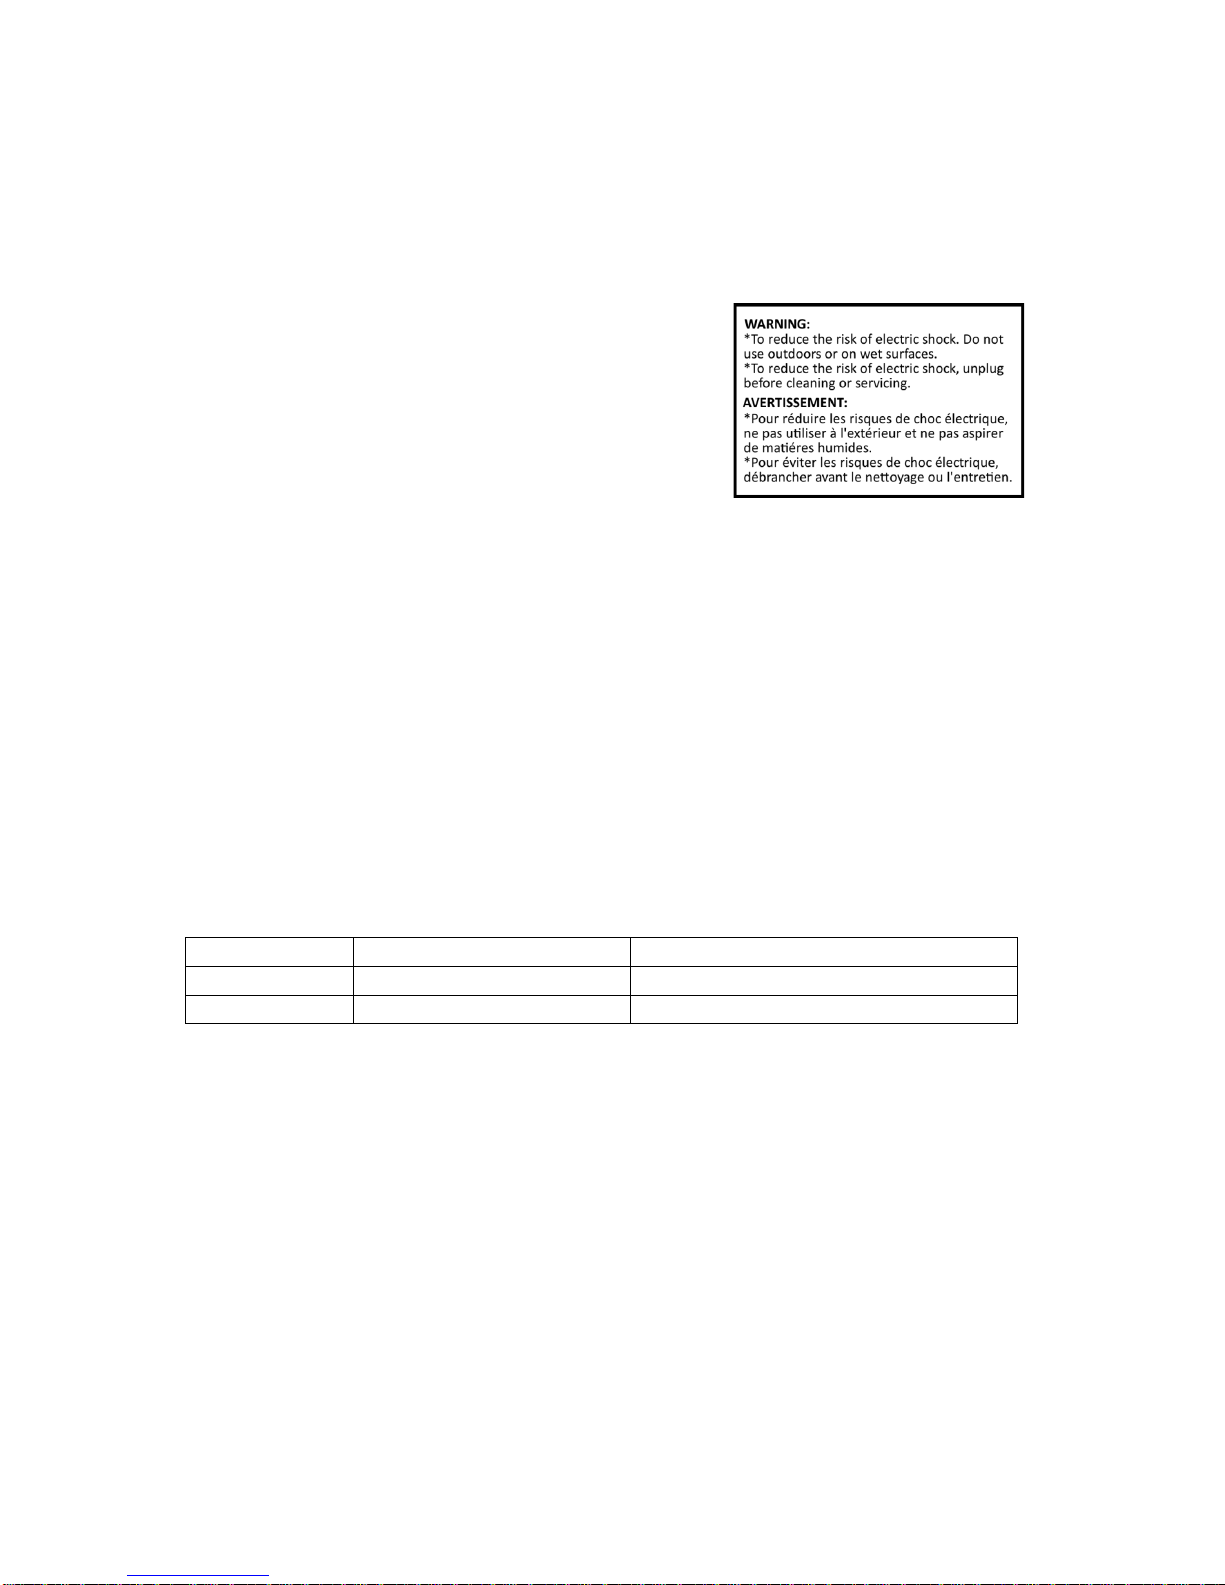
SAFETY LABEL
•The following label appears on the machine, next to the
machines rating plate. Replace label if it is missing,
becomes damaged or illegible. Failure to follow this
warning label may result in fire, electric shock or injury.
1. UNPACKING
When unpacking the machine, please check that the following accessories are included:
•The hose with end fittings.
•Wand.
•Floor nozzle.
If any of the above-mentioned parts are missing, please contact your local distributor or our sales representative.
For models that do not already have the front casters assembled due to packaging limitations. Assemble the front
casters using the using bolt or nut and washer that are included in the package depending on your application.
Protect the environment:
Please dispose of packaging materials and used machine components in an environmentally safe way according
to local disposal regulations. Always remember to recycle.
1. FUNCTION
The machine is designed for vacuuming and separating dry, non-combustible dust with an
explosion limit value of 0.1mg/m3.
The dust extractor is started by the switch.
Type
Models without automatic start
Autostart function models
Red switch 2 step
0: Motor off, 1: Motor on
N/A
Black switch 3 step
N/A
0: Motor off, 1: Motor on, 2: Automatic start
Dust-laden air is then sucked through the inlet valve at high speed via the suction hose. The air is slowed down
by the cyclone and coarse dust particles are separated out, partly by centrifugal force and partly by gravity. Air
and finer particles then pass through the double filter system where separation is made. The machine is designed
for filter cleaning by reverse air pulse.
The separated dust accumulates in the cyclone until the machine is switched off, when it drops through the
bottom flap into the plastic bag. The filter cleaning process is not completed before it is clear that the dust inside
the tank has fallen down into the collection bag. In some extreme cases the adhesive ability of the dust must be
broken manually. This can be done by hitting the dust through the bag or tapping the tank using i.e. a rubber
hammer.
Automatic start function: When you use the dust extractor together with another machine, there is an
electrical outlet on the dust extractor. Connect the machine to this outlet. Then when you start it up the dust
extractor will also start after
1
orms
11
. 1-2 seconds. When you turn it off, the dust extractor will continue to run
for approximately 10 seconds. To empty the hose. Then stop

4. FILTER CLEANING
The filter must be cleaned from time to time. This must be done before changing the bag collection system and
should also be done when work is completed or when there is poor suction.
Procedure: Cover the inlet, if applicable, use attached cover. First let the machine build up vacuum for four to
five seconds then quickly push down on the key and release it. Repeat the procedure five times. It is important to
let the machine rebuild the vacuum in between every repetition.
Turn off the motor and wait until it stops completely, then uncover the inlet.
If suction remains poor, the pre-filter needs to be replaced. If suction still remains poor afterwards, the Hepa
filters needs to be replaced. See instructions in chapter 6. FILTER CHANGE.
5. DUST STORAGE SYSTEM
The dust extractors are mainly equipped with Longopac system for effective dust storage or a regular plastic bag
system depending on model. Longopac is a 22 m long plastic tube that will be divided into plastic bags using the
zip ties attached with the machine.
To assemble a new Longopac bag: Release the belt holding the last bag. Remove the holder, put in a new
Longopac bag & pull out the inner end upwards. Assemble the holder on to the machine and strap the opening
facing upwards with the belt. Pull down the outside end and close it using a zip tie.
All dust extractors can be used with original Pullman Ermator dust bags for single use. Also all models can be
fitted with the longopac system.
Only change Longopac or regular bag after filter cleaning cycle have been completed.
6. FILTER CHANGE
Risk of dust dispersion –Use personal safety equipment
Unhealthy dust can be spread during filter change. Accordingly, the user should wear protective glasses,
protective gloves, and a breathing mask conforming to protection class FFP3.
Wear breathing mask Wear ear protection Wear protective glasses
Pre-filter
Loosen the 3 clamps and remove the top. Take the bag from the new filter.
Lift out the filter and place it gently in a plastic bag. This bag must be properly disposed.
Insert a new filter.
Important:
If you are removing the Pre-filter in order to clean it. Hitting the filter with force or use of compressed air will
destroy the filter. It can handle water, but high pressure water cleaning will destroy it.
Hepa Filter
Loosen the two nuts on each filter cover cap. Carefully lift the filter into a clean plastic bag, use the bag from the
new filter. This bag must be properly disposed. Insert a new filter in reverse order.
Important:
Hepa filters can’t be cleaned, trying this might destroy it. When installing the replacement filter, make sure to
not touch the inside of the filter. Any kind of force/damage on the inside of filter media will destroy the new
filter.
WARNING
Remember to switch off the machine and pull the plug out of the outlet before servicing.

7. SERVICE
•When cleaning and servicing the machine, you must switch off the machine and remove the plug from
the outlet.
•Avoid cleaning with a high pressure cleaner. If necessary, do not direct at the openings on the machine,
especially the opening for cooling air.
•Before moving the machine from the work area, the machine must be cleaned.
•All other equipment must be regarded as contaminated and be treated thereafter.
•If possible, use a special suitable room.
•Proper personnel protective equipment must be used. Dust can be spread when the coarse filter and the
absolute filter are replaced that can be hazardous to health. Accordingly, the user should wear protective
glasses, protective gloves, and a breathing mask conforming to protection class FFP3.
•All parts which are contaminated after service must be properly disposed of in plastic bags according to
all regulations.
•If the machine has to be used for other purposes, it is extremely important that the machine is cleaned,
to avoid the spread of hazardous dust.
•Do not puncture the Hepa filter. Risk of dust dispersion.
Replacement parts, Filters and Dust collection system
Part no:
Description
S13
S26
S36
1376013
Longopac (4-bags)
1
1
1
1276008
Plastic bags (25-pcs)
1
1
1
201000016
Pre-filter S13
1
N/A
N/A
201000016a
PTFE Pre-filter S13
1
N/A
N/A
200900050
Pre-filter S26
N/A
1
N/A
200900050a
PTFE Pre-filter S26
N/A
1
N/A
200900051
Pre-filter S36
N/A
N/A
1
2000900051a
PTFE Pre-filter S136
N/A
N/A
1
200700070
HEPA FILTER S-LINE
1
2
3
200700070a
HEPA FILTER S-LINE USA
1
2
3
8. WARRANTY
All Pullman Ermator devices and accessories have a 12-month factory warranty for material and manufacturing
defects. The warranty extends to 36 months when returning the attached warranty slip. Do not attempt to repair
the suction apparatus without the consent of the manufacturer.
The warranty does not cover defects which are the result of normal wear and tear, negligence, defective use,
unauthorised repair or the suction apparatus being connected to the incorrect voltage.
In the event of any complaint, the suction apparatus or an agreed part of it must be returned to us or our
authorised representative for warranty examination and for any warranty repair or replacement.
9. PROBLEM SOLVING
The dust extractors are designed and manufactured for severe environments and tasks, but the user must note that
the machine must be protected from knocks and blows. Filter, seals, attachments, and connections are carefully
adapted and selected with regard to the operator’s work environment. Therefore, the operator and service
personnel must treat the machine with care in order for it to work correctly for many years.
Issue
Cause
Solution
Motor doesn’t start
No power
Plug in machine
Cable defective
Replace cable
Switch defective
Replace switch
Soft start defective
Replace soft start
Motor stops
immediately after
starting
Wrong fuse
Connect to correct fuse
Shortcut in cable/machine
Order service
Motor runs but there is
not suction
Hose not connected
Connect hose
Hose clogged/blocked
Clean hose
No dust collection bag
Fit dust collection
system
Motor runs but poor
suction
Hole in hose
Replace hose
Filter clogged
Clean filter/Replace
filter
Loose top cover
Adjust
Defective gaskets
Replace affected gaskets
Dust blown from motor
Wrongly assembled or
damaged filter system
Adjust/Replace filters
Abnormal noise
Order service
SAVE THESE INSTRUCTIONS!

10. TECHNICAL DATA
Data
Unit
S13 120 V
S13 230 V
S26 120 V
S26 230 V
S36 230 V
S36 120 V
Voltage
(single phase)
V
120
230
120
230
230
120
Power (max)
W
1200
1200
2400
2400
3600
2400
HP
1,6
1,6
3,2
3,2
4,8
3,2
Current (UL)
A
8
4
16
8
12
16
airflow (max)
m3/h
200
200
400
400
600
485
cfm
118
118
236
236
354
285
Vacuum (max)
kPa
24
22
24
22
22
18
Inch ”
100
90
100
90
90
72
Main hose
Metric
(mm)
4m x 38
4m x 38
7,5m x 51
7,5m x 51
10m x 63
10m x 63
USCS
13’x 1,5”
13’x 1,5”
24’x 2”
24’x 2”
32’x 2,5”
32’x 2,5”
Inlet
Metric
(mm)
51
51
63
63
63
63
USCS
2”
2”
2,5”
2,5”
2,5”
2,5”
Pre-filter
EN779-F8
%
@1um
>99,5
>99,5
>99,5
>99,5
>99,5
>99,5
Pre-filter area
Metric
1,5 m²
1,5 m²
3 m²
3 m²
4,5 m²
4,5 m²
USCS
16 ft²
16 ft²
32 ft²
32 ft²
48 ft²
48 ft²
Hepa filter
EN1822-H13
%
@0.3um
>99,99
>99,99
>99,99
>99,99
>99,99
>99,99
Total HEPA
filter
area
Metric
1,2 m²
1,2 m²
2,4 m²
2,4 m²
3,6 m²
3,6 m²
USCS
13 ft²
13 ft²
26 ft²
26 ft²
39 ft²
39 ft²
Sound level
dB(a)
70
70
70
70
70
70
Dust collection
system
Type
Plastic bag
Plastic bag
Longopac
Longopac
Longopac
Longopac
Dimensions
(L*W*H)
Metric
(mm)
680x400x1100
680x400x1100
756x546x1275
756x546x1275
840x620x1500
840x620x1500
USCS
26x15,8x43,3 ”
26x15,8x43,3 ”
29x21,5x50,2 ”
29x21,5x50,2 ”
33x24,5x60 ”
33x24,5x60 ”
Weight
Metric
29 kg
29 kg
47 kg
47 kg
63 kg
63 kg
USCS
66 lbs
66 lbs
105 lbs
105 lbs
140 lbs
140 lbs

11. PLUGS
MODEL
PLUG TYPE
RECEPTACLE
TYPE
RECEPTACLE
MAX AMPS
CABLE &
PLUG
MAX
AMPS
S13 120 V
NEMA 5-15P
N/A
N/A
15 A
S13 230 V
SOCKET F
GROUNDED
SOCKET F
5 A
10 A
S26 120 V
NEMA 5-20P
N/A
N/A
20 A
S26 230 V US
NEMA L6-15P
N/A
N/A
15 A
S26 230 V
SOCKET F
GROUNDED
N/A
N/A
10 A
S36 120 V US
NEMA 5-20P
N/A
N/A
20 A
S36 230 V
30A
NEMA L6-30P
NEMA L6-30
20 A
30 A
S36 230 V
50A
NEMA L6-50P
NEMA L6-50
35 A
50 A
S36 230 V
IEC 60309 16 A
N/A
N/A
16 A
The grounding methods of S13 120V machine follow
the UL1017 section 11.3.1 part b) as below:
For a grounded, cord-connected appliance rated less than 15 A and
intended for use on a nominal 120-V supply circuit, the instructions in either item 1 or 2:
1) This appliance is for use on a nominal 120-V circuit, and has a grounded plug that looks like the plug
illustrated in sketch A in Figure 20. A temporary adaptor that looks like the adaptor illustrated in sketches B and
C may be used to connect this plug to a 2-pole receptacle as shown in sketch B if a properly grounded outlet is
not available. The temporary adaptor should be used only until a properly grounded outlet (sketch A) can be
installed by a qualified electrician. The green colored rigid ear, lug, or the like extending from the adaptor must
be connected to a permanent ground such as a properly grounded outlet box cover. Whenever the adaptor is
used, it must be held in place by a metal screw.
Exception: In Canada, the use of a temporary adaptor is not permitted by the Canadian
Electrical Code, C22.1.
2) This appliance is for use on a nominal 120-V circuit and has a grounding attachment plug that looks like the
plug illustrated in sketch A in Figure 20. Make sure that the appliance is connected to an outlet having the same
configuration as the plug. No adaptor should be used with this appliance.
The grounding methods of S26 120V, S26 230V, S36 120V US, S36 230V 30A AND S36
230V 50A follow the UL1017 section 11.3.1 part c) as below:
For all other grounded, cord-connected appliances:
This appliance is for use on a circuit having a nominal rating more than 120 V (or This appliance is rated more
than 15 A and is for use on a circuit having a nominal rating of 120 V) and is factory-equipped with a specific
electric cord and plug to permit connection to a proper electric circuit. Make sure that the appliance is connected
to an outlet having the same configuration as the plug. No adaptor should be used with this appliance. If the
appliance must be reconnected for use on a different type of electric circuit, the reconnection should be made
by qualified service personnel.
12. DEKLARATION OM ÖVERENSSTÄMMELSE
12. DECLARATION OF CONFORMITY
12. DECLARATION DE CONFORMITÉ
12. ERKLÄRUNG DER ÜBERSTIMMUNG
12. SAMSVARSERKLRING
Pullman Ermator AB
Industrivägen 10
S-777 34 SMEDJEBACKEN
Försäkrar under eget ansvar att maskinen
Declare under our sole responsibility that the machine
Certifie sous sa
7
orms
7
responsabilité que le produit ciaprès
Versichern auf eigener verantwortung, dass das Produkt
Forsikrer under eget ansvar at maskinen
Model
Serial number
M/F
year
Model
Serial number
M/F
year
S13 120 V
0900058a0001-xxxx
2010-
S36 120 V US
0900242e0001-xxxx
2014-
S13 230 V
0900058 0001-xxxx
2010-
S36 230 V
30A
0900242a0001-xxxx
2010-
S26 120 V
0900256a0001-xxxx
2010-
S36 230 V
50A
0900242d0001-xxxx
2011-
S26 230 V US
0900256b0001-xxxx
2010-
S36 230 V
0900242 0001-xxxx
2010-
S26 230 V
0900256 0001-xxxx
2010-
som omfattas av denna försäkring är i överensstämmelse med standarder:
included in this declaration, follows the provisions of the:
est conforme aux aux
7
orms suivantes:
den folgenden Normen entspricht:
er i overensstemmelse med standarder:
SS-EN 60335-1: 2002+A11+A1+A12+A2+A13+A14
SS-EN 60335-2-69:2009
SS-EN 61000-6-3:2007
SS-EN 61000-6-2:2005
enligt villkoren i/according to/selon/laut/i henhold til vilkårene i
Machine Directive 2006/42/EC
Low voltage Directive 2006/95/EC
EMC Directive 2004/108/EC
SMEDJEBACKEN 2016.04.26 Petra Bengtsson
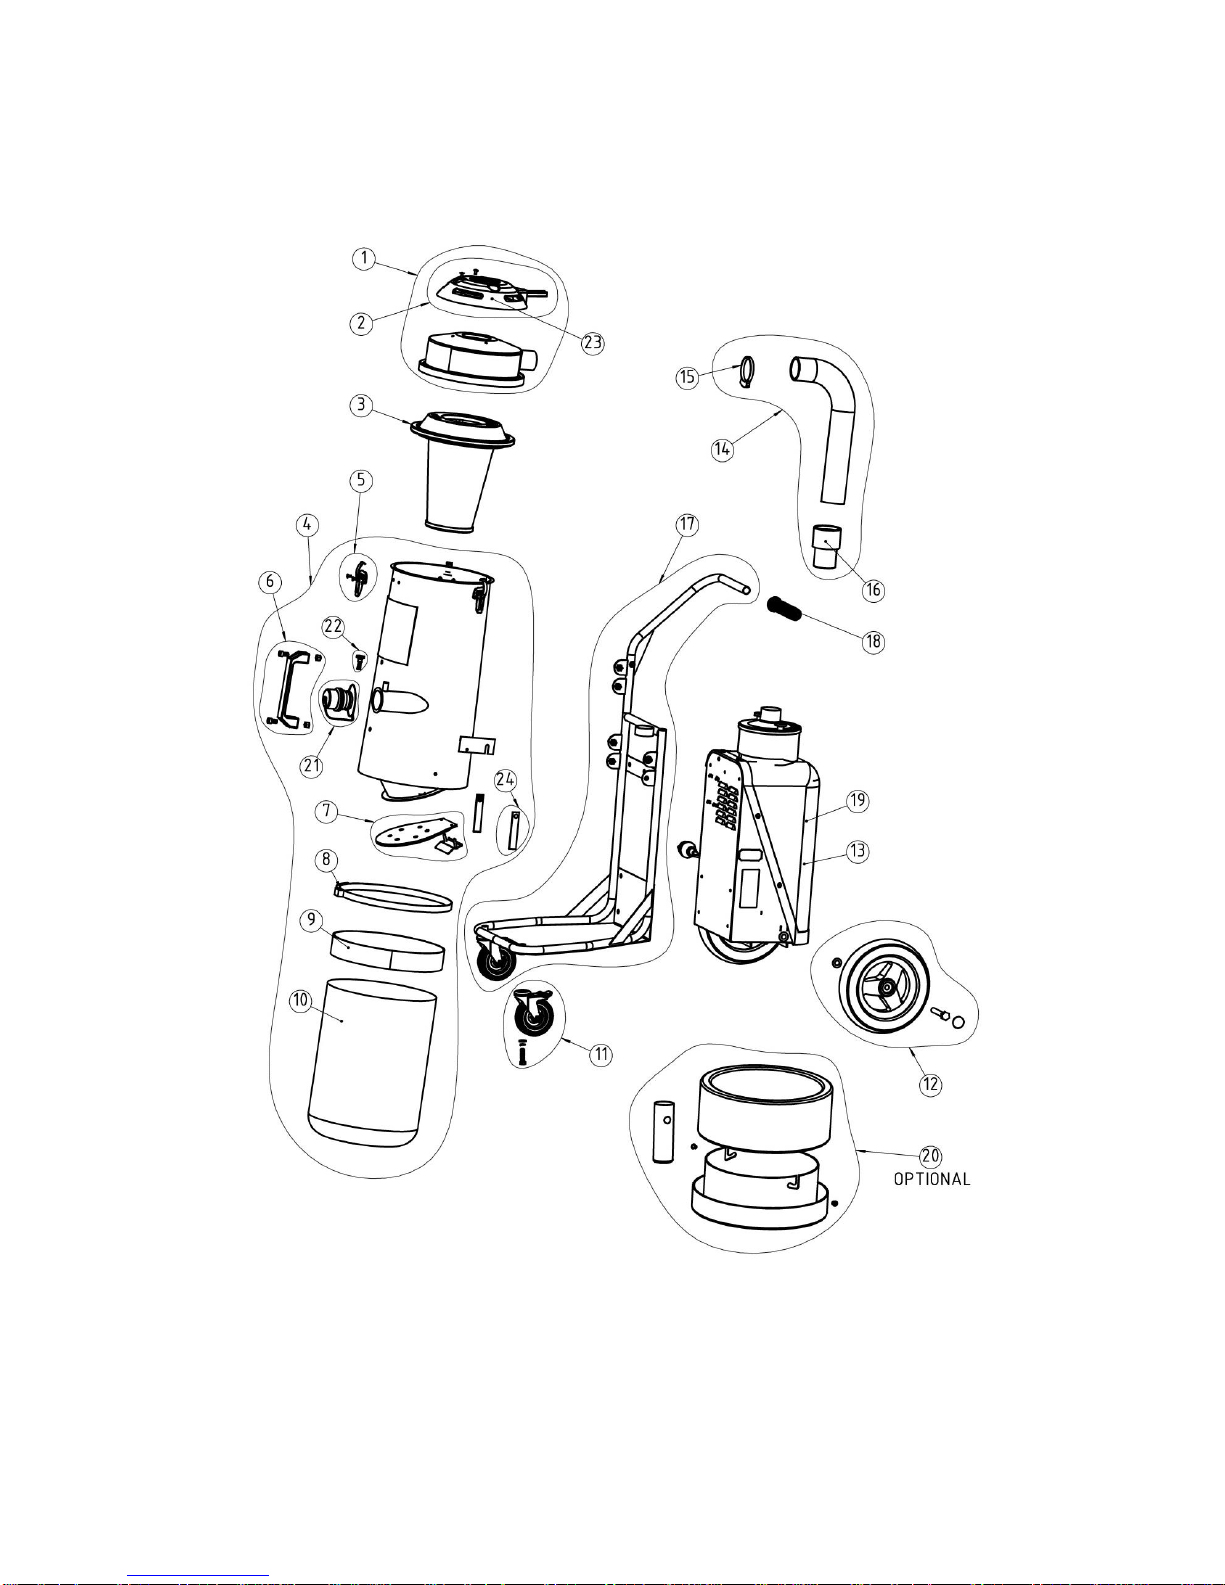
S13 230V, S13 120V
EXPLODED VIEW

ITEM NO.
QTY.
PART NUMBER
DESCRIPTION
1
1
201000117
TOP COVER ASSEMBLY PACKING (ex.S13)
2
1
201000118
CLEAN UNIT KIT
3
1
201000016
FILTER
4
1
201000119
TANK COMPLETE (ex.S13)
5
3
200600799
HOLDER KIT
6
1
201000120
HANDLE KIT
7
1
201000116
FLAP ASSEMBLY KIT
8
1
201100140
BELT PACKING
9
1
201100141
ANTI-SKID PACKING
10
1
12760008
PLASTIC BAG 25PACK
11
1
200800152
FRONT WHEEL KIT
12
1
200800151
REAR WHEEL KIT
13
1
201100146
ENGINE PACK 230V PACKING
14
1
201000123
HOSE KET S13 PACKING
15
1
201100137
HOSE CLAMP60-65MM PACKING
16
1
201100125
HOSE END A51B PACKING
17
1
201000124
WAGON COMPLETE PACKING
18
1
201100138
HANDLE WAGON (ex. S13) PACKING
19
1
201100146a
ENGINE PACK 120V PACKING
20
1
201000115
LONGOPAC KIT PACKING
21
1
201000122
INLET SEAL COMPLETE SET PACKING
22
1
201100139
LOCKING DEVICE PACKING
23
1
201000670
TOP COVER KIT ex. CLEAN UNIT
24
1
201500174
BELT HOLDER KIT (ex.S13)

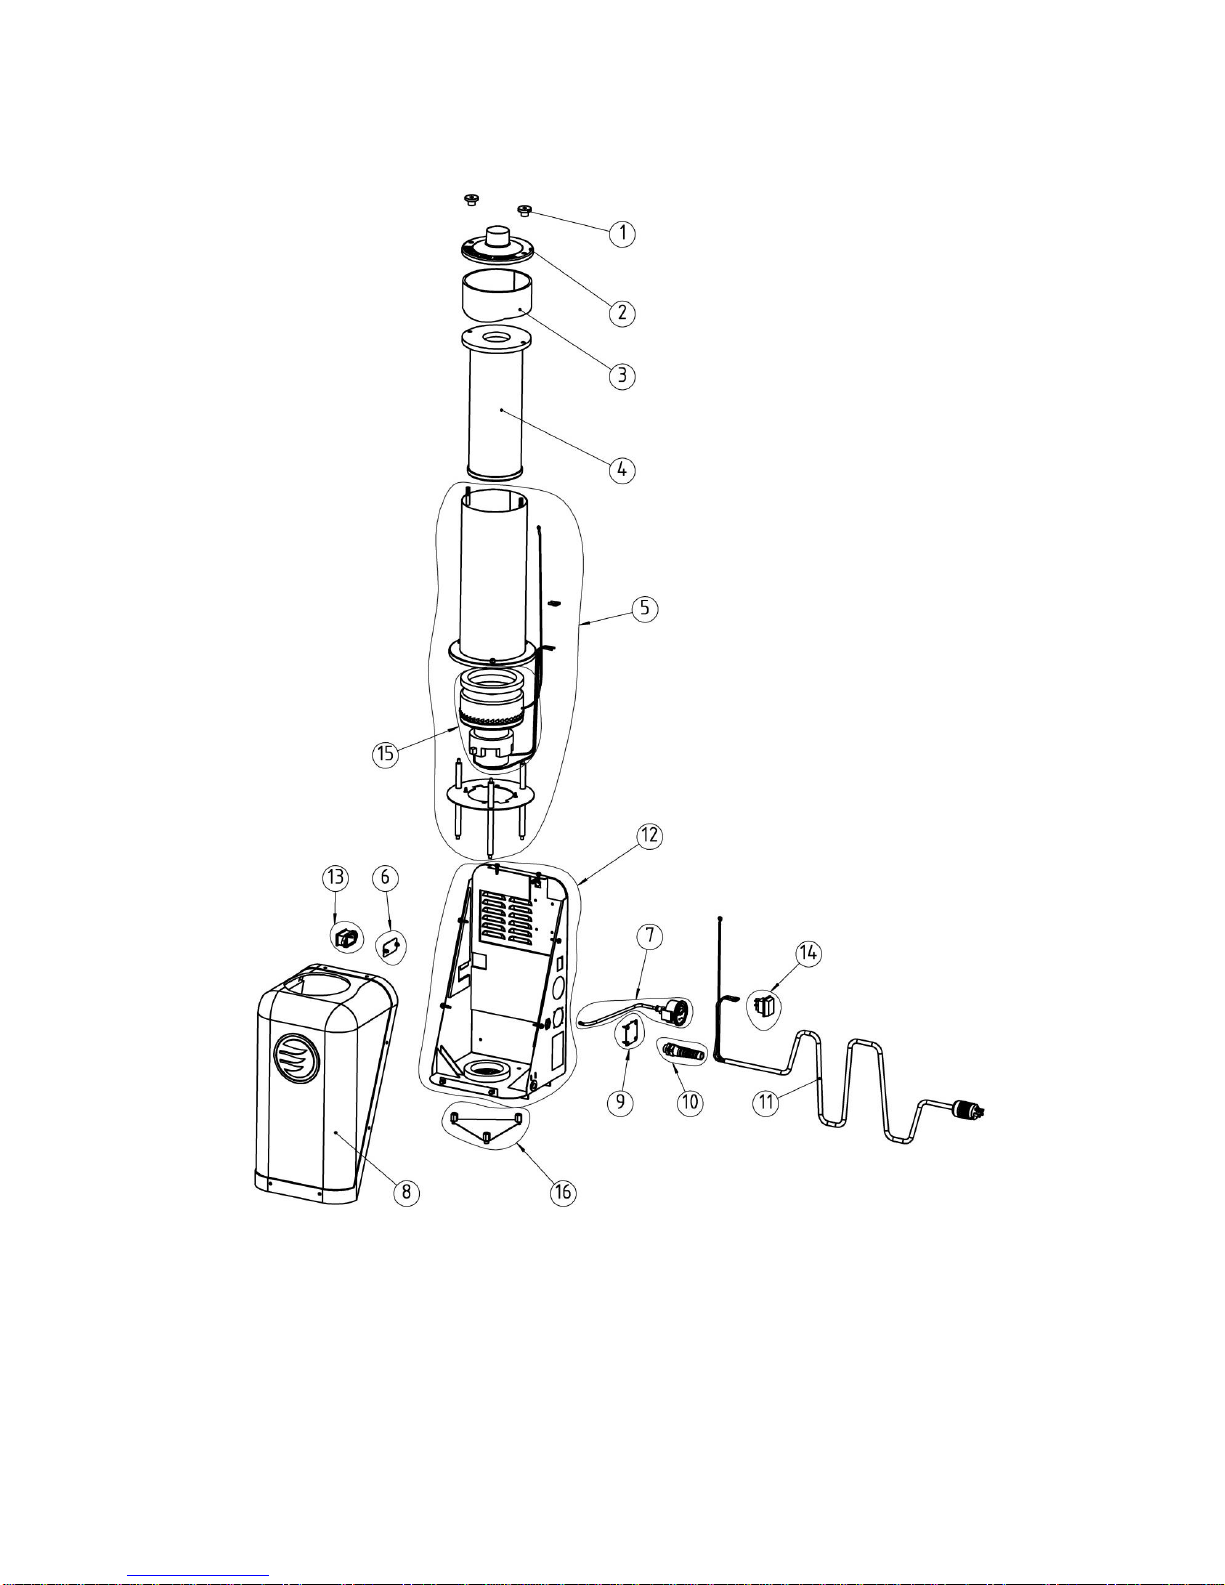
S13 230V
MOTOR PACKAGE

POS.
QTY
NUMBER
DESCRIPTION
1
2
201100128
NUT
2
1
201000121
FILTER COVER KIT
3
1
201100127
SEALING PACKING
4
1
200700070
HEPA FILTER S-LINE
5
1
201100144
ENGINE TUBE KIT (WITH NIPPLE ) PACKING
6
1
201100129
COUNTER COVER PACKING
7
1
201000764
CIRCUIT BOARD KIT
8
1
200600482
ENGINE COVER, KIT
9
1
200600408
ELECTRICAL OUTLET KIT
10
1
201000141
CABLE FIX KIT (PG11)
11
1
201100132
CORD SET PACKING
12
1
201000134
CHASSI COMPLETE KIT
13
1
201100236
SWITCH PACKING
14
1
200700413
MANOMETER, KIT
15
1
200800060
MOTOR KIT 230V KIT
16
1
201100147
CABLE KIT (ex.S13)
17
1
201000133
COUNTER KIT (OPTIONAL S13)
S13 120V
MOTOR PACKAGE

POS.
QTY
NUMBER
DESCRIPTION
1
2
201100128
NUT
2
1
201000121
FILTER COVER KIT
3
1
201100127
SEALING PACKING
4
1
200700070a
HEPA FILTER S-LINE USA
5
1
201100144a
ENGINE TUBE KIT (WITH NIPPLE ) PACKING US
6
1
201100129a
COUNTER COVER PACKING(STEEL VERSION)
7
1
200700413
MANOMETER, KIT
8
1
200600482a
ENGINE COVER ETL VERSION, KIT
9
1
201100148a
OUTLET COVER KIT (STEEL VERSION)
10
1
201100150
CABLE FIX KIT (PG13)
11
1
201500176
CORD SET PACKING (NEMA 5-15P)
12
1
201000134a
CHASSI ETL VERSION COMPLETE KIT
13
1
201000133
COUNTER KIT (OPTIONAL S13)
14
1
201100151
SWITCH PACKING 120V
15
1
200800227
MOTOR KIT 120V 1200W KIT
16
1
201500175
BOTTOM COVER KIT

ACCESSORIES S13
POS.
QTY
NUMBER
DESCRIPTION
1
1
200900281
HOSE 38mm x 4m
2
1
6324034
KC004 SUCTION PIPE
3
1
1326054
GRD370 FLOOR TOOL
4
1
1340011
D370A RUBBER BLADES

S26 230V, S26 120V, S26 230V US
EXPLODED VIEW

POS.
QTY.
NUMBER
DESCRIPTION
1
1
201000143
TOP COVER KIT (ex.S26)
2
1
201000118
CLEAN UNIT ASSEMBLY PACKING
3
1
200900050
MAIN FILTER
4
3
200600799
HOLDER KIT
5
1
201000129
TANK COMPLETE PACKING (ex. S26)
6
1
201000116
FLAP KIT
7
1
201100140
BELT PACKING
8
1
201100141
ANTI-SKID PACKING
9
1
1376013
LONGOPAC BAG 4 PACK
10
1
201100135
LONGOPAC HOLDER PACKING
11
1
200800152
FRONT WHEEL KIT
12
1
200800151
REAR WHEEL KIT
13
1
201000130
ENGINE PACK KIT PACKING (ex.S26 230V)
14
1
200800153
CLIP HOLDER KIT
15
2
201000144
HOSE KIT S26
16
2
201100137
HOSE CLAMP 60-65 PACKING
17
2
201100125
HOSE END (51MM) PACKING
18
1
201000831
WAGON COMPLETE PACKING
19
1
201000130a
ENGINE PACK KIT PACKING (ex.S26 120V)
20
1
201100139
LOCKING DEVICE PACKING
21
1
201000145
INLET SEAL COMPLETE SET (ex.S26)
22
1
95102
LONGOPAC SEAL CLIPS(60 PCS)
23
1
201000670
PLASTIC COVER KIT (ex. CLEAN UNIT)
24
1
201000130b
ENGINE PACK KIT PACKING (ex.S26 230V US)

S26 230V
MOTOR PACKAGE
This manual suits for next models
9
Table of contents
Other pullman Ermator Vacuum Cleaner manuals

pullman Ermator
pullman Ermator I2000ESD User manual

pullman Ermator
pullman Ermator S1400 User manual

pullman Ermator
pullman Ermator T7500 User manual

pullman Ermator
pullman Ermator S 25 User manual

pullman Ermator
pullman Ermator W250P Technical manual

pullman Ermator
pullman Ermator I940T User manual

pullman Ermator
pullman Ermator HTC 30D User manual

pullman Ermator
pullman Ermator S 25 User manual

pullman Ermator
pullman Ermator HTC 26D User manual

pullman Ermator
pullman Ermator w350 User manual


