manuals.online logo
Brands
  1. Home
  2. •
  3. Brands
  4. •
  5. Pullman Holt
  6. •
  7. Vacuum Cleaner
  8. •
  9. Pullman Holt 45 Installation guide

Pullman Holt 45 Installation guide

Operation & Care Instructions
Save For Future Reference
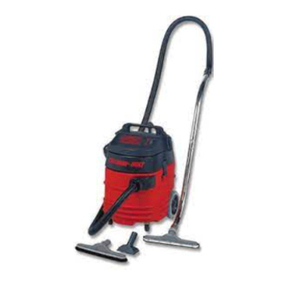
Model 45
Wet/Dry Vacuum Cleaner
This vacuum cleaner is a high quality, precision made
product. All parts used in the manufacturing of this
vacuum cleaner have passed rigid quality control
standards prior to assembly and an “each unit” final
inspection prior to packaging is your assurance of
proper assembly. This vacuum cleaner was protectively
packaged to prevent possible damage in transit. Should
damage occur, please notify the transporting carrier
immediately for loss and\or claim.
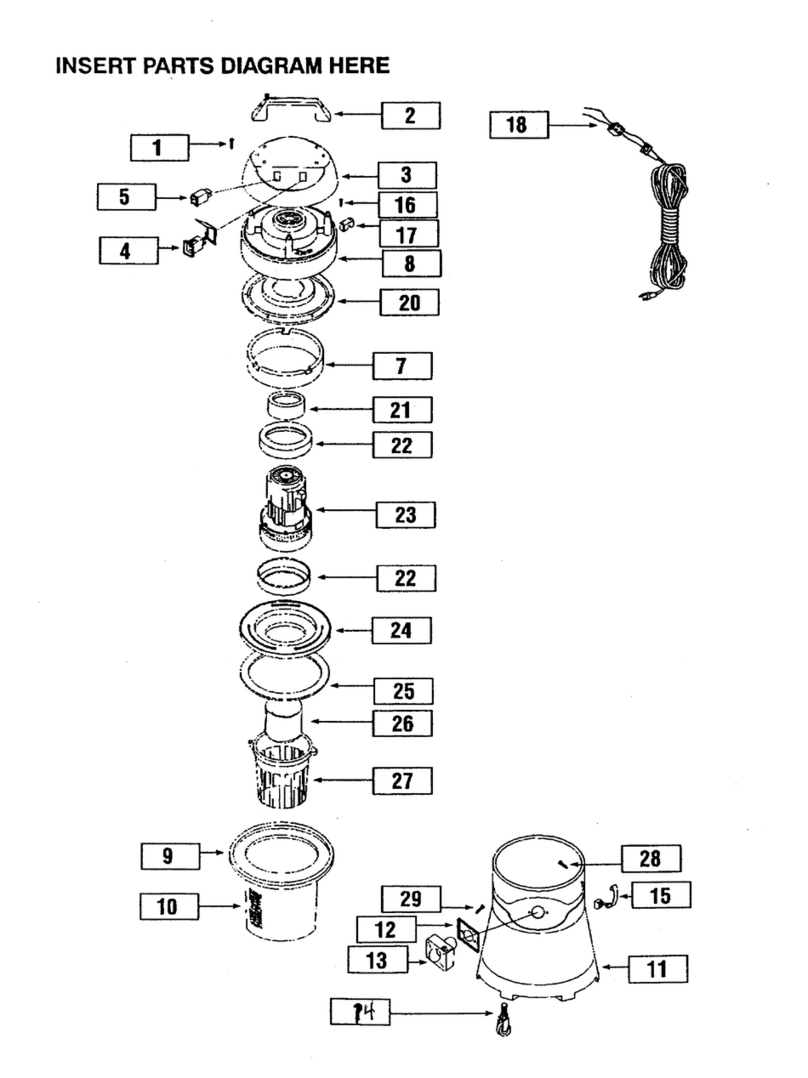
ABOUT THE MACHINE
TO CONNECT THE HOSE
Insert the hose end into the tank inlet until it clicks. To
remove the hose, press the button on top of the hose
inlet, and remove hose.
TO OPERATE
The vacuum cleaner is designed to perform as a
wet/dry unit. The cloth bag is used for dry operation
only and must be removed from the tank prior to wet
pickup.
ASSEMBLY INSTRUCTIONS (45-10P Only)
Insert casters into sockets on bottom of canister. Push
casters until seated. Attach hose to coupling on front
of can.
MAINTENANCE
This vacuum cleaner contains no user serviceable
parts. If repair is needed, please take the vacuum
cleaner to an authorized Pullman-Holt factory service
center.
CAUTION
Do not use this vacuum to pick up hazardous
materials without HEPA filter being installed.
FOR DRY PICKUP (*45-10P)
Install paper bag on inlet inside of tank.* Insert the
cloth filter assembly in the top of the tank. Install
motor head. The cloth filter located inside the can
provides highly efficient separation of dust and dirt
particles from the incoming air stream.
FOR WET PICKUP
Remove paper bag and cloth filter from tank. Make
sure foam filter sleeve is installed on float assembly.
Make sure float moves freely. When the liquid level in
the tank rises to a point just below the inlet, the float
assembly shuts off air flow, thus preventing overflow
and possible damage to the vacuum motor.
CAUTION: A disposable paper bag cannot be
used during liquid pick up.
CAUTION
Never lubricate the vacuum cleaner motor. The
motor bearings are permanently sealed. This
vacuum is intended for indoor or outdoor use
and for wet pickup, but it is not intended to be
exposed to rain.
CAUTION
Duringdryoperation,neveroperatethevacuum
cleanerunlesstheclothfilterisingoodcondition
and properly asembled to the vacuum head.
IMPORTANT SAFETY
INSTRUCTIONS
When using an electrical appliance, basic precaution should always be
followed, including the following:
WARNING
To reduce the risk of fire, electric shock or injury:
1. Do not leave appliance when plugged in. Unplug from outlet when
not in use and before servicing.
2. Do not expose to rain. Store indoors.
3. Do not allow to be used as a toy. Close attention is necessary
when used by or near children.
4. Use only as described in this manual. Use only manufacturer’s
recommended attachments.
5. Do not use with damaged cord or plug. If appliance is not working
asitshould,hasbeendropped,damaged,leftoutdoors,ordropped
into water, contact Customer Service.
6. Do not pull or carry by cord, use as a handle, close a door on cord,
or pull cord around sharp edges or corners. Do not run appliances
over cord. Keep cord away from heated surfaces.
7. Do not unplug by pulling on cord. To unplug, grasp the plug, not
the cord.
8. Do not handle plug or appliance with wet hands.
9. Do not put any object into openings. Do not use with any opening
blocked; keep free of dust, lint, hair and anything that may reduce
air flow.
10. Keep hair, loose clothing, fingers and all parts of the body away
from openings and moving parts.
11. Do not pick up anything that is burning or smoking, such as
cigarettes, matches, or hot ashes.
12. Do not use without dustbag and/or filters in place.
13. Turn off all controls before unplugging.
14. Use extra care when cleaning on stairs.
15. Do not use to pick up flammable or combustible liquids such as
gasoline, or use in areas where they may be present.
16. This vacuum is for commercial use only.
17. Connect to a properly grounded outlet only. See grounding
instructions.
READALLINSTRUCTIONS
BEFORE USING THIS VACUUM CLEANER
SAVE THESE INSTRUCTIONS
GROUNDING
INSTRUCTIONS
Thisappliancemustbegrounded. Ifitshouldmalfunctionorbreakdown,
grounding provides a path of least resistance for electric current to
reducethe riskof electric shock. This appliance is equipped with a cord
having equipment grounding conductor and grounding plug. The plug
must be inserted into an appropriate outlet that is properly installed and
grounded in accordance with all local codes and ordinances.
This appliance is for use on a nominal 120 - Volt circuit, and has a
grounded plug that looks like the plug illustrated in sketch A below. A
temporary adapter that looks like the adapter illustrated in sketches B
andCmaybe used to connectthisplugto a 2-polereceptacleasshown
in sketch B if a properly grounded receptacle is not available. The
temporary adapter should be used only until a properly grounded outlet
(sketchA) can be installed by a qualified electrician. The green colored
ear, lug, or the like extending from the adapter must be connected to
a permanent ground such as a properly grounded outlet box cover.
Whenevertheadapterisused,itmustbeheldinplacebyametalscrew.
NOTE: In Canada, the use of a temporary adapter is not permitted by
the Canadian Electrical Code.
WARNING
Improper connection of the equipment grounding conductor can
result in a risk of electric shock. Check with a qualified electrician
or service person if you are in doubt as as to weather the outlet is
properly grounded.
Donot modifythe plugprovided withthe appliance- ifit willnot fitthe
outlet, have a proper outlet installed by a qualified electrician.
LIMITED WARRANTY
Thevacuum cleaneris warrantiedfor 1year fromthe dateof purchaseas
shownonyourdistributor’sinvoice. Partsnotcoveredunderwarrantyare
power cords, filters, motor brushes and squeegee blades. The warranty
covers only failure due to defective parts or workmanship and will be
invalidated by improper application and abuse.
In NO circumstance should you return a failed unit to the factory. If you
experience any problems with your vacuum during the warranty period,
contact the Customer Service.
SUPPLEMENTAL
CARE AND OPERATING INSTRUCTIONS
Save for future reference
45HEPA-D
HEPA Filter System:
Description: The air seal gasket between the canister and the
motor head forms a positive air seal.
• The paper filter bag provides primary filtration.
• The cloth filter provides secondary filtration.
• The HEPA filter provides the final filtration.
Disposable Bag Changing:
The recommended bag replacement procedure is as follows:
1. Remove the motor head from the unit.
2. Tape a 6 mil. poly bag over the can rim so that the paper
bag is completely enclosed.
3. Using the poly bag as a glove disengage the paper bag
from the can vacuum inlet system.
4. Seal the poly bag securely and dispose of as prescribed
by law.
5. Attach a new paper bag securely to the can inlet.
6. Replace the motor head and secure the clamps.
7. Thoroughly vacuum the work area to recover any dust
that may have been dropped.
Filter Assembly
Filter Maintenance:
If the vacuum cleaner begins to show a loss of performance
replace the paper collection bag. If the loss of performance
has not improved clean or replace the cloth secondary filter.
To install the cloth secondary filter place the cloth filter bag
over the barrel of the HEPA filter taking care to cover the
secondary filter retaining groove with the cloth filter bag.
Work the rubber band up the outside of the cloth filter bag
and place it in the secondary filter retaining groove. If the
performance still has not improved it may be time to replace
the HEPA filter.
The HEPA filter is a sealed unit and can not be cleaned.
Periodically make a visual inspection of the filter for
excessive amounts of debris. If the filter media appears to be
clogged, has a hole, or has changed color (the media should
be white) replace with a new HEPA filter.
B703989
CAUTION: This unit isfor dry pickup only. Liquid pick
up may damage the unit and invalidate your warranty.
COMPLETE FILTER ASSEMBLY - B260619
Secondary Filter
B000517
HEPA Filter
Secondary Filter
Retaining Groove
Rubber Band
The model 45HEPA-D vacuums equipped with
HEPA filters do not utilize the following items from
the spare parts list:
B703054 Float
B701885 Filter Ring
B701903 Float Cage
B701904 Cloth Filter
B527094 Squeegee Tool
When it comes to quality wet & dry vacuums, Pullman Ermator is the brand you can depend on.

This manual suits for next models

1

Other Pullman Holt Vacuum Cleaner manuals

Pullman Holt E1500 User manual

Pullman Holt

Pullman Holt E1500 User manual

Pullman Holt 390CV Installation guide

Pullman Holt

Pullman Holt 390CV Installation guide

Pullman Holt 86ASB-5-4-C Application guide

Pullman Holt

Pullman Holt 86ASB-5-4-C Application guide

Pullman Holt Rug Boss E1300 User manual

Pullman Holt

Pullman Holt Rug Boss E1300 User manual

Pullman Holt 102ASB-12PD Installation guide

Pullman Holt

Pullman Holt 102ASB-12PD Installation guide

Pullman Holt 25 User manual

Pullman Holt

Pullman Holt 25 User manual

Pullman Holt Evacuator Series Installation guide

Pullman Holt

Pullman Holt Evacuator Series Installation guide

Pullman Holt U10 Installation guide

Pullman Holt

Pullman Holt U10 Installation guide

Pullman Holt 45-20P POV Installation guide

Pullman Holt

Pullman Holt 45-20P POV Installation guide

Pullman Holt 45-10P Application guide

Pullman Holt

Pullman Holt 45-10P Application guide

Pullman Holt P7 Porter Vac Backpack Vacuum/Blower Installation guide

Pullman Holt

Pullman Holt P7 Porter Vac Backpack Vacuum/Blower Installation guide

Pullman Holt 30ASB Application guide

Pullman Holt

Pullman Holt 30ASB Application guide

Pullman Holt 390CV User manual

Pullman Holt

Pullman Holt 390CV User manual

Pullman Holt UV9 Application guide

Pullman Holt

Pullman Holt UV9 Application guide

Pullman Holt 30ASB Installation guide

Pullman Holt

Pullman Holt 30ASB Installation guide

Pullman Holt EVACII15 Installation guide

Pullman Holt

Pullman Holt EVACII15 Installation guide

Pullman Holt UV10 User manual

Pullman Holt

Pullman Holt UV10 User manual

Pullman Holt 102ASB-12P Application guide

Pullman Holt

Pullman Holt 102ASB-12P Application guide

Pullman Holt UV5 User manual

Pullman Holt

Pullman Holt UV5 User manual

Pullman Holt 45 Installation guide

Pullman Holt

Pullman Holt 45 Installation guide

Pullman Holt 45 Installation guide

Pullman Holt

Pullman Holt 45 Installation guide

Pullman Holt EVACII-20 User manual

Pullman Holt

Pullman Holt EVACII-20 User manual

Pullman Holt 102 12SS Installation guide

Pullman Holt

Pullman Holt 102 12SS Installation guide

Pullman Holt E1200 Installation guide

Pullman Holt

Pullman Holt E1200 Installation guide

Popular Vacuum Cleaner manuals by other brands

Black & Decker Dustbuster V1250 user manual

Black & Decker

Black & Decker Dustbuster V1250 user manual

Dustcontrol TPR 54 30 kW Original instructions

Dustcontrol

Dustcontrol TPR 54 30 kW Original instructions

Sencor SVC 308BK Translation of the original manual

Sencor

Sencor SVC 308BK Translation of the original manual

Metabo ASR 36-18 BL 25 M SC Original instructions

Metabo

Metabo ASR 36-18 BL 25 M SC Original instructions

Hoover L2310 - GUV 10 Amp Lon Garage Utility Vacuum owner's manual

Hoover

Hoover L2310 - GUV 10 Amp Lon Garage Utility Vacuum owner's manual

Bissell 3101-0 user guide

Bissell

Bissell 3101-0 user guide

Shark Navigator NV42 owner's guide

Shark

Shark Navigator NV42 owner's guide

Black & Decker DV4810N Original instructions

Black & Decker

Black & Decker DV4810N Original instructions

CFR Perfect Heat Pro 750 Series instruction manual

CFR

CFR Perfect Heat Pro 750 Series instruction manual

Hotpoint HS MR 2A ZU B UK operating instructions

Hotpoint

Hotpoint HS MR 2A ZU B UK operating instructions

Miele Boost CX1 PowerLine operating instructions

Miele

Miele Boost CX1 PowerLine operating instructions

Dyson Radix 6 quick start guide

Dyson

Dyson Radix 6 quick start guide

Hoover TS2361 001 Service manual

Hoover

Hoover TS2361 001 Service manual

Goldair GVC410 operating instructions

Goldair

Goldair GVC410 operating instructions

Vax V-039 Series instruction manual

Vax

Vax V-039 Series instruction manual

Bissell PROdry 7350 series user guide

Bissell

Bissell PROdry 7350 series user guide

Vax Mach Air SERIES user guide

Vax

Vax Mach Air SERIES user guide

Samsung Vacuum cleaner operating instructions

Samsung

Samsung Vacuum cleaner operating instructions

manuals.online logo
manuals.online logoBrands
  • About & Mission
  • Contact us
  • Privacy Policy
  • Terms and Conditions

Copyright 2025 Manuals.Online. All Rights Reserved.