Pure Pressure Pikes Peak V2 User manual

Pikes Peak V2
Longs Peak
User Manual v2.1
2018

Table of Contents
1. Introduction
1.1. Warranty
1.2. What’s Included
1.3. Technical Specifications
1.4. Disclaimers & Safety Precautions
1.5. Uncrating Your Press
2. Press Setup
2.1. Vertical Orientation Setup
2.2. Horizontal Orientation Setup
2.3. Dual Pressure Installation
2.4. Electrical Power
2.5. Compressed Air
3. Rosin Extraction Basics
3.1. Tips & Tricks
3.2. Yield and Material Types
3.3. Choosing Your Material
3.4. Filter Bag Preparation
4. Pressware Controls
4.1. Home Screen
4.2. System Settings
4.3. Quick Press
4.4. Last Run Data
4.5. Recipes Overview
4.6. Recipes Menu Options
4.7. Software Updates
5. Press Operation
5.1. Loading the Press
5.2. Pressure Control
5.3. Plate Speed Control
5.4. Pressing Material
6. Maintenance & Troubleshooting
6.1. Common Mistakes
6.2. FAQ
NOTE: FINALIZE LINKS LAST

1. Introduction
From all of us here at PurePressure, thank you for your purchase! Our rosin
presses are engineered to last for many years with proper care. The following user
manual covers virtually every topic you might want to know about, including how to
use the press, technical specifications, tips and tricks on getting the most out of
your presses, and much more.
Unless otherwise noted, the instructions contained in this manual apply to both the
Pikes Peak V2 and Longs Peak rosin presses identically and are interchangeable.
720-446-9565
Sales Inquiries: [email protected]
General Questions: [email protected]
Technical Support: [email protected]
purepressure.com
Contact:
We’re always here to help. Talk to us!
@gopurepressure

1.1 Warranty
ONE YEAR MANUFACTURER WARRANTY: PurePressure, LLC warrants this product to be free from defects in workmanship and materials, under normal use and
conditions, for a period of one (1) year from the final invoice date. This limited warranty applies only to the original purchaser of these products. In the event of a limited
warranty claim, proof of purchase will be required - save sales receipt. Warranty applies for original purchaser only.
Shipping and handling fees are to be paid for by the customer. The manufacturer agrees, at its option during the warranty period, to repair defects in
components/workmanship or to furnish a refurbished product of equal value in exchange without charge (except for a fee for shipping, handling, packing, return
postage, and insurance which will be incurred by the customer). Such repair/replacement is subject to verification of the defect or malfunction and proof of
purchase as confirmed by showing the model number on original dated sales receipt.
WARRANTY LIMITATIONS This warranty does not include:
a. Any condition resulting from other than ordinary wear or any use for which the product was not intended. This includes pressing items other than soft plant
materials.
b. Any condition resulting from incorrect or inadequate maintenance or care. This includes using compressed air with a high moisture content.
c. Damage resulting from misuse, abuse, negligence, accidents or shipping damage.
d. Normal wear and tear.
e. Damages incurred during transportation.
f. Damages incurred during maintenance.
g. Any used, previously displayed items.
CLAIM PROCEDURES:
a. Claims for defective merchandise must be made within ONE year from invoice date. Claims for missing parts must be made within 30 calendar days after
the merchandise is received.
b. Any claim for defective merchandise returns must be packed in original packaging.
c. We reserve the right to specify that items be returned to the original warehouse for inspection or be inspected by our representative in the field.
d. Pictures are required to claim defective merchandise, along with a copy of the original invoice.
e. If the claim is justified, the item(s) or part(s) will be repaired or replaced or a credit will be issued. It is our policy to replace parts whenever possible
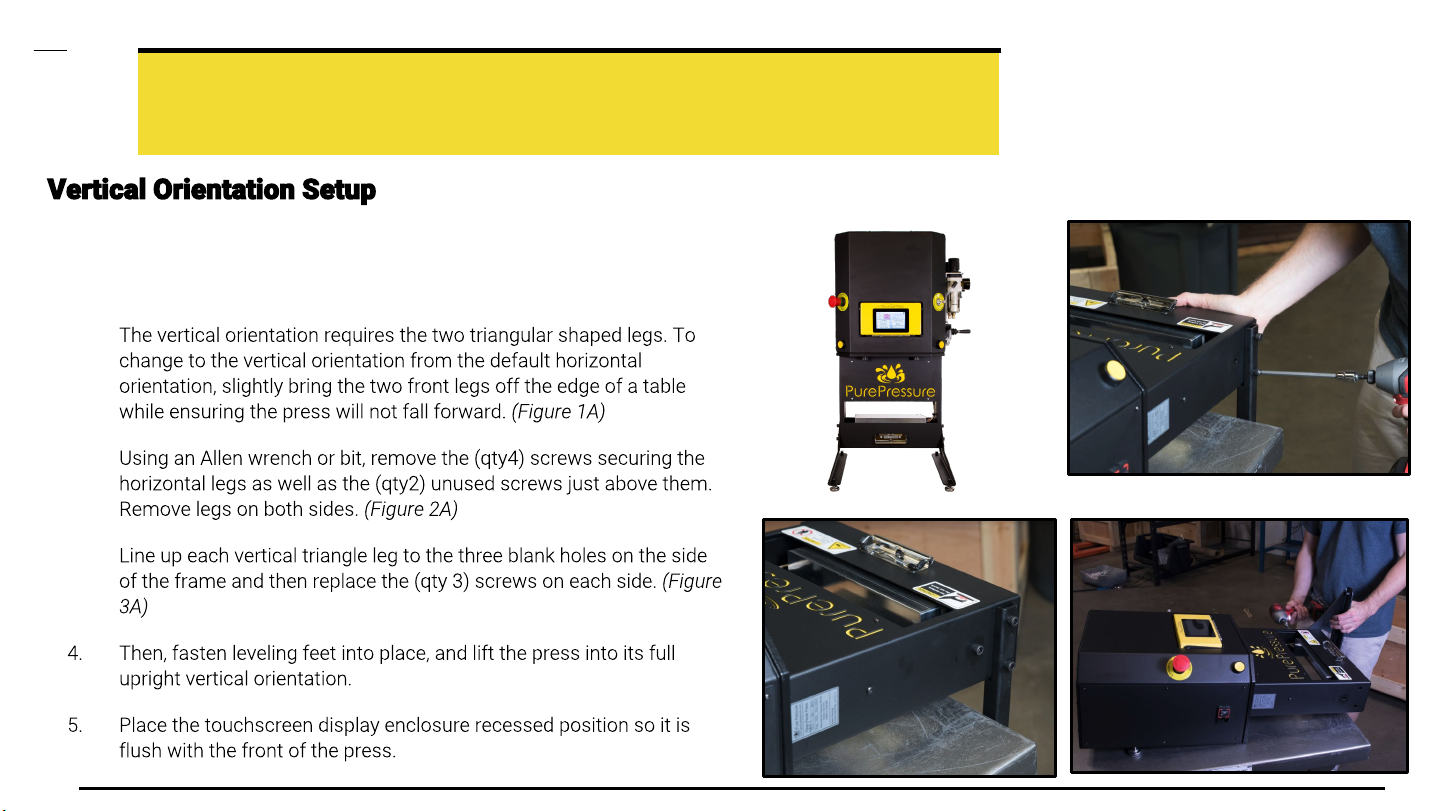
NOTE: NEEDS TO BE
UPDATED

1.2 What’s Included
(items may differ depending on kit or model)
●LED capacitive touch screen
●Two button safety start
●Emergency-stop
●Plate speed actuation dial
●Compressed air filter / regulator(s)
●Pressure toggle for ramping control
●Parchment clips
●Vertical orientation legs (qty 2)
●Horizontal orientation legs (qty 2)
●Leveling feet (qty 4)
●Industrial ¼” male air fitting
●Power cable
5 Tons of Force 8 Tons of Force
Pikes Peak V2 Longs Peak

1.3 Technical Specifications
Weight
Overall Dimensions
Depth x Width x Height
Horizontal:
Vertical:
Horizontal:
Vertical:
Input Voltage
Fuses (2x) Type:
Current:
Dimensions:
Type:
Current:
Dimensions:
Compressed Air Requirements PSI:
CFM:
PSI:
CFM:
Pneumatic Cylinder Maximum Force Output
Frame & Enclosure Metal
Heat Plates Sizes:
Material:
Maximum Temperature: °F
Sizes:
Material:
Maximum Temperature: °F

1.4 Disclaimers & Safety Precautions
WARNING:
DISCLAIMER:
DISCLAIMER:
WARNING:
WARNING:
WARNING:
WARNING:
WARNING:
WARNING:
WARNING:
WARNING:
NOTE:
WARNING:
WARNING:

1.5 Uncrating Your Press
Steps to Safely Uncrate Your Press
Note:
NOTE: IMAGES OF NEW UNCRATING TO
COME WEEK OF 3/11

2. Press Setup
Most users will encounter greater utility and productivity using the Pikes Peak V2 or Longs Peak rosin press in the vertical orientation. This is
because loading and unloading bags and parchment tends to be easier. It is our recommendation that you become familiar with the press in its
vertical orientation first, if desired.
For horizontal orientation pressing, virtually any silicone or parchment collection surface will work well.
Note:

2.1 Vertical Orientation Setup
Warning: HEAVY EQUIPMENT. Two people recommended for setting
up the press vertically or horizontally.
1.
2.
3.
Figure 2A
Figure 1A Figure 3A
Vertically Oriented Pikes Peak

2.2 Horizontal Orientation Setup
Warning: HEAVY EQUIPMENT. Two people recommended for setting
up the press vertically or horizontally.
2.
3.
4.
Figure 1A
Horizontally Oriented Pikes Peak Figure 2A
Figure 3A

2.3 Dual Pressure Installation
Vertical installation detailed below.
1.
2.
3.
4.
Note: In the vertical orientation, the pneumatic hoses should cross as shown
in Figure 4A. In the horizontal orientation, they will not cross.
Note: Your Dual Pressure system installs easily in both
the horizontal and vertical orientations with just a
Phillips screwdriver. There is a separate bag included
with your press kit of additional pneumatic tubing for
the horizontal setup if you are mounting it that way.
Figure 1A
Figure 2A
Figure 3A
Figure 4A

2.4 Electrical Power
Your product serial label will indicate if your press is rated for 120/240VAC
or just 120VAC. Your press kit will come with an appropriate power cable for
your location.
Power Draw: 8 amps while heating, 2 amps passive draw.
Emergency Stop: In the event of an emergency, pushing the E-Stop button
disconnects power to the heaters and the solenoid valve. Disconnecting
power to the solenoid valve will cause the plates to immediately retract so
long as an air supply is connected.
Fuse Replacement
2.
3.
Figure 1A
Figure 2A
Note: Connecting to any other power source other than
what your press is rated for on its serial label will void
your warranty.
Figure 3A

2.5 Compressed Air
Both the Pikes Peak V2 and Longs Peak require clean, dry compressed air
for long term operation. While there are many brands and types of air
compressors, we specifically suggest California Air Tools, Chicago
Pneumatic, or Quincy as some of the top brands we recommend and retail
on our website at www.purepressure.com.
Pikes Peak V2 Recommended Air Compressor Features
Maximum PSI:
CFM Output:
Storage Tank Size:
Longs Peak Recommended Air Compressor Features
Maximum PSI:
CFM Output:
Storage Tank Size:
To hook up your air compressor, attach an appropriately rated pneumatic
hose from your air compressor to your Pikes Peak V2 or Longs Peak rosin
press with a ¼” industrial quick connect fitting. (Figure 1A)
Figure 1A
¼” Quick Connect Fitting

3. Rosin Extraction Basics
Rosin is Created by the Application of Heat and Pressure
●
●
●
●

3.1 Tips & Tricks

3.2 Choosing Your Material

3.3 Yield & Material Types
PSI: The PSI on the X axis refers
to the pressure at your bag, not
the compressed air pressure that
is available from your air
compressor.
While the Pikes Peak V2 and
Longs Peak can automatically
bag pressure, the formula is as
followed:
(Total Available Force / Square
Inches of Bag Pressed) = PSI at
the Bag
Example:
(9,000 LB / F) / (12 square inch
bag) = 750 PSI
Note: Some strains tend to yield very well, whereas
others may not. Try not to get discouraged if your yields
aren’t what you expected on your first press. Heavily
resinous, terpene-rich strains will always yield the best
quality rosin!

4. Pressware Controls
Even though the Pressware touchscreen interface can look
intimidating at first, rest assured, it is extremely easy to learn and
use.
Heat, press time, pressure stage indicators, and more are all
controlled by the interface. In the settings menu, you can also
adjust your values to convert all calculations and numbers metric,
if desired.
You do still need to manually set, adjust and regulate your
pressure via the Dual Pressure regulators in conjunction with your
air compressor.
In the following sections, we will cover exactly how to use your
Pressware controls and how you can get the most out of your
PurePressure rosin press.
Save Up to 30 Recipes Touchscreen LCD Tech
This manual suits for next models
1
Table of contents
Other Pure Pressure Industrial Equipment manuals