PureFlow Airdog FPII-125 User manual

INDUSTRIAL
Fuel Air Separation System
PROTECTED UNDER THE FOLLOWING PATENTS
CANADA UNITED STATES OF AMERICA MEXICO
2,108,391 5,355,860; 5,746,184; 6,729,310 270409
NEW ZEALAND ITALY AUSTRALIA HONG KONG ECUADOR
532356 1362177 2005101054 1061420 PL10-2021
Additional Foreign Patents Issued and Pending in Europe, South America, Japan, and China
INSTALLATION MANUAL
UNIVERSAL DIESEL ENGINE APPLICATIONS
AIRDOG
®
FPII-125
NOW WITH DEMAND FLOW
Providing “Test Cell Performance” in “Real World Conditions” Since 1993
Proudly Made in the USA
www.airdogdiesel.com
1-573-635-0555 or
1-877-463-4373
Revised 6/22/2021

2
THE RIGHT CHOICE FOR YOUR DIESEL ENGINE
INDUSTRIAL
Fuel Air Separation System
SMALL and COMPACT
7” Long x 3.2” Wide x 10” Tall

3
SYSTEM OVERVIEW
Welcome to the AirDog®Heavy Duty FPII-125
Fuel Air Separation System
The AirDog® FPII-125 with ADVANCED FUEL AIR SEPARATION, DEMAND FLOW,
ADJUSTABLE REGULATOR, LOW PRESSURE SENSOR with LED INDICATOR LIGHT
and the 4G-HD FUEL PUMP, is a premium fuel ltration and delivery system for the diesel
engine.
The AirDog®FPII-125 removes water, particulates and the air that becomes entrained in diesel
fuel from sloshing and agitation from the fuel ow to the engine. The entrained air and vapor
separated from the fuel is returned to the fuel tank through a small return line. The fuel ow
to the engine’s transfer pump is at a NET POSITIVE PRESSURE HEAD preventing cavitation
and the formation of vapor thus overcoming the performance related problems from plugged
fuel lters, high altitude operation and torque loss at higher engine RPM’s.
Air and vapor are compressible. When Air/Vapor is present in a fuel injection system, the
pressure buildup and injection of fuel is delayed while the air/vapor is being compressed.
This delays the injection timing causing a shorter power stroke and low power, increased fuel
consumption and increased exhaust emissions. Preventing the formation of vapor from pump
cavitation and removing entrained air from the fuel ow to the injectors restores Correct
Injection Timing. Diesel engines equipped with the AirDog®can now perform as designed,
delivering “test cell” performance while in “real world” use!
All AirDog®products are manufactured with a personal touch,
unsurpassed attention to detail and the most stringent quality assurance.
TYPICAL INSTALLATION LAYOUT
The AirDog® FPII-125 returns entrained air and vapor (foam) with very little fuel ow back to the
tank and requires only one small return line to only one tank for quick and easy installations.
Positive Fuel
Pressure to
Transfer Pump
Air/Vapor Return Line
Fuel Supply Line
Entrained Air in Fuel
from Agitation & Sloshing
Transfer Pump
Fuel Preporator®

4
PureFlow®Technologies, Inc.
AirDog®FPII-125 Universal Applications
QUICK CONNECT COMPONENT OVERVIEW
Provided in this kit is an OE style quick connection system. This system works to allow for
a quick, clean, and professional install.
SAE J2044 Quick Connect System
The SAE J2044 quick connect system is the most commonly used system in the automotive
industry. The images below show the formation of the SAE J2044 connection. To connect
the assemblies, simply insert the male end form into the mating female connector. Push
rmly until you hear it “click” into place. To disconnect the ttings, press down and hold
the tabs on the female connector while you rmly pull the assembly apart.

5
PureFlow®Technologies, Inc.
AirDog®FPII-125 Universal Applications
TABLE OF CONTENTS
Section 1……..….….…...........……................................…...…….....Table of Contents
Section 2…….........….…………………....................Installation and Safety Guidelines
Section 3……..……...…..……….….…..............….…………………...….….Parts List
INSTALLATION PROCEDURES
Section 4…....…...........................................................Fittings, Brackets, and Mounting
Section 5……..…...…..................................................................………........Fuel Lines
Section 6….....……....................…..……....………….….…………......Wire Harness
Section 7..…….................….…..….................…….........……Initial Start Up Procedure
MAINTENANCE
Section 8.………..........................................…………Filter Service Recommendations
Section 1 Table of Contents

6
PureFlow®Technologies, Inc.
AirDog®FPII-125 Universal Applications
INSTALLATION GUIDELINES
The installation of your AirDog® FPII-125 can be made relatively easy by following the steps
outlined in this manual, and:
1. Inventory the package components. Immediately notify PureFlow®Technologies, Inc.
of any missing or damaged parts.
2. Read the installation manual completely. Understand how the system operates and the
installation recommendations before beginning.
3. Proper location of the AirDog®FPII-125 on the vehicle is essential. Consider hazards
presented to the equipment by road debris and the elements.
4. The installation recommendations and guidelines contained herein are suggestions only.
Individual installations may vary.
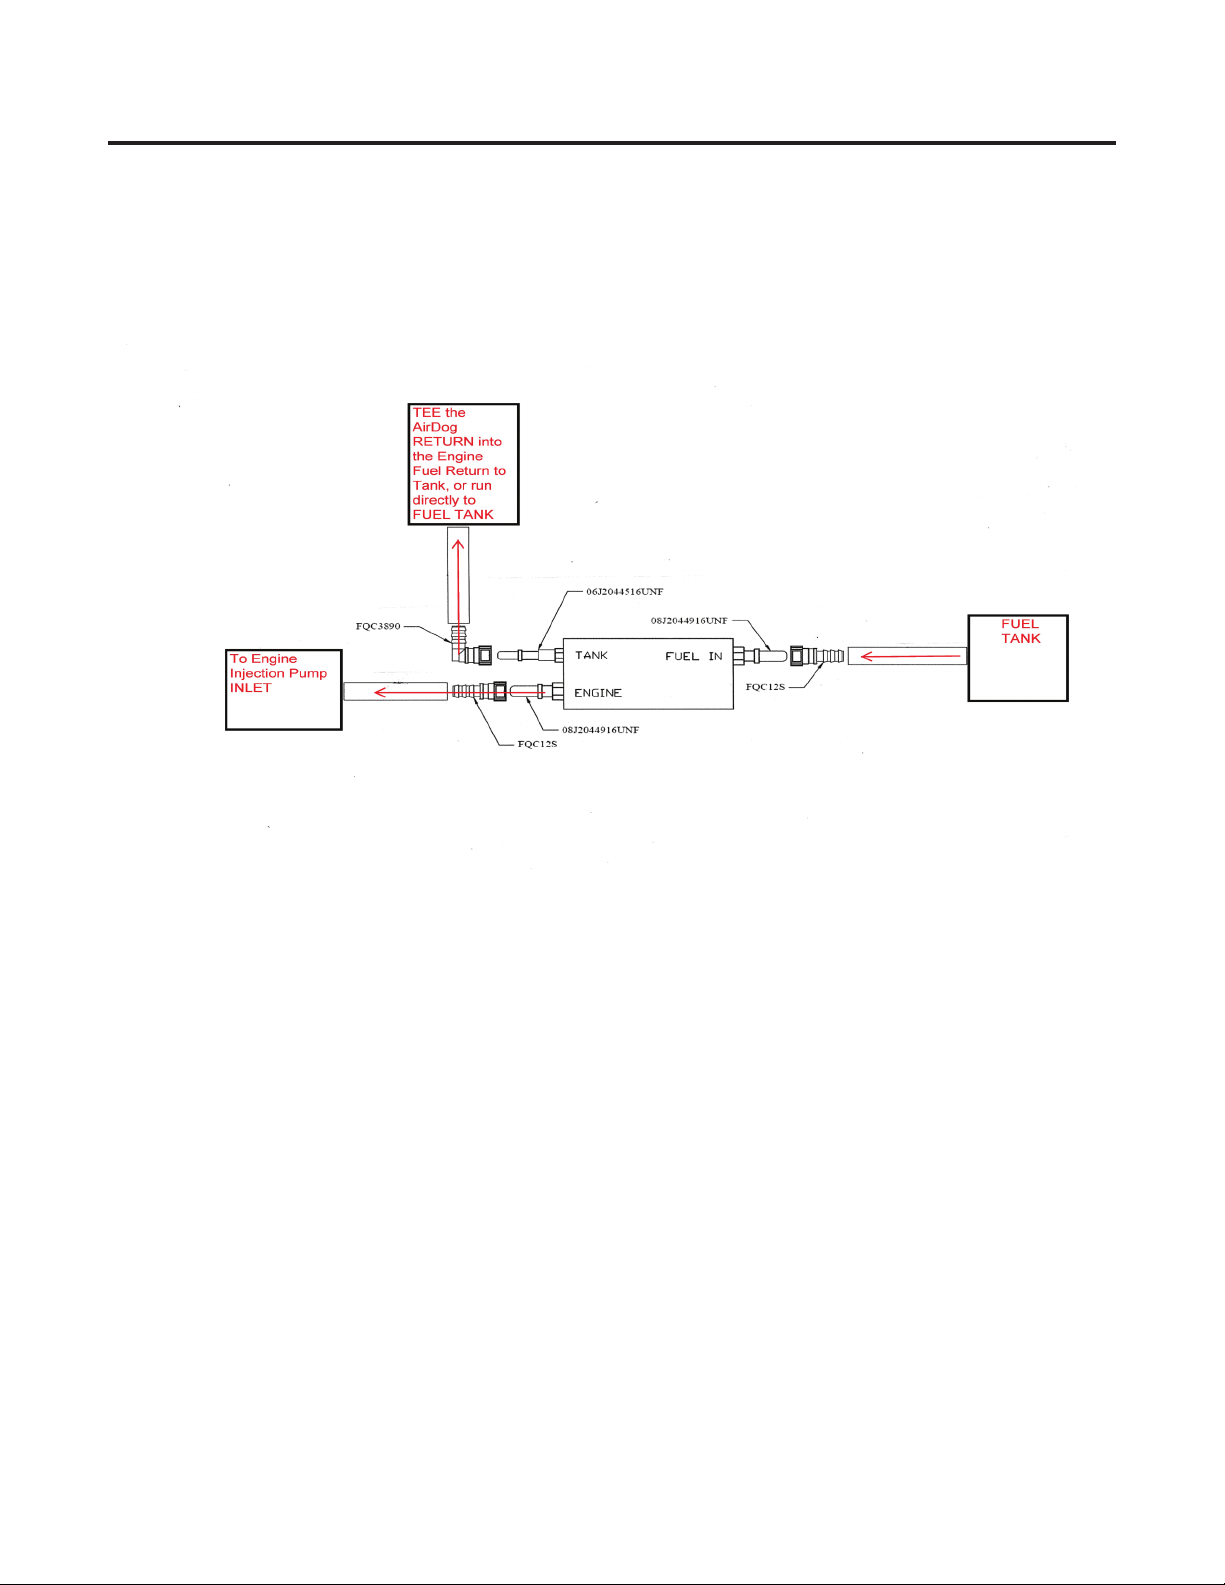
5. Use diesel compatible thread sealer when installing ttings with NPT threads.
(Loctite® 545 Thread Sealer is diesel compatible)
SAFETY GUIDELINES
CAUTION: Chock the vehicle’s tires to prevent rolling.
CAUTION: Disconnect the battery cables before proceeding with the AirDog®installation.
CAUTION: Wear safety glasses when operating power tools, such as drills and grinders, or when
using a punch or chisel.
CAUTION: Do not drill into or weld the top of the frame rail or within 1-½” of the frame rail
ange on the side of the frame rail.
CAUTION: Route the fuel lines and electrical harnesses keeping them away from hot exhaust
components and/or moving parts. Properly secure the fuel lines and electrical
harnesses to prevent chang using zip ties included in installation kit.
CAUTION: Do not subject the AirDog® system directly to high-pressure wash systems. Doing so
may damage seals and electrical components, and such damage is NOT covered under
warranty.
If you are uncertain of any installation procedure, please call PureFlow®
Technologies, Inc. at 877-463-4373 for technical assistance.
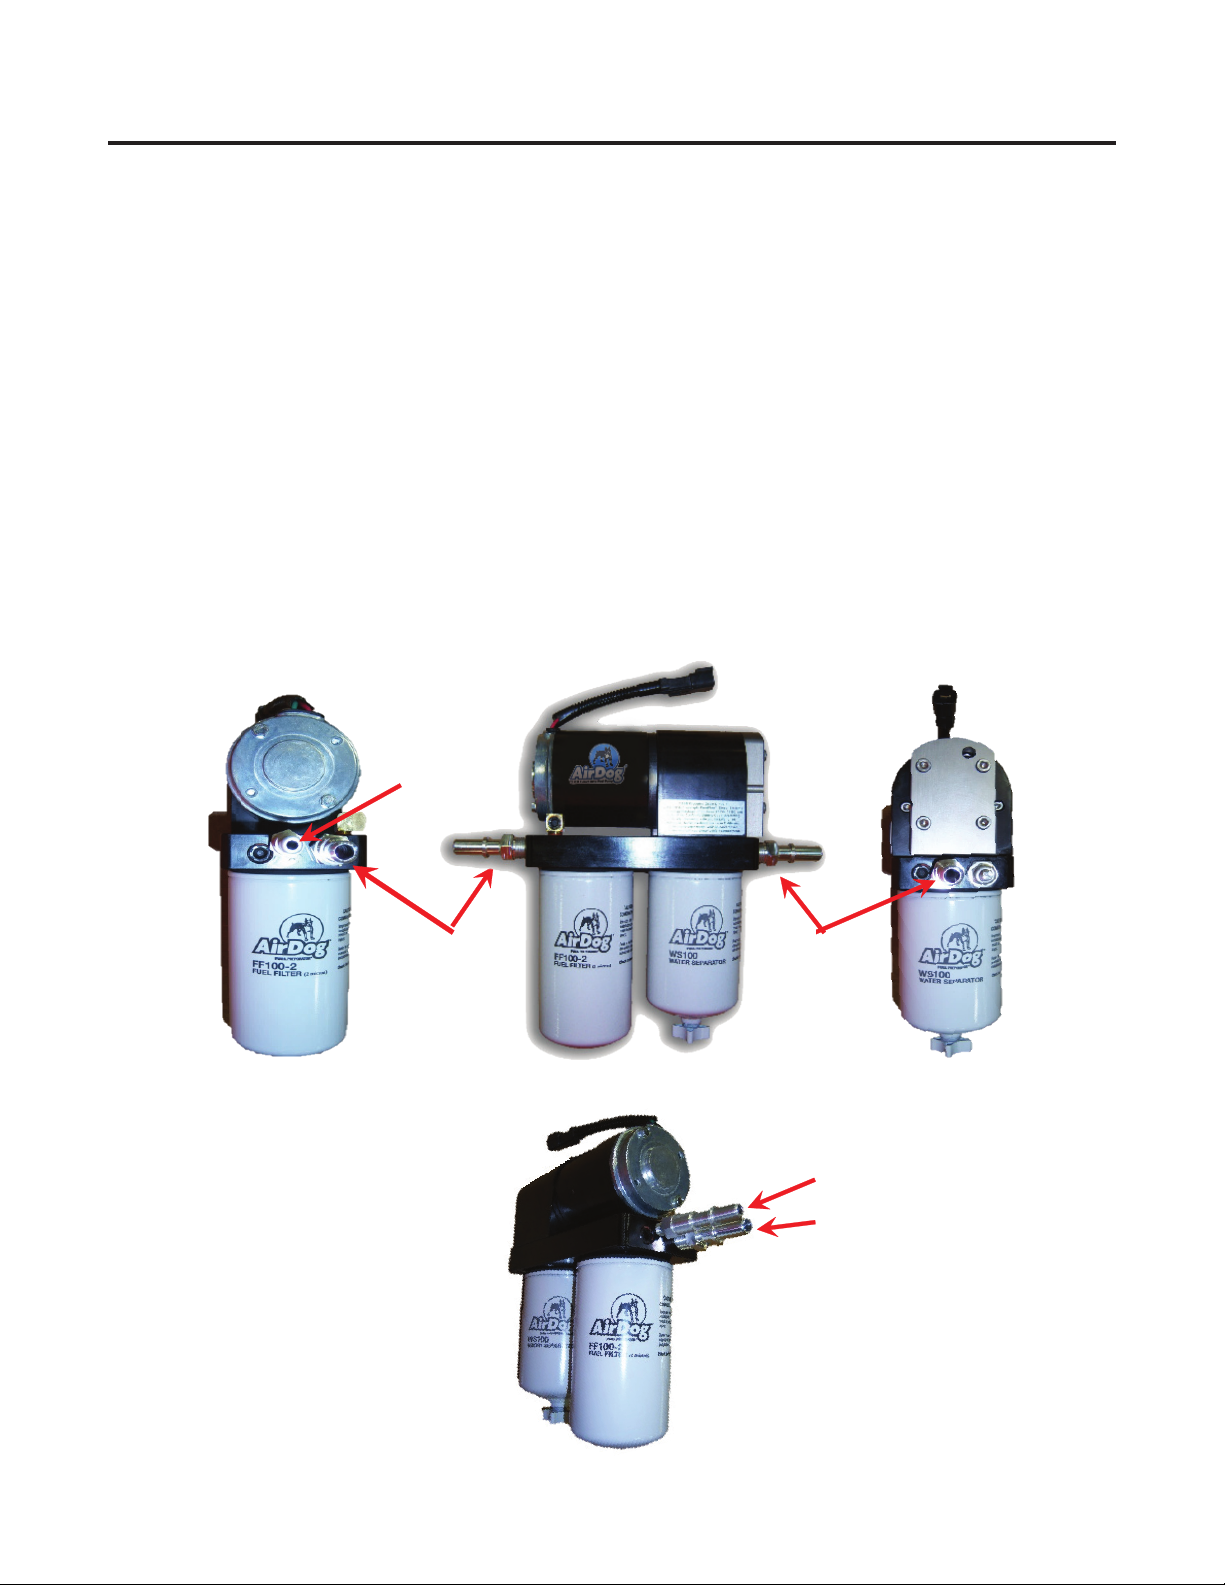
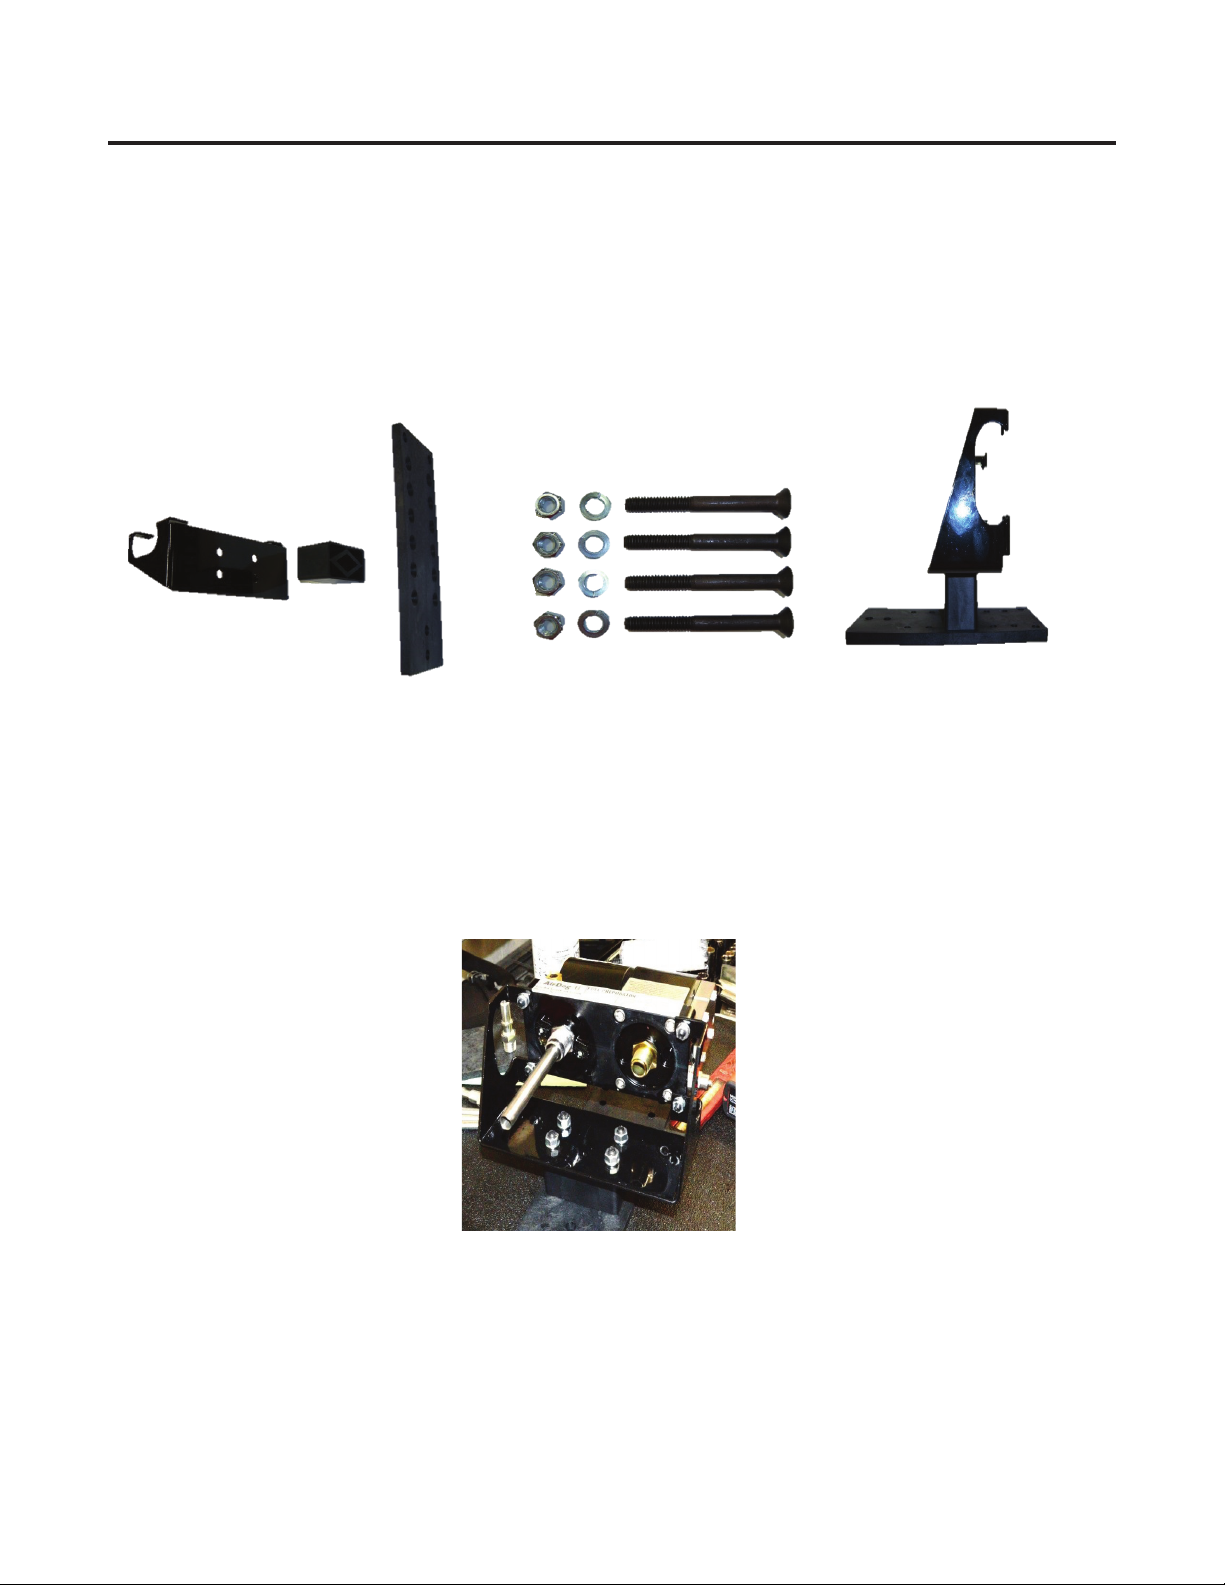
NOTE: The pictures used in this manual are for example only and may not
depict the exact components as found on your vehicle.
Section 2 Installation & Safety Guidelines

7
PureFlow®Technologies, Inc.
AirDog®FPII-125 Universal Applications
Installation Parts List
Section 3 Parts List
1 AirDog® FPII-125 FPII-125
1 AirDog®FPII-125 Bracket 001-3C-0004-PC
1 Frame Brackets 010-3C-0002PC
1 Wire Harness with Indicator Light 5E-2-010
1 Indicator Light Dash Plate 201-3-0004-S-M
1 1/2” General Purpose Hose (Fuel Line) - 30 ft Section 4C-1-02-08-004-030
QTY Description Part Number Image
010-3C-0001PC
1 3/8 ID 7/8 OD Rubber Grommet 5J-1-1-04-2758
2 1/2 F 90° Hose Quick Connect Fitting 4A-9-FQC1290
2
1/2 F Straight Hose Quick Connect Fitting
4A-9-FQC12S
1 3/8 F 90° Hose Quick Connect Fitting 4A-9-FQC3890
2 1/2 M J2044 Quick Connect x 9/16 UNF 4A-9-08J2044916UNF
1 3/8 M J2044 Quick Connect x 5/16 UNF 4A-9-06J2044516UNF
3 #8F JICX x 1/2 Push-lock Hose Barb 4A-1-09-08-08-B
2 #8M JIC x 3/8 M ORB Straight Connector 4A-1-01-08-06-S
1 3/8-18 M NPTF x 3/8-18 F NPTF x 3/8-18 F NPTF Tee 4A-4-01-06-S
1 #8M JIC x 3/8 M NPTF Straight Connector 4A-1-02-08-06-SZ
908-01-0460-QC Fitting Kit
ADFK-460 Installation Kit
1 Fuel Pressure Sensor 908-5C-9-007 or
908-5C-9-0010
1
Spacer
010-3C-0003A-P
1 Zip Tie Bundle 5H-2-1-06/12B
1 Mounting Hardware Kit Includes: 901-61-0125
(1) Nut Packet 908-61-0125-N
(1) Washer Packet 908-61-0125-W
1/4-20 x 1-1/4 SHCS (4) 1L-A20SZ
5/16-18 x 2-3/4 FHSCS (4) 1M-B44SZ
3/8-16 x 4-1/2 HHCS (3) 1J-1-C72SZ
Fuel Filter FF100-2
Water Separator WS100

8
PureFlow®Technologies, Inc.
AirDog®FPII-125 Universal Applications
Illustration of Quick Connect Components
Section 4 Fittings, Brackets, and Mounting

9
PureFlow®Technologies, Inc.
AirDog®FPII-125 Universal Applications
Installing the J2044 Quick Connect Fittings & Pressure Sensor
into the AirDog®FPII-125 Filter Base
Section 4 Fittings, Brackets, and Mounting
4-1. Dip the threaded end of the 1/2” M J2044 quick connect x 9/16” UNF
(4A-9-08J2044916UNF) ttings into clean motor oil and hand-thread into the “ENGINE”and
“FUEL IN” ports of the AirDog® FPII-125 lter base as illustrated in Figures 1, 2, and 3.
Using a 3/4” deep socket, torque the ttings to 120in-lb or 10ft-lb. Do NOT overtighten
the ttings or damage may occur.
4-2. Dip the threaded end of the 3/8” M J2044 quick connect x 5/16” UNF
(4A-9-06J2044516UNF) tting into clean motor oil and hand-thread into the return port of the
AirDog® FPII-125 lter base as illustrated in Figures 1 and 4. Using a 5/8” deep socket, torque the
tting to 60in-lb or 5ft-lb. Do NOT overtighten the ttings or damage may occur.
4-3. Remove the 1/8” NPT plug in the 45° elbow. Install the pressure sensor into the elbow.
Figure 1 Figure 2 Figure 3
RETURN
ENGINE FUEL IN
RETURN
ENGINE
Figure 4

10
PureFlow®Technologies, Inc.
AirDog®FPII-125 Universal Applications
Section 4 Fittings, Brackets, and Mounting
4-4. Assemble the AirDog®mounting bracket (PN 001-3C-0004-PC) to the frame bracket (PN
010-3C-0001PC) using the spacer (PN 010-3C-0003A-P) as shown in Figure 5 using the four bolts,
lock washers, and nuts included in the mounting bracket hardware kit (PN 901-61-0125) shown
in Figure 6. Properly torque all fasteners. You will need a 3/16” allen and a 1/2” wrench. The bracket
assembly should look like Figure 7.
4-5. Attach the AirDog® FPII-125 to the frame bracket assembly as shown in Figure 8 using the
supplied hardware in the mounting bracket hardware kit.
4-6. Be sure to tuck the AirDog® FPII-125 as far up as possible without it rubbing on anything to
prevent damage from road debris. The bracket assembly is adjustable to achieve this.
NOTE: We recommend installing the AirDog® on the inside of the frame rail, but we understand some
applications don’t have room. The photos in this manual may not be the same as your application.
Figure 8
Figure 5 Figure 6 Figure 7

11
PureFlow®Technologies, Inc.
AirDog®FPII-125 Universal Applications
Section 4 Fittings, Brackets, and Mounting
NOTE: Some frame rails have a bracket that is used to support the frame during the manufacturing
process. If this bracket is on your frame rail and obstructs the proper positioning of the AirDog®
FPII-125 mounting bracket, you may remove part or all of it, as needed. Be very careful not to
damage the frame ange.
4-7. Clamp the frame between the AirDog® bracket assembly and the backing plate
(PN 010-3C-0002PC) (Figure 11) using the 3/8” bolts, lock washers, and nuts included in the kit.
You will need two 9/16” wrenches. Properly tighten all fasteners. BE SURE to mount the AirDog®
FPII-125 with the “FUEL IN” port toward the rear of the vehicle (Figure 12).
Figure 9 Figure 10
Figure 11
Figure 12
FUEL IN
VEHICLE
FRONT
VEHICLE
REAR

12
PureFlow®Technologies, Inc.
AirDog®FPII-125 Universal Applications
Section 5 Fuel Lines
Assembling the Fuel Lines
Assemble the fuel lines and fuel line ends as you install them. It is not
recommended to pre-cut fuel lines, as pre-cut lengths may not be accurate.
5-1. Take the fuel line end and lubricate the barbed end with clean motor oil (Figure 13) and press
it into the fuel line until all three barbs are covered (Figure 14). The fuel line end should look like
Figure 15.
Figure 13
Figure 14
Figure 15
NOTE: Hose clamps are not needed for these push-lock connectors.

13
PureFlow®Technologies, Inc.
AirDog®FPII-125 Universal Applications
When installing the AirDog® fuel system, it is recommended to bypass the factory lter canister
for optimum engine performance.
5-2. Remove the original factory fuel supply line at the fuel inlet port of the injection pump
(Figure 16).
Section 5 Fuel Lines
Figure 16
5-3. Assemble one end of the 1/2” fuel line (reference Section 5) using a #8 F JIC Swivel x
1/2” Pushlock Hose Barb (PN 4A-1-09-08-08-B) (Figure 17). Then connect the swivel end to the
fuel inlet of the injection pump. A #8 M JIC x 3/8 M ORB Adapter (PN 4A-1-01-08-06-S) has
been supplied in this kit; however, you may need to adapt as necessary for your specic engine
application.
½” fuel line
Figure 17
5-4. Run the fuel line along the frame away from any hot or moving parts, such as exhaust
or driveshaft, to the “Engine” port in the AirDog®. Cut the fuel line to length and insert fuel line
end FQC12S (Figure 18) or FQC1290 per step 5-1. Once the connector is installed, connect it to
the male J2044 tting in the “Engine” port in the AirDog®. A “click” will be heard once properly
connected.
FQC12S Figure 18
1/2” fuel line

14
PureFlow®Technologies, Inc.
AirDog®FPII-125 Universal Applications
5-5. It is advised to remove the factory supply lines between the tank and the lter canister, if
equipped. Also, remove the factory supply line between the lter canister and the injection pump.
Then plug the ports on the lter canister (Figure 19). This will prevent fuel spillage.
Section 5 Fuel Lines
Figure 19
NOTE: Be sure to keep the ORIGINAL ENGINE RETURN LINE connected as it is from the
factory. In many cases, the return runs through the ange of the lter canister.

15
PureFlow®Technologies, Inc.
AirDog®FPII-125 Universal Applications
Section 5 Fuel Lines
5-6. Assemble one end of the 1/2” fuel return line (reference Section 5) using fuel line end
FQC3890 and plug it into the “Return” J2044 tting installed in the AirDog® (Figure 20). A “click”
will be heard once the tting is properly connected.
5-7. Run the fuel return line along the frame away from any hot or moving parts, such as exhaust
or driveshaft, to the tank. Cut the fuel return line to length and insert a #8 F JIC Swivel x 1/2”
Pushlock Hose Barb (PN 4A-1-09-08-08-B) (Figure 21) and connect to return to tank, after
regulator, if equipped, and before splitter, if equipped with dual tanks. For single tank application,
you may connect the return directly to the tank. If available, an open auxiliary port is an option for
the return connection
Figure 20
Figure 21
1/2” fuel return line
FQC3890 1/2” fuel return line

16
PureFlow®Technologies, Inc.
AirDog®FPII-125 Universal Applications
NOTE: For the return to tank connections, a 3/8” NPT Tee (PN 4A-4-01-06-S) and #8 M JIC x
3/8” M NPT Adapter (PN 4A-1-02-08-06-SZ) have been included in this kit, and are adaptable
to most applications. As an example, Figure 22 shows the 3/8” NPT Tee used to Tee the AirDog®
return with the engine fuel return connected to a port on top of the fuel tank. Additional or
replacement ttings may be required to adapt to your specic application.
Figure 22
Section 5 Fuel Lines

17
PureFlow®Technologies, Inc.
AirDog®FPII-125 Universal Applications
Fuel Suction Line
Connecting the Fuel Supply Line from the Tank to the AirDog® FPII-125
5-8. Remove the original fuel suction line tting from fuel tank. The original suction line can be tied
out of the way or removed.
5-9. Assemble one end of the 1/2” fuel line (reference section 5) using required ttings. A #8 F JIC
Swivel x 1/2” Pushlock Hose Barb (PN 4A-1-09-08-08-B) (Figure 23) has been supplied in this
kit; however, you may need to adapt as necessary for your specic engine application. Attach to the
connection where the factory suction line was just removed in the previous step. A #8 M JIC x 3/8
M ORB Adapter (PN 4A-1-01-08-06-S) has been supplied in this kit; however, you may need to
adapt as necessary for your specic engine application.
Section 5 Fuel Lines
5-10. Run the fuel line along the frame away from any hot or moving parts, such as exhaust
or driveshaft, to the AirDog® “Fuel In” port. Cut the fuel line to length and insert fuel line end
FQC12S or FQC1290 per step 5-1. Once the fuel line end is pressed in, connect it to the male
J2044 tting in the AirDog® “Fuel In” port (Figure 24). A “click” will be heard once properly
connected.
Figure 23
1/2” fuel line
FQC12S
Figure 24
1/2” fuel line

18
PureFlow®Technologies, Inc.
AirDog®FPII-125 Universal Applications
Section 6 Wire Harness
Wire Harness
*VERY IMPORTANT: The AirDog® electrical harness requires a 15 amp fuse.
The AirDog® wire harness has a low pressure sensor and an amber LED indicator light as standard
equipment. The indicator light will illuminate at start-up, remain on for a few seconds, then go o,
and should remain o unless pressure ow to the engine drops below minimum requirements.
TheAirDog®Wire Harness
Securing the AirDog®Wire Harness Relay to the Vehicle
6-1. Secure the AirDog®wire harness relay to the vehicle. This
picture shows the relay mounted on the rewall.
6-2. Route the AirDog®wire harness pump motor lead and the fuel pressure sensor lead to the
AirDog®unit. Connect the wire harness pump motor lead to the AirDog®unit pump motor lead.
6-3. Connect the AirDog®wire harness fuel pressure sensor lead (lead with the green seal) to the
AirDog®unit fuel pressure sensor.
AirDog®Pump Motor Lead (6-2)
Fuel Pressure Sensor Lead (6-3)
Indicator Light & Dash Plate (6-5 & 6-9)
Battery Positive Lead - Red (6-11)
Battery Negative Lead - Green (6-11)
Indicator Light Lead (6-5 & 6-9)
Relay Trigger Lead (No Connector/Plug) (6-5 & 6-6)
Relay
(6-1)

19
PureFlow®Technologies, Inc.
AirDog®FPII-125 Universal Applications
Battery
Ignition
Accessory
Relay Trigger Lead and Indicator Light Lead
The indicator light lead must be routed through the rewall and to the dashboard. The relay trigger
lead must be connected to a contact point that is electrically “HOT” when the key is in the “RUN”
position. This could be either in a spare fuse holder in the fuse panel or on the ignition switch itself.
NOTE: Do NOT connect the relay trigger lead to a point that is “HOT” when the key is in the
ACCESSORY position.
Routing the Indicator Light and Relay Trigger Lead through the Firewall
6-4. If an access hole is available, remove the plug and route the lead through the hole. If no access
hole is available, select the best location and drill a 5/8” hole in the rewall to allow entry of the
relay trigger lead and indicator light into the cab.
6-5. Route the relay trigger lead (red) and indicator light lead through the rewall. Be sure to seal
the opening or install a grommet (supplied) around the wire loom to prevent water leakage and
protect it from chang.
6-6. Connect the red relay trigger lead to a terminal on the ignition switch that is “HOT” when the
ignition key is in the “RUN” position OR connect the red relay trigger lead to a fuse holder in the
fuse panel that is “HOT” when the ignition key is in the “RUN” position.
Section 6 Wire Harness
Do NOT
Connect
Here
OR

20
PureFlow®Technologies, Inc.
AirDog®FPII-125 Universal Applications
6-7. Select a location on the dashboard that is easily visible to the driver.
6-8. Remove the dash components as necessary to access the area behind the selected location.
6-9. Drill a 10MM hole in the dash at the selected location. Be very careful when drilling. Do not damage
components located behind the dash. Remove the nut from the indicator light.
6-10. Remove backing from double sided tape on backside of dash plate. Install the dash plate and
indicator light in the dash. Reinstall nut and tighten until snug. Connect the indicator light lead to the
connector on the wire harness. Connect the positive (orange wire) lead on the wire harness to the positive
(marked orange) quick connect terminal on the indicator light (see image above). Then connect the
negative (blue wire) lead on the wire harness to the negative (unmarked) quick connect terminal on the
indicator light.
6-11. Re-install the removed dash components to their original position.
Connecting the Power Supply Leads
The power supply leads can be easily connected to the appropriate contacts on the alternator.
However, any high amperage terminal that is always “HOT” is OK for the Positive + (RED)
lead. Be sure the NEGATIVE ▬ (GREEN) lead is connected to a reliable chassis ground.
6-12. Route the red and green power supply leads to the alternator. Connect the Green (-) ground
lead to the alternator Ground connection.
Section 6 Wire Harness
6-13. Connect the Red (+) positive lead to
the alternator Hot Lead going to the battery.
NOTE: Secure wire harness with zip ties
included in installation kit.
Table of contents
Popular Automobile Accessories manuals by other brands

Renkforce
Renkforce RF-BTFE-1000 operating instructions

ADAPT SOLUTIONS
ADAPT SOLUTIONS XL-Seat XLS-DAKQ05R installation manual

HAKO
HAKO 7091.85 Assembly manual

Quadratec
Quadratec QuadraTop Adventure Top 1113.00 Series installation manual

BraunAbility
BraunAbility ULB user manual

Revelation
Revelation lnd-10716 installation instructions