PureLiving Umami User manual

使用說明書
蒸鮮鍋
● 使用前請詳閱說明書 Read all instructions below before using the Steamer.
● 產品保固卡於最末頁 Warranty Registration Card is located at the back of this manual.
請多加使用會員服務,產品消息或相關情報將會以電子郵件形式通知您。
Please visit our website for updated product information and news, and as a registered
memeber, we will notify you by email.
登入會員請上官網:http://www.purelivinguvc.com
Please register as a member on our official website: www.purelivinguvc.com
Steamer
OPERATING INSTRUCTIONS
Patent Pending
蒸鮮鍋購買後,第一次使
用前溫馨提示設於尾頁。
Please read the last page
on the instruction when first
use.

P. 1
目錄
參考烹調時間
注意事項
產品結構
- 蒸鮮鍋分解圖
- 鋼化玻璃鍋蓋安裝圖
- 控制面版
操作說明
- 組裝
- 基本操作
- 水量不足警示
清潔及保養
產品規格
保用條款
售後服務、商品保固卡
-------------------------------------------------------------------------------P.1
-------------------------------------------------------------------------------------P.2
-------------------------------------------------------------------------------------P.3
-------------------------------------------------------------------------------------P.4
----------------------------------------------------------------------------------P.5
-------------------------------------------------------------------------------------P.6
----------------------------------------------------------------P.14
1 3分鐘
3 5分鐘
5 7分鐘
6 8分鐘
3 4分鐘
貝殼類
魚 片
丸 類
蔬菜類
瓜果類
肉 片
肉 塊
雞 塊
蟹 類
蝦 類
參考烹調時間
下表只作參考之用,請按食物大小、厚度、份量、新鮮程度、擺放位置以
及個人喜好來調整烹調時間。
4 5分鐘
2 3分鐘
3 5分鐘
2 3分鐘
3 5分鐘

P. 2
注意事項
重要說明
- 為安全起見,初次使用產品前請先細閱本說明書,並保存說明書,以便作參考之用。
- 本產品只供家居使用。請必須依照本說明書內的指示操作。
- 搬動產品時,請以雙手托住產品底部,切勿只提起精華鍋、活動蒸架、儲水箱/底座和電
源線。
1. 檢查家中電源是否符合本產品規格列明之要求。
2. 本產品應放在堅固和穩定的平面上使用。切勿將它放在潮濕或有腐蝕性物質的地方。
3. 注意組裝位置要正確和穩固。
4. 由於產品會釋放高溫的蒸氣,切勿在操作時觸摸產品表面,開蓋時請使用隔熱手套。
5. 蒸煮進行時,切勿伸手入蒸鮮鍋中,應利用食物夾來查看或翻動食物。
6. 使用本機時,請確活動蒸架和精華鍋已放在蒸鮮鍋底座上。
7. 提起鍋蓋時,注意以免被燙熱的蒸氣燙傷。
8. 如要切斷電源,應先按關機按鈕,然後再拔下電源插頭。
9. 必須待蒸鮮鍋完全冷卻方可拆開精華鍋和底座。
10. 如蒸鮮鍋內有任何燙熱食物,用戶都不應移動機身。
11. 清洗產品前,必須拔下電源插頭。用戶應待產品完全冷卻後,才將組件拆開,進行清洗
或收藏產品。
12. 任何情況下都不應將底座浸入水內或任何液體中。
13. 本產品並不適宜讓兒童、身體或心智殘障、缺乏經驗或知識的人士操作,除非該人士得
到負責保障其安全的人士的監管或指引。
14. 切勿讓兒童使用,觸摸本機。
15. 不應將本產品放置在靠牆或廚櫃附近的位置操作,以免蒸氣對牆身和櫃身造成破壞,亦
請勿將蒸鮮鍋放近爐火或熱源旁邊。
16. 電源線應妥為擺放,以免行走時被絆倒。切勿讓電源線懸垂於桌邊或與任何發熱體接觸。
17. 拔除插頭時,請不要接觸到金屬部分或用力過度。
18. 切勿將蒸鮮鍋用於任何非指定家庭用途。
19. 蒸鮮鍋機身內並沒有任何可供自行維修的部件。用戶切勿打開機身。
20. 如電源線損壞或其他問題出現,必須由本公司維修部或合資格的技術人員更換及處理。
切勿自行拆除這些部件或更換不符合安全規格的配件。
21. 本產品有預防過熱及缺水的保護設計,當溫度過高時或水量低於最低水位時,產品的安
全設計會自動啟動保護程式而自動關機。如果發生自動關機時,請優先檢查儲水箱內的
水量,是否低於所標示的低水位MIN ?
是:請加水量於高水位MAX及低水位MIN之間後重新啟動即可正常使用。
否:如果重新啟動還是無效,請連繫我們的技術服務專線。
22. 蒸煮完食物後,而且電源也關閉的狀態,底部仍會有餘熱,散熱風扇會持續地工作2分
鐘,這是保護產品的安全設計,屬於正常現象,此時切勿強制拔除電源線。

P. 3
產品結構
蒸鮮鍋分解圖
鋼化玻璃鍋蓋安裝圖
1鋼化玻璃鍋蓋 2活動蒸架 3精華鍋 4儲水箱/底座
5電源線
控制面板
開關按鈕
(電源指示燈)
時間設定按鈕
大火,中火按鈕
小火及保溫按鈕
水量不足警示燈
1
2
3
4
5
開關按鈕
(電源指示燈)
時間設定按鈕
大火按鈕
小火及保溫按鈕
水量不足警示燈
1
2
3
4
5
重要說明
- 第一次使用本機前,請先徹底清洗所有配件(機身底座、電源線及插頭除外)。
- 切勿在儲水箱中注入暖/熱水,調味品、香料、酒、湯或任何其他液體,以免損害蒸鮮鍋性能。
- 請確保儲水箱內有最少超過最低水位標示為MIN 的水才操作,以免本機因空燒而損壞。
- 加水量時,也請勿超過高水位標示為MAX。
- 烹調進行 時,活動蒸架和精華鍋均十分燙手。切勿用手觸碰,以免受傷。
5
22
34
3
1
+
5
2 2
4
3
1
S
S
鐵片光面向下
凸形膠圈
膠圈
請用十字螺絲刀
光面向下
請用十字螺絲刀

P. 4
操作說明
1. 將儲水箱/底座 放在平坦的位置上。
2. 將精華鍋 平穩地放置於底座 上,確定對正在出氣孔
上,裝配不可左右搖晃。
3. 將活動蒸架 放於精華鍋 上。
4. 放上鋼化玻璃鍋蓋 。
4
3 4
2 3
1
1
2
3
4
B. 基本操作
1. 注入 常溫潔淨水 於儲水箱/底座內。 (請注意,水量請勿高於最高刻度)。
並且依照 A.組裝說明 把蒸鮮鍋放置完成。
2. 插上電源插頭,會提醒一聲“嗶”的警示聲。
3. 放入食物。
4. 開啟電源後,會發出3個音階的音樂鈴聲提示已開機的狀態,並電源指示燈會亮紅燈,同時
請確認顯示面板上的缺水燈熄滅。
5. 時間設定為:01分鐘-99分鐘,閃爍3下後確認設定完成,以倒數計時方式顯示,選擇火力大
小的按鍵後開始加熱,此時電源指示紅燈會熄滅。
6. 若倒數模式完成並顯示00分鐘時,會有3次警示音通知時間到,此時會自動轉成為10分鐘的
小火及保溫狀態,若10分鐘以 內沒有選擇火力和時間操作,過後會自動關機。
7. 在小火及保溫狀態中可任意選擇火力調節和所需時間設定。如需繼續蒸煮,只需重複第4點
及第6點的操作步驟即可。
C. 水量不足警示
1. 加水量請勿高於儲水箱/底座的最高刻度MAX 或低於最低水量最低刻度MIN,並確認剩餘水
量是否足夠煮食。
2. 水量不足時,水位警示燈會在面板上顯示橙燈並會連續發出“嗶”警示聲3次後,會自動關
機。
3. 確認蒸鮮鍋已關機,再把適量的常溫潔淨水注入水箱內,以及確認缺水警示燈熄滅,才方
可重新開機使用。
A. 組裝

P. 5
清潔及保養
注意
- 在清潔產品前,先讓蒸鮮鍋完全冷卻,關掉本機,拔除電源。
- 切勿把蒸鮮鍋底座,電源線和插頭浸在水中或其他液體裡。
- 不要用粗糙的清潔用具(如鋼刷)來清洗蒸鮮鍋的任何部份。
備註
1. 除鈣程序有助防止水槽中的鈣化物質積聚,讓蒸鮮鍋發揮最佳蒸煮效能和延長其使用
壽命。
2. 如用常溫潔淨水蒸煮食物,約一年只需做一次的除鈣程序清潔;
如果非使用常溫潔淨水蒸煮食物,每使用3次蒸鮮鍋,就必須要做一次除鈣程序清潔。
A. 精華鍋,活動蒸架,鋼化玻璃鍋蓋
手洗:
1. 請把精華鍋倒放,將清水注入蒸氣嘴的孔內,達到徹底清潔蒸氣嘴。
2. 請以手洗或用具有清潔液的溫水來清洗可拆的鍋件,再用清水徹底沖洗乾淨。
B. 儲水箱/底座
用濕布把蒸鮮鍋底座清理,再以乾淨的柔軟乾布擦乾,千萬不能把蒸鮮鍋底座放入
洗碗機清洗。
C. 除鈣程序
如產品用了一段時間後,或當發現產品所需的蒸煮時間比較長,請按以下方法來除垢:
1. 製作除鈣水:把白醋130ml及純淨水650ml倒入儲水箱。
2. 放回活動蒸架及強化玻璃鍋蓋於精華鍋座上。
3. 開啟電源,並設定大火10分鐘,讓除鈣水循環加熱系統,達到除鈣效果。
4. 把剩餘的除鈣水倒出。
5. 完成除鈣後,請務必使用純淨水800ml,再以大火10分鐘清洗。

P. 6
產品規格(CE)
保用條款
型號
電壓
頻率
功率
儲水箱容量
機身尺寸
淨重
產品規格及設計如有變更,恕不另行通知。
製造:中國
PU-GT、PU-RT、PU-BT
220-240V~
50Hz/60Hz
1300W
蒸鮮鍋 4 升 、 蒸鮮鍋S 1.4 升
蒸鮮鍋:(長) 380mm x (寬) 330mm x (高) 270mm
蒸鮮鍋S:(長) 370mm x (寬) 256mm x (高) 235mm
蒸鮮鍋 4 公斤 、 蒸鮮鍋S 2.8 公斤
此保用提供蒸鮮鍋產品之機件在正常使用下 壹年保用(自購買日起計算)。
*貴戶須在購機十天內,以下列方式向本公司登記資料,保用手續方正式生效。
填妥保用登記卡,並連同購機發票之副本一併郵寄到客戶服務部
(本公司將不發還發票副本或登記卡)。
注意:
1. 未能出示購買發票正本者,將不獲免費維修服務。
2. 用戶應依照說明書的指示操作。
3. 總代理有權選擇維修或更換配件或其損壞部份。
4. 本保用並不包括:
˙上門安裝、檢驗、維修、更換零件之工資以及一切運輸費用。
5. 購買後因天然或人為意外造成的損壞,將不獲免費維修服務。 (包括運輸及其他)
6. 任何塑膠附件及輔助裝置,是不包括在免費維修服務內。
7. 電源接合不當,不 依說明書而錯誤或疏忽使用本機所引致之損壞,是不獲保修。
於下列情況下,用戶之保用資格將被取消:
- 購買發票有任何非認可之刪改;
- 產品被用作商業或工業用途;
- 產品經非認可之技術人員改裝或加裝任何配件;
- 機身編號被擅自塗改,破壞或刪除。
- 產品一經被轉讓,其保用即被視作無效。

P. 7
Table of Contents
Cooking Time Reference
Read Before Use
Product Structure
- Structure of Umami Steamer
- Tempered Glass lid installation instruction
- Control Panel
Operating Instructions
- Assembling
- Basic Operation
- Water Level
Care & Maintenance
Technical Specifications
Warranty Terms & Conditions
After Service & Warranty Card
---------------------------------------------------------------------P.7
---------------------------------------------------------------------------P.8-9
-----------------------------------------------------------------------------P.10
-----------------------------------------------------------------------P.11
-------------------------------------------------------------------------P.12
---------------------------------------------------------------------P.13
--------------------------------------------------------------P.13
-------------------------------------------------------------P.14
1 3 min
3 5 min
5 7 min
6 8 min
3 4 min
Shellfish
Fish (Thin Slices)
Meat Balls
Vegetables
Root Vegetables
Meat (Thin Slices)
Meat
Chicken
Crab
Prawn
Cooking Time Reference
Steam time stated in below table are for reference only. The time may vary depend-
ing on the food size, portion, position and spacing inside the steam rack as well as
personal preferences. Please adjust cooking time accordingly.
4 5 min
2 3 min
3 5 min
2 3 min
3 5 min

P. 8
Read Before Use
Important
- For safety purpose, please read the instructions before using the appliance for the first time.
- The appliance is designed for domestic use and may only be operated in accordance with this
instruction manual.
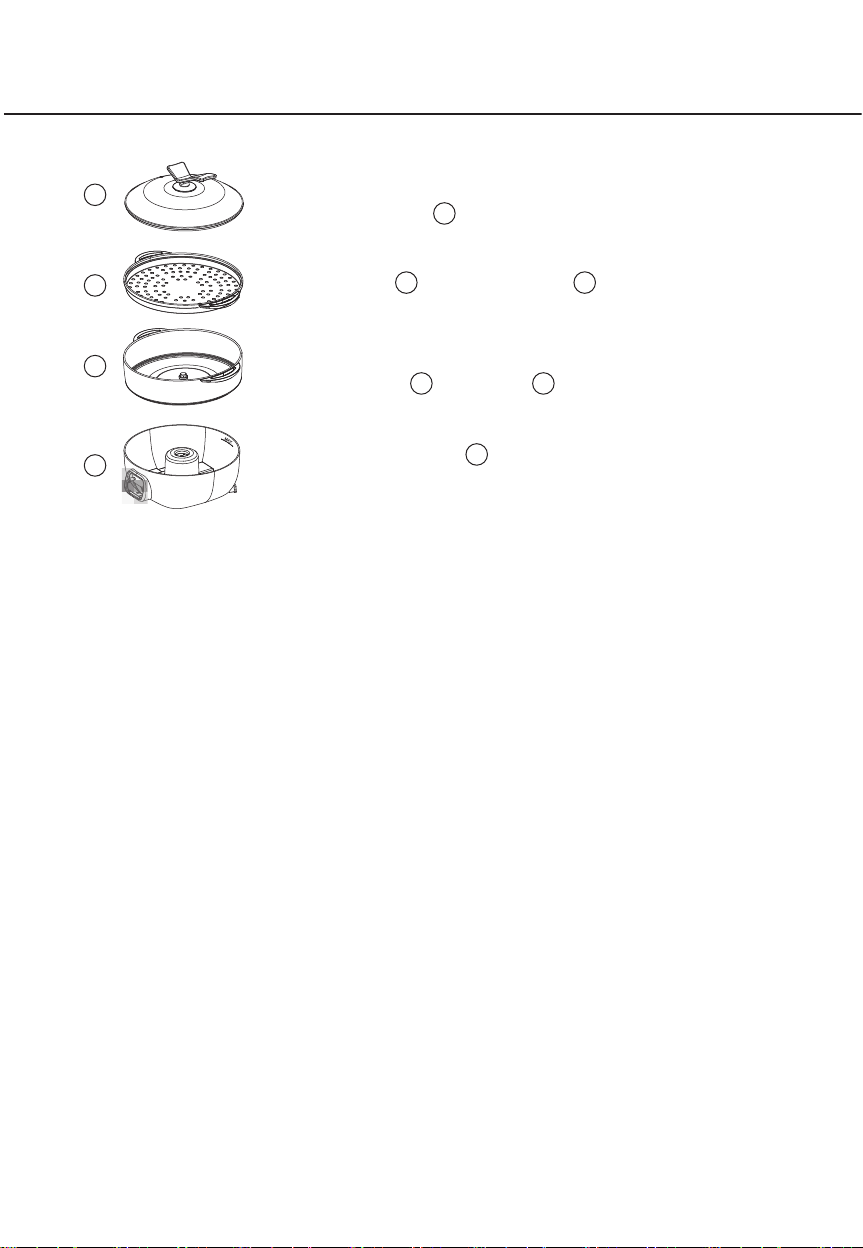
- When moving the unit, hold the steamer base with both hands. Do not hold it by the steam basket,
steam rack or power cord alone.
- Save the instructions for future reference.
1. The main voltage stated on the rating plate should correspond to the local electricity supply.
2. Place the appliance on a firm and steady flat surface. Do not position the appliance in a wet or
corrosive place.
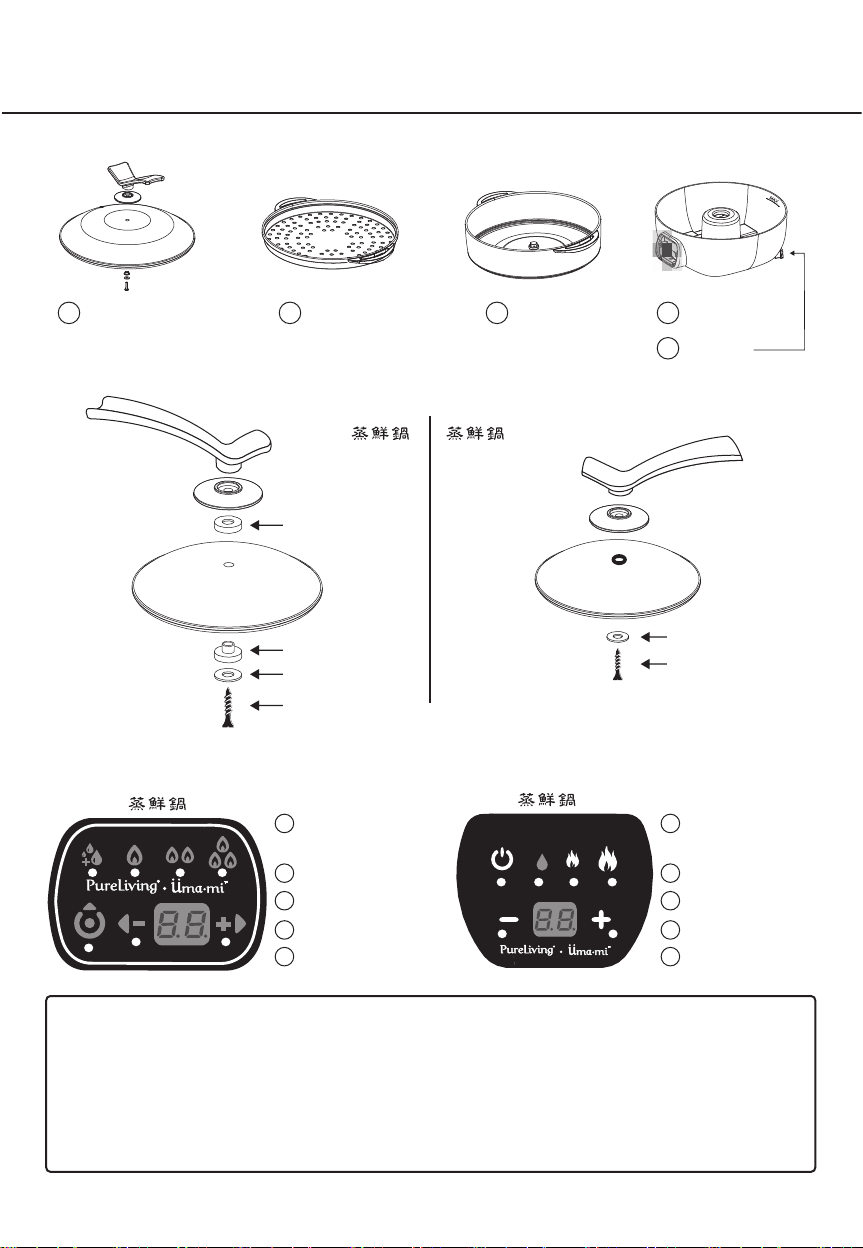
3. Assemble each compartment correctly and make sure they stack up securely.
4. Becareful of the emitting hot steams when removing the lid during operation. Please use oven mitts
or other protective gear when handling the appliance.
5. Do not put your hand into the appliance while cooking. If you need to check on the cooking progress
or stir the food, use an appropriate utensil.
6. Please ensure that the Food Extract Chamber is securely placed on to the Steamer Base before
turning on the appliance.
7. When lifting and opening the Lid, keep the bottom side of the lid away from yourself to avoid high
temperature steam.
8. To disconnect, turn off the power of the appliance, then remove plug from power socket.
9. Allow the appliance to cool down before disassembling the Steam Rack and the Food Extract
Chamber.
10. Never move your appliance if it contains anything hot.
11. Unplug from power outlet when not in use and before cleaning. Allow cooling before putting on or
taking off parts and before cleaning or storing.
12. Do not immerse the Steamer Base in water.
13. The appliance is not intended for use by children and people with reduced physical, sensory or
mental capabilities, or any individual lack of experience and knowledge, unless they have been
given supervision or instruction by a person responsible for their safety.

P. 9
Read Before Use
14. Children should be supervised to ensure that they do not play with the appliance.
15. Do not operate the appliance near wall or cabinet to prevent damage from steam air. Keep the
appliance away from open fire and heat.
16. Be aware of where the cord is placed to avoid tripping. The power cord should avoid contact with
hot surfaces.
17. Do not touch the metal parts of the power plug and do not pull with force when unplugging.
18. Do not use appliance for other then intended household use.
19. Do not attempt to open the Steamer Base or dismantle any parts of the appliance.
20. If the supply cord is damaged or other troubles appear, please contact our Repair Centre or
qualified technicians for help. Do not dismantle these parts or repair the Steamer by yourself.
21. This appliance is designed to prevent overheating and protect water shortage. When the tempera-
ture is too high or the water is below minimum level, safety sensor will automatically turn on, and
the product will shutdown automatically. When is shuts down automatically, please check the water
level in the steamer base to ensure water level is not below the level requirement.
Yes: Please refill water into the steamer in between the minimum and maximum level of water
required, and then turn on the steamer.
No: If the steamer fails to restart, please contact with our service department.
22. When the steamer is turned off after useage, the steamer is still hot in temperate, henece the
equipped cooling fanwill automatically turn on for 2 minutes to cool down the steamer. Please do
not remove the plug from the power socket during the cooling progress.

P.10
Product Structure
Steamer Overview
1Tempered Glass Lid 2Steam Rack 3Food Extract
Chamber
4Water Tank/Base
5Power Cord
Control Panel
Attention
- Before using for the first time, thoroughly wash all the components of the appliance except the unit base,
power cord and plug.
- Do not fill water tank with warm or hot water, salt, pepper, seasonings, herbs, wine, stock or any liquid
other than cold water.
- Ensure the water level is over the minimum water requirement to prevent damages.
- Ensure the water level is under the maximum water requirement.
- Please do not touch the Steam Rack and Food Extract Chamber during operation to avoid burns from the
hot temperature.
Steamer Steamer S
Steamer Steamer S
Tempered Glass lid installation instruction
5
22
34
3
1
+
5
2 2
4
3
1
On & Off Button
(Signal Light)
Timer Display and
Buttons
High / Medium
Temperature Buttons
1
2
3
4
5
Low temperature and thermo insulation Button
Low Water Level Warning Light
On & Off Button
(Signal Light)
Timer Display and
Buttons
High Temperature
Buttons
1
2
3
4
5
Low temperature and thermo insulation Button
Low Water Level Warning Light
Glossy direction
face down
Please use the
Phillips screwdriver.
Glossy direction
face down
Please use the
Phillips screwdriver.

P. 11
Operating Instructions
1. Place the Steamer Base on a flat surface before assembling.
2. To make sure the Food Extract Chamber is in place securely, please
take proper caution of placing the steam escape hole is in place
securely on the steam output contraption in the center of the
Steamer Base.
3. Place the Steam Rack on top of the Food Extract Chamber.
4. Place the Glass Lid onto the Steam Rack.
1
2
3
4
B. Basic Operation
1. Always use distill water when using the steamer. Do not over fill the water higher then our maximum
water level restrictions, and please follow assembly instruction section A before next step.
2. Plug in the power cord. A “Beep” sound will release when connected to the power source.
3. When the steamer is turned on, a red light will illuminate on the display panel follow by a beep indicating
the steamer is ready for use. Please ensure the water warning signal is off on the display panel.
4. Place the food onto the Steam Rack.
5. Cooking time can be selected from 1 minute to 99 minutes by a count down format, and once timing is
selected, the display will flash 3 times to confirm. Proceed to temperature selection for the steamer to turn
on.
6. Once the time counts down to 00 on the display panel, the steamer will automatically switch to thermo
insulation / Low temperature mode for 10 minutes. When no selection is made during the 10 minutes, a
continuing “Beep” sound is released for 1 minute before the steamer turns off automatically.
7. During the thermo insulation / Low temperature mode, you can select the timing or temperature at anytime
for re-cooking. (Please refer to step 4 -6).
C. Water Level
1. Ensure water level is in between the minimum and maximum markings. Please add water when needed
into the steamer base.
2. When water level is low, the warning light will turn on, and the steamer will automatically switch off after
3 “Beep” sounds.
3. When refilling the water tank with distill water, please ensure the steamer is off. Before resuing the
steamer, confirm that the low water signal light is off.
A. Assembling

P.12
Care & Maintenance
Attention
- Before cleaning the appliance, let the steamer cool down entirely, turn off the steamer and unplug
the appliance.
- Do not submerge the steamer base, power cord and the plug into water or any other liquid.
- Do not clean any parts with any rough cleaning tool (such as steel wool).
Note
1) The descaling process allow to clean out all the mineral on the steamer to provide best
performance and longer lasting.
2) It is essential that the steamer is descaled regularly since the steamer uses different type
of water during each use.
A) It is recommended to descale the steamer once every year when using distill water for
steaming.
B) It is recommended to descale the steamer every 3 times when using regular tap water for
steaming.
A. Food Extract Chamber, Steam Rack, Tempered Glass Lid
Hand Wash:
1) Turn the Food Extract Chamber upside down and rinse water through to the steaming vent in
order to clean the steaming vent completely.
2) Wash with soap and hot water, then rinse with clean water and dry thoroughly.
B.Water Tank, Steamer Base
Wipe the water tank/ steamer base with clean damp cloth and dry it with a soft dry cloth. Do not put
the steamer base into the dishwasher.
C.Descaling
When you find that the appliance takes a longer time to cook than normal, it is about time to clear
the minerals away from the surface of the appliance (dephosphorize).
1. Fill the water tank with 650ml of water and 130ml of white vinegar.
2. Place the food extract chamber, steam rack, and the glass lid onto the steamer base.
3. Turn the appliance on by selecting high temperature and steam for 30 minutes.
4. Pour the remaining white vinegar and water out of the water tank.
5. Rinse the water tank several times with cold water.

P.13
Technical Specifications
Warranty Terms & Conditions
Model
Voltage
Frequency
Power
Water Tank Volume
Dimensions
Net Weight
Specifications are subject to change without prior notice.
Made in China
PU-GT、PU-RT、PU-BT
220-240V~
50Hz/60Hz
1300W
Umami steamer 4 Liter 、Umami steamer S 1.4 Liter
Umami steamer: (L) 380mm x (W) 330mm x (H) 270mm
Umami steamer S: (L) 370mm x (W) 256mm x (H) 235mm
Umami steamer 4 KG 、Umami steamer S 2.8KG
Under normal operations, the Steamer will receive a 1 year full warranty (effective starting from
the date of purchase).
* This warranty is not valid until Customer’s registration information is returned to and received by our
Service Centre within 10 days of purchase, please complete all fields on the attached Warranty Card and
mail it back to our Customer Service Centre along with a photocopy of the purchase invoice.
(Warranty Card and invoice copy will not be returned to Customer).
Remark:
1. Customer who fails to present original purchase invoice will be disqualified for free warranty.
2. Customer should always follow the operating instructions.
3. Sino Mind Group Limited will, in its discretion, repair or replace any defective part.
4. This warranty does not apply to:
• Labor costs for on-site installation, check up, repair, replacement of parts and other transportation costs.
5. Damages caused by accidents of any kind by the user will be disqualified for free warranty.
6. Plastic parts and accessories, does not apply to free warranty.
7. Operating failures resulted from incorrect voltage, improper operations and unauthorized installations or
repairs will not be covered by the warranty.
This warranty is invalid if:
- Purchase invoice is modified by unauthorized party.
- Product is used for any commercial or industrial applications.
- Product is repaired or modified by unauthorized personnel, or unauthorized parts are installed.
- Serial number is modified, damaged or removed from the product.
- Warranty will be void if there is any transfer of ownership from the original purchaser.

售後服務、商品保固卡 After service & Warranty Card
維修及消耗品之申請 Enquiry for service and accessories.
商品保固卡 Warranty Card
請沿此線剪下 Please cut along this line
產品名稱:
(PU-GT、PU-RT、PU-BT)
先生/小姐
年 月 日
地址
姓名
客戶
資料
Customer
Information 保固期
維修事項 Maintenance items
Warranty
銷售店
Sales shop
1年(此產品)
1 year (this product)
Address 聯絡電話 Tel
發票號碼 Invoice
Name
購買日期
Date of
purchase
Sir / Miss
Year Month Day
Product Name :
公司名稱 Distributor:A&T Unlimit Limited
地址 Address:香港九龍新蒲崗大有街一號勤達中心5樓506室
Unit 506, 5/F., Midas Plaza, 1 Tai Yau Street, San Po Kong, Kowloon, Hong Kong.
1. 請填妥以下空格並與發票一併保存,以 便維修時核對資料。
2. 用戶提供本公司之所有資料必須正確無誤,否則免費保用將會無效。
3. 填妥保用登記卡,並連同購機發票之副本一併郵寄到客戶服務部。
(本公司將不發還發票副本或登記卡)
1. Please fill in the following space on the warranty card and keep the purchase invoice for after care
and repair verification.
2. The information provided by the customer must be correct, otherwise free warranty is invalid.
3. Please send the completed warranty registration card along with a copy of the purchase invoice to
the customer service department.
(The company will not return the copy of the purchase invoice or the warranty registration card).
請連同購機發票之副本一併郵寄到客戶服務部
貼: 流水號 /機身號碼
蒸鮮鍋
Steamer

蒸鮮鍋購買後,第一次使用前溫馨提示:
1. 請使用清潔劑把鋼化玻璃鍋蓋、 活動蒸架及精華鍋澈底清洗,方可蒸煮。
2. 儲水箱注入潔淨水後,請把火力開至大火蒸煮10分鐘,目的是清潔儲水箱的同時,也清潔蒸
汽口,完成後請把污水倒掉及再用潔淨水清理一次。 (注:儲水箱是不能使用清潔劑及放在
水中清洗)
3. 請勿把食物及湯汁放入儲水箱內,這會導致電板機身及蒸汽口嚴重毀壞,所以儲水箱之位置
只能擺放清水。 (注:以上條文是不例入保修範圍內,如在保修期內經檢測觸犯以上條文,
閣下需另付修理之費用。)
Important: Please read before use.
1. Please use dishwashing detergent to wash the glass lid, the steam rack, and the food extract cham-
ber before initial use.
2. To clean the water tank and the steam vent, put clean water into the water tank and let steam on
high power for ten minutes. Empty the remaining water in the water tank and repeat. (Warning: Do
not put dishwashing detergent into the water tank, and do not rinse the steamer base under
water.)
3. Do not leave food and soup into the water tank except clean water, this will cause damage to the
steam outlet. (Remark: Warranty will not cover for above issues, additional repairing charge will
be apply).
警告語:
This appliance is intended to be used in household and similar application;
such as: -staff kitchen areas in shops, offices and other working environments;
farm houses; -by clients in hotels, motels and other residential type environments;
Table of contents