manuals.online logo
Brands
  1. Home
  2. •
  3. Brands
  4. •
  5. Purus
  6. •
  7. Plumbing Product
  8. •
  9. Purus Minimax 50 Two Part Vinyl User manual

Purus Minimax 50 Two Part Vinyl User manual

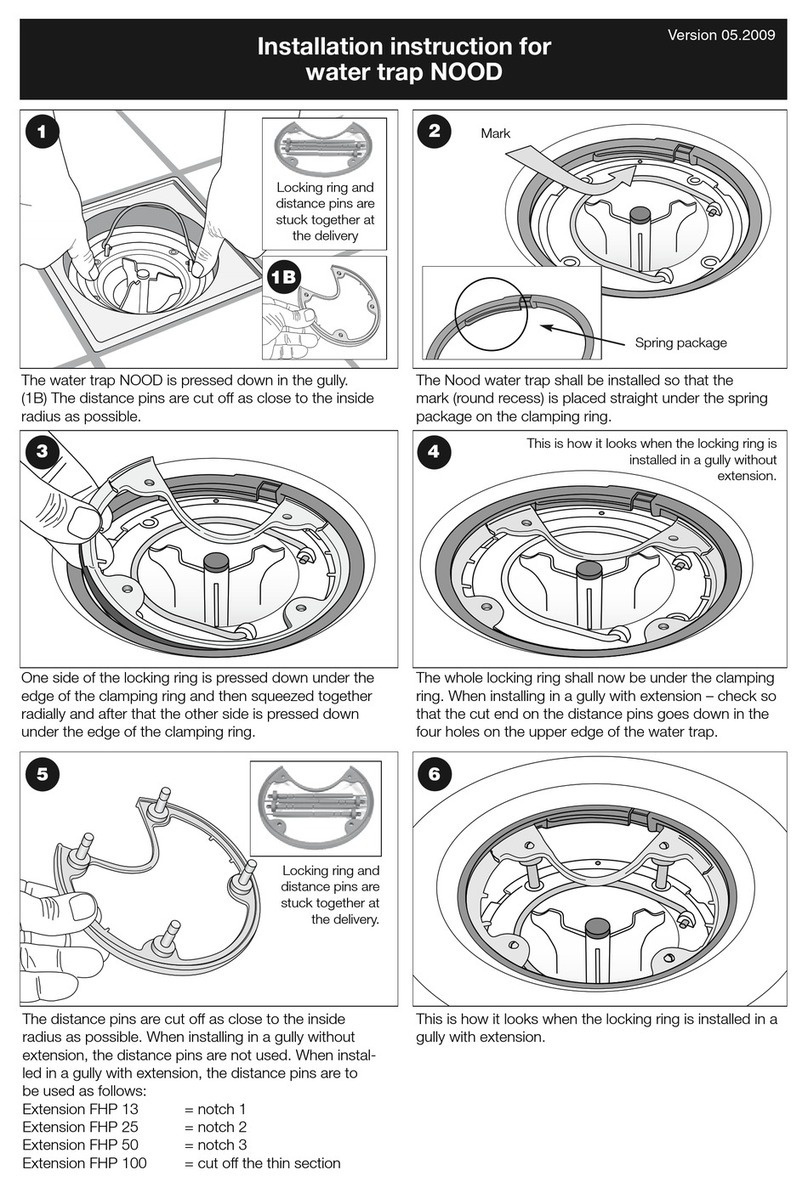
Purus - UK - Installation instruction Minimax 50 Two Part Vinyl - 02832 - 20120213
1
1 Grate for vinyl
2 Clamping ring
3 Purus Nood trap
4 Top section
5 Middle section
6 Gasket
7 Outlet section with 1 1/2” ABS adapter for solvent weld
8 Installation tool
The Minimax two part vinyl is a specific wet room floor gully
for wooden joists using floor former trays . The floor gully
consists of three main sections: the top section (4), middle
section (5) and the outlet (7).
Minimax two part vinyl is equipped with a clamping ring that
connects the vinyl or waterproof membrane securely to the
floor gully. The Purus nood trap is a combined water and
mechanical trap which is always closed for foul odours, water
build-up and pests.
Please Note.
There are some accessories available for installing with cera-
mic tiles. Please ask your distributor for details.
Our ongoing product development may cause changes in the
specifications. We reserve these rights.
52719_för rendering
WEIGHT:
Assembly
A1
SHEET 1 OF 1
SCALE:1:2
DWG NO.
TITLE:
REVISION
DO NOT SCALE DRAWING
MATERIAL:
DATE
SIGNATURE
NAME
DEBUR AND
BREAK SHARP
EDGES
FINISH:
UNLESS OTHERWISE SPECIFIED:
DIMENSIONS ARE IN MILLIMETERS
SURFACE FINISH:
TOLERANCES:
LINEAR:
ANGULAR:
Q.A
MFG
APPV'D
CHK'D
DRAWN
INSTALLATION INSTRUCTION
Minimax 50 Two Part Vinyl
52719_för rendering
WEIGHT:
Assembly
A1
SHEET 1 OF 1
SCALE:1:2
DWG NO.
TITLE:
REVISION
DO NOT SCALE DRAWING
MATERIAL:
DATE
SIGNATURE
NAME
DEBUR AND
BREAK SHARP
EDGES
FINISH:
UNLESS OTHERWISE SPECIFIED:
DIMENSIONS ARE IN MILLIMETERS
SURFACE FINISH:
TOLERANCES:
LINEAR:
ANGULAR:
Q.A
MFG
APPV'D
CHK'D
DRAWN
4
3
2
1
8
7
6
5
!
52719_för rendering
WEIGHT:
Assembly
A1
SHEET 1 OF 1
SCALE:1:2
DWG NO.
TITLE:
REVISION
DO NOT SCALE DRAWING
MATERIAL:
DATE
SIGNATURE
NAME
DEBUR AND
BREAK SHARP
EDGES
FINISH:
UNLESS OTHERWISE SPECIFIED:
DIMENSIONS ARE IN MILLIMETERS
SURFACE FINISH:
TOLERANCES:
LINEAR:
ANGULAR:
Q.A
MFG
APPV'D
CHK'D
DRAWN
10
Carefully read the installation instructions
before assembling and installing.
Purus - UK - Installation instruction Minimax 50 Two Part Vinyl - 02832 - 20120213
2
Installation:
Connect the outlet section (7) securely to the waste pipe
system to ensure no leaks.
Test for leaks before proceeding.
Support the outlet section (7) of the floor gully vertically
before laying the floor former tray and floor boards.
Grab the outlet section (7) with one hand and start
screwing on the middle section (5). Then continue
using the installation tool.
Screw down the middle section (5) firmly with the
installation tool so that the middle (5) and the outlet
sections (7) are fully fixed together.
Remember to remove the installation tool (8)
from the floor gully.
!
7
8
5
This document must not be copied without our written permission,
and the contents thereof must not be imported to a third party nor
be used for any unauthorized purpose. Contravention will be
prosecuted. Purus AB
Denna handling får ej utan vårt medgivande kopieras.
Den får ej heller delgivas annan eller eljest obehörigen användas.
Överträdelse härav beivras med stöd av gällande lag. Purus AB
Tel 0416 - 257 00 Fax 0416 - 257 20
Purus AB Södergatan 7
52719_Monteringsanvisning
Two Part MiniMax 50 (Vinyl)
1(1)
--
-
Assembly
1:20
2011-10-25
SwS
-
-
-
-
-
-
1
-
E
Artikel nr
Benämning
Blad
Ersatt av / Utgången
datum
Denna ersätter
Godkänd sign.
datum
Konstruktör
Material
Skala
Skapad datum
Generell tolerans. ISO 2768-1
Utgåva
Vikt (gram)
Volym (cm3)
Ytbehandling
Kommentar
275 31 SJÖBO
www.purus.se
A3
1
2
3
Purus - UK - Installation instruction Minimax 50 Two Part Vinyl - 02832 - 20120213
3
Test fully for leaks before using shower!
Push the top section (4) firmly inside the middle sec-
tion (5) until they click together. The gasket (6) should
not be visible when the top section (4) is installed
correctly.
Screw the top part on to the former tray board with
appropriately sized screws.
!
4
For installation in floor boards when not using a for-
mer tray use the Purus plate 130 Art.no 713 36 81 or
Purus multiplate Art.no 713 36 90
2
7
36
5
1
4
8
ITEM NO.
PART NUMBER
DESCRIPTION
Exploded
View/QTY.
1
HA7133690
Monteringsplatta
1
2
HA7133694
Låsring
1
3
HA7133692
Distansring 150
1
4 07238
Distansklots 13 mm
4
5 07236
Distansklots 6 mm
4
6
HA7133695
Täckbricka
4
7
HA7133693
Distansring 130
1
8
151000-010
Skruv SX 3,5x13 A2
2
This document must not be copied without our written permission,
and the contents thereof must not be imported to a third party nor
be used for any unauthorized purpose. Contravention will be
prosecuted. Purus AB
Denna handling får ej utan vårt medgivande kopieras.
Den får ej heller delgivas annan eller eljest obehörigen användas.
Överträdelse härav beivras med stöd av gällande lag. Purus AB
Ph. +46 10 44 900 Fax +46 10 41 44 996
Purus AB Södra Dragongatan 15
7133690
PURUSPLATTAN 300 Multi
1(1)
--
-
Sammanställning
1:5
2011-04-11
SwS
-
-
864.75
-
-
900.59
1
-
E
Article no
Name
Page
Replaced by
Date
This drawing replace
Approved by
Date
Designer
Material
Scale
Created date
General tolerance. ISO 2768-1
Edition
Weight (gram)
Volume (cm3)
Surface treatment
Annotation
SE-271 39 YSTAD, SWEDEN
www.purus.se
A3
i
5
4
Purus - UK - Installation instruction Minimax 50 Two Part Vinyl - 02832 - 20120213
4
For vinyl/pvc cut a cross in the membrane so that the
spike will appear.
Apply slight pressure on the arm release knife holder so
the blade locks in to position.
1
5
3
4
Place the arm of the knife on the spike and spin the knife
360 degrees cutting.
!The knife is extremly sharp take extra care.
Press the vinyl/pvc or waterproff membrane for tiles
down so that the spike on the bottom section cuts
through.
After having removed the clamping ring place the Purus
knife bottom section in the clamping ring seat in the floor
gully.
7
6
i
Heat the vinyl/pvc. DO NOT OVERHEAT!
NOTE! The waterproof membrane for tiles should not be
heated!
To change the blade, pull the holder all the way out of the
body.
Spare blade: Stanly 5903 or Purus species, 52582.
Take out the bottom section of the Purus knife from the
gully.
8
Purus knife:
www.purusgroup.com
Carefully read the installation instructions
from the supplier of vinyl/pvc or waterproof
membrane for tiles before commencing the
installation.
!
2
Place the clamping ring with the text up and put the
grating on top of it. Press them both firmly down in to the
gully until they are fully fixed.
Test fully for leaks before using shower!
!

Other Purus Plumbing Product manuals

Purus V240 User manual

Purus

Purus V240 User manual

Purus Pro Line User manual

Purus

Purus Pro Line User manual

Purus Line - Twist User manual

Purus

Purus Line - Twist User manual

Purus V430 User manual

Purus

Purus V430 User manual

Purus NOOD User manual

Purus

Purus NOOD User manual

Purus V301 User manual

Purus

Purus V301 User manual

Purus Pro Line Premium User manual

Purus

Purus Pro Line Premium User manual

Purus Pro Line User manual

Purus

Purus Pro Line User manual

Popular Plumbing Product manuals by other brands

Glacier bay MELINA HD67513W-6C01 Installation and care guide

Glacier bay

Glacier bay MELINA HD67513W-6C01 Installation and care guide

Hans Grohe AXOR Edge 46432009 Instructions for use/assembly instructions

Hans Grohe

Hans Grohe AXOR Edge 46432009 Instructions for use/assembly instructions

Schon 67579W-6101 Installation and care guide

Schon

Schon 67579W-6101 Installation and care guide

IKEA TVALLEN manual

IKEA

IKEA TVALLEN manual

Harvia sentiotec BASIC MEDIUM Assembly instructions

Harvia

Harvia sentiotec BASIC MEDIUM Assembly instructions

Kohler K-2191 installation guide

Kohler

Kohler K-2191 installation guide

RIDGID CountPlus Operator's manual

RIDGID

RIDGID CountPlus Operator's manual

Hans Grohe AXOR Citterio 27831 0 Series Installation/User Instructions/Warranty

Hans Grohe

Hans Grohe AXOR Citterio 27831 0 Series Installation/User Instructions/Warranty

Moen 84557 Series Specifications

Moen

Moen 84557 Series Specifications

Elkay Signature PLUS HD322425 installation instructions

Elkay

Elkay Signature PLUS HD322425 installation instructions

Kohler K-1002-H2 Homeowner's guide

Kohler

Kohler K-1002-H2 Homeowner's guide

ProFlo PFXC6517CP/ZBN installation instructions

ProFlo

ProFlo PFXC6517CP/ZBN installation instructions

KWC 10.501.003 Features

KWC

KWC 10.501.003 Features

VALVEX URIVEX 2452950 Assembly and operation instructions

VALVEX

VALVEX URIVEX 2452950 Assembly and operation instructions

Hans Grohe RainDrain UK Coupler DN50 to 56 mm 94344000 manual

Hans Grohe

Hans Grohe RainDrain UK Coupler DN50 to 56 mm 94344000 manual

Gessi RETTANGOLO 44834 manual

Gessi

Gessi RETTANGOLO 44834 manual

Moen 104463 quick start guide

Moen

Moen 104463 quick start guide

Sterling Plumbing ENSEMBLE 72110106 Specifications

Sterling Plumbing

Sterling Plumbing ENSEMBLE 72110106 Specifications

manuals.online logo
manuals.online logoBrands
  • About & Mission
  • Contact us
  • Privacy Policy
  • Terms and Conditions

Copyright 2025 Manuals.Online. All Rights Reserved.