PVI VECASTER PRO Series User manual


VECASTER SERIES MANUAL Pro Video instruments
1
PRODUCT SPECS & FEATURES
●Power: 12v/DC (12v/1A 5W)
●Encoding: Latest H.264/H.265 High Efficiency Encoding Technology (Depending on Model) HD 720P/ 1080i
/1080p / 4K 30hz UltraHD (Depending on model) @ 60 Hz ultra-low latency. Standard baseline/Main/High
Profile support. HDMI 2.0 and HDCP compliant.
●Supports ACC-LC, HE-ACC, HE-ACC v2, MP3, MPEG-2, AC3 Dobly Stereo Audio
●CBR/VBR (constant & variable) bitrates option available with up to 12-32MBps bitrate depending model.
●Dual Encoding technology for support of multiple styles of formats and encoding preferences to different
servers.
●RTMP, HLS, HTTP, UDP, RTSP, SRT
●Distribute any 720p/1080p/4K HDMI 2.0 UHD Video DIRECTLY to unlimited Smart TVs, Mobile Phones,
Tablets, PCs, IP Box.
●Network Integration: IPTV over LAN - WIFI –Internet
●Smart TV Integration: See our guide for SMART IPTV App Integration below.:
https://support.provideoinstruments.com/knowledge/smart-iptv-vecaster-setup
●Change Channels on TV via TV Remote Control in your SmartTV IPTV app.
●Built-In Gigabit Server (excluding the h.264 1080p model) to stream directly to hundreds of simultaneous
VeCaster players. Ability to also stream to Facebook, YouTube, Vimeo, Wowza, Akamai, and RTMP services.
●Dual Simultaneous Encoders and Scalers to create two versions of the same channel & then optimized for TV
and mobile playback simultaneously.
●4 Zones On Screen Display Generators for Text or Logo

VECASTER SERIES MANUAL Pro Video instruments
2
●Modular-Expandable-Reliable
CONNECTING TO THE UNIT
NETWORK CONNECTION VIA WINDOWS PC
These steps walk you through setting a Windows PC to a Static IP address, to allow an Ethernet connection with the unit on its
default IP address of 192.168.1.168.
1. Connect your PC to the Network Port of the VeCOAX unit via Ethernet cable.
2. On your PC, in the Control Panel, open Network and Sharing Center (Network and Internet for Windows 8 and above)
3. Once you have Network and Sharing Center open, click on "Change adapter settings."
4. Right Click on your Local Ethernet connection and click on "Properties."
5. Once the Ethernet Properties are open click on, "Internet Protocol Version 4 (TCP/IPv4)," and click on, "Properties."
6. In the Properties, select "Use the following IP address" and set the static IP: 192.168.1.100.
7. Click OK.
You are now ready to connect.
NETWORK CONNECTION VIA MAC OS X
These steps walk you through setting a Mac running OS X to a Static IP address, to allow an Ethernet connection with the unit on
its default IP address of 192.168.1.168.
1. Connect your Mac to the Network Port of the VeCOAX unit via Ethernet cable.
2. From the Apple menu, select System Preferences, then select network.
3. Select Ethernet.
4. From the Configure IPv4 menu, select Manually.
5. Enter the IP address 192.168.1.100.
6. Enter the Subnet Mask 255.255.255.0.
7. It is not necessary to enter DNS or Router.
8. Click Apply.
You are now ready to connect.

VECASTER SERIES MANUAL Pro Video instruments
3
Note: The following manual refers to the Vecaster HEVC model. Menu features and format might differ from your model;
however, the core features are the same.
POWERING THE DEVICE –QUICK GUIDE
1. Connect the power adapter that came with your unit.
2. Once the unit is powered on, insert a valid HDMI video signal into the HDMI port. The ON-AIR LED on the back will start
blinking.
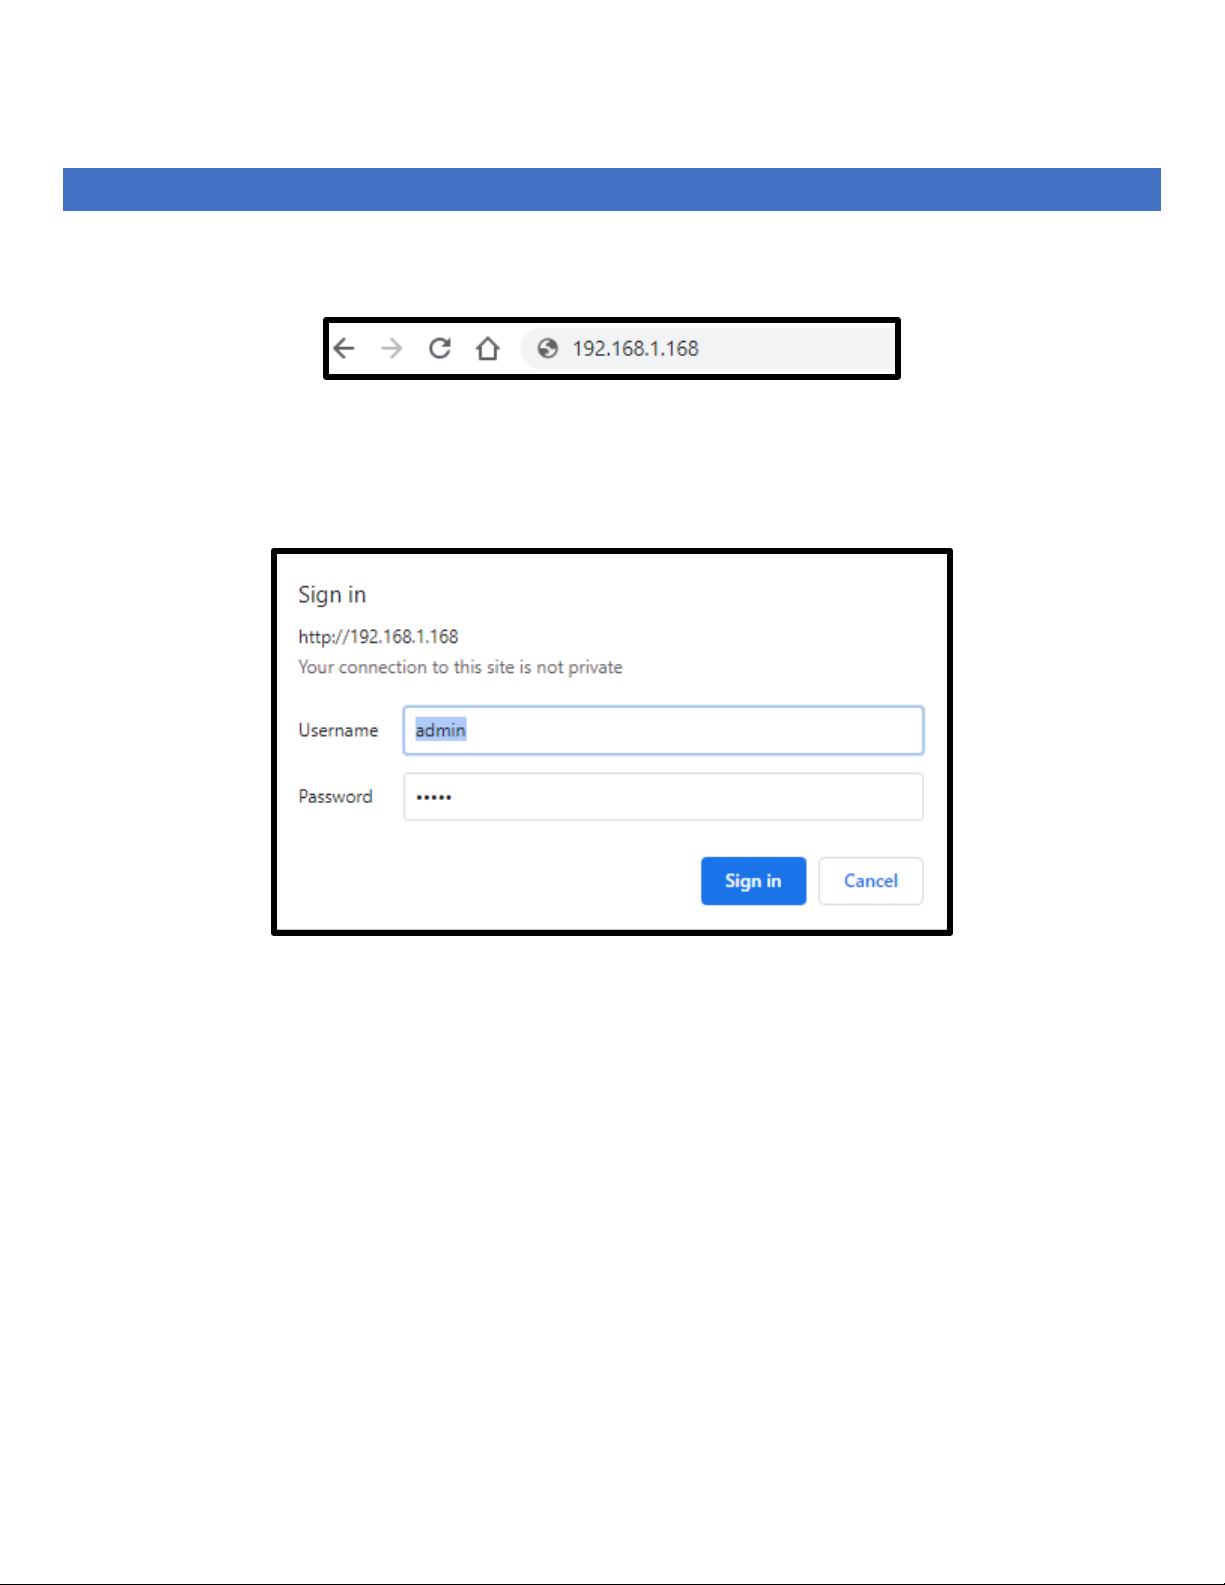
3. Set your computer to a static IP such as 192.168.1.100. (See below on how to set your static IP connection.)
4. Connect your PC ETHERNET PORT to the VECASTER ETHERNET PORT using a CAT 5E/6 cable.
5. Run VLC. (www.videolan.org ). VLC > MEDIA > OPEN NETWORK STREAM > http://192.168.1.168/0.ts
6. You should now see the video playing on VLC.
NOTE: If the above is not working, please check all connections, network settings, and ensure your video source is working. You
could also try with another PC or reset the VeCaster unit by pressing the reset button for 15 seconds on the rear panel of the unit.
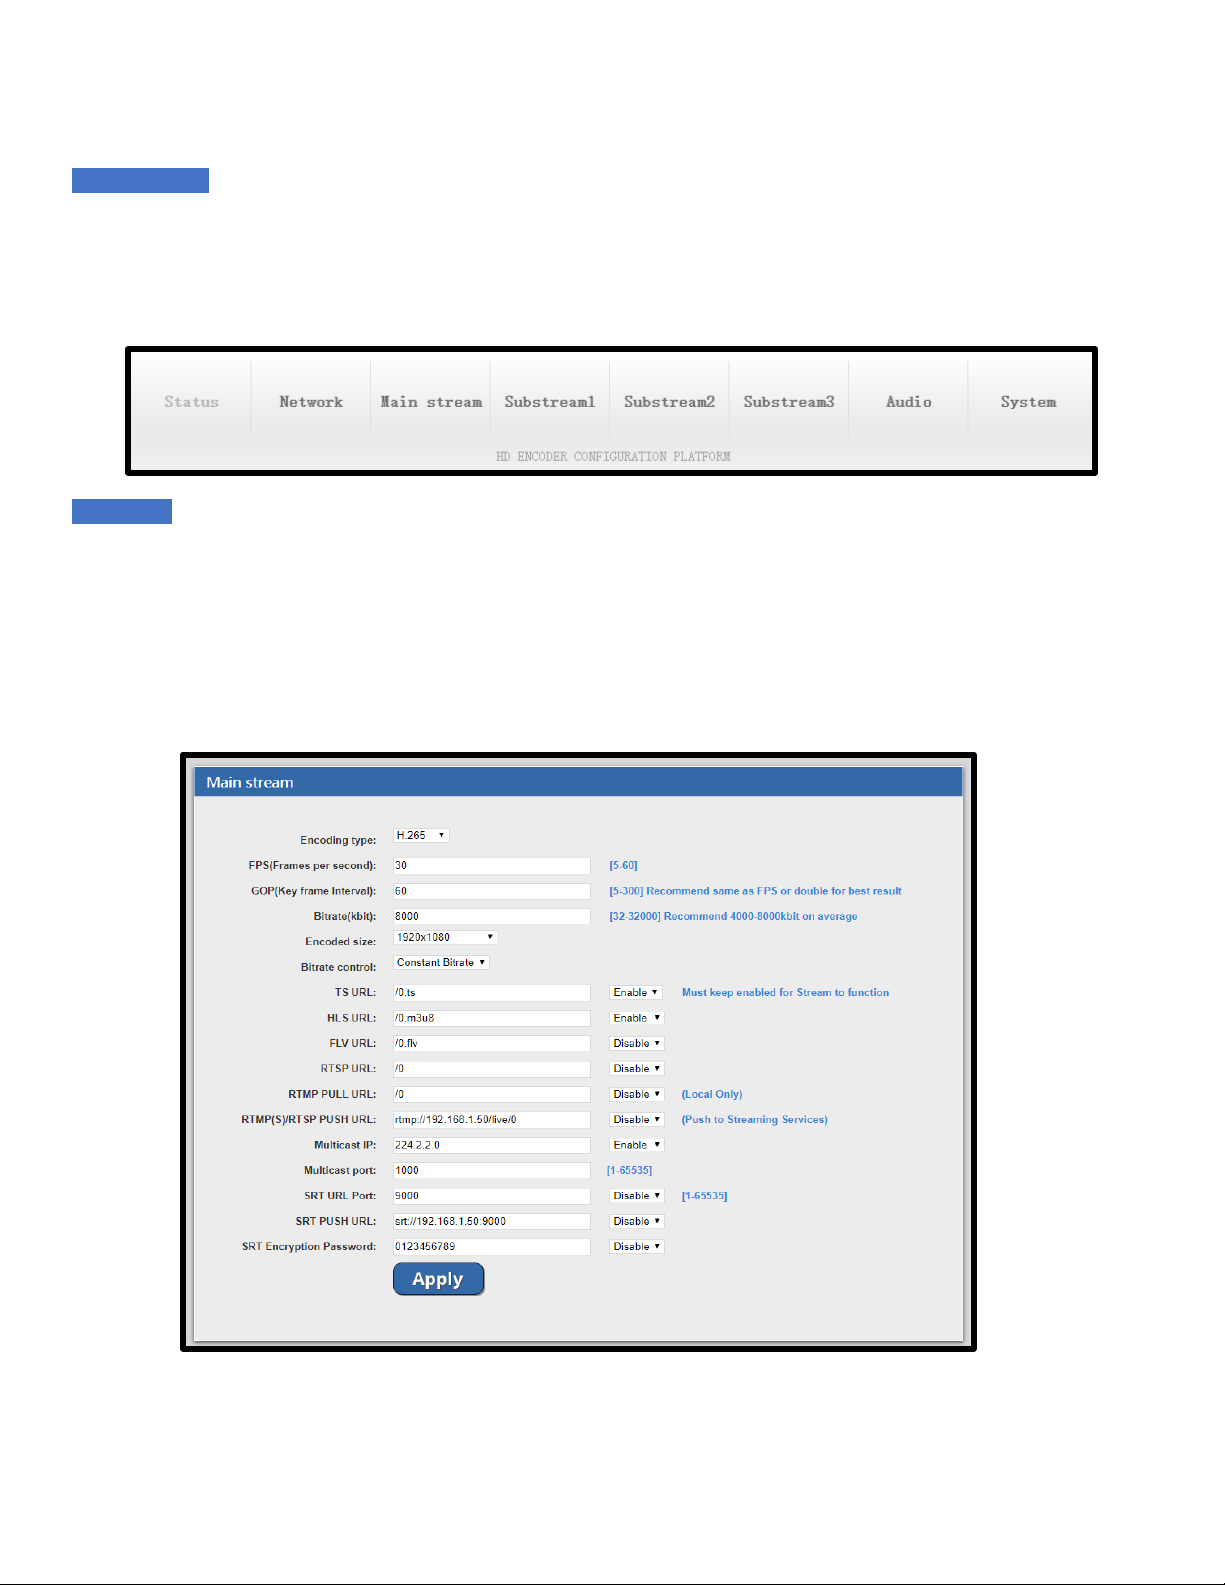
PARAMETERS &CUSTOMIZATIONS
Each unit is ready to work default by plug & play. You can also customize the unit parameters to fit your application and needs. The
unit comes with 2 independent video encoder engines. Each is capable of outputting 6 different protocols. RTMP / HTTP / RTSP /
UDP / HLS/ SRT, Video Scaling, HEVC H.265 or H.264 video formats depending on your model, AAC or MP3 Audio Formats, FIVE CG
Logo Generators, frame rate controls, etc.
DIRECT STREAMING &REPEATER SERVERS
Each unit except the H.264 models have a built-in 1 gigabit streaming server. This allows you to stream direct-to-internet to
hundreds of players at the same time (limit depends from the selected bitrate and the available bandwidth from your internet
service provider & your LAN traffic). There is no need for any additional hardware, but it is suggested to run a MULTICAST IGMP
ENABLED SWITCH if running multiple units. Should you need to do a wider distribution over the internet you can always point the
stream / receive the stream over single or multiple internet services such as YouTube, Facebook, or similar to receive / repeat /
redistribute your stream(s) to millions of people.

VECASTER SERIES MANUAL Pro Video instruments
4
INSTALLING MULTIPLE UNITS
To install multiple units on the same network, make sure to CHANGE the IP address of each unit BEFORE you connect them to the
same network so there will be no IP Conflicts. Point your web browser to the IP address of the unit (default is 192.168.1.168) Login
to the unit, click NETWORK on the bottom, change the NETWORK SETTINGS as needed by your application. Save your settings and
power cycle the unit.
As an example, you can set your unit(s) IP addresses to 192.168.1.168, 169, 170, etc. Write down these values or put a sticker on
each unit with the new assigned IP address so it will be easy to login to the unit in the future without the need to reset it. Depending
on your setup, it's suggested to use a Multicast IGMP enabled to switch to help with the traffic. Device Layout
1) 12v 1 Amp Power Jack
2) Power/ On Air Indicator Light
3) Hard Factory Reset –Hold for 30 Sec
4) HDMI Input
5) Analog Audio 3.5mm In (Available only
on HEVC models
6) 1-gigabyte Network port
⮚Note: Depending on the model purchased, the device layout might differ

VECASTER SERIES MANUAL Pro Video instruments
5
CONNECTING TO THE VECASTER
The factory network settings of the Network port are as followed:
IP address
192.168.1.168
Subnet
255.255.255.0
Gateway
192.168.1.1
To connect to the Web interface, we must first connect directly to the Network port on the back of the unit using an Ethernet patch
cable CAT5e/CAT6 or higher.
Once connected, you can verify the physical connection by ping command. This step is not necessary but helpful to ensure a
connection can be established before proceeding.

VECASTER SERIES MANUAL Pro Video instruments
6
Open a CMD prompt in windows and use the following command: ping 192.168.1.168
If you are connected directly to the unit, you should get a response. If not, the following message appears in the command prompt.
If the unit is not pingable, verify that your connections are secure and that your Static IP of your PC is set up correctly. Refer to
Setting up a Static IP section of the guide.

VECASTER SERIES MANUAL Pro Video instruments
7
LOGGING INTO WEB GUI INTERFACE
If you can ping the unit successfully, then we can proceed to open your web browsers such as Firefox, Chrome, or Safari.
In the address bar, enter the default IP of the unit: 192.168.0.136 and hit enter.
The login page prompt appears for the Web interface.
Default Username: admin Default Password: admin

VECASTER SERIES MANUAL Pro Video instruments
8
WEB INTERFACE
●Once you have logged into the unit you will see the STATUS page. This will display all your enabled formats for all streams
and video input resolution as well as status of the current unit.
NOTE: If the unit starts slowing down or the CPU usage is too high under the status page, please disable any formats you are not
using or Factory Reset the Unit under the Systems Tab

VECASTER SERIES MANUAL Pro Video instruments
9
NAVIGATION PANEL
●This is at the bottom of the web interface. Depending on your model, it may look slightly different. Here you can change
between your Main & Subtreams, Network Settings, Audio Settings, & Advance System menu. Your focus should be on
MAIN STREAM & NETWORK.
MAINSTREAM
●Here you can set your settings for the Mainstream. You can enable and disable different formats you wish to use as well as
Bitrate, FPS, Encoding Size, & Compression Profile. You may adjust these settings to match your needs. Please set your unit
all up and then power cycle the unit to ensure the settings take effect. The same settings can be done in the other streams
ut are not necessary unless you wish to use a specific format and require special settings such as lower bitrate or frames for
that specific application.

VECASTER SERIES MANUAL Pro Video instruments
10
SUBSTREAM
●Here you can set your settings for the Substream. You can enable and disable different formats you wish to use as well as
Bitrate, FPS, Encoding Size, & Compression Profile. You may adjust these settings to match your needs. Please set your unit
all up and then power cycle the unit to ensure the settings take effect. The same settings can be done in the other
substreams (if available to you) but are not necessary unless you wish to use a specific format and require unique settings
such as lower bitrate or frames for that particular application.
This is just an example of our substream settings here at PVI:

VECASTER SERIES MANUAL Pro Video instruments
11
ON SCREEN DISPLAY (OSD)
●Here you can set your Logo to Display (overlay) over the incoming HDMI video such as your company logo or Text. The
unit has 4 different CG Generators providing you many options such as Text, Logo, Scrolling Text, or Time Stamping.
●The logo requires to be named logo1.bmp. It must be a BMP or PNG format picture. Depending on the zone you wish to
use the logo results in the required name.
oBMP Example: Logo1.bmp for ZONE 1 Logo2.bmp for ZONE 2 Logo3.bmp for ZONE 3 Logo4.bmp for ZONE 4
oPNG Example: Logo1.png for ZONE 1 Logo2.png for ZONE 2 Logo3.png for ZONE 3 Logo4.png for ZONE 4
●You can use all 4 zones at the same time to show both logos and Text.

VECASTER SERIES MANUAL Pro Video instruments
12
To enable OSD –On Screen Display, click on the drop-down menu for the specific zone and enable.
Select the type of OSD you wish to use. Depending on your model some OSD options might not be available.

VECASTER SERIES MANUAL Pro Video instruments
13
TEXT SETTINGS
⮚TEXT X: [0-1920]: Left and Right position of the Text.
⮚TEXT Y: [0-1080]: Up and down position of the Text.
⮚FONT: [8-72]: Size of Text.
⮚ALPHA: Opacity of the Text [0-128].
⮚COLOR: Color of the Text.
⮚BG: Background color of the text if you wish.
⮚TEXT: type the text here that you wish to display.
PICTURE SETTINGS
⮚Picture: Disable/Enable
⮚Picture X: [0-1920] –Left and Right position of the Picture
⮚Picture Y: [0-1080] –Up and down position of the Picture
⮚ALPHA: Opacity of the Picture [0-128]
SCROLL TEXT SETTINGS
⮚Position: Position of scroll text on screen.
⮚Speed: Speed of the scroll
⮚Text: Text you want displayed
⮚Font Size: Size of Text
⮚Background Color: Background color of text
⮚Color: Color of the Text
TIME SETTINGS
⮚X: [0-1920]: Left and Right position of the Picture
⮚Y: [0-1080]: Up and down position of the Picture
⮚FONT SIZE:[8-72] –Size of Text
⮚BACKGROUND COLOR: Background color of time
⮚COLOR:Color of the Time

VECASTER SERIES MANUAL Pro Video instruments
14
OSD- EXAMPLES
TEXT:
LOGO:

VECASTER SERIES MANUAL Pro Video instruments
15
SCROLLING TEXT:
TIME STAMP:

VECASTER SERIES MANUAL Pro Video instruments
16
NETWORK
Here you can adjust the network settings to match the needs of your specific network topology.

VECASTER SERIES MANUAL Pro Video instruments
17
AUDIO ENCODING SETTINGS
Here you can adjust your Audio Format and Volume for the Streams to suit your needs. The settings by default work just fine.
●Audio Input: Source for audio input
●Sample rate: Adjust this setting to toggle between sample rates. A higher sample rate may provide higher quality but
require more bandwidth.
●Format: Use this to select your ideal compression format.
●Bitrate: Increase or decrease this value to balance quality/performance.
●Analog Vol: Adjust this value to change the output volume of your stream.

VECASTER SERIES MANUAL Pro Video instruments
18
AUDIO FORMAT OPTIONS:
AAC-LC: ADVANCE AUDIO CODING –LOW COMPLEXITY
Designed for standard Audio encoding over IP that achieves higher sound quality than MP3 at the
same bitrate.
HE-ACC: HIGH EFFICACY –ADVANCED AUDIO ENCODING
Extension of ACC optimized for applications that require low bitrate without losing much audio
quality such as audio-only streams.
HE-ACC V2
Further extension of HE-ACC and more standard in today's world. It has been further developed
for low bitrate application as well as enhanced features for Stereo audio and Multichannel audio. However, our VeCaster only uses
the Stereo channel functions of this format.
MP3
formally MPEG-1 Audio Layer III or MPEG-2 Audio Layer III, mp3 is a lossy audio compression used when quality with smaller bitrates
was necessary. This format isn't as good as ACC audio format used in today's world but still has a place for specific applications
MPEG-2:
Standard Mpeg 2 Stereo Audio used in a lot of specific applications where most standard audio formats are not supported;
therefore, the older Mpeg 2 audio is the only option. Mpeg 2 audio requires a higher bitrate to achieve the same audio quality as the
other formats
AC3 STEREO
AC3 or also known as Dolby Digital Stereo 2 channel audio, is an audio compression technology developed by Dolby Laboratories.
Originally named Dolby Stereo Digital is used for TV Broadcasts and some IP streams. Most Coax broadcasts require AC3 audio, or
the TVs don't decode the sound correctly.

VECASTER SERIES MANUAL Pro Video instruments
19
SYSTEM SETTINGS
Under the System tab of the nav menu provides you several advance options for the encoder. Change password, Advance encoding
options, NTP Time server, Update firmware, Load configuration, Backup configuration, Reboot, Factory reset.
CHANGE PASSWORD:
Customers can change the password here. It's required to enter the old password before proceeding to create the new password.
Other manuals for VECASTER PRO Series
1
Table of contents
Other PVI Media Converter manuals
Popular Media Converter manuals by other brands

Littfinski Daten Technik
Littfinski Daten Technik 210311 Assembly instruction

evertz
evertz 7700 Series manual

Baumer
Baumer Hubner Berlin HOG 16 + DSL.E Installation and operating instructions

Victron energy
Victron energy Orion 12/24-40 manual

Lumagen
Lumagen Radiance Series Tech Tip

Digigram
Digigram IQOYA *LINK user manual

Auralic
Auralic Aries quick start guide

Firma
Firma McVoice SW-24 Reference manual

AJA
AJA UDC Installation & operation guide

Lika
Lika Posicontrol IF55 LIN CB Series Mounting instructions

GC Tech
GC Tech GCAN-202 user manual

B&B Electronics
B&B Electronics Asynchronous to Synchronous Converter 2010 user manual