Pyle PLDTVN65 User manual

VIDEOVIDEO
PLDTVN65


It is prohibited in law if you watch TV or other multimedia
programs while driving. So for your safety, please do not watch
programsor operate the instruments.
The system is designed to aid you to back cars, we will not take
Any responsibility if there is an accident when backing.
There is laser in CD changer. There will be possibly an exposure
of harmful laser if try to operate or adjust or make a
performance control.
Do not open the CD changer or try to make any change. It is
very complicated, and it uses laser adapter to read information
out of CD surface. Try to avoid the laser because of it is still
there.

Brief Introduction
Thank you for purchasing this series of high quality AV products for automobiles. This
product is a multi-function system developed by our company and special for high-level
cars, business vehicles and special-use vehicles and has a car-carried control center
concentrating entertainment, audio-visual, radar distance test, rear view and TV as a whole.
This product also adopts professional car-carried suck-up DVD chip and can play DVD,
MP3, VCD and CD. With high sensitive TV module, you can enjoy the every convenience
brought by TV, know the world news and stock increase & decrease at any time and
anywhere. This machine can control disc exchanger of CD & DVD, 50W car-carried
special power amplifier and FM/AM digital tuning radio, providing satisfactory AV
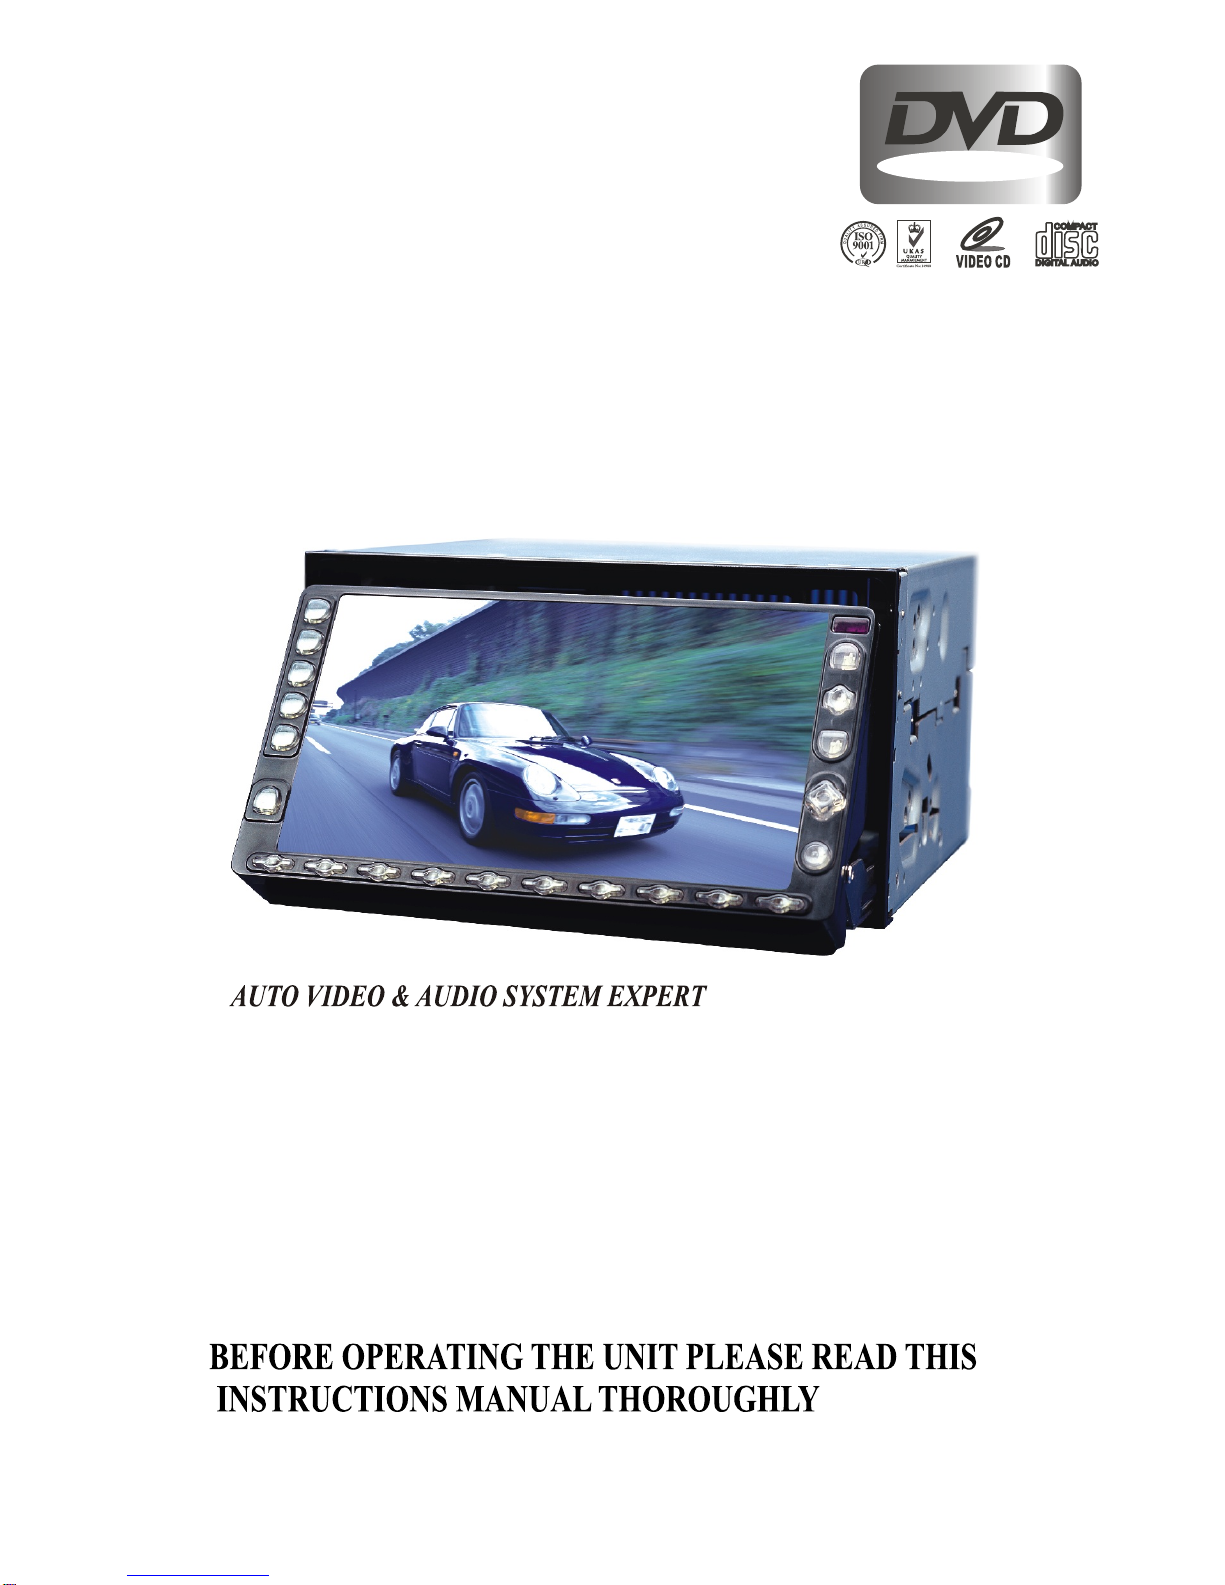
entertainment for the customers. It uses 6.5” LCD display with 16:9 proportion suitable for
people's eyes, which has very wide visual angle in upper & down, left & right and its
structural dimensions conforming with the mounting dimension of ISO TWO Din.
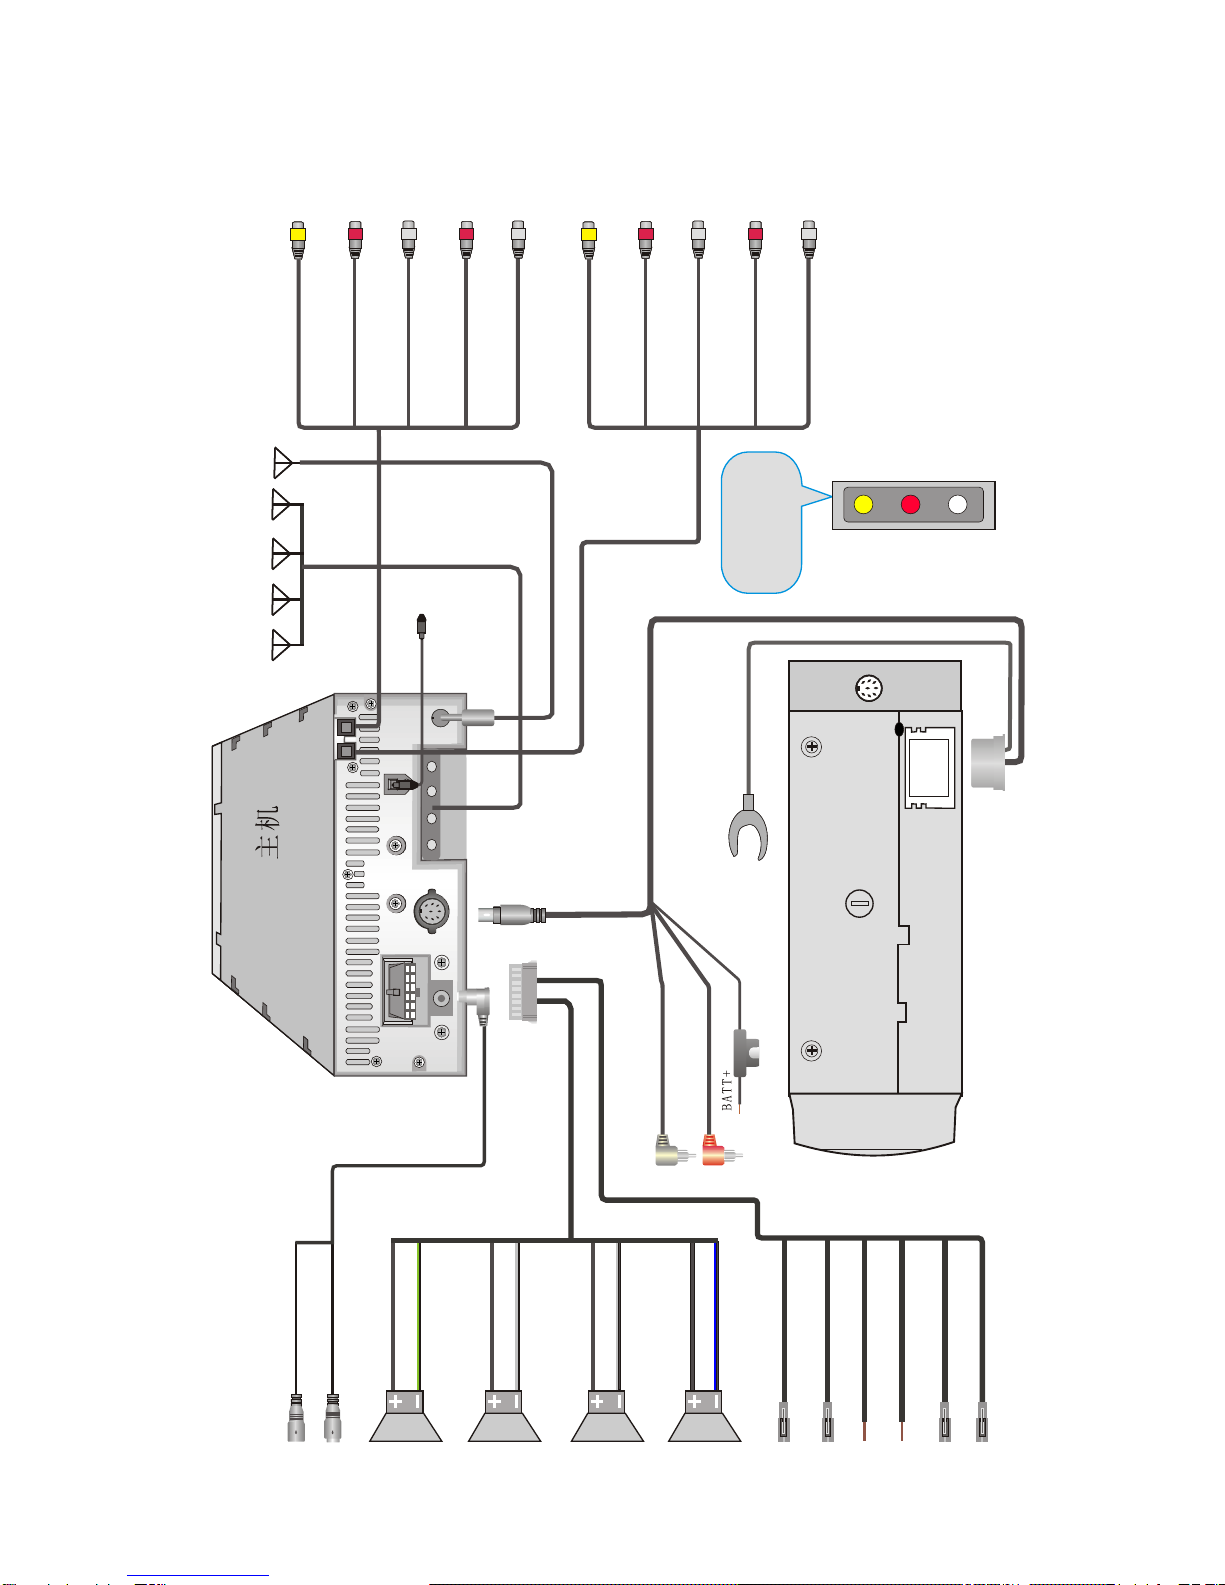
This system bears the professional design of car-carrier products, intelligence of all the
operations, and OSD menu display. And all the set parameters and location have automatic
memory and can restore automatically. It also has video input/output interface and car-
backing visual input to show the information at car backing automatically. Professional
radar distance test module can be used alternatively, which makes the monitoring and
entertainment be done at the same time and frees you of apprehensions in the rear. Wide
band voltage design is applicable to the requirements of all types of automobiles. In order
to correctly install and use this product, please read this manual attentively.
Characteristics
2.1 Specifications
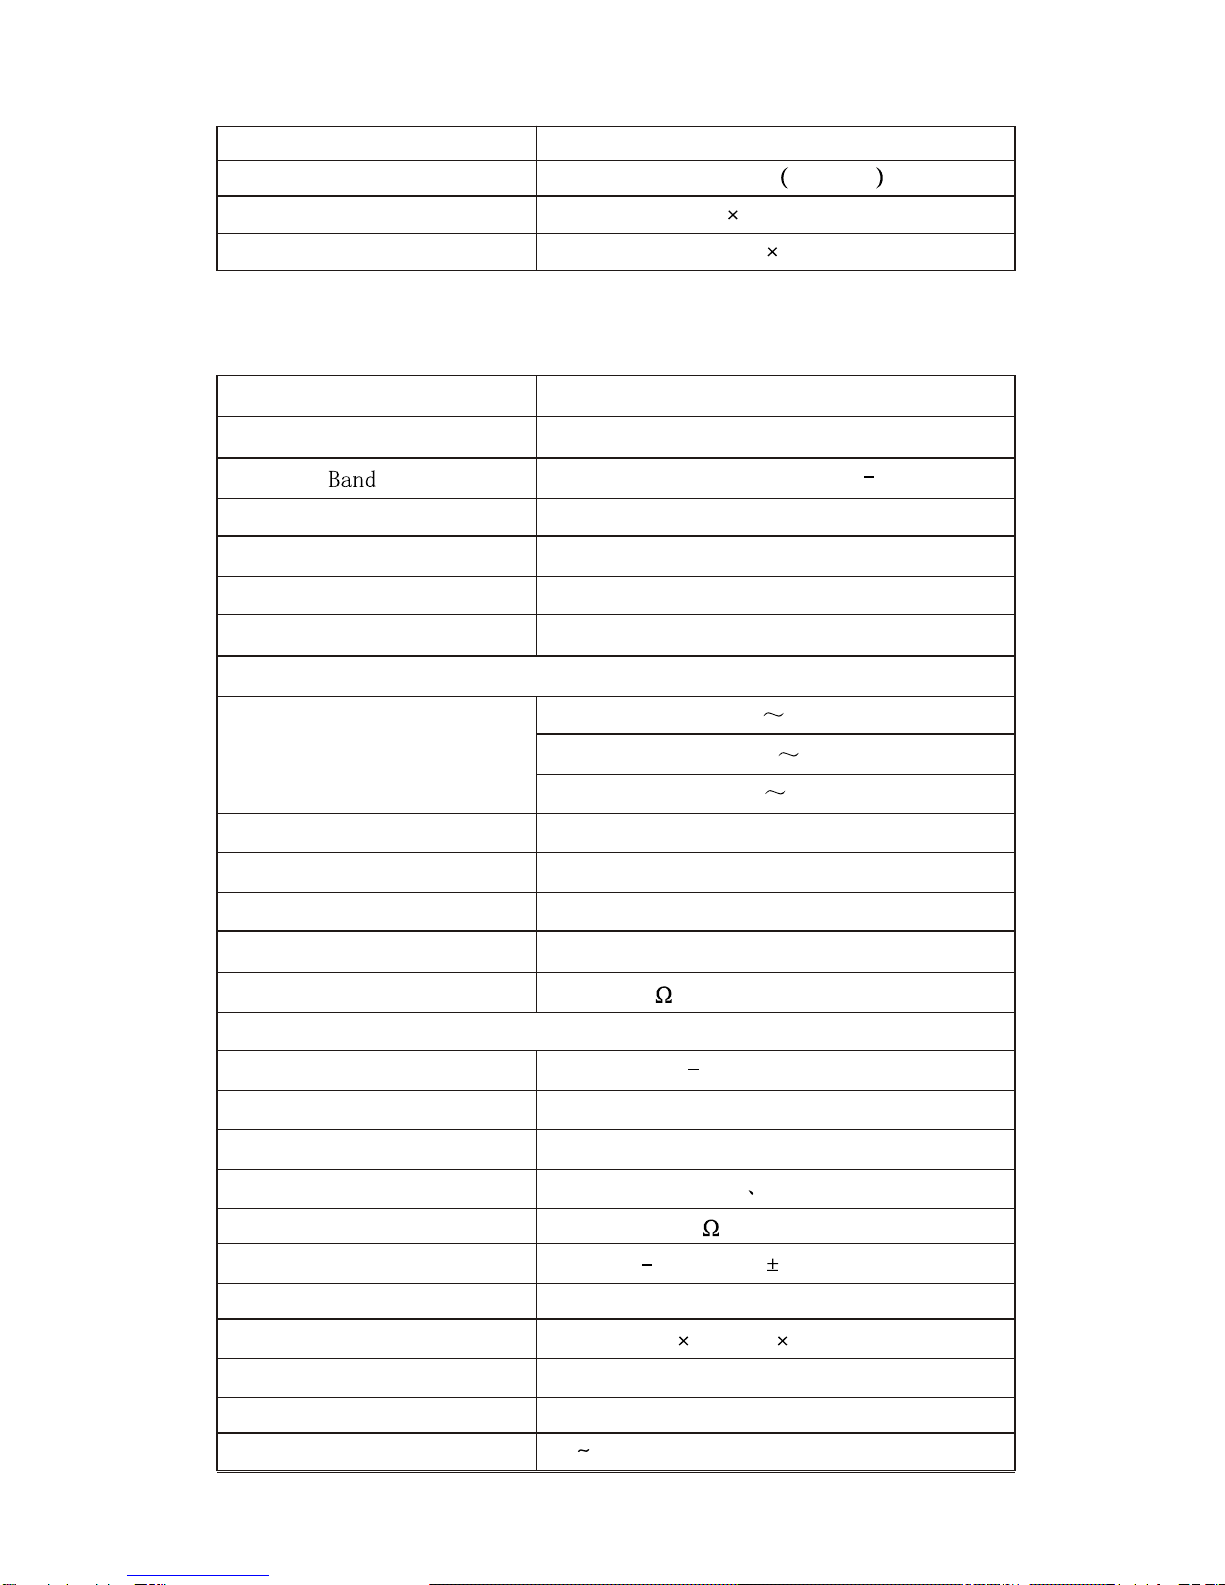
2.1.1 System parameters
Items
Parameters
Voltage
Current
WorkingTemp.
Store Temp.
DC 11V-14V
1.5A Amplifier off MAX 10
-10 60
-30 80
Auto PAL or NTSC
Video system
Inputs One channels of video input/backing lens input
(Comprise one channel of back running video)
Sizes 178(W) 176(L) 100(H) mm
-1-

2.1.2 Performance parameters
Weight
Screen size
Resolution
Dot pitch
2.6 kg
16:9 6.5 inches diagonal
1200 234 pixels
0.136(H) 0.416(V)
Items Parameters
FM/AM modulationparameters
Modulation
Display
Memory capacity
Seeking
Band
Receive System
Seeking
Memory method
Antenna resistance
Memory capacity
CD parameters
TV parameters
Voltage
Current
Audio output Vol.
Output tracks
FM:87.5-108MHz AM:522 1611Mhz
Phase-locked loop frequency modulation
Panel LCD or OSD
FM:16 AM:8
Automatic/by hand
VHF-L 48.25 170.00MHz
VHF-H 170.00 450.00MHz
UHF 450.00 863.25MHz
Automatic
40 channels
PAL /NTSC
Automatic/manual
75
11 14V
< 1A
2 Vpp
2 tracks (R L)
Output resistance
Frequency response 600
5 20000Hz ( 1dB)
SNR
CD Changer Dims
CD Changer weight
96 dB
230(L) 69.5(H) 164.5(W)mm
1.5Kg
Disc box weight 0.17Kg
Disc box capacity 8 16 discs(8 discs Panasonic DP88 /12 disc)
-2-

2.2 Functions
VCD parameters
Video output 1 Vpp
Video system NTSC (default) or PAL
DVD parameters
Disc 12cm DVD/VCD/CDMP3/CD-R
SNR >90 dB
Dynamic area >90 dB
Distortion <0.05%
Definition >500
TV system PAL/NTSC
Amplifier parameters
Test voltage
Maximum power output
Full power output
Speaker resistance
Bass
Tone Treble
13.8V
50W 4 4
25W 4 4
4 can be 4 8
100Hz 12dB
10kHz 12dB
Built-in function: in car DVD, 50W amplifier, DVD, VCD, CD,MP3,CD-R
TV:Build in TV function, 40 channels restorable
AM/FM receiver: 24 stations restorable
Radar measure: radar measuring back sight system (optional)
Monitor: introduce 16:9 6.5 inch TFT LCD monitor
Automatic memory: All set characteristics and positions can be remembered
automatically, and can be restored automatically.
Display system: AUTO PAL or NTSC.
Remote controller: remote controller can fulfill all function.
Menu function: OSD menu can indicate all operations, and real-time is also available.
Signal sources: AV input/output (comprise one channel of back running input).
Back running detection: This system has back running video input, the input system
Will be switched to back running input to monitor the back running process.
-3-

System Installation
3.1 Installation key points
The product is specially designed for 12V vehicle, if installed in other vehicles, please
install power Changer.
To avoid short-circuit, it is strongly suggested to disconnect accumulator cathode before
installation.
This product should not be used without fuse.
Do not connect with the mains directly with that of other electrical equipments.
Do connect the ACC & BATT cord according to the installation instruction, or the
instrument will automatically power off abnormally. And please remember to switch off
the power supply after usage, or it will consume lot of the stored battery.
The installation position should be chose in a place which will not effect the
Operation of other electronic instruments, such as air-conditioner.
3.2 Host equipment installation
Pay attention not to destroy or dirty instrument desk.
Find a free slot in the instrument desk, clean up the inside for enough space.
insert DVD player in the slot.
Take out the host equipment and connect to power supply jack, video jack.
Please refer to CD changer installation instruction.(Refer to 11.2)
3.3Connection
Connect power cord ACC (red) to ignition switch.
Connect BATT (yellow) to the circuit of accumulator.
Connect back running cable (blue) to back running switch or back running lamp
Circuit (12V is valid)
Connect antenna and amplifier control cable.
Connect all video cable to video inputs.
Connect speakers to amplifier outputs (pay attention to color and polarity)
Plug antenna-to-antenna jack.
Connect CD changer control line (referring to CD changer installation)
Check all connections.
Clean up all cables for installation
-4-

Radio antenna input
VCD changer
Lens Input Video output (yellow)
VCD changer Cable
:
:
:
VCD output
Yellow: Video
Red: Right channel
White: Left channel
GND
Caution:
1\Antenna control is height effective
2\Amplifier control is height effective
3\Cassette should be grounded
TV antenna input
Radar Input (Optional) Audio output (RR Red)
Audio output (FL White)
AV Video input (Yellow)
CD Audio input R (Red)
AV Audio input R (Red)
CD Audio input L (White)
AV Audio input L (White)
Audio output (FR Red)
Audio output (RL White)
Right Back
Left Front
Left Back
Right Front
BACK Blue
GND Black
BATT+ Yellow
ACC Red
BRAKE Blue/white
DVD
Red CD AUDIO OUTPUT/R
White CD AUDIO OUTPUT/L
With build-in Dolby
digital, DTS or
MPEG decoder
White/Black
White
Gray
Gray/Black
Green
Green/Black
Purple/Black
Purple
A/P Green
3.3.1 System connectiondiagram
-5-

2
3
4
5
6
1
DVD Play/Switch Display Data
9
8
7
10
Radio Play
TV Select
Switch Power/LCD Angle Adjust
AV Select
Last Track/Last Station
Next Track/Next Station
Fast forward/Frequency Fine tune(+)
Reverse/Frequency fine tune(-)
12
13
14
15
16
11
Title Select/Last Disc
19
18
17
20
Tract Switch/Band Select
Back to Main Menu(DVD)
Language Select/Next Disc
DVD Setup
Mute
Setup Control
System Setup
Audio Control Switch
Volume(Down)
CDC Play/Switch Display Data
21 Volume(Up)
RADIO
BAND
AV
MUTE DVDS
MODE
M S
SET
4.1 Buttonson monitorpanel
, Introduction tobuttons
-6-

LCD ANGLE
Source
Setup
Mode
Mute
OSD
PRE
MENU
NEXT
1
4
7
1
0
MEMORY
2
5
8
3
6
9
Language
BAND
L/R
Seek
Title
Next Track
/Next Station/Right
Last Track
/Last Station/Left
Reverse/Frequency fine
tune Down
Number buttons
LCD Angle adjust(-)
LCD Angle adjust(+)
Volume Adjust(-)
Volume Adjust(+)
DVD Language Select
Band/Track Switch
Manual Memory/DVD Setup
OSD Switch
DVD/Title
Self-search
Fast forward/Frequency
Fine tune(+)/Up
DVD Main Menu
(DVD) Next Track
Audio Control Switch
Mute
(DVD) Last Track
Signal Source Select
System Setup
4.2 Remote controller button functions
4.2.1 Signalsource selection
Press the signal source selection key SOURCE on the remote board, the screen will display
as the following picture, use or for switch, and press ENTER for confirmation of
entering into the corresponding play mode (AV/CDC/TV/DVD/RADIO)
AV TV DVD RADIOAV TV DVD RADIOAV TV DVD RADIOAV TV DVD RADIOCDCCDCCDCCDC
-7-

System operationinstruction
5.1 Turn off /start system
Press key (>2S) for 1 second to turn off the power of the system, pressing it once again
will start the system automatically and restore to the last used status.
5.2 Volume control
In the volume adjusting mode, press key + , the volume will get louder and get
weaker when press .
The volume during adjustment will be displayed on the screen (min. 0, max.31),
press key + or Continuously, the volume
Can be adjusted continuously, see the right picture.
Bass : 0
Treble : 0
Volume: 16
5.2.1 Bass adjustment
Press MODE until the bass-adjusting mode is got,
the screen will display as the right picture, then adjust the
bass effect with key +/- .
5.2.2 Treble adjustment
Press MODE until the treble adjusting mode is got,
the screen will display as the right picture, then adjust the
treble effect with key +/- .
5.2.3 Mute
Press MUTE to shut down the sound, and the system will go into no-sound mode,
MUTE will display on the screen. Press UTE once again to leave the mute mode.
The volume still can be adjusted under the mute mode, but system is still in no-sound
status. Only pressing MUTE again can restore to the sound mode.
5.3 System setup
Press button SET in any mode, the screen will
display as the right picture, or (18) up and
down to select LCD SETP (LCD Screen Setup).
BALANCE (balance adjustment up and down, right
and left.).
SYS SETP (System Setup), the selected menu will become pink.
press LCD SETP
BALANCE
SYS SETP

5.3.3 System setup
Press SET to enter into system setup. Press
or to select System Setup, press
vertically to confirm entering into system
setup mode. The screen will display as the right
picture. The blue screen, beep, car-backing, view
switch, time displaying and time adjustment can
be set up respectively.
Press or select up and down, and the selected menu will become pink; press
(18)
(18)
(18) to
5.3.2 Balance adjustment up and down, right and left.
Press SET to enter into menu setup, press or
select Balance Adjustment Up &Down,
Right & Left. press vertically to confirm
entering into Balance Adjustment Up &Down,
Right & Left. The screen will display as the right
picture.
Press respectively + will
move up and down, right and left to control the volume of the four channels up and down,
right and left. The volume of the four channels will be the same when + is in the
middle. Press SET again to exit system setup
(18) to
(18)
(18)
5.3.1 LCD Screen Setup
Press SET to enter into menu setup, press
or o select LCD screen setup, press
vertically to confirm into LCD screen
setup.
The screen will display as the right picture.
The setup of brightness, color, contrast,
angle and screen view (wide/zoom/center) can be done respectively.
Pres ) to select up and down, the selected menu will become pin
)to make setup. Press SET again to exit system setup.
(18) t
(18)
s or (18 k. Press
or (18
Front
L
Rear
L
Front
R
Rear
R
BALANCE
BRIGHT :32
COLOUR:22
CONTR :25
ANGLE :30
VIEW :WIDE
BRIGHT :32
COLOUR:22
CONTR :25
ANGLE :30
VIEW :WIDE
SYS SETUP
BLUE :ON OFF
BEE :ON OFF
BACK:ON OFF
TIME :ON OFF
TIME :ADJ
SYS SETUP

5.4 Timesetting
Press SET to go into System Setup (refer to 5.3.3 in detail),
and select TIME ADJ, press (18) vertically to confirm
entering into time setup mode. The screen will display as the
right picture.
Press or (18) for time adjusting, press or (18) for change-over selection between
HOUR and MINUTE. Press vertically after that to confirm and store the time setup,
also return to System Setup.
Press SET directlyto exit withoutstoring the setup.
Or (18) tomake setup. Press SETagain to exitSystem
Note: When the blue screen is setto ON , and no visual signal is input, the
screen will displayin blue.
TIME
12:00
ADJ
5.5 Monitorangle adjust
When the systemis ON , short pressing can adjust thedisplay angle tothe
preset angle orreturn to verticalmode.
A.When the systemis under non-DVDmode, the displayangle status canbe
vertical preset angle;
B.When the systemis under DVDmode, the displayangle status canbe vertical
preset angle max. angle.
When the systemis ON , pressing onthe remote boardcan tune the
display angel tobigger or smaller;
The preset angleof the displaycan be setin the SystemMenu (refer to5.3.1),
under non-DVD mode, or also canbe used topreset angle.
Radio operation
6.1 Receivepre-storedstations
Press RADIO toenter into radiomode
and play backthe pre-stored radiochannels,
please see theright picture.
Press or to playthe pre-stored lastor
next radio channel;
FM - - M2
M1 M2 M3 M4 M5 M6 M7 M8M1 M2 M3 M4 M5 M6 M7 M8
RADIO
90.6MHz
FM - - M2

6.2 FrequencySwitch
Press button BAND,you can chooseFM(FM1/FM2) and AM.
FM - - Seek
RADIO
90.6MHz
FM - - Seek
M1 M2 M3 M4 M5 M6 M7 M8M1 M2 M3 M4 M5 M6 M7 M8
Press the digital keys (1~8)on the remote board, directlyplay the corresponding
pre-stored radio channel;
Volume adjusting please refer to5.2;
Select other functions(AV,TV,DVD,CDC) to stop playing radio.
6.3 Searchingstation
A.Manual search
Press or , tune theradio frequency forwardand backward by0.05MHz
each step;
Pressing (>2S) or longer will initiatethe automatic searchor last/next
radio channel; pressSEEK or reversesearch key toend manual search.The
current receiving frequencywill be displayedon the screen.
B.Automatic search
Pressing SEEK twotimes continuously
(3S)under receiving statuswill enter into
automatic search mode.Search for allthe
radio channels within the frequency in
order and storeautomatically. During the
search, the changed frequency will be
displayed on thescreen.
After the searchends, the firstsearched channel willbe played automaticallyand
the current receivingfrequency will bedisplayed on thescreen.
Pressing SEEK underthe automatic searchmode will endthe automatic
search and returnto receiving status.
6.4 Storestation manually
Press or to select the radio channel No. (M1~M8) you want to store, then again
Press or to manually search the radio frequency you want (refer to 6.3 in detail).
When the radio channel has been found, press M, making the radio No. you want to
store blinking and pressing Mbutton once more in 3 seconds, which will store the
radio channel into the correspondingNumber
This system can contains 24preset channels, and store 8channels of FM1, Fm2 And
AM respectively.

7.3 TVchannel selectionand adjustment
,TV operation
7.1 TVplay
Press TV buttonto start TVsignal receiving.
Volume adjust referto 5.2
Select other function(AV\Radio\DVD\CDC) to stopplaying TV.
7.2 Receive presetTV stations
Press TV button to watchTV, press or for playing presetnext TV station
or last TVstation.
Press number button(0-9) system will switchto that TVstation after 3seconds.
Press button(0-4), screen will display X, press once again the button
within 3 seconds,system will switchto XX channel automatically.
The numbersof TVstation dependon theTV signal.
This unitcan store40 channels.
A.Automatic search
Press SEEK two times continuously (3S)
under the TV playing status to enter into TV
channel automatic searchmode. Search forall the
TV channels withinthe frequency inorder and
store automatically. After the search ends, the first searched TV channel will be
played automatically.
Pressing SEEK underthe automatic searchmode will endthe automatic search
and return tothe playing status.
B.Tuning
Press or ,tune the TVfrequency forward andbackward by 50KHz;
C.Store theTV stationsmanually.
Press or toselect the TVchannel No., thenPress or againto manually
search the TVfrequency you want. When theTV channel hasbeen found, pressM,
VHF: L
TV SEEK

making the TVchannel No. youwant to storeblinking and pressingM once again in
3 seconds, whichwill store theTV channel intothe corresponding Number.
This machine canpre-store 40 channels.
, DVDoperation
8.1 DVDplaying
Press key DVD,play DVD. PressDVD again orpress OSD onthe remote board
to change todisplay OSD information.
Press keyMor TITLE onthe remote rodto select captions.
Press keyS or LANGUAGE onthe remote rodto select language.
Press key Ato return toDVD playing menu.
During playing, press (18) to pause DVD playing , press it again to leave
pause status.
Press key DVD to enter or exit DVD setup (DVD will pause playing when
entering into DVDsetup).
Select other functions(AV, TV, Radio, CDC)tostop DVD playing.
8.2 Changingsong
Under DVD playingstatus, press or to choose lastor next track.
Under DVD playing status, press PRE on the remote board to last track,
press NEXT to next track.
8.3 Fastforward/reverse
Press or buttonfor fast forwardor reverse.
Press button forbacking to normalplaying state.
8.4 Changingdisc
Press to adjust the screen to the max. angle and reveal the disc ejection window, as
shown in the following picture. Press again the on the DVD window to eject the DVD disc.
DISC
Note: When the indicator of the disc case isON, it means a disc is inside theDVD case.

Press key CDC, play CDC. Press CDC again or press OSD on the remote board to
change to display OSD information.
Select other functions (AV, TV, Radio, DVD)to stop CDCplaying.
, CDCoperation
9.1 CDCplaying
Under DVD mode, press BANDto change the sound channel.There are 3 selections
(L/L, R/R, L/R) for sound channel change; the sound channel status will be displayed
on the screen. If itis stereo(L/R) , the displaywill disappear after 3 seconds.
8.5 Track switch
Under CDC playing status, press or to select last or nexttrack.
9.2 Changingsong
Press or continuously to make disc go forwardor reverse fast, release themto
end the fast forward orreverse and restore to thenormal playing status.
9.3 Fastforward andreverse
9.4 Changingdisc
A.
B.
Manual change
Press keyMor Sto play thelast or nextdisc;
Press the digitalkeys to playthe disc inthe corresponding case.
Automatic change
The system willchange the discautomatically after theplaying of onedisc has
ended.
9.3 Fastforward andreverse9.3 Fastforward andreverse
Under CDC mode, press BAND to change the sound channel. There are 3
selections (L/L, R/R, L/R) forsound channel change, the sound channel status will be
displayed on the screen. Ifit is stereo (L/R), thedisplay will disappear after 3seconds.
9.5 Track switch

Place the box with theside which has CD symbolupward. Draw out plate oneby one
to stop positions.
Place discs on the platesin sequence.
Push forward the plates intobox until you hear asound of click.
Toavoid accidental failure, placeonly one disc onone plate.
9.6 CDchanger operation
9.6.1 Insertdiscs
Draw out disc plates out of CD changerto stop position, take out of discs withhands.
9.6.2 Removediscs
Take CD changer with care, if the disc insertion
position faces downward, there may be a risk of slipping
disc out of plates.
Glide the door leftward untilthe door is opened widelywith a sound of click.
Check equipment top and the direction of disc insertion, push CD changer inside
gently until a sound ofclick.
Close door until you heara sound of click.
9.6.3 Insertdisc box
Make sureto closeCD changer
door closelyto preventdusty enter.
Screw ignition key turn on receiver power.
Open glide door.
Press ejection button , CD changer will beejected out.
Draw out CD changer according to arrow direction, until CD changer glides out of
equipment.
9.6.4 Removedisc box

Press AV button, start playing AV
select other function(TV Radio DVD CDC),stop playing AV.
, AV operation
10.1 AV play
Note: The AV input channel iscommonly used with car-backingscene,
if you use AV function, please setthe BACK in SysSetup to OFF (refer
to 5.3.3 in detail).
If you want to usethe rear-view function at backing,please set BACK in SysSetup
to ON (refer to 5.3.3in detail). If the AV interface loses efficacy, the signal can notbe
input.
When the car converters into BACK, no matter what condition the system is in, it
will automatically transfer to backview display,the screen will display BACK (car
backing signal input). After leaving the BACK mode, all the functions of the system
will restore automatically.
10.2 Backingwith backsight
CAUTION: If in any case, the CD changer can not be draw out, press RESET
button and push the CD changer inside with strength, then press ejection button .
Table of contents
Other Pyle Car Video System manuals

Pyle
Pyle PLD58MUT User manual

Pyle
Pyle PLDVD65IN User manual

Pyle
Pyle PYLE View Series PLTFT72 User manual

Pyle
Pyle PLTS79DUB User manual

Pyle
Pyle PL9PHRG User manual

Pyle
Pyle PYLE View Series PLVWR5600 User manual

Pyle
Pyle PLVWR7200 User manual

Pyle
Pyle PLM4135BT User manual

Pyle
Pyle PLTVD7P User manual

Pyle
Pyle PLRD92 User manual
Popular Car Video System manuals by other brands

Hyundai
Hyundai SONATA Quick reference guide

Panasonic
Panasonic CQVD7005U - IN-DASH DVD MONITOR operating instructions

Boss Audio Systems
Boss Audio Systems BV9965T user manual

Alpine
Alpine INE-W997D installation manual

Alpine
Alpine XXL Premium X903D-DU installation manual

Discount Car Stereo
Discount Car Stereo A2D-HON03 installation guide