manuals.online logo
Brands
  1. Home
  2. •
  3. Brands
  4. •
  5. Pyle
  6. •
  7. Car Video System
  8. •
  9. Pyle PLHR7T User manual

Pyle PLHR7T User manual

PLHR7T
7” TV MONITOR
* Specifications
1. Supply voltage DC 12V +/-10%
5. Monitor screen size 7" ( 16:9)
6. Operating system TFT active matrix.
7. Resolution 1440 x 234 dots.
8. System NTSC / PAL Dual System View Area
2. Power consumption:
3. Operating temperature: 0 C ~+ 60 C
4. Storage temperature: -25 C ~ +70 C
1A 10%
" /": Show this country has no sound to output the system
Other have not listed the country and above catalogs system same also in
this machine support scope.
TV SYSTEM AND AUDIO MODE OF PRIMARY
11
4.AUTO SEARCH
When the indicator is on the AUTO SEARCH, press
ENTER on the unit/remote to display this picture and
auto full scan channels by pressing ENTER.
5.SEARCH
When the indicator is on the SEARCH, press ENTER on
the unit/remote to display this picture and auto scan
channels by pressing ENTER.
6.FINE TUNE
When the indicator is on the FINE TUNE, press ENTER
on the unit/remote to display this picture and fine tune by
“ / OR V+/V-” button.
7.PROGRAM
When the indicator is on the PROGRAM, press ENTER
on the unit/remote to display and select the item you
want to change by “ / OR V+/V-” button.
8.SKIP
When the indicator is on the SKIP, press ENTER on the
unit/remote to display and select the item you want to
change by “ / OR V+/V-” button. Press “enter” button
to select “ON / OFF’.
.
9.FREQ:Show the TV channel’s Frequency.
When you feel that there are some repeated TV program
or image and audio founded not good .You need to skip
some program and quick to select.
Remark: Skip function is available only going on
choosing the program in sequence by using the program
selection of CH-/CH+
10
1. Table of Contents------------------------------------------------------ 1
2. Warning ---------------------------------------------------------------- 1
4.Connection Diagram
13.TV SYSTEM AND AUDIO MODE OF PRIMARY
3. Package ---------------------------------------------------------------- 2
---------------------------------------------------2
5.Remote Control ----------------- ---------------------------------------3
6.Appendix--------------- ------------------------------------------------ 4
7.Using the Remote Control----------------- ----------------------------4
8.Monitor Section---------------------------- ----------------------------5
9. OSD Menus in A/V Source --------------------------------------------6
TV SECTION
10. OSD Menus in TV Source ---------------------------------------------7
11. OPERATIONS----------------------------------------------------------8
12.DISPLAY------------------------------------------------------------9~10
------------------11
14.Specifications---------------------------------------------------------- 11
Table of Contents
WARN ING
This unit is not intended for installation in the front Driver / Passenger Co mpa rtmen t
whe re it may be seen by the Driver. Installation of this unit in any portion of the vehicle
whi ch could impa ir or distract the Driver is impr oper and dangerous and
assumes N o l i abi l i t y wha t
so ever for failure to follow the proper installation of
this product.
To reduce the risk of electric shock, please do not expose this unit to rain, moi sture or
open the unit. Dangerous high voltages are present inside the unit.
Our wa rranty could be voided if you mak e changes or mod ifications not expressly
approved by
1
ANT.OUT
AV
DC +12V
+12V
AC ADAPTER
Earphone
(Option)
DVD Player
(Option)
Antenna
(Option)
YELLOW
VIDEO
WHITE
AUDIO
Connection Diagram
Package
This LCD monitor comes with all the items below. Check to
make sure your unit complete. Contact your dealer immediately
if anything is missing.
* 7" TV Monitor
* AC Adapter
* A/V cable
* Antenna jack
* Stand X 1
* Operation manual
X 1
X 1
X 1
X 1
2
DISPLAY
1.MAIN MENU
Press MENU on the unit/remote to display this picture
and adjust the item by “ / OR V+/V-” button.
2.ANT SOURCE
<ANT SOURCE>
AIR
CABLE
When the indicator is on the ANT SOURCE, press ENTER
on the unit/remote to display this picture and select AIR or
CABLE by “ / OR V+/V-” button. When ANT SOURCE is on
AIR, this will affect the frequency list in the AUTO
SEARCH.
3.TV SYSTEM
<TV SETUP>
ANT SOURCE
TV SYSTEM
AUTO SEARCH
SEARCH
FINE TUNE
PROGRAM
SKIP
FREQ
<TV SYSTEM>
NTSC
FM RADIO
SECAM-DK
PAL-I
PAL-BG
When the indicator is on the TV SYSTEM, press ENTER
on the unit/remote to display this picture and select
NTSC, FM RADIO, SECAM-DK, PAL-I and PAL-BG by “ /
OR V+/V-” button.
9
OPERATIONS
when use TV system in different countries, you must first set the
system, then set the signal as antenna or the coaxial of the CATV,
AUTO SEARCH. When it is OK, press MENU to return or auto return by
tuner to TV picture, then you may enjoy the TV program.
SETUP 1 ANT SOURCE
Firstly press MENU to enter Main Menu. Move cursor to “ANT
SOURCE” by “ / OR V+/V-” button, and then press ENTER to
enter the Menu.
The items (AIR/CABLE) can be changed by “ / OR V+/V-” button.
The updated parameter will be set up when items changed. And the
result be shown immediately.
Press MENU back to Main Menu. Press MENU again, you can cancel
Main Menu, or Main Menu will be canceled automatically 30 seconds
later.
SETUP 2 TV System
First press MENU to enter Main Menu. Move cursor to “TV SYSTEM”
by “ / OR V+/V-” button and then press ENTER to enter the Menu.
The items (NTSC/FM RADIO/SECAM-DK/PAL-I/PAL-BG) can be
changed by “ / OR V+/V-” button. The updated parameter will be
set up when items changed. And the result be shown immediately.
Press MENU back to Main Menu. Press MENU again, you can cancel
Main Menu, or Main Menu will be canceled automatically 30 seconds
later.
SETUP 3 AUTO SEARCH
Press MENU to enter the Main Menu; and move the cursor to “AUTO
SEARCH” by “ / OR V+/V-” button, and press ENTER; then you can
enter Sub-Menu and press ENTER according to the cue. During the
Channel Scan, the Schedule will displayed in the OSD. If press Enter,
the Channel Scan will be stopped. On the right angle demonstrated
finally seeks the channel,4 seconds later, it will go back to the TV
mode, and the program will stay from the first channel in the guide
program searching. Press MENU again, you can cancel Main Menu, or
Main Menu will be canceled automatically 30 seconds later.
SETUP 4
After returns to the television picture then to depend on the common
television operating mode, enjoys the various countries brilliant
television program.
8
1234
5678
9 0
POWER
MUTE
SOURCE
ENTER
MENU
CH+
CH-
V - V+
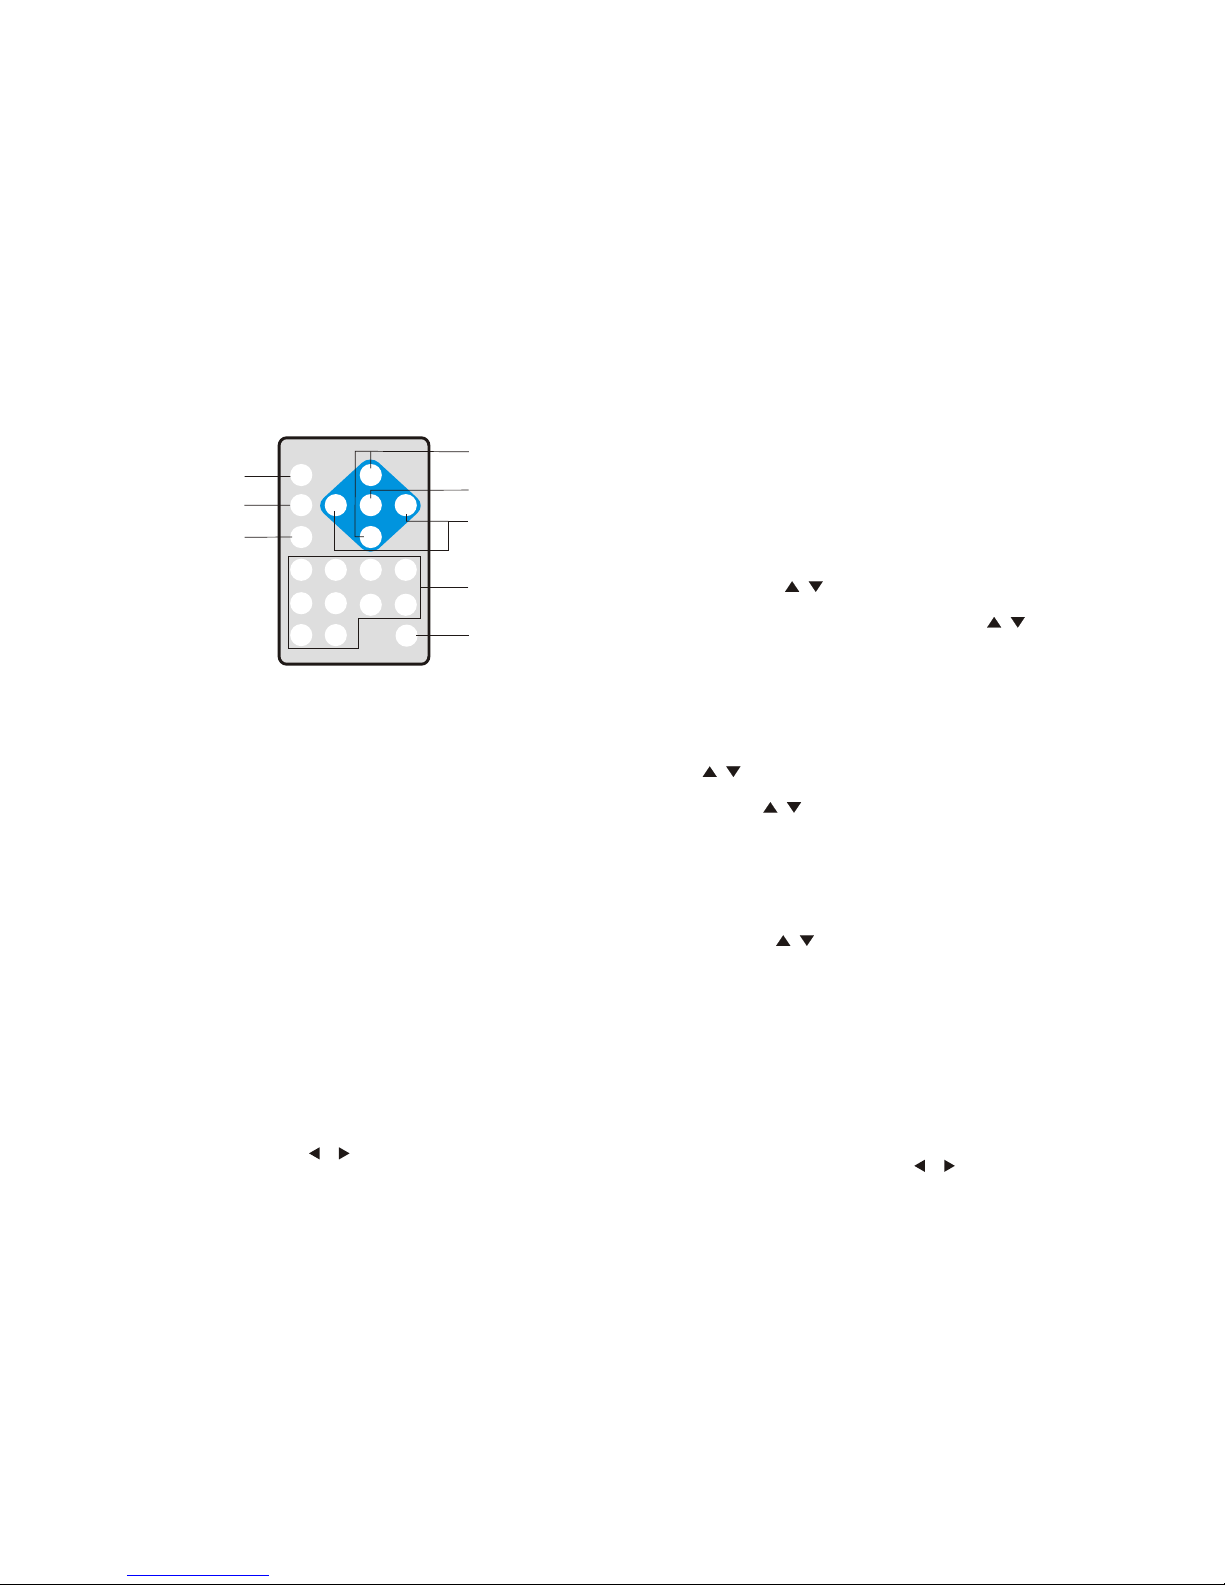
1. POWER: Power for ON or OFF
2. SOURCE: Switch input source button (TV, AV input)
3. ENTER: Confirm the selection.
4. CH+/CH-: Adjust channel up / down(For TV only).
5. MENU: A. When source input is TV. Press “MENU”
button to enter TV OSD Menu.
B.When source input is AV. Press “MENU”
button to enter monitor OSD Menu.
6. V+/V-: A. When the OSD menu function is turned off,
press the " V+/V- " buttons directly from the
remote control to adjust volume.
B. Make item selection in OSD menus to increase
or decrease parametersas well
7.0-9:Choose number key
8.MUTE:Press the key to close the sound,press it
again to resume the sound.
.
1
2
3
4
5
6
7
8
Remote Control
3
+- 30 Degree
Appendix
Changing the New Battery in Remote Control
1. Push the battery case button to wards the right.
(As shown # 1 in below
figure)
2. Pull the battery case away from the remote control.(As shown # 2
in below figure) Change a new battery.
Cassette Button
1
2Battery
Using the Remote Control
1.Point the remote control towards the IR sensor in front of
the monitor housing.
2.Operation angle: IR remote control will work about 30
degree in each direction from the IR sensor of the monitor
housing.
4
* TV SECTION
<TV SETUP>
ANT SOURCE
TV SYSTEM
AUTO SEARCH
SEARCH
FINE TUNE
PROGRAM
SKIP
FREQ
<ANT SOURCE>
AIR
CABLE
<TV SYSTEM>
NTSC
FM RADIO
SECAM-DK
PAL-I
PAL-BG
VOLUME
* Quick Adjustment OSD Menus
1. By pressing "MENU" button, you may open the MAIN MENU, using " " or " "
buttons to pick out OSD functions.
2. In order to select desire options, it is necessary to press "MENU" again to
enter each mode, than using " "/ " " to increase or decrease parameters as well.
3. Press " " or " " button directly to adjust speaker volume.
4. Press the " EXIT" mode to store your selected parameter and
leave the OSD Menus.
50
* OSD Menus in TV Source
7
4
3
12
1.POWER:
2.
3. / :
4.
5.
Power for ON or OFF
MENU: A. When source input is TV. Press “MENU”
button to enter TV OSD Menu.
B.When source input is AV. Press “MENU”
button to enter monitor OSD Menu.
A. When the OSD menu function is turned off,
press the " V+/V- " buttons directly from the
remote control to adjust volume.
B. Make item selection in OSD menus to increase
or decrease parametersas well
SOURCE/ENTER:
A. Switch input source button (TV, AV input)
B. Confirm the OSD selection.
CH+/CH-: Adjust channel up / down(For TV only).
5
Monitor Selection
5
* OSD Menus in A/V Source
VOLUME
* Quick Adjustment OSD Menus
1. By pressing "MENU" button, you may open the MAIN MENU, using " " or " "
buttons to pick out OSD functions.
2. In order to select desire options, it is necessary to press "MENU" again to
enter each mode, than using " "/ " " to increase or decrease parameters as well.
3. Press " " or " " button directly to adjust speaker volume.
4. Press the " EXIT" mode to store your selected parameter and
leave the OSD Menus.
< MAIN MENU >
CONTRAST
BRIGHTNESS
COLOR
SHARPNESS
VIDEO SOURCE
AUDIO
RESET
RETURN
50
6

Other Pyle Car Video System manuals

Pyle PLDVD65IN User manual

Pyle

Pyle PLDVD65IN User manual

Pyle PLVW1410IR User manual

Pyle

Pyle PLVW1410IR User manual

Pyle PLDVD128 User manual

Pyle

Pyle PLDVD128 User manual

Pyle PLVHR75 User manual

Pyle

Pyle PLVHR75 User manual

Pyle PLTV71 User manual

Pyle

Pyle PLTV71 User manual

Pyle PLVWR840 User manual

Pyle

Pyle PLVWR840 User manual

Pyle PLDNANDVR695 User manual

Pyle

Pyle PLDNANDVR695 User manual

Pyle PYLE View Series PLVSMN7 User manual

Pyle

Pyle PYLE View Series PLVSMN7 User manual

Pyle PLHRDVD101KT User manual

Pyle

Pyle PLHRDVD101KT User manual

Pyle PLDINTV7 User manual

Pyle

Pyle PLDINTV7 User manual

Pyle PLDN70U User manual

Pyle

Pyle PLDN70U User manual

Pyle PLVW1443R User manual

Pyle

Pyle PLVW1443R User manual

Pyle PLHR56R User manual

Pyle

Pyle PLHR56R User manual

Pyle PLRD106 User manual

Pyle

Pyle PLRD106 User manual

Pyle PLCD88USMP Quick start guide

Pyle

Pyle PLCD88USMP Quick start guide

Pyle PLVW8M User manual

Pyle

Pyle PLVW8M User manual

Pyle PLCMTR91 User manual

Pyle

Pyle PLCMTR91 User manual

Pyle PYLE PLVS7BK User manual

Pyle

Pyle PYLE PLVS7BK User manual

Pyle PLD7HB User manual

Pyle

Pyle PLD7HB User manual

Pyle PLVIN56 User manual

Pyle

Pyle PLVIN56 User manual

Pyle View PL2DNTV7 User manual

Pyle

Pyle View PL2DNTV7 User manual

Pyle PL9PHRG User manual

Pyle

Pyle PL9PHRG User manual

Pyle PLTVRD10 User manual

Pyle

Pyle PLTVRD10 User manual

Pyle PL71PHB User manual

Pyle

Pyle PL71PHB User manual

Popular Car Video System manuals by other brands

Rosen AV7950H quick start guide

Rosen

Rosen AV7950H quick start guide

Ssl SB9FI user manual

Ssl

Ssl SB9FI user manual

Boss Audio Systems DVD-9800B user manual

Boss Audio Systems

Boss Audio Systems DVD-9800B user manual

Stinger Heigh10 installation guide

Stinger

Stinger Heigh10 installation guide

Discount Car Stereo A2D-STS Quick start installation guide

Discount Car Stereo

Discount Car Stereo A2D-STS Quick start installation guide

Pyle view PLD75MU user manual

Pyle view

Pyle view PLD75MU user manual

Advent ADV25 installation guide

Advent

Advent ADV25 installation guide

Mazda Connect user guide

Mazda

Mazda Connect user guide

PowerAcoustik H-8BK owner's manual

PowerAcoustik

PowerAcoustik H-8BK owner's manual

XO Vision X348NT user manual

XO Vision

XO Vision X348NT user manual

PowerAcoustik PTID-7350NR operating manual

PowerAcoustik

PowerAcoustik PTID-7350NR operating manual

PowerAcoustik PTID-7001N operating manual

PowerAcoustik

PowerAcoustik PTID-7001N operating manual

Sound Storm DD875MI user manual

Sound Storm

Sound Storm DD875MI user manual

PowerAcoustik PT-718TS instruction manual

PowerAcoustik

PowerAcoustik PT-718TS instruction manual

PowerAcoustik PMD-90CM owner's manual

PowerAcoustik

PowerAcoustik PMD-90CM owner's manual

PowerAcoustik MD-830CM owner's manual

PowerAcoustik

PowerAcoustik MD-830CM owner's manual

PowerAcoustik PT-56HB user manual

PowerAcoustik

PowerAcoustik PT-56HB user manual

Smart Witness SVA030 quick guide

Smart Witness

Smart Witness SVA030 quick guide

manuals.online logo
manuals.online logoBrands
  • About & Mission
  • Contact us
  • Privacy Policy
  • Terms and Conditions

Copyright 2025 Manuals.Online. All Rights Reserved.