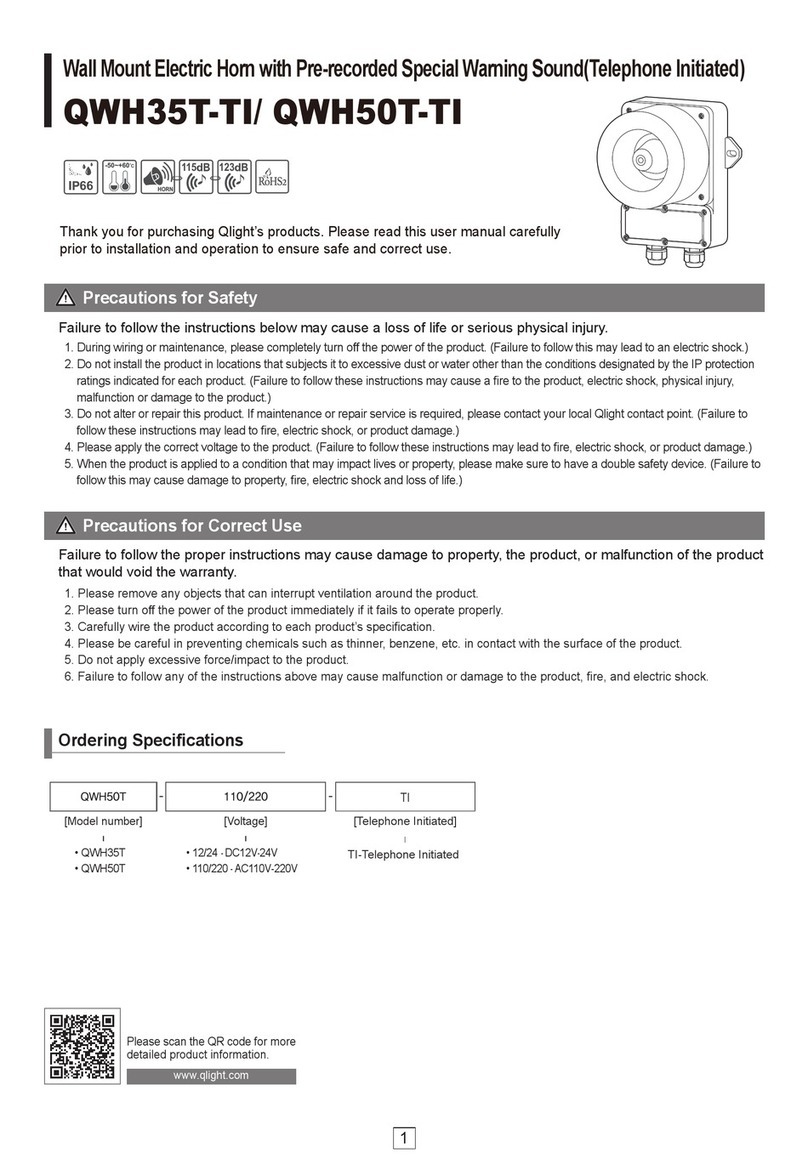
Qlight QWH35T User manual

1
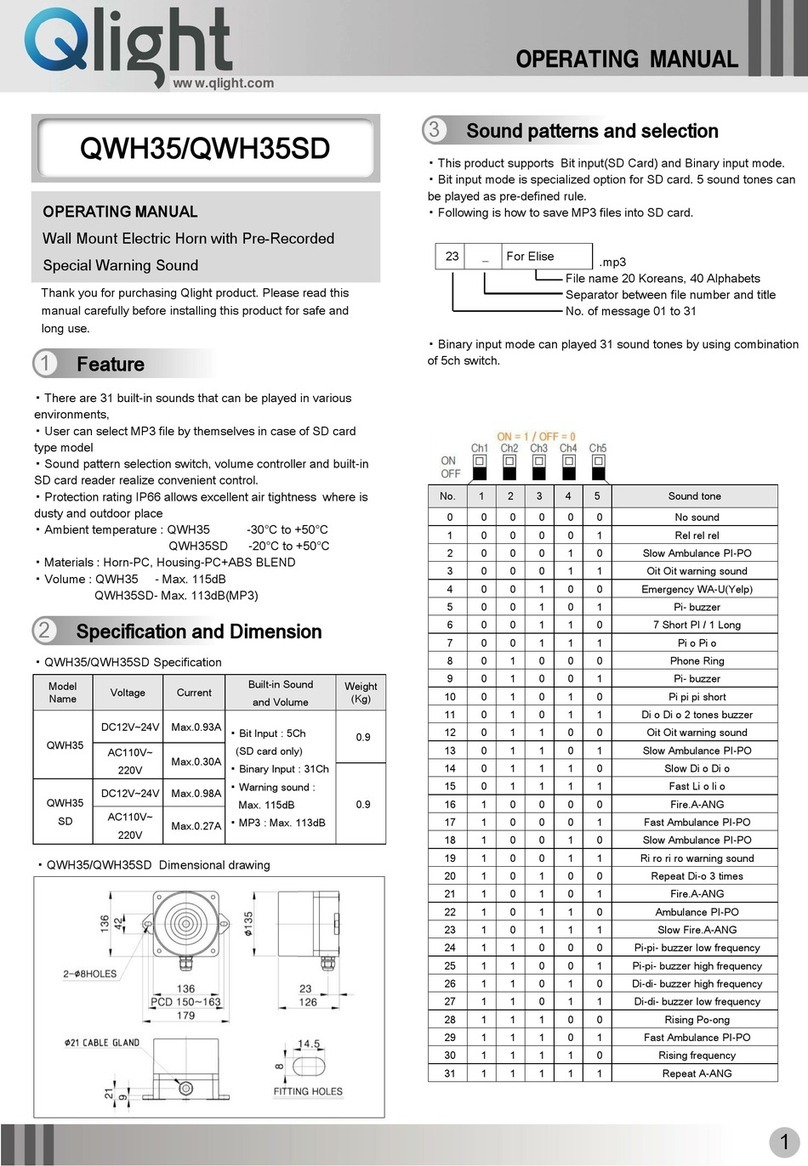
Wall Mount Electric Horn with Pre-recorded Special Warning Sound
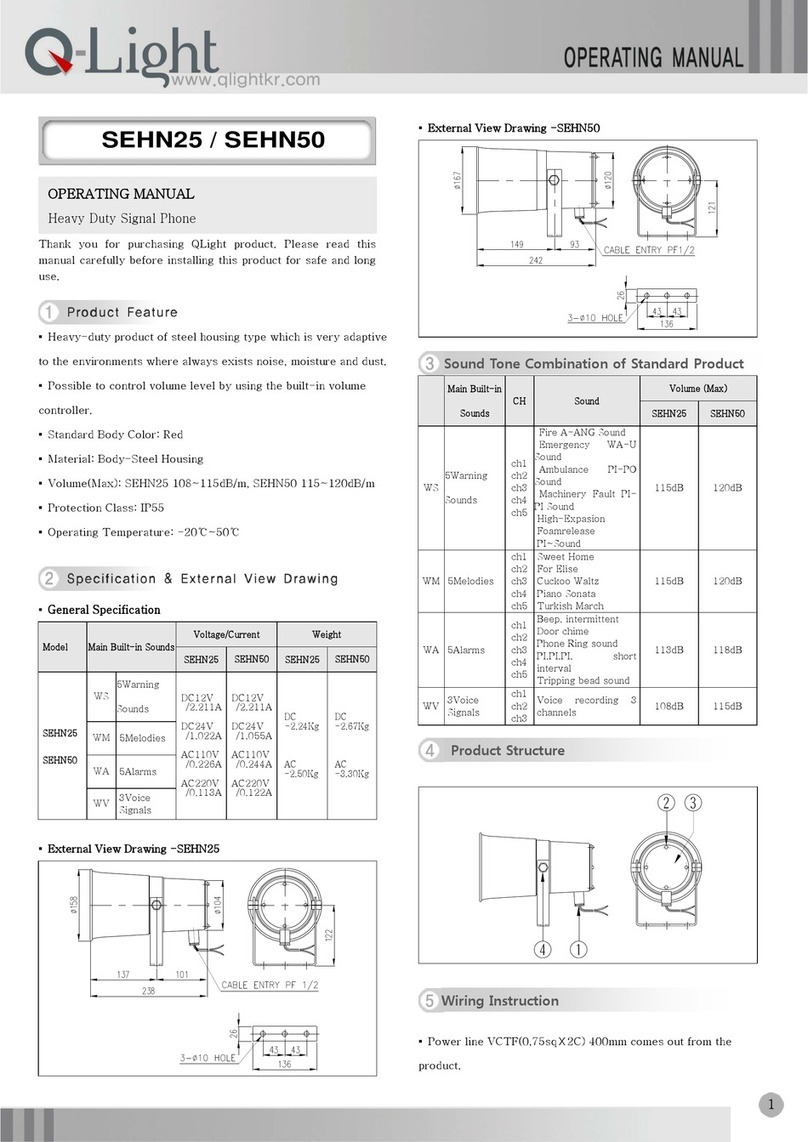
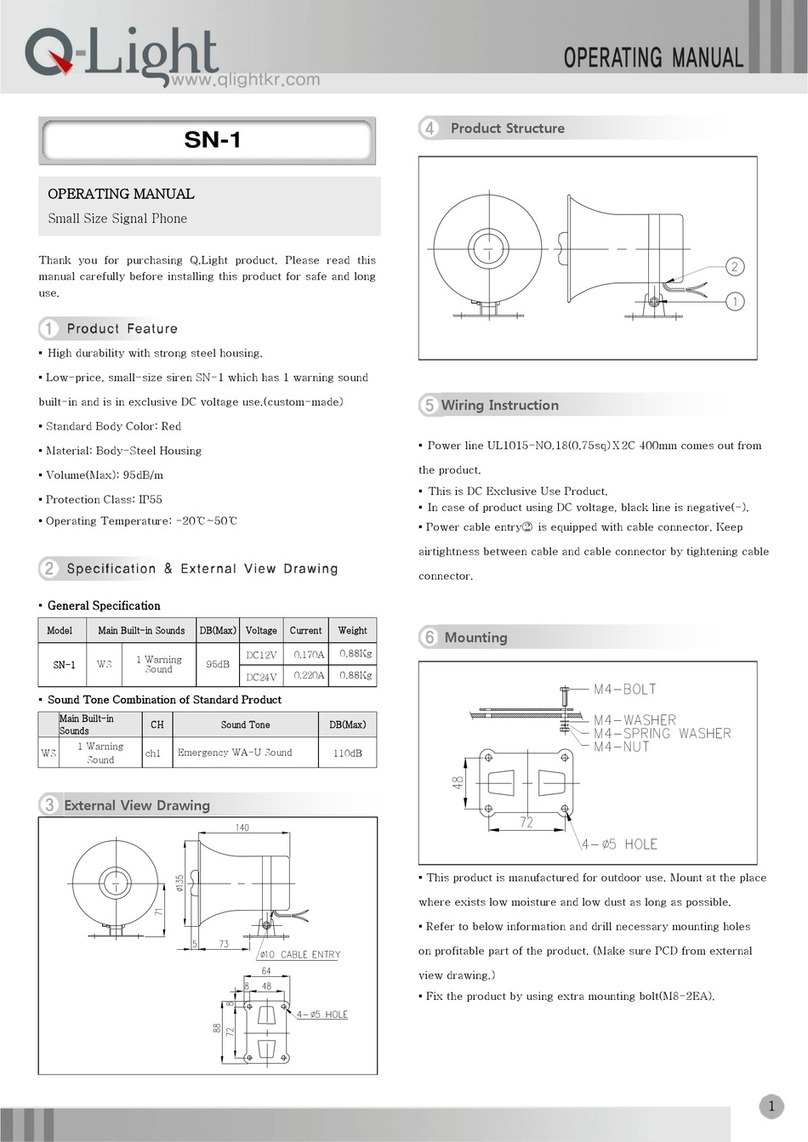
QWH35T/ QWH35TSD
QWH50T/ QWH50TSD
Please scan the QR code
for more
detailed product information.
www.qlight.com
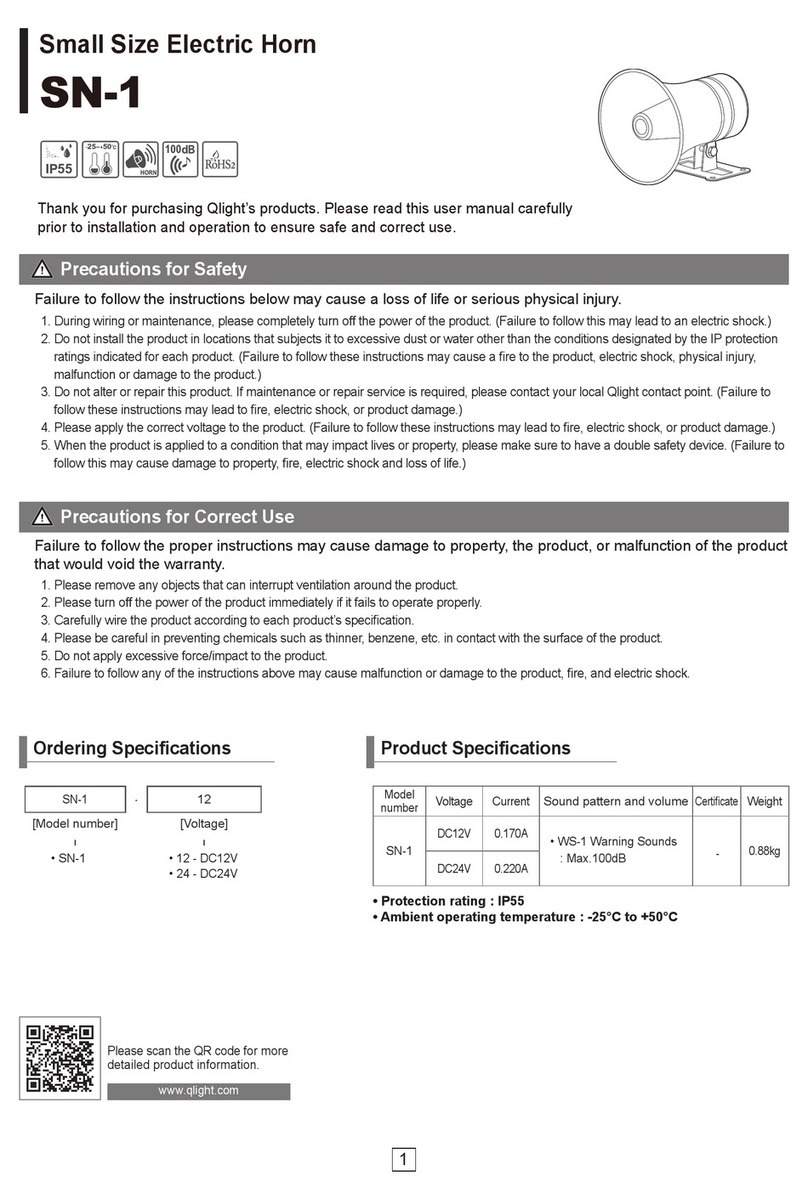
Ordering Specications
QWH50T - 110/220
-
LC
[Model number] [Voltage] [Sound
selection]
| | |
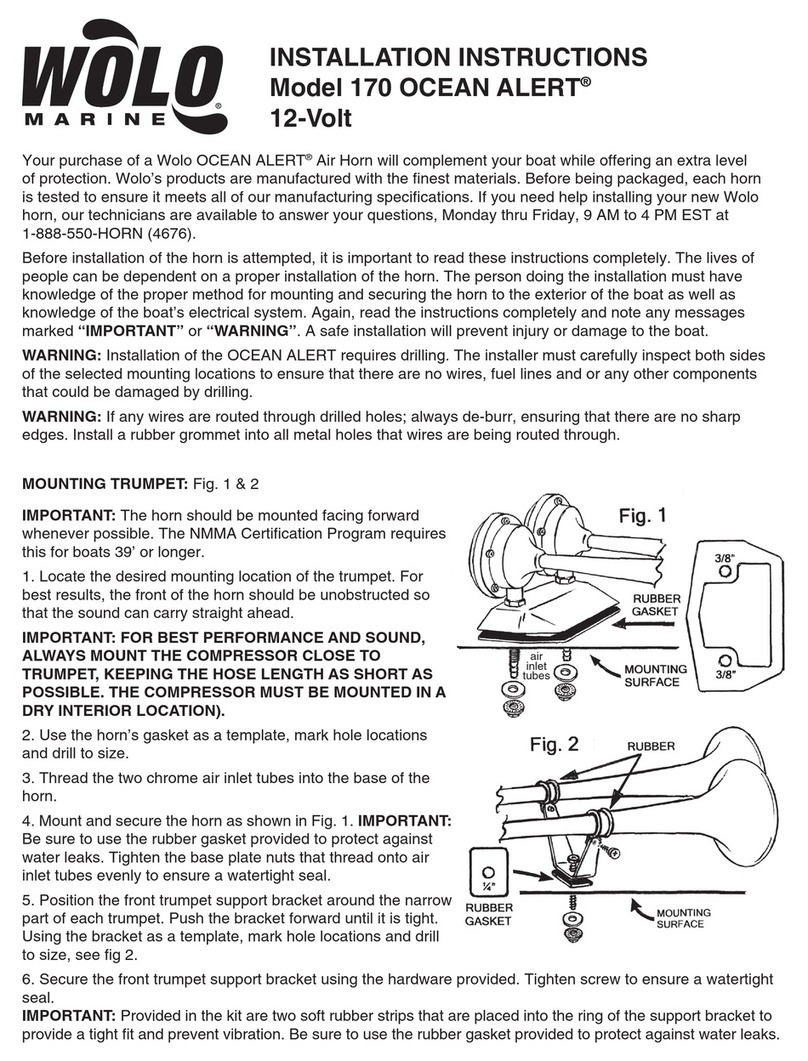
• QWH35T
• QWH35TSD
• QWH50T
• QWH50TSD
• 12/24 - DC12V-24V
• 110/220 - AC110V-220V • (Blank) - Standard type
• LC Type -Uses external contact
Thank you for purchasing Qlight’s products. Please read this user manual carefully
prior to installation and operation to ensure safe and correct use.
Precautions for Safety
Failure to follow the instructions below may cause a loss of life or serious physical injury.
1. Please remove any objects that can interrupt ventilation around the product.
3OHDVHWXUQRWKHSRZHURIWKHSURGXFWLPPHGLDWHO\LILWIDLOVWRRSHUDWHSURSHUO\
&DUHIXOO\ZLUHWKHSURGXFWDFFRUGLQJWRHDFKSURGXFW¶VVSHFL¿FDWLRQ
4. Please be careful in preventing chemicals such as thinner, benzene, etc. in contact with the surface of the product.
5. Do not apply excessive force/impact to the product.
)DLOXUHWRIROORZDQ\RIWKHLQVWUXFWLRQVDERYHPD\FDXVHPDOIXQFWLRQRUGDPDJHWRWKHSURGXFW¿UHDQGHOHFWULFVKRFN
Precautions for Correct Use
Failure to follow the proper instructions may cause damage to property, the product, or malfunction of the product
that would void the warranty.
’XULQJZLULQJRUPDLQWHQDQFHSOHDVHFRPSOHWHO\WXUQRWKHSRZHURIWKHSURGXFW)DLOXUHWRIROORZWKLVPD\OHDGWRDQHOHFWULFVKRFN
2. Do not install the product in locations that subjects it to excessive dust or water other than the conditions designated by the IP protection
UDWLQJVLQGLFDWHGIRUHDFKSURGXFW)DLOXUHWRIROORZWKHVHLQVWUXFWLRQVPD\FDXVHD¿UHWRWKHSURGXFWHOHFWULFVKRFNSK\VLFDOLQMXU\
malfunction or damage to the product.)
3. Do not alter or repair this product. If maintenance or repair service is required, please contact your local Qlight contact point. (Failure to
IROORZWKHVHLQVWUXFWLRQVPD\OHDGWR¿UHHOHFWULFVKRFNRUSURGXFWGDPDJH
3OHDVHDSSO\WKHFRUUHFWYROWDJHWRWKHSURGXFW)DLOXUHWRIROORZWKHVHLQVWUXFWLRQVPD\OHDGWR¿UHHOHFWULFVKRFNRUSURGXFWGDPDJH
5. When the product is applied to a condition that may impact lives or property, please make sure to have a double safety device. (Failure to
IROORZWKLVPD\FDXVHGDPDJHWRSURSHUW\¿UHHOHFWULFVKRFNDQGORVVRIOLIH
-20~+50
-50~+60
-30~+60
115123 113118
HORN
66

2
Dimensions
(Units : mm)
Product Specications
Model number Voltage Current Sound pattern and volume &HUWL¿FDWH Weight
QWH35T
Terminal box equipped type
Built-in standard sound
QWH35TSD
Terminal box equipped type
MP3 type
DC12V-24V Max.0.930A • Bit Input : 5Ch(SD card)
• Binary Input : 31Ch
• Warning Sounds : Max.115dB
• MP3 Messages : Max.113dB
1.10kg
AC110V-220V Max.0.300A
DC12V-24V Max.0.930A 1.15kg
AC110V-220V Max.0.270A
QWH50T
Terminal box equipped type
Built-in standard sound
QWH50TSD
Terminal box equipped type
MP3 type
DC12V-24V Max.3.480A • Bit Input : 5Ch(SD card)
• Binary Input : 31Ch
• Warning Sounds : Max.123dB
• MP3 Messages : Max.118dB
3.00kg
AC110V-220V Max.0.460A
DC12V-24V Max.4.310A 3.10kg
AC110V-220V Max.0.530A
QWH35T/ QWH35TSD
QWH50T/ QWH50TSD
195.5
42
PCD 150-163
135.5
126
57
25
58
CABLE GLAND "PG13.5"
179.2
14.5
8
FITTING HOLES
9
20
16
8
FITTING HOLES
163
25
58
Ø164.3
52.1
PCD 186-202
168
222.2
228.5
CABLE GLAND "PG13.5"
58
9
20
2- Ø8 SLOT HOLES
Ø130.5
2- Ø8 SLOT HOLES
195.5
42
PCD 150-163
135.5
126
57
25
58
CABLE GLAND "PG13.5"
179.2
14.5
8
FITTING HOLES
9
20
16
8
FITTING HOLES
163
25
58
Ø164.3
52.1
PCD 186-202
168
222.2
228.5
CABLE GLAND "PG13.5"
58
9
20
2- Ø8 SLOT HOLES
Ø130.5
2- Ø8 SLOT HOLES
• Protection rating : IP66
• Ambient operating temperature : -30°C to +60°C (QWH35T, QWH50T - Standard)
-50°C to +60°C (QWH35T, QWH50T - Low temperature type only DC)
-20°C to +50°C (QWH35TSD, QWH50TSD)

3
Sound Selection - Using Internal Switch (Built-in Sound Type)
Wiring Instructions for LC Type Bit/ Binary Input Method Depending on
Wiring Method
• For built-in sound type, use ‘Sound Channel Selection Switch’ located inside the product in
RUGHUWRVHOHFWWKHW\SHRIVRXQG)RUVRXQGFRQ¿JXUDWLRQFKDUWSOHDVHUHIHUWRSDJHDQG
• LC type product with exposed sound selection signal line is avail-
able upon request. Please refer to the diagram below for wiring.
• External power line - UL1015 AWG18(0.75sq) x 2C 400mm
• External signal line - UL1007 AWG22(0.3sq) 400mm
• For DC type, the polarity of black line is negative(-).
* Caution
Supplying power to the common line or signal lines may cause
malfunction of the product.
1 2 3 4 5
ON
※
The channel selection method
using a transistor is the same
as the external contact method,
SOHDVHUHIHUWRWKH¿JXUHRQ
the right.
※
7KHVZLWFK¿JXUHWRWKHULJKW
explains how to wire the exter-
nal
contacts of a signal line
product. If the product is not a
signal line product, use the
channelselectionswitch
attached
inside the product.
No. 1 2 3 4 5
0 0 0 0 0 0
1 1 0 0 0 0
2 0 1 0 0 0
3 0 0 1 0 0
4 0 0 0 1 0
5 0 0 0 0 1
0 0 0 0 0 0
1 0 0 0 0 1
2 0 0 0 1 0
30 1 1 1 1 0
31 1 1 1 1 1
Ch1 Ch2 Ch3 Ch4 Ch5
ON(1)
OFF(0)
Binary input mode
Can select up to
31 sound options
Bit input mode
Can select up to
5 sound options
Ch 1 Ch 2 Ch 3 Ch 4 Ch 5
COM
Ch 1
EXTERNAL CONTACT
Ch 2
Ch 3
Ch 4
Ch 5
Fuse
COMMON
POWER
Ch 1
EXTERNAL TRASISTOR-NPN
Ch 2
Ch 3
Ch 4
Ch 5
Fuse
COMMON
POWER
Red
Amber
Green
Blue
White
White
Black
Black
Red
Amber
Green
Blue
White
White
Black
Black
• Bit input mode(using external line) allows you to select one of
¿YHVRXQGRSWLRQVE\VZLWFKLQJRQRQHRIWKHFKDQQHOV
(Ch1 - Ch5)
7RWDORIVRXQGRSWLRQVDUHFRQ¿JXUDEOH
•
Binary input mode(using external line) allows you to receive
PXOWLSOHLQSXWVE\XVLQJWKHFKDQQHOV&K&KWRFRQ¿J
ure one of 31 sound options.
•7RWDORIVRXQGRSWLRQVDUHFRQ¿JXUDEOH
■
Bit Input Mode
■
Binary Input Mode

4
QWH35T QWH35TSD
Body(PC+ABS) Body(PC+ABS)
PCB
Cable gland
Horn(PC+ABS) Horn(PC+ABS)
Resonator(PC) Resonator(PC)
Terminal blockTerminal block
PCB
Cable gland
SD card slot
■
Parts Denition
2-Ø9 HOELS or
2-M8 TAPS
PCD 150-163
2-Ø9 HOELS or
2-M8 TAPS
PCD 186-202
Parts Denition / Installation
■
Installation
• First, make taps or holes that match the product
mounting bolts locations on the mounting surface①.
• The mounting hole of this product is 9mm in diameter
(long hole).
• If the tap is machined, fasten the bolt through the
mounting hole of the product.
• When machining a hole, insert the bolt through the
product, insert it into the hole, and tighten the nut from
the opposite side of the mounting surface.
• ,QVWDOODDWZDVKHUDQGDVSULQJZDVKHUWRWKHEROWLI
the product can experience severe vibration and
shock.
v7DS0DFKLQLQJ
v+ROH0DFKLQLQJ
- SD cards are sold separately
SD card
Precautions for installation
• In case of outdoor applications, install the product in the upright
position. Do not install the product horizontal or upside-down
positions where water can potentially penetrate into the product
and impact it’s operation.
Left direction Reverse direction Right direction
[Installation]

5
Body(PC+ABS) Body(PC+ABS)
PCB
Horn(PC+ABS)
Resonator(PC) Resonator(PC)
PCB
Horn(PC+ABS)
QWH50T QWH50TSD
- SD cards are sold separately
SD card
Installation Environment and Protection Rating
• This product is designed for indoor and outdoor use with protection rating of IP66.
• If the product is installed in locations that subject it to excessive dust or water other than the designated IP protection ratings
indicated(IP66), it may cause malfunction or damage to the product.
• After installing the cable, tighten the cable entry as same level of protection rating of the product and seal it so that dust and moisture
can not penetrate into the product.
• For further information, please visit our website (www.qlight.com).
■
Installation
2-Ø9 HOELS or
2-M8 TAPS
PCD 150-163
2-Ø9 HOELS or
2-M8 TAPS
PCD 186-202
• First, make taps or holes that match the product
mounting bolts locations on the mounting surface①.
• The mounting hole of this product is 9mm in diameter
(long hole).
• If the tap is machined, fasten the bolt through the
mounting hole of the product.
• When machining a hole, insert the bolt through the
product, insert it into the hole, and tighten the nut from
the opposite side of the mounting surface.
• ,QVWDOODDWZDVKHUDQGDVSULQJZDVKHUWRWKHEROWLI
the product can experience severe vibration and
shock.
■
Parts Denition
Parts Denition / Installation
v7DS0DFKLQLQJ
v+ROH0DFKLQLQJ
Cable gland
Terminal blockTerminal block
Cable gland
SD card slot

QWH35TSD
QWH50TSD
6
②
②
④
④
⑤
⑤
①
①
③
③
•
User can save sounds(MP3) to the SD card and able to select
1 sound from 5 saved sounds.
• User can save 5 sounds.
• Available in QWH35TSD/ QWH50TSD models.
■ Bit Input - Playing External Sound (SD Card)
%LWLQSXWPHWKRGVRXQGVRXUFHFRQ¿JXUDWLRQ
Type of sound
No. 1 2 3 4 5
0 0 0 0 0 0
No sound
1 1 0 0 0 0
Custom sound 1(01_xxx.mp3)
2 0 1 0 0 0
Custom sound2(02_xxx.mp3)
3 0 0 1 0 0
Custom sound3(03_xxx.mp3)
4 0 0 0 1 0
Custom sound4(04_xxx.mp3)
5 0 0 0 0 1
Custom sound5(05_xxx.mp3)
ON(1)
OFF(0)
%LQDU\LQSXWPHWKRGVRXQGFRQ¿JXUDWLRQ
Type of sound
No. 1 2 3 4 5
0 0 0 0 0 0 No sound
1 0 0 0 0 1 Rel rel rel
2 0 0 0 1 0 Slow Ambulance PI-PO
3 0 0 0 1 1 Oit Oit warning sound
4 0 0 1 0 0 Emergency WA-U(Yelp)
5 0 0 1 0 1 Pi- buzzer
6 0 0 1 1 0 7 Short PI. / 1 Long
7 0 0 1 1 1 Pi o Pi o
8 0 1 0 0 0 Phone Ring
9 0 1 0 0 1 Pi- buzzer
10 0 1 0 1 0 Pi pi pi short
11 01011Di o Di o 2 tones buzzer
12 0 1 1 0 0 Oit Oit warning sound
13 0 1 1 0 1 Slow Ambulance PI-PO
14 0 1 1 1 0 Slow Di o Di o
15 0 1 1 1 1 Fast Li o li o
16 1 0 0 0 0 Fire.A-ANG
17 1 0 0 0 1 Fast Ambulance PI-PO
18 1 0 0 1 0 Slow Ambulance PI-PO
19 1 0 0 1 1 Ri ro ri ro warning sound
20 1 0 1 0 0 Repeat Di-o 3 times
21 1 0 1 0 1 Fire.A-ANG
22 1 0 1 1 0 Ambulance PI-PO
23 1 0 1 1 1 Slow Fire.A-ANG
24 1 1 0 0 0 Pi-pi- buzzer low frequency
25 1 1 0 0 1 Pi-pi- buzzer high frequency
26 1 1 0 1 0 Di-di- buzzer high frequency
27 1 1 0 1 1 Di-di- buzzer low frequency
28 1 1 1 0 0 Rising Po-ong
29 1 1 1 0 1 Fast Ambulance PI-PO
30 1 1 1 1 0 Rising frequency
31 1 1 1 1 1 Repeat A-ANG
ON(1)
OFF(0)
Operation Parts Conguration
• Built-in sound type product supports binary input 31 channels.
①
Sound channel selection switch
(For more information, please refer to Page 6, “Types and Combina-
tions of sounds.”)
②
Volume dial
(For more information, please refer to Page 7, “VolumeAdjustment”.)
①
Sound channel selection switch
(For more information, please refer to Page 6, “Types and Combina-
tions of Sounds.”)
②
Volume dial
(For more information, please refer to Page 7, “VolumeAdjustment”.)
③
Sound setting switch
(For more information, please refer to Page 7, “Selecting the Built-in
Sound and External Sound (SD Card)”.)
④
Play mode setting switch
(For more information, please refer to Page 8, “Play Mode Setting”.)
⑤
SD card slot
(For more information, please refer to Page 8, “Selecting an SD Card
and Saving Sound Files”.)
■ QWH35T/ QWH50T(Built-in Sound Type)
■ QWH35TSD/ QWH50TSD(SD Card Type-MP3)
QWH35T
QWH50T
6
①
①
②
②
• When playing the built-in sound, select the sound in binary
input mode.
• In binary input mode, you can choose one sound from 31
VRXQGVE\FRQ¿JXULQJWKHFKDQQHOV
• Available in QWH35T/ QWH50T/ QWH35TSD/ QWH50TSD
models.
Sound Type and Combination Manual
■ Binary Input - Playing Built-in Sound

②
Volume Dial
Volume Adjustment
• The volume output of this
product is adjustable.
•
Turn the volume dial clockwise
to increase the volume, and
turn counter clockwise to
decrease the volume.
• There will be no sound when
the dial is put at MIN.
7
VOL.
MIN.MAX.
②
②
③
③
QWH35TSD
QWH50TSD
Selection between Built-in Sound and
External Sound (SD Card Type)
• To play built-in sounds, set the sound set-
ting switch to the OFF (0) position.
• To play an external sound on the SD card,
insert the SD card into SD card slot and
set the sound setting switch to ON (1).
• The user can save sounds(MP3) to the SD card and able to select
the sound in binary input mode.
• Binary input mode chooses one of the 31 sounds by combining
WKHRQRVZLWFKRIWKHGLHUHQWFKDQQHOVWRWKHDVVRFLDWHGWRQH
•Available on QWH35TSD/ QWH50TSDmodels.
■ Binary Input - Playing External Sound (SD Card)
ON(1)
OFF(0)
%LQDU\LQSXWPHWKRGVRXQGVRXUFHFRQ¿JXUDWLRQ
Type of sound
No. 1 2 3 4 5
0 0 0 0 0 0
No sound
1 0 0 0 0 1
Custom sound1(01_xxx.mp3)
2 0 0 0 1 0
Custom sound2(02_xxx.mp3)
3 0 0 0 1 1
Custom sound3(03_xxx.mp3)
4 0 0 1 0 0
Custom sound4(04_xxx.mp3)
5 0 0 1 0 1
Custom sound5(05_xxx.mp3)
6 0 0 1 1 0
Custom sound6(06_xxx.mp3)
7 0 0 1 1 1
Custom sound7(07_xxx.mp3)
8 0 1 0 0 0
Custom sound8(08_xxx.mp3)
9 0 1 0 0 1
Custom sound9(09_xxx.mp3)
10 0 1 0 1 0
Custom sound10(10_xxx.mp3)
11 01011
Custom sound11(11_xxx.mp3)
12 0 1 1 0 0
Custom sound12(12_xxx.mp3)
13 0 1 1 0 1
Custom sound13(13_xxx.mp3)
14 0 1 1 1 0
Custom sound14(14_xxx.mp3)
15 0 1 1 1 1
Custom sound15(15_xxx.mp3)
16 1 0 0 0 0
Custom sound16(16_xxx.mp3)
17 1 0 0 0 1
Custom sound17(17_xxx.mp3)
18 1 0 0 1 0
Custom sound18(18_xxx.mp3)
19 1 0 0 1 1
Custom sound19(19_xxx.mp3)
20 1 0 1 0 0
Custom sound20(20_xxx.mp3)
21 1 0 1 0 1
Custom sound21(21_xxx.mp3)
22 1 0 1 1 0
Custom sound22(22_xxx.mp3)
23 1 0 1 1 1
Custom sound23(23_xxx.mp3)
24 1 1 0 0 0
Custom sound24(24_xxx.mp3)
25 1 1 0 0 1
Custom sound25(25_xxx.mp3)
26 1 1 0 1 0
Custom sound26(26_xxx.mp3)
27 1 1 0 1 1
Custom sound27(27_xxx.mp3)
28 1 1 1 0 0
Custom sound28(28_xxx.mp3)
29 1 1 1 0 1
Custom sound29(29_xxx.mp3)
30 1 1 1 1 0
Custom sound30(30_xxx.mp3)
31 1 1 1 1 1
Custom sound31(31_xxx.mp3)
7

LED(+) (-) AMP(+)
DC INPUT
(10V~30V)
NL
AC INPUT
(100V~240V)
LED(+) (-) AMP(+)
DC INPUT
(10V~30V)
NL
AC INPUT
(100V~240V)
8
Wiring Instruction for Terminal Block
• 6’FDUGVSHFL¿FDWLRQV
- Use standard SD card.
- Mini SD or Micro SD also can be used
with adaptor.
- SD, SDHC type supported
- Storage capacity : Max. 32GB
&ODVV1RVSHFL¿FDWLRQ
• 3OHDVHVDYHWKH03VRXQG¿OHRQWKH6’FDUGDVVKRZQEHORZ
• Create an “MP3_FILE” folder on the SD card and save the MP3
¿OHLQWKHIROORZLQJ¿OHIRUPDW
• 03¿OHIRUPDW
• :KHQVDYLQJ¿OHVSOHDVHVDYHWKHPLQRUGHU
- Please start saving after formatting the SD card.
• 7KHOHQJWKRIWKH¿OHQDPHPXVWQRWH[FHHGFKDUDFWHUV
23 _ For Elise .mp3
Filename (Up to 40 characters)
6HSDUDWRU7UDFNDQG¿OHWLWOH
Track# (01-31)
01_Fire.mp3
02_Emergency.mp3
03_For Elise.mp3
31_Cuckoo's Waltz.mp3
[Example]
SD Card Specications and Sound
Saving Manual
PLAY MODE
1
Bit Input Mode
• Play back one of the 5 built-in or
external sounds once
• For a built-in sound, the playback
time is about 10 seconds
2
Binary Input Mode
• Play back one of the 31 built-in or
external sounds once
• For a built-in sound, the playback
time is about 10 seconds
3
Bit Input Hold
Playback Mode
• Play back one of the 5 built-in or
external sounds continuously
4
Binary Input Hold
Playback Mode
• Play back one of the 31 built-in or
external sounds continuously
5
Bit Input Sound
Reduction Mode
• Decrease the volume of the selected
channel by 15dB
• Play back one of the 5 built-in or
external sounds continuously
6
Binary Input Sound
Reduction Mode
• Decrease the volume of the selected
channel by 15dB
• Play back one of the 31 built-in or
external sounds continuously
7
Bit Input Sequence
Memory Playback
Mode
• When other channel signals are
continuously inputted within 3
seconds after inputting the channel,
the input order is memorized and
playback in the memorized order
(playback time is 3 - 5 seconds)
• The last input channel is played
continuously (Bit input only)
8
Test Mode
• In the test mode, the Ch1 of the
built-in sound or the external sound
is automatically played continuously
• Switch back to another mode to exit
test mode
• Can select between channel input methods (bit/ binary)
and various playback modes.
• 8VHDDWVFUHZGULYHUWRURWDWHRQHVSDFHDWDWLPH
(regardless of the direction of rotation).
• Switch 0 and 9 have no function.
Play Mode Setting
0
1
2
3
4
5
6
7
8
9
Play mode switch
Can rotate regardless of
direction
※ setting withdrawal in 3 is SD
• Please wire up the power line into terminal ①.
• Please use ‘O’type or ‘U’ type wire terminal for safe wiring.
• AC type : Can be wired regardless of polarity.
• ’&W\SH3OHDVHUHIHUWRDERYH¿JXUHDQGFDUHIXOO\IROORZWKH
wiring instructions.
■QWH35T
(Built-in Sound Type)
/ QWH35TSD
(SD Card Type)
QWH35T-DC type
QWH50T-DC type
QWH35T-AC type
QWH50T-AC type
■QWH50T(Built-in Sound Type)/ QWH50TSD(SD Card Type)
※Applicable cable range :AWG18-AWG26

9
1. Please refer to page 8
‘6’&DUG6SHFL¿FDWLRQVDQG6RXQG
Saving Manual’
WRVHHKRZWRVDYHVRXQG¿OHV
- 6XSSRUWVXSWRXVHUGH¿QHGVRXQGV
2. Insert the SD card into the SD card slot.
3. Set the No. 1 switch of the
sound
setting switch to ON to select
external sound.
4. Use the play mode setting switch to select 1, 3, 5, 7 or 8 mode.
- Mode 8 is a test mode which continuously plays channel 1.
(In this case, channel selection is disabled.)
- For more information, refer to page8
‘Play Mode Setting’.
5.
Use the sound select switch to select the one of the 31 user-
GH¿QHGVRXQGV
- For more information, please refer to page 7
‘Binary Input -
Playing External Sound (SD Card)’
.
- For external signal line type (LC) products, please refer to
page 3
‘Bit/ Binary Input Method Depending on Wiring Method’
.
※Insert SD card → Sound switch setting → Play mode switch
setting → Channel selection
■ When Using an External Sound Source (SD Card) Source in
Binary Input Mode
1. Please refer to page 8
‘6’&DUG6SHFL¿FDWLRQVDQG6RXQG
Saving Manual’
WRVHHKRZWRVDYHVRXQG¿OHV
- 6XSSRUWVXSWRXVHUGH¿QHGVRXQGV
2. Insert the SD card into the SD card slot.
3. Set the No. 1 switch of the sound switch to ON to select external
sound.
- For more information, please refer to page 7
‘Selection between
Built-in Sound and External Sound (SD Card Type)’
4. Use the Play mode setting switch to select 1, 3, 5, 7 or 8 mode.
- Mode 8 is a test mode which continuously plays channel 1.
(In this case, channel selection is disabled.)
- For more information, refer to page8,
‘Play Mode Setting’.
5. To select a channel, use the terminal block in the back side of
WKHSURGXFWWRVHOHFWRQHRIWKHXVHUGH¿QHGVRXQGV
- For more information, please refer to page 5
‘Bit Input - Use
External Sound (SD Card)’
- For external signal line type (LC) products, please refer to
page 3
‘Bit/ Binary Input Method Depending on Wiring Method’
.
※Insert SD card → Sound switch setting → Play mode switch
setting → Channel selection
■ When Using an External Sound Source (SD Card) in Bit
Input Mode
1. Set the sound setting switch to OFF to select the built-in sound.
- For more information, please refer to page 7
‘Selecting between
Built-in Sound and External Sound’
.
2.
Select one of 4 modes(2, 4, 6, or 8) by using play mode setting switch.
- Mode 8 is a test mode and the sound of channel 1 is continuously
played. (In this case, channel selection is disabled.)
- For more information, please refer to page8,
‘Play Mode Setting’
.
3.
Use the channel selection switch to select one of t he 31 built in sound.
- For more information, please refer to page6,
‘Binary Input - Use
Built-in Sound Source’.
-
For Extracted sound selection signal line type(LC) product,
refer to page3 ‘Bit/ Binary Input Method According to Wiring
Method’for details of channel selection method.
2. QWH35TSD/ QWH50TSD
※Sound switch setting → Play mode switch setting
→ Channel selection
■ When Using a Built-in Sound in Binary Input Mode
Model number Built-in
sound When playing a built-in sound When playing an external sound (SD Card)
Binary input Bit input Binary input
QWH35T
QWH50T 31 types of
sounds Play one of 31 Special warning
sounds - -
QWH35TSD
QWH50TSD 31 types of
sounds Play one of 31 Special warning
sounds Play one of the 5 user-
recorded sounds Play one of the 31 user-
recorded sounds
Operation Method and Setting
1. QWH35T/ QWH50T
-
Use ‘Channel Selection Switch’ to select one of the 31 built in
sounds.
-
For more information, see page6 ‘Sound Selection’section.
-
For LC type product, refer to page3 ‘Bit/ Binary Input Method
According to Wiring Method’ section for detailed manual of
channel selection method.
■ When Using a Built-in Sound in Binary Input Mode
9
Product installation direction
■ Install the product in accordance with the manual. Otherwise rainwater or moisture may penetrate into the product.
ㆍELECTRONIC SOUNDER/SIGNAL HORN
Sounder part shall not be facing the sky.
ㆍBEACON/SIGNALING LIGHT
Power cord inlet part shall not be facing the sky.
ㆍSIGNAL TOWER LIGHTS
ㆍHEAVY-DUTY & EXPLOSION PROOF SIGNALINGS
※For products with a protection rating of less than IPX4, please install it vertically.

MEMO

+HDG2FH_6XLWH67;97RZHU*DVDQGLJLWDOUR*HXPFKHRQJX6HRXO.RUHD
Tel. +82-2-2679-6152(Toll free. +82-80-328-2222) Fax. +82-2-2679-6154
)DFWRU\_0XNEDQJUR6DQJGRQJP\HRQ*LPKDHVL*\HRQJVDQJQDPGR.RUHD7HO7ROOIUHH
Qlight OverSEAs Sales Dept |
1DNGRQJGDHUR6DVDQJJX%XVDQ.RUHD(RPJXQJ’RQJ7HO
4OLJKW3XEOLF5HODWLRQV0DUNHWLQJ7HDP2FH_1DNGRQJGDHUR6DVDQJJX%XVDQ.RUHD(RPJXQJ’RQJ7HO
3003 North First Street, Suite #341, San Jose, CA95134 USATel. +1-408-519-5740 Fax. +1-408-519-5739
&KLQD)DFWRU\6KDQJKDL6DOHV2FH_1DQGD5RDG%DRVKDQ$UHD6KDQJKDL&KLQD7HO
-
21
-
6651
-
7100 Fax. +86
-
21
-
6315
-
3929
China Factory Site 2 (Qidong) | #33, Haiyan Road, Qidong High-tech Industrial Development Zone, Qidong, Jiangsu Province, China
Tel +86
-
513
-
8384
-
9999 Fax +86
-
513
-
8384
-
9910
Product Operation Inquiry / Customer Support +82-51-620-4100
You can expect prompt service if you have exact information such as model name, symptom, telephone number and address.
※ALLPRODUCT, PRODUCT SPECIFICATIONS AND DATAARE SUBJECTTO CHANGE WITHOUT NOTICE TO IMPROVE
RELIABILITY, FUNCTION OR DESIGN OR OTHERWISE.
+HDGRIILFH6XLWH67;97RZHU*DVDQGLJLWDOUR*HXPFKHRQJX6HRXO.RUHD (Postal Code : 08507)
)DFWRU\0XNEDQJ5R6DQJGRQJ0\HRQ*LPKDH6L*\HRQJVDQJQDP’R.RUHD Postal Code : 50805)
For your safety
6SHFL¿FDWLRQDQGGLPHQVLRQVOLVWHGLQWKLVFDWDORJXHVXEMHFWWRFKDQJHZLWKRXWQRWLFHIRUSURGXFWTXDOLW\LPSURYHPHQW
7KHQHZHVWSURGXFWLQIRUPDWLRQLVDYDLODEOHRQRXUZHEVLWHZZZTOLJKWFRP
3OHDVHUHDGWKHLQVWUXFWLRQPDQXDODWWDFKHGWRWKHSURGXFWFDUHIXOO\EHIRUHLQVWDOODWLRQDQGXVH
www.qlight.com
EN - QWH35T - 2304A
This manual suits for next models
3
Table of contents
Other Qlight Horn manuals
Popular Horn manuals by other brands

Vixen Horns
Vixen Horns VXO8530/4114B installation guide

Vixen Horns
Vixen Horns VXO8330O/3418B installation guide

Vixen Horns
Vixen Horns VXO4830AB/1164B installation guide

Qlightec
Qlightec QWH35-TI quick start guide

WERMA Signaltechnik
WERMA Signaltechnik 572 Series Instructions for use

Vixen Horns
Vixen Horns VXO8805/3118B installation guide